- Home
- /
- Article

Thanks for your feedback.

Your Cisco Headset 500 Series
 In this article
 Feedback?
Get to know and set up your headset.
Cisco Headset 520 Series
Cisco Headset 521 and 522 are wired headsets that have been developed for use on Cisco IP phones and devices. The Cisco Headset 521 features a single earpiece for extended wear and comfort while the Cisco Headset 522 features two earpieces for use in a noisy workplace.
Both headsets feature a 3.5 mm connector for use on personal computers and mobile devices. With the 3.5 mm connector, the headset works like other headsets that plug into audio jacks.
The headsets also come with an inline USB controller that provides easy access to call control capabilities, including answer, end call, reject call, hold and resume, mute, and volume control. The inline controller is also available with a USB-C connector.
If you have headset firmware release 2.3(1) or later, you can maintain call control through your Cisco Headset 520 Series when you switch between soft clients. For example, you can mute a call on the Webex app (version 41.8 or later) and answer an incoming Cisco Jabber call (version 14.1 or later) through the Jabber UI. Once the Jabber call is complete, you can resume your Webex call and retain call control through your headset.
For more information on multi-app control, see Cisco Headset Multi-app Feature.
See the Cisco Headset Compatibility Guide for complete information on compatibility with other Cisco devices and call clients.
Your controller buttons are used for basic call features.

|
Number |
Name |
Description |
|---|---|---|
|
1 |
Mute button |
Toggle the microphone on and off. |
|
2 |
Volume button |
Adjust the volume on your headset. |
|
3 |
Call |
Manage calls:
|
Cisco Headset 530 Series
The Cisco Headset 531 and 532 are two wired headsets developed for use on Cisco IP phones and other call devices. The Cisco Headset 531 features a single earpiece for extended wear and comfort. The Cisco Headset 532 features two earpieces for use in a noisy workplace.
Both headsets feature an RJ9 connector for use on most Cisco IP phones. With the RJ9 connector, you get simple, high-quality, two-way audio.
An inline USB adapter is also available with a built-in controller that provides easy access to call control capabilities, including answer, end call, reject call, hold and resume, mute, and volume control. You can use the quick disconnect on the USB controller cable to move your headset from one device to another.
The inline controller is also available with a USB-C connector.
You can connect a second headset to the Cisco Headset 530 Series with the Cisco Headset 530 Series Y-trainer Cable. See Connect and Use the Cisco Headset 530 Series Y Trainer Cable for more information.
If you have headset firmware release 2.3(1) or later, you can maintain call control through your Cisco Headset 530 Series when you switch between soft clients. For example, you can mute a call on the Webex app (version 41.8 or later) and answer an incoming Cisco Jabber call (version 14.1 or later) through the Jabber UI. Once the Jabber call is complete, you can resume your Webex call and retain call control through your headset.
For more information on multi-app control, see Cisco Headset Multi-app Feature.
See the Cisco Headset Compatibility Guide for complete information on compatibility with other Cisco devices and call clients.
Your adapter is used for basic call features.
|
Number |
Name |
Description |
|---|---|---|
|
1 |
Mute button |
Toggle the microphone on and off. |
|
2 |
Volume button |
Adjust the volume on your headset. |
|
3 |
Call button |
Place, answer, and manage your calls:
|
Connect and use the Cisco Headset 530 Series Y Trainer Cable
| 1 |
Connect the trainer cable to the Cisco Headset 530 Series USB controller. |
| 2 |
Connect the trainee headset to the arm of the trainer cable without the control switch. |
| 3 |
Connect the trainer headset to the arm of the Y cable with the switch. |
| 4 |
Use the switch on the trainer cable to alternate voice feedback between the headsets. |
Cisco Headset 560 Series
The Cisco Headset 560 Series includes two wireless headset models designed for use in a modern office space. The Cisco Headset 561 features a single earpiece for lightweight comfort and support. The Cisco Headset 562 offers dual ear cups for rich sound and comfort in a noisy office space. To use this series, you need either the standard base or the multibase. The bases plug into the call device and facilitate communication with the headset
Each headset base has a default range of approximately 145 feet (45 meters) unless there are physical barriers such as walls and doors or outside interference from other DECT radio sources. Your administrator can increase your headset range up to approximately 330 feet (100 meters). A headset will unpair from its base if it's taken too far away. The base light turns solid white when it's paired to the headset, and flashes when it isn't.
As of firmware release 2.1(1), your headset powers down if it is unpaired to a base for more than 20 minutes. This feature conserves the headset battery.
Your Cisco Headset 560 Series can hold its charge for up to 10 hours of continuous use. Seat your headset in the base when the battery is low. It takes 3 hours for a battery to complete a full charge.
If you have headset firmware release 2.1(1) or later, you can maintain call control through your Cisco Headset 560 Series when you switch between soft clients. For example, you can mute a call on the Webex app and still maintain call control in Cisco Jabber.
For more information on multi-app control, see Cisco Headset Multi-app Feature.
See the Cisco Headset Compatibility Guide for complete information on compatibility with other Cisco devices and call clients.
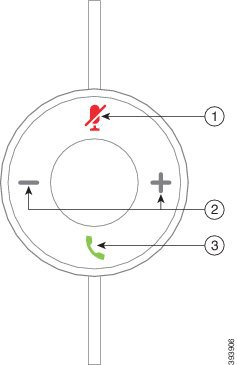
Your headset buttons are used for basic call features.

|
Number |
Button |
Name |
Description |
|---|---|---|---|
|
1 |  |
Power and Call button |
Use to power the headset on and off. Press and hold for 4 seconds to power the headset off and on. Incoming and active call management depends upon if you have one call or multiple calls. One call:
Multiple calls:
|
|
2 |  |
Mute button |
Toggle the microphone on and off. |
|
3 |  |
Volume buttons |
Adjust the volume on your headset. |
|
4 |
N/A |
LED |
Shows the headset status:
|
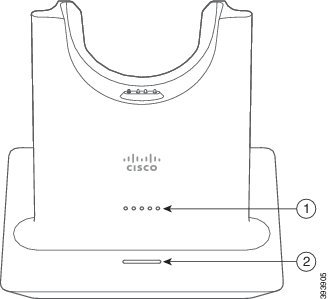
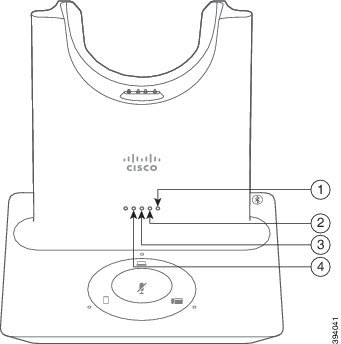
Standard base for Cisco Headset 560 Series
The standard base charges your headset and has LEDs that show your headset's battery level and call state. You can also answer and end calls when you lift or place your headset on the base.
The standard base comes with the following connector cables:
-
USB to USB cable: for devices with USB connectivity
-
USB Y-cable: for Cisco IP phones without a USB port
-
USB-A to USB-C cable: available separately for PC or Mac devices
|
Number |
Name |
Description |
|---|---|---|
|
1 |
Battery status LED |
Indicates the headset battery charge and base status:
The base enters power save mode when there is no call source connectivity after 10 minutes. |
|
2 |
Call status LED |
Alerts you to the call state:
|
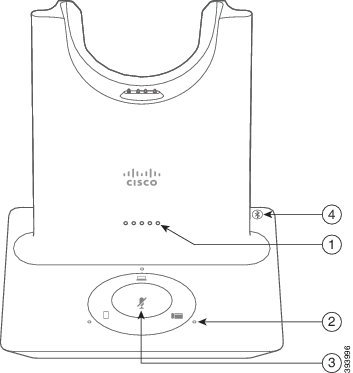
Multibase for Cisco Headset 560 Series
The multibase can connect up to three call sources through Bluetooth®, the USB connector, or the Y-cable. The multibase can save up to four Bluetooth devices. You can switch between call sources using the buttons on the multibase. You use the call control buttons on the headset to answer and end calls. When your headset is in the base, you automatically answer the call when you remove the headset from the base. You can return the headset to the base to end the call.
The multibase comes with the following connector cables:
-
USB to USB cable: for Cisco IP phones with USB connectivity
-
USB Y-cable: for Cisco IP phones without a USB port
-
Mini USB cable: for PC or Mac.
-
Mini USB to USB-C cable: available separately for PC or Mac devices.
The multibase for the Cisco Headset 560 Series is incompatible with Cisco IP Phone 7800 Series phones using Power over Ethernet (PoE). Use the external power supply if you intend to connect the multibase.
|
Number |
Name |
Description |
|---|---|---|
|
1 |
Battery status LED |
Indicates the headset battery charge and base status:
The base enters power save mode when there is no call source connectivity after 10 minutes. |
|
2 |
Call status LEDs |
Alerts you to the call state of each source:
|
|
3 |
Mute status LED |
Alerts you when your headset is muted. |
|
4 |
Bluetooth status LED |
Alerts you to the Bluetooth status:
|
You use the source control buttons on the base to control the active source. Each source button corresponds with a specific connection on the multibase.
Even if you are connected to a source, the LED may not be lit. The source LED only lights when the source is selected or has an active call. For example, you may be properly connected to aCisco IP phone, your PC, and your mobile phone through Bluetooth. However, the respective source LED is only lit when it is selected, has an active call, or has an incoming call. Press the source button to check if a source is properly connected. The source LED flashes three times if there is no connection.
You can alternate between active call sources.
Place an active call on hold before you change to a different call source. Calls on one call source aren't automatically put on hold when you switch to a different call source.
|
Source |
Base icon |
Connection |
|---|---|---|
|
Desk phone | 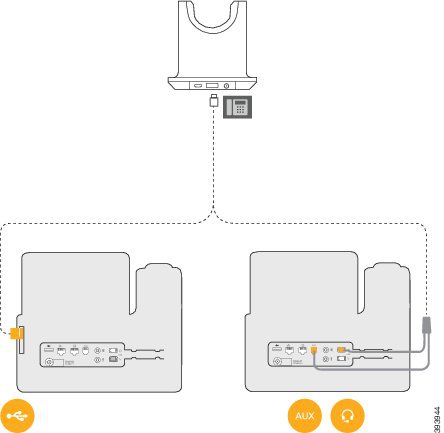 USB to USB cord or Y-cable The desk phone icon corresponds with the middle USB port at the back of the multibase. It is intended for connecting to Cisco IP phones but it will function properly with any compatible call device. | |
|
Laptop | 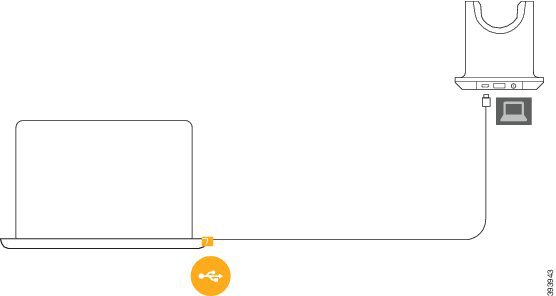 Micro-USB cord The laptop icon corresponds with the micro-USB port found on the back of the multibase. The micro-USB port is intended for connections with a laptop or desktop computer. | |
|
Mobile | The mobile phone icon corresponds with the Bluetooth connection found at the back of the base. While the icon is of a mobile phone, the base will connect with any compatible Bluetooth call device. The multibase can save and remember up to four Bluetooth call devices. If you are listening to music through the Bluetooth source, the music pauses when you place the headset on the base. |
Connect the multibase to a Bluetooth device
You can find your headset serial number in the lower right corner on the underside of your base.
The multibase can store up to four different paired Bluetooth devices. If you already have four paired devices, the base will replace the device which has not been used in the longest time.
| 1 |
Press the Bluetooth button on the back of the base twice to start pairing. |
| 2 |
Select your headset from the Settings menu on your device. The Bluetooth LED lights white when pairing is successful. |
Turn Bluetooth on and off with the multibase
|
Press the Bluetooth button on the back of the base once to turn in on or off. |
Erase all Bluetooth pairings
|
Press and hold the Bluetooth button on the back of the multibase for four seconds to clear the memory. |
Cisco Headset 560 Series conferencing
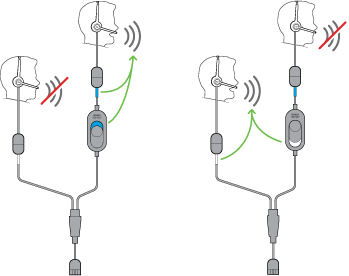
If your administrator has enabled headset conferencing, you can pair up to three guest Cisco Headset 560 Series headsets to either the standard base or the multibase. With this feature, people that sit near you can connect to each other and to the same call with one base. You can conference headsets both on and off an active call. If the call source or the multibase is muted, conferenced headsets can interact with each other and won't interfere with the active call.
If you are on a call and need a coworker to join the call, the coworker's headset can pair with your base. When the call ends, you and your coworker are still connected to each other. Decide on a base that will act as the primary base and pair your coworker's headsets to that base. When you no longer need people connected to your base, they can pair their headsets back to their own bases.
Headset firmware release 1.5(1) or later is required for a headset to enter conferencing mode.
Headset firmware release 2.1(1) or later enables headset conferencing capabilities by default.
When the base is in conferencing mode, the battery status LEDs display number of connected headsets and each headset's status. The far-right LED shows the primary headset status while the middle LEDs indicate the status of each guest headset. The LEDs light in order as headsets connect. When a headset disconnects, newer headsets keep their position on the base. The following figure and table show the corresponding conference mode LEDs.
|
Number |
Headset |
|---|---|
|
1 |
Primary Headset |
|
2 |
Guest Headset #1 |
|
3 |
Guest Headset #2 |
|
4 |
Guest Headset #3 |
The following table describes LED behavior when a base is in conferencing mode.
|
LED state |
Headset status |
|---|---|
|
LED is solid |
Headset is connected and not muted |
|
LED blinks |
Guest headset is waiting to pair |
|
LED flashes every two seconds |
Headset is muted |
|
LED blinks rapidly |
Headset is unable to pair with the base |
|
LED is off |
Headset is disconnected from the base |
Guest headsets use their own tuning settings while in conferencing mode. Users can mute and adjust the volume in their headsets without changing the settings on any other paired headsets.
Pair a guest headset
When the guest headset tries to pair, the primary headset can't accept any incoming calls until it accepts or rejects the guest headset to the base.
Before you begin
Make sure that your headset firmware is 2.1(1) or later. For more information about upgrading the headset firmware, see Upgrade Your Cisco Headset 500 Series.
| 1 |
Place the guest headset on the base. 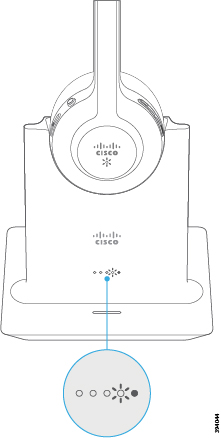
|
| 2 |
Press Call 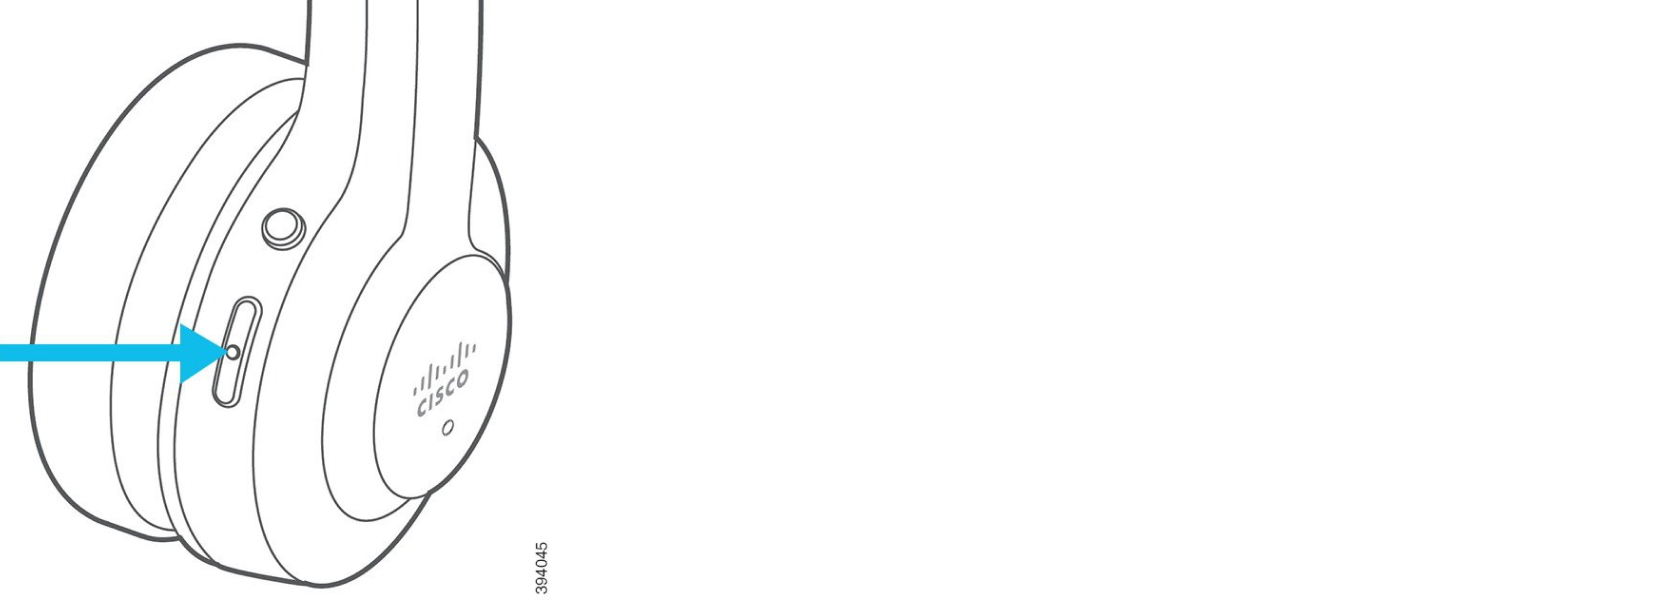
|
| 3 |
Press the Mute |
Unpair a guest headset
|
Do one of these actions.
|
Change the primary paired headset
| 1 |
On the new headset, hold Mute
|
| 2 |
Place the new headset on the base. You can skip step one if you power cycle the base with the new headset seated in the cradle. |
Unpair your primary headset from your base
You can't unpair the primary headset if you have an active call or are in conferencing mode.
| 1 |
On your new headset, hold Mute
|
| 2 |
Place the headset on the base. The base designates the new headset as the primary headset and un-pairs with the old headset. The old primary headset plays a tone indication when it unpairs from the base. |


