- ホーム
- /
- 投稿記事

コメントありがとうございます。

 この記事の内容
 フィードバックがある場合
品質保証、セキュリティ、トレーニングなどの理由から、特定のユーザーまたは仮想回線による発信および着信通話を録音したい場合があります。
概要
デスクフォンまたはWebexアプリで行われた通話および受信された通話は、Webexまたはサードパーティの通話録音プロバイダーを使用して録音されます。管理者として、通話録音プロバイダーに対し、組織内の特定のユーザーまたは仮想回線のすべての着信および発信通話を録音することを許可できます。オンデマンド録音、常時録音、常時録音をサポートしています。 Pause/Resume 録音モード。
Webexの通話録音はデフォルトで有効になっています。Control Hubを使用して、サードパーティの通話録音プロバイダーを設定できます。
以下の要件を満たす必要があります。
-
パートナー企業は、貴社向けに通話録音サービスを有効にする必要があります。このサービスはデフォルトでは有効になっているため、特定のユーザー向けに設定することができます。
-
サードパーティの通話録音プロバイダーを使用して通話を録音する場合、ユーザーとワークスペースはWebex Calling Professionalライセンスを所有している必要があります。
Webex Calling Standardライセンスをお持ちのユーザーは、Webexを通話録音プロバイダーとして利用できます。
-
通話録音に関する規制要件については、法務部門にご相談ください。
Webex Callingをご利用のお客様は全員、Webex Call RecordingとDubber Goをご利用いただけます。Webex Callingをご利用のお客様は、これらのオプションを利用することで、追加料金なしで通話を録音できます。
有料プランでは、コンプライアンス対応の通話録音、無制限のデータ保存、AI分析、複数のサードパーティプロバイダーからの管理者アクセスなど、より多くのオプションが利用できます。
-
Webexはデフォルトで全てのユーザーが利用でき、無制限の録音にアクセスできます。Webexの録音データは現在、保存期間が1年間に設定されており、組織ごとのストレージ容量は100GBです。コンプライアンス担当者は、選択した保存場所にある通話録音にアクセスして管理できます。管理者は、ユーザーの通話録音へのアクセス権限を設定および管理できます。ユーザーは、ユーザーハブとWebexアプリを使用して録音を管理できます。
-
Dubber Goはすべてのユーザーが利用でき、無制限の録音にアクセスできます。各録音は 30 日間保存されます。Dubber ポータルから録音にアクセスして管理できるのは、録音したユーザーのみです。
-
Dubber チームおよびプレミアライセンスには、Dubber との契約が必要です。有料ライセンスでは、管理者は無制限の録音、無制限のストレージ、および録音データにアクセスできます。Dubberの通話録音ライセンスは、Cisco Commerce Workspace(CCW)(Solutions Plus)を通じて入手できます。
-
Imagicle は、完全なクラウドベースの音声録音ソリューションであり、分析、文字起こし、感情分析、画面録音機能を備えた、コンプライアンスに準拠した音声録音を提供します。Imagicleは、Imagicleクラウド上で無制限のストレージ容量を提供するとともに、録音データを顧客のオンプレミスのローカルストレージに移動するオプションも提供しています。これにはImagicleとの契約合意が必要です。これはCisco Commerce Workspace(CCW)を通じて注文できます。
IMAGICLE-CLOUDまたはA-FLEX-S+-CALLINGを検索してIMAGICLEを選択してください。 -
CallCabinet コンプライアンス通話録音 & AIソリューションは、あらゆる通信環境において、制約のないビジネスインテリジェンスを可能にします。CallCabinetのクラウドネイティブソリューションは、次世代AIを搭載し、特殊な機械学習を活用することで、比類のないビジネスインテリジェンスをリアルタイムで提供します。当社は、将来を見据えた規制遵守、カスタムビジネスインテリジェンスレポートを備えた次世代の会話分析、および品質保証自動化ツールを通じて、ビジネスの成功を促進します。CallCabinet Complianceのクラウドサービスは、無制限のクラウドストレージ容量を提供するか、録音データを顧客のオンプレミスのローカルストレージに移動するオプションを提供します。この録音ソリューションは、Cisco Commerce Workspace(CCW)を通じて注文できます。
CALLCABINETPLATまたはA-FLEX-S +-CALLINGを検索してCALLCABINETを選択してください。 -
Eleveno は、コンプライアンス、自動品質管理、画面録音、文字起こし、音声分析のための、クラウドベースの使いやすく強力なAI搭載ソリューションです。Eleveoは、オンプレミス環境とクラウド環境の両方において、Webex CallingをはじめとするCiscoのコラボレーションおよびコンタクトセンターソリューションを統合するための単一プラットフォームを提供します。ユーザーは、Eleveoの単一画面を通して、Ciscoのすべての音声録音にアクセスし、再生することができます。バックオフィス業務でもコンタクトセンター業務でも、オンプレミス環境でもクラウド環境でも、Eleveoの柔軟かつ強力なメディアキャプチャツールは、コンプライアンスと品質に関する目標達成を可能にします。
-
MiaRec は、通話録音、自動品質管理、画面録音、音声分析機能を提供する、AIを活用した生成型会話インテリジェンスプラットフォームです。MiaRecは、オンプレミス環境とクラウド環境の両方において、Webex CallingをはじめとするCiscoのコラボレーションおよびコンタクトセンターソリューションを統合するための単一プラットフォームを提供します。ユーザーは、MiaRecの単一画面を通して、Ciscoのすべての音声録音にアクセスし、再生することができます。
アカウント作成
高度なDubberサブスクリプションまたは有料Dubberサブスクリプションについては、 Dubberサポートに連絡して Dubberアカウントをアップグレードしてください。Dubberに関する詳細については、 Sales Connectをご覧ください。
Dubber Goはすべてのユーザーが利用可能で、Control HubはDubberと連携してDubberアカウントを自動的にプロビジョニングします。ユーザーが通話録音を有効にしている場合、組織がDubberアカウントを持っていなくても、Dubberアカウントは自動的にプロビジョニングされます。ユーザーとDubber Goの利用権限も、Dubberアカウントに自動的にプロビジョニングされます。
高度な機能を利用するには、Dubberのユーザーライセンスを無料プランから有料プランにアップグレードしてください。有料プランから無料プランへはいつでもダウングレードできます。そのためには、権限変更が必要なユーザーを特定し、パートナーに連絡してください。Dubberアカウントの管理者権限を持つユーザーも、これらの変更を行うことができます。
無料サブスクリプションから有料サブスクリプションに移行すると、自動削除が停止し、無制限の保存が開始されます。有料プランから無料プランに移行すると、無制限の保存期間は終了し、録音データは30日後に削除されます。
Imagicleは 無料 トライアルアカウントを提供しています。Imagicle ライセンスを Cisco Commerce Workspace (CCW) (Solution Plus) で取得後、新しい本番アカウントをプロビジョニングするか、トライアルアカウントを有料アカウントに変換するには、 Imagicle サポート にお問い合わせください。Imagicleの詳細については、 Sales Connectをご覧ください。
Control Hubは、ユーザーが通話録音を有効にした場合でも、Imagicleアカウントを自動的に作成しません。
Imagicleは、Webex for Developers APIを使用しているユーザーをImagicleアカウントに同期するためのツールを提供しています。詳細については、 Imagicle サポート にお問い合わせください。
CallCabinetは無料トライアルアカウントを提供しています。Cisco Commerce Workspace (CCW) (Solution Plus) で CallCabinet ライセンスを注文した後、新しい本番アカウントをプロビジョニングするか、トライアルアカウントを有料アカウントに変換するには、CallCabinet サポート にお問い合わせください。Call Cabinet の詳細については、 Sales Connectをご覧ください。
Control Hubは、ユーザーが通話録音を有効にした場合でも、CallCabinetアカウントを自動的に作成しません。
新規アカウントのプロビジョニングに関するサポートが必要な場合は、CallCabinet サポート にお問い合わせください。CallCabinetの通話録音ソリューションは、米国リージョンでホストされているWebex Callingのお客様にご利用いただけます。CallCabinetの通話録音機能は、まもなく他の地域でも利用可能になります。
Eleveoはご要望に応じて カスタマイズされた デモを提供します。Eleveoライセンスを注文したら、 Eleveo サポートに連絡して新しい本番アカウントをプロビジョニングしてください。Eleveoの詳細については、 Sales Connectをご覧ください。
Control Hubは、ユーザーが通話録音を有効にした場合でも、Eleveoアカウントを自動的に作成しません。
Eleveoの通話録音ソリューションは、ヨーロッパおよび米国地域でホストされているWebex Callingのお客様にご利用いただけます。Webex Callingで通話録音機能を有効にするには、ユーザーは少なくとも1つのWebex Calling Professionalライセンスを所有している必要があります。
MiaRecプラットフォームを使用して組織の通話を録音するには、 https://app.miarec.com でMiaRecアカウントを作成してください。詳細については、 MiaRec サポート にお問い合わせください。
Control Hubは、ユーザーが通話録音を有効にした場合でも、MiaRecアカウントを自動的に作成しません。
MiaRecの通話録音ソリューションは、米国リージョンでホストされているWebex Callingのお客様にご利用いただけます。
利用規約
組織内で通話録音プロバイダーとして Dubber を選択する場合、顧客またはパートナー管理者は、顧客に代わって Dubber 利用規約に同意する必要があります。利用規約に同意すると、Webex Calling組織用のDubberアカウントが作成されます。
利用規約への同意は一度限りの行為です。契約を承認するとWebex Calling ユーザー名、ユーザーの場所の名前、タイムゾーン名、名、およびメール ID を Dubber と共有します。
組織内で通話録音プロバイダーとして Imagicle を選択する場合、顧客またはパートナー管理者は、顧客に代わって Imagicle利用規約に同意する必要があります。利用規約に同意すると、Webex Calling組織用のImagicleアカウントが作成されます。
利用規約への同意は一度限りの行為です。契約に同意すると、Imagicleは顧客名、ユーザーの所在地のタイムゾーン、名、姓、およびメールアドレスにアクセスできるようになります。
組織内で通話録音プロバイダーとして CallCabinet を選択する場合、顧客またはパートナー管理者は、顧客に代わって CallCabinet 利用規約 に同意する必要があります。
利用規約への同意は一度限りの行為です。契約に同意すると、CallCabinetはWebex Callingから顧客名、ユーザーの所在地タイムゾーン、名、姓、およびメールアドレスにアクセスして通話を録音できるようになります。
組織の通話録音プロバイダーとしてEleveoを選択する場合、顧客またはパートナー管理者は、顧客に代わって Eleveoの利用規約に同意する必要があります。
利用規約への同意は一度限りの行為です。契約に同意すると、EleveoはWebex Callingから顧客名、ユーザーの所在地タイムゾーン、名、姓、およびメールアドレスにアクセスして通話を録音できるようになります。
組織の通話録音プロバイダーとして MiaRec を選択する場合、顧客またはパートナー管理者は、顧客に代わって MiaRec 利用規約 に同意する必要があります。
利用規約への同意は一度限りの行為です。契約に同意すると、MiaRecはWebex Callingから顧客名、ユーザーの所在地タイムゾーン、名、姓、およびメールアドレスにアクセスして通話を録音できるようになります。
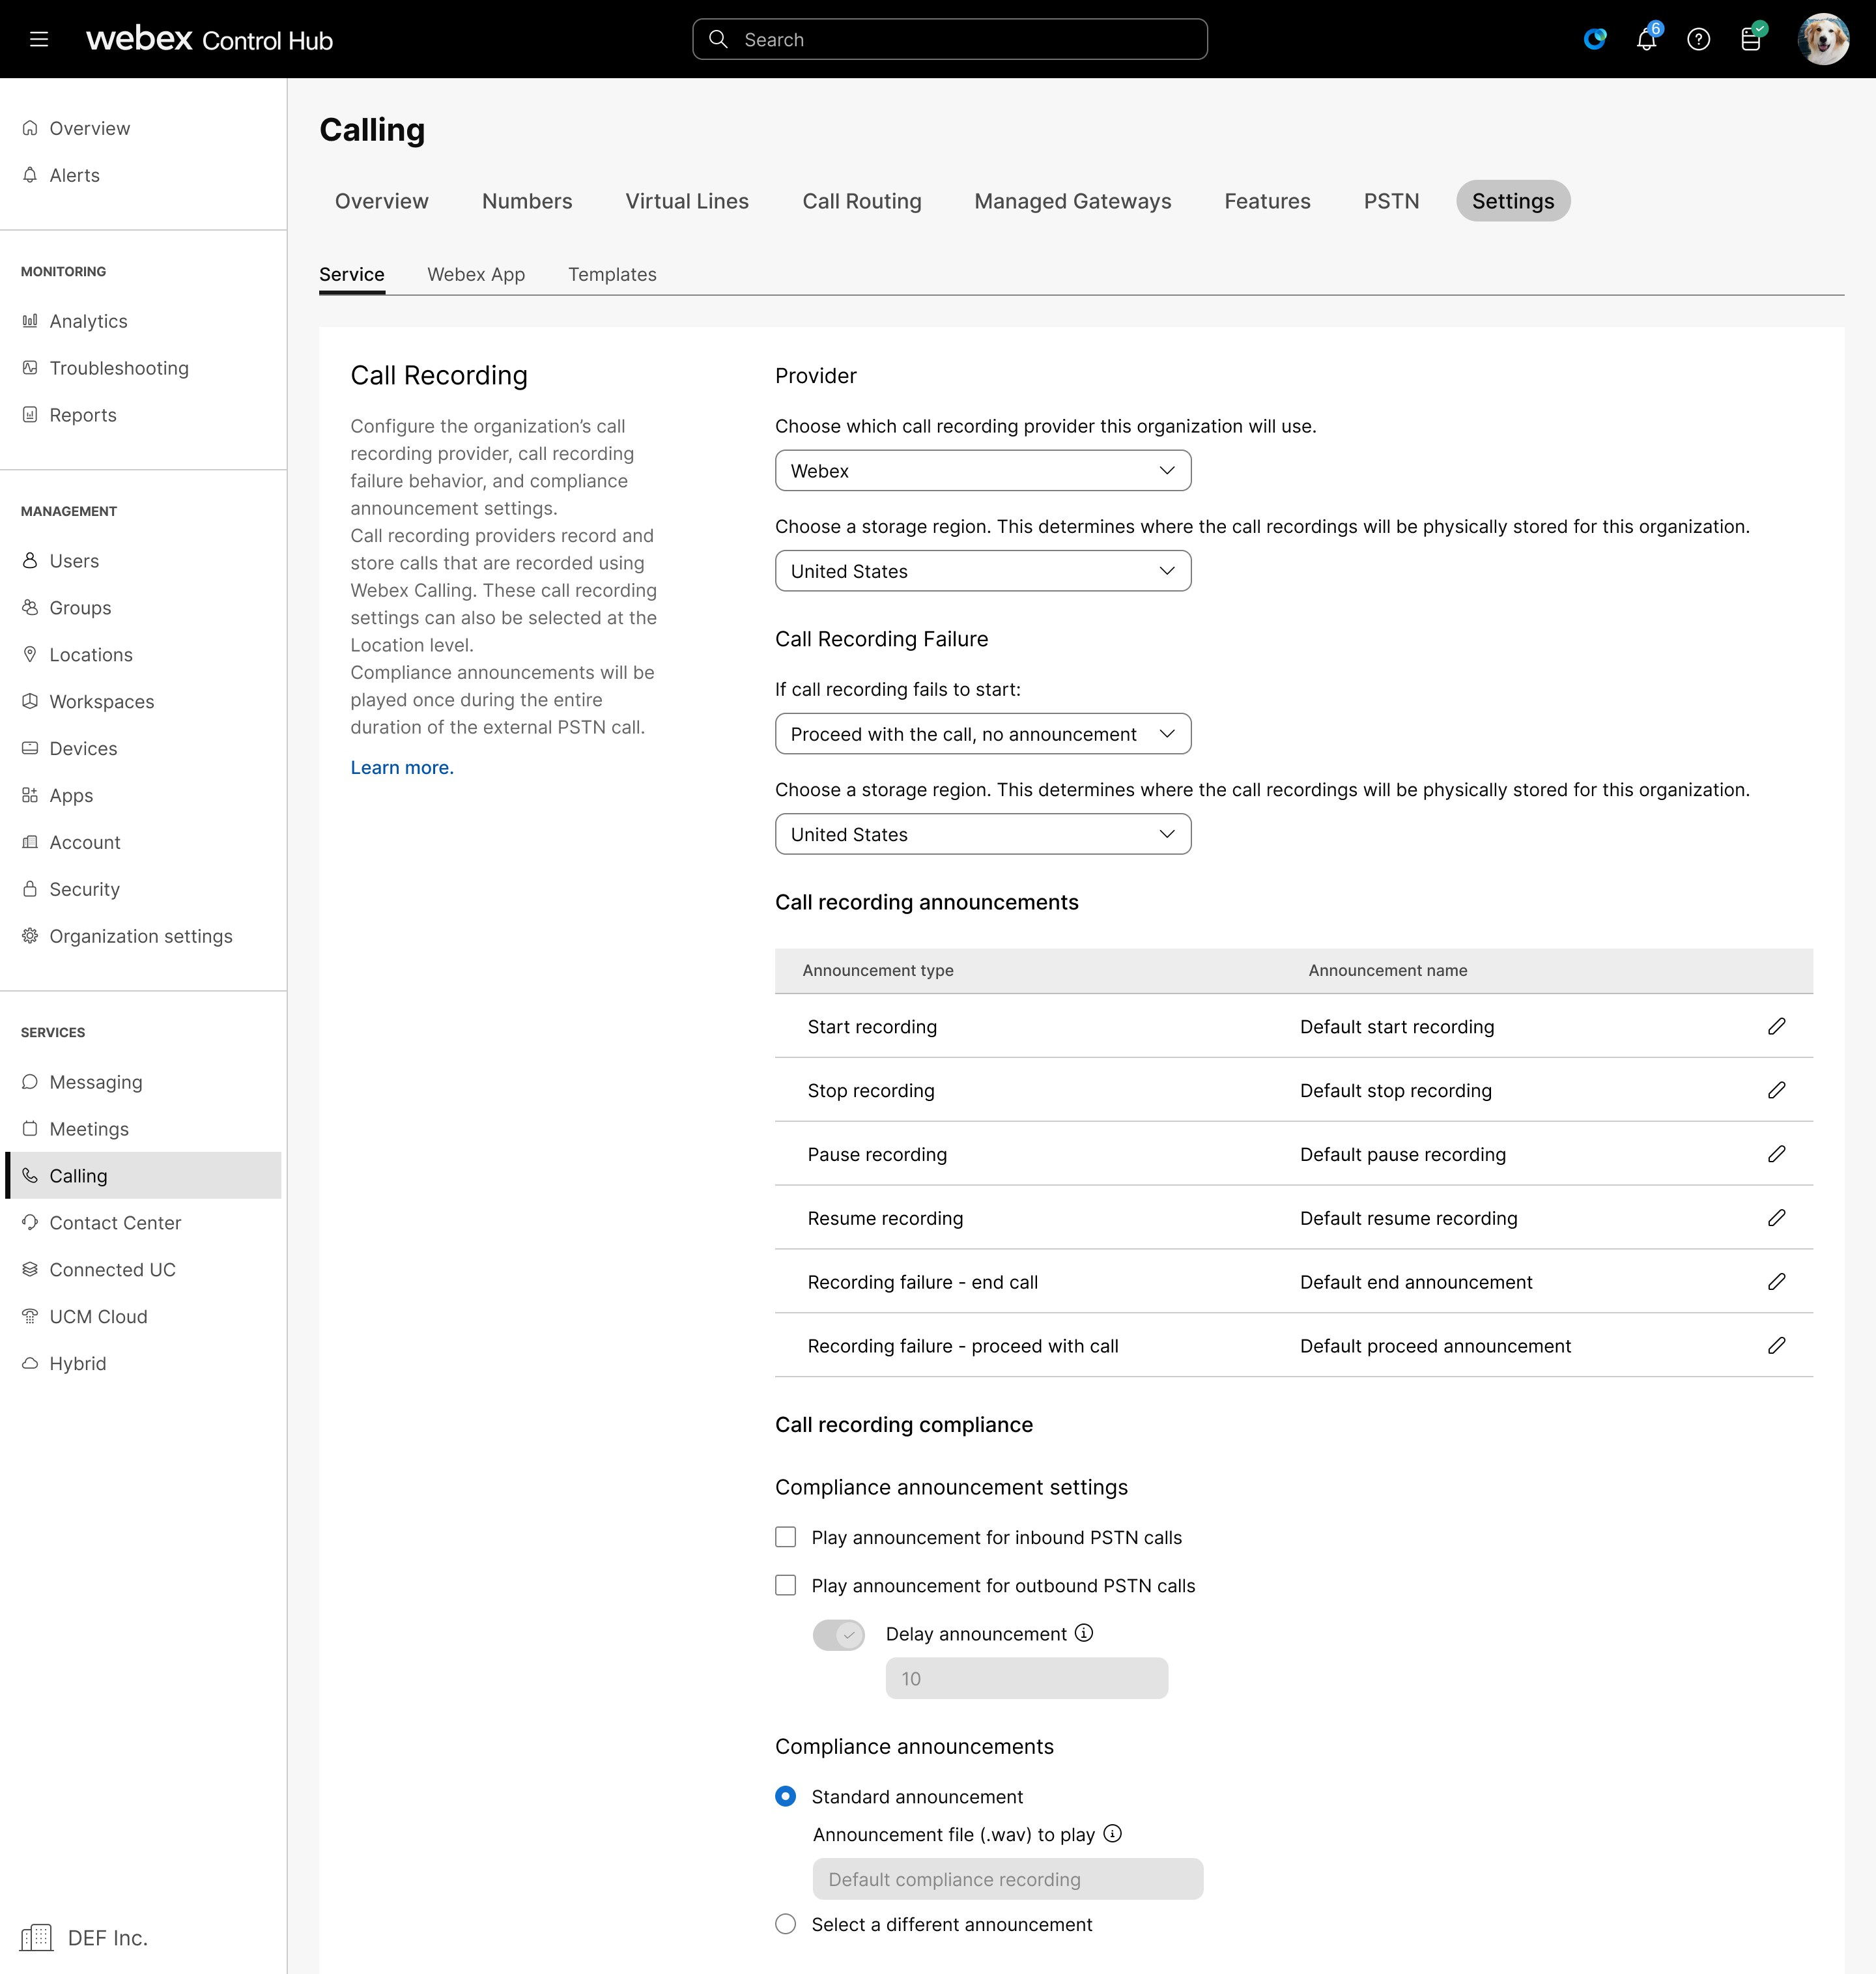
通話録音プロバイダーを選択してください
組織レベルで通話録音を有効にする
| 1 |
。 |
| 2 |
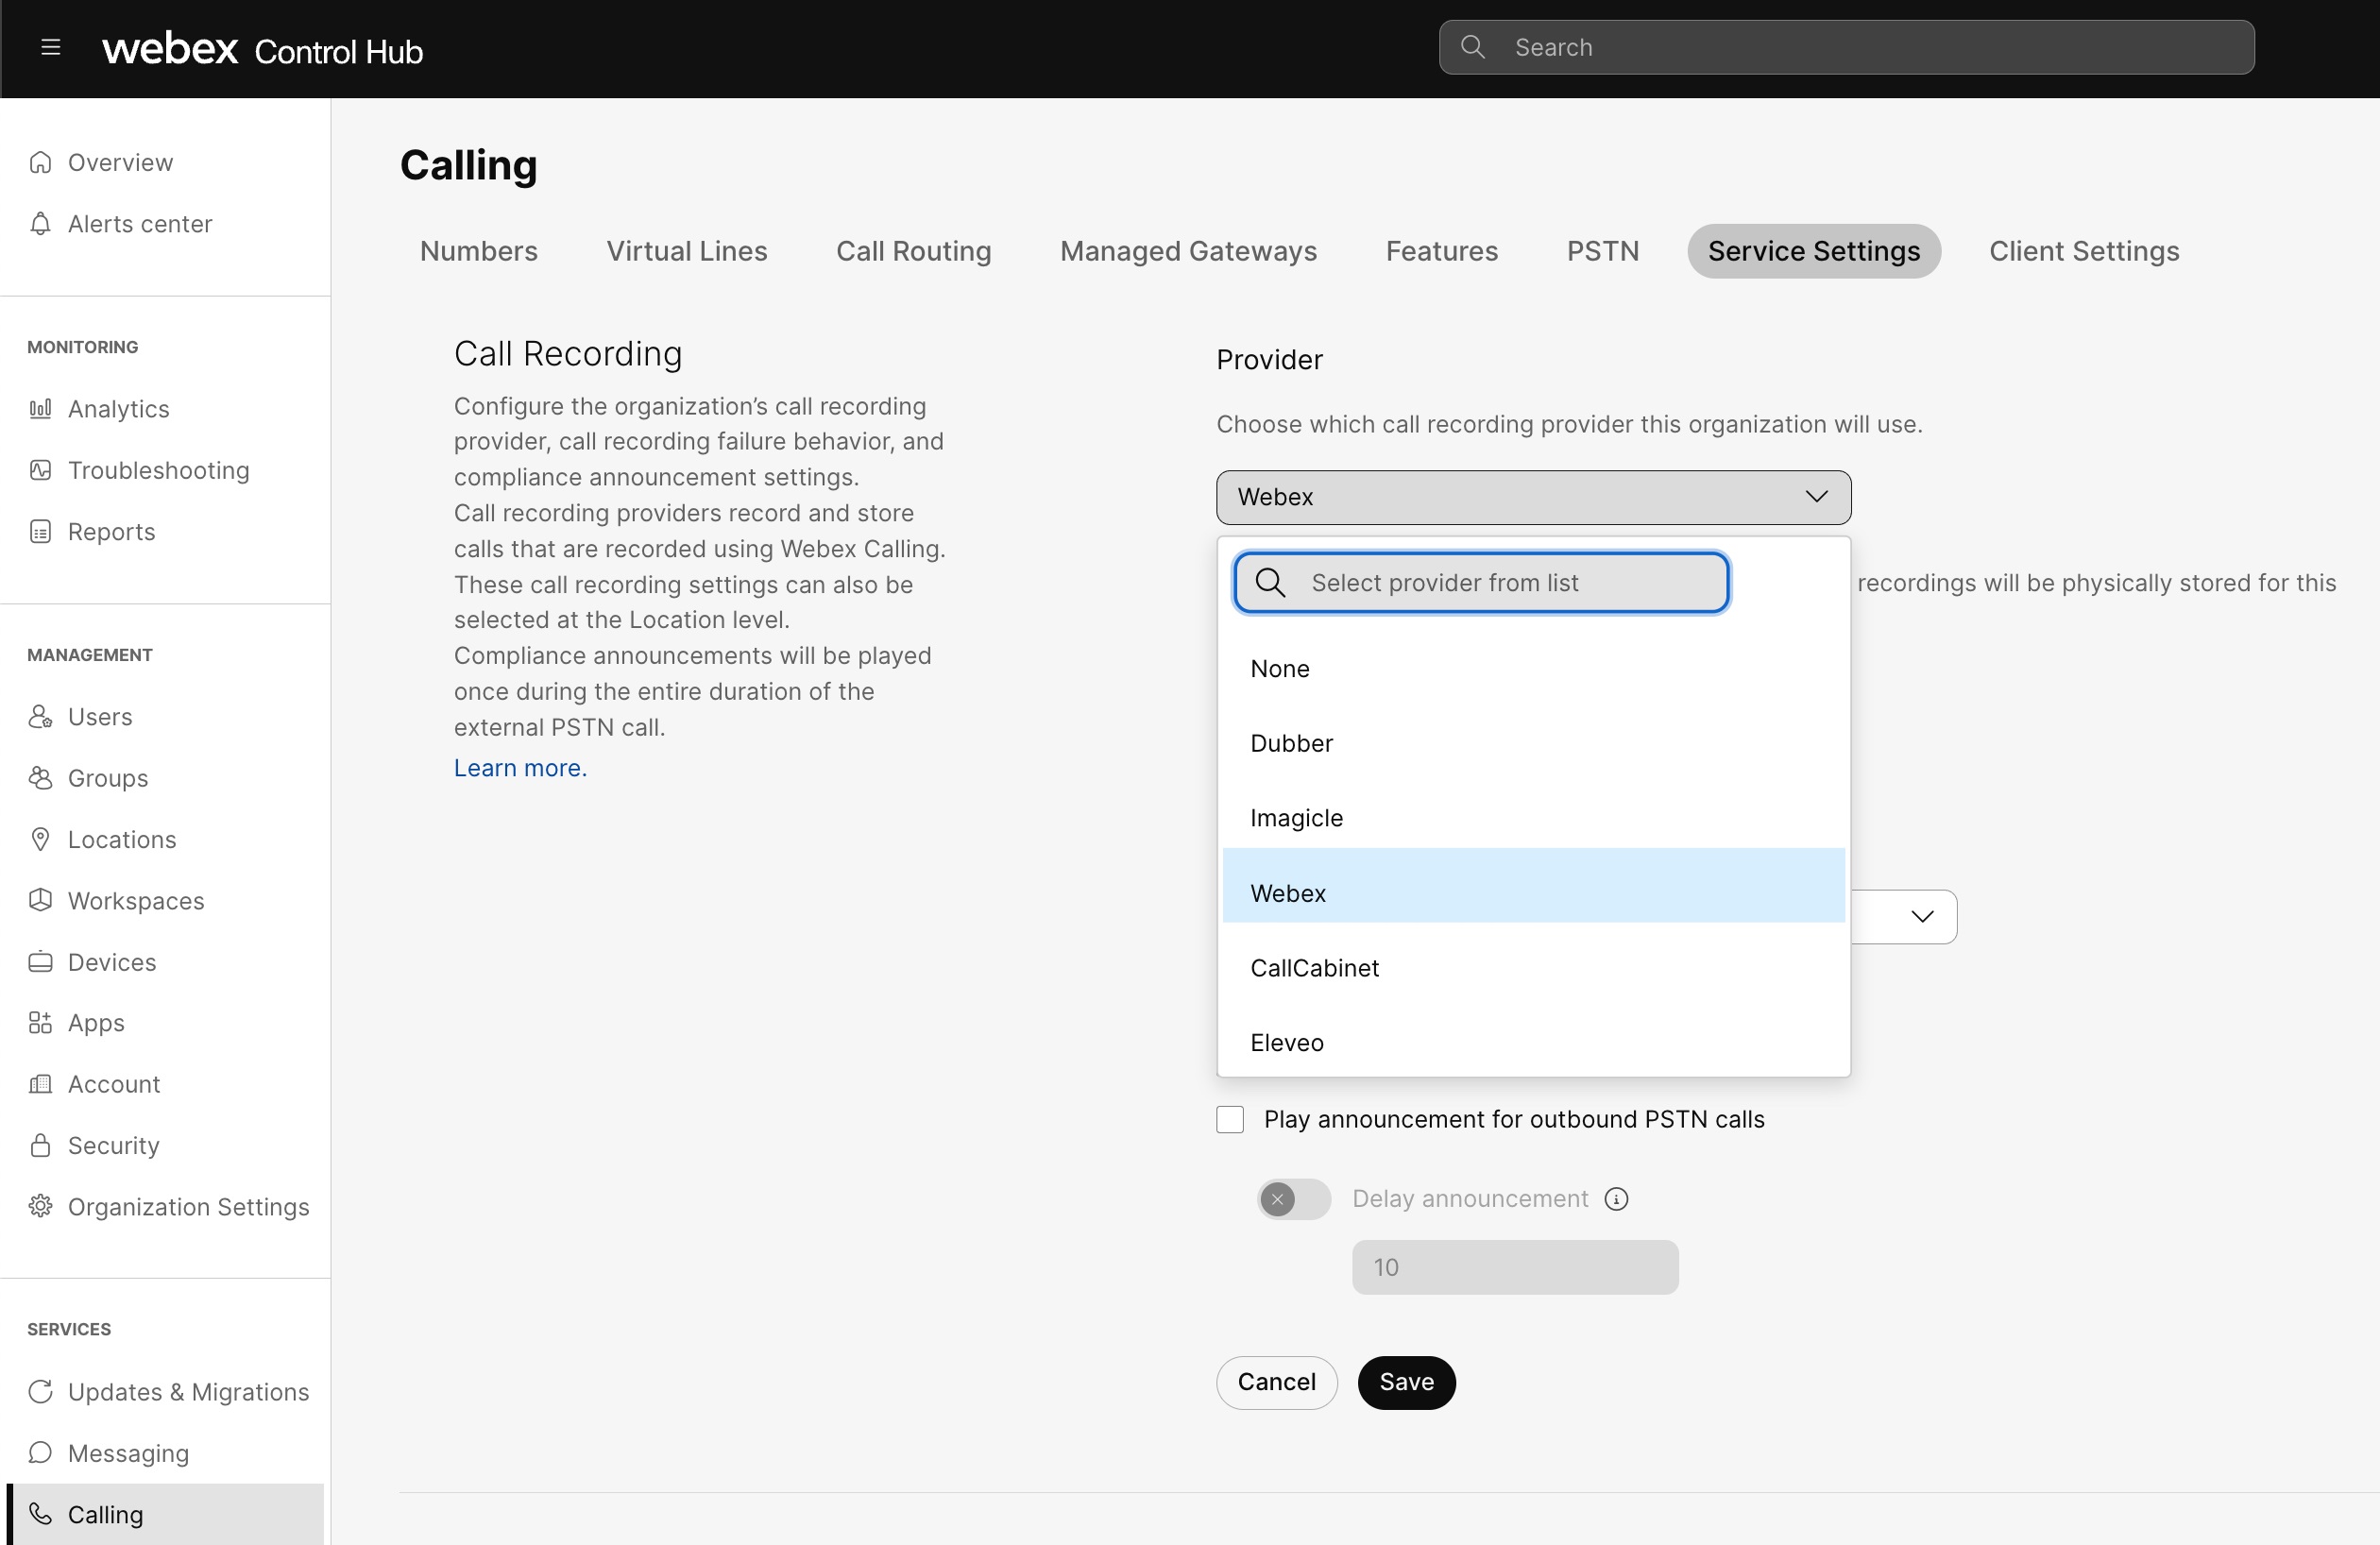
通話録音 の下で、組織に適した通話録音プロバイダーをドロップダウンリストから選択してください。 Webexの通話録音は、組織全体およびすべての拠点において、デフォルトで有効になっています。
 |
| 3 |
プロバイダーの下で、ドロップダウンリストから組織に該当する通話録音プロバイダーを選択してください。 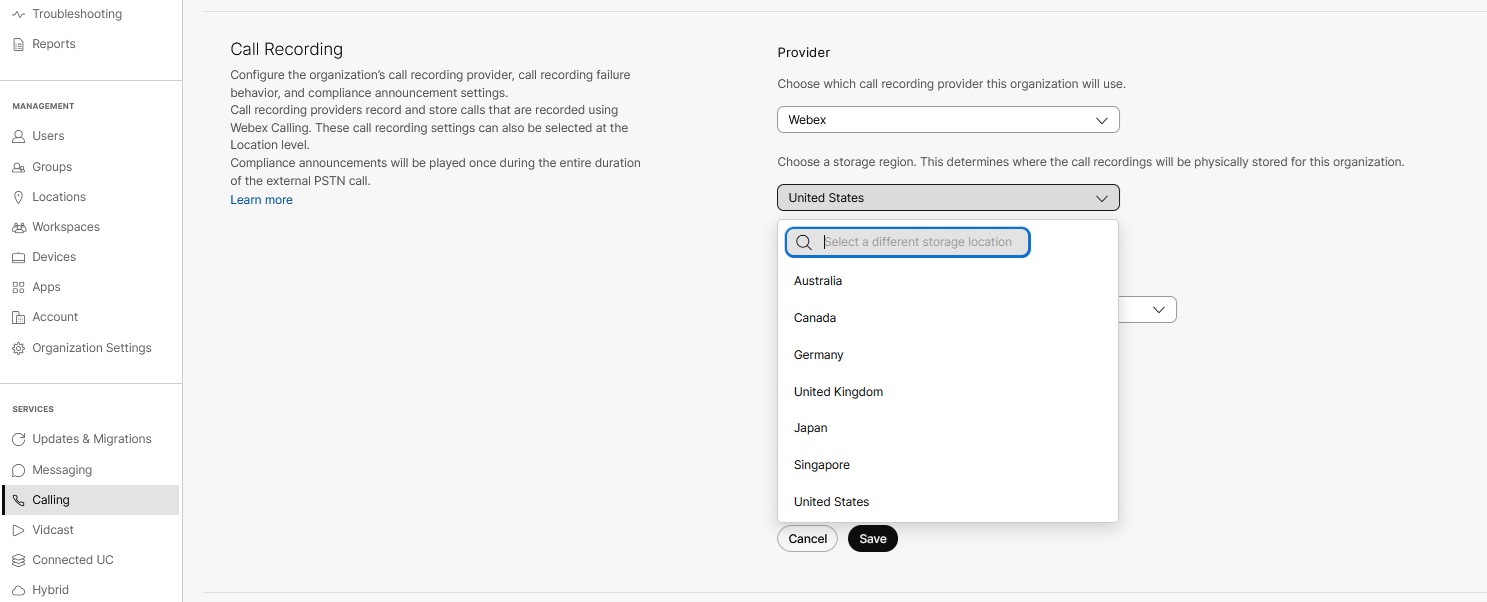 保管場所に保存されている通話録音データにアクセスできるのは、コンプライアンス担当者のみです。コンプライアンス担当者として、法的措置のためにデータを保存することができます。録音にアクセスするには、 Webex for Developers の API を使用し、 Webex Calling に移動します。 > 参考資料 > ガイド > 統合録音。 Webhooksを使用して、Webex通話録音にWebhook通知を作成できます。 Dubberはデフォルトで選択されます。Webex Callingのユーザー権限にDubber Goを含める場合、追加料金は発生しません。 |
| 4 |
通話録音失敗の下で、通話の録音に失敗した場合に通知するオプションを選択します。以下の選択肢から一つ選んでください。
|
| 5 |
[保存] をクリックします。
|
組織レベルで通話録音を無効にする
場所レベルでの通話録音の上書き
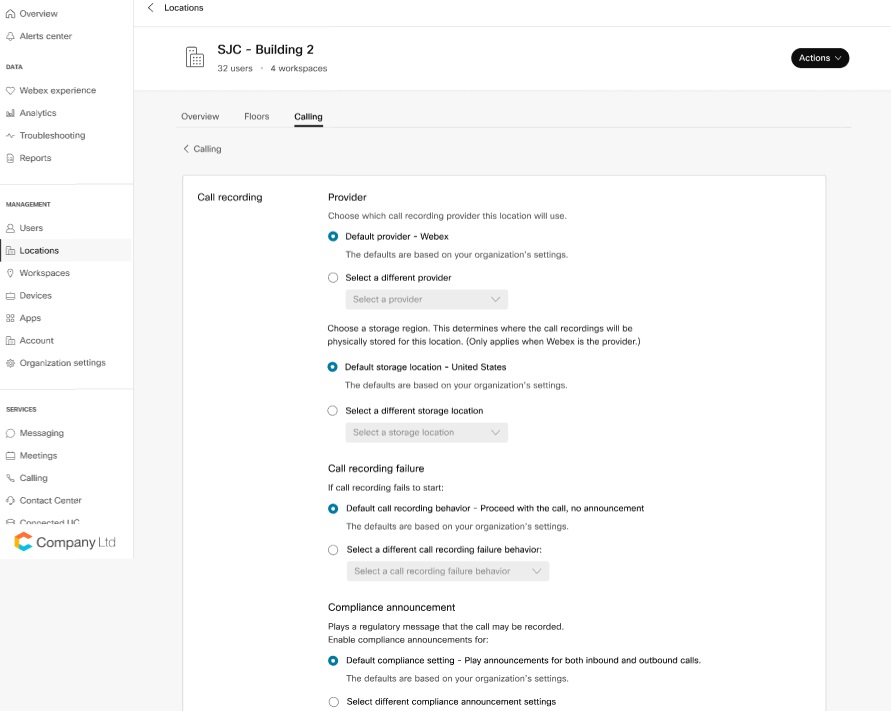
新しい場所を作成する際、通話録音プロバイダーはデフォルトで組織レベルに設定されます。管理者は、場所レベルで通話録音プロバイダーの設定を上書きできます。
| 1 |
。 |
| 2 |
通話録音設定を変更したい場所を選択してください。 |
| 3 |
。 |
| 4 |
通話録音設定をクリックし、以下のいずれかを選択してください。
 |
| 5 |
[保存] をクリックします。 |
パートナーハブで通話録音を確認する
Webex Callingは、複数のサードパーティプロバイダーをサポートしており、ユーザーのすべての着信および発信通話を録音できます。これらの第三者プロバイダーは、録音されたすべての通話を保存および管理することができます。
Webex CallingおよびPartner Hubでは、組織に対して通話録音機能がデフォルトで有効になっています。
組織にパートナー管理者がいない場合、パートナーハブを使用して通話録音を管理することはできません。
開始する前に
ユーザーによる通話録音を有効にする前に、Control Hubで組織で使用する通話録音プロバイダーを選択してください。パートナーまたはユーザー管理者は、特定のユーザーに対して通話録音を有効または無効にすることができます。
ただし、パートナーは自身のアカウントで通話録音オプションを有効にすることはできず、シスコのサポートに問い合わせる必要があります。
| 1 |
https://admin.webex.comのパートナーハブビューから、 顧客に移動し、顧客を選択します。 |
| 2 |
[設定] に移動します。 |
| 3 |
[通話] までスクロールして、[通話録音] がオンに設定されていることを確認します。 顧客のデフォルトでは、通話の録音がオンに設定されています。お客様がコントロールハブに通話録音機能を表示させたくない場合は、すべてのユーザーが通話録音機能を使えないように設定した後、この機能をオフにすることができます。 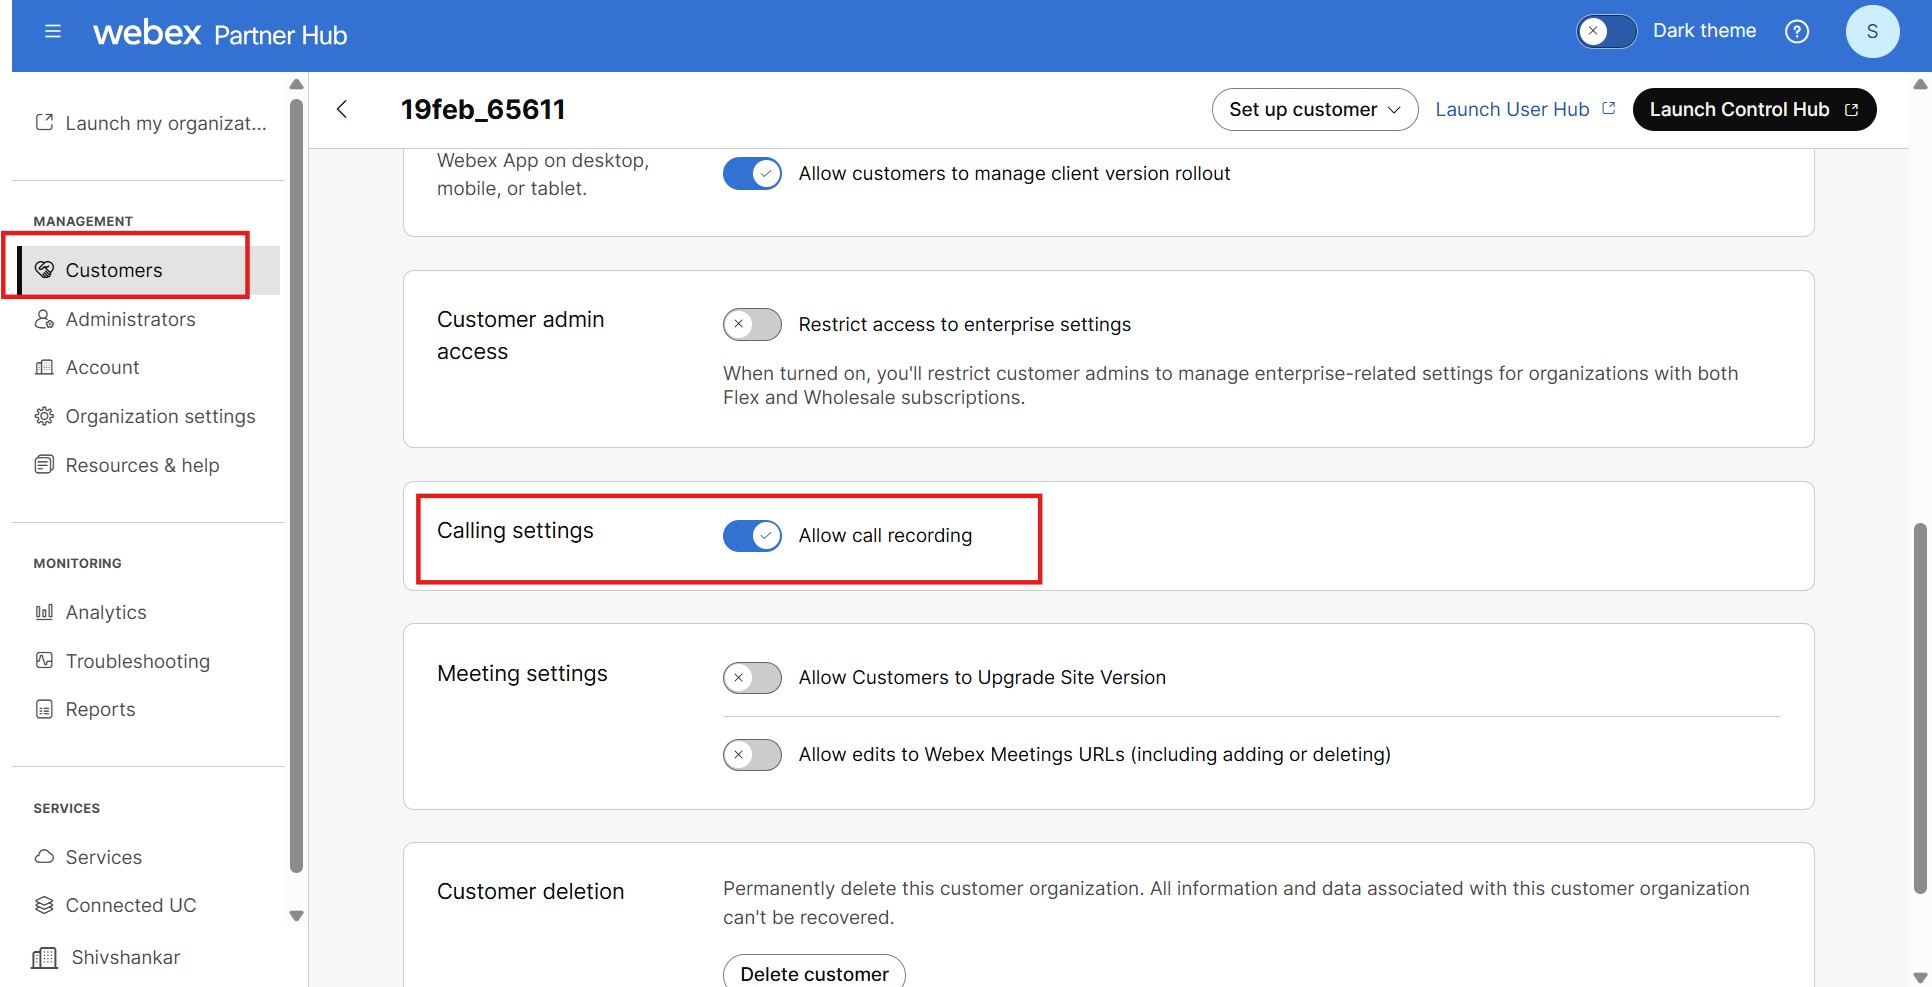 |
| 4 |
(オプション) Launch Control Hub を選択し、ここに 記載されている手順に従ってください。 |
コンプライアンスコール録音アナウンスを有効にする
コンプライアンスアナウンスの設定は、PSTNの着信通話と発信通話で個別に有効にできます。アナウンスを有効にすると、PSTN通話の発信または着信時に、発信者(PSTNユーザー)は通話開始時に「この通話は録音される場合があります」というアナウンスを聞くことになります。通話録音を有効にしているユーザーが電話に出た後に録音が開始されます。コンプライアンスアナウンスが再生されると、 start/stop Webex Callingユーザーの場合、録音アナウンスは抑制されます。通話中に転送などの操作が開始された場合でも、アナウンスは複数回再生されません。通話が録音されていることを示す視覚的なインジケーターが、Webexアプリまたは対応する電話機に表示されます。
ユーザーが直接電話を受けた場合、コンプライアンスに関するアナウンスは、 。
ワークスペースが呼び出しを受信すると、コンプライアンスアナウンスは 。
自動応答、コールキュー、またはハントグループ機能が直接コールを受信した場合、コンプライアンスアナウンスは 。
対応言語の一覧は、各設定のドロップダウンメニューに表示されます。仮想回線に直接着信があった場合、コンプライアンスアナウンスは、 > 仮想回線を選択してください > 。
法令遵守に関するアナウンスの音声は録音されません。ただし、通話が録音された場合、通話録音プロバイダーに送信されるメタデータには、コンプライアンスアナウンスまたは user/workspace アナウンスは流された場合もあれば、流されなかった場合もある。
の user/workspace レベルアナウンスの設定は、コンプライアンスアナウンスが再生されない場合にのみ優先され、これは着信通話にのみ適用されます。詳細については、 Webex Calling ユーザーとワークスペースの通話録音を有効にする セクションを参照してください。
有効にすることをお勧めします user/workspace すべてのレベルアナウンス設定 users/workspaces 通話録音を有効にしているユーザー。これは、着信時にコンプライアンスに関するアナウンスが再生されない場合に、通常のアナウンスを再生するための信頼できる代替手段として機能します。
コンプライアンスに関するアナウンスは、組織レベルで有効化し、拠点レベルで上書きすることができます。
組織レベルでコンプライアンスアナウンスを有効にする
コンプライアンスに関するお知らせは、組織レベルではデフォルトで無効になっています。
| 1 | |
| 2 |
をクリックし、 通話録音 セクションまでスクロールしてください。 |
| 3 |
コンプライアンスアナウンス設定で、以下のいずれかのオプションを有効にしてください。
|
| 4 |
通話録音失敗の下で、録音失敗時の動作を選択できます。
この設定は、すべての録音プラットフォームに適用されます。 |
| 5 |
通話録音アナウンスでは、標準のWebex通話録音アナウンス、または特定の録音イベント(開始、停止、一時停止、再開、録音失敗など)に対するカスタムアナウンスを再生するように選択できます。お知らせをカスタマイズするには:
|
| 6 |
コンプライアンスアナウンスでは、標準のWebexコンプライアンスアナウンスまたはカスタムアナウンスを再生するかを選択できます。 |
| 7 |
[保存] をクリックします。 |
 をクリックしてください。以下の選択肢から1つを選んでください。
場所レベルでのコンプライアンスアナウンスを上書きする
新しい場所が作成されると、コンプライアンスに関するお知らせの設定はデフォルトで組織レベルになります。場所レベルで設定を上書きできます。
| 1 | |
| 2 |
。 |
| 3 |
コンプライアンスに関するお知らせの設定を変更したい場所を選択してください。 |
| 4 |
セクションをクリックし、 通話録音をクリックします。 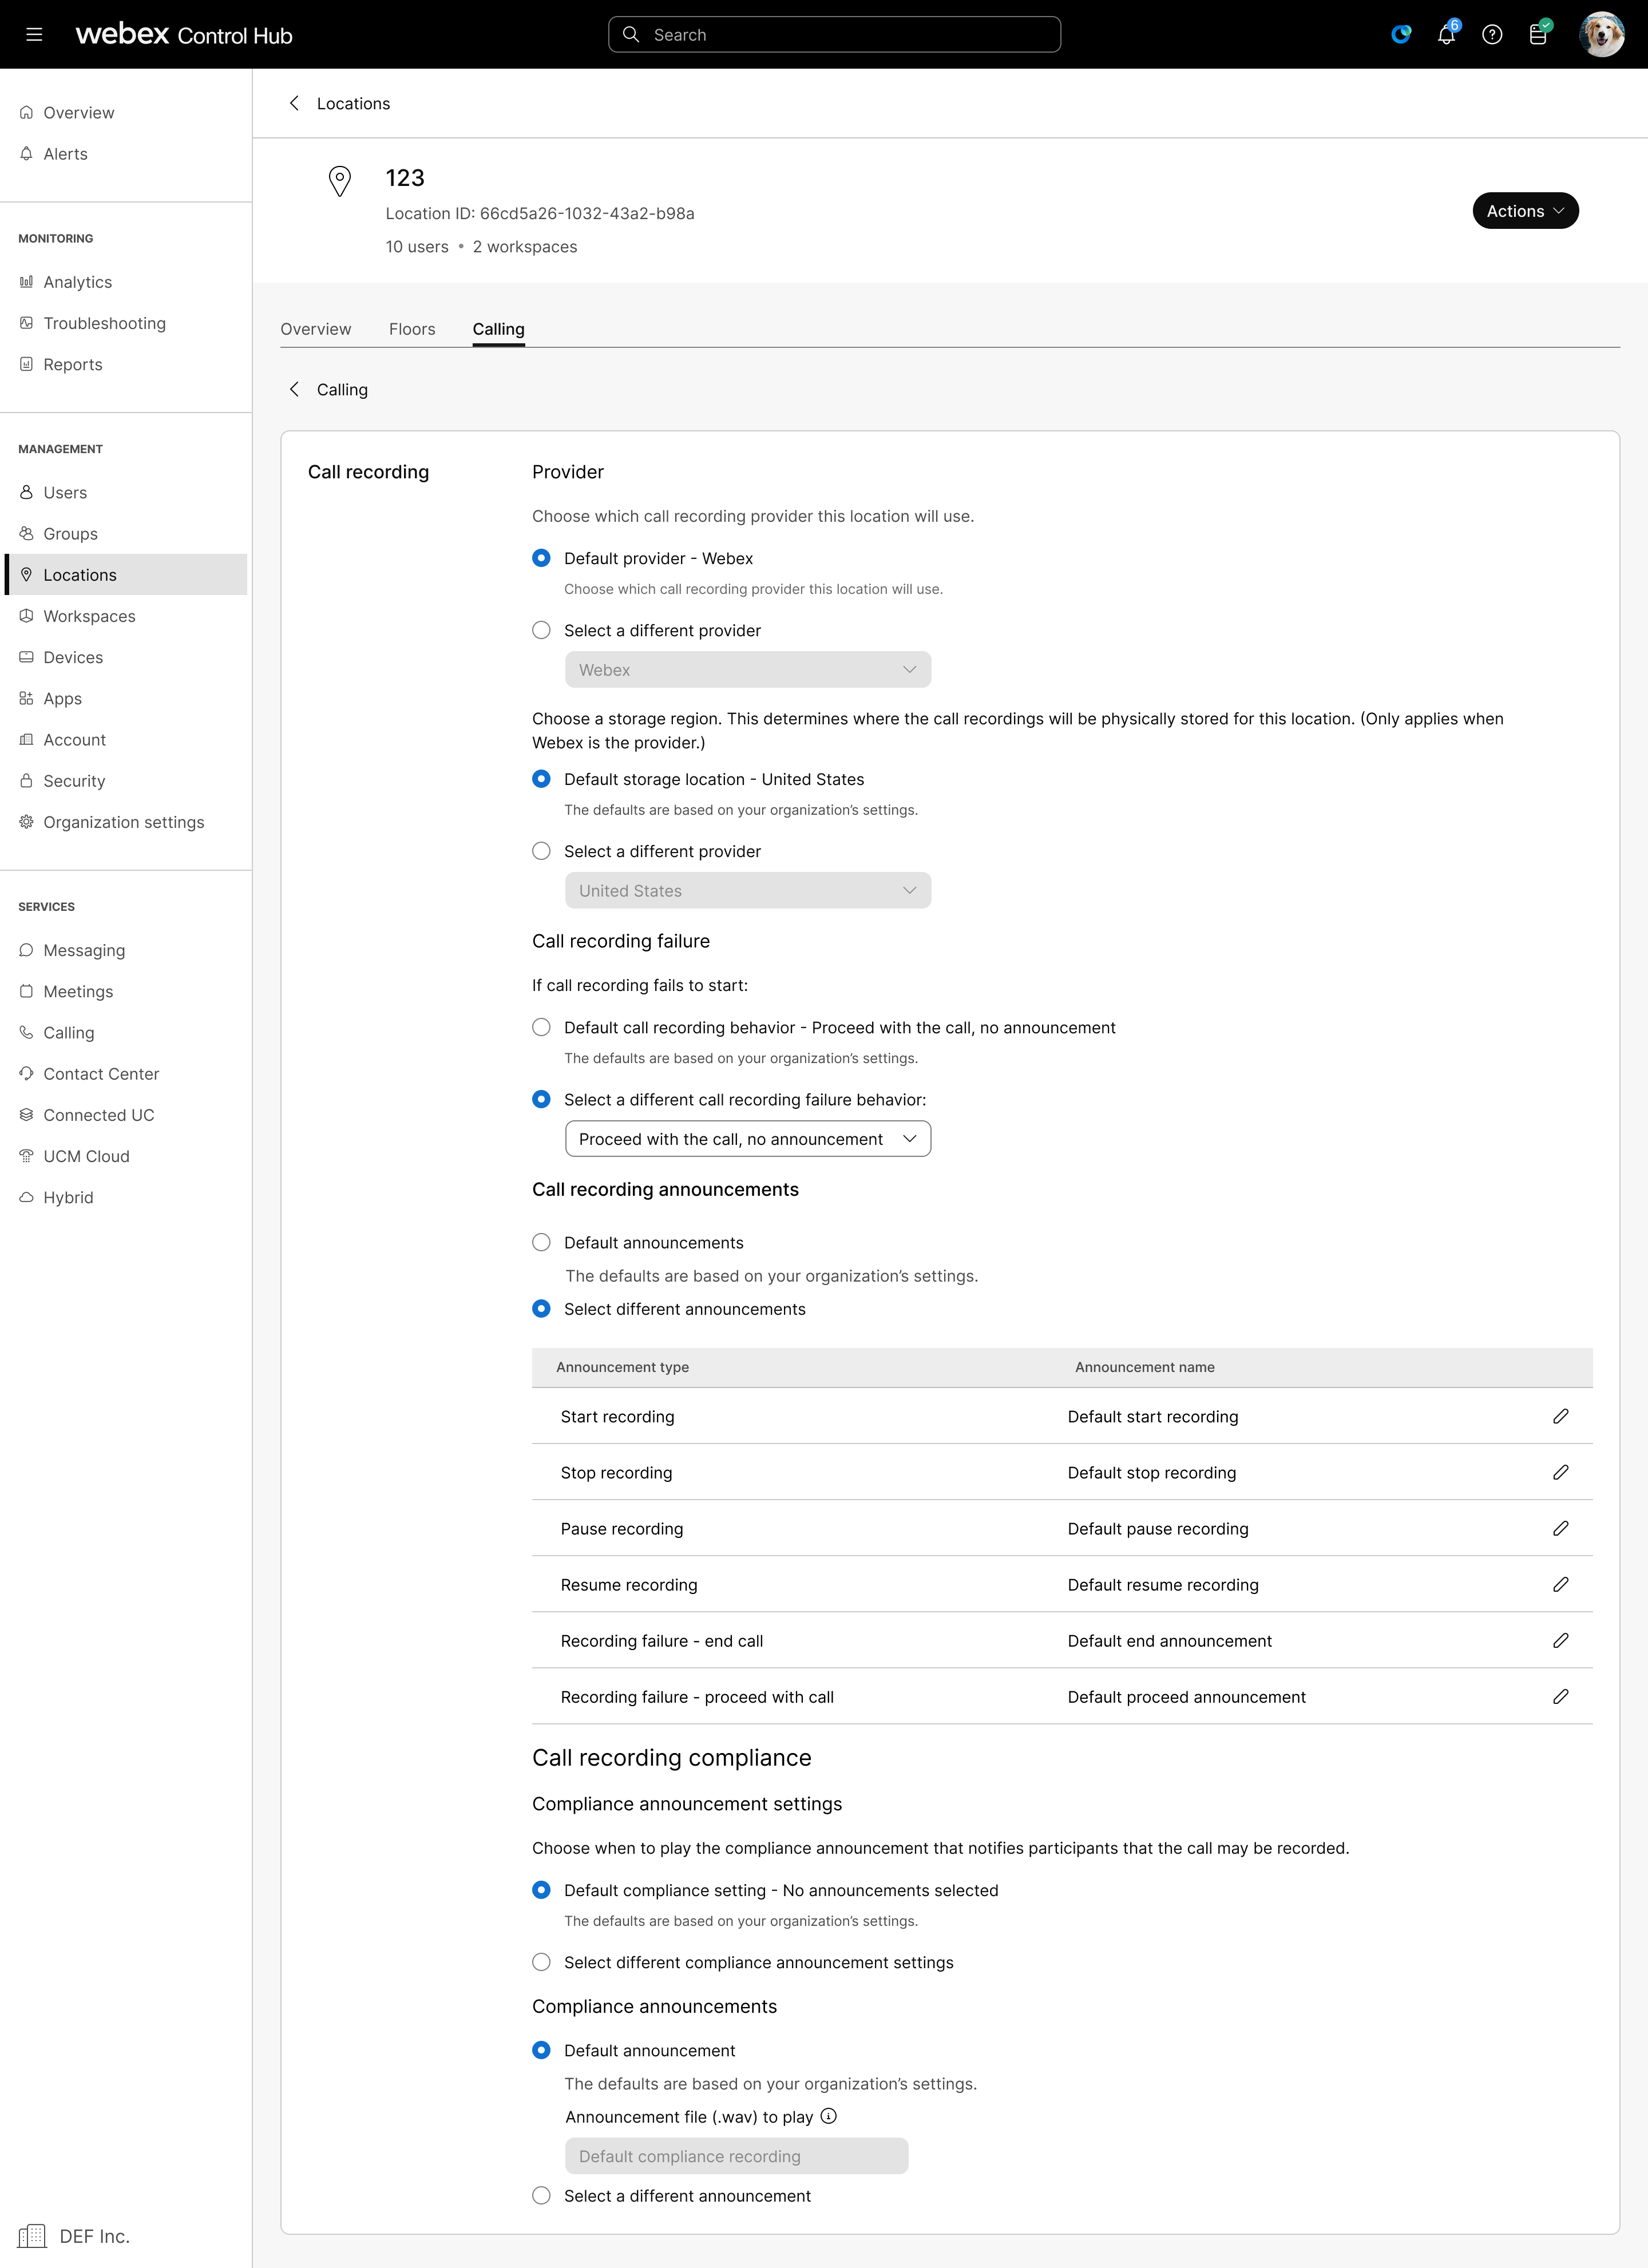 |
| 5 |
コンプライアンスアナウンス設定 で、以下のいずれかのオプションを有効にしてください。
|
| 6 |
通話録音アナウンスで、この場所で録音イベントの音声をどのように処理するかを選択します。
|
| 7 |
コンプライアンスに関するお知らせでは、以下のいずれかのオプションを選択できます。
|
| 8 |
[保存] をクリックします。 |
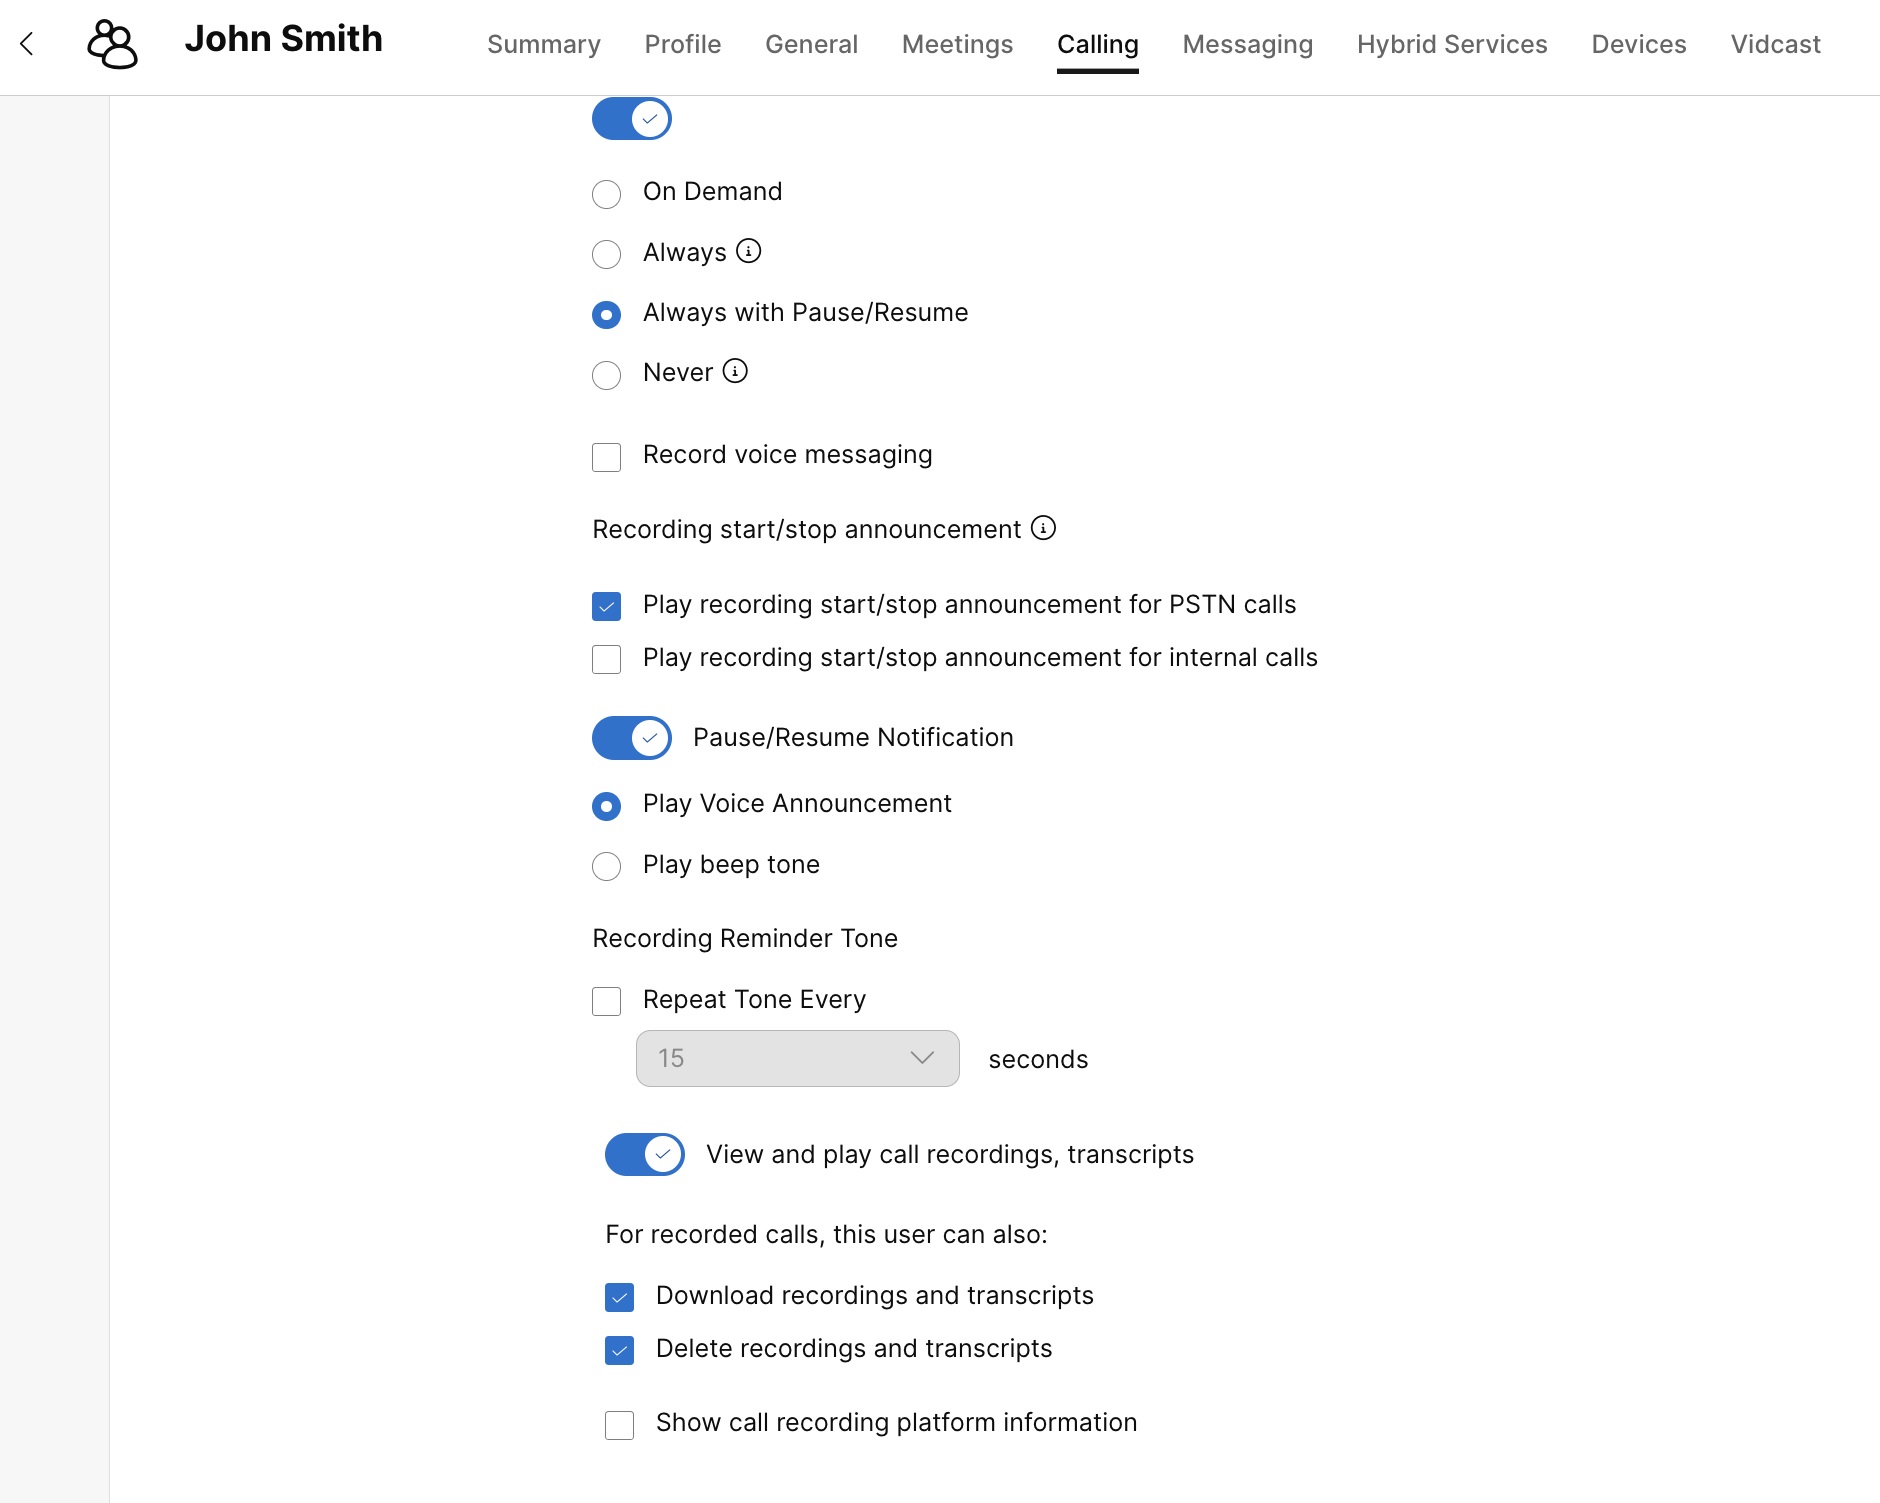
Webex Callingのユーザーとワークスペースで通話録音を有効にする
開始する前に
-
ユーザーには、プロフェッショナルまたはスタンダードのWebex Callingユーザーライセンスが割り当てられていることを確認してください。
-
ワークスペースにプロフェッショナル版Webex通話ライセンスが割り当てられていることを確認してください。
-
Control Hubで通話録音を有効にする管理者は、Dubberアカウントでも管理者の役割を割り当てられます。この管理者は Dubber ポータルを使用して他の管理者を追加したり、Dubber ライセンスを再割り当てすることができます。
| 1 |
それぞれのパスに移動してください。
|
| 2 |
通話録音をオンにする。 ユーザーの通話録音設定がクリアされました。この変更以前に録音された通話は、引き続き通話録音プロバイダーのプラットフォーム上に保存されます。 Dubberアカウントの場合、ユーザープロビジョニングは自動化されています。通話録音機能をユーザーに有効化した管理者も、Dubberアカウントの管理者として追加されます。この管理者は Dubber ポータルを使用して他の管理者を追加したり、Dubber ライセンスを再割り当てすることができます。 Control Hubは、Dubberを除き、通話録音プロバイダーのユーザーを自動的にプロビジョニングしません。他のプロバイダーによっては、ユーザーを通話録音プロバイダーのアカウントに同期させるためのツールを提供している場合があります。 パートナー管理者が顧客向けに通話録音機能を有効にした場合、同一のパートナー管理者ユーザーが複数の顧客アカウントで同じ機能を使用することはできません。 スタンダードライセンスを持つユーザーの場合、ユーザーに関連付けられた場所でWebexが通話録音プロバイダーとして設定されている場合に、Control Hubに通話録音オプションが表示されます。 通話録音オプションは、場所の通話録音プロバイダーがデフォルトの組織通話録音プロバイダーに設定され、かつ組織通話録音プロバイダーがWebex通話録音プロバイダーに設定されている場合にのみ、ユーザーに表示されます。 |
| 3 |
通話録音を有効にした後も、通話録音に問題が発生する場合は、 通話録音プラットフォーム情報の表示 セクションに記載されている情報を使用して、通話録音サポートプロバイダーに問い合わせることができます。 ユーザーページから、 ワークスペースページから、 |
| 4 |
以下のいずれかの設定を構成してください。
|
| 5 |
[保存] をクリックします。 |
次に行うこと
通話録音管理ポータルからユーザーに問題が発生した場合は、以下の情報が正しいことを確認してください。
-
製品— 製品を選択してください。
-
外部タイプ— BroadWorks を入力します。
-
サービスプロバイダー—コントロールハブから対応する値をコピーして貼り付けます。
-
外部グループ—コントロールハブから対応する値をコピーして貼り付けます。
-
外部識別子—コントロールハブから対応する値をコピーして貼り付けます。
その後、[変更を保存] をクリックします。
さらにサポートが必要な場合は、ご利用の通話録音サービスプロバイダーのサポートチームにお問い合わせください。
Webex通話プロバイダーの録音にアクセスする
通話録音にアクセスするには、以下の手順を実行してください。
開始する前に
通話の下の 録音 タブを表示するには、組織が Webex Calling ライセンスを所有していることを確認してください。
-
組織に Webex Calling の権限があるが、録音が OFFになっている場合、 録音 タブが表示され、録音が OFFであるというメッセージが表示されます。
-
通話録音機能が有効になっている場所では、検索結果は表示されません。
| 1 | |
| 2 |
を呼び出し、 機能を選択します。 |
| 3 |
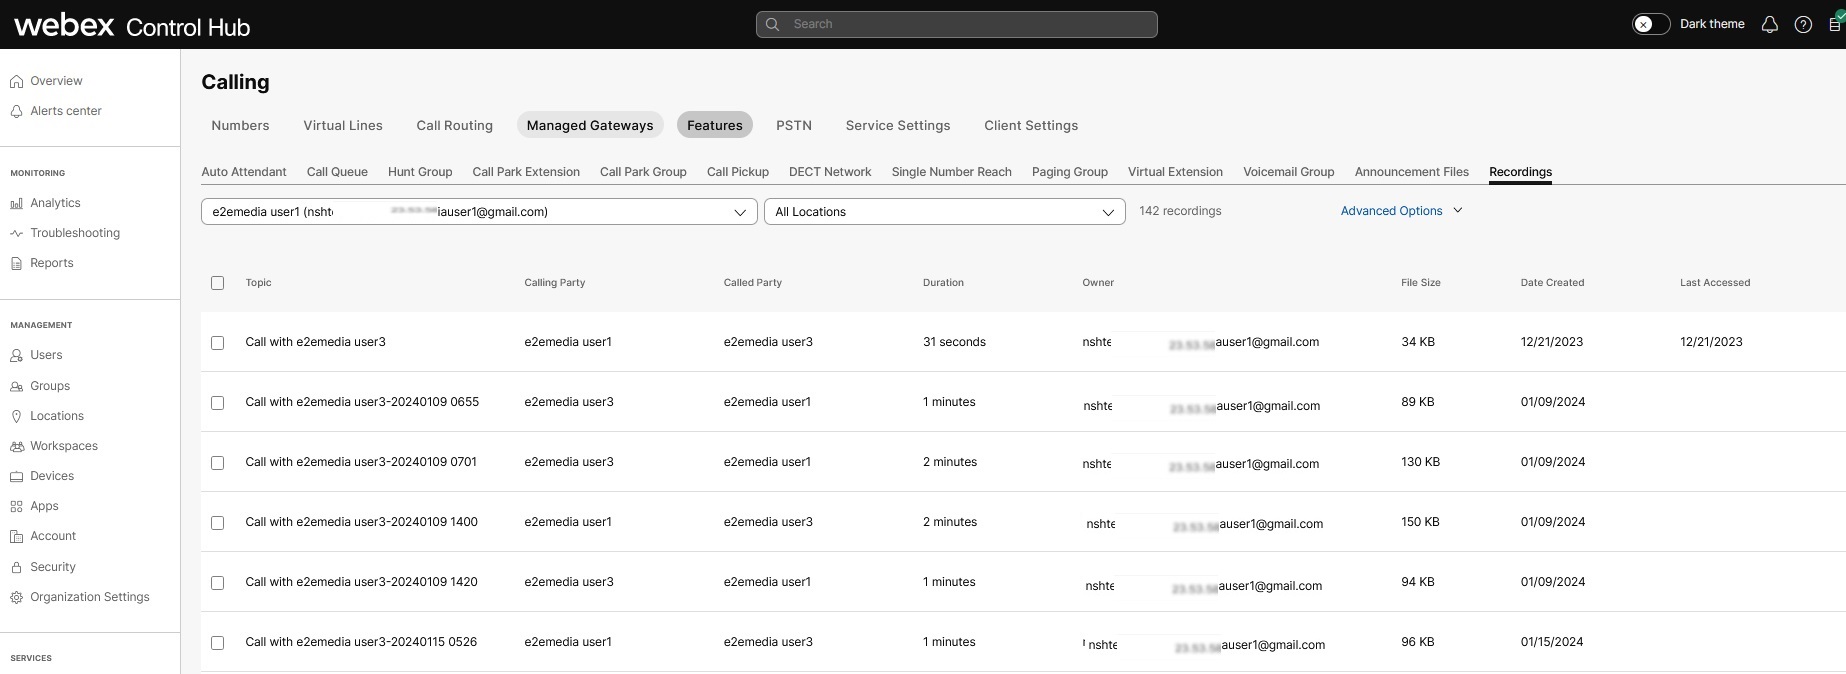
録音 タブを選択すると、録音ランディングページが表示されます。検索フィールドを使って、お好みの録音を探してください。 管理者が検索を開始するまで、ランディングページには最初はレコードが表示されません。検索モードは2種類から選択できます。
シンプルな検索フィールドを使用して、名前またはメールアドレスに基づいて、ユーザーに関連付けられた録音を検索できます。この検索では所有者のすべての録音データが取得されますが、表示されるのは最初の100件のみです。残りの録音を見るには、下にスクロールしてください。 録音の生成時間は、ファイルサイズと帯域幅によっては、 録音 タブに表示されるまでに最大 24 時間かかる場合があります。 発信者にカーソルを合わせると、発信に使用されたPSTN番号または内線番号が表示されます。
録音 ページには、以下の詳細を含む通話の一覧が表示されます。
|
| 4 |
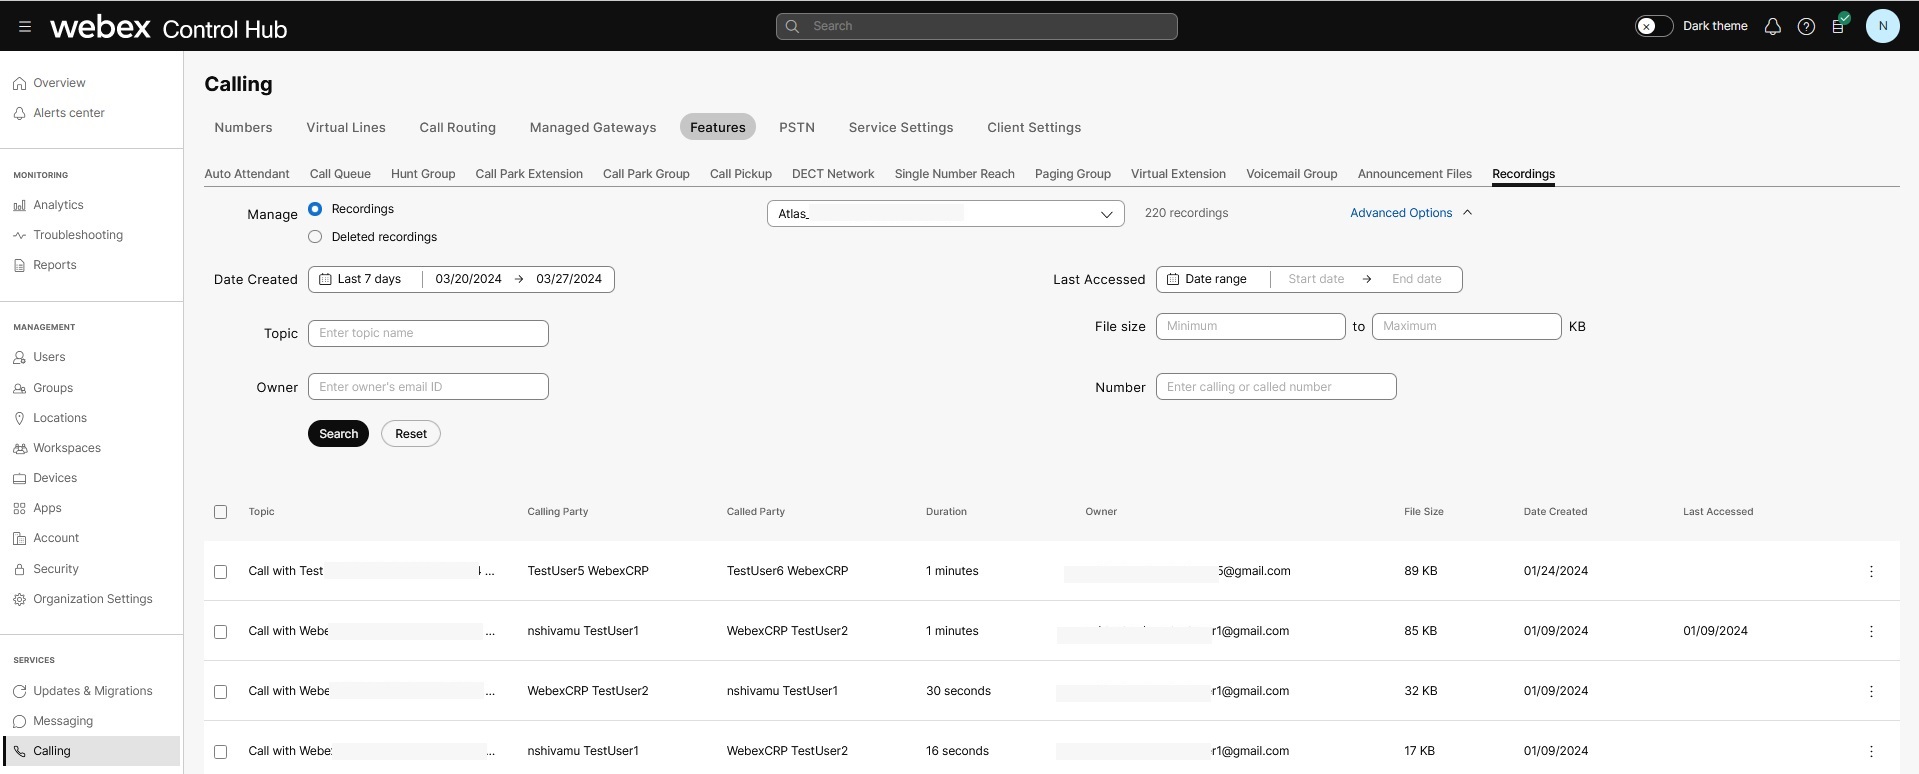
検索条件を絞り込むには、 詳細オプション をクリックしてください。 Recordings リポジトリがチェックされていることを確認してください。 詳細オプションを使用して、以下を指定してください。
デフォルトでは、過去 7 日間に保存された通話記録が 詳細 検索オプションに表示されます。 Webexの通話録音は、録音日から1年間利用可能です。
デフォルトでは、場所フィールドは すべての場所に設定されています。 通話録音を表示したり、録音、削除済み録音、消去済み録音でフィルタリングしたりできます。 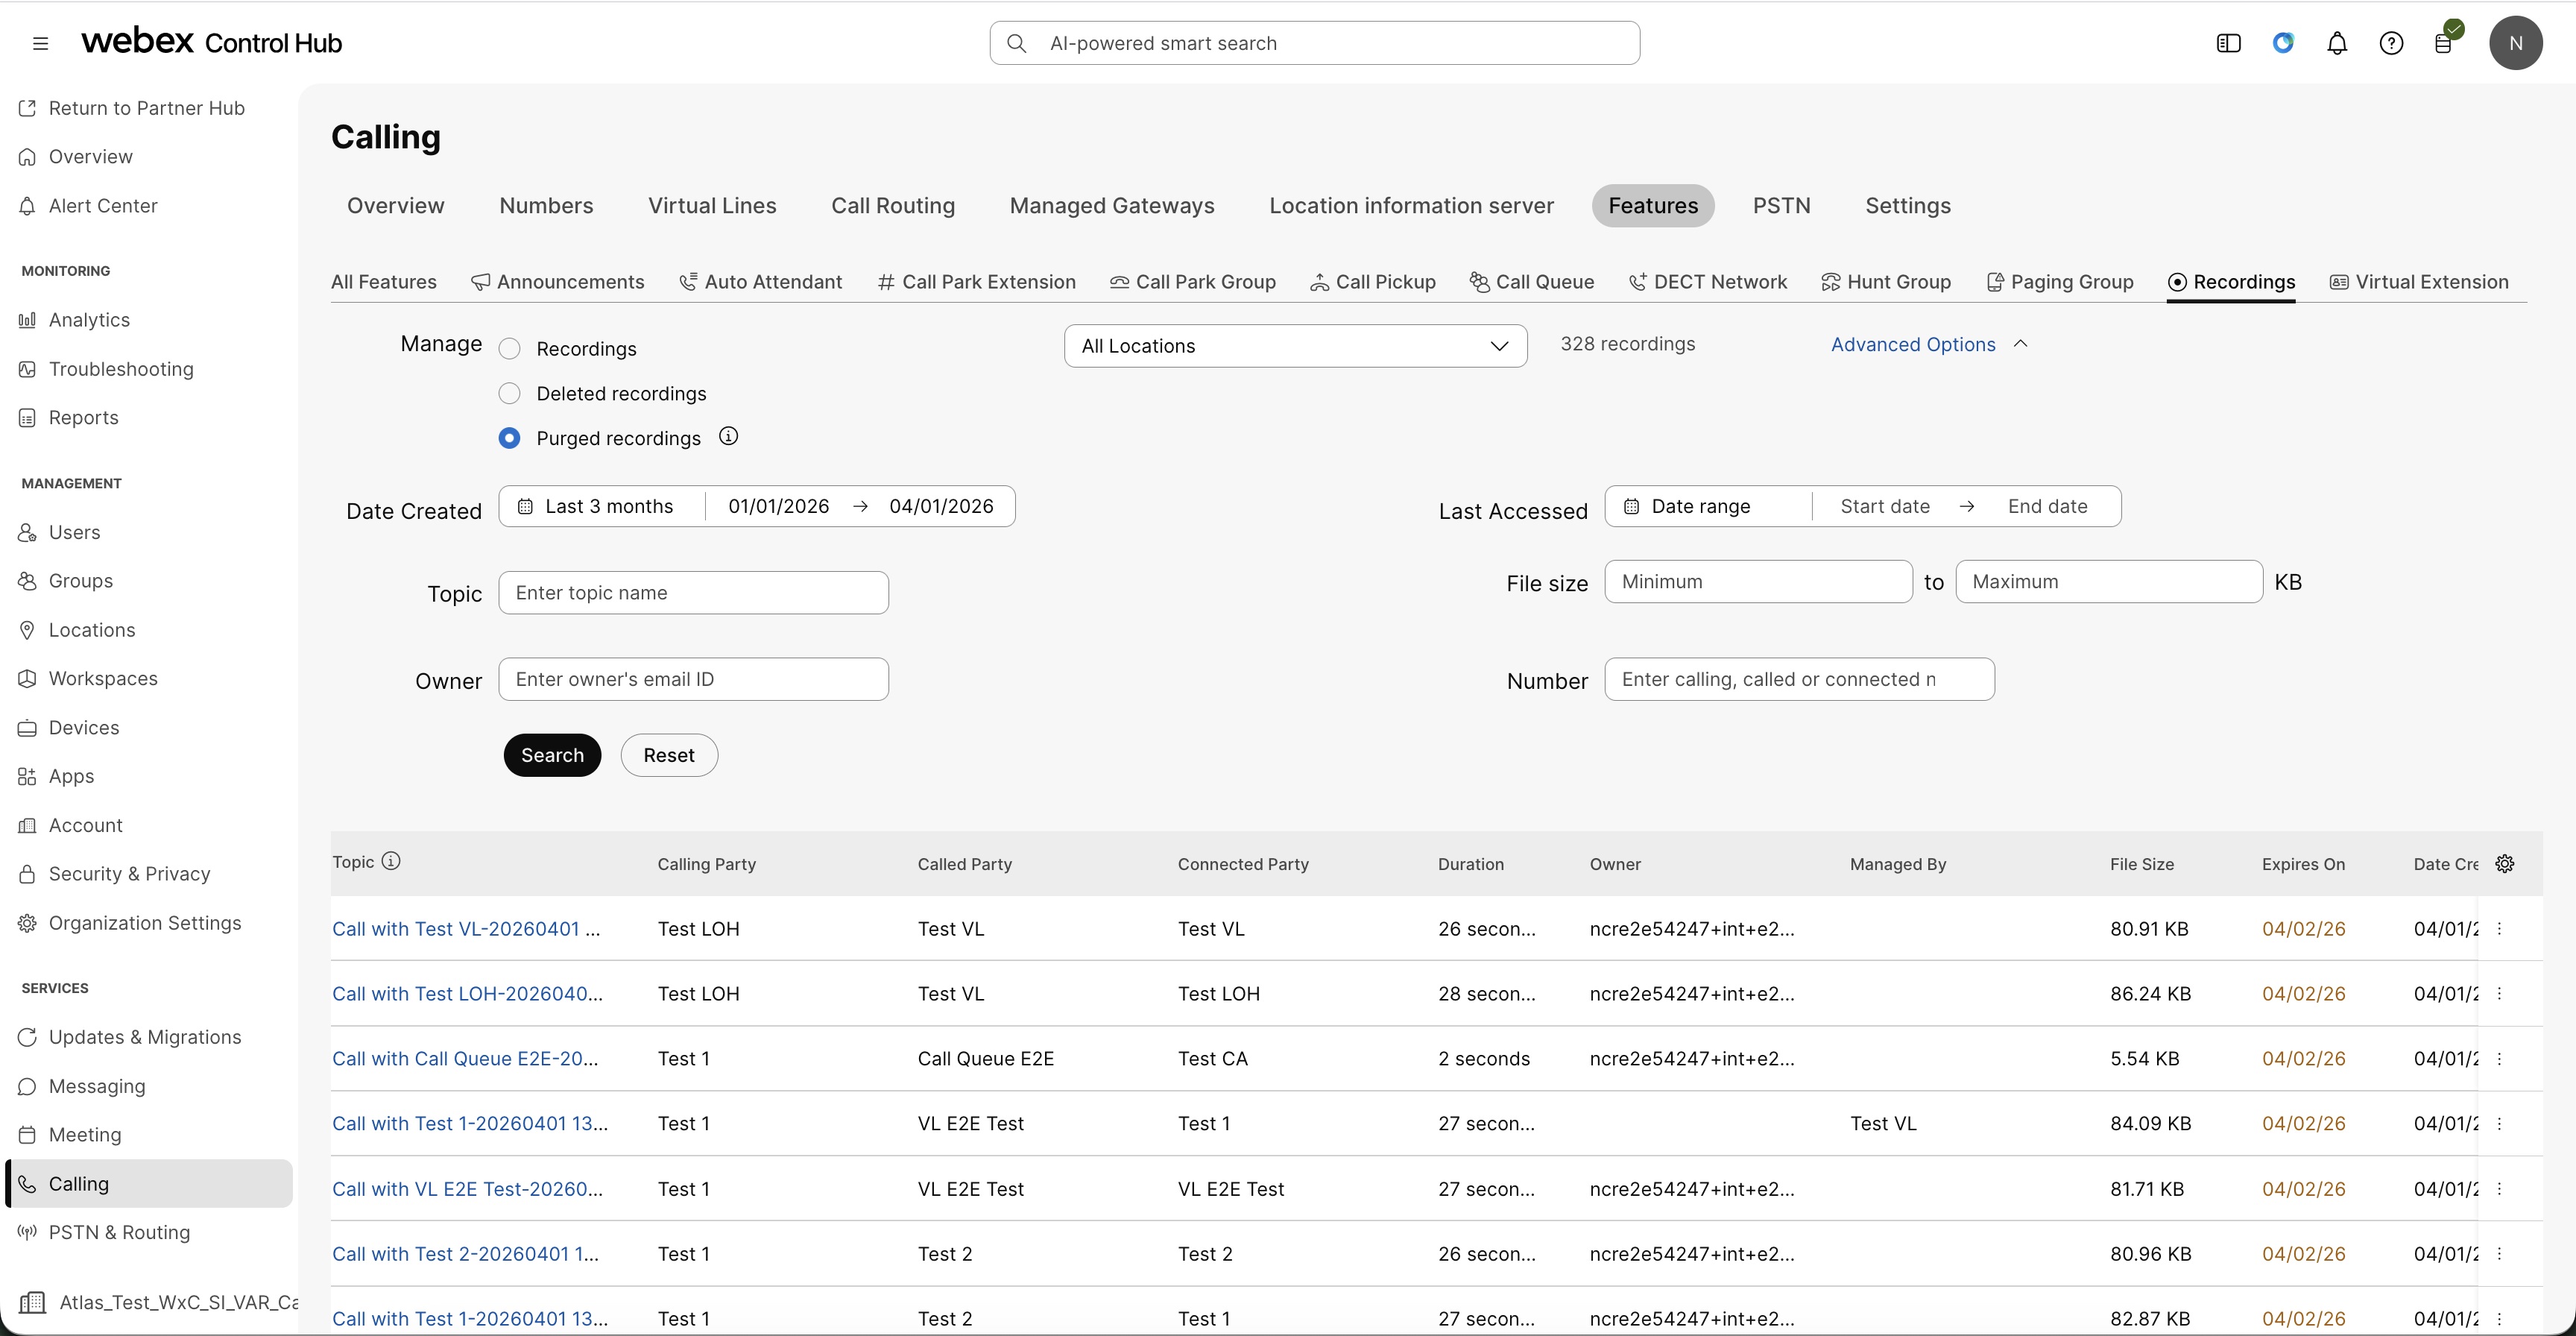 |
| 5 |
検索 をクリックすると、選択内容に基づいて録音を検索できます。 |
| 6 |
リストから録音を選択すると、 アクション バーが表示されます。サポートされている操作は以下のとおりです。
複数の録音を選択するには、 すべて選択 オプションを使用します。録音データが複数ある場合は、最初の200件が選択されます。
|
| 7 |
その操作に対して警告メッセージが表示されます。リクエストを削除またはキャンセルすることができます。 |
緊急通話を録音
管理者として、緊急通報の録音を有効または無効にすることで、インシデント分析の改善や組織内でのトレーニング強化を図ることができます。コントロールハブで緊急通報録音設定を管理し、組織のポリシーおよび規制要件を満たしましょう。
詳細については、 緊急通話録音を参照してください。
コンプライアンス担当者として通話録音を管理する
コンプライアンス担当者のアクセス権を持つ完全な管理者として、通話録音画面から録音を ダウンロードしたり 、 再生 したりできます。この機能はWebexの通話録音用です。コントロールハブから統合プレーヤーを起動して、録音したファイルを再生できます。
役割にコンプライアンス責任者権限を持つフル管理者権限が付与されているかどうかを確認するには、以下の手順に従ってください。
| 1 | |
| 2 |
管理画面の ユーザー に移動してください。 ユーザーウィンドウが表示されます。アクセス詳細を表示するには、リストからユーザーを選択してください。
|
| 3 |
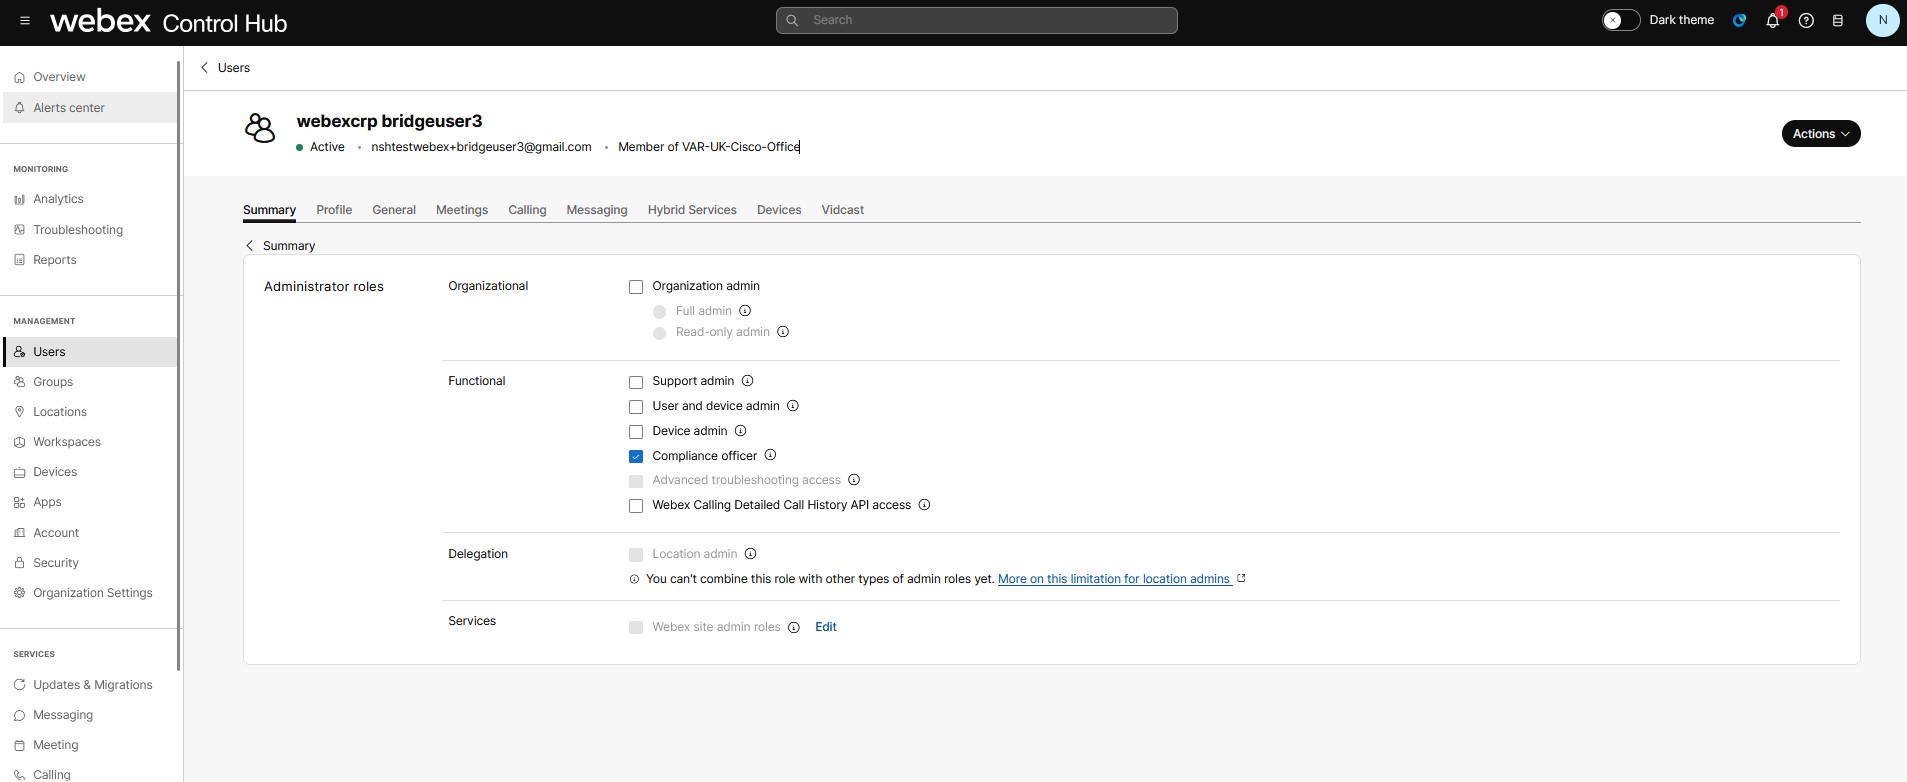
概要 タブで、 管理者ロールまでスクロールします。管理者ロールをクリックすると、権限が表示されます。 「機能」で 「コンプライアンス担当者 」オプションがチェックされている場合、ユーザーは録音を再生およびダウンロードする権限を持ちます。
ユーザーがフル管理者であることを確認し、 コンプライアンス担当者 の役割を確認してください。それ以外の場合は、 フル管理者 と コンプライアンス担当者 オプションを選択して、通話録音を管理してください。
パートナー管理者は、コンプライアンス担当者の役割を割り当てることはできません。したがって、パートナー管理者としての経験は、管理者としての経験とは異なります。 |
通話録音をダウンロードして再生する
コンプライアンス担当者であれば、録音をダウンロードして再生することができます。
| 1 | |
| 2 |
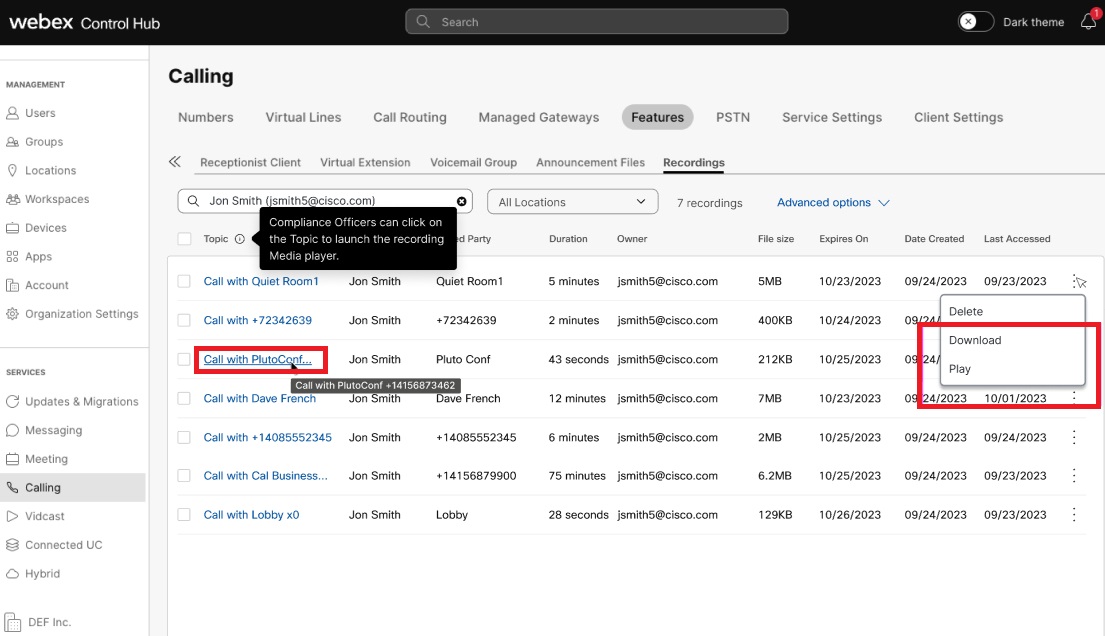
「サービス」の 「呼び出し 」に移動してください。 。 録音ウィンドウには、以下の情報が表示されます。録音内容、発信者と着信者の詳細、所有者情報、および通話録音時間。また、通話録音に使用されるデータストレージ、ファイルサイズ、およびデータが削除される有効期限も表示されます。 「有効期限」列は、保持ポリシーの設定に基づいた有効期限を示します。詳細については、 保持の呼び出しを参照してください。録音データの有効期限が近づくと、その日付がオレンジ色で表示され、組織の管理者に録音データの削除が近づいていること、そして適切な対応が必要であることを知らせます。 コンプライアンス担当者であれば、録音をクリックして統合プレーヤーで再生できます。
|
| 3 |
録音に対応する行の コンプライアンス担当者として、メニューまたはハイパーリンクから ダウンロード を選択すると、録音がダウンロードされます。ブラウザによっては、管理者にダウンロードの通知が届きます。 再生 オプションを選択すると、ブラウザに新しいウィンドウが開き、通話録音が表示されます。 再割り当て オプションを選択すると、 録音所有者の再割り当て ウィンドウが表示され、この録音の所有者として割り当てるユーザーを選択できます。 コンプライアンス担当者の権限を持たない管理者は 、削除 と 再割り当て のオプションのみを表示できます。ユーザーは録音を再生できないため、トピック名がハイパーリンクになっていることに気づけず、 再生 操作の説明情報アイコンも表示されません。 複数の録音を再割り当てまたは削除するには、録音を選択して 再割り当て または 削除をクリックします。複数の録音を選択するには、 すべて選択 オプションを使用することもできます。録音データが複数ある場合は、最初の200件が選択されます。 |
 アイコンをクリックすると、
 Webex通話プロバイダーによって録音された通話の文字起こしを生成します。
録音された通話の自動文字起こしを設定できます。ユーザーは、Webexアプリまたはユーザーハブから録音を再生する際に、プレーヤー内で文字起こしを確認できます。
FedRAMPでは現在、文字起こしにおける話者識別機能はサポートされていません。
開始する前に
- 文字起こしデータは、Webexの通話録音サービスによって録音された通話のみ利用可能です。
- 通話内容の文字起こしは、通話が英語で行われた場合にのみ利用可能です。
組織レベルでトランスクリプトを有効にする
ユーザー、ワークスペース、または仮想回線レベルでトランスクリプトを有効にする
個々のユーザー、ワークスペース、または仮想回線レベルの設定は、組織レベルの設定よりも優先されます。ユーザー、ワークスペース、または仮想回線に対してこれらの設定を構成する際に、それぞれのレベルでさらに詳細な変更を行うことができます。これらの個別の設定は、組織のデフォルト設定に自動的に戻ることはありません。
| 1 | |
| 2 |
それぞれのパスに移動してください。
|
| 3 |
トグルをスライドして、 通話録音を有効にします。 |
| 4 |
トグルをスライドして、 トランスクリプトの生成を有効にします。
文字起こし生成 のトグルが表示されない場合は、ユーザーまたは場所のアナウンス言語を英語に変更してください。 言語を更新するには:
|
| 5 |
ユーザー、ワークスペース、または仮想回線がトランスクリプトを表示、ダウンロード、削除できるようにするには、 通話録音、トランスクリプトの表示と再生を有効にしてから、 録音とトランスクリプトのダウンロード と 録音とトランスクリプトの削除を選択します。 文字起こしの表示、ダウンロード、削除のオプションは、 文字起こしの生成を有効にした場合にのみ表示されます。 通話録音、トランスクリプトの表示と再生を無効にすると、ユーザーは通話録音とトランスクリプトにアクセスできなくなります。 |
| 6 |
[保存] をクリックします。 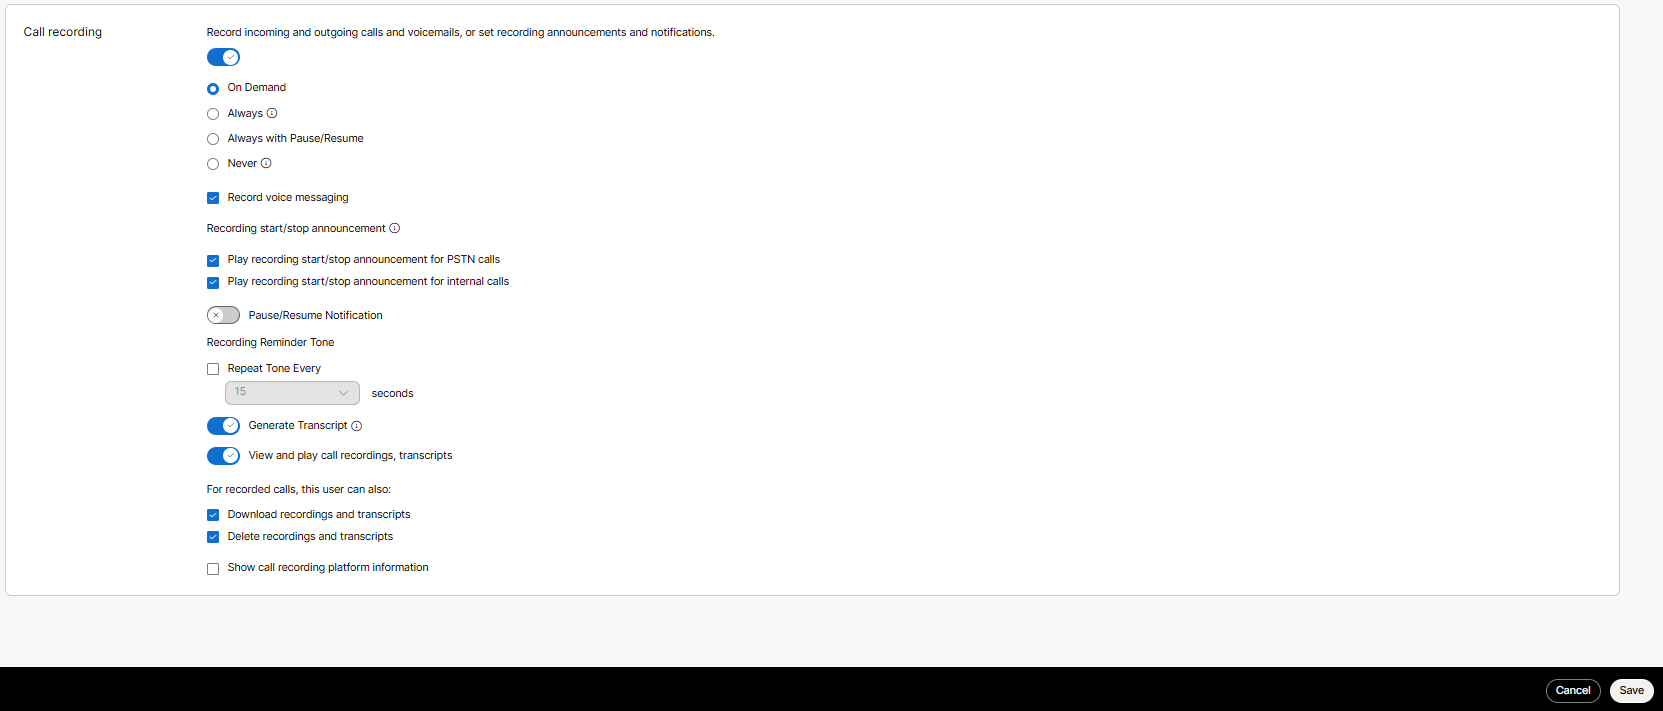 |
仮想回線の通話録音
管理者として、仮想回線の通話録音を有効にすることができます。仮想回線は、デスクフォンやWebexアプリなどのユーザーデバイスまたはワークスペースデバイスに、追加回線として追加されます。仮想回線は、ユーザーまたはワークスペースの主回線で利用可能なすべての通話録音オプション(視覚的および音声による通知を含む)をサポートしています。仮想回線での通話は、Dubber、Imagicle、CallCabinetなどの提携通話録音サービスを使用して録音されます。仮想回線で録音された通話にアクセスするには、これらの通話録音サービスから追加のライセンスを購入する必要がある場合があります。詳細については、ご利用の通話録音サービスプロバイダーにお問い合わせください。
仮想回線では、通話録音はデフォルトで無効になっています。仮想回線で通話録音を有効にする前に、組織レベルまたは場所レベルで、仮想回線に関連付けられた通話録音プロバイダーを選択してください。
Control Hubは、サードパーティの通話録音プロバイダーであるDubberと連携しています。仮想回線で通話録音が有効になっていて、割り当てられたユーザーが通話録音を有効にしていない場合、Dubberはそのユーザーのアカウントを自動的に作成します。
仮想回線の通話録音にアクセスするには、管理者はDubber管理ポータルでチームを作成する必要があります。仮想回線に関連付けられたDubポイントは、チームの貢献者として設定する必要があります。録音を聞く必要がある他のユーザーは、そのチームのリスナーとして設定する必要があります。詳細については、 ダバーサポートにお問い合わせください。
他の通話録音プロバイダーを利用している場合は、仮想回線の録音にアクセスするには、該当する通話録音プロバイダーのドキュメントを参照するか、サポートチームにお問い合わせください。
サードパーティの通話録音サービスとしてImagicleを使用している場合、Control Hubは仮想回線の通話録音用のアカウントを自動的に作成しません。Imagicleポータルにアクセスしてアカウントを作成してください。詳細については、 Imagicle サポート にお問い合わせください。
サードパーティの通話録音サービスとしてCallCabinetを使用している場合、Control Hubは仮想回線の通話録音用のアカウントを自動的に作成しません。CallCabinetポータルにアクセスしてアカウントを作成してください。詳細については、CallCabinet サポート にお問い合わせください。
CallCabinetの通話録音ソリューションは、米国リージョンでホストされているWebex Callingのお客様にご利用いただけます。他の地域でも間もなく利用可能になります。
サードパーティの通話録音サービスとしてEleveoを使用している場合、Control Hubは仮想回線の通話録音用のアカウントを自動的に作成しません。Eleveoポータルにアクセスしてアカウントを作成してください。詳細については、Eleveo サポート にお問い合わせください。
MiaRecプラットフォームを使用して組織の通話を録音するには、 https://app.miarec.com でMiaRecアカウントを作成してください。詳細については、 MiaRec サポート にお問い合わせください。
Control Hubは、ユーザーが通話録音を有効にした場合でも、MiaRecアカウントを自動的に作成しません。
MiaRecの通話録音ソリューションは、米国リージョンでホストされているWebex Callingのお客様にご利用いただけます。
前提条件
仮想回線での通話録音に関して、注意すべき重要な点は以下のとおりです。
-
仮想回線での通話録音にアクセスするには、提携先の通話録音サービスの追加ライセンスが必要です。
-
Webexアプリユーザーに割り当てられた仮想回線の場合、現在、通話録音は 常時 録音モードでサポートされています。ただし、その他の録音モードも間もなく利用可能になります。
仮想回線の通話録音を有効にする
| 1 |
。 |
| 2 |
仮想回線を選択してください。 |
| 3 |
通話をクリックし、 ユーザー通話エクスペリエンスまでスクロールして、 通話録音をオンにします。 Control Hubは、Dubberを除き、通話録音プロバイダーのユーザーやワークスペースを自動的にプロビジョニングしません。他のプロバイダーによっては、ユーザーを通話録音プロバイダーのアカウントに同期させるためのツールを提供している場合があります。 通話録音をオフにすると、通話録音の設定がクリアされます。この設定変更前に録音された通話は、引き続き通話録音プロバイダーのプラットフォームに保存されます。 |
| 4 |
通話録音を有効にした後、ユーザーまたはワークスペースで通話録音に関する問題が発生した場合は、通話プロバイダーのサポートにお問い合わせください。サポート情報は 通話録音プラットフォーム情報の表示で確認できます。 |
| 5 |
通話録音の設定を行います。詳細については、 Webex Calling ユーザーとワークスペースの通話録音を有効にするに記載されている通話録音設定を参照してください。 |
| 6 |
[保存] をクリックします。 |
次に行うこと
さらにサポートが必要な場合は、通話録音サービスプロバイダーのサポートにお問い合わせください。
通話録音の動作
-
ユーザーは、マルチプラットフォーム電話(MPP)とWebexアプリに、通話が録音されていることを示すアイコンが表示されます。
-
オンデマンド録音モードが有効になっているユーザーとワークスペースには、録音を開始するためのソフトキー(ボタン)が表示されます。
-
オンデマンドと常時接続のユーザーとワークスペース Pause/Resume ユーザーの設定が有効になっている場合、録音を一時停止および再開するためのソフトキー(ボタン)を動的に表示します。
-
通話が録音されている場合、2つのストリームが通話録音プロバイダーに送信されます。
-
開始、停止、一時停止、または再開操作中にアナウンスが再生されると、Webex Calling はアナウンスが再生されたことを SIPREC メタデータ メッセージとして通話録音プロバイダーに送信します。
-
ICE(メディア最適化)機能と通話録音機能は、それぞれ単独でも通話開始時にわずかな音声遅延を引き起こしますが、両方を同時に使用すると、音声遅延がわずかに長くなり、顧客にとってより顕著になります。
認定録音プロバイダーによるWebexのコンプライアンス対応通話録音
Webexには通話録音機能が内蔵されているほか、Cisco認定のサードパーティ製通話録音ソリューションを選択できるオプションも用意されています。内蔵の通話録音機能により、サードパーティがWebexクラウドから録音データを自社プラットフォームに取得できる統合アプリケーションを構築するためのAPIが提供されます。これらのアプリは必ずしもシスコの認証を受けているとは限りません。
Cisco認定の通話録音ソリューションは、さまざまなコンプライアンス録音機能を提供するように特別に設計されています。これらのソリューションは、録音プロバイダーとシスコの両方によってテストおよび検証されており、Webexのお客様は特定のコンプライアンス要件を満たす高品質の録音ソリューションを利用できます。このソリューションでは、録音データは録音プロバイダーのクラウド上で直接管理および保存されます。このソリューションは、Webexクラウドと録音プロバイダーのクラウドを直接接続することで、録音データの安全な送信を保証します。
以下の録音プロバイダーは、Webex Callingで認証済みです。
|
プロバイダー |
Webサイト |
|---|---|
|
Call Cabinet |
|
|
Dubber |
|
|
Eleveo |
|
|
Imagicle |
|
|
MiaRec |


