- Home
- /
- Article

Thanks for your feedback.

 In this article
 Feedback?
The Webex for Cisco BroadWorks Solution Guide is aimed at partner-level administrators. The guide describes how to set up and deploy Webex for Cisco BroadWorks. Webex for Cisco BroadWorks provides your BroadWorks calling customers with Webex collaboration features. Subscribers use a single application (the Webex App) to take advantage of features provided by both platforms.
Introducing Webex for Cisco BroadWorks
This section addresses system administrators at Cisco partner organizations (service providers) who implement Webex for their customer organizations or provide this solution directly to their own subscribers.
Solution Purpose
-
To provide Webex cloud collaboration features to Small and Medium customers who already have calling service provided by BroadWorks Service Providers.
-
To provide BroadWorks based calling service to small and medium Webex customers.
Context
We’re evolving all our collaboration clients towards a unified application. This path reduces adoption difficulties, improves interoperability and migration, and delivers predictable user experiences across our entire collaboration portfolio. Part of this effort is to move the BroadWorks calling capabilities into the Webex App, and eventually reduce investment in the UC-One clients.
Benefits
-
Future proofing: against End-of-life of UC-One Collaborate, movement of all clients towards the Unified Client Framework (UCF)
-
Best of both: Enabling Webex Messaging and Meeting features while retaining BroadWorks calling on your telephony network
Solution Scope
-
Existing / new small to medium customers (fewer than 250 subscribers) who want a suite of collaboration features, may already have BroadWorks calling.
-
Existing small to medium Webex customers looking to add BroadWorks Calling.
-
Not larger enterprises (Please review our Enterprise portfolio for Webex).
-
Not single users (Please evaluate Webex Online offers).
The feature sets in Webex for Cisco BroadWorks target small to medium business use cases. The Webex for Cisco BroadWorks packages are designed to reduce complexity for SMBs, and we constantly evaluate their suitability for this segment. We may choose to hide or remove features that would otherwise be available in the enterprise packages.
Prerequisites for Success with Webex for Cisco BroadWorks
|
# |
Requirement |
Notes |
|---|---|---|
|
1 |
Patch Current BroadWorks R22 or above | |
|
2 |
XSP|ADP for XSI, CTI, DMS, and authService |
Dedicated XSP|ADP for Webex for Cisco BroadWorks |
|
3 |
Separate XSP|ADP for NPS, can be shared with other solutions that use NPS. |
If you have an existing collaborate deployment, then review recommendations on XSP|ADP and NPS configurations. |
|
4 |
CI Token Validation (with TLS) configured for Webex connections to the Authentication Service. | |
|
5 |
mTLS configured for Webex connections to the CTI interface. |
Other applications do not require mTLS. |
|
6 |
Users must exist in BroadWorks and need the following attributes, depending on your provisioning decision:
|
For trusted emails: We recommend you put the same email address in the Alternate ID attribute as well, to enable users to sign in with email address against BroadWorks. For untrusted emails: Depending on the user’s email settings, the use of untrusted emails may result in the email getting sent to the user’s Junk or SPAM folder. The administrator may have to change the user’s email settings to allow domains |
|
7 |
Webex for Cisco BroadWorks DTAF file for Webex App | |
|
8 |
BW Business Lic or Std Enterprise or Prem Enterprise User Lic + Webex for Cisco BroadWorks Subscription |
If you have an existing collaborate deployment, you no longer need UC-One Add-On Bundle, Collab Lic, and Meet-me conference Ports. If you have an existing UC-One SaaS deployment, no additional changes other than accepting Premium Package terms. |
|
9 |
IP/Ports must be accessible through the Webex backend services and the Webex Apps over public internet. |
See the “Prepare your Network” section. |
|
10 |
TLS v1.2 Configuration on XSP|ADPs | |
|
11 |
For Flowthrough provisioning, the Application Server must connect out to the BroadWorks Provisioning Adapter. We do not test or support outbound proxy configuration. If you use an outbound proxy, you accept the responsibility for supporting it with Webex for Cisco BroadWorks. |
See the “Prepare your Network” topic. |
About this Document
The purpose of this document is to help you understand, prepare for, deploy, and manage your Webex for Cisco BroadWorks solution. The major sections in the document reflect this purpose.
This guide includes conceptual and reference material. We intend to cover all aspects of the solution in this one document.
The minimum set of tasks to deploy the solution are:
-
Reach your account team to become a Cisco Partner. It's imperative that you explore the Cisco touch points to familiarize yourself (and get trained). When you become a Cisco Partner, we apply the Webex for Cisco BroadWorks toggle to your Webex partner organization. (See Deploy Webex for Cisco BroadWorks > Partner Onboarding in this document.)
-
Configure your BroadWorks systems for integration with Webex. (See Deploy Webex for Cisco BroadWorks > Configure Services on Your Webex for Cisco BroadWorks XSP|ADPs in this document.)
-
Use Partner Hub to connect Webex to BroadWorks. (See Deploy Webex for Cisco BroadWorks > Configure your Partner Organization in Partner Hub in this document.)
-
Use Partner Hub to prepare User Provisioning Templates. (See Deploy Webex for Cisco BroadWorks > Configure your Onboarding templates in this document.)
-
Test and onboard a customer by provisioning at least one user. (See Deploy Webex for Cisco BroadWorks > Configure Your Test Organization.)
-
These are high-level steps, in the typical order. There are several contributing tasks that you can't ignore.
-
If you want to create your own applications to manage your Webex for Cisco BroadWorks subscribers, you should read Using the Provisioning API in the Reference section of this guide.
Terminology
We try to limit the jargon and acronyms used in this document, and to explain each term when it’s first used. (See Webex for Cisco BroadWorks Reference > Terminology if a term isn’t explained in context.)
How it Works
Webex for Cisco BroadWorks is an offer that integrates BroadWorks Calling in Webex. Subscribers use a single application (the Webex app) to take advantage of features provided by both platforms:
-
Users call PSTN numbers using your BroadWorks infrastructure.
-
Users call other BroadWorks numbers using your BroadWorks infrastructure (audio/video calls by selecting the numbers associated to the users or the dialpad to introduce the numbers).
-
Users can, alternatively, make a Webex VOIP Call over the Webex Infrastructure by selecting the option “Webex Call” on the Webex app. (These calls are Webex app to Webex app, not Webex app to PSTN).
-
Users can host and join Webex Meetings.
-
Users can message each other one to one or in spaces (persistent group chat), and benefit from features like search and file share (on Webex infrastructure).
-
Users can share presence (status). They can choose custom presence or client calculated presence.
-
After we onboard you as a Partner Organization in Control Hub, with the correct entitlements, you can configure the relationship between your BroadWorks instance and Webex.
-
You create customer organizations in Control Hub, and provision users in those organizations.
-
Each subscriber in BroadWorks gets a Webex identity based on their email address (Email ID attribute in BroadWorks).
-
Users authenticate against BroadWorks or against Webex.
-
Clients are issued with long-lived tokens to authorize them for services at BroadWorks and Webex.
The Webex App at the center of this solution; it’s a brandable application available on Mac/Windows desktops, and Android/iOS mobiles and tablets.
There’s also a web version of the Webex App that doesn't currently include calling features.
The client connects to the Webex cloud to deliver messaging, presence, and meetings features.
The client registers to your BroadWorks systems for calling features.
The Webex cloud works with your BroadWorks systems to ensure a seamless user provisioning experience.
Features and Limitations
We offer several packages with different features.
"Softphone" Package
This package type uses the Webex app as a softphone only client with calling capability, but no messaging capabilities. Users with this package type can join Webex meetings, but cannot start meetings on their own. When other users (softphone or non-softphone) search the directory for a softphone user, the search results provide no option to send a message.
Softphone users can share their screen while in a call.
"Basic" Package
The basic package includes Calling, Messaging, and Meeting features. It includes 100 participants in meetings. (** see the below Note for exception). In this package the meetings can have a maximum duration of 40 minutes.
"Standard" Package
This package also includes everything in the Basic package plus additional meeting features including Closed Captions, Real Time Transcription of 5 main languages, Cisco AI Assistant and polling & Q&A by Slido.
"Premium" Package
This package includes everything in the Standard package plus up to 300 participants in 'Unified Space' meeting and up to 1000 participants in a Personal Meeting Room (PMR), cloud recording of meetings and advanced messaging features that include the Cisco AI Assistant.
'Unified Space Meetings' refers to a Webex meeting (scheduled or unscheduled) that takes place in a Webex space. For example, a user initiates a meeting from the space via the 'Meet' or 'Schedule' buttons.
Compare Packages
|
Package |
Calling |
Messaging |
Unified Space Meetings |
PMR Meetings |
|---|---|---|---|---|
|
Softphone |
Included |
Not Included |
None |
None |
|
Basic |
Included |
Included |
100 participants |
100 participants |
|
Standard |
Included |
Included |
100 participants |
100 participants |
|
Premium |
Included |
Included |
300 participants |
1000 participants |
'PMR Meetings' refers to a Webex Meeting (scheduled or unscheduled) that takes place in a user's Personal Meeting Room (PMR). These meetings use a dedicated URL (for example: cisco.webex.com/meet/roomOwnerUserID).
Messaging and Meeting Features
Refer to the following table for PMR meeting feature support differences for Basic, Standard and Premium packages.
|
Meeting Feature |
Supported with Basic Package |
Suported with Standard Package |
Supported with Preminum Package |
Comment |
|---|---|---|---|---|
|
Meeting Duration |
40 Minutes or less |
24 Hours |
24 Hours | |
|
Desktop Sharing |
Yes |
Yes |
Yes | |
|
Application Sharing |
Yes |
Yes |
Yes | |
|
Multi-party Chat |
Yes |
Yes |
Yes | |
|
Whiteboarding |
Yes |
Yes |
Yes | |
|
Password Protection |
Yes |
Yes |
Yes | |
|
Web app - no downloading or plugins (Guest Experience) |
Yes |
Yes |
Yes | |
|
Support pairing with Webex Devices |
Yes |
Yes |
Yes | |
|
Floor control (Mute One / Expel All) |
Yes |
Yes |
Yes | |
|
Persistent Meetings link |
Yes |
Yes |
Yes | |
|
Meetings Site Acces |
Yes |
Yes |
Yes | |
|
Meeting Join via VoIP |
Yes |
Yes |
Yes | |
|
Locking |
Yes |
Yes |
Yes | |
|
Presenter Controls |
No |
No |
Yes | |
|
Remote Desktop Control |
Yes |
Yes |
Yes | |
|
Number of participants |
100 |
100 |
1000 | |
|
Recording saved locally in the system |
Yes |
Yes |
Yes | |
|
Recording in the cloud |
No |
No |
Yes | |
|
Recording - Cloud Storage |
No |
No |
10GB per site | |
|
Recording transcriptions |
No |
No |
Yes | |
|
Meeting Scheduling |
Yes |
Yes |
Yes | |
|
Enable Content sharing with External Integrations |
No |
No |
Yes | |
|
Allow PMR URL change |
Yes |
Yes |
Yes | |
|
Meetings Live Streaming (E.g., on Facebook, Youtube) |
No |
No |
Yes | |
|
Let other users to schedule meetings on their behalf |
No |
No |
Yes | |
|
Add alternate host |
Yes |
Yes |
Yes | |
|
App Integration (e.g. Zendesk, Slack) |
Depends on the integration |
Depends on the integration |
Yes |
See the App Integrations section below for more information on support. |
|
Integration with Microsoft Office 365 Calendaring |
Yes |
Yes |
Yes | |
|
Integration with Google Calendaring for G Suite |
Yes |
Yes |
Yes |
The Webex Help Center publishes the features and user facing documentation for Webex at help.webex.com. Read the following articles to learn more about the features:
Calling Features
The calling experience is similar to previous solutions that use the BroadWorks call control engine. The difference to UC-One Collaborate and UC-One SaaS is that the Webex app is the primary soft client.
App Integrations
You can integrate Webex for Cisco BroadWorks with the following applications:
-
Zendesk—Premium only
-
Slack—Premium only
-
Microsoft Teams for Webex Meetings—Standard or Premium
-
Microsoft Teams for Calling—Supported with all packages
-
Office 365 Calendaring—Standard or Premium
-
Google Calendaring for G Suite—Standard or Premium
Virtual Desktop Infrastructure (VDI) Support
Webex for Cisco BroadWorks now supports Virtual Desktop Infrastructure (VDI) environments. For details on how to deploy VDI infrastructure, refer to Deployment Guide for Webex for Virtual Desktop Infrastructure (VDI).
IPv6 Support
Webex for Cisco BroadWorks supports IPv6 addressing for the Webex App.
Pro Pack For Control Hub
Pro Pack for Control Hub add-on service provides your administrators, information security professionals, and compliance officers with advanced functionality in security, compliance, and analytics that can integrate with your software.
These add-on services will be only available for Standard and Premium packages.
For more information, see the Help Page of Pro Pack for Control Hub.
Future Roadmap
For insight into our intentions for the future versions of Webex for Cisco BroadWorks, visit https://salesconnect.cisco.com/#/program/PAGE-16649. The roadmap items aren’t binding in any capacity. Cisco reserves the right to withhold or revise any or all of these items from future releases.
Limitations
Provisioning Limitations
Meetings Site Timezone
The timezone of the first subscriber for each package becomes the timezone for the Webex Meetings site created for that package.
If no timezone is specified in the provisioning request for the first user of each package, the Webex Meetings site timezone for that package is set to the regional default of the subscribers' organization.
If your customer needs a specific Webex Meetings site timezone, specify the timezone parameter in the provisioning request for:
-
the first subscriber provisioned for Standard package in the organization.
-
the first subscriber provisioned for Premium package in the organization.
-
the first subscriber provisioned for Basic package in the organization.
General Limitations
-
Webex for Intune is not supported for Webex for Cisco BroadWorks deployments.
-
No calling in the Web version of the Webex client (This is a client limitation, not a solution limitation.)
-
Webex may not yet have all the UI controls to support some of the call control features available from BroadWorks.
-
The Webex client can’t currently be “White Labeled".
-
When you create customer organizations using your chosen provisioning method, they are automatically created in the same region as your partner organization. This behavior is by design. We expect multinational partners to create a partner organization in each region where they are managing customer organizations.
-
Reporting on meetings and messaging usage is available through the customer organization in Control Hub.
Known Issues and Limitations
For an up to date list of known issues and limitations with the Webex for Cisco BroadWorks offer, see Known Issues and Limitations.
Messaging Limits
The following data storage limits (messaging and files combined) apply to organizations that have purchased Webex for Cisco BroadWorks services through a Service Provider. These limits represent the maximum storage for messaging and files combined.
-
Basic: 2 GB per user for 3 years
-
Standard 5 GB per user for 3 years
-
Premium: 10 GB per user for 5 years
For each customer organization, these per user totals are pooled to provide an aggregated total for that customer, based on the number of users. For example, a company with five premium users has a total messaging and file storage limit of 50 GB. An individual user can exceed the per-user limit (10 GB) provided the company is still under the aggregated maximum (50 GB).
For team spaces that are created, the messaging limits apply against the aggregated total for the customer organization that owns the team space. You can find information on the owner of individual team spaces from the Space Policy. For information on how to view the Space Policy for an individual team space, see https://help.webex.com/en-us/baztm6/Webex-Space-Policy.
Additional Information
For additional information on general messaging limits that apply to Webex messaging team spaces, refer to https://help.webex.com/en-us/n8vw82eb/Webex-Capacities.
Security, Data, and Roles
Webex Security
The Webex client is a secure application that makes secure connections to Webex and BroadWorks. The data that is stored in the Webex cloud, and exposed to the user through the Webex app interface, is encrypted both in transit and at rest.
There’s more detail on data exchange in the Reference section of this document.
Additional Reading
Organization Data Residency
We store your Webex data in the data center that most closely matches your region. See Data Residency in Webex in the Help Center.
Roles
Service provider administrator (you): For day to day maintenance activities, you manage the on-premises (calling) parts of the solution using your own systems. You manage the Webex parts of the solution through Partner Hub.
For information on the roles that are available to partners, the access privileges that accompany those roles, and how to assign roles, see Partner Administrator Roles for Webex for BroadWorks and Wholesale RTM.
The first user provisioned to a new partner organizaiton is assigned automatically to the Full Administrator and Full Partner Administrator roles. That administrator can use the above article to assign additional roles.
Cisco cloud operations team: Creates your “partner organization” in Partner Hub, if it doesn’t exist, during your onboarding.
Once you have your Partner Hub account, you configure the Webex interfaces to your own systems. You next create “Onboarding templates” to represent the suites or packages served through those systems. You then provision your customers or subscribers.
|
# |
Typical Task |
SP |
Cisco |
|---|---|---|---|
|
1 |
Partner Onboarding - Creating the Partner Org if one doesn’t exist and enabling the necessary feature toggles |
● | |
|
2 |
BroadWorks Configuration in Partner Org via Partner Hub (Cluster) |
● | |
|
3 |
Configuring Integration settings in Partner Org via Partner Hub (Offer Templates, Branding) |
● | |
|
4 |
Preparing BroadWorks environment for Integration (AS, XSP|ADP Patching, firewalls, XSP|ADP configuration, XSI, AuthService, CTI, NPS, DMS applications on XSP|ADP) |
● | |
|
5 |
Develop Provisioning Integration or Process |
● | |
|
6 |
Prepare GTM Materials |
● | |
|
7 |
Migrate or Provision New Users |
● |
Architecture
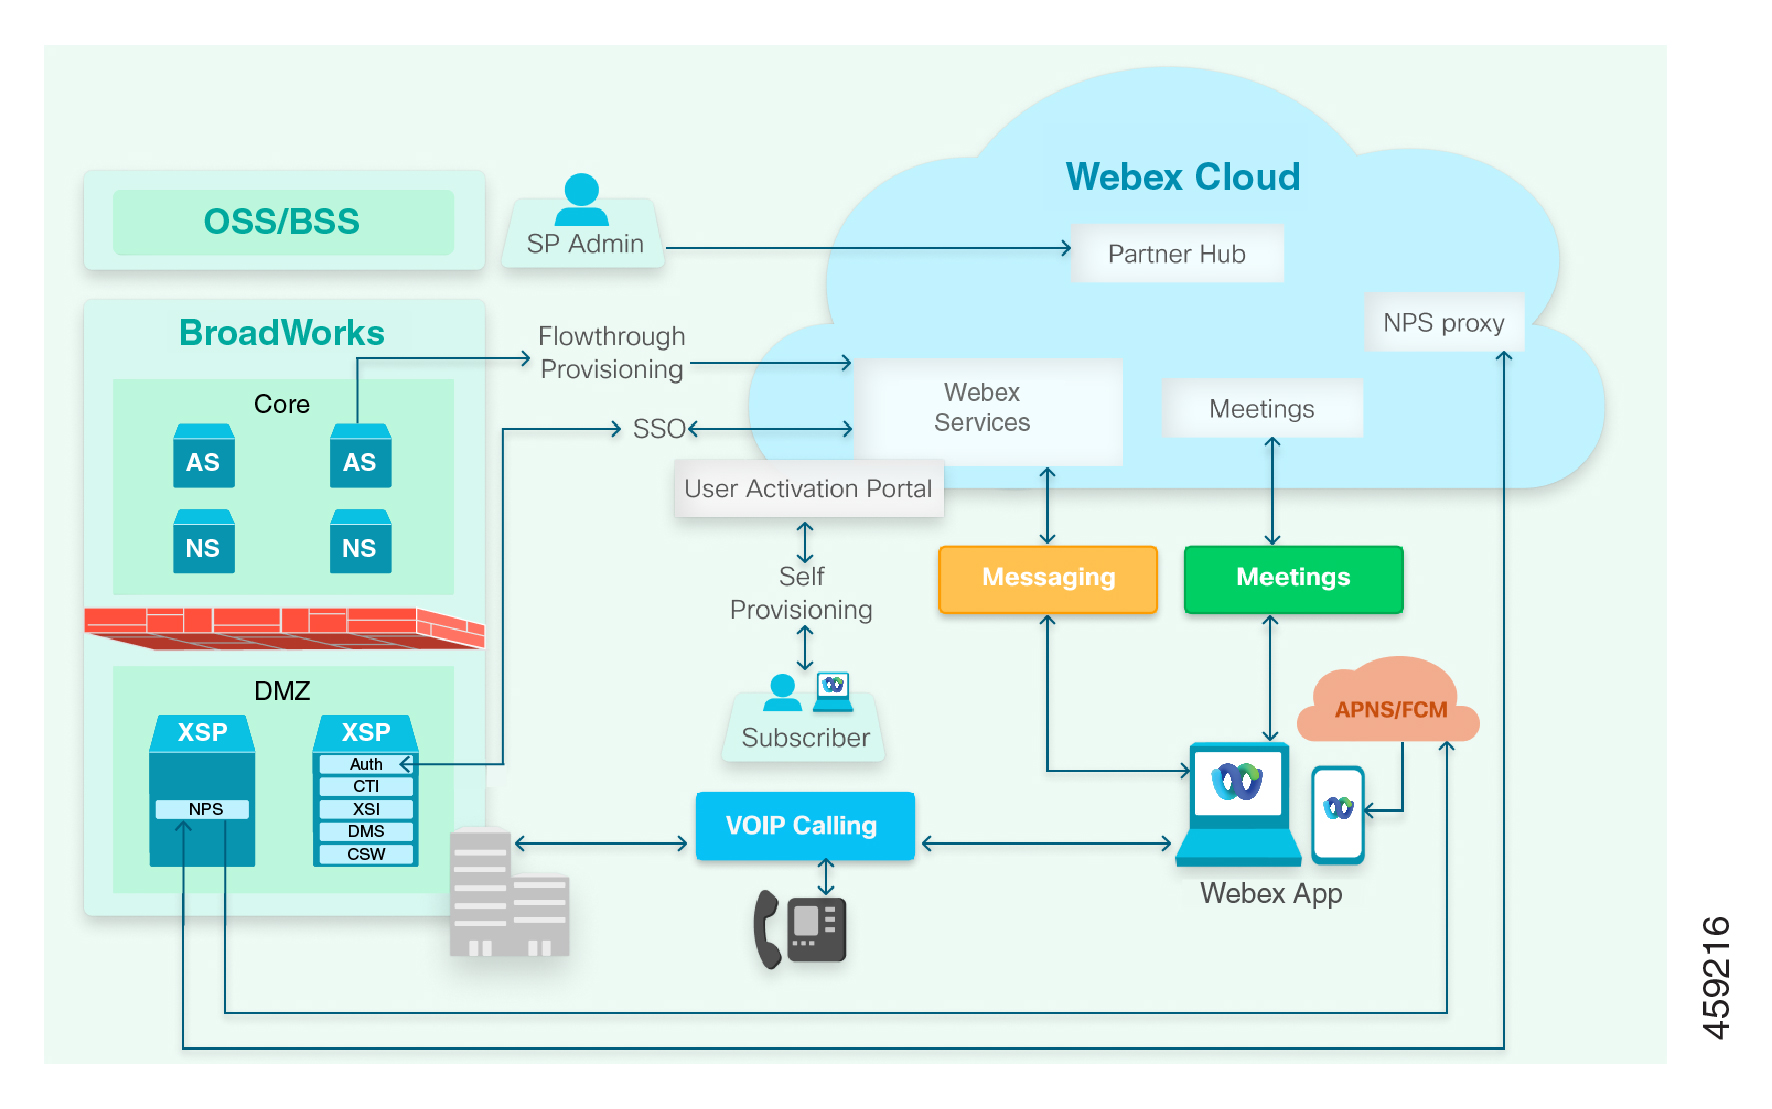
What's in the Diagram?
Clients
-
The Webex App client serves as the primary application in Webex for Cisco BroadWorks offers. The client is available on desktop, mobile, and web platforms.
The client has native messaging, presence, and multiparty audio/video meetings provided by the Webex cloud. The Webex client uses your BroadWorks infrastructure for SIP and PSTN calls.
-
Cisco IP phones and related accessories also use your BroadWorks infrastructure for SIP and PSTN calls. We expect to be able to support third-party phones.
-
User Activation Portal for users to sign into Webex using their BroadWorks credentials.
-
Partner Hub is a web interface for administering your Webex organization and your customers’ organizations. Partner Hub is where you configure the integration between your BroadWorks infrastructure and Webex. You also use Partner Hub to manage client configuration and billing.
Service Provider Network
The green block on the left of the diagram represents your network. Components hosted in your network provide the following services and interfaces to other parts of the solution:
-
Public-facing XSP|ADP, for Webex for Cisco BroadWorks: (The box represents one or multiple XSP|ADP farms, possibly fronted by load balancers.)
-
Hosts the Xtended Services Interface (XSI-Actions & XSI-Events), Device Management Service (DMS), CTI interface, and Authentication Service. Together, these applications enable phones and Webex clients to authenticate themselves, download their calling configuration files, make and receive calls, and see each other's hook status (telephony presence) and call history.
-
Publishes directory to Webex clients.
-
-
Public-facing XSP|ADP, running NPS:
-
host Call Notifications Push Server: A Notification Push Server on an XSP|ADP in your environment. It interfaces between your Application Server and our NPS proxy. The proxy supplies short-lived tokens to your NPS to authorize notifications to the cloud services. These services (APNS & FCM) send call notifications to Webex clients on Apple iOS and Google Android devices.
-
-
Application Server:
-
Provides call control and interfaces to other BroadWorks systems (generally)
-
For flowthrough provisioning, the AS is used by partner administrator to provision users in Webex
-
Pushes user profile into BroadWorks
-
-
OSS/BSS: Your Operations Support System / Business SIP Services for administering your BroadWorks enterprises.
Webex Cloud
The blue block in the diagram represents the Webex cloud. Webex microservices support the full spectrum of Webex collaboration capabilities:
-
Cisco Common Identity (CI) is the identity service within Webex.
-
Webex for Cisco BroadWorks represents the set of microservices that support the integration between Webex and Service Provider Hosted BroadWorks:
-
User Provisioning APIs
-
Service Provider Configuration
-
User Login using BroadWorks credentials
-
-
Webex Messaging box for messaging-related microservices.
-
Webex Meetings box representing media processing servers and SBCs for multiple participant video meetings (SIP & SRTP)
Third-Party Web Services
The following third-party components are represented in the diagram:
-
APNS (Apple Push Notifications Service) pushes call and message notifications to Webex applications on Apple devices.
-
FCM (FireBase Cloud Messaging) pushes call and message notifications to Webex applications on Android devices.
XSP|ADP Architecture Considerations
The Role of Public-Facing XSP|ADP Servers in Webex for Cisco BroadWorks
The public-facing XSP|ADP in your environment provides the following interfaces/services to Webex and clients:
-
Authentication Service (AuthService), secured by TLS, which responds to Webex requests for BroadWorks JWT (JSON Web Token) on user’s behalf
-
CTI interface, secured by mTLS, to which Webex subscribes for call history events and telephony presence status from BroadWorks (hook status).
-
Xsi actions and events interfaces (eXtended Services Interface) for subscriber call control, contact and call list directories, and end-user telephony service configuration
-
DM (Device Management) service for clients to retrieve their calling configuration files
Supply URLs for these interfaces when you configure Webex for Cisco BroadWorks. (See Configure your BroadWorks Clusters in Partner Hub in this document.) For each cluster, you can only provide one URL for each interface. If you have multiple interfaces into your BroadWorks infrastructure, you can create multiple clusters.
XSP|ADP Architecture
We require that you use a separate, dedicated XSP|ADP instance or farm to host your NPS (Notification Push Server) application. You can use the same NPS with UC-One SaaS or UC-One Collaborate. However, you may not host the other applications required for Webex for Cisco BroadWorks on the same XSP|ADP that hosts the NPS application.
We recommend that you use a dedicated XSP|ADP instance/farm to host the required applications for Webex integration for the following reasons
-
For example, if you’re offering UC-One SaaS, we recommend creating a new XSP|ADP farm for Webex for Cisco BroadWorks. This way the two services can operate independently while you migrate subscribers.
-
If you collocate the Webex for Cisco BroadWorks applications on an XSP|ADP farm that is used for other purposes, it's your responsibility to monitor usage, manage the resulting complexity, and plan for the increased scale.
-
The Cisco BroadWorks System Capacity Planner assumes a dedicated XSP|ADP farm and may not be accurate if you use it for collocation calculations.
Unless noted otherwise, the dedicated Webex for Cisco BroadWorks XSP|ADPs must host the following applications:
-
AuthService (TLS with CI Token Validation or mTLS)
-
CTI (mTLS)
-
XSI-Actions (TLS)
-
XSI-Events (TLS)
-
DMS (TLS)—Optional. It's not mandatory that you deploy a separate DMS instance or farm specifically for Webex for Cisco BroadWorks. You can use the same DMS instance that you use for UC-One SaaS or UC-One Collaborate.
-
Call Settings Webview (TLS)—Optional. Call Settings Webview (CSW) is required only if you want Webex for Cisco BroadWorks users to be able to configure calling features on the Webex App.
Webex requires access to CTI through an interface secured by mutual TLS authentication. To support this requirement, we recommend one of these options:
-
(Diagram labelled Option 1) One XSP|ADP instance or farm for all applications, with two interfaces configured on each server: an mTLS interface for CTI and a TLS interface for other apps such as the AuthService.
-
(Diagram labelled Option 2) Two XSP|ADP instances or farms, one with an mTLS interface for CTI, and the other with a TLS interface for other apps, such as the AuthService.
XSP|ADP Reuse
If you have an existing XSP|ADP farm that conforms to one of the suggested architectures above (Option 1 or 2) and it is lightly loaded, then it is possible to reuse your existing XSP|ADPs. You will need to verify that there are no conflicting configuration requirements between existing applications and the new application requirements for Webex. The two primary considerations are:
-
If you need to support multiple webex partner organizations on the XSP|ADP, then that means you must use mTLS on the Auth Service (CI Token Validation is only supported for a single partner organization on an XSP|ADP). If you use mTLS on the Authentication Service, then that means you can’t have clients which are using basic authentication on the Authentication Service at the same time. This situation would prevent reuse of the XSP|ADP.
-
If the existing CTI Service configured to be used by clients with the secure port (typically 8012) but without mTLS (i.e., client authentication) then that will conflict with the webex requirement to have mTLS.
Because the XSP|ADP’s have many applications and the number of permutations of these applications is large, there may be other unidentified conflicts. For this reason, any potential reuse of XSP|ADP’s should be verified in a lab with the intended configuration prior to committing to the reuse.
Configure NTP Synchronization on XSP|ADP
The deployment requires time synchronization for all XSP|ADPs that you use with Webex.
Install the ntp package after you install the OS and before you install the BroadWorks software. Then you can configure NTP during the XSP|ADP software installation. See the BroadWorks Software Management Guide for more detail.
During the interactive installation of the XSP|ADP software, you’re given the option to configure NTP. Proceed as follows:
-
When the installer asks,
Do you want to configure NTP?, entery. -
When the installer asks,
Is this server going to be a NTP server?, entern. -
When the installer asks,
What is the NTP address, hostname, or FQDN?, enter the address of your NTP server, or a public NTP service, for example,pool.ntp.org.
If your XSP|ADPs use silent (noninteractive) installation, the installer configuration file must include the following Key=Value pairs:
NTPNTP_SERVER=<NTP Server address, e.g., pool.ntp.org>XSP|ADP Identity and Security Requirements
Background
The protocols and ciphers of Cisco BroadWorks TLS connections are configurable at different levels of specificity. These levels range from the most general (SSL provider) to the most specific (individual interface). A more specific setting always overrides a more general setting. If they aren’t specified, ‘lower’ level SSL settings are inherited from ‘higher’ levels.
If no settings are changed from their defaults, all levels inherit the SSL provider default settings (JSSE Java Secure Sockets Extension).
Requirements List
-
The XSP|ADP must authenticate itself to clients using a CA-signed certificate in which the Common Name or Subject Alternate Name matches the domain portion of the XSI interface.
-
The Xsi interface must support TLSv1.2 protocol.
-
The Xsi interface must use a cipher suite that meets the following requirements.
-
Diffie-Hellman Ephemeral (DHE) or Elliptic Curves Diffie-Hellman Ephemeral (ECDHE) key-exchange
-
AES (Advanced Encryption Standard) cipher with a minimum block size of 128 bits (e.g. AES-128 or AES-256)
-
GCM (Galois/Counter Mode) or CBC (Cipher Block Chaining) cipher mode
-
If a CBC cipher is used, only the SHA2 family of hash functions is allowed for key derivation (SHA256, SHA384, SHA512).
-
-
For example, the following ciphers meet the requirements:
-
TLS_ECDHE_ECDSA_WITH_AES_256_CBC_SHA384 -
TLS_ECDHE_ECDSA_WITH_AES_256_GCM_SHA384 -
TLS_DHE_RSA_WITH_AES_256_GCM_SHA384 -
TLS_DHE_PSK_WITH_AES_256_CBC_SHA384
The XSP|ADP CLI requires the IANA naming convention for cipher suites, as shown above, not the openSSL convention.
Supported TLS Ciphers for the AuthService and XSI Interfaces
This list is subject to change as our cloud security requirements evolve. Follow the current Cisco cloud security recommendation on cipher selection, as described in the requirements list in this document.
-
TLS_ECDHE_ECDSA_WITH_AES_256_GCM_SHA384 -
TLS_ECDHE_RSA_WITH_AES_256_GCM_SHA384 -
TLS_DHE_RSA_WITH_AES_256_GCM_SHA384 -
TLS_ECDHE_ECDSA_WITH_CHACHA20_POLY1305_SHA256 -
TLS_ECDHE_RSA_WITH_CHACHA20_POLY1305_SHA256 -
TLS_DHE_RSA_WITH_CHACHA20_POLY1305_SHA256 -
TLS_ECDHE_ECDSA_WITH_AES_128_GCM_SHA256 -
TLS_ECDHE_RSA_WITH_AES_128_GCM_SHA256 -
TLS_DHE_RSA_WITH_AES_128_GCM_SHA256 -
TLS_ECDHE_ECDSA_WITH_AES_256_CBC_SHA384 -
TLS_ECDHE_RSA_WITH_AES_256_CBC_SHA384 -
TLS_DHE_RSA_WITH_AES_256_CBC_SHA256 -
TLS_ECDHE_ECDSA_WITH_AES_128_CBC_SHA256 -
TLS_ECDHE_RSA_WITH_AES_128_CBC_SHA256 -
TLS_DHE_RSA_WITH_AES_128_CBC_SHA256 -
TLS_ECDHE_ECDSA_WITH_AES_256_CBC_SHA -
TLS_ECDHE_RSA_WITH_AES_256_CBC_SHA -
TLS_DHE_RSA_WITH_AES_256_CBC_SHA -
TLS_ECDHE_ECDSA_WITH_AES_128_CBC_SHA -
TLS_ECDHE_RSA_WITH_AES_128_CBC_SHA -
TLS_DHE_RSA_WITH_AES_128_CBC_SHA -
TLS_RSA_PSK_WITH_AES_256_GCM_SHA384 -
TLS_DHE_PSK_WITH_AES_256_GCM_SHA384 -
TLS_RSA_PSK_WITH_CHACHA20_POLY1305_SHA256 -
TLS_DHE_PSK_WITH_CHACHA20_POLY1305_SHA256 -
TLS_ECDHE_PSK_WITH_CHACHA20_POLY1305_SHA256 -
TLS_RSA_WITH_AES_256_GCM_SHA384 -
TLS_PSK_WITH_AES_256_GCM_SHA384 -
TLS_PSK_WITH_CHACHA20_POLY1305_SHA256 -
TLS_RSA_PSK_WITH_AES_128_GCM_SHA256 -
TLS_DHE_PSK_WITH_AES_128_GCM_SHA256 -
TLS_RSA_WITH_AES_128_GCM_SHA256 -
TLS_PSK_WITH_AES_128_GCM_SHA256 -
TLS_RSA_WITH_AES_256_CBC_SHA256 -
TLS_RSA_WITH_AES_128_CBC_SHA256 -
TLS_ECDHE_PSK_WITH_AES_256_CBC_SHA384 -
TLS_ECDHE_PSK_WITH_AES_256_CBC_SHA -
TLS_RSA_PSK_WITH_AES_256_CBC_SHA384 -
TLS_DHE_PSK_WITH_AES_256_CBC_SHA384 -
TLS_RSA_PSK_WITH_AES_256_CBC_SHA -
TLS_DHE_PSK_WITH_AES_256_CBC_SHA -
TLS_RSA_WITH_AES_256_CBC_SHA -
TLS_PSK_WITH_AES_256_CBC_SHA384 -
TLS_PSK_WITH_AES_256_CBC_SHA -
TLS_ECDHE_PSK_WITH_AES_128_CBC_SHA256 -
TLS_ECDHE_PSK_WITH_AES_128_CBC_SHA -
TLS_RSA_PSK_WITH_AES_128_CBC_SHA256 -
TLS_DHE_PSK_WITH_AES_128_CBC_SHA256 -
TLS_RSA_PSK_WITH_AES_128_CBC_SHA -
TLS_DHE_PSK_WITH_AES_128_CBC_SHA -
TLS_RSA_WITH_AES_128_CBC_SHA -
TLS_PSK_WITH_AES_128_CBC_SHA256 -
TLS_PSK_WITH_AES_128_CBC_SHA
Xsi Events Scale Parameters
You may need to increase the Xsi-Events queue size and thread count to handle the volume of events that the Webex for Cisco BroadWorks solution requires. You can increase the parameters to the minimum values shown, as follows (don’t decrease them if they are above these minimum values):
XSP|ADP_CLI/Applications/Xsi-Events/BWIntegration> eventQueueSize = 2000
XSP|ADP_CLI/Applications/Xsi-Events/BWIntegration> eventHandlerThreadCount = 50
Multiple XSP|ADPs
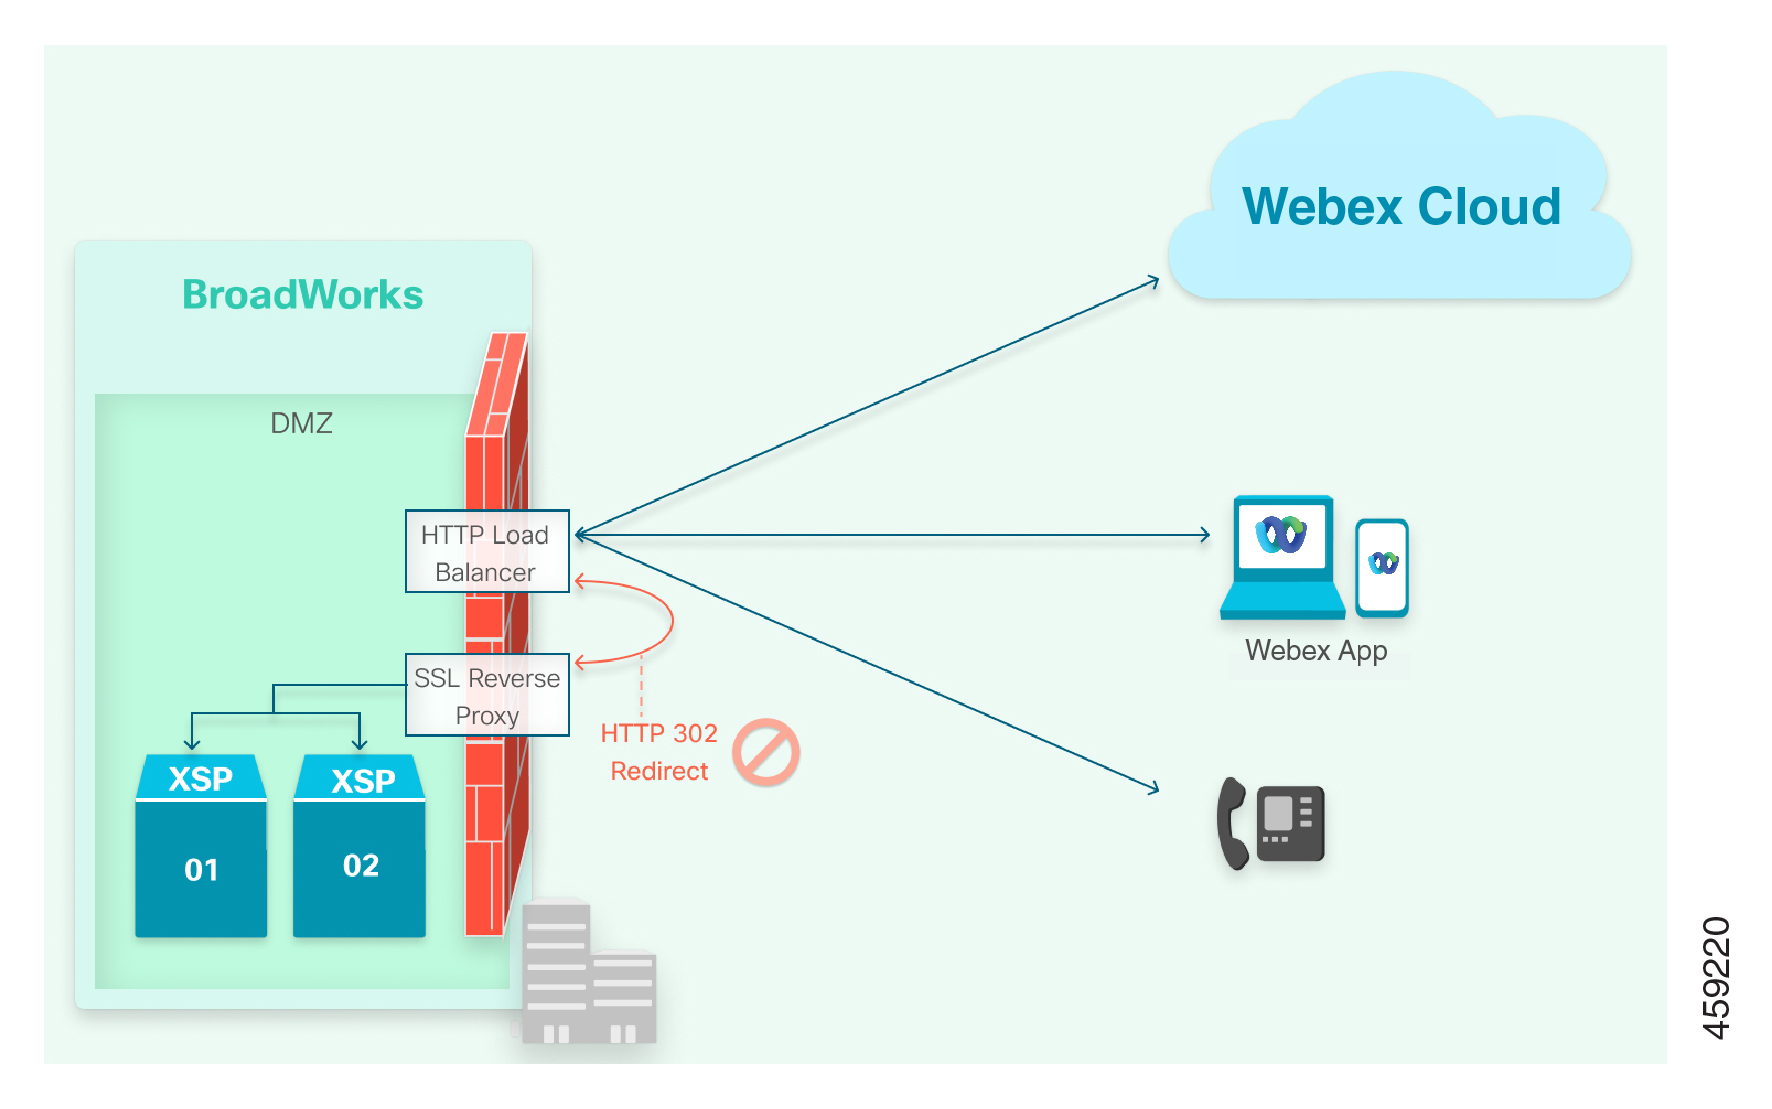
Load Balancing Edge Element
If you have a load balancing element on your network edge, it must transparently handle the distribution of traffic between your multiple XSP|ADP servers and the Webex for Cisco BroadWorks cloud and clients. In this case, you would provide the URL of the load balancer to the Webex for Cisco BroadWorks configuration.

Notes on this architecture:
-
Configure DNS so the clients can find the load balancer when connecting to the Xsi interface (see DNS configuration).
-
We recommend that you configure the edge element in reverse SSL proxy mode, to ensure point to point data encryption.
-
Certificates from XSP|ADP01 and XSP|ADP02 should both have the XSP|ADP domain, for example your-XSP|ADP.example.com, in the Subject Alternate Name. They should have their own FQDNs, for example XSP|ADP01.example.com, in the Common Name. You can use wildcard certificates, but we don’t recommend them.
Internet-Facing XSP|ADP Servers
If you expose the Xsi interfaces directly, use DNS to distribute the traffic to the multiple XSP|ADP servers.
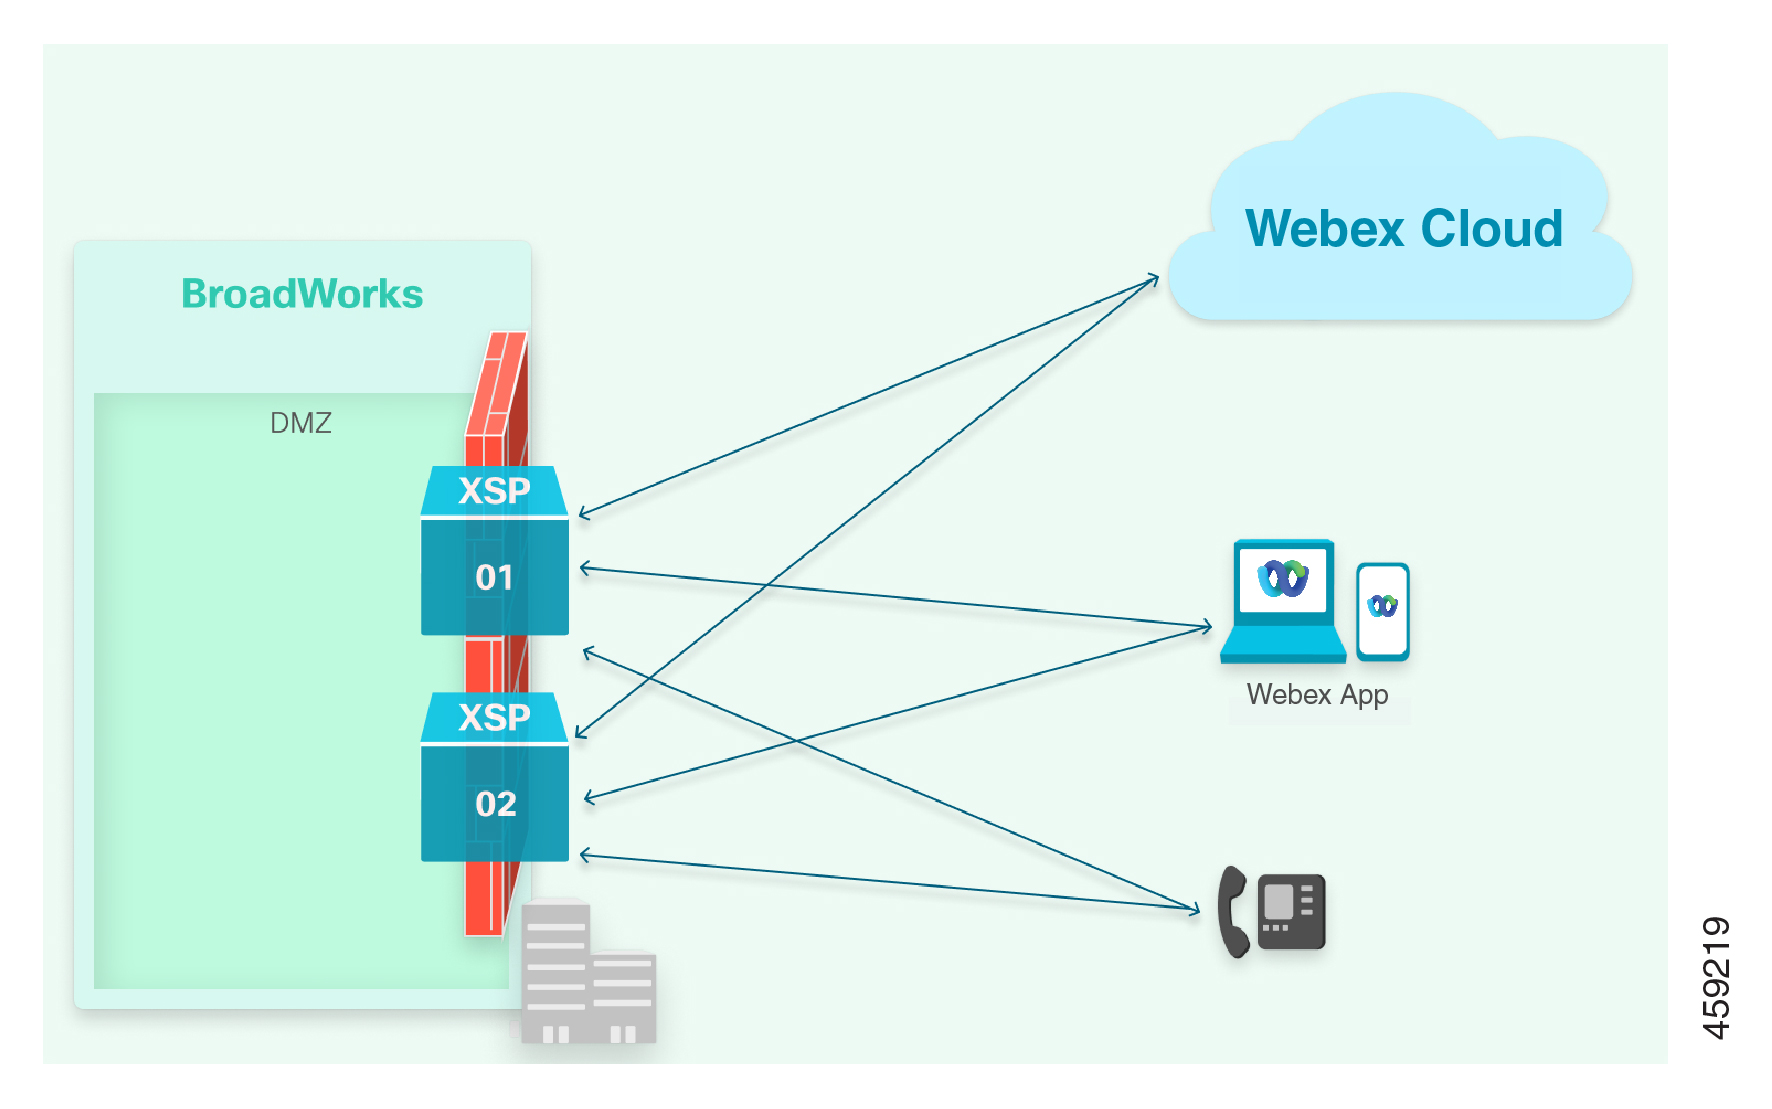
Notes on this architecture:
-
Two records are required to connect to the XSP|ADP servers:
-
For Webex microservices: Round-robin A/AAAA records are required to target the multiple XSP|ADP IP addresses. This is because the Webex microservices can’t do SRV lookups. For examples, see Webex Cloud Services.
-
For Webex App: An SRV record that resolves to A records where each A record resolves to a single XSP|ADP. For examples, see Webex App.
Use prioritized SRV records to target the XSI service for the multiple XSP|ADP addresses. Prioritize your SRV records so that the microservices will always go to the same A record (and subsequent IP address) and will only move to the next A record (and IP address) if the first IP address is down. DO NOT use a round-robin approach for the Webex App.
-
-
Certificates from XSP|ADP01 and XSP|ADP02 should both have the XSP|ADP domain, for example your-XSP|ADP.example.com, in the Subject Alternate Name. They should have their own FQDNs, for example XSP|ADP01.example.com, in the Common Name.
-
You can use wildcard certificates, but we don’t recommend them.
Avoid HTTP Redirects
Sometimes, DNS is configured to resolve the XSP|ADP URL to an HTTP load balancer, and the load balancer is configured to redirect through a reverse proxy to the XSP|ADP servers.
Webex does not follow a redirect when connecting to the URLs you supply, so this configuration does not work.
Ordering and Provisioning
Ordering and provisioning applies at these levels:
-
Partner/Service Provider provisioning:
Each Webex for Cisco BroadWorks Service Provider (or Reseller) onboarded must be configured as a Partner Organization in Webex, and granted the necessary entitlements. Cisco Operations provides the administrator of the Partner Organization with access to manage Webex for Cisco BroadWorks on Webex Partner Hub. The Partner Administrator must do all required provisioning steps before they can provision a Customer/Enterprise organization.
-
Customer/Enterprise ordering and provisioning:
Each BroadWorks Enterprise enabled for Webex for Cisco BroadWorks triggers creation of an associated Webex Customer Organization. This process occurs automatically as part of user/subscriber provisioning. All users/subscribers within a BroadWorks enterprise are provisioned in the same Webex Customer organization.
The same behavior applies if your BroadWorks system is configured as a Service Provider with Groups. When you provision a subscriber in a BroadWorks group, a Customer organization that corresponds with the group is automatically created in Webex.
-
User/Subscriber ordering and provisioning:
Webex for Cisco BroadWorks currently supports the following user provisioning models:
-
Flowthrough provisioning with trusted emails
-
Flowthrough provisioning without trusted emails
-
User Self-provisioning
-
API provisioning
-
Flowthrough Provisioning with Trusted Emails
You configure the Integrated IM&P service to use a Webex provisioning URL, and then assign the service to users. The Application Server uses the Webex provisioning API to request the corresponding Webex user accounts.
If you can assert that BroadWorks has subscriber email addresses that are valid, and unique to Webex, this provisioning option automatically creates and activates Webex accounts with those email addresses as user IDs.
You can change the subscriber package through Partner Hub, or you can write your own application to use the provisioning API to change subscriber packages.
Flowthrough Provisioning Without Trusted Emails
You configure the Integrated IM&P service to use a Webex provisioning URL, and then assign the service to users. The Application Server uses the Webex provisioning API to request the corresponding Webex user accounts.
If you cannot rely on the subscriber email addresses held by BroadWorks, this provisioning option creates Webex accounts, but cannot activate them until subscribers supply and validate their email addresses. At that point, Webex can activate the accounts with those email addresses as user IDs.
You can change the subscriber package through Partner Hub, or you can write your own application to use the provisioning API to change subscriber packages.
User Self-Provisioning
With this option, there is no flowthrough provisioning from BroadWorks to Webex. After you configure the integration between Webex and your BroadWorks system, you get one or more links that are specific for provisioning users within your Webex for Cisco BroadWorks partner organization.
You then design your own communications (or delegate to your customers) to distribute the link to subscribers. The subscribers follow the link, then supply and validate their email addresses to create and activate their own Webex accounts.
Because the accounts are provisioned within the scope of your partner organization, you can manually adjust user packages through Partner Hub, or use the API to do that.
Users must exist in the BroadWorks system that you integrate with Webex, or they are forbidden from creating accounts with that link.
Service Provider Provisioning by APIs
Webex exposes a set of public APIs that enable you to build Webex for Cisco BroadWorks user/subscriber provisioning into your existing user management workflow/tools.
Required Patches with Flow-through Provisioning
If you are using flow-through provisioning, you must install a system patch and apply a CLI property. Refer to the below list for instructions that apply to your BroadWorks release:
For R22:
-
Install AP.as.22.0.1123.ap376508.
-
After installation, set the property
bw.msg.includeIsEnterpriseInOSSschematotruefrom the CLI inMaintenance/ContainerOptions.For more information, see the patch notes https://www.cisco.com/web/software/286326332/154309/AP.as.22.0.1123.ap376508.txt.
For R23:
-
Install AP.as.23.0.1075.ap376509
-
After installation, set the property
bw.msg.includeIsEnterpriseInOSSschematotruefrom the CLI inMaintenance/ContainerOptions.For more information, see the patch notes https://www.cisco.com/web/software/286326332/154325/AP.as.23.0.1075.ap376509.txt.
For R24:
-
Install AP.as.24.0.944.ap375100
-
After installation, set the property
bw.msg.includeIsEnterpriseInOSSschematotruefrom the CLI inMaintenance/ContainerOptions.For more information, see the patch notes https://www.cisco.com/web/software/286326332/154326/AP.as.24.0.944.ap375100.txt.
After you complete these steps, you will be unable to provision new users with UC-One Collaborate services. Newly provisioned users must be Webex for Cisco BroadWorks users.
Extension Dialing
Extension Dialing feature support allows Webex for Cisco Broadworks users to dial other users with an extension similar to the primary phone number within the same enterprise. This is especially useful for users who do not have DID numbers.
During provisioning, the extension of the users gets stored in the Webex directory as the user’s extension. For BroadWorks calling, the extension appears on the Webex App in the extension field of all the call initiation method areas and the user’s profile. Webex for Cisco BroadWorks supports extension-only calls between users within the same group and different groups of the same enterprise with the combination of location dialing code and extension. However, calling between two enterprises using only extensions is not supported.
An extension can be provisioned for the Cisco BroadWorks users through the following methods:
-
Cisco BroadWorks users
-
Public API provisioning as ‘extension
-
The extension parameter should be explicitly passed as part of the API call. For enterprises/groups that have Location Dialing Code (LDC) configured, the extension parameter should be the combination of LDC and 'extension number.
-
-
Flowthrough or Self-Activation provisioning
-
Extension and LDC (where applicable) will be automatically retrieved from BroadWorks.
-
-
-
BroadWorks-only Calling users or entities
-
Synced automatically from BroadWorks by Directory Sync using the combination of Location Dialing Code (LDC) and extension number.
-
|
BroadWorks Calling Records |
Description |
Provisioning method |
Managing Extension |
|---|---|---|---|
|
Webex for Cisco BroadWorks users |
Users are enabled for Webex for Cisco BroadWorks |
Public API |
Extension needs to be passed as parameter |
|
Flowthrough |
Extension retrieved from BroadWorks automatically | ||
|
BroadWorks-only calling users |
Calling users who are not onboarded to Webex |
Directory Sync |
Extension synced by Directory sync |
|
Non-user calling entities |
E.g., a conference room phone, fax machine, Hunt group number |
Directory Sync | Extension synced by Directory sync |
|
BroadWorks phone lists |
Enterprise, Group or Personal Phone Lists |
Directory Sync |
Not Applicable |
Prerequisites
-
Client version required for supporting this feature is 42.11 or later.
-
Patch where extension and location dialing codes are added to XSI and Provisioning Adapter February 2022 for version 23 or above as part of :
-
AP.platform.23.0.1075.ap380045
-
AP.as.23.0.1075.ap380045
-
AP.xsp.23.0.1075.ap380045
-
AP.as.24.0.944.ap380045
-
-
Enable the header X-BroadWorks-Remote-Party-Info on the AS using the below CLI command for this SIP call flow which is required for extension dialing feature support.
AS_CLI/System/DeviceType/SIP> set <device_profile_type> supportRemotePartyInfo true
App Call Options Priority
As part of the Extension Dialing feature support, The app call options priority setting is also provided at the partner level for all the Webex for Cisco Broadworks partners. Using this setting, the partner can control the call priority settings of all its managed customers from Partner Hub. The app call options priority setting for a customer can also be modified at a customer level from Control Hub.
The app call options priority setting contains extension as second option in both Partner Hub and Control Hub when a Webex for Cisco Broadworks user is newly provisioned with extension through any of the above-mentioned provisioning methods.
For all the existing provisioned Orgs, the extension option will be in the hidden state (by default) in the app call options priority setting. This will not show an extension in the audio/video call option of the user in the Webex App.
Following are the options to make the extension call option visible for the existing customers:
-
If a partner wants all its managed customer orgs to be provided with an extension as one of the call options, it is recommended for the Partner Admin to move the Extension from hidden to available in Partner Hub. This will let the managed customer orgs inherit the setting from their partner.
-
If a Partner wants to provide an extension in call options for a specific customer org, it is recommended for the Partner Admin to move the extension from hidden to available in Control Hub.
Group Contacts Support
This feature enhances the Webex for BroadWorks DirSync service by removing the limitation for syncing up to 1500 contacts from the Group phone lists on BroadWorks and allowing partners to sync up to 30K contacts from a single Group phone list and bring it on par with the 30K contacts increase for Enterprise phone list, which was released separately.
There is an overall limit of 200K for all external contacts per Organization, which would apply to the sum of Enterprise and Group phone lists in a single BroadWorks enterprise. For example, a BroadWorks enterprise that has Enterprise phone list with 30K and also 5 Group phone lists each with 30K will be supported (180K total per Org). However, if there are 6 group phone lists each with 30K, this will not be supported (210K total).
This feature is available on request. Please contact your account team to have it enabled.
-
Before enabling the feature, a prerequisite migration is to be run to provision and associate groups for all the existing provisioned users.
-
Cisco team will run an internal API to migrate any existing provisioned users to associate them with the correct group. NOTE: This can take up to one week to process.
-
Once the migration is completed for the partner and the feature is enabled, any newly provisioned users will be 'grouped' appropriately.
After the feature is enabled, the DirSync service starts syncing BroadWorks Group phone list contacts into dedicated per group contact storage in the Webex Contact Service.
During provisioning, the enterprise group of the user needs to be stored in the Webex directory to indicate the group this user belongs to. The association of the user with a BroadWorks group in the Webex Directory allows the Webex app to do contact search in the Contact Service group storage for the specific group of the user.
The feature requires the Webex for BroadWorks subscribers to be provisioned in Webex with the BroadWorks enterprise Group Id.
The BroadWorks enterprise Group Id can be provisioned for the Cisco BroadWorks users through the following methods:
-
Webex for Cisco BroadWorks users
-
Public API provisioning as ‘spEnterpriseGroupId’
-
The BroadWorks enterprise Group Id should be explicitly passed in spEnterpriseGroupId parameter of the API call.
-
-
Flowthrough or Self-Activation provisioning
-
BroadWorks enterprise Group Id will be automatically retrieved from BroadWorks.
-
-
BroadWorks-only Calling users or entities
-
Not applicable. It’s not required to sync BroadWorks enterprise Group Id for these users.
-
-
|
BroadWorks Calling Records |
Description |
Provisioning method |
Managing Enterprise Group ID |
|---|---|---|---|
|
Webex for Cisco BroadWorks users |
Users are enabled for Webex for Cisco BroadWorks |
Public API |
BroadWorks enterprise Group Id needs to be passed as parameter spEnterpriseGroupId |
|
Flowthrough |
BroadWorks enterprise Group Id is retrieved from BroadWorks automatically | ||
|
BroadWorks-only calling users |
Calling users who are not onboarded to Webex |
Directory Sync |
Not applicable |
|
Non-user calling entities |
E.g., a conference room phone, fax machine, Hunt group number |
Directory Sync |
Not applicable |
|
BroadWorks phone lists |
Contacts in the BroadWorks Group Phone Lists |
Directory Sync |
Group contacts are stored in Webex Contact Service associated with the specific group |
|
BroadWorks Enterpsie or Persional phone lists |
Contacts in the Enterprise or Personal Phone Lists |
Directory Sync |
Not applicable |
Public API must be updated PRIOR to the MIGRATION. Migration cannot be completed until THIS API is completed The BroadWorks enterprise Group Id should be explicitly passed in spEnterpriseGroupId parameter of the API call https://developer.webex.com/docs/api/changelog#2023-march
After the feature is enabled and as a result of the next directory sync the enterprise user groups will also be displayed in Control Hub. Visualizing the groups in Control Hub for Webex for BroadWorks is purely informational at this stage. Partner and customer admins should not make any modifications to groups or group membership in Control Hub as these changes will not be reflected back to BroadWorks. Group Management in Control Hub is intended for use by partners who will be adopting the upcoming Contact Management APIs.
Migration and Future-proofing
The Cisco progression of the BroadSoft unified communications client is to move away from UC-One towards Webex. There’s a corresponding progression of the supporting services away from the Service Provider network – except for calling – towards the Webex cloud platform.
Whether you’re running UC-One SaaS, or BroadWorks Collaborate, the preferred migration strategy is to deploy new, dedicated XSP|ADPs for integration with Webex for Cisco BroadWorks. You can run the two services in parallel while you migrate customers to Webex, and eventually recoup the infrastructure used for the previous solution.
Recommended Document Subscriptions
Webex Help Center articles (on help.webex.com) have a Subscribe option that lets you receive an email notification whenever that article gets updated.
We recommend that you subscribe to each of the following articles to ensure that you don't miss out on critical updates that affect network connectivity. To subscribe, go to each of the below links and in the article that launches, click the Subscribe button.
At a minimum, we recommend that you subscribe to the above list. However, most of the Webex articles and documents listed under Additional Documents have a Subscribe option. For this option to appear, the article must appear on help.webex.com.
There is no subscription option for documentation landing pages.
Additional Documents
Refer to the following related documentation for more information about Webex for Cisco BroadWorks:
Webex for Cisco BroadWorks documents
Partner administrators can use the following documents and sites to obtain information on Webex for Cisco BroadWorks.
-
Bring Your Own PSTN Solution for Webex for Cisco BroadWorks—This solution lets Service Providers provision phone numbers that they own (rather than Cisco-provided numbers) for users to use when joining Webex Meetings.
-
Webex for Cisco BroadWorks Configuration Guide—Describes how to configure the Webex App for Webex for Cisco BroadWorks.
- Device Integration Guide for Webex for Cisco BroadWorks—Describes how to onboard and service Room OS and MPP devices.
-
Webex for Cisco BroadWorks Troubleshooting Guide—Contains troubleshooting information forWebex for Cisco BroadWorks.
Webex for Cisco BroadWorks articles
Partner administrators can use the following optional sites to learn more about Webex for Cisco BroadWorks:
-
Webex for Cisco BroadWorks Documentation—The landing page lists technical documents and optional Webex articles targeted to partner administrators of Webex for Cisco BroadWorks.
-
What's New with Webex for Cisco BroadWorks—Read about the latest released features along with what's coming soon.
-
Known Issues and Limitations—Read about known issues that we've identified in the Webex for Cisco BroadWorks solution.
-
Partner Administrator Roles for Webex for BroadWorks and Wholesale RTM—This article describes how to assign partner administrator roles for partner organizations that offer Webex for Cisco BroadWorks. Roles get used to assign administration access to settings in Partner Hub and Control Hub.
Cisco BroadWorks documents
Partner administrators can refer to the Cisco BroadWorks site on cisco.com for technical documents that describe how to deploy the Cisco BroadWorks part of the solution:
Webex Help articles
The following Webex Help sites can be used to find Webex articles that help customer administrators and end users to use Webex features.
-
Webex from Service Providers—This landing page contains links with getting started info and commonly used articles for Webex App users who purchased Webex services from a Service Provider.
-
Webex Help Center—Use the search feature at help.webex.com to search for additional Webex articles that describe Webex App and Webex Meetings functionality. You can search for either user or administrator articles.
Developer documentation
-
Webex for BroadWorks Developer Guide—Provides information for developers who create applications that use the Webex for Cisco BroadWorks APIs.
Decision Points
| Consideration | Questions to answer | Resources |
|
Architecture & Infrastructure
|
How many XSP|ADPs? How do they take mTLS? |
Cisco BroadWorks System Capacity Planner Cisco BroadWorks System Engineering Guide XSP|ADP CLI Reference This document |
| Customer and user provisioning |
Can you assert that you trust emails in BroadWorks? Do you want users to provide email addresses to activate their own accounts? Can you build tools to use our API? |
Public API docs at https://developer.webex.com This document |
| Branding | What color and logo do you want to use? | Webex app branding article |
| Templates | What are your different customer use cases? | This document |
| Subscriber Features per customer/enterprise/group | Choose package to define level of service per template. Basic, Standard, Premium, or Softphone. |
This document Feature/package matrix |
| User authentication | BroadWorks, or Webex | This document |
| Provisioning adapter (for flowthrough provisioning options) |
Do you already use Integrated IM&P, eg for UC-One SaaS? Do you intend to use multiple templates? Is there a more common use case anticipated? |
This document Application Server CLI reference |
Architecture & Infrastructure
-
What kind of scale do you intend to start with? It is possible to scale up in future, but your current usage estimate should drive infrastructure planning.
-
Work with your Cisco account manager / sales representative to size your XSP|ADP infrastructure, according to the Cisco BroadWorks System Capacity Planner and the Cisco BroadWorks System Engineering Guide.
-
How will Webex make Mutual TLS connections to your XSP|ADPs? Directly to the XSP|ADP in a DMZ, or via TLS proxy? This affects your certificate management, and the URLs you use for the interfaces. (We do not support unencrypted TCP connections to the edge of your network).
Customer and User Provisioning
Which user provisioning method suits you best?
-
Flowthrough Provisioning With Trusted Emails: By assigning the “Integrated IM&P” service on BroadWorks, the subscriber is automatically provisioned in Webex.
If you can also assert that the subscriber email addresses in BroadWorks are valid, and unique to Webex, then you can use the "trusted email" variant of flowthrough provisioning. Subscriber Webex accounts are created and activated without their intervention; they simply download the client and sign in.
Email Address is a key user attribute on Webex. Therefore the Service Provider must supply a valid email address for the user in order to provision them for Webex services. This must be in the user’s Email ID attribute in BroadWorks. We recommend that you copy it into the Alternate ID attribute as well.
-
Flowthrough Provisioning Without Trusted Emails: If you cannot trust the subscriber email addresses, you can still assign the Integrated IM&P service in BroadWorks to provision users in Webex.
With this option, the accounts are created when you assign the service, but the subscribers need to supply and validate their email addresses to activate the Webex accounts.
-
User Self-Provisioning: This option does not require IM&P service assignment in BroadWorks. You (or your customers) distribute a provisioning link instead, and the links to download the different clients, with your branding and instructions.
Subscribers follow the link, then supply and validate their email addresses to create and activate their Webex accounts. Then they download the client and sign in, and Webex fetches some additional configuration about them from BroadWorks (including their primary numbers).
-
SP Controlled Provisioning via APIs: Webex exposes a set of Public APIs that allow Service Providers to build user/subscriber provisioning into their existing workflows.
Provisioning Requirements
The following table summarizes the requirements for each provisioning method. In addition to these requirements, your deployment must meet the general system requirements that are described in this guide.
|
Provisioning Method |
Requirements |
|---|---|
|
Flowthrough Provisioning (Trusted or Untrusted emails) |
The Webex provisioning API adds existing BroadWorks users to Webex automatically once the user meets requirements and you toggle the Integrated IM+P service to on. There are two flows (trusted emails or untrusted emails) which you assign via the Onboarding template on Webex. BroadWorks requirements:
Webex requirements: The Onboarding template includes the following settings:
|
|
User Self-Provisioning |
Admin provides an existing BroadWorks user with a link to the User Activation Portal. The user must log in to the portal using BroadWorks credentials and provide a valid email address. After the email is validated, Webex fetches additional user information to complete provisioning. BroadWorks requirements:
Webex requirements: The Onboarding template includes the following settings:
|
SP controlled provisioning via API (Trusted or Untrusted emails) |
Webex exposes a set of public APIs that enable you to build user provisioning into your existing workflows and tools. There are two flows:
BroadWorks Requirements:
Webex Requirements:
To use the APIs, go to BroadWorks Subscribers. |
Required Patches with Flow-through Provisioning
If you are using flow-through provisioning, you must install a system patch and apply a CLI property. Refer to the below list for instructions that apply to your BroadWorks release:
For R22:
-
Install AP.as.22.0.1123.ap376508.
-
After installation, set the property
bw.msg.includeIsEnterpriseInOSSschematotruefrom the CLI inMaintenance/ContainerOptions.For more information, see the patch notes https://www.cisco.com/web/software/286326332/154309/AP.as.22.0.1123.ap376508.txt.
For R23:
-
Install AP.as.23.0.1075.ap376509
-
After installation, set the property
bw.msg.includeIsEnterpriseInOSSschematotruefrom the CLI inMaintenance/ContainerOptions.For more information, see the patch notes https://www.cisco.com/web/software/286326332/154325/AP.as.23.0.1075.ap376509.txt.
For R24:
-
Install AP.as.24.0.944.ap375100
-
After installation, set the property
bw.msg.includeIsEnterpriseInOSSschematotruefrom the CLI inMaintenance/ContainerOptions.For more information, see the patch notes https://www.cisco.com/web/software/286326332/154326/AP.as.24.0.944.ap375100.txt.
After you complete these steps, you will be unable to provision new users with UC-One Collaborate services. Newly provisioned users must be Webex for Cisco BroadWorks users.
Supported language locales
When you're provisioning, the system automatically assigns the language from your first provisioned administration user in BroadWorks as the default locale for your customer organization. This setting controls the default language in activation emails, meetings, and meeting invites under that customer organization.
You can use five-character language locales in (ISO-639-1)_(ISO-3166) format. For example, en_US corresponds to English_UnitedStates. If you request only a two-letter language (ISO-639-1 format), the service combines it with a country code from the template and creates a five-character locale. For example, "requestedLanguage_CountryCode." If the system can't generate a valid locale this way, it uses the default locale based on your required language code.
The following table shows supported locales and how two-letter language codes convert to five-character locales.
|
Supported language locales (ISO-639-1)_(ISO-3166) |
If only a two-letter language code is available... | |
|---|---|---|
|
Language code (ISO-639-1) ** |
Use the default sensible locale instead (ISO-639-1)_(ISO-3166) | |
|
en_US en_AU en_GB en_CA |
en |
en_US |
|
fr_FR fr_CA |
fr |
fr_FR |
|
cs_CZ |
cs |
cs_CZ |
|
da_DK |
da |
da_DK |
|
de_DE |
de |
de_DE |
|
hu_HU |
hu |
hu_HU |
|
id_ID |
id |
id_ID |
|
it_IT |
it |
it_IT |
|
ja_JP |
ja |
ja_JP |
|
ko_KR |
ko |
ko_KR |
|
es_ES es_CO es_MX |
es |
es_ES |
|
nl_NL |
nl |
nl_NL |
|
nb_NO |
nb |
nb_NO |
|
pl_PL |
pl |
pl_PL |
|
pt_PT pt_BR |
pt |
pt_PT |
|
ru_RU |
ru |
ru_RU |
|
ro_RO |
ro |
ro_RO |
|
zh_CN zh_TW |
zh |
zh_CN |
|
sv_SE |
sv |
sv_SE |
|
ar_SA |
ar |
ar_SA |
|
tr_TR |
tr |
tr_TR |
Webex Meetings doesn't support the locales es_CO, id_ID, nb_NO, and pt_PT on your site. When you try to use these locales, your Webex Meetings site displays in English only. If you don't specify a language, enter an invalid one, or choose an unsupported option, English becomes the default locale for your site. You work with this language field when you're creating an organization and setting up your Webex Meetings site. If you don't specify a language in your post or subscriber API, the system uses the language from your template as the default.
Branding
Partner administrators can use Advanced Branding Customizations to customize how the Webex App looks for the customer organizations that the partner manages. Partner administrators can customize the following settings to ensure that the Webex App reflects their company brand and identity:
-
Company logos
-
Unique Color Schemes for Light mode or Dark mode
-
Customized Support URLs
For details on how to customize branding, refer to Configure Advanced Branding Customizations.
-
Basic Branding customizations are in the process of being deprecated. We recommend that you deploy Advanced Branding, which offers a wider range of customizations.
Onboarding templates
Onboarding templates allow you to define the parameters by which customers and associated subscribers are automatically provisioned on Webex for Cisco BroadWorks. You may configure multiple Onboarding templates as required, but when you onboard a customer it is associated with only one template (you cannot apply multiple templates to one customer).
Some of the primary template parameters are listed below.
Package
-
You must select a default package when you create a template (See Packages in the Overview section for details). All users who are provisioned with that template, whether by flowthrough- or self-provisioning, receive the default package.
-
You have control over the package selection for different customers by creating multiple templates and selecting different default packages in each. You could then distribute different provisioning links, or different per-enterprise provisioning adapters, depending on your chosen user provisioning method for those templates.
-
You can change the package of specific subscribers from this default, using the provisioning API (see Webex for Cisco BroadWorks API documentation or through Partner Hub (see Change User Package in Partner Hub).
-
You cannot change a subscriber’s package from BroadWorks. The assignment of the Integrated IM&P service is either on or off; if the subscriber is assigned this service in BroadWorks, the Partner Hub template associated with that subscriber’s enterprise’s provisioning URL defines the package.
Reseller and Enterprises or Service Provider and Groups?
-
The way your BroadWorks system is configured has an impact on flow through provisioning. If you are a reseller with Enterprises, then you need to enable Enterprise mode when you create a template.
-
If your BroadWorks system is configured in Service Provider mode, you can leave the Enterprise mode switch off in your templates.
-
If you plan to provision customer organizations using both BroadWorks modes, you must use different templates for groups and enterprises.
Make sure that you have applied the BroadWorks patches that are required for flow-through provisioning. For details, see Required Patches with Flow-through Provisioning.
Make sure that you have applied the BroadWorks patches that are required for flow-through provisioning. For details, see Required Patches with Flow-through Provisioning.
Multiple Partner Arrangements
Are you going to sub-license Webex for Cisco BroadWorks to another service provider? In this case, each service provider will need a distinct partner organization in Webex Control Hub to allow them provision the solution for their customer base.
Provisioning Adapter and Templates
When you are using flowthrough provisioning, the provisioning URL that you enter in BroadWorks is derived from the template in Control Hub. You can have multiple templates, and therefore multiple provisioning URLs. This enables you to select, on an enterprise by enterprise basis, which package to apply to subscribers when they are granted the Integrated IM&P service.
You need to consider whether you want to set a system level provisioning URL as a default provisioning path, and which template you want to use for that. This way, you only need to explicitly set the provisioning URL for those enterprises that need a different template.
Also, bear in mind that you may already be using a system level provisioning URL, for example with UC-One SaaS. If that is the case, you may opt to preserve the system level URL for provisioning users on UC-One SaaS, and override for those enterprises moving to Webex for Cisco BroadWorks. Alternatively, you may want to go the other way and set the system level URL for Webex for BroadWorks, and reconfigure those enterprises you want to keep on UC-One SaaS.
The configuration choices related to this decision are detailed in Configure Application Server with Provisioning Service URL.
Provisioning Adapter Proxy
For added security, the Provisioning Adapter Proxy lets you use an HTTP(S) proxy on the Application Delivery Platform for flowthrough provisioning between the AS and Webex. The proxy connection creates an end-to-end TCP tunnel that relays traffic between the AS and Webex, thereby negating the need for the AS to connect to the public internet directly. For secure connections, TLS can be used.
This feature requires that you set up the proxy on BroadWorks. For details, see Cisco BroadWorks Provisioning Adapter Proxy Feature Description.
Minimum Requirements
Accounts
All subscribers that you are provisioning for Webex must exist in the BroadWorks system that you integrate with Webex. You can integrate multiple BroadWorks systems if necessary.
All subscribers must have BroadWorks licenses and a primary number or extension.
Webex uses email addresses as primary identifiers for all users. If you are using flowthrough provisioning with trusted emails, then your users must have valid addresses in the email attribute in BroadWorks.
If your template uses BroadWorks authentication, you can copy subscriber email addresses into the Alternate ID attribute in BroadWorks. This makes it possible for users to sign into Webex using their email addresses and their BroadWorks passwords.
Your admins must use their Webex accounts to sign in to Partner Hub.
It is not supported to onboard a BroadWorks administrator to Webex for Cisco BroadWorks. You can only onboard BroadWorks calling users who have a primary number and/or extension. If you are using flowthrough provisioning, users must also be assigned the Integrated IM&P service.
Servers in Your Network and Software Requirements
-
BroadWorks instance(s) with minimum version R22. See BroadWorks Software Requirements (in this document) for supported versions and patches. For more information, see BroadSoft products lifecycle policy section in BroadSoft Lifecycle Policy and BroadWorks Software Compatibility Matrix.
-
The BroadWorks instance(s) should include at least the following servers:
-
Application Server (AS) with BroadWorks version as above
-
Network Server (NS)
-
Profile Server (PS)
-
-
Public-facing XSP|ADP Server(s) or Application Delivery Platform (ADP) meeting the following requirements:
-
Authentication service (BWAuth)
-
XSI actions and events interfaces
-
DMS (device management web application)
-
CTI interface (Computer Telephony Intergration)
-
TLS 1.2 with a valid certificate (not self-signed) and any intermediates required. Requires System Level Admin to facilitate enterprise lookup.
-
Mutual TLS (mTLS) authentication for Authentication Service (Requires the public Webex client certificate chain installed as trust anchors)
-
Mutual TLS (mTLS) authentication for CTI interface (Requires the public Webex client certificate chain installed as trust anchors)
-
-
A separate XSP/ADP server acting as a “Call Notifications Push Server” (an NPS in your environment used to push call notifications to Apple/Google. We call it “CNPS” here to distinguish it from the service in Webex that delivers push notifications for messaging and presence).
This server must be on R22 or later.
-
We mandate a separate XSP/ADP server for CNPS because the unpredictability of the load from Webex for BWKS cloud connections could negatively impact the performance of the NPS server, with the result of increasing notification latency. See the Cisco BroadWorks System Engineering Guide for more on XSP|ADP scale.
Webex App Platforms
To download the English version of the Webex App, go to https://www.webex.com/webexfromserviceproviders-downloads.html. The Webex App is available on:
-
Windows PCs/laptops
-
Apple PCs / laptops with MacOS
-
iOS (Apple store)
-
Android (Play store)
-
Web browsers (go to https://teams.webex.com/)
Localized Versions
To download a localized version of the Webex App, use one of these links:
-
https://www.webex.com/ko/webexfromserviceproviders-downloads.html (Korean)
-
https://www.webex.com/fr/webexfromserviceproviders-downloads.html (French)
-
https://www.webex.com/pt/webexfromserviceproviders-downloads.html (Portuguese)
-
https://www.webex.com/zh-tw/webexfromserviceproviders-downloads.html (Chinese Traditional)
-
https://www.webex.com/zh-cn/webexfromserviceproviders-downloads.html (Chinese Simplified)
-
https://www.webex.com/ja/webexfromserviceproviders-downloads.html (Japan)
-
https://www.webex.com/es/webexfromserviceproviders-downloads.html (Spain)
-
https://www.webex.com/de/webexfromserviceproviders-downloads.html (German)
-
https://www.webex.com/it/webexfromserviceproviders-downloads.html (Italian)
Physical Phones and Accessories
-
Cisco IP phones:
-
Cisco IP Phone 6800 Series with Multiplatform Firmware
-
Cisco IP Phone 7800 Series with Multiplatform Firmware
-
Cisco IP Phone 8800 Series with Multiplatform Firmware
See https://www.cisco.com/c/en/us/products/collaboration-endpoints/ip-phones/multiplatform-firmware.html for models and more information.
-
-
We support third party phones in the same way as with other BroadWorks integrations. However, they do not yet have contacts and presence integration with Webex for Cisco BroadWorks.
-
Adapters:
-
Cisco ATA 191 Multiplatform Analog Telephone Adapter
-
Cisco ATA 192 Multiplatform Analog Telephone Adapter
See https://www.cisco.com/c/en/us/products/unified-communications/ata-190-series-analog-telephone-adapters/index.html for models and more information.
-
-
Headsets:
-
Cisco Headset 500 Series
See https://www.cisco.com/c/en/us/products/collaboration-endpoints/headset-500-series/index.html for models and more information.
-
-
Room OS Devices:
-
Webex Room and Room Kit Series
-
Webex Desk Series
-
Webex Board Series
-
Device Integration
For details on how to onboard and service Room OS and MPP devices for Webex for Cisco BroadWorks, see Device Integration Guide for Webex for Cisco BroadWorks.
Device Profiles
Following are the DTAF files you need to load onto your Application Servers to support the Webex App as a calling client. They are the same DTAF files as used for UC-One SaaS, however there is a new config-wxt.xml.template file that is used for the Webex App.
To download the latest device profiles, go to the Application Delivery Platform Software Downloads site to get the latest DTAF files. These downloads work for both ADP and XSP.
|
Client Name |
Device Profile Type and Package name |
|---|---|
|
Webex Mobile Template |
Identity/Device Profile Type: Connect - Mobile DTAF: Config file: |
|
Webex Tablet Template |
Identity/Device Profile Type: Connect - Tablet DTAF: Config file: |
|
Webex Desktop Template |
Identity/Device Profile Type: Business Communicator - PC DTAF: Config file: |
Identify/Device Profile
All Webex for Cisco BroadWorks users must have an Identity/Device Profile assigned in BroadWorks that uses one of the above device profiles in order to make calls using the Webex App. The profile provides the configuration that allows the user to place calls.
Obtaining OAuth credentials for your Webex for Cisco BroadWorks
Raise a service request with your onboarding agent or with Cisco TAC to provision Cisco OAuth for your Cisco Identity Provider Federation account.
Use the following request title for respective features:
-
XSP|ADP AuthService Configuration' to configure service on XSP|ADP.
-
'NPS Configuration for Auth Proxy Setup' to configure NPS to use authentication proxy.
-
CI User UUID Sync' for CI user UUID sync. For more details on this feature, see: Cisco BroadWorks support for CI UUID.
-
Configure BroadWorks to enable Cisco Billing for BroadWorks and Webex For BroadWorks Subscriptions.
Cisco gives you an OAuth client ID, a client secret, and a refresh token that is valid for 60 days. If the token expires before you use it, you can raise another request.
If you already obtained Cisco OAuth Identity Provider credentials, complete a new service request to update your credentials.
Order Certificates
Certificate requirements for TLS Authentication
You need Security certificates, signed by a well-known certificate authority and deployed on your Public facing XSP|ADPs, for all required applications. You use these to support TLS certificate verification for all inbound connectivity to your XSP|ADP servers.
These certificates should include your XSP|ADP public fully qualified domain name as Subject Common Name or Subject Alternate Name.
The specific requirements for deploying server certificates vary based on the deployment method of your public-facing XSP|ADPs.
-
Over a TLS bridging proxy
-
Over a TLS pass-through proxy
-
Directly to the XSP|ADP
This diagram summarizes where you need to load the CA-signed public server certificate in these three cases:
For details on publicly supported CAs that the Webex App supports for authentication, see Supported Certificate Authorities for Webex Hybrid Services.
TLS Certificate Requirements for TLS-bridge Proxy
-
The publicly signed server certificate is loaded into the proxy.
-
The proxy presents this publicly signed server certificate to Webex.
-
Webex trusts the public CA that signed the proxy’s server certificate.
-
An internal CA signed certificate can be loaded onto the XSP|ADP.
-
The XSP|ADP presents this internally signed server certificate to the proxy.
-
The proxy trusts the internal CA that signed the XSP|ADP server certificate.
TLS Certificate Requirements for TLS-passthrough Proxy or XSP|ADP in DMZ
-
The publicly signed server certificate is loaded into the XSP|ADPs.
-
The XSP|ADPs present publicly signed server certificates to Webex.
-
Webex trusts the public CA that signed the XSP|ADPs’ server certificates.
Additional certificate requirements for mutual TLS authentication over CTI interface
When connecting to the CTI interface, Webex presents a client certificate as part of Mutual TLS authentication. The Webex client certificate CA/chain certificate is available for download through Control Hub.
To download the certificate:
Sign in to Partner Hub.
Click the Services card.
Go to Additional links, and click the Download Webex CA certificate link.
The specific requirements for deploying a Webex CA certificate chain vary based on the deployment method of your public-facing XSP|ADPs.
-
Over a TLS bridging proxy
-
Over a TLS pass-through proxy
-
Directly to the XSP|ADP
This diagram summarizes the certificate requirements in these three cases:
(Option) Certificate requirements for TLS-bridge proxy
-
Webex presents a publicly signed client certificate to the proxy.
-
The proxy trusts the Cisco internal CA that signed the client certificate. You can download this CA / chain from Control Hub and add it to the proxy’s trust store. Load the publicly signed XSP|ADP server certificate into the proxy.
-
The proxy presents the publicly signed server certificate to Webex.
-
Webex trusts the public CA that signed the proxy’s server certificate.
-
The proxy presents an internally signed client certificate to the XSP|ADPs.
This certificate must have the x509.v3 extension field Extended Key Usage populated with the BroadWorks OID 1.3.6.1.4.1.6431.1.1.8.2.1.3 and the TLS clientAuth purpose. For example:
X509v3 extensions:
    X509v3 Extended Key Usage:
        1.3.6.1.4.1.6431.1.1.8.2.1.3, TLS Web Client Authentication
The CN of the internal certificate must be
bwcticlient.webex.com.-
There's no support for SAN certificates, when generating internal client certificates for the proxy. Internal server certificates for the XSP|ADP can be SAN.
-
Public certificate authorities might be unwilling to sign certificates that require the proprietary BroadWorks OID. If there is a bridging proxy, you have to use an internal CA to sign the client certificate that the proxy presents to the XSP|ADP.
-
-
The XSP|ADPs trust the internal CA.
-
The XSP|ADPs presents an internally signed server certificate.
-
The proxy trusts the internal CA.
-
The Application Server’s ClientIdentity contains the CN of the internally signed client certificate presented to the XSP|ADP by the proxy.
(Option) Certificate requirements for TLS-passthrough proxy or XSP|ADP in DMZ
-
Webex presents a Cisco internal CA-signed client certificate to the XSP|ADPs.
-
The XSP|ADPs trust the Cisco internal CA that signed the client certificate. You can download this CA / chain from Control Hub and add it to the proxy’s trust store. You can also load the publicly signed XSP|ADP server certificate into the XSP|ADPs.
-
The XSP|ADPs presents the publicly signed server certificates to Webex.
-
Webex trusts the public CA that signed the XSP|ADPs’ server certificates.
-
The Application Server ClientIdentity contains the CN of the Cisco-signed client certificate presented to the XSP|ADP by Webex.
Prepare Your Network
For more information on connections that are used by Webex for Cisco BroadWorks, see: Network Requirements for Webex for Cisco BroadWorks. This article has the list of IP addresses, ports and protocols required to configure your firewall Ingress and Egress rules.
Network Requirements for Webex Services
The preceding Ingress and Egress Rules firewall tables document only the connections that are specific to Webex for Cisco BroadWorks. For general information on connections between the Webex app and the Webex cloud, see Network Requirements for Webex Services. This article is generic to Webex, but the following table identifies the different sections of the article and how relevant each section is to Webex for Cisco BroadWorks.
|
Section of Network Requirements Article |
Relevance of Information |
|---|---|
|
Informational | |
|
Transport protocols and encryption ciphers for cloud registered Webex apps and devices |
Informational |
|
Must read | |
|
Must read | |
|
Domains and URLs that need to be accessed for Webex Services |
Must read |
|
Optional | |
|
Optional | |
|
Optional | |
|
Optional | |
|
Optional | |
|
Optional | |
|
Webex Services for FedRAMP customers |
N/A |
Additional Information
For additional information, see Webex App Firewall Whitepaper (PDF).
BroadWorks Redundancy Support
The Webex Cloud Services and the Webex Client Apps that need to access the partner’s network fully support the Broadworks XSP|ADP redundancy provided by the partner. When an XSP|ADP or site is unavailable for planned maintenance or unplanned reason, the Webex services & apps are able to advance to another XSP|ADP or site provided by the partner in order to complete a request.
Network Topology
The Broadworks XSP|ADPs can be deployed directly on the Internet, or can reside in a DMZ fronted by a load balancing element such as the F5 BIG-IP. To provide geo-redundancy, the XSP|ADPs can be deployed in two (or more) datacenters, each can be fronted by a load balancer, each having a public IP address. If the XSP|ADPs are behind a load balancer, the Webex microservices and App see only the IP address of the load balancer and Broadworks appears to have just one XSP|ADP, even if there are multiple XSP|ADPs behind.
In the example below, the XSP|ADPs are deployed at two sites, Site A and Site B. There are two XSP|ADPs fronted by a Load Balancer at each site. Site A has XSP|ADP1 and XSP|ADP2 fronted by LB1, and Site B has XSP|ADP3 and XSP|ADP4 fronted by LB2. Only the Load Balancers are exposed on the public network, and the XSP|ADPs are in the DMZ private networks.
Webex Cloud Services
DNS Configuration
The Webex Cloud microservices must be able to find the Broadworks XSP|ADP server(s) for connecting to the Xsi interfaces, authentication service and CTI.
Webex Cloud microservices will perform DNS A/AAAA lookup of the configured XSP|ADP hostname and connect to the returned IP Address. This could be a load balancing edge element, or it could be the XSP|ADP server itself. If multiple IP Addresses are returned, the first IP in the list will be selected. SRV lookup are not currently supported.
Example: The partner’s DNS A Record for discovery of Round-Robin balanced internet-facing XSP|ADP server/Load Balancers.
|
Record Type |
Name |
Target |
Purpose |
|---|---|---|---|
|
A |
|
|
Points to LB1 (Site A) |
|
A |
|
|
Points to LB2 (Site B) |
Any reference to XSP includes either XSP or ADP.
Failover
When the Webex microservices send a request to the XSP|ADP/Load Balancer and the request fails, several things can happen:
-
If the failure is due to a network error (ex: TCP, SSL), the Webex microservices mark the IP as blocked and immediately perform a route advance to the next IP.
-
If an error code (HTTP 5xx) is returned, the Webex microservices mark the IP as blocked and immediately perform a route advance to the next IP.
-
If no HTTP response is received within 2 seconds, the request times out and the Webex microservices mark the IP as blocked and perform a route advance to the next IP.
Each request is tried 3 times before a failure is reported back to the microservice.
When an IP is in the blocked list, it will not be included in the list of addresses to try when sending a request to a XSP|ADP. After a predetermined period of time, a blocked IP expires and goes back in the list to try when another request is made.
If all IP addresses are blocked, the microservice will still try to send the request by randomly selecting an IP address from the blocked list. If successful, that IP address is removed from the blocked list.
Status
The status of the connectivity of the Webex Cloud services to the XSP|ADPs or Load Balancers can be seen in Control Hub. Under a BroadWorks Calling Cluster, a connection status is displayed for each of these interfaces:
-
XSI Actions
-
XSI Events
-
Authentication Service
The connection status is updated when the page is loaded or during input updates. The connections statuses can be:
-
Green: When the interface can be reached on one of the IPs in the A record lookup.
-
Red: When all IPs in the A record lookup are unreachable and the interface is unavailable.
The following services use the microservices to connect to the XSP|ADPs and are impacted by the XSP|ADP interface availability:
-
Webex App Login
-
Webex App token refresh
-
Untrusted email/self activation
-
Broadworks Service Health Check
Webex App
DNS Configuration
The Webex App accesses the Xtended Services Interface (XSI-Actions & XSI-Events) and Device Management Service (DMS) services on the XSP|ADP.
To find the XSI service, the Webex App performs DNS SRV lookup for
_xsi-client._tcp.<webex app xsi domain>. The SRV points
to the configured URL for the XSP|ADP hosts or load balancers for the XSI service.
If SRV lookup is not available, the Webex App falls back to A/AAAA lookup.
The SRV can resolve to multiple A/AAAA targets. However, each A/AAAA record must map to a single IP address only. If there are multiple XSP|ADPs in a DMZ behind the load balancer/edge device, it is required that the load balancer be configured to maintain session persistence to route all requests of the same session to the same XSP|ADP. We mandate this configuration because the client's XSI-event heartbeats must go to the same XSP|ADP that is used to establish the event channel.
In Example 1, the A/AAAA record for webex-app-XSP|ADP.example.com does not exist, and does not need to. If your DNS requires that one A/AAAA record must be defined, then only 1 IP address should be returned. Regardless, the SRV must still be defined for the Webex App.
If the Webex App uses the A/AAAA name that resolves to more than one IP address, or if the load balancer/edge element does not maintain session persistence, the client eventually sends heartbeats to an XSP|ADP where it did not establish an event channel. This results in the channel being torn down, and also in significantly more internal traffic which impairs your XSP|ADP cluster performance.
Because the Webex Cloud and Webex App have different requirements in A/AAAA record lookup,
you must use a separate FQDN for the Webex Cloud and Webex App to access your
XSP|ADPs. As shown in the examples, Webex Cloud uses A record
webex-cloud-xsp.example.com, and Webex App uses SRV
_xsi-client._tcp.webex-app-xsp.example.com.
Example 1—Multiple XSP|ADPs, each behind separate load balancers
In this example, the SRV points to mutiple A records with each A record pointing to a different load balancer at a different site. The Webex App will always use the first IP address in the list and will only move to the next record if the first is down.
Below is an example of SRV records.
|
Record Type |
Record |
Target |
Purpose |
|---|---|---|---|
|
SRV |
|
|
Client discovery of Xsi interface |
|
SRV |
|
|
Client discovery of Xsi interface |
|
A |
|
|
Points to LB1 (site A) |
|
A |
|
|
Points to LB2 (site B) |
Example 2—Multiple XSP|ADPs behind a single load balancer (with TLS Bridge)
For the initial request, the load balancer selects a random XSP|ADP. That XSP|ADP returns a cookie that the Webex App includes in future requests. For future requests, the load balancer uses the cookie to route the connection to the correct XSP|ADP, ensuring that the event channel doesn't break.
|
Record Type |
Record |
Target |
Purpose |
|---|---|---|---|
|
SRV |
|
|
Load balancer |
|
A |
LB.example.com |
|
IP address of load balancer (XSP|ADPs are behind load balancer) |
DMS URL
During the login process, the Webex App will also retrieve the DMS URL to download its config file. The host in the URL will parsed and the Webex App will perform DNS A/AAAA lookup of the host to connect to the XSP|ADP that hosts the DMS service.
Example: DNS A Record for discovery of Round-Robin balanced internet-facing XSP|ADP server/Load Balancers by Webex App to download config files through DMS:
|
Record Type |
Name |
Target |
Purpose |
|---|---|---|---|
|
A |
|
|
Points to LB1 (site A) |
|
A |
|
|
Points to LB2 (site B) |
Any reference to XSP includes either XSP or ADP.Any reference to XSP includes either XSP or ADP.
How Webex App Finds XSP|ADP Addresses
The client attempts to locate the XSP|ADP nodes using the following DNS flow:
-
Client initially retrieves Xsi-Actions/Xsi-Events URLs from Webex Cloud (you entered them when creating the associated BroadWorks Calling Cluster). The Xsi hostname/domain is parsed from the URL and the client performs SRV lookup as follows:
-
Client performs an SRV lookup for _xsi-client._tcp.<xsi domain>
-
If the SRV lookup returns one or more A/AAAA targets:
-
The client does A/AAAA lookup for those targets and caches the returned IP addresses.
-
The client connects to one of the targets (and therefore its A/AAAA record with a single IP address) based on the SRV priority, then weight (or at random if they’re all equal).
-
-
If the SRV lookup does not return any targets:
The client does A/AAAA lookup of the Xsi root parameter and then tries to connect to the returned IP address. This could be a load balancing edge element, or it could be the XSP|ADP server itself.
As noted, the A/AAAA record must resolve to one IP address for the same reasons.
-
-
(Optional) You may subsequently provide custom XSI-Actions/XSI-Events details in the device configuration for the Webex app, using the following tags:
<protocols> <xsi> <paths> <root>%XSI_ROOT_WXT%</root> <actions>%XSI_ACTIONS_PATH_WXT%</actions> <events>%XSI_EVENTS_PATH_WXT%</events> </paths> </xsi> </protocols>-
These configuration parameters take precedence over any configuration in your BroadWorks Cluster in Control Hub.
-
If they exist, the client will compare against the original XSI address it received via the BroadWorks Cluster configuration.
-
If there is any difference detected, the client will re-initialize its XSI Actions/ XSI Events connectivity. The first step in this is to perform the same DNS lookup process listed under step 1 – this time requesting a lookup for the value in the %XSI_ROOT_WXT% parameter from its configuration file.
Make sure to create the corresponding SRV records if you use this tag to change the Xsi interfaces.
-
Failover
During login, the Webex App performs a DNS SRV lookup for _xsi-client._tcp.<xsi domain>, builds a list of hosts, and connects to one of the hosts based on the SRV priority, then weight. This connected host becomes the selected one for all future requests. An event channel is then opened to the selected host and a heartbeat is sent regularly to verify the channel. All requests sent after the first one include a cookie that is returned in the HTTP response, therefore, it’s important that the load balancer keeps session persistence (affinity) and always sends requests to the same backend XSP|ADP server.
If a request or a heartbeat request to a host fails, several things can happen:
-
If the failure is due to network error (ex: TCP, SSL), the Webex App route advances immediately to the next host on the list.
-
If an error code (HTTP 5xx) is returned, the Webex App marks that IP address as blocked and route advances to the next host on the list.
-
If a response is not received within a period of time, then the request is considered failed due to timeout and the next requests are sent to the next host. However, the timed out request is considered as failed. Some requests are retried after failure (with increasing retry time). The requests that the assumed non vital are not retried.
When a new host is tried successfully, it becomes the new selected host if the host is present in the list. After the last host in the list is tried, the Webex App will rollover to the first one.
In the case of heartbeat, if there are two consecutive request failures, the Webex App will re-initialize the event channel.
Note that the Webex App does not perform fail-back, and DNS service discovery is performed only once at sign-in.
During sign-in, the Webex App tries to download the config file through the XSP|ADP/Dms interface. It performs a A/AAAA record lookup of the host in the retrieved DMS URL and connects to the first IP. It will first try to send the request to download the config file using a SSO token. If this fails for any reason, it will try again but with the device username and password.
Deployment Overview
The following diagrams represent the typical order of your deployment tasks for the different user provisioning modes. Many of the tasks are common to all provisioning modes.
Partner Onboarding for Webex for Cisco BroadWorks
Each Webex for Cisco BroadWorks Service Provider or Reseller needs a to be setup as a Partner Organization for Webex for Cisco BroadWorks. If you have an existing Webex Partner Organization, this can be used.
In order to complete the necessary onboarding, you must execute your Webex Cisco BroadWorks paperwork and new partners must accept the online Indirect Channel Partner Agreement (ICPA). When these steps are completed, Cisco Compliance will create a new Partner Org in Partner Hub (if needed) and send an email with authentication details to the Admin of Record in your paperwork. At the same time, your Partner Activation and/or Customer Success Program Manager will contact you to start your onboarding.
Webex Partners in one region can create customer organizations in any region that we offer the services. For help, see: Data residency in Webex.
Configure Services on Your Webex for Cisco BroadWorks XSP|ADPs
We require that the NPS application be run on a different XSP|ADP. Requirements for that XSP|ADP are described in Configure Call Notifications from your Network.
You need the following applications / services on your XSP|ADPs.
|
Service/Application |
Authentication required |
Service/application purpose |
|---|---|---|
|
Xsi-Events |
TLS (server authenticates itself to clients) |
Call control, service notifications |
|
Xsi-Actions |
TLS (server authenticates itself to clients) |
Call control, actions |
|
Device management |
TLS (server authenticates itself to clients) |
Calling configuration download |
|
Authentication Service |
TLS (server authenticates itself to clients) |
User authentication |
|
Computer Telephony Integration |
mTLS (client and server authenticate each other) |
Telephony presence |
|
Call Settings Webview application |
TLS (server authenticates itself to clients) |
Exposes user call settings in the selfcare portal within the Webex app |
This section describes how to apply the required configurations for TLS and mTLS on these interfaces, but you should reference existing documentation to get the applications installed on your XSP|ADPs.
Co-Residency Requirements
-
Authentication Service must be co-resident with Xsi applications, because those interfaces must accept long-lived tokens for service authorization. The authentication service is required to validate those tokens.
-
Authentication service and Xsi can run on the same port if required.
-
You may separate the other services/applications as required for your scale (dedicated device management XSP|ADP farm, for example).
-
You may co-locate the Xsi, CTI, Authentication Service, and DMS applications.
-
Do not install other applications or services on the XSP|ADPs that are used for integrating BroadWorks with Webex.
-
Do not co-locate the NPS application with any other applications.
Xsi Interfaces
Install and configure the Xsi-Actions and Xsi-Events applications as described in Cisco BroadWorks Xtended Services Interface Configuration Guide.
Only one instance of the Xsi-Events applications should be deployed on the XSP|ADP used for the CTI interface.
All Xsi-Events used for integrating Broadworks with Webex must have the same callControlApplicationName defined under Applications/Xsi-Events/GeneralSettings. For example:
ADP_CLI/Applications/Xsi-Events/GeneralSettings> get
callControlApplicationName = com.broadsoft.xsi-events
When a user is onboarded to Webex, Webex creates a subscription for the user on the AS in order to receive telephony events for presence and call history. The subscription is associated with the callControlApplicationName and the AS uses it to know to which Xsi-Events to send the telephony events.
Changing the callControlApplicationName, or not having the same name on all Xsi-Events webapps will impact subscriptions and telephony events functionality.
Configure Authentication Service (with CI Token Validation)
Use this procedure to configure the Authentication Service to use CI Token Validation with TLS. This authentication method is recommended if you are running R22 or higher and your system supports it.
Mutual TLS (mTLS) is also supported as an alternative authentication method for the Auth Service. If you have multiple Webex organizations running off the same XSP|ADP server, you must use mTLS authentication because CI Token Validation does not support multiple connections to the same XSP|ADP Auth Service.
To configure mTLS authentication for the Auth Service instead of CI Token Validation, refer to the Appendix for Configure Services (with mTLS for the Auth Service).
If you currently use mTLS for the Auth Service, it's not mandatory that you reconfigure to use CI Token Validation with TLS.
-
Obtaining OAuth credentials for your Webex for Cisco BroadWorks.
-
Install the following patches on each XSP|ADP server. Install the patches that are appropriate to your release:
-
For R22:
-
For R23:
-
For R24—no patch required
Any reference to XSP includes either XSP or ADP.
-
-
Install the
AuthenticationServiceapplication on each XSP|ADP service.Run the following command to activate the AuthenticationService application on the XSP|ADP to the /authService context path.
XSP|ADP_CLI/Maintenance/ManagedObjects> activate
                                application AuthenticationService
                            22.0_1.1123/authService
Run this command to deploy the AuthenticationService on the XSP|ADP:
XSP|ADP_CLI/Maintenance/ManagedObjects>
                                deploy application /authServiceBroadWorks SW Manager deploying
                                /authService...
-
Starting with Broadworks build 2022.10, the certificates authorities that are coming with Java are no longer automatically included to the BroadWorks trust store when switching to a new version of java. The AuthenticationService opens a TLS connection to Webex to fetch the access token, and needs to have the following in its truststore to validate the IDBroker and Webex URL:
-
IdenTrust Commercial Root CA 1
-
Go Daddy Root Certificate Authority - G2
Verify that these certificates are present under the following CLI
ADP_CLI/System/SSLCommonSettings/Trusts/Defaults> getIf not present, run the following command to import the default Java trusts:
ADP_CLI/System/SSLCommonSettings/Trusts/Defaults> importJavaCATrustAlternatively, you can manually add these certificates as trust anchors with the following command:
ADP_CLI/System/SSLCommonSettings/Trusts/BroadWorks> updateTrust <alias> <trustAnchorFile>If the ADP is upgraded from a previous release, then the certificate authorities from the old release are automatically imported to the new release and will continue to be imported until they are manually removed.
The AuthenticationService application is exempt from the validatePeerIdentity setting under ADP_CLI/System/SSLCommonSettings/GeneralSettings, and always validates the peer Identity. See the Cisco Broadworks X509 Certificate Validation FD for more info on this setting.
-
-
Configure the Identity Providers by running the following commands on each XSP|ADP server:
XSP|ADP_CLI/Applications/AuthenticationService/IdentityProviders/Cisco> get-
set clientId client-Id-From-Step1 -
set enabled true -
set clientSecret client-Secret-From-Step1 -
set ciResponseBodyMaxSizeInBytes 65536 -
set issuerName <URL>—For theURL, enter the IssuerName URL that applies to your CI Cluster. See following table. -
set issuerUrl <URL>—For theURL, enter the IssuerUrl that applies to your CI Cluster. See the following table. -
set tokenInfoUrl <IdPProxy URL>—Enter the IdP Proxy URL that applies to your Teams Cluster. See the second table that follows.
Table 1. Set issuerName and issuerURL If CI Cluster is... Set issuerName and issuerURL to... US-A
https://idbroker.webex.com/idbEU
https://idbroker-eu.webex.com/idbUS-B
https://idbroker-b-us.webex.com/idbCA
https://idbroker-ca.webex.com/idbSG
https://idbroker-sg.webex.com/idbIN
https://idbroker-in.webex.com/idbAE
https://idbroker-ae.webex.com/idbAU
https://idbroker-au.webex.com/idbIf you don't know your CI Cluster, you can obtain the information from the Customer details in Help Desk view of Control Hub.
Table 2. Set tokenInfoURL If Teams Cluster is... Set tokenInfoURL to...(IdP Proxy URL) ACHM
https://broadworks-idp-proxy-a.wbx2.com/broadworks-idp-proxy/api/v1/idp/authenticateAFRA
https://broadworks-idp-proxy-k.wbx2.com/broadworks-idp-proxy/api/v1/idp/authenticateAORE
https://broadworks-idp-proxy-r.wbx2.com/broadworks-idp-proxy/api/v1/idp/authenticateADXB
https://broadworks-idp-proxy-d.wbx2.com/broadworks-idp-proxy/api/v1/idp/authenticateASYD
https://broadworks-idp-proxy-m.wbx2.com/broadworks-idp-proxy/api/v1/idp/authenticate-
If you don't know your Teams Cluster, you can obtain the information from the Customer details in the Help Desk view of Control Hub.
-
For testing, you can verify that the tokenInfoURL is valid by replacing the "
idp/authenticate" portion of the URL with "ping".
-
-
Specify the Webex entitlement that must be present in the user profile in Webex by running the following command:
XSP|ADP_CLI/Applications/AuthenticationService/IdentityProviders/Cisco/Scopes> set scope broadworks-connector:user -
Configure Identity Providers for Cisco Federation using the following commands on each XSP|ADP server:
XSP|ADP_CLI/Applications/AuthenticationService/IdentityProviders/Cisco/Federation> get-
set flsUrl https://cifls.webex.com/federation -
set refreshPeriodInMinutes 60 -
set refreshToken refresh-Token-From-Step1
-
-
Run the following command to validate that your FLS configuration is working. This command will return the list of Identity Providers:
XSP|ADP_CLI/Applications/AuthService/IdentityProviders/Cisco/Federation/ClusterMap> Get -
Configure Token Management using the following commands on each XSP|ADP server:
-
XSP|ADP_CLI/Applications/AuthenticationService/TokenManagement> -
set tokenIssuer BroadWorks -
set tokenDurationInHours 720
-
-
Generate and Share RSA Keys. You must generate keys on one XSP|ADP then copy them to all other XSP|ADPs. This is due to the following factors:
-
You must use the same public/private key pairs for token encryption/decryption across all instances of the authentication service.
-
The key pair is generated by the authentication service when it is first required to issue a token.
If you cycle keys or change the key length, you need to repeat the following configuration and restart all the XSP|ADPs.
-
Select one XSP|ADP to use for generating a key pair.
-
Use a client to request an encrypted token from that XSP|ADP, by requesting the following URL from the client’s browser:
https://<XSP|ADP-IPAddress>/authService/token?key=BASE64URL(clientPublicKey)(This generates a private / public key pair on the XSP|ADP, if there wasn’t one already)
-
The key store location is not configurable. Export the keys:
XSP|ADP_CLI/Applications/authenticationService/KeyManagement>exportKeys -
Copy the exported file
/var/broadworks/tmp/authService.keysto the same location on the other XSP|ADPs, overwriting an older.keysfile if necessary. -
Import the keys on each of the other XSP|ADPs:
XSP|ADP_CLI/Applications/authenticationService/KeyManagement>
                                    importKeys /var/broadworks/tmp/authService.keys
-
-
Provide the authService URL to the web container. The XSP|ADP’s web container needs the authService URL so it can validate tokens. On each of the XSP|ADPs:
-
Add the authentication service URL as an external authentication service for the BroadWorks Communications Utility:
XSP|ADP_CLI/System/CommunicationUtility/DefaultSettings/ExternalAuthentication/AuthService>set url http://127.0.0.1:80/authService -
Add the authentication service URL to the container:
XSP|ADP_CLI/Maintenance/ContainerOptions> add
                                    tomcat bw.authservice.authServiceUrl
                                    http://127.0.0.1:80/authService
This enables Webex to use the Authentication Service to validate tokens presented as credentials.
-
Check the parameter with
get. -
Restart the XSP|ADP.
-
Remove Client Authentication Requirement for Auth Service (R24 only)
If you have the Authentication Service configured with CI Token validation on R24, you also need to remove the Client Authentication Requirement for the Authentication Service. Run the following CLI command:
ADP_CLI/Interface/Http/SSLCommonSettings/ClientAuthentication/WebApps> set <interfaceIp> <port> AuthenticationService clientAuthReq false
Configuring TLS and Ciphers on the HTTP Interfaces (for XSI and Authentication Service)
The Authentication Service, Xsi-Actions, and Xsi-Events applications use HTTP server interfaces. Levels of TLS configurability for these applications are as follows:
Most general = System > Transport > HTTP > HTTP Server interface = Most specific
The CLI contexts you use to view or modify the different SSL settings are:
| Specificity | CLI context |
| System (global) |
|
| Transport protocols for this system |
|
| HTTP on this system |
|
| Specific HTTP server interfaces on this system |
|
Reading HTTP Server TLS Interface Configuration on the XSP|ADP
-
Sign in to the XSP|ADP and navigate to
XSP|ADP_CLI/Interface/Http/HttpServer> -
Enter the
getcommand and read the results. You should see the interfaces (IP addresses) and, for each, whether they are secure and whether they require client authentication.
Apache tomcat mandates a certificate for each secure interface; the system generates a self-signed certificate if it needs one.
XSP|ADP_CLI/Interface/Http/HttpServer> getAdding TLS 1.2 Protocol to the HTTP Server Interface
The HTTP interface that is interacting with the Webex Cloud must be configured for TLSv1.2. The cloud does not negotiate earlier versions of the TLS protocol.
To configure the TLSv1.2 protocol on the HTTP Server interface:
-
Sign in to the XSP|ADP and navigate to
XSP|ADP_CLI/Interface/Http/HttpServer/SSLSettings/Protocols> -
Enter the command
get <interfaceIp> 443to see which protocols are already used on this interface. -
Enter the command
add <interfaceIp> 443 TLSv1.2to ensure that interface can use TLS 1.2 when communicating with the cloud.
Editing TLS Ciphers Configuration on the HTTP Server Interface
To configure the required ciphers:
-
Sign in to the XSP|ADP and navigate to
XSP|ADP_CLI/Interface/Http/HttpServer/SSLSettings/Ciphers> -
Enter the command
get <interfaceIp> 443to see which ciphers are already used on this interface. There must be at least one from the Cisco recommended suites (see XSP|ADP Identity and Security Requirements in the Overview section). -
Enter the command
add <interfaceIp> 443
                            <cipherName>
to add a cipher to the HTTP Server interface.The XSP|ADP CLI requires the IANA standard cipher suite name, not the openSSL cipher suite name. For example, to add the openSSL cipher
ECDHE-ECDSA-CHACHA20-POLY1305to the HTTP server interface, you would use:XSP|ADP_CLI/Interface/Http/HttpServer/SSLSettings/Ciphers>add 192.0.2.7 443 TLS_ECDHE_ECDSA_WITH_CHACHA20_POLY1305See https://ciphersuite.info/ to find the suite by either name.
Configure Device Management on XSP|ADP, Application Server, and Profile Server
Profile Server and XSP|ADP are mandatory for Device Management. They must be configured according to instructions in the BroadWorks Device Management Configuration Guide.
CTI Interface and Related Configuration
The “inmost to outmost” configuration order is listed below. Following this order is not mandatory.
-
Configure Application Server for CTI Subscriptions
-
Configure XSP|ADPs for mTLS Authenticated CTI Subscriptions
-
Open Inbound Ports for Secure CTI Interface
-
Subscribe Your Webex Organization to BroadWorks CTI Events
Configure Application Server for CTI Subscriptions
Update the ClientIdentity on Application Server with the common name (CN) of the Webex for Cisco BroadWorks CTI client certificate.
For each Application Server you are using with Webex, add the certificate identity to the ClientIdentity as follows:
AS_CLI/System/ClientIdentity> add bwcticlient.webex.com
The common name of the Webex for Cisco BroadWorks client certificate is bwcticlient.webex.com.
Configure TLS and Ciphers on the CTI Interface
The levels of configurability for the XSP|ADP CTI interface are as follows:
Most general = System > Transport > CTI Interfaces > CTI interface = Most specific
The CLI contexts you use to view or modify the different SSL settings are:
|
Specificity |
CLI Context |
|---|---|
|
System (global) (R22 and later) |
XSP|ADP_CLI/System/SSLCommonSettings/JSSE/Ciphers> XSP|ADP_CLI/System/SSLCommonSettings/JSSE/Protocols> |
|
Transport protocols for this system (R22 and later) |
XSP|ADP_CLI/System/SSLCommonSettings/OpenSSL/Ciphers> XSP|ADP_CLI/System/SSLCommonSettings/OpenSSL/Protocols> |
|
All CTI interfaces on this system (R22 and later) |
XSP|ADP_CLI/Interface/CTI/SSLCommonSettings/Ciphers> XSP|ADP_CLI/Interface/CTI/SSLCommonSettings/Protocols> |
|
A specific CTI interface on this system (R22 and later) |
XSP|ADP_CLI/Interface/CTI/CTIServer/SSLSettings/Ciphers> XSP|ADP_CLI/Interface/CTI/CTIServerSSLSettings/Protocols> |
On a fresh install, the following ciphers are installed by default at the system level. If nothing is configured at the interface level (for example, at the CTI interface or HTTP interface), this cipher list applies. Note that this list may change over time:
-
TLS_ECDHE_RSA_WITH_AES_128_GCM_SHA256
-
TLS_ECDHE_ECDSA_WITH_AES_128_GCM_SHA256
-
TLS_ECDHE_RSA_WITH_AES_128_CBC_SHA256
-
TLS_ECDHE_ECDSA_WITH_AES_128_CBC_SHA256
-
TLS_DHE_DSS_WITH_AES_128_GCM_SHA256
-
TLS_DHE_RSA_WITH_AES_128_GCM_SHA256
-
TLS_DHE_RSA_WITH_AES_128_CBC_SHA256
-
TLS_DHE_DSS_WITH_AES_128_CBC_SHA256
-
TLS_ECDH_RSA_WITH_AES_128_GCM_SHA256
-
TLS_ECDH_ECDSA_WITH_AES_128_GCM_SHA256
-
TLS_ECDH_RSA_WITH_AES_128_CBC_SHA256
-
TLS_ECDH_ECDSA_WITH_AES_128_CBC_SHA256
Reading CTI TLS Interface Configuration on the XSP|ADP
-
Sign in to the XSP|ADP and navigate to
XSP|ADP_CLI/Interface/CTI/CTIServer> Enter the
getcommand and read the results. You should see the interfaces (IP addresses) and, for each, whether they require a server certificate and whether they require client authentication.XSP|ADP_CLI/Interface/CTI/CTIServer> get Interface IP Port Secure Server Certificate Client Auth Req ================================================================= 10.155.6.175 8012 true true true
Adding TLS 1.2 Protocol to the CTI Interface
The XSP|ADP CTI interface that is interacting with the Webex Cloud must be configured for TLS v1.2. The cloud does not negotiate earlier versions of the TLS protocol.
To configure the TLSv1.2 protocol on the CTI interface:
-
Sign in to the XSP|ADP and navigate to
XSP|ADP_CLI/Interface/CTI/CTIServer/SSLSettings/Protocols> -
Enter the command
get <interfaceIp>to see which protocols are already used on this interface. -
Enter the command
add <interfaceIp> TLSv1.2to ensure that interface can use TLS 1.2 when communicating with the cloud.
Editing TLS Ciphers Configuration on the CTI Interface
To configure the required ciphers on the CTI interface:
-
Sign in to the XSP|ADP and navigate to
XSP|ADP_CLI/Interface/CTI/CTIServer/SSLSettings/Ciphers> -
Enter the
getcommand to see which ciphers are already used on this interface. There must be at least one from the Cisco recommended suites (see XSP|ADP Identity and Security Requirements in the Overview section). -
Enter the command
add <interfaceIp> <cipherName>to add a cipher to the CTI interface.The XSP|ADP CLI requires the IANA standard cipher suite name, not the openSSL cipher suite name. For example, to add the openSSL cipher
ECDHE-ECDSA-CHACHA20-POLY1305to the CTI interface, you would use:XSP|ADP_CLI/Interface/CTI/CTIServer/SSLSettings/Ciphers> add 192.0.2.7 TLS_ECDHE_ECDSA_WITH_CHACHA20_POLY1305See https://ciphersuite.info/ to find the suite by either name.
Trust Anchors for CTI Interface (R22 and later)
This procedure assumes the XSP|ADPs are either internet-facing or face the internet via pass-through proxy. The certificate configuration is different for a bridging proxy (see TLS Certificate Requirements for TLS-bridge Proxy).
For each XSP|ADP in your infrastructure that is publishing CTI events to Webex, do the following:
-
Sign in to Partner Hub.
-
Go to Services > Additional links and click Download Webex CA Certificate to get
CombinedCertChain2023.txton your local computer.These files contain two sets of two certificates. You need to split the files before you upload them to the XSP|ADPs. All files are required.
-
Split the certificate chain into two certificates -
combinedcertchain2023.txt-
Open
combinedcertchain2023.txtin a text editor. -
Select and cut the first block of text, including the lines
-----BEGIN CERTIFICATE-----and-----END CERTIFICATE-----, and paste the text block into a new file. -
Save the new file as
root2023.txt. -
Save the original file as
issuing2023.txt. The original file should now only have one block of text, surrounded by the lines-----BEGIN CERTIFICATE-----and-----END CERTIFICATE-----.
-
-
Copy both text files to a temporary location on the XSP|ADP you are securing, e.g.
/var/broadworks/tmp/root2023.txtand/var/broadworks/tmp/issuing2023.txt -
Sign in to the XSP|ADP and navigate to
/XSP|ADP_CLI/Interface/CTI/SSLCommonSettings/ClientAuthentication/Trusts> -
(Optional) Run
help updateTrustto see the parameters and command format. -
Upload the certificate files to new trust anchors - 2023
XSP|ADP_CLI/Interface/CTI/SSLCommonSettings/ClientAuthentication/Trusts>
                            updateTrust webexclientroot2023
                            /var/broadworks/tmp/root2023.txt
XSP|ADP_CLI/Interface/CTI/SSLCommonSettings/ClientAuthentication/Trusts> updateTrust webexclientissuing2023 /var/broadworks/tmp/issuing2023.txtAll aliases must have a different name.
webexclientroot2023, andwebexclientissuing2023are example aliases for the trust anchors; you can use your own as long as all entries are unique. -
Confirm the anchors are updated:
XSP|ADP_CLI/Interface/CTI/SSLCommonSettings/ClientAuthentication/Trusts>
                            get
Alias Owner Issuer ============================================================================= webexclientissuing2023 Internal Private TLS SubCA Internal Private Root webexclientroot2023 Internal Private Root Internal Private Root[self-signed] -
Allow clients to authenticate with certificates:
XSP|ADP_CLI/System/CommunicationUtility/DefaultSettings/ExternalAuthentication/CertificateAuthentication> set allowClientApp true
Add CTI Interface and Enable mTLS
-
Add the CTI SSL interface.
The CLI context depends on your BroadWorks version. The command creates a self-signed server certificate on the interface, and forces the interface to require a client certificate.
-
On BroadWorks R22 and R23:
XSP|ADP_CLI/Interface/CTI/CTIServer> add <Interface
                                    IP> 8012 true true true
-
-
Replace the server certificate and key on the XSP|ADP's CTI interfaces. You need the IP address of the CTI interface for this; you can read it from the following context:
-
On BroadWorks R22 and R23:
XSP|ADP_CLI/Interface/CTI/CTIServer> getThen run the following commands to replace the interface’s self-signed certificate with your own certificate and private key:
XSP|ADP_CLI/Interface/CTI/CTIServer/SSLSettings/Certificates>
                                    sslUpdate <interface IP> keyFile</path/to/certificate
                                    key file> certificateFile </path/to/server certificate>
                                    chainFile</path/to/chain file>
-
-
Restart the XSP|ADP.
Enable Access to BroadWorks CTI Events on Webex
You need to add and validate the CTI interface when you configure your clusters in Partner Hub. See Configure Your Partner Organization in Partner Hub for detailed instructions.
-
Specify the CTI address by which Webex can subscribe to BroadWorks CTI Events.
-
CTI subscriptions are on a per-subscriber basis and are only established and maintained while that subscriber is provisioned for Webex for Cisco BroadWorks.
Call Settings Webview
Call Settings Webview (CSWV) is an application hosted on XSP|ADP to enable users to modify their BroadWorks call settings through a webview that they see in the soft client. See the Cisco BroadWorks Call Settings Webview Solution Guide.
Webex makes use of this feature to provide users with access to common BroadWorks call settings that are not native to the Webex App.
If you want your Webex for Cisco BroadWorks subscribers to access call settings beyond the defaults available in the Webex app, you need to deploy Call Settings Webview feature.
Call Settings Webview has two components:
-
Call Settings Webview application, hosted on a Cisco BroadWorks XSP|ADP.
-
The Webex App, which renders the call settings in a Webview.
User Experience
-
Windows users: Click Call Settings and then click .
-
Mac users: Click profile picture, then .
Deploy CSWV on BroadWorks
Install Call Settings Webview on XSP|ADPs
CSWV application must be on the same XSP|ADP(s) that host the Xsi-Actions interface in your environment. It is an unmanaged application on XSP|ADP, so you need to install and deploy a web archive file.
-
Sign in to cisco.com and search for "BWCallSettingsWeb" in the software download section.
-
Find and download the most recent version of the file.
For example,
BWCallSettingsWeb_1.8.2_1.war( https://software.cisco.com/download/home/286326302/type/286326345/release/RI.2022.04) was the most recent at the time of writing. -
Install, activate, and deploy the web archive according to the Cisco BroadWorks Xtended Service Platform Configuration Guide for your XSP|ADP version. (R24 version is https://www.cisco.com/c/dam/en/us/td/docs/voice_ip_comm/broadworks/Design/XSP/BW-XtendedServicesInterfaceConfigGuide.pdf).
-
Copy the .war file to a temporary location on the XSP|ADP, such as
/tmp/. -
Navigate to the following CLI context and run the install command:
XSP|ADP_CLI/Maintenance/ManagedObjects> install
                                    application /tmp/BWCallSettingsWeb_1.7.5_1.war
The BroadWorks software manager validates and installs the file.
-
[Optional] Delete
/tmp/BWCallSettingsWeb_1.7.5_1.war(this file is no longer required). -
Activate the application:
XSP|ADP_CLI/Maintenance/ManagedObjects> activate
                                    application BWCallSettingsWeb 1.7.5 /callsettings
The name and version are mandatory for any application, but for CSWV you must also provide a contextPath because it is an unmanaged application. You can use any value that is not used by another application, for example,
/callsettings. -
Deploy the Call Settings application on the selected context path:
XSP|ADP_CLI/Maintenance/ManagedObjects> deploy
                                    application /callsettings
-
-
You can now predict the call settings URL that you will specify for clients, as follows:
https://<XSP|ADP-FQDN>/callsettings/Notes:
-
You must supply the trailing slash on this URL when you enter it in the client configuration file.
-
The XSP|ADP-FQDN must match the Xsi-Actions FQDN, because CSWV needs to use Xsi-Actions, and CORS is not supported.
-
Make sure to add the
<XSP|ADP-FQDN>to the HttpAlias on each ADP or XSP hosting CSWV:ADP_CLI/Interface/Http/HttpAlias>
-
-
Repeat this procedure for other XSP|ADPs in your Webex for Cisco BroadWorks environment (if necessary).
The Call Settings Webview application is now active on the XSP|ADPs.
Configure the Webex App to use Call Settings Webview
For more detail on client configuration, see Webex for Cisco BroadWorks Configuration Guide.
There's a custom tag in the Webex app configuration file that you can use to set the CSWV URL. This URL shows the call settings to the users through the application interface.
<config>
    <services>
        <web-call-settings target="%WEB_CALL_SETTINGS_TARGET_WXT%">
            <url>%WEB_CALL_SETTINGS_URL_WXT%</url>
        </web-call-settings>
In the Webex app configuration template on BroadWorks, configure the CSWV URL in the %WEB_CALL_SETTINGS_URL_WXT% tag.
If you don't explicitly specify the URL, the default is empty and the call settings page isn't visible to the users.
-
Make sure you have the latest configuration templates for the Webex app (see Device Profiles).
-
Set the Web Call Settings Target to
csw:%WEB_CALL_SETTINGS_TARGET_WXT% csw -
Set the Web Call Settings URL for your environment, for example:
%WEB_CALL_SETTINGS_URL_WXT% https://yourxsp.example.com/callsettings/You derived this value when deploying the CSWV application.
-
The resulting client configuration file should have an entry as follows:
<web-call-settings target="csw">
    <url>https://yourxsp.example.com/callsettings/</url>
</web-call-settings>
Any reference to XSP includes either XSP or ADP.
Configure call push notifications in Webex for BroadWorks
In this document we use the term Call Notifications Push Server (CNPS) to describe an XSP-hosted, or ADP-hosted application that runs in your environment. Your CNPS works with your BroadWorks system to be aware of incoming calls to your users, and pushes notifications of those to the Google Firebase Cloud Messaging (FCM) or Apple Push Notification service (APNs) notification services.
Those services notify the mobile devices of Webex for Cisco BroadWorks subscribers that they have incoming calls on Webex.
For more information about NPS, see the Notification Push Server Feature Description.
A similar mechanism in Webex works with Webex messaging and presence services to push notifications to the Google (FCM) or Apple (APNS) notification services. Those services in turn notify the mobile Webex users of incoming messages or presence changes.
This section describes how to configure NPS for authentication proxy when the NPS doesn’t already support other apps. If you need to migrate a shared NPS to use NPS proxy, see Updating Cisco BroadWorks NPS to Use NPS Proxy.
NPS Proxy Overview
For compatibility with Webex for Cisco BroadWorks, your CNPS must be patched to support the NPS Proxy feature, Push Server for VoIP in UCaaS.
The feature implements a new design in the Notification Push Server to resolve the security vulnerability of sharing push notification certificate private keys with service providers for mobile clients. Instead of sharing push notification certificates and keys with the service provider, the NPS uses a new API to obtain a short-lived push notification token from Webex for Cisco BroadWorks backend, and uses this token for authentication with the Apple APNs and Google FCM services.
The feature also enhances the capability of the Notification Push Server to push notifications to Android devices through the new Google Firebase Cloud Messaging (FCM) HTTPv1 API.
-
For more information, see the Push Server for VoIP in UCaaS Feature Description.
-
The BroadWorks patches for the feature are available on: https://software.cisco.com/download/home/286326302/type/286326345/release/RI.2022.04.
For NPS software and patches, see the section Prepare Your NPS for Webex for Cisco BroadWorks.
Search and download the patch from the software download page.
-
More information on the ADP server can be found at Cisco BroadWorks Application Delivery Platform.
APNS Considerations
Apple will no longer support the HTTP/1-based binary protocol on the Apple Push Notification service after March 31, 2021. We recommend that you configure your XSP|ADP to use the HTTP/2-based interface for APNs. This update requires that your XSP|ADP hosting the NPS be running R22 or later.
Prepare Your NPS for Webex for Cisco BroadWorks
| 1 |
Install and configure a dedicated XSP (minimum version R22), or Application Delivery Platform (ADP). |
| 2 |
Install the NPS Authentication Proxy patches: XSP R22 patches: XSP R23 patches: |
| 3 |
Activate the Notification Push Server application. |
| 4 |
(For Android notifications) Enable the FCM v1 API on the NPS.
|
| 5 |
(For Apple iOS notifications) Enable HTTP/2 on the NPS.
This is exclusive to Release 22 and earlier versions; it is not available in Release 23 and above versions, which only support HTTP/2. |
| 6 |
Attach a techsupport from the NPS XSP/ADP. |
| 7 |
On each AS server:
Example for multiple ADP/XSP: _pushnotification-client._tcp.qaxsps.broadsoft.com SRV 20 20 443 ADP1-qaxsps.broadsoft.com _pushnotification-client._tcp.qaxsps.broadsoft.com SRV 20 20 443 ADP2-qaxsps.broadsoft.com ADP1-qaxsps.broadsoft.com IN A 10.193.78.149 ADP2-qaxsps.broadsoft.com IN A 10.193.78.150 Once set, one of the following is required to pickup the changes:
|
What to do next
For fresh installs of an NPS, go to Configure NPS to use authentication proxy
To migrate an existing Android deployment to FCMv1, go to Migrate NPS to FCMv1
Configure NPS to use authentication proxy
This task applies to a new installation of NPS, dedicated to Webex for Cisco BroadWorks.
If you want to configure the authentication proxy on an NPS that is shared with other mobile apps, see Updating Cisco BroadWorks NPS to Use NPS Proxy.
| 1 |
Obtaining OAuth credentials for your Webex for Cisco BroadWorks. | |||||||||||||||||||
| 2 |
Create the client account on the NPS:
To verify the values you entered match with what you were given, run
The CiscoCI issuerUrl should ALWAYS be US CI cluster irrespective of your location and the default should be: | |||||||||||||||||||
| 3 |
Enter the NPS Proxy URL, and set the token refresh interval (30 minutes recommended):
To enhance the DNS resolution speed, instead of the current FQDN nps.uc-one.broadsoft.com we recommend you to use the appropriate FQDN based on your region. Region-based FQDNs: US East:
US West:
Europe:
Saudi Arabia:
Australia:
If push notifications time out due to a delay in DNS resolution, increase the timeout value in the "/etc/resolv.conf" file on the BroadWorks server. | |||||||||||||||||||
| 4 |
(For Android notifications) Add the Android application ID to the FCM applications context on the NPS.
| |||||||||||||||||||
| 5 |
(For Apple iOS notifications) Add the application ID to the APNS applications context, making sure to omit the Auth key – set it to empty.
| |||||||||||||||||||
| 6 |
Configure the following NPS URLs:
| |||||||||||||||||||
| 7 |
Configure the following NPS connection parameters to the recommended values shown:
| |||||||||||||||||||
| 8 |
Check if the Application Server is screening application IDs, because you may need to add the Webex apps to the allow list: | |||||||||||||||||||
| 9 |
Restart the XSP|ADP: | |||||||||||||||||||
| 10 |
Test call notifications by making calls from a BroadWorks subscriber to two Webex mobile users. Verify that the call notification appears on iOS and Android devices. |
Migrate NPS to FCMv1
This topic contains optional procedures that you can use in Google FCM Console when you have an existing NPS deployment that you need to migrate to FCMv1. There are three procedures:
-
Migrate UC-One clients to FCMv1—When you have existing UCaaS clients and need to migrate them to use FCMv1.
-
Migrate SaaS Clients to FCMv1—When you have existing SaaS clients and need to migrate them to use FCMv1.
-
Update ADP Server—When you are migrating the NPS to an ADP server.
Migrate UC-One Clients to FCMv1
Use the below steps in Google FCM Console to migrate UC-One clients to Google FCM HTTPv1.
If branding is applied to the client, the client must have the Sender ID. In the FCM Console, see . The setting appears in the Project credentials table.
For details, see the Connect Mobile Branding Guide. Refer to
the gcm_defaultSenderId parameter, which is located in the
Branding Kit, Resource folder, branding.xml file with the below syntax:
<string name="gcm_defaultSenderId">xxxxxxxxxxxxx</string>
-
Log into FCM Admin SDK at http://console.firebase.google.com.
-
Select the appropriate Android application.
-
In the General tab, record the project ID
-
Navigate to the service accounts tab to configure a service account. You can create a new service account or configure an existing one.
To create a new Service Account:
-
Click the blue button for create new service account
-
Click on the blue button to generate a new private key
-
Download key to a secure location
To reuse an existing service account:
-
Click on the blue text to view existing service accounts.
-
Identify the service account to use. Service account needs permission firebaseadmin-sdk.
-
On the very right, click the hamburger menu and create a new private key.
-
Download the json file that contains the key and save to a secure location.
-
-
Copy the json file onto the XSP|ADP.
-
Configure the project ID and :
XSP|ADP_CLI/Applications/NotificationPushServer/FCM/Projects> add <project id> <path/to/json-key-file> ...Done XSP|ADP_CLI/Applications/NotificationPushServer/FCM/Projects> get Project ID Accountkey ======================== my_project ******** -
Configure the application:
XSP|ADP_CLI/Applications/NotificationPushServer/FCM/Applications> add <app id> projectId <project id> ...Done XSP|ADP_CLI/Applications/NotificationPushServer/FCM/Applications> get Application ID Project ID ============================== my_app my_project -
Enable FCMv1:
XSP|ADP_CLI/Applications/NotificationPushServer/FCM> set V1Enabled true ...Done -
Run the
bwrestartcommand to restart the XSP|ADP.
Migrate SaaS Clients to FCMv1
Use the below steps on Google FCM Console if you want to migrate SaaS clients to FCMv1.
Make sure that you have already completed the procedure "Configure NPS to Use Authentication Proxy".
-
Disable FCM:
XSP|ADP_CLI/Applications/NotificationPushServer/FCM> set V1Enabled false ...Done -
Run the
bwrestartcommand to restart the XSP|ADP. -
Enable FCM:
XSP|ADP_CLI/Applications/NotificationPushServer/FCM> set V1Enabled true ...Done -
Run the
bwrestartcommand to restart the XSP|ADP.
Update ADP Server
Use the below steps in Google FCM Console if you are migrating the NPS to use an ADP server.
-
Get the JSON file from the Google Cloud Console:
-
On the Google Cloud Console, go to the Service Accounts page.
-
Click Select a project, choose your project and click Open.
-
Find the row of the service account that you want to create a key for, click the More vertical button, then click Create key.
-
Select a Key type and click Create
The file downloads.
-
-
Add FCM to the ADP server:
-
Import the JSON file to the ADP server using the
/bw/installcommand. -
Login to the ADP CLI and add Project and API key:
ADP_CLI/Applications/NotificationPushServer/FCM/Projects> add connect /bw/install/google JSON: -
Next, add the Application and key:
ADP_CLI/Applications/NotificationPushServer/FCM/Applications> add com.broadsoft.ucaas.connect projectId connect-ucaas...Done -
Verify the configuration:
ADP_CLI/Applications/NotificationPushServer/FCM/Projects> g
Project ID Accountkey
========================
connect-ucaas ********

ADP_CLI/Applications/NotificationPushServer/FCM/Applications> g
Application ID Project ID
===================================
com.broadsoft.ucaas.connect connect-ucaas
-
Configure Your Partner Organization in Partner Hub
Configure Your BroadWorks Clusters
[once per cluster]
This is done for the following reasons:
-
To enable Webex cloud to authenticate your users against BroadWorks (via XSP|ADP-hosted authentication service).
-
To enable Webex apps to use Xsi interface for call control.
-
To enable Webex to listen for CTI events published by BroadWorks (telephony presence and call history).
The cluster wizard automatically validates the interfaces as you add them. You can continue editing the cluster if any of the interfaces do not validate successfully, but you cannot save a cluster if there are invalid entries.
We prevent this because a misconfigured cluster could cause issues that are difficult to solve.
What you need to do:
-
Sign in to Partner Hub at
admin.webex.com. -
Open Services page from the side menu, and find Additional links card.
If the admin user does not have visibility of the Additional links card, it is recommended that you must open a case with Cisco TAC.
-
Click Add Cluster.
This launches a wizard where you supply your XSP|ADP interfaces (URLs). You can add a port to the interface URL if you are using a non-standard port.
-
Name this cluster and click Next.
The cluster concept here is simply a collection of interfaces, typically collocated on an XSP|ADP server or farm, that enable Webex to read information from your Application Server (AS). You may have one XSP|ADP per AS cluster, or multiple XSP|ADPs per cluster, or multiple AS clusters per XSP|ADP. Scale requirements for your BroadWorks system are out of scope here.
-
(Optional) Enter a BroadWorks user Account Name and Password that you know is within the BroadWorks system you are connecting to Webex, then click Next.
The validation tests can use this account to validate the connections to the interfaces in the cluster.
-
Add your XSI Actions and XSI Events URLs.
-
Optional. Update the DAS URL with the URL of the Device Activation Service.
-
Optional. Check the Enable direct BroadWorks authentication check box if you want logins to BroadWorks to be direct to BroadWorks. Otherwise, authentication to BroadWorks is proxied through the Webex-hosted IdP proxy service.
This check box affects these login situations:
-
User Activation Portal login—Users must enter their BroadWorks credentials when logging in to the portal. The above setting determines if the login is direct to BroadWorks or is through the IdP Proxy.
-
Client Login—If BroadWorks Authentication is configured in the Onboarding template, the above setting determines if client login to the Webex App is direct to BroadWorks or is proxied through the IdP Proxy.
-
-
Click Next.
-
On the CTI Interface page, do the following:
-
Add the CTI URL and Port for the CTI interface to which you want to connect.
-
Optional. Enable the Call History toggle and then enter your BroadWorks user ID. When this option is selected, BroadWorks call history events get synced to the Webex cloud. Users can view their call history on the Webex App.
-
Optional. Enable the Do not disturb (DND) sync toggle and then enter your BroadWorks user ID. This option syncs DND events between Webex and BroadWorks, ensuring that the feature works the same on both platforms.
-
Optional. Enable the Personal Assistant Status Sync toggle and then enter your BroadWorks user ID. This option synchronizes the personal assistant presence status between the BroadWorks Calling devices and the Webex App.
-
Click Next.
-
-
Add your Authentication Service URL.
-
Select Auth Service with CI token validation.
This option does not require mTLS to protect the connection from Webex, because the Authentication Service properly validates the user token against the Webex identity service before it issues the long-lived token to the user.
-
Review your entries on the final screen, and then click Create. You should see a success message.
Partner Hub passes the URLs to various Webex microservices that test the connections to the supplied interfaces.
-
Click View Clusters and you should see your new cluster, and whether the validation succeeded.
-
The Create button may be disabled on the final (preview) screen of the wizard. If you cannot save the template, it indicates a problem with one of the integrations you just configured.
We implemented this check to prevent errors in subsequent tasks. You can go back through the wizard as you configure your deployment, which may require modifications to your infrastructure (e.g. XSP|ADP, load balancer, or firewall) as documented in this guide, before you can save the template.
Checking the Connections to Your BroadWorks Interfaces
-
Sign in to Partner Hub (admin.webex.com) with your partner administrator credentials.
-
Open Services page from the side menu, and find BroadWorks Calling card.
-
Click View Broadworks Calling.
-
Partner Hub initiates connectivity tests from the various microservices towards the interfaces in the clusters.
After the tests complete, the cluster list page shows status message next to each cluster.
You should see green Success messages. If you see a red Error message, click the affected cluster name to see which setting is causing the problem.
-
Optional. Select a cluster if you want to see existing settings for that cluster, such as XSI-Actions, XSI-Events, DAS URL and the CTI interface settings.
Configure your Onboarding templates
Onboarding templates are the way that you will apply shared configuration to one or more customers as you onboard them via the provisioning methods. You must associate each template with a cluster (that you created in previous section).
You can create as many templates as you need, but only one template can be associated with a customer.
-
Sign in to the Partner Hub and select Customers.
-
Click the Onboarding templates button to view the existing templates.
-
Click Create Template.
-
In the Template Details window, add the Template name, Country or Region and Default email Language.
-
Click the drop-down for the CCW Subscription ID, find the listed subscriptions for the partner, and select the applicable subscription.
This field is shown only for partners migrated from Webex for BroadWorks to Webex.
-
In the Service Setting window, use the Cluster dropdown to choose the cluster you want to use with this template.
-
Enter a Template Name, then click Next.
-
Configure your provisioning mode, using these recommended settings:
Table 3. Recommended Provisioning Settings for Different Provisioning Modes Setting Name
Flowthrough provisioning with trusted emails
Flowthrough provisioning without emails
User self-provisioning
Enable BroadWorks Flow Through Provisioning (include provisioning account credentials if On**)
On
Supply the provisioning Account Name and Password as per BroadWorks configuration.
On
Supply the provisioning Account Name and Password as per BroadWorks configuration.
Off
Automatically Create New Organizations in Control Hub
On†
On†
On†
Service Provider Email Address
Select an email address from the dropdown (you can type some characters, to find the address if it's a long list).
This email address identifies the administrator within your Partner organization who will be granted delegated admin access to any new customer organizations created with the Onboarding template.
Country
Choose which country you use for this template.
The country you choose matches customer organizations that are created with this template to a particular region. At present, the region could be (EMEAR) or (North America and rest of world). See the country to region mappings in this spreadsheet.
The organization country will determine the default global call-in numbers for Cisco PSTN in Webex Meeting Sites. Refer to the Country section of help page for more information.
BroadWorks Enterprise Mode Active
Enable this if the customers you provision with this template are enterprises in BroadWorks.
If they are groups, leave this switch off.
If you have a mix of enterprises and groups in your BroadWorks, you should create different templates for those different cases.
Notes from the table:
-
† This switch ensures that a new customer organization is created if a subscriber’s email domain does not match an existing Webex organization.
This should always be on, unless you are using a manual ordering and fulfilment process (via Cisco Commerce Workspace) to create customer organizations in Webex (before you start provisioning users in those organizations). That option is often referred to as the "Hybrid Provisioning" model, and is out of the scope of this document.
-
** "Provisioning account" refers to the BroadWorks system-level admin account. On BroadWorks, you need an admin account with these attributes: Administrator Type=Provisioning, Read-only=Off.
-
-
Select the default services package for customers using this template (see Packages in the Overview section); either Basic, Standard, Premium or Softphone.
You can override this setting for individual users via Partner Hub.
-
Optional. Check Disable Cisco Webex Free Calling if you want to disable Webex Calls,.
-
For Meeting Join Configuration, select one of the following options:
-
Cisco Call-in Numbers (PSTN)
-
Partner-provided Call-in Numbers (BYoPSTN)—If you select this option, refer the Bring Your Own PSTN Solution Guide for Webex for Cisco BroadWorks for detailed information on how to configure this option.
-
-
Click Next.
-
There are two approaches for provisioning subscribers with regards to how their identities are verified – using Trusted Emails or Untrusted Emails.
In the Trusted Email workflow users provide email addresses to the partner who adds them in BroadWorks. You as a partner are responsible for provisioning the email address as part of either the flow-through or API method.
It is highly recommended to use the Trusted provisioning method because it ensures that all subscribers are fully provisioned by you as a partner and there is no action required from the end users.
In the Untrusted email case users need to verify their emails before provisioning, or users can self-activate themselves.
In the Untrusted case there are several provisioning modes based on the verification settings in the table below:
Table 4. Recommended User Verification Settings for Untrusted Provisioning Modes Setting Name
Flowthrough provisioning without emails
User self-provisioning
Provision Admin First
Recommended*
Not applicable
Allow users to self activate
Not applicable
Required
-
Notes from the table:
-
* Each customer organization in Webex is required to have at least one user with administrator role. The first user to whom you assign Integrated IM&P in BroadWorks takes the customer administrator role if a new customer organization is created in Webex. As a Service Provider you may want to have control over who gets the role. Checking this setting blocks users from completing activation until the first user you provisioned is activated. If you uncheck this setting, then the first user to become active in the new organization becomes the customer administrator.
-
-
Click Next.
-
Select the default authentication mode (either BroadWorks Authentication or Webex Authentication) for user login to Webex.
This setting has no effect on user login to the User Activation Portal. Users must use their BroadWorks user ID and password when logging in to the portal, irrespective of how the Onboarding template is configured.
This setting will be applied to newly created customer organizations only. If partner administrators try to apply a new authentication setting to existing customer organizations, the existing settings apply so that existing users don't lose access. To change the authentication mode for existing customer organizations, you must open a ticket with Cisco TAC.
(See Authentication Mode in the Prepare your Environment section).
-
Click Next.
-
For Preferences, configure the following:
-
Choose whether you want to Prefill user email addresses in login page.
You should only use this option if you selected BroadWorks Authentication and have also have put the users’ email addresses in the Alternate ID attribute in BroadWorks. Otherwise, they will need to use their BroadWorks username. The login page gives an option to change user, if necessary, but this may lead to login issues.
-
If you want to enable directory sync, set the Enable phone directory sync for all new customer organizations toggle to On.
This option enables Webex to read BroadWorks contacts into the customer organization, so that users can find and call them from the Webex app.
-
Enter a Partner Admin.
This name is used in the automated email message from Webex, that invites users to validate their email addresses.
-
Make sure the Allow admin-invite emails when attaching to existing orgs toggle is On (the default setting is On).
-
Click Next.
-
Review your entries on the final screen. You can click the navigation controls at the top of the wizard to go back and change any details. Click Create.
You should see a success message.
Click View Templates and you should see your new template listed with any other templates.
-
Click the template name to modify or delete the template, if necessary.
You do not need to re-enter the provisioning account details. The empty password/password confirm fields are there to change the credentials if you need to, but leave them empty to keep the values you gave to the wizard.
Add more templates if you have different shared configurations you want to provide to customers.
Keep the View Templates page open, as you may need template details for a following task.
Configure Application Server with Provisioning Service URL
This task is only required for flow through provisioning.
Patch Application Server (R22, R23, and R24 only)
-
If you haven't yet done so, apply the following patch that applies to your release:.
-
For R22:
AP.as.22.0.1123.ap373197 -
For R23:
AP.as.23.0.1075.ap373197 -
For R24:
AP.as.24.0.944.ap384177
For a complete list of BroadWorks patches that form the requirement for deploying Webex for Cisco BroadWorks, See BroadWorks Software Requirements in the Reference section.
-
-
Change to the
Maintenance/ContainerOptionscontext. -
Enable the provisioning URL parameter:
/AS_CLI/Maintenance/ContainerOptions> add provisioning bw.imp.useProvisioningUrl true
Get the Provisioning URL(s) from Partner Hub
Refer to the Cisco BroadWorks Application Server Command Line Interface Administration Guide for details (Interface > Messaging and Service > Integrated IM&P) of the AS commands.
-
Sign in to Partner Hub and go to .
-
Click View Templates.
-
Select the template you’re using to provision this enterprise/group’s subscribers in Webex.
The template details display in a flyout pane on the right. If you haven’t yet created a template, you need to do that before you can get the provisioning URL.
-
Copy the Provisioning Adapter URL.
Repeat this for other templates if you have more than one.
(Option) Configure System-Wide Provisioning Parameters on Application Server
You may not want to set system-wide provisioning and service domain if you are using UC-One SaaS. See Decision Points in the Prepare your Environment section.
-
Sign in to the Application Server and configure the messaging interface.
-
AS_CLI/Interface/Messaging> set provisioningUrl provisioningURL -
AS_CLI/Interface/Messaging> set provisioningUserId provisioning_account_name -
AS_CLI/Interface/Messaging> set provisioningPassword provisioning_account_password -
AS_CLI/Interface/Messaging> set enableSynchronization true
-
-
Activate the Integrated IMP interface:
-
/AS_CLI/Service/IntegratedIMP> set serviceDomain example.com -
/AS_CLI/Service/IntegratedIMP/DefaultAttribute> set userAttrIsActive true
-
You must enter the fully qualified name for the provisioningURL parameter, as it was given in Control Hub. If your Application Server cannot access DNS to resolve the hostname, then you must create the mapping in the /etc/hosts file on the AS.
(Option) Configure Per-Enterprise Provisioning Parameters on Application Server
-
In BroadWorks UI, open the enterprise you want to configure, and go to Services > Integrated IM&P.
-
Select Use service domain and enter a dummy value (Webex ignores this parameter. You could use
example.com). -
Select Use Messaging Server.
-
In the URL field, paste the provisioning URL you copied from your template in Partner Hub.
You must enter the fully qualified name for the
provisioningURLparameter, as it was given in Partner Hub. If your Application Server cannot access DNS to resolve the hostname, then you must create the mapping in the/etc/hostsfile on the AS. -
In the Username field, enter a name for the provisioning administrator. This must match the value on the template in Partner Hub.
-
Enter a password for the provisioning administrator. This must match the value on the template in Partner Hub.
-
For Default User Identity for IM&P ID, select Primary.
-
Click Apply.
-
Repeat for other enterprises you want to configure for flow through provisioning.
User Provisioning Data
For information on the user data that gets exchanged between BroadWorks and Webex during user provisioning, see Service Provider User Provisioning.
Pre-provisioning check API
The pre-provisioning check API helps partners and sales teams identify potential errors or conflicts before provisioning a customer or subscriber (user) for a package. Only users or integrations authorized by a user with the partner full administrator role can access this API.
The API performs several validation checks, such as:
-
Whether the subscriber is already assigned to another customer or partner.
-
If the email address is already in use by another subscriber.
-
Conflicts between the requested provisioning parameters and existing Webex records.
This helps you catch and fix problems early, so the provisioning goes smoothly without unexpected errors.
For more information on precheck customer provisioning and precheck subscriber provisioning, see developer.webex.com portal.
Configure partner SSO with OpenID Connect (OIDC) (Recommended)
Partner administrators can configure OIDC SSO for newly created customer organizations. They can configure a single predefined SSO relationship and apply that configuration to the customer organizations they manage, and to their own employees.
The following partner SSO OIDC steps apply to newly created customer organizations only. If partner administrators try to modify the default authentication type to partner SSO OIDC in an existing template, the changes don't apply to the customer organizations already onboarded using the template.
-
Open a service request with Cisco TAC with the details of the OpenID Connect IDP.
The following table shows the mandatory and optional IDP attributes. TAC set up the IDP on the CI and provide you with the redirect URI to be configured on the IDP.
Attribute
Required
Description
IDP Name
Yes
Unique, case-insensitive name. It can include letters, numbers, hyphens, underscores, tildes, and dots. Max length: 128 characters.
OAuth client Id
Yes
Used to request OIDC IdP authentication.
OAuth client Secret
Yes
Used to request OIDC IdP authentication.
List of scopes
Yes
Used to request OIDC IdP authentication. Space-separated list of scopes (for example, openid email profile) must include openid and email.
Authorization Endpoint
Yes if discoveryEndpoint isn’t provided
URL of the IdP's OAuth 2.0 authorization endpoint.
tokenEndpoint
Yes if discoveryEndpoint isn’t provided
URL of the IdP's OAuth 2.0 token endpoint.
Discovery Endpoint
No
URL of the IdP's discovery endpoint for OpenID endpoints discovery.
userInfoEndpoint
No
URL of the IdP's UserInfo endpoint.
Key Set Endpoint
No
URL of the IdP's JSON web key set endpoint.
In addition to the above IDP attributes, you need to specify a partner organization ID in the TAC request.
-
Configure the redirect URI on the OpenID connect IDP.
-
Configure an onboarding template.
For the Authentication Mode setting, select Partner authentication with OpenID Connect
For OpenID Connect IDP Entity ID, enter the IDP name provided during the IDP setup.
Once you've completed the configuration, you can manually verify that the Partner IdP Entity ID is set up correctly.
-
Onboard a customer that uses the template and create a new user in the customer organization.
-
Very that the user can sign in using the SSO authentication flow.
Configure partner SSO with SAML
Partner administrators can configure SAML SSO for newly created customer organizations. They can configure a single predefined SSO relationship and apply that configuration to the customer organizations they manage, and to their own employees.
The following partner SSO steps apply to newly created customer organizations only. If partner administrators try to add Partner SSO to an existing customer organization, the system retains the existing authentication method to prevent existing users from losing access.
| 1 |
Verify that the third-party Identity Provider (IdP) meets the requirements listed in the Requirements for Identity Providers section of Single Sign-On Integration in Control Hub. |
| 2 |
Open a service request with Cisco TAC. TAC must establish a trust relationship between the third-party IdP and Cisco Common Identity service.
If your IdP requires enabling the
|
| 3 |
Upload the CI metadata file that TAC provided to your IdP. |
| 4 |
Configure an onboarding template:
|
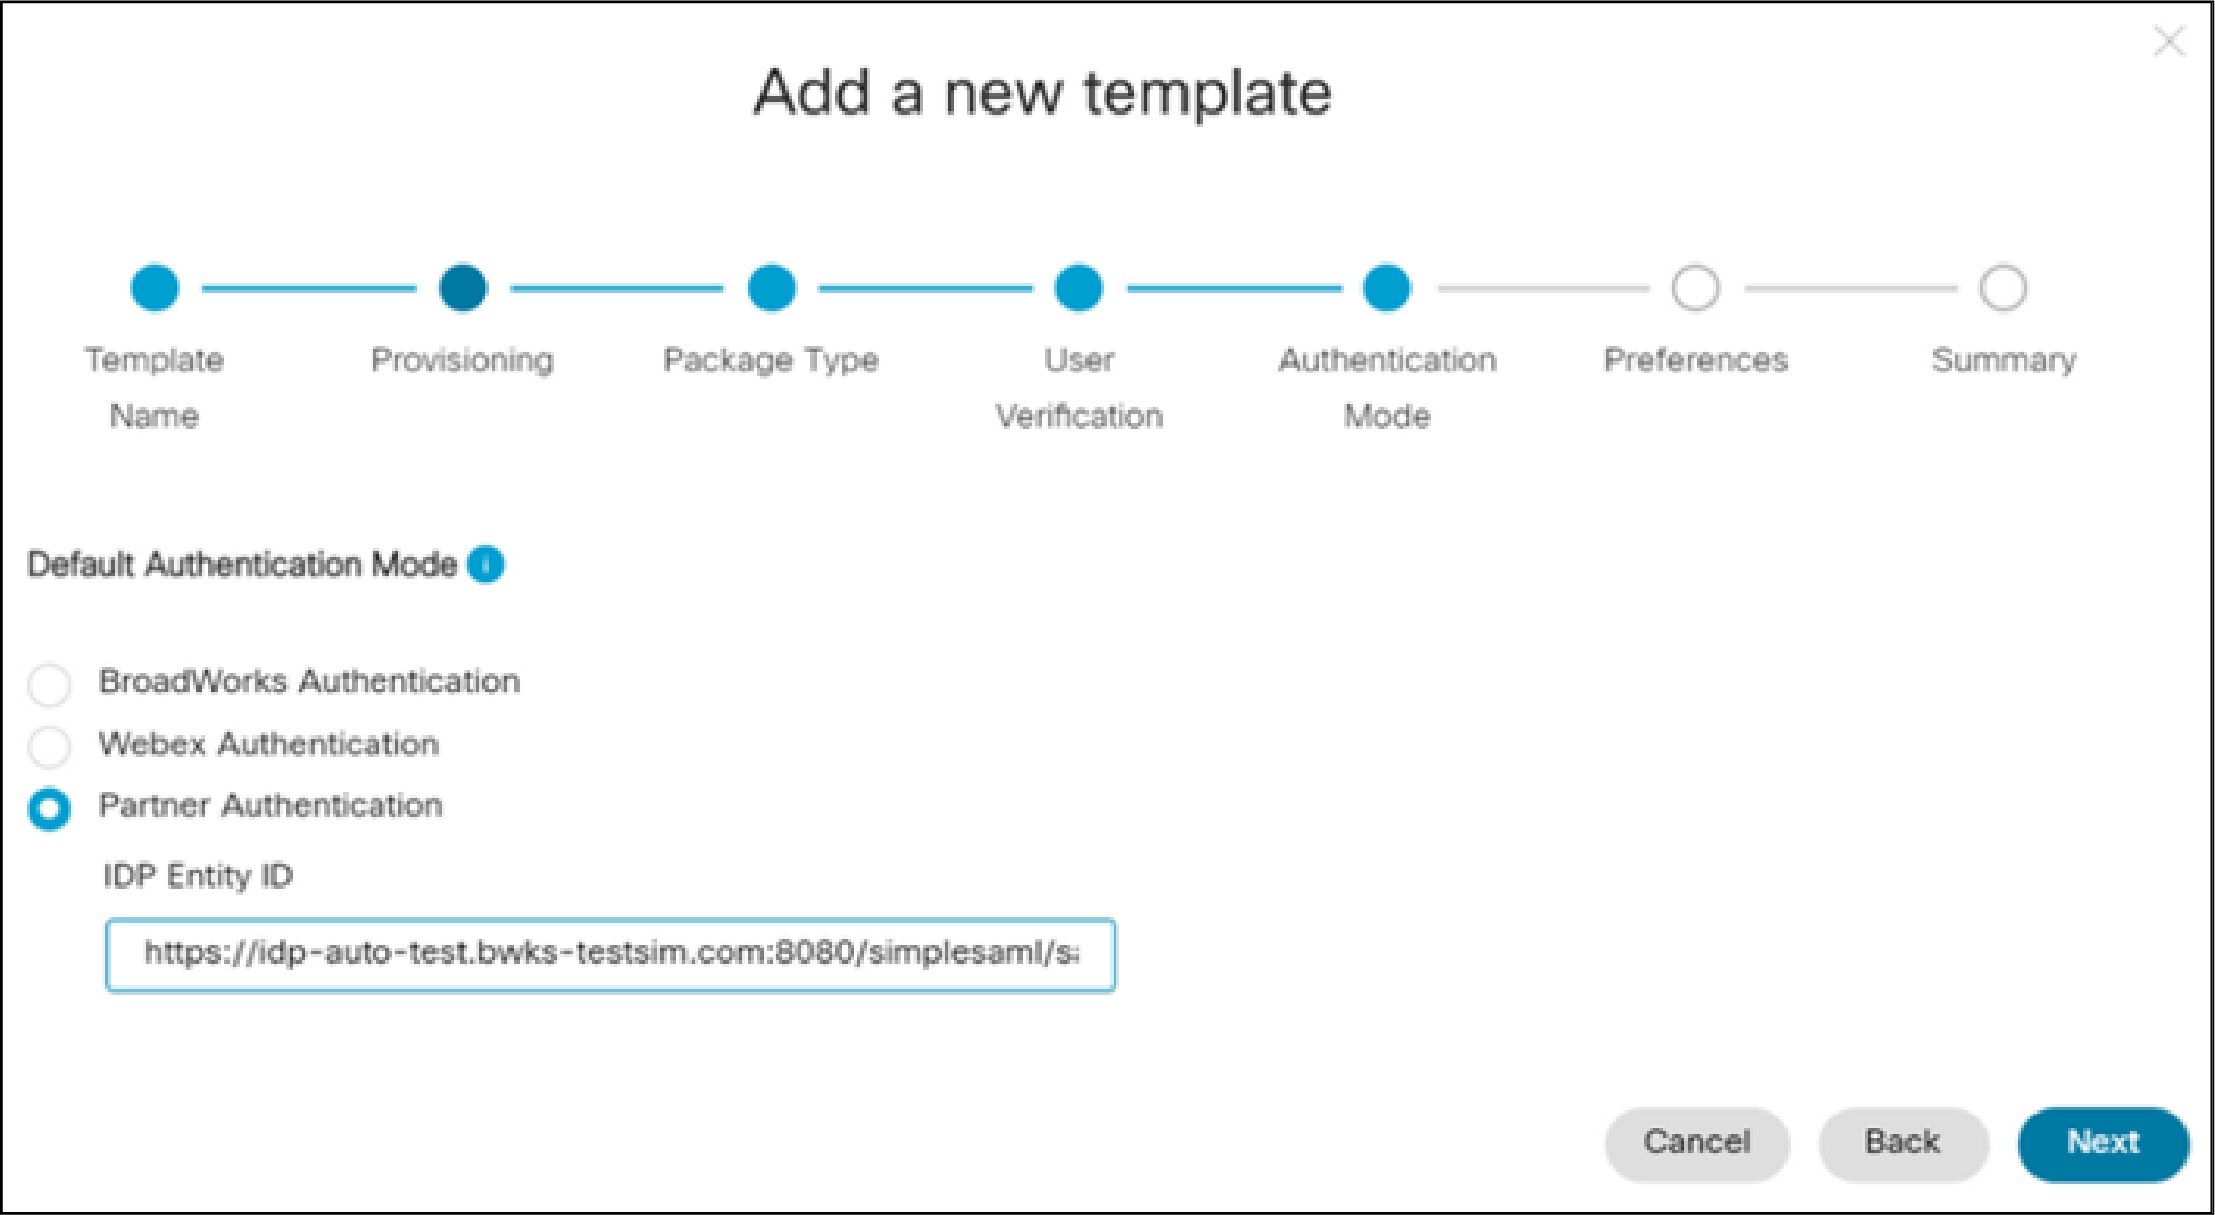
Once you've completed the configuration, you can manually verify that the Partner IdP Entity ID is set up correctly.
-
Onboard a customer that uses the template and create a new user in the customer organization.
-
Verify that the user can sign in.
User sign-in should redirect to the partner IdP sign-in page, and the user must be able to sign in successfully with valid credentials.
Activate BroadWorks IdP in Control Hub
Once you've completed the configuration and verified that the partner IdP is set up correctly, you can activate it in Control Hub.
Before you begin
Configure and verify the partner IdP for single sign-on integration.
| 1 |
Sign in to Control Hub. |
| 2 |
Go to . |
| 3 |
Select Broadworks and click Activate. The IdP appears in the Identity provider tab. |
Enable Call Correlation Identifier
To run Webex for Cisco BroadWorks, it's required that you enable the Call Correlation Identifier. This setting is required for many calling features, including Call Recording, Group Call Pickup, Executive and Executive-Assistant.
Use the CLI to enable the feature on all AS and XSP|ADP interfaces.
-
Run the following commands on AS interfaces. This will enable the AS to send the
X-BroadWorks-Correlation-InfoSIP header:AS_CLI/Interface/SIP> set sendCallCorrelationIDNetwork trueAS_CLI/Interface/SIP> set sendCallCorrelationIDAccess true -
The
enableCallCorrelationIDparameter associated with the Xsi-Actions application is used to control the inclusion of call correlation information in Xsi-Actions logs. It is recommended to haveenableCallCorrelationIDenabled using the following command on XSP|ADP interfaces:XSP|ADP_CLI/Applications/Xsi-Actions/GeneralSettings>set enableCallCorrelationID true
For additional information on the Call Correlation Identifier, see Cisco BroadWorks Call Correlation Identifier Feature Description.
Directory Sync
Directory sync ensures that Webex for Cisco BroadWorks users can use the Webex directory to call any calling entity from the BroadWorks server. When this feature is enabled, the full calling directory from the BroadWorks server gets synced to the Webex directory. Users can access the directory from the Webex App and place a call to any calling entity from the BroadWorks server.
To turn Directory Sync on, go to Directory Sync in Webex for Cisco BroadWorks.
Webex for Cisco BroadWorks flowthrough provisioning adds messaging users and associated calling information from the BroadWorks server to the Webex platform. However, phone lists, non-messaging users, and non-user entities are not included (for example, a conference room phone, fax machine or hunt group number). Turning on Directory sync ensures that all calling entities get added to the Webex platform.
Unified Call History
When Unified Call History is enabled, BroadWorks call events sync to the Webex cloud and become part of the Webex Unified Call and Meetings History that displays on the Webex App. Users can view their own detailed Call history and Meeting history from the Webex App.
Unified Call History can be enabled by partner-level administrators in Partner Hub on a cluster-by-cluster basis. When this feature is turned on, the BroadWorks deployment syncs the following call events to the Webex cloud:
-
Call History events—these events get used to build a detailed Unified Call History
-
Hook Status events—Unified Call History includes hook status optimizations that decrease the amount of network bandwidth for Telephony Presence updates
Unified Call History Requirements
Before configuring Unified Call History, make sure that you’ve patched your system. This feature depends on the following BroadWorks patches being installed. If your system is on a Release Independent (RI) version, the requirements are already included.
For R22:
-
AP.as.22.0.1123.ap378585—after patch installation, you must activate feature 25433. For example:AS_CLI/System/ActivatableFeature> activate 25433
For R23:
-
AP.as.23.0.1075.ap378585—after patch installation, you must activate feature 25433. For example:AS_CLI/System/ActivatableFeature> activate 25433 -
If using XSP—
AP.xsp.23.0.1075.ap378585 -
If using ADP—
Xsi-Events-23_2021.05_1.251.bwar
For R24:
-
AP.as.24.0.944.ap378585—after patch installation, you must activate feature 25433. For example:AS_CLI/System/ActivatableFeature> activate 25433
For the full list of BroadWorks patches that you must install as a prerequisite to running Webex for Cisco BroadWorks, see BroadWorks Software Requirements.
In addition to patching your system, the client config file (config-wxt.xml) must have the following tag set: <call-history enable-unified-history=”%ENABLE_UNIFIED_CALL_HISTORY_WXT%”/>
To have Hunt Group, Call Center and other redirection info in Unified Call History, the following BroadWorks patches must be installed and active:
For R23:
-
AP.as.23.0.1075.ap383346
-
AP.as.23.0.1075.ap383994
For R24:
-
AP.as.24.0.944.ap383346
-
AP.as.24.0.944.ap383994
To have Executive-Assistant info in Unified Call History, the following BroadWorks patches must be installed and active:
For R24:
-
AP.as.24.0.944.ap380052
-
AP.as.24.0.944.ap384239
-
ADP running Xsi-Events-24_2022.06 or later
In addition to the BroadWorks patches, Directory Sync must also be enabled for the Executive-Assistant Unified Call History.
When you enable Call History or DND Sync, Webex sends CTI subscription refresh requests for all users under the cluster. Depending on the number of users, this may last up to a few hours. It’s recommended to not perform any BroadWorks maintenance activity during the same maintenance window.
Enable Call History (New Cluster)
To enable Call History on a new cluster, see the steps for adding a cluster in Configure Your Partner Organization in Partner Hub.
Enable Call History (Existing Cluster)
To enable Call History on an existing cluster, follow the below steps:
-
Sign in to Partner Hub at
admin.webex.com. -
Go to Services.
-
Click View Broadworks Calling and select the appropriate BroadWorks cluster.
-
Verify the cluster connection is good. The right panel should display a green check mark with Connection established.
If this doesn't appear, under Check Connnections (Optional), enter BroadWorks User Id and BroadWorks Password and click Check to verify the connection is good.
-
Check the Enable call history check box.
-
Click Save.
Feature Interactions
The following feature interactions exist for Unified Call History:
-
Unified Call History isn’t supported for users who are configured in BroadWorks with Route Lists or Direct Routes. When this situation exists, Call History and Hook Status events don’t get sent to the Webex App.
-
Unified Call History isn’t supported with extension dialing. Calls that are placed using extension dialing may not be reflected correctly in the Call History.
View Call History on Webex App
End users can access and view their Unified Call History from the Webex App. For details, see: Webex | View Call and Meeting History.
Disable Unified Call History
Once you enable Unified Call History on a cluster, you can’t disable the feature on your own. If you need to disable the feature, contact Cisco Technical Assistance Center (TAC).
Visual Spam Indication
The Webex App supports a visual indication of spam calls in the call toast when the call is presented to the callee and in the Unified Call History records when BroadWorks is updated to perform Caller ID validation through the STIR/SHAKEN framework. To have this feature:
- Enable Unified Call History as described in the previous section.
- The following patches must be installed and active:
- AP.as.23.0.1075.ap384591 / AP.as.24.0.944.ap384591
- or AS-25_Rel_2022.12 at a minimum
- The feature must be activated through the AS CLI:
- AS_CLI/System/ActivatableFeature> activate 104112
- AS_CLI/System/StirShaken> set enableVerification true
- BroadWorks must be configured to perform STIR-SHAKEN signing, tagging, and verification as described in Cisco BroadWorks STIR-SHAKEN Signing Tagging and Verification
When BroadWorks is properly configured, a new header X-Cisco-CallerId-Disposition will be added in INVITE requests sent to Cisco clients and a new field callerIdDisposition will be added to the existing Call History Events that are sent to Webex Cloud through the CTI interface. Webex devices use this information to provide a visual spam indication in the call presentation and the Unified Call History of the callee.
Personal Assistant Status Sync
The Personal Assistant (PA) Status Sync feature synchronizes the personal assistant presence status between the BroadWorks Calling devices and the Webex App.
The PA service provides the user an option to inform the callers the reason the called party isn't available, optionally providing information on when the called party returns and whether there's an attendant to handle the call. PA feature enables users in the Webex Apps to see the user’s Away presence along with the PA status and the duration configured.
Prerequisites
Make sure that the following patches are applied to the AS and XSP|ADP. Apply only the patches for your BroadWorks version.
Patch for RI and Release 24:
-
AP.as.24.0.944.ap385558
XSI Event Package for Personal Assistant Status Synchronization feature introduces a new PersonalAssistantSync event package to allow XSI clients to synchronize with Cisco BroadWorks Personal Assistant presence changes. For more information, see XSI Event Package for Personal Assistant Status Synchronization Feature.
In addition to patching your system, the client config file (config-wxt.xml) must have the following tag set: <personal-assistant enabled="%PERSONAL_ASSISTANT_ENABLED_WXT%"/>
Enable Personal Assistant Status Sync (New Cluster)
To enable Personal Assistant Status Sync on a new cluster, see the steps for adding a cluster in Configure Your Partner Organization in Partner Hub.
Enable Personal Assistant Status Sync (Existing cluster)
-
Sign in to Partner Hub with your partner admin credentials at https://admin.webex.com.
-
Click Services.
-
Click View Broadworks Calling and select the appropriate BroadWorks cluster.
- Under CTI Interface section, enable the Personal Assistant Status Sync toggle.
-
Enter your BroadWorks user ID and click Enable.
The system validates that the BroadWorks cluster has the appropriate patches to support PA Sync. If validation fails, the Save button is disabled.
-
If validation succeeds, click Save.
Enabling PA Status Sync is a one-way toggle. Once the feature is enabled, you can’t disable it on your own.
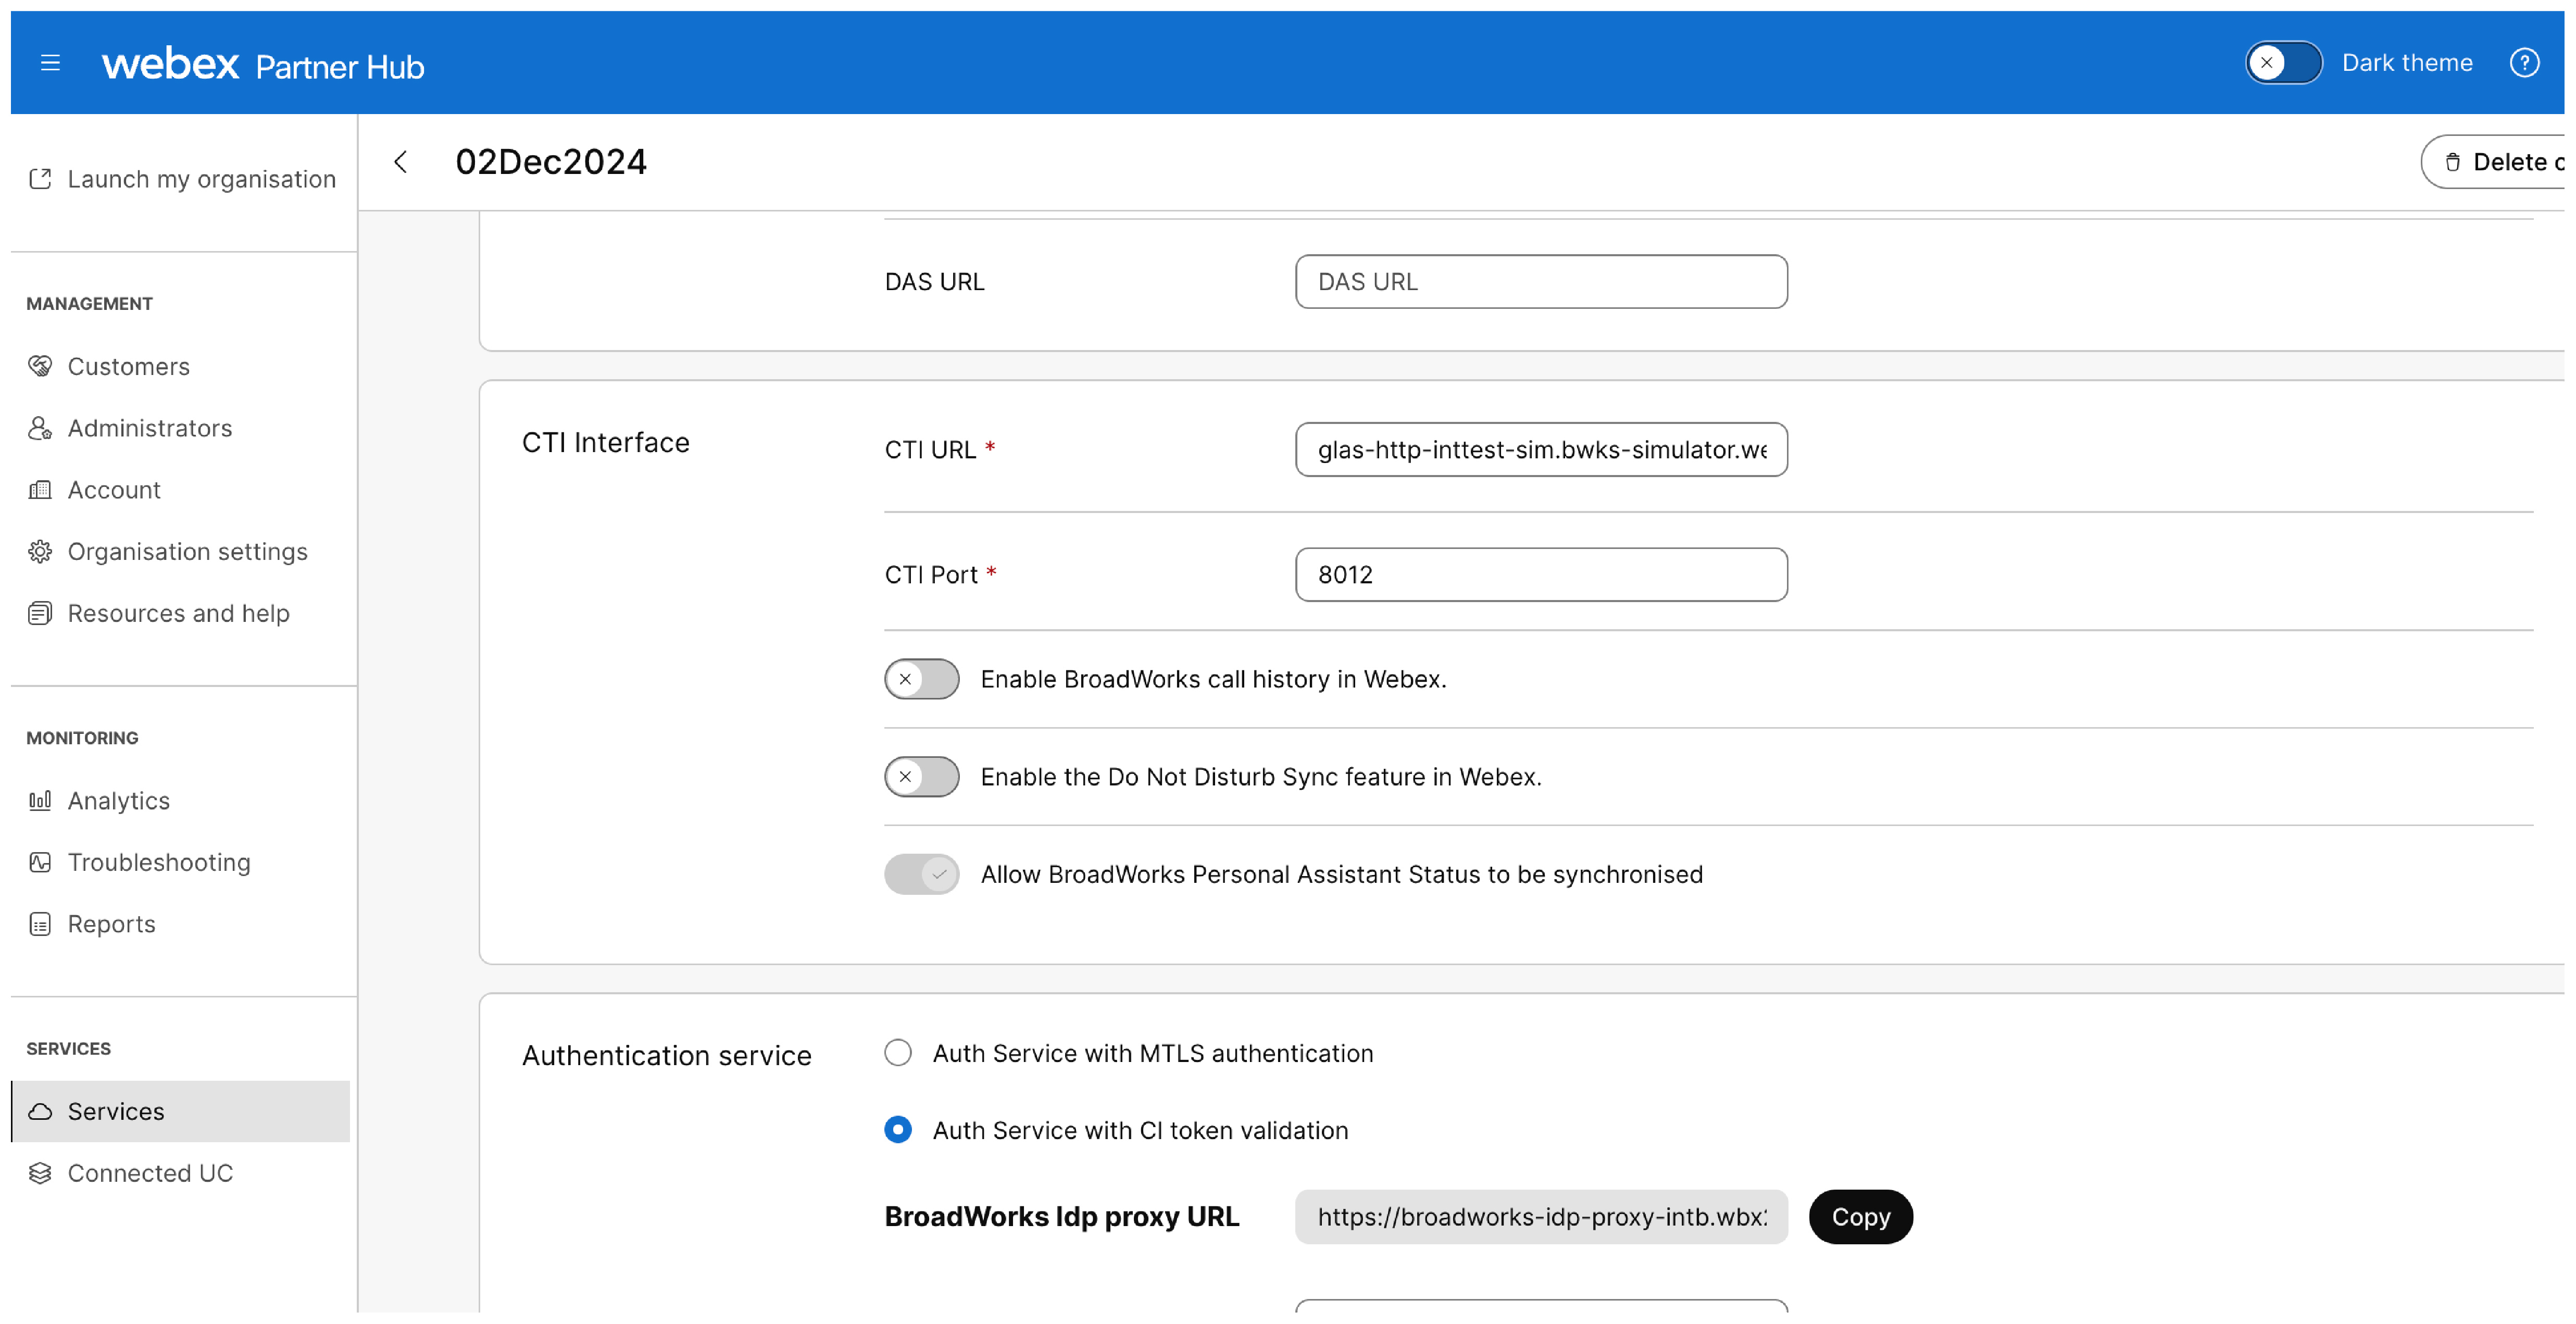
Disable Personal Assistant Status Sync
Once you enable PA Sync status on any of the BroadWorks clusters, you can’t disable this feature on your own. If you need to disable, contact Cisco Technical Assistance Center (TAC).
Caller Identification and Call Redirection
Caller Identification
When the Webex App receives a call, it will attempt to identify who the caller is and display this information in the incoming call notification, the in-call window, and after the call is complete, in the call history and voicemail.
The Webex App will attempt to find the caller ID by matching the incoming phone number with the phone numbers of contacts found in various sources. The Webex App will use the following sources in this order. Once it finds it in one source it will not attempt to search anywhere else.
If it finds multiple instances of a number in one source, it will not try to choose one of them, in this case, it will not display any caller ID.
-
Webex Common Identity (CI) which contains your organization users.
-
Personal and Organization Contacts. Personal Contacts are visible under the Contacts tab.
-
Local Address Book. In Windows - Outlook application, in Mac - Mac Contacts, in iOS - iPhone contacts, in Android - Android contacts.
If there is no match found with the incoming phone number, then the app will use the display name in the SIP FROM header if available. Otherwise, it will use the username part of the SIP URI from the SIP From header as a last resort.
For remote call control (i.e., Deskphone Control Mode) XSI info is used, where BWKS ID or extension is used, extracted from remote-party-info in the XSI event. If remote-party-info is not available, then P-Asserted Identity (PAI) (if configured) will be used.
Call Redirection
In the case where a call has been redirected or forwarded, then the app will attempt to show who the caller is and how it was forwarded in the call notification and call history.
-
Call Forwarded: Shows number that forwarded the call.
-
Hunt Group: Shows name of the hunt group that forwarded the call.
-
Call Center Queue: Shows name of the queue that forwarded the call.
-
Executive-Assistant: Shows name of Executive the call is coming in for.
Exceptions:
-
For internal call queue calls, where an agent calls back an internal party, the remote party will not see the name of the call queue but will see the name of the agent calling them.
Call Answered Elsewhere:
For Hunt Groups or Call Queues that are set up with simultaneous routing, agents will see a call answered elsewhere in call history if another agent picks up the call. For Hunt Groups or Call Queues with sequential routing, or in an overflow, calls will show as missed call in call history if answered by another agent.
Select Caller ID
Overview
The "Select Caller ID" feature enables users to switch between different Calling Line IDs for external calls. If enabled by the admin, users can choose from the following options for their Calling Line Identity:
-
User number ("Use user phone number for Calling Line Identity")
-
Configurable CLID ("Use configurable CLID for Calling Line Identity")
-
Group CLID ("Use group/department phone number for Calling Line Identity")
Functionality
Users have two methods to change their Caller ID as provisioned by the administrator:
-
Feature Access Codes (FAC): Specific codes for each of the three Caller ID options.
-
Webex App Interface: A user-friendly view within the Webex desktop and mobile apps that display the available Caller ID options enabled by the administrator, allowing users to select their preferred ID.
Additional Features
-
The Webex apps will also include options for Call Center queues DNIS.
-
Mobile app users will have Dual Persona options available for Mobility users.
Preconditions
The following conditions must be met on the BroadWorks server for the user to be able to control their choice of external CLID policy:
-
To enable the system flag 'EnableUserSelectionOfExternalCLIDPolicy'
Run the CLI command:
AS_CLI/SubscriberMgmt/Policy/CallProcessing/CallingLineId> set defaultEnableUserSelectionOfCLIDPolicy true. -
To enable 'EnableUserConfigurableCLIDModification'
Run the CLI command:
AS_CLI/SubscriberMgmt/Policy/CallProcessing/CallingLineId> set defaultEnableUserConfigurableCLIDModification true.This enables Allow User Selection of External CLID Policy and Allow User Configurable CLID Modification.
-
User level Call Processing Policy Calling Line ID scope is set to "Use User Calling Line Id Policy" for this user.
-
The User level Call Processing Policies flag 'Allow User Selection of External CLID Policy' is enabled for the user.
-
If no number is defined for the "Use configurable CLID for Calling Line Identity" or "Use group/department phone number for Calling Line Identity" options, the FACs or app display will have no effect. This setting must be configured by the administrator prior to user selection.
For more information see, User Selection of External Calling Line ID Option feature description guide.
BroadWorks Patches
This feature requires two specific BroadWorks patches to function correctly:
Refer to Section 8 Release Independent and Service Patch Information.
-
BWKS-5230 was the original user-selectable CLID feature - it lets users (if the system is configured properly) change which CLID policy is applicable. See FD here: https://www.cisco.com/c/dam/en/us/td/docs/voice_ip_comm/broadworks/FD/AS/UserSelectionOfExternalCallingLineIDOptionFD-R250.pdf
-
BWKS-9510 is an XSI enhancement requested by the Webex client team to make it easier to discover which options are available for a user. This is necessary because the choice of CLID policy isn't a simple user-level feature (like CFA) that is directly controllable. Rather it depends on various system configuration options and the "call processing policies" hierarchy. You can see details here: https://www.cisco.com/c/dam/en/us/td/docs/voice_ip_comm/broadworks/FD/AS/XSIEnhancementToSupportUserSelectableCLIDFD-R250.pdf
Webex App Configuration
These tag needs to be enabled in the desktop, tablet, and mobile configurations:
<config>
<services>
<calls>
<caller-id>
<outgoing-calls enabled="%ENABLE_CLID_OUTGOING_CALLS_WXT%">
Shared line appearance
Shared line appearance is the ability to provision other users' lines as shared lines on the end-user device. The shared line configuration for the Webex App is similar to the shared line configuration for desk phones. This specific feature allows you to assign shared line appearances to the end user's Webex App.
This feature benefits the users to handle calls on other user's extension directly from the Webex App.
-
You can configure shared line appearance only for the desktop version of a Webex App.
-
You can add a maximum of 10 lines including the primary line to Webex App.
-
You can't assign workspace line as shared line.
-
A user cannot be provisioned with Executive-Assistant service at the same time as having Shared Lines.
-
A user's primary line port should not be changed to a Shared Line.
Requirements
To deploy this feature on Webex for Cisco BroadWorks, you must deploy the following BroadWorks patches:
Patch 1: Owner Flag in Device List to Support Webex Client Shared Lines
R23 without ADP:
-
AP.as.23.0.1075.ap384179
-
AP.xsp.23.0.1075.ap384179
R23 with ADP:
-
AP.as.23.0.1075.ap384179
-
Xsi-Actions-23_2022.10
R24:
-
AS: AP.as.24.0.944.ap384179
-
Xsi-Actions-24_2022.10
R25:
-
AS: RI release Rel_2022.10_1.310
-
Xsi-Actions-25_2022.10
Patch 2: Patches for increasing port count on device profile types. Example: For the desktop client: System>Identity/Device Profile Type Modify> Business Communicator - PC: Profile , Standard Options, Number of Ports:
- IF 'Unlimited' is enabled, no change is required
- IF 'Limited To' is <10, change the value = 10 and save to utilize all available lines
-
RI release Rel_2022.10_1.310
For details on client configuration, see section 6.1.44 'Primary Profile' from the Webex for Cisco BroadWorks Configuration Guide.
Do Not Disturb (DND) Sync
Do Not Disturb (DND) Sync aligns DND settings between Webex and BroadWorks by synchronizing DND status between the two platforms. For example, if a user turns on DND from the Webex App, that status syncs to BroadWorks calling devices. As a result, the user’s BroadWorks-registered desk phone doesn’t ring when someone attempts to call it. Similarly, if a user sets DND from a desk phone, the status syncs to the Webex App. Without this feature, DND updates from one platform don't get recognized by the other platform.
DND Sync gets applied at the BroadWorks cluster level and can be enabled in Partner Hub by a partner administrator.
If there are many customers (>50) in the BroadWorks cluster, DND sync isn’t supported. In such instances, it’s recommended to contact a Cisco TAC support engineer for assistance.
Prerequisites
Make sure that the following patches are applied to the AS and XSP|ADP. Apply only the patches for your BroadWorks version.
For Release 23:
<snipped>
- ADP apps: Xsi-Actions-23_2022.03_1.220.bwar, Xsi-Events-23_2022.03_1.220.bwar
For Release 24:
<snipped>
- ADP apps: Xsi-Actions-24_2022.03_1.220.bwar, Xsi-Events-24_2022.03_1.220.bwar
After you apply the patches, activate feature 25433 on the AS:
AS_CLI/System/ActivatableFeature> activate 25433
If there are many customers (>50) in the BroadWorks cluster, operations such as updating XSI Actions, XSI Events, DAS URL, XSP|ADP URL, or DND sync aren’t supported. In such instances, it’s recommended to contact a Cisco TAC support engineer for assistance.
Configure Device Feature Key Synchronization on BroadWorks. Make sure that the phone supports SIP SUBSCRIBE/NOTIFY for the “as-feature-event” event package. For details, see Cisco BroadWorks Device Feature Key Synchronization.
Enable DND Sync (Existing cluster)
-
Sign in to Partner Hub
-
Click Services.
-
Click View Broadworks Calling and select the appropriate BroadWorks cluster.
-
Enable the Do not disturb (DND) sync toggle.
-
Enter your BroadWorks user ID and click Enable.
The system validates that the BroadWorks cluster has the appropriate patches to support DND Sync. If validation fails, the Save button gets disabled.
-
If validation succeeds, click Save.
-
Once DND Sync gets enabled, Webex refreshes all user subscriptions to include the Do not disturb event package. Depending on the number of users, this process may take a few hours to complete.
-
Enabling DND Sync is a one-way toggle. Once the feature is enabled, you can’t disable it on your own.
Enable DND Sync (New cluster)
You can also enable the feature during cluster creation. For details, see “Configure Your BroadWorks Clusters” in Configure Your Partner Organization in Partner Hub.
Quiet Hours
In Webex for BroadWorks deployments, the 'Quiet Hours' feature relies on the 'Do Not Disturb (DND) Sync' functionality to ensure that the quiet hours settings are synchronized across all devices. To properly synchronize quiet hours across desktop and mobile devices, ensure that 'DND Sync' is enabled on the user's account.
Disable DND Sync
You can’t disable DND sync on your own. To disable the DND feature, create a TAC case with the title "Disable Do Not Disturb Sync" and provide partnerId and BroadWorks cluster name.
Use Cases
Call Recording
Webex for Cisco BroadWorks supports four modes of call recording.
|
Recording Modes |
Description |
Controls/Indicators that display on the Webex App |
|---|---|---|
|
Always |
Recording is initiated automatically when the call is established. The user has no ability to start or stop recording. |
|
|
Always with Pause/Resume |
Recording is initiated automatically when the call is established. The user can pause and resume recording. |
|
|
OnDemand |
Recording is initiated automatically when call is established, but the recording is deleted unless the user presses Start Recording. If the user starts recording, the full recording from the call setup is retained. After starting the recording, the user can also pause and resume recording |
|
|
OnDemand with User-Initiated Start |
Recording doesn’t initiate unless the user selects the Start Recording option on the Webex App. The user has the option to start and stop recording multiple times during a call. |
|
Requirements
To deploy this feature on Webex for Cisco BroadWorks, you must deploy the following BroadWorks patches. If your system is on a Release Independent (RI) version, the requirements are already included.
-
For R22: AP.as.22.0.1123.ap377718
-
For R23: AP.as.23.0.1075.ap377718
-
For R24: AP.as.24.0.944.ap377718
The Call Correlation Identifier must be turned on. For details, see Enable Call Correlation Identifier.
The following configuration tag must be enabled in order to use this feature: %ENABLE_CALL_RECORDING_WXT%.
This feature requires an integration with a third-party call recording platform.
To configure call recording on BroadWorks, go to the Cisco BroadWorks Call Recording Interface Guide.
Additional Information
For user information on how to use the Recording feature, see Webex | Record Your Calls.
To replay a recording, users or administrators must go to their third-party call recording platform.
Enabling Voicemail for Microsoft Teams Integration
You can enable voicemail for Microsoft Teams users in the Webex for BroadWorks solution. This integration allows users to retrieve their voicemails directly through Microsoft Teams, enhancing the overall user experience.
Steps to Enable Voicemail
To enable Voicemail for BroadWorks, you need to enable the toggle broadworks-voicemail-enabled-spark-541886: true at the organization level.
To enable this feature, contact Cisco Technical Assistance Center (TAC).
User Experience
Once the integration is set up, users can:
- Retrieve voicemails directly within the Microsoft Teams application.
- Receive notifications for new voicemails.
- Manage voicemail settings from the Webex interface.
Requirements
To support voicemail retrieval in the Microsoft Teams integration with the Webex for BroadWorks offer, additional network changes are required. BroadWorks partners should enable Cross-Origin Resource Sharing (CORS) for the following URLs on their BroadWorks platform:
-
https://jabber-integration-a.wbx2.com
-
https://jabber-integration-r.wbx2.com
-
https://jabber-integration-k.wbx2.com
-
https://msteams-calling.webex.com
Ensure that the BroadWorks Voicemail is configured according to the settings outlined in Voicemail Playback.
For more details on the configuration steps, refer to section 8.5.1.2 of the BW Application Delivery Platform Configuration Guide, which requires version 2024.05 on the ADP.
Group Call Park and Retrieve
Webex for Cisco BroadWorks supports Group Call Park and Retrieve. This feature provides a way for users within a group to park calls, which can then be retrieved by other users in the group. For example, retail employees in a store setting could use the feature to park a call that can then be picked up by someone in another department.
Feature Operation
Once the feature is configured
-
While in a call, a user clicks the Park option on their Webex app to park the call at an extension that the system selects automatically. The system displays the extension to the user for a period of 10 seconds.
-
Another user in the group clicks the Retrieve call option on their Webex app. The user then enters the extension of the parked call in order to continue the call.
Requirements
For this feature to work, make sure of the following:
-
The client config file must have the following tags set:
<call-park enabled="%ENABLE_CALL_PARK_WXT%" timer="%CALL_PARK_AUTO_CLOSE_DIALOG_TIMER_WXT%"/> -
The Call Correlation Identifier must be enabled on the AS and XSP|ADP. For details, see Enable Call Correlation Identifier.
-
Your SBC must be configured to pass the ‘
x-broadworks-correlation-in' SIP attribute to and from the Application Server.
Configuration
For information on how to configure Group Call Park on BroadWorks, see “Add Call Park Group” in the Cisco BroadWorks Application Server Group Web Interface Administration Guide – Part 2. You must create a group and add users to the group.
For information on how to configure the Call Correlation Identifier on BroadWorks, see Cisco BroadWorks Call Correlation Identifier Feature Description.
Additional Information
For user information on how to use Group Call Park, see Webex | Park and Retrieve Calls.
Call Park/Directed Call Park
Regular or directed call park is not supported in the Webex app UI, but provisioned users can deploy the feature using Feature Access Codes:
-
Enter *68 to park a call
-
Enter *88 to retrieve a call
Barge-in
Barge-in service is commonly used in call center environments or other situations where immediate assistance or intervention may be required.
When a barge-in service is enabled, a designated user or supervisor can enter an active call by initiating a specific command or by using a dedicated button or key combination on their phone or communication device. Once the barge-in request is made, the system establishes a connection with the ongoing call, allowing the authorized person to listen to the conversation or join the call as an active participant.
Barge-in service can be useful in various scenarios. In a call center setting, supervisors or trainers can monitor and coach customer service representatives by listening to their calls in real-time. If necessary, they can intervene to provide guidance or take over the call if the representative is struggling. In emergency situations or critical discussions, authorized personnel can quickly join ongoing conversations to provide assistance or make important decisions.
In the Webex app for Barge in, we get a notification that the call is transformed into a conference. There is no additional information in the NOTIFY (call-info or conference-info) what is the type of conference, so we can treat it in a different way.
When a barge-in occurs, a three-way call is established between the parties. The following terms are introduced:
-
Supervisor: A supervisor is a person who oversees and manages a team of customer service agents or call center representatives. In the context of call barge-in, a supervisor typically has the ability to monitor and intervene in ongoing customer calls. They may use call monitoring tools or software to listen in on calls, provide guidance to agents, and ensure quality control. The supervisor's role may involve training agents, addressing customer concerns, and optimizing the performance of the team.
-
Customer: A customer refers to an individual or entity that engages with a company or organization to obtain products, services, or support. In the context of call barge-in, a customer is someone who is making or receiving a phone call with a customer service agent. Customers may seek assistance, information, or resolution to their queries or issues during the call. The call barge-in feature allows supervisors or authorized personnel to join the ongoing call between the customer and the agent.
-
Agent: An agent, also known as a customer service representative or call center agent, is a person responsible for handling customer interactions and providing support or assistance over the phone or other communication channels. Agents are trained to address customer inquiries, resolve problems, process transactions, and deliver a positive customer experience. In the context of call barge-in, an agent is the individual speaking directly to the customer during the phone call. The agent may receive guidance or feedback from the supervisor through call barge-in if necessary.
For any client initiated requests such as CallStartRequest, CallPickupRequest, DirectedCallPickupRequest, DirectedCallPickupWithBargeInRequest, etc, if <Webex Client> (please choose the right name instead of Webex client, if it is not appropriate) is provisioned as a Shared Call Appearance device, 'Alert all appearances for Click-to-Dial calls' configuration should be enabled on Shared Call Appearance setting for the client to receive a call, unless the location is explicitly provided by the client initiating the request.
SIP call transfer to Webex Meeting
The SIP call transfer to Webex Meeting comes with two unique features:
-
New Push Notification (Mobile)
Users on a native call can now switch to the Webex App by tapping on the New push notification. When you start a native call screen a new push notification appears on the screen and tapping the notification takes you straight to the Webex App in-call screen.
You see the Webex notification during a mobile phone call if you use Webex Go or your mobile network operator (MNO) has call signaling using Cisco call control for your mobile phone calls.
-
Move Call to Meeting
When you're in the middle of a call with someone, you may want to move that call into a meeting to make use of some advanced meetings features like video, share, or whiteboarding. Or invite other people into the discussion and move to a meeting.
BroadWorks requirements
-
Activatable feature 25239
-
R23 with XSP|ADP:
-
AS Patch AP.as.23.0.1075.ap383064
-
XSP|ADP Patch AP.xsp.23.0.1075.ap383064
-
Patch AP.platform.23.0.1075.ap383064
-
-
R23 with ADP:
-
AS Patch AP.as.23.0.1075.ap383064
-
ADP with Xsi-Actions-23, CommPilot-23 version > 2022.05_1.303 and NPS version > 2022.08_1.350
-
-
R24:
-
AS patch: AP.as.24.0.944.ap383064
-
ADP with Xsi-Actions-24, CommPilot-24 version > 2022.05_1.303 and NPS version > 2022.08_1.350
-
-
R25:
-
AS RI release Rel_2022.08_1.354
-
ADP with Xsi-Actions-25, CommPilot-25 > 2022.08_1.350 and NPS version > 2022.08_1.350
-
Configure URI dialing
Enable BroadWorks to route a REFER‑generated SIP INVITE to a Webex meeting URI. Example: sip:<digits>+<meetingID>@<site>.webex.com.
Before you begin
-
This configuration enables routing only.
-
An internet‑facing SBC/CUBE is required for call completion.
- Configuration is required on Application Server (AS) and Network Server (NS).
| 1 |
Configure Application Server (AS). This configuration allows AS to process SIP URI calls and generate INVITEs after REFER. |
| 2 |
Configure Network Server (NS). |
| 3 |
Validate the route test: You can expect any one of the following results:
|
Best practices, limitations and troubleshooting
Best practices
To ensure the Webex Cloud correctly identifies the Meeting ID and enterprise context, you must configure the CUBE to preserve the original Request-URI (R-URI).
Example configuration:
dial-peer voice 1000 voip
 description *** Webex Edge Deployment ***
 session protocol sipv2
 session target dns:<REGIONAL_SESSION_TARGET>
 voice-class sip requri-passing
 dtmf-relay rtp-nte
 codec g711ulaw
 no vad
The key functional elements are:
-
Voice-class sip requri-passing: This command is mandatory. It ensures that the original R-URI (containing the enterprise domain and meeting ID) is preserved in the outbound INVITE. Without this, the Webex Cloud can't associate the call with the correct meeting.
-
Regional Session Targets: The session target must point to the appropriate regional Webex Cloud ingress. This must be configured based on the customer’s geographic region. For example, EMEA:
dns:ecccp.euro.pub.webex.com. Partners must verify the correct regional FQDN for their specific deployment cluster through the Control Hub.
In multi-tenant deployments, ensuring the R-URI remains unmodified is critical. If the R-URI is altered by the CUBE, the call fails to route to the intended meeting.
Partners are responsible for ensuring that their specific CUBE version and dial-peer logic don't conflict with this command. Always ensure that the enterprise domain and meeting context are correctly mapped within the Control Hub to match the traffic ingress.
Known limitations
Here are some known limitations:
-
BroadWorks AS has no direct internet access.
-
SBC/CUBE configuration is still required.
-
Desktop REFER escalation support is under validation.
Troubleshooting call failure
If the call fails, perform the following steps:
-
Capture AS XS logs.
-
Capture NS routing logs.
-
Verify SBC internet connectivity.
-
Share logs with Cisco TAC.
E911 Emergency Calling
Webex for Cisco BroadWorks supports E911 emergency services calling. With this feature, emergency calls get routed to a Public Safety Answering Point (PSAP) who can then direct emergency services to the caller’s location. To use this feature, you must integrate Webex for Cisco BroadWorks with an E911 emergency call provider.
Use the following Webex articles to configure support for E911 emergency calling services:
-
E911 Emergency Calling in Webex for BroadWorks—Use this article to configure E911 emergency calling in Webex for Cisco BroadWorks using one of the following supported E911 providers:
-
Bandwidth
-
Intrado
-
RedSky
-
-
Emergency Call Disclaimer—If you have a location service, you can configure the Emergency Services Disclaimer window on the Webex App to include an option for users to update their location when logging in.
Customize and provision clients
Users download and install their generic Webex App, for desktop or mobile (for download links, see Webex App Platforms). Once the user authenticates, the client registers against the Webex Cloud for Messaging and Meetings, retrieves its branding info, discovers its BroadWorks service info, and downloads its calling configuration from BroadWorks Application Server (through DMS on XSP|ADP).
You configure the calling parameters for Webex App in BroadWorks (as normal). You configure branding, messaging, and meeting parameters for the clients in the Control Hub. You don’t directly modify a configuration file.
These two sets of configurations can overlap, in which case the Webex configuration supersedes the BroadWorks configuration.
Add Webex App configuration templates to BroadWorks Application Server
Webex App is configured with DTAF files. The clients download a configuration XML file from the Application Server, through the Device Management service on the XSP|ADP.
The R22.0 template files are no longer supported and are removed from the DTAF archive. The templates previously labeled R23.0 are renamed to R24.0, as BroadWorks R24.0 is the oldest version currently supported. These R24.0 templates are intended for use on all supported Application Server releases, including R24.0, R25.0, and R26.0.
| 1 |
Download the zip files of the desired Webex App (Desktop, Mobile, or Tablet) from Software Downloads site. For details on Device Profile Type and Package name, see Device Profiles in the Prepare Your Environment section. | ||||||||||
| 2 |
Check that you've the right tag sets in . | ||||||||||
| 3 |
Import and update DTAF Files. The DTAF package downloaded from the Cisco Software Download site is a container
archive. You must extract this archive locally to access the specific
| ||||||||||
| 4 |
Configure Device Profiles for each client you're provisioning. | ||||||||||
| 5 |
Click Files and Authentication and then select the option to rebuild all system files.
|
Customize branding for Webex App
-
Partner customizations—Partner administrators can apply advanced branding customizations that apply to the partner organization and/or customers that the partner manages. See Configure Advanced Branding Customizations.
-
Customer customizations—If the partner allows customers to apply their own Branding customizations, customer administrators can follow the procedures at Add Your Company Branding to Webex.
The User Activation Portal uses the same logo that you add for client Branding.
Customize problem reporting and help URLs
To customize these options, administrators can follow the procedure "Add Feedback and Help Site URLs", which can be found in both of the preceding branding articles.
Configure Your Test Organization for Webex for Cisco BroadWorks
Before you begin
With Flowthrough Provisioning
You must configure all the XSP|ADP services, and the partner organization in Control Hub, before you can perform this task.
| 1 |
Assign Service in BroadWorks: |
| 2 |
Verify Customer Organization and Users in Control Hub: |
User Testing
| 1 |
Download the Webex app on two different machines. |
| 2 |
Sign in as your test users on the two machines. |
| 3 |
Make test calls. |
Provision Customer Organizations
In the current model, we automatically provision the customer organization when you onboard the first user through any of the methods described in this document. Provisioning happens only once for each customer.
Provision Users
You can provision users in these ways:
-
Use APIs to create Webex accounts
-
Assign Integrated IM&P (flowthrough provisioning) with trusted emails to create Webex accounts
-
Assign Integrated IM&P (flowthrough provisioning) without trusted emails. Users provide and validate email addresses to create Webex accounts
-
Allow users to self-activate (you send them a link, they create Webex accounts)
Public Provisioning APIs
Webex exposes public APIs to allow Service Providers to integrate Webex for Cisco BroadWorks subscriber provisioning into their existing provisioning workflows. The specification for these APIs is available on developer.webex.com. If you wish to develop with these APIs, contact your Cisco representative to get Webex for Cisco BroadWorks.
Wholesale customers will be rejected by these APIs.
Flowthrough Provisioning
On BroadWorks, you can provision users with the Enable Integrated IM&P option. This action causes the BroadWorks provisioning adapter to make an API call to provision the user on Webex. Our provisioning API is backwards-compatible with the UC-One SaaS API. BroadWorks AS requires no code change, only a configuration change to the API endpoint for the provisioning adapter.
Subscriber provisioning on Webex can take considerable (several minutes for the initial user within an enterprise). Webex performs the provisioning as a background task. So, success on flowthrough provisioning indicates that the provisioning has started. It doesn't indicate completion.
To confirm that users and the customer organization are fully provisioned on Webex, you must sign in to Partner Hub and look in your Customers list.
BroadWorks trunking users can have Webex for BroadWorks via a shared call appearance (SCA). The trunking user will need to have the Authentication service assigned. As described in the BroadWorks Trunking Solution Guide Section 8, this allows the authentication of the SCA Webex appearance to be separate from the common trunk authentication. Webex for BroadWorks cannot be provisioned for trunking users with the Route List or Direct Route features assigned.
The location of templates has been moved from BroadWorks Calling in Org Settings to the Customer List section and it is now called the Onboarding template.
User Self-Activation
To provision BroadWorks users in Webex, without assigning the Integrated IM&P service:
-
Sign in to Partner Hub, and find the Customer List page.
-
Click View Templates.
-
Select the provisioning Onboarding template you want to apply to this user.
Remember that each template is associated with a cluster and your partner organization. If the user is not in the BroadWorks system associated with this template, the user cannot self-activate with the link.
-
Copy the provisioning link and send it to the user.
You may also want to include the software download link, and remind the user they need to supply and validate their email address to activate their Webex account.
-
You can monitor the user's activation status on the selected template.
For more information, see User Provisioning and Activation Flows.
Provisioning with Untrusted Emails
Partner Hub provides a set of controls within the User Status view that lets Webex for Cisco BroadWorks Service Provider administrators review user status and resolve errors when provisioning with untrusted emails. For details, see Verify User Provisioning with Untrusted Emails.
Move Webex Users to Webex for Cisco BroadWorks
To move existing Webex users to Webex for Cisco BroadWorks, refer to the following table to determine which procedure to follow.
|
Existing Webex user belongs to a… |
Follow these processes to move the user |
|---|---|
|
Consumer organization or self-signup (for example, free account, trial account) |
If Webex for BroadWorks organization doesn’t exist (no users are provisioned):
If Webex for BroadWorks organization exists (at least one user is provisioned):
|
|
Customer organization |
|
Move User (with Consent) to Webex for Cisco BroadWorks
Use this procedure to move an existing Webex user who is in a consumer organization or has a self-signup account (free account or trial account) to Webex for Cisco BroadWorks. Note that the Webex for Cisco BroadWorks organization must exist (with the first user provisioned). In this case, you can use one of these options to move users:
-
Move User (with Trusted Email)—Uses provisioning with trusted emails
-
Move User (with Untrusted Email)—Uses provisioning with untrusted emails
-
Self-Activation
If the Webex for Cisco BroadWorks organization is not yet created (no users are provisioned), follow normal provisioning processes ( Provision Users) to create the organization and add the first user as an administration user. After the first user is provisioned into the organization, follow the consent-based methods in this procedure to move subsequent users.
Move User (with Trusted Email)
If the Onboarding template uses Trusted Emails, the partner administrator can move subsequent users with this process:
-
Administrator adds the user.
-
The user gets pushed to the BroadWorks Provisioning Bridge.
-
The CI lookup determines that this user has another Webex account with this email address.
-
An automated email is sent to the user.
-
-
User opens the email and clicks Activate Account. The user is redirected to the Webex Consumer portal.
-
User logs in to Webex.
-
User clicks Delete to delete the old Webex account.
-
Old Webex account is deleted.
-
User is provisioned to Webex for Cisco BroadWorks using the same email address.
-
User is directed to Download page.
-
Move User (with Untrusted Email)
If the Onboarding template uses Untrusted Emails, the user’s email address must first be validated. The administrator can follow this process to move subsequent users:
-
Administrator adds the user.
-
The user gets pushed automatically to the BroadWorks Provisioning Bridge.
-
A text with an activation link is sent to the user.
-
-
User clicks the Activation link and enters their email address.
-
The CI lookup determines that this user has another Webex account with this email address.
-
An automated email is sent to the user.
-
-
User opens the email and clicks Join Now.
-
The email address is validated.
-
User is redirected to log in to the Webex Consumer portal.
-
-
User logs in to Webex.
-
User must click Delete to delete the old Webex account.
-
Old Webex account is deleted.
-
User is provisioned to Webex for Cisco BroadWorks using the same email address.
-
User is directed to Download page.
-
Self-Activation Flow
If the user has an existing BroadWorks account, they can use the Self-Activation process to move their account.
-
The user logs in to the User Access Portal URL using BroadWorks credentials.
-
User enters their email address.
-
User gets pushed to BroadWorks Provisioning Bridge.
-
An automated email is sent to the user email address.
-
-
User opens the email and clicks the Join Now link, which validates the email address.
-
CI finds user has existing Webex account. User must delete the old account before they can continue.
-
User is redirected to log in to Webex.
-
-
The user logs in to the Consumer Portal.
-
The user clicks Delete Account.
-
The old Webex account is deleted.
-
The user is provisioned a new Webex for Cisco BroadWorks account with the same email address.
-
Attach Webex for BroadWorks to Existing Organization
If you are a partner administrator adding Webex for BroadWorks services to an existing Webex customer organization, which is not yet associated with a partner managed BroadWorks enterprise, the customer organization administrator MUST approve administrator access for the provisioning request to succeed.
Organization administrator approval is needed if any of the following are true:
-
The existing customer organization has 100 users or more
-
The organization has a verified email domain
-
The organization domain is claimed
If none of the criteria above are true, then an Automatic Attach may occur.
In an Automatic Attachment scenario, a Webex for BroadWorks subscription is added to an existing customer organization without any notification to the existing org administrator or end user. In most cases your Partner Org will be given Provisioning Admin rights. However, if the customer org has no licenses or only suspended/canceled licenses, then you will be made a Full Admin.
With Provisioning Admin access, you will have limited visibility in Control Hub to the users in the existing org. It is recommended that you contact the customer admin and request Full Admin access to the org.
Partner administrators can complete the following procedure to add BroadWorks calling services to an existing Webex org:
Make sure the Allow admin-invite emails when attaching to existing orgs (the toggle is on by default).
| 1 |
The partner administrator provisions Webex for Cisco BroadWorks for the customer. For help, see Provision Customer Organizations. The following occurs:
Suppose the customer administrator does not receive an email. In that case, the customer administrator can manually add the partner administrator (specified in the template) as the external administrator of the customer org from the Control Hub. Then retry provisioning the user, which will trigger the Webex for Cisco BroadWorks customer provision. |
| 2 |
With full administrator access, the partner administrator can complete the process of provisioning the customer. You will need to re-attempt the Provisioning of the customer starting from Step 1 above. However, now as an external Full Admin, you should not observe the error 2017. Once the provisioning of calling services is completed, the existing customer org will be visible as a customer underneath the Webex for BroadWorks Partner Org. The attached org’s name will not change to the BroadWorks enterprise name. The name of the attached org will be remain as it was prior to the attach process. |
Conditions of Org Attachment
-
The email address of the first BroadWorks subscriber provisioned must match the email address of an existing user in the targeted customer org. Otherwise, a new customer org will be created.
-
The first user from the existing org who is provisioned for Webex for BroadWorks is not provisioned as an admin user. Settings and entitlements from the existing org are retained.
-
The organization’s existing authentication settings take precedence over what is configured on the Webex for BroadWorks provisioning template. As a result, there is no change to how existing users log in.
-
However, if the existing customer organization has basic branding enabled, after the attach occurs the Partner's Advanced branding settings will take precedence. If the customer wants the basic branding to remain intact, then the partner must configure the customer organization to override branding in the Advanced Branding settings.
-
-
The name of the existing organization will not change.
-
There is no change to the email suppression flag setting in the existing org’s settings. This may affect newly provisioned users. Depending on how the flag is set, new users may or may not receive an email with a code that must be entered in order to complete activation.
-
Restricted Admin Mode (set by the Restricted by Partner Mode toggle) is turned off for the attached org.
-
Make sure to complete the organization attachment process (moving existing users and updating the organization ID), before you provision new users into the Webex for Cisco BroadWorks organization.
-
A BroadWorks enterprise can be associated with one Webex organziation only. You cannot provision subscribers from a single BroadWorks enterprise into separate Webex organizations.
Add External Administrator
For the steps that customer organization administrators can follow to add the partner administrator as an external administrator, see the Approve External Administrator Request article on help.webex.com.
The customer admin must provide the external admin with the Full Administrator rights and privileges.
The email address that the customer organization administrator adds as an external administrator must match the partner administrator's email address as configured in the Onboarding template on Partner Hub.
After adding the email from the Onboarding template on Partner Hub as a Full Administrator, any additional partner admins will also need to be added as an external admin with Full Administrator rights.
Detach Webex for BroadWorks from Existing Organization
Follow these steps to detach Webex for BroadWorks from an existing Webex organization. For example, if you attached Webex for BroadWorks to an existing organization by accident and want to remove the attachment.
In Standard flow detaching Webex for BroadWorks from an existing Webex organization (standard flow only) will delete all associated subscriber data and deactivate the customer’s Webex for BroadWorks subscription. Also, you will lose access to the customer organization if this is the only associated subscription. In Hybrid flow the customer subscriptions are not modified.
-
If you don’t have access to the customer settings in Control Hub, have the customer administrator grant you external administrator access by following Approve External Administrator Request.
-
Remove all Webex for BroadWorks workspaces from the organization. Use the Remove a BroadWorks Workspace API.
-
Remove all Webex for BroadWorks subscribers from the organization. Use the Remove a BroadWorks Subscriber API.
-
Remove pending Webex for BroadWorks users from the organization. For example, if users were provisioned via the untrusted email flow, and valid emails have not yet been entered, the users are left in a pending state. Follow Verify User Provisioning with Untrusted Emails to delete the users.
-
Delete the BroadWorks Calling configuration for this customer. Open the customer's Control Hub instance, click Hybrid, under BroadWorks Calling section delete all configurations.
After completing the detachment, if you want to attach Webex for BroadWorks to the customer, follow the provisioning processes to attach to an existing customer.
An alternative option to remove subscribers if you don't want to use the Remove a BroadWorks Subscriber API is to go into BroadWorks CommPilot and remove the Integrated IM&P service for the affected users.
Manage Users and Organizations
To manage users in Webex for Cisco BroadWorks, remember that the user exists both in BroadWorks and in Webex. Calling attributes and the user's BroadWorks identity are held in BroadWorks. A distinct email identity for the user, and its licensing for Webex features, are held in Webex.
Verify User Provisioning with Untrusted Emails
If you are provisioning Webex for BroadWorks users using flow-through provisioning with untrusted emails, users must self-provision by entering their email address in the User Activation Portal. If the user encounters an error, they can use the Try again option that displays in the portal to make another attempt. If the user reencounters the error, the administrator can use the below steps in Partner Hub to review the status and either onboard the user, delete the user, or apply configuration changes.
| 1 |
Sign in to Partner Hub and find the Customer List page. |
| 2 |
Click View Templates. Select the appropriate Onboarding template you want to apply to this user. |
| 3 |
Under User Verification, verify that the following settings are set to ensure that flow-through provisioning with untrusted emails is configured properly:
|
| 4 |
After user provisioning occurs, in the User Verification section, click Show User Status to check provisioning status. The User Status view displays the list of users along with details such as the BroadWorks ID, selected package type, and the current Status, which shows if the user is provisioned, or if there is pending requirement.
|
| 5 |
For users with errors or pending requirements, click the three dots on the right and choose one of the following administrative options:
|
Additional View Options
The following additional options are available when viewing the list of users:
-
Export—Click this button if you want to export the user list to a CSV file.
-
Exclude provisioned users—Enable this toggle if you want to view only users with pending requirements or errors.
Change User ID or Email Address
User ID and Email Address Changes
Email ID and Alternate ID are the BroadWorks user attributes used with Webex for Cisco BroadWorks. The BroadWorks User ID is still the primary identifier of the user in BroadWorks. The following table describes the purposes of these different attributes, and what to do if you need to change them:
| Attribute in BroadWorks | Corresponding Attribute in Webex | Purpose | Notes |
| BroadWorks User ID | None | Primary identifier | You can’t change this identifier and still link the user to the same account in Webex. You can delete the user and recreate it if it’s wrong. |
| Email ID | User ID |
Mandatory for flow-through provisioning (creating Webex User ID) when you assert that you trust email Not required in BroadWorks if you don’t assert that you can trust emails Not required in BroadWorks if you allow subscribers to self-activate |
There’s a manual process to change this in both places if the user is provisioned with the wrong email address:
Don’t change the BroadWorks user ID. This isn’t supported. |
| Alternate ID | None | Enables authn of user, by email and password, against BroadWorks User ID | It should be the same as the Email ID. If you can’t put the email in the Alternate ID attribute, users have to enter their BroadWorks User ID when authenticating. |
Change User Package in Partner Hub
| 1 |
Sign in to Partner Hub and click Customers. |
| 2 |
Find and select the customer organization where the user is homed. The organization overview page opens in a panel on the right of the screen. |
| 3 |
Click View Customer. The customer organization opens in Control Hub, showing the Overview page.
|
| 4 |
Click Users, then find and click the affected user. |
| 5 |
In the user's Services, click Webex for BroadWorks Packages (Subscriptions). The user's packages panel opens, and you can see which package is currently assigned to the user. |
| 6 |
In the Profile tab, look in the Package section and click the arrow (>) to expand the view. |
| 7 |
Select the package you want for this user (Basic, Standard, Premium or Softphone) and click Save. Control Hub shows a message that the user is updating. |
| 8 |
You can close the user details and the Control Hub tab. |
Standard and Premium packages have distinct meeting sites that are associated with each package. When a subscriber with administrator privileges with one of these two packages moves to the other package, the subscriber shows up with two meeting sites in Control Hub. The subscriber’s host meeting capabilities and meeting site align to their current package. The previous package's meeting site and any previously created content on that site, such as recordings, remain accessible to the meeting site admin.
It may take two to three hours for new PMR settings that result from a package change to update.
Delete Users
There are a variety of methods that administrators can use to delete a user from Webex for Cisco BroadWorks:
If the user that you are going to delete has administrator privileges, assign a new administrator before you delete the user. There is no automatic transfer of the administrator role should the last administrator be deleted.
Webex for Cisco BroadWorks API
Partner administrators can use the Webex for Cisco BroadWorks API to delete users:
-
Run the Remove a BroadWorks Subscriber API request at https://developer.webex.com/docs/api/v1/broadworks-subscribers/remove-a-broadworks-subscriber. This request removes the Webex for Cisco BroadWorks subscription. The user is no longer billed as a Webex for Cisco BroadWorks user and is treated as a free Webex user.
-
Run the Delete a Person API request at https://developer.webex.com/docs/api/v1/people/delete-a-person to delete the user completely.
Flow-through Provisioning
Partner administrators can use flow-through provisioning to delete users:
-
On the BroadWorks server, remove the IM+P Integrated service from the user. You can disable the service for the user from the User – Integrated IM&P page on BroadWorks. For a detailed procedure, see "Configure Integrated IM&P" in the Cisco BroadWorks Application Server Group Web Interface Administration Guide – Part 2.
After the service is disabled, flow-through provisioning removes the Webex for Cisco BroadWorks subscription from the user. The user is no longer billed as a Webex for Cisco BroadWorks user and is treated as a free Webex user.
-
In Control Hub, find and select the user.
- Go to Actions and select Delete User.
Control Hub (Customer Administrators)
Customer administrators can use Control Hub to delete users from their organization. For details, see Delete a User from Your Organization in Webex Control Hub at https://help.webex.com/0qse04/.
Delete Organization
| 1 |
Use the People APIs to delete all users from the organization: The Remove a BroadWorks Subscriber API removes Webex for Cisco BroadWorks entitlements from a user, but does not delete the user. |
| 2 |
If Directory Sync is turned on, disable it. This can be done via Partner Hub or via the public API. To disable Directory Sync via Partner Hub: To disable Directory Sync via API, use the Update Directory Sync for a BroadWorks Enterprise API and disable the enableDirSync setting. All users related to BroadWorks Directory Sync for this organization will be deleted. Note that the removal of users (using either method) may take some time depending on the quantity of users. |
| 3 |
After all of the users are removed, use the Delete an Organization API to delete the organization. |
Canceling a Subscription from Control Hub
As the API is private, customers won't have access to it. Instead, the following steps show how customers can cancel their own subscription from Control Hub:
-
The Partner Admin can navigate to the "Hybrid" Services page on the Customer's Control Hub.
-
Locate the "BroadWorks Calling" card.
-
Once all users have been de-provisioned from Webex for BroadWorks for that Customer, the Partner should see a button to "Clear Configuration" (i.e., delete their customer_config entry in BPB).
Release Management
Release Management controls in Partner Hub make it easy for Webex for Cisco BroadWorks Service Providers to manage releases by giving them the ability to control the release cadence by which users' Webex Apps upgrade to the latest software.
By default, the Webex App uses Automatic upgrades (Cisco-controlled monthly releases). However, with this feature, partner administrators can:
-
Configure customized release schedules with deferrals from the Cisco-default release schedule
-
Configure a single release schedule and cascade that schedule to all of the customer organizations that they manage
-
Assign different release schedules to different customer organizations
For more information about Release Management, including information on how to configure and apply customized release schedules, see the Webex article Release Management Customizations.
Reconfigure the System
You can reconfigure the system as follows:
-
Add a BroadWorks Cluster in Partner Hub
-
Edit or Delete a BroadWorks Cluster in Partner Hub
-
Add a Onboarding template in Partner Hub
-
Edit or Delete a Onboarding template in Partner Hub
Edit or delete a BroadWorks cluster in Partner Hub
Edit or remove a BroadWorks cluster in Partner Hub.
| 1 |
Sign in to Partner Hub. |
| 2 |
Click Services. |
| 3 |
On the BroadWorks Calling card, click View Broadworks Calling. |
| 4 |
Click View Clusters. |
| 5 |
Click the cluster that you want to edit or delete. |
| 6 |
You have these options:
The cluster list updates with your changes.
|
Edit or delete a Onboarding template in Partner Hub
You can edit or delete Onboarding templates in Partner Hub.
| 1 |
Sign in to Partner Hub. | |||||||||
| 2 |
Click Services. | |||||||||
| 3 |
On the BroadWorks Calling card, click View Broadworks Calling. | |||||||||
| 4 |
Click the template that you want to edit or delete. | |||||||||
| 5 |
You have these options:
The cluster list updates with your changes.
|
Webex Assistant
Webex Assistant for Meetings is an intelligent, interactive virtual meeting assistant that makes meetings searchable, actionable, and more productive. You can ask Webex Assistant to follow up on action items, take note of important decisions, and highlight key moments during a meeting or event.
Webex Assistant for Meetings is available for free for Premium and Standard package meeting sites and Personal Meeting Rooms. Support includes both new and existing sites.
Enable Webex Assistant for Meetings
Webex Assistant is by default enabled for both Standard and Premium package Broadworks Customers.
Partner Administrators and Customer Organization Administrators can disable the feature for Customer Organizations through Control Hub.
Limitations
The following limitations exist for Webex for Cisco BroadWorks:
-
Support is limited to Premium and Standard package meeting sites and Personal Meeting Rooms only.
-
Closed captioning transcriptions are supported in English, Spanish, French, and German only.
-
Content sharing via email can be accessed only by users within your organization
-
Meeting content is not accessible to users outside your organization. Meeting content is also not accessible when shared between users of different packages from within the same organization.
-
With the Premium package, post-meeting transcriptions are available whether Webex Assistant is enabled or disabled. However, if local recording is selected, post-meeting transcripts or highlights are not captured.
-
With the Standard package, Record meeting on cloud option is not available and so post-meeting transcriptions are not available whether Webex Assistant is enabled or disabled. However, if local recording is selected, even then post-meeting transcripts or highlights are not captured.
Additional Information About Webex Assistant
For user information on how to use the feature, see Use Webex Assistant in Webex Meetings and Events.
Disable Webex Calls
Free Webex calling is enabled by default letting users place free calls to any Webex-enabled device. However, if you want all calls to use the BroadWorks infrastructure, you can disable Webex calls within a Onboarding template, which disables that option for the customer organizations that use the template.
Feature Support
When Webex Calling is disabled, the following conditions apply to Webex for Cisco BroadWorks users:
-
Users no longer see Call with Webex as a selectable call option on the Webex App.
-
Users cannot place or receive free Webex calls to non-Webex for Cisco BroadWorks users. This includes calls initiated from a Webex team space, Call History, Contacts, by entering the other user's URI or email address in the Search bar.
-
Screen sharing works within a BroadWorks call.
-
Webex meetings, and telephony presence still work, even if Webex Calls are disabled.
Disable Webex Calls (New Onboarding template)
While configuring a new Onboarding template, you can configure whether Webex calls are enabled or disabled by checking or unchecking the Disable Cisco Webex Free Calling check box within the Add a new template wizard. This setting will be picked up for users in customer organizations that you assign to the template.
For details on configuring a new Onboarding template, see Configure Your Partner Organization in Partner Hub.
Disable Webex Calls (Existing Onboarding template)
Follow this procedure to disable Webex calls from an existing Onboarding template. This will disable the feature for all new users in customer organizations that use this template.
-
Sign in to Partner Hub at admin.webex.com.
-
Choose Settings.
-
Click View Template and choose the appropriate Onboarding template.
-
Click Disable Cisco Webex Free Calling.
-
Click Save.
Disable Webex Calls (Existing User)
Disabling this feature on a Onboarding template changes the setting only for new users who are assigned to the template. To disable Webex Calls for an existing user, you can follow one of the below procedures to update the user.
Make sure that you have already completed one of the above procedures to disable Webex Calls from the Onboarding template to which the user is assigned. Otherwise, either of the below procedures will reconfigure the user with Webex Calls enabled.
If you are using flow-through provisioning, you can do the following:
-
Open CommPilot and go to the user configuration.
-
Remove the Integrated IM+P service from the user and click OK.
-
Add the Integrated IM+P service to the user and click OK.
Otherwise, you can use the API to update the user.
-
Use the Remove a BroadWorks Subscriber API to delete the user.
-
Use the Provision a BroadWorks Subscriber API to add the user.
Disable Video or Screen Sharing within Calls
Partner administrators can use configuration tags to disable video calls and/or screen sharing within a call from the Webex App (by default, both media types are enabled for calls).
For full configuration details and options, see Disable Video Calls and Disable Screen Sharing in the Webex for Cisco BroadWorks Configuration Guide.
For video, you can also configure whether incoming call media defaults to video or audio only.
Busy Lamp Field / Call Pickup Notification
Busy Lamp Field (BLF) / Call Pickup Notification leverages the BLF and Directed Call Pickup features. A BLF user receives an audio and visual notification on the Webex App when a user from the BLF monitored list receives an incoming call. The BLF user can Ignore or Pick up the monitored user’s call.
BLF / Call Pickup Notification helps in situations where a user needs to answer calls for other team members who may be working in a different location.
Users can also see their BLF monitored list in the Multi-Call Window - Watchlist section - (Windows only, Mac not supported) to see the presence of their Webex and non-Webex team members. For help with enabling multi-call, see: Multi-Call Window
Webex members will have a full Webex presence. Non-Webex members must be directory synced into Webex, and they will only have "unknown" and "in-a-call" states (ringing state will trigger the call pickup dialog).
Limitations of Presence for Non-Webex users:
-
Presence is not supported for non-CI broadworks users, even if they are in the BLF list.
-
CI users without Webex cloud entitlement or machine type of accounts (workspaces) only show ‘in-call’ and ‘unknown’ presence. There is no active, ringing, etc. status.
-
Non-Webex users from the BLF watch list, who started a call before the Webex client was started or while it was offline will be shown with an ‘unknown’ presence.
-
Losing your connection means all the non-Webex in-call states will be reset to ‘unknown’ upon reconnecting.
-
If a non-Webex user from the BLF holds a call they will continue to be shown as ‘in a call’.
Requirements
Make sure that the following patches are applied on BroadWorks. Install only the patches that apply to your release:
For R22:
-
AP.platform.22.0.1123.ap382053
-
AP.as.22.0.1123.ap382053
-
AP.as.22.0.1123.ap382362
-
AP.xsp.22.0.1123.ap382053
-
AP.xsp.22.0.1123.ap382362
-
AP.as.22.0.1123.ap383459
-
AP.as.22.0.1123.ap383520
For R23:
-
AP.platform.23.0.1075.ap382053
-
AP.as.23.0.1075.ap382053
-
AP.as.23.0.1075.ap382362
-
AP.as.23.0.1075.ap383459
-
AP.as.23.0.1075.ap383520
-
If you're using XSP|ADP:
-
AP.xsp.23.0.1075.ap382053
-
AP.xsp.23.0.1075.ap382362
-
-
If you're using ADP:
-
Xsi-Actions-23_2022.01_1.200.bwar
-
Xsi-Events-23_2022.01_1.201.bwar (or later)
-
For R24:
-
AP.as.24.0.944.ap382053
-
AP.as.24.0.944.ap382362
-
AP.as.24.0.944.ap383459
-
AP.as.24.0.944. ap383520
-
Xsi-Actions-24_2022.01_1.200.bwar
-
Xsi-Events-24_2022.01_1.201.bwar (or later)
Make sure that the following configuration tags are enabled on the Webex App:
-
<busy-lamp-field enabled="%ENABLE_BUSY_LAMP_FIELD_WXT%"> -
<display-caller enabled="%ENABLE_BLF_DISPLAY_CALLER_WXT%"/> -
<notification-delay time=”%BLF_NOTIFICATON_DELAY_TIME_WXT%”/>(this tag is optional)
You must activate feature 101642 Enhanced Xsi Mechanism For Team Telephony on the AS:
AS_CLI/System/ActivatableFeature> activate 101642
Enable X-BroadWorks-Remote-Party-Info on the AS using the below CLI command as some SIP call flows require this feature:
AS_CLI/System/DeviceType/SIP> set
                    <device_profile_type> supportRemotePartyInfo true
Make sure that the following services are assigned to users:
-
Assign the Directed Call Pickup service for all users
-
Set up the Busy Lamp Field for users
Any reference to XSP includes either XSP or ADP.
Configure Busy Lamp Field on BroadWorks
Partner administrators can use the following procedure to set up the Busy Lamp Field for a user.
-
Sign in to BroadWorks CommPilot.
-
For a selected user, go to Client Applications and configure the Busy Lamp Field.
-
Add the URL of the BLF list that will be monitored.
-
Use the search parameters to locate and add users to the Monitored Users list.
-
Click OK.
Slido Integration Support
Webex for Cisco BroadWorks supports Webex App integration with Slido.
Slido is an easy-to-use audience engagement tool. It helps people to get the most out of meetings by bridging the gap between speakers and their audiences. When Slido is integrated into your Control Hub organization, your users can add the Slido app to their meetings in Webex App. This integration brings additional Q&A and polling functionality to the meeting.
For additional information on how to deploy and use Slido with the Webex App, see Integrate Slido with Webex App.
Automatic Answer with Tone
With automatic answer with tone, users can make a call from a third-party app, such as Contact Center, and the call is routed automatically through the Webex App on their desktop. When the Webex App rings the other party, the user hears a certain tone, advising them that the call is connecting.
For a Webex for Cisco BroadWorks user to use this feature:
-
The feature is supported on the primary line appearance only
-
The Webex App must be the primary line appearance
-
The %ENABLE_AUTO_ANSWER_WXT% tag must be enabled
If the user also has Shared Call Appearances (for example, a desk phone is configured as one of the secondary line appearances), the feature is still supported on the primary appearance so long as the shared call appearances are configured to not to receive incoming calls. This can be accomplished by configuring either of the following three conditions on BroadWorks for all shared call appearances:
-
Alert all appearances for Click-to-Dial calls is disabled in the Shared Call Appearance configuration—this is the recommended approach
or
-
Allow Termination to this location must be disabled for all shared call appearances or
or
-
Locations are disabled for all shared call appearances
Increasing Capacity
XSP|ADP Farms
We recommend you use the capacity planner to determine how many additional XSP|ADP resources you need for the proposed increase in subscriber numbers. For either of the dedicated NPS or dedicated Webex for Cisco BroadWorks farms, you have the following scalability options:
-
Scale dedicated farm: Add one or more XSP|ADP servers to the farm that needs extra capacity. Install and activate the same set of applications and configurations as the farm’s existing nodes.
-
Add dedicated farm: Add a new, dedicated XSP|ADP farm. You’ll need to create a new cluster and new templates in Partner Hub, so you can start adding new customers on the new farm, to relieve pressure on existing farm.
-
Add specialized farm: If you are experiencing bottlenecks for a particular service, you may want to create a separate XSP|ADP farm for that purpose, taking into consideration the co-residency requirements listed in this document. You may need to reconfigure your Control Hub clusters and DNS entries if you change the URL of the service that has a new farm.
In all cases, the monitoring and resourcing of your BroadWorks environment is your responsibility. Should you wish to engage Cisco assistance, you can contact your account representative, who can arrange professional services.
Managing HTTP Server Certificates
You must manage these certificates for mTLS authenticated web applications on your XSP|ADPs:
-
Our chain of trust certificate from Webex cloud
-
Your XSP|ADP’s HTTP server interfaces’ certificates
Chain of Trust
You download the chain of trust certificate from Control Hub and install it on your XSP|ADPs during your initial configuration. We expect to update the certificate before it expires, and notify you of how and when to change it.
Your HTTP Server Interfaces
The XSP|ADP must present a publicly signed server certificate to Webex, as described in Order Certificates. A self-signed certificate is generated for the interface when you first secure the interface. This certificate is valid for one year from that date. You must replace the self-signed certificate with a publicly signed certificate. It’s your responsibility to request a new certificate before it expires.
Wholesale general settings
Restricted by Partner Mode is a Partner Hub setting that partner administrators can assign to specific customer organizations to limit the organization settings that customer administrators can update in Control Hub. When this setting is enabled for a given customer organization, all of that organization's customer administrators, irrespective of their role entitlements, are unable to access a set of restricted controls in Control Hub. Only a partner administrator can update the restricted settings.
Restricted by Partner Mode is an organization-level setting rather than a role. However, the setting restricts specific role entitlements for customer administrators in the organization to which the setting is applied.
Restrict by Partner mode
Customer administrators receive a notification when Restricted-by-Partner Mode is applied. After login, they will see a notification banner at the top of the screen, immediately under the Control Hub header. The banner notifies the customer administrator that Restricted Mode is enabled and they may not be able to update some calling settings.
For a customer administrator in an organization where Restricted by Partner Mode is enabled, the level of Control Hub access is determined with the following formula:
(Control Hub access) = (Organization Role entitlements) - (Restricted by Partner Mode restrictions)
Customer administrators will face several restrictions, regardless of the Restricted-by-Partner Mode. These restrictions include:
- Call Settings: The 'App Options Call Priority' settings in the Calling menu are read-only.
- Location Setup: Setting up calling after location creation will be hidden.
- PSTN Management and Call Recording: These options will be greyed out for the location.
- Phone Number Management: In the Calling menu, phone number management is disabled, and the 'App Options Call Priority' settings, as well as call recordings, are read-only.
Restrictions
When Restricted-by-Partner Mode is enabled for a customer organization, customer administrators in that organization are restricted from accessing the following Control Hub settings:
-
In the Users view, the following settings are not available:
-
Manage Users button is greyed out.
-
Manually Add or Modify Users—No option to add or modify users, either manually or via CSV.
-
Claim Users—not available
-
Auto-assign Licenses—not available
-
Directory Synchronization—Unable to edit directory sync settings (this setting is available to Partner-level admins only).
-
User details—User settings such as First Name, Last Name, Display Name and Primary Email* are editable.
-
Reset Package—No option to reset the package type.
-
Edit Services—No option to edit the services that are enabled for a user (e.g., Messages, Meetings, Calling)
-
View Services status—Unable to see full status of Hybrid Services or Software Upgrade Channel
-
Primary Work Number—This field is read-only.
-
-
In the Account view, the following setting is not available:
-
Company Name is read-only.
-
-
In the Security view, the following setting is not available:
-
Authentication—No option to edit Authentication and SSO settings.
-
-
In the Organization Settings view, the following settings are not available:
-
Domain—Access is read-only.
-
Email—The Suppress Admin Invite Email and Email Locale Selection settings are read-only.
-
-
In the Calling menu, the following settings are not available:
-
Call Settings—The App Options Call Priority settings are read-only.
-
Calling Behavior—Settings are read-only.
-
Location > PSTN—The Local Gateway and Cisco PSTN options are hidden.
-
-
Under SERVICES, the Migrations and Connected UC service options are suppressed.
Enable restricted by Partner mode
Partner administrators can use the below procedure to enable Allow restricted by partner mode for a given customer organization (the default setting is enabled).
-
Sign in to Partner Hub ( https://admin.webex.com) and select Customers.
-
Select the applicable customer organization.
-
In the Wholesale general settings section, enable the Allow restrict by partner mode toggle to turn the setting on.
If you want to turn Allow restrict by partner mode off, disable the toggle.
If the partner removes the restricted administrator mode for a customer administrator, the customer administrator will be able to perform the following:
-
Add Webex for Wholesale users (with the button)
-
Change packages for a user
For more information on list of time zones supported for Wholesale Provisioning, see List of Time Zones supported for Wholesale Provisioning.
Partner Analytics
Control Hub improvements make it easy for partner administrators to view and update package information on behalf of their users. This feature provides the ability for partners to get an aggregated view across all customers and includes the following details:
-
Total users by package (Softphone, Basic, Standard, Premium)
-
User by package trend (Daily/Weekly/Monthly)
-
Customers with # of packages assigned
For full details on how to use Partner Analytics, see the Webex article Analytics for Webex for Wholesale and Webex for Broadworks packages in Partner Hub.
Billing Report APIs
Webex for Developers provides public APIs that can be used for monthly billing reports. Partner administrators can use these APIs to create, list, get and delete billing reports. The following table lists the APIs, the type of access required and the role requirements.
|
Billing API |
Purpose |
Type of Access |
Role Requirement for API (Admin requires at least one of these roles) |
|---|---|---|---|
|
Create a BroadWorks Billing Report |
Used to generate a billing report. |
Write access |
|
|
List BroadWorks Billing Reports |
Used to list the reports that are available to view. |
Read Access |
|
|
Get a BroadWorks Billing Report |
Used to obtain a copy of a generated report. |
Read Access |
|
|
Delete a BroadWorks Billing Report |
Used to delete a generated report. |
Write Access |
|
Billing Fields
The following table lists the fields that are contained in the generated report.
|
Field |
Description |
|---|---|
|
resellerName |
Partner name or Partner Org Id |
|
billingId |
Partner Unique Billing Identifier or C-Number |
|
spEnterpriseId |
The Service Provider-supplied unique identifier for the subscriber's enterprise. |
|
internal |
The Customer Internal Trial Status (Yes/No) |
|
userId |
The userID of the subscriber on BroadWorks |
|
subscriberId |
A unique identifier for the subscriber in question in Webex |
|
selfActivated |
Yes/No |
|
firstStartDate |
Date when subscriber was provisioned. |
|
billingStartDate |
Date when billing starts in this month |
|
billingEndDate |
Date when billing ends in this month |
|
package |
The package type that is being charged |
|
quantity |
Prorated quantity for billing.
|
-
Once you generate a billing report for a specific period, you cannot regenerate that report unless you first delete the existing report.
-
If you change either the package type or BroadWorks userID for a given user, the report for the month where the change occurred shows multiple entries for that user with separate prorated entries before and after the change.
Troubleshooting Webex for Cisco BroadWorks
Subscribe to the Webex Status Page
First check https://status.webex.com when you experience an unexpected interruption of service. If you haven't changed your configuration in Control Hub or BroadWorks before the interruption, check the status page. Read more about subscribing for status and incident notifications at Webex Help Center.
Use Control Hub Analytics
Webex tracks usage and quality data for your organization and your customer’s organizations. Read more about the Control Hub Analytics on Webex Help Center.
Network Issues
Customers or users aren’t being created in the Control Hub with flowthrough provisioning:
-
Can the application server reach the provisioning URL?
-
Are the provisioning account and password correct, does that account exist in BroadWorks?
Clusters are consistently failing connectivity tests:
The mTLS connection to the authentication service is expected to fail when you create the first cluster in Partner Hub, because you need to create the cluster to get access to the Webex certificate chain. Without that, you can’t create a trust anchor on the authentication service XSP|ADPs, so the test mTLS connection from Partner Hub isn’t successful.
-
Are the XSP|ADP interfaces publicly accessible?
-
Are you using the correct ports? You can enter a port in the interface definition on the cluster.
Interfaces Failing Validation
Xsi-Actions and Xsi-Events Interfaces:
-
Check that the interface URLs are correctly entered on the cluster in Partner Hub, including the
/v2.0at the end of the URLs. -
Check the firewall allows communication between Webex and these interfaces.
-
Review the interface configuration advice in this document.
Authentication Service Interface:
-
Check that the interface URLs are correctly entered on the cluster in Partner Hub, including the
/v2.0at the end of the URLs. -
Check the firewall allows communication between Webex and these interfaces.
-
Review the interface configuration advice in this document, with particular attention to:
-
Make sure you shared RSA keys across all XSP|ADPs.
-
Make sure you provided AuthService URL to the web container on all XSP|ADPs.
-
If you edited the TLS cipher configuration, check that you used the correct naming convention. The XSP|ADP requires that you enter the IANA name format for the TLS ciphers. An earlier version of this document incorrectly listed the required cipher suites in the OpenSSL naming convention.
-
If you’re using mTLS with Authentication Service, are the Webex client certificates loaded on your XSP|ADP/ADP trust store? Is the app (or the interface) configured to require client certificates?
-
If you’re using CI token validation with Authentication Service, is the app (or interface) configured to not require client certificates?
-
Client Issues
Verify the Client is Connected to BroadWorks
-
Sign in to the Webex App.
-
Check that the Calling Options icon (a handset with a gear above it) is present on the sidebar.
If the icon isn’t present, the user may not yet be enabled for the calling service in the Control Hub.
-
Open the Settings/Preferences menu and go to the Phone Services section. You should see the status SSO Session You're signed in.
If a different phone service, such as Webex Calling, is shown, the user isn’t using Webex for Cisco BroadWorks.
This verification means:
-
The client has successfully transversed the required Webex microservices.
-
The user has successfully authenticated.
-
The client has been issued a long-lived JSON web token by your BroadWorks system.
-
The client has retrieved its device profile and has registered to BroadWorks.
Client Logs
All Webex App clients can Send Logs to Webex. This is the best option for mobile clients. You should also record the user email address and approximate time the issue occurred if you’re seeking assistance from TAC. For more information, see Where Do I Find Support for Webex?
If you need to manually collect logs from a Windows PC, they are located as follows:
Windows PC: C:\Users\{username}\AppData\Local\CiscoSpark
Mac: /Users/{username}/Library/Logs/SparkMacDesktop
current_log.txt contains the BWC-related logs as well.
User Sign-In Issues
mTLS Auth Misconfigured
If all users are affected, check the mTLS connection from Webex to your Authentication Service URL:
-
Check that either the authentication service application, or the interface it uses, are configured for mTLS.
-
Check that the Webex certificate chain is installed as a trust anchor.
-
Check that the server certificate on the interface/application is valid, and signed by a well-known CA.
License Overage Message
This message may appear for a customer on the Customers view of Partner Hub. This message appears when the license usage exceeds what the license allows. The message can be ignored.
Troubleshooting Guide
For detailed information on troubleshooting Webex for Cisco BroadWorks, refer to the Webex for Cisco BroadWorks Troubleshooting Guide.
Support
Steady State Support Policy
The Service Provider is the first point of contact for the end customer (enterprise) support. Escalate issues that the SP can't resolve to TAC. BroadWorks server version support follows the BroadSoft policy of the current version and two previous major versions (N-2). Read more at BroadSoft products lifecycle policy section in BroadSoft Lifecycle Policy and BroadWorks Software Compatibility Matrix.
Escalation Policy
-
You (Service Provider/ Partner) are the first point of contact for end customer (enterprise) support.
-
Issues that cannot be resolved by the SP are escalated to TAC.
BroadWorks Versions
-
BroadWorks server version support follows BroadSoft policy, of current version and two previous major versions (N-2). Read more at BroadSoft products lifecycle policy section in BroadSoft Lifecycle Policy and BroadWorks Software Compatibility Matrix.
Self-Support Resources
-
Users can find support through the Webex Help Center, where there is a Webex for Cisco BroadWorks-specific page listing common Webex app help and support topics.
-
The Webex app can be customized with this help URL and a problem report URL.
-
Webex app users can send feedback or logs directly from the client. The logs go to the Webex cloud, where they can be analyzed by Webex DevOps.
-
We also have a Help Center page dedicated to administrator-level help for Webex for Cisco BroadWorks.
Collect Information for Submitting a Service Request
When you see errors in Control Hub, they might have attached information that can help TAC to investigate your problem. For example, if you see a tracking ID for a particular error, or an error code, save the text to share with us.
Try to include at least the following information when you’re submitting a query or opening a case:
-
Customer Organization ID and Partner Organization ID (each ID is a string of 32 hex digits, separated by hyphens)
-
TrackingID (also a 32 hex digit string) if the interface or error message provides one
-
User email address (if a particular user is experiencing issues)
-
Client versions (if the issue has symptoms noticed through the client)
UC-One SaaS Comparison with Webex for Cisco BroadWorks
|
Solution > |
UC-One SaaS |
Webex for Cisco BroadWorks |
|---|---|---|
|
Cloud |
Cisco UC-One Cloud (GCP) |
Webex Cloud (AWS) |
|
Clients |
UC-One: Mobile, Desktop Receptionist, Supervisor |
Webex: Mobile, Desktop, Web |
|
Major Technology Difference |
Meetings delivered on Broadsoft Meet Technology |
Meetings delivered on Webex Meetings Technology |
|
Early Field Trials |
Staging environment, Beta clients |
Production environment, GA clients |
|
User identity |
BroadWorks ID served as primary ID, unless Service Provider has SSO Integration already.
User ID and secret in BroadWorks |
Email ID in Cisco CI serves as primary ID SSO integration into Service Provider BroadWorks where User will authenticate with BroadWorks User ID and BroadWorks secret at time.
User supplies credentials via SSO with BroadWorks and secret in BroadWorks OR User ID and secret in CI IdP OR User ID in CI, ID and secrets in IdP |
|
Client authentication |
Users supply credentials through client BroadWorks long-lived tokens required if using Webex messaging |
Users supply credentials via browser (either login page from Webex BIdP proxy or CI) Webex access and refresh tokens |
|
Management / configuration |
Your OSS/BSS systems and Reseller portal |
Your OSS/BSS systems and Control Hub |
|
Partner/Service Provider activation |
One time setup by Cisco Operations |
One time setup by Cisco Operations |
|
Customer/enterprise activation |
Reseller portal |
Control Hub Auto-created upon first user enrollment |
|
User activation options |
Self-enrolled Set external IM&P in BroadWorks
|
Set Integrated IM&P in BroadWorks (typically enterprises) |
|
XSP|ADP service interfaces |
XSI-Actions
XSI-Events CTI (mTLS) AuthService (mTLS optional) DMS |
XSI-Actions XSI-Actions (mTLS) XSI-Events CTI (mTLS) AuthService (TLS) DMS |
Install Webex and Sign In (Subscriber Perspective)
| 1 |
Download and install Webex. For details, see Webex | Download the App. |
| 2 |
Run Webex. Webex prompts you for your email address.
|
| 3 |
Enter your email address and click Next. |
| 4 |
One of the following happens, depending on the way your organization is configured in Webex: Webex loads after you successfully authenticate against the IdP or BroadWorks.
|
Data Exchange and Storage
These sections provide detail on data exchange and storage with Webex. All data is encrypted both in transit and at rest. For additional details, see Webex App Security.
Service Provider Onboarding
When you configure clusters and user templates in Webex Control Hub during Service Provider onboarding, you exchange the following BroadWorks data which Webex stores:
-
Xsi-Actions URL
-
Xsi-Events URL
-
CTI interface URL
-
Authentication service URL
-
BroadWorks Provisioning Adaptor credentials
Service Provider User Provisioning
This table lists user and enterprise data that is exchanged as part of user provisioning through the Webex APIs.
|
Data Moving to Webex |
From |
Through |
Stored by Webex? |
|---|---|---|---|
|
BroadWorks UserID |
BroadWorks, by API |
Webex APIs |
Yes |
|
Email (if SP Provided) |
BroadWorks, by API |
Webex APIs |
Yes |
|
Email (if User Provided) |
User |
User Activation Portal |
Yes |
|
First name |
BroadWorks, by API |
Webex APIs |
Yes |
|
Last name |
BroadWorks, by API |
Webex APIs |
Yes |
|
Primary Phone Number |
BroadWorks, by API |
Webex APIs |
Yes |
|
Mobile Phone Number |
BroadWorks, by API |
Webex APIs |
Yes |
|
Primary Extension |
BroadWorks, by API |
Webex APIs |
Yes |
|
BroadWorks Service Provider ID & Group ID |
BroadWorks, by API |
Webex APIs |
Yes |
|
Language |
BroadWorks, by API |
Webex APIs |
Yes |
|
Time zone |
BroadWorks, by API |
Webex APIs |
Yes |
User Removal
Webex for Cisco BroadWorks APIs support both partial and full user removal. This table lists all user data that is stored during provisioning and what is deleted in each scenario.
|
User Data |
Partial Deletion |
Full Deletion |
|---|---|---|
|
BroadWorks UserID |
Yes |
Yes |
|
|
No |
Yes |
|
First name |
No |
Yes |
|
Last name |
No |
Yes |
|
Primary Phone Number |
Yes |
Yes |
|
Mobile Phone Number |
Yes |
Yes |
|
Extension |
Yes |
Yes |
|
BroadWorks Service Provider ID & Group ID |
Yes |
Yes |
|
Language |
No |
Yes |
User Login and Configuration Retrieval
Webex Authentication
Webex authentication refers to user sign-in to a Webex app by any of the Webex support authentication mechanisms. ( BroadWorks authentication is covered separately.) This table illustrates the type of data exchanged between the different components on the authentication flow.
|
Data Moving |
From |
To |
|---|---|---|
|
Email address |
User through Webex app |
Webex |
|
Limited access token and (independent) IdP URL |
Webex |
User browser |
|
User credentials |
User browser |
Identity provider (which already has user identity) |
|
SAML assertion |
User browser |
Webex |
|
Authentication code |
Webex |
User browser |
|
Authentication code |
User browser |
Webex |
|
Access and Refresh tokens |
Webex |
User browser |
|
Access and Refresh tokens |
User browser |
Webex app |
BroadWorks Authentication
BroadWorks authentication refers to user sign-in to a Webex app using their BroadWorks credentials. This table illustrates the type of data exchanged between the different components on the authentication flow.
|
Data Moving |
From |
To |
|---|---|---|
|
Email address |
User through Webex app |
Webex |
|
Limited access token and (Webex Bwks IdP proxy) IdP URL |
Webex |
User browser |
|
Branding information and BroadWorks URLs |
Webex |
User browser |
|
BroadWorks user credentials |
User through browser (branded sign-in page served by Webex) |
Webex |
|
BroadWorks user credentials |
Webex |
BroadWorks |
|
BroadWorks user profile |
BroadWorks |
Webex |
|
SAML assertion |
User browser |
Webex |
|
Authentication code |
Webex |
User browser |
|
Authentication code |
User browser |
Webex |
|
Access and Refresh tokens |
Webex |
User browser |
|
Access and Refresh tokens |
User browser |
Webex app |
BroadWorks Password Expiration Notification During Login
This feature enhances the login process and controls the login flow based:
Login warning and error message enhancement:
- At present the Wexbex for BWKS users who use BroadWorks authentication and login through the UAP do not get notification that their password is about to expire or that they are unable to login because the password has already expired. With this feature, if the password is about to expire in 10 days or less - the user receives warning that password is about to expire with indication how many days are left, and the user is advised to contact the Partner, or to follow the Forgot Password link on the login screen to reset their password.
- If the password has expired and the configuration in BroadWorks ‘enforcePasswordChangeOnExpiry’ is set to true then error “incorrect username and password” was thrown but now with this feature the error message is enhanced: The login attempt failed. The combination of the User ID and password provided does not match our records or your password needs to be updated. Try again or contact your administrator to update the password. Error code 100006
Control login flow:
- Partner can restrict the login by enabling a setting “w4bwks-password-expiry-fail-login". This setting “can be enabled by Cisco upon request from a partner. If BroadWorks password has expired, the configuration in BroadWorks ‘enforcePasswordChangeOnExpiry’ is set to false and the setting ‘w4bwks-password-expiry-fail-login' is enabled then error is thrown saying password got expired x days ago whereas if setting service is disabled, then login is allowed. By default, the setting is disabled.
The Forgot Password link on the login page is configurable by the partner as part of Customized Branding: Advanced Customization. Partners must configure the link to redirect users to the partner's portal for password management and reset.
This feature only improves the user login experience during login of activated user when the password is about to expire or has already expired. The feature does not handle if a password expires while the user is logged in the Webex app. The user will get notification for password expiration on their next login attempt.
Client Configuration Retrieval
This table illustrates the type of data exchanged between the different components while retrieving client configurations.
|
Data Moving |
From |
To |
|---|---|---|
|
Registration |
Client |
Webex |
|
Organization settings, including BroadWorks URLs |
Webex |
Client |
|
BroadWorks JWT token |
BroadWorks through Webex |
Client |
|
BroadWorks JWT token |
Client |
BroadWorks |
|
Device Token |
BroadWorks |
Client |
|
Device Token |
Client |
BroadWorks |
|
Config file |
BroadWorks |
Client |
Steady State Usage
This section describes the data moving between components during re-authentication after token expiry, either through BroadWorks or Webex.
This table lists data movement for calling.
|
Data Moving |
From |
To |
|---|---|---|
|
SIP signalling |
Client |
BroadWorks |
|
SRTP media |
Client |
BroadWorks |
|
SIP signalling |
BroadWorks |
Client |
|
SRTP media |
BroadWorks |
Client |
This table lists data movement for messaging, presence, and meetings.
|
Data Moving |
From |
To |
|---|---|---|
|
HTTPS REST messaging and presence |
Client |
Webex |
|
HTTPS REST messaging and presence |
Webex |
Client |
|
SIP signalling |
Client |
Webex |
|
SRTP media |
Client |
Webex |
|
SIP signalling |
Webex |
Client |
|
SRTP media |
Webex |
Client |
Using the Provisioning API
Developer Access
The API specification is available on https://developer.webex.com and a guide to using it is at https://developer.webex.com/docs/api/guides/webex-for-broadworks-developers-guide.
You need to sign in to read the API specification at https://developer.webex.com/docs/api/v1/broadworks-subscribers.
Application Authentication and Authorization
Your application integrates with Webex as an Integration. This mechanism allows the application to perform administrative tasks (such as subscriber provisioning) for an administrator within your Partner organization.
Webex APIs follow the OAuth 2 standard ( http://oauth.net/2/). OAuth 2 allows third-party integrations to obtain refresh and access tokens on behalf of your chosen Partner administrator for authenticating API calls.
You must first register your integration with Webex. Once registered, your application must then support this OAuth 2.0 authorization grant flow to obtain the necessary refresh and access tokens.
For more details on integrations and how to build this OAuth 2 authorization flow into your application, see https://developer.webex.com/docs/integrations.
There are two required roles for implementing integrations - the developer and the authorizing user - and they may be held by separate people/teams in your environment.
-
The developer creates the app and registers it on https://developer.webex.com to generate the required OAuth ClientID/Secret with scopes expected for the application. If your application is being created by a third-party, they could register the application (if you have requested their access), or you could do it with your own access.
-
The authorizing user is the account that the application uses to authorize its API calls, to change your partner organization, your customers' organizations, or their subscribers. This account needs to have either the Full Administrator or Sales Full Administrator role in your partner organization. This account must not be held by a third party.
Organization Name
The Organization Name depends on which provisioning mode you use:
-
Enterprise mode—The Organization Name is an exact match of spEnterpriseId.
-
Service Provider mode—The Organization Name is the groupID portion of the spEnterpriseId.
The Organization Name will contain any whitespace, uppercase and special characters specified in the original spEnterpriseId.
BroadWorks Software Requirements
See Lifecycle Management - BroadSoft Servers.
We expect the Service Provider to be "patch current" with the latest BroadWorks patches and Release Independent (RI) apps. The following list of patches is the minimum requirement for integrating with Webex.
Make sure to review the patch notes for these software patches. Some patches may have additional CLI requirements.
Version R22
|
Server |
Patch |
Additional Info |
|---|---|---|
|
Application Server | ||
|
Required for Directory Sync | ||
|
Required to upgrade from V1 to V2 Push Notifications | ||
|
Required patch for Application Server | ||
|
Required to upgrade from V1 to V2 Push Notifications | ||
|
Required patch for Call Recording feature | ||
|
Required Patch for Flow-through Provisioning | ||
|
Required Patch for Hook Status (Presence) and Unified Call History | ||
|
Profile Server | ||
|
Required Patch for Hook Status (Presence) and Unified Call History | ||
|
Platform | ||
|
Required for NPS Authentication Proxy | ||
|
Required for NPS Authentication Proxy | ||
|
Required for the Auth Service with CI Token Validation | ||
|
Required Patch for Hook Status (Presence) and Unified Call History | ||
|
XSP|ADP |
Required for NPS Authentication Proxy | |
|
Required for the Auth Service with CI Token Validation | ||
|
Required for NPS Authentication Proxy | ||
|
Required to upgrade from V1 to V2 Push Notifications | ||
|
Required for NPS Authentication Proxy | ||
|
Required for NPS Authentication Proxy | ||
|
Required for the Auth Service with CI Token Validation | ||
|
Required for Unified Call History | ||
|
Other |
AP.xsa.22.0.1123.ap372757 | |
Version R23
|
Server |
Patch |
Additional Info |
|---|---|---|
|
Application Server |
Required for Directory Sync | |
|
Config App Server | ||
|
Required to upgrade from V1 to V2 Push Notifications | ||
|
Required for Call Recording | ||
|
Required Patch for Hook Status (Presence) and Unified Call History | ||
|
Profile Server | ||
|
Platform | ||
|
Required for NPS Authentication Proxy | ||
|
Required Patch for Hook Status (Presence) and Unified Call History | ||
|
XSP|ADP | ||
|
Required for NPS Authentication Proxy | ||
|
Required to upgrade from V1 to V2 Push Notifications | ||
|
Required for NPS Authentication Proxy | ||
|
Required for NPS Authentication Proxy | ||
|
Required Patch for Hook Status (Presence) and Unified Call History | ||
|
Other |
If using ADP... |
Required Patch for Hook Status (Presence) and Unified Call History |
Version R24
|
Server |
Patch |
Additional Info |
|---|---|---|
|
Application Server |
Required for Unified Messaging Server (UMS) | |
|
Required for flowthrough provisioning | ||
|
Required for Call Recording | ||
|
Required Patch for Hook Status (Presence) and Unified Call History | ||
|
Other |
Required Patch for Hook Status (Presence) and Unified Call History |
BroadWorks Tags Required for Webex
For information on the BroadWorks system tags and custom tags that you must configure for Webex, refer to the Webex for Cisco BroadWorks Configuration Guide.
User Provisioning and Activation Flows
Provisioning describes adding the user to Webex. Activation includes email validation and service assignment in Webex.
Users email addresses must be unique as Webex uses the email address to identify a user. If you have trusted email addresses for the users, you can choose to have them automatically activated when you automatically provision them. This process is “automatic provisioning and automatic activation”.
Automated User Provisioning and Automatic Activation (Trusted Email Flow)
Prerequisites
-
Your provisioning adapter points to Webex for Cisco BroadWorks (which requires an outbound connection from AS to Webex Provisioning Bridge).
-
You must have valid reachable end-user email addresses as alternate IDs in BroadWorks.
-
Control Hub has a provisioning account in your partner organization configuration.
|
Step |
Description |
|---|---|
|
1 |
You quote and take orders for the service with your customers. |
|
2 |
You process the customer order and provision the customer in your systems. |
|
3 |
The service provisioning system triggers the provisioning of BroadWorks. This step, in summary, creates the enterprise and the users. It then assigns the necessary services and numbers to each user. One of those services is the external IM&P. |
|
4 |
This provisioning step triggers the automatic provisioning of the customer organization and users in Webex. (The IM&P service assignment causes the provisioning adapter to call the Webex provisioning API). |
|
5 |
Your systems need to use the Webex provisioning API if you later need to adjust the package for the user (to change from the default). |
SSO Login Flow
Following is the SAML SSO login flow for the Webex app when using BroadWorks authentication, and when Cross-Origin Resource Sharing is enabled, allowing for direct authentication to BroadWorks. The image displays client and user events on the left with text on the arrows representing what the client provides for authorization. Steps 1 and 5 are user events. The right side of the image represents login services events along with what gets returned to the client.
Following is the BroadWorks Service Discovery Flow that follows immediately from the preceding Webex SAML SSO login flow. The client uses the access token that was obtained while registering to Webex Device Management to request registration from the BroadWorks deployment.
Alternative Login Flows
The images above assume that SAML SSO Login is configured using BroadWorks authentication with direct BroadWorks authentication enabled (Cross-Origin Resource Sharing). Below are some alternative SAML SSO login flows:
-
BroadWorks Authentication without direct BroadWorks authentication (Cross-Origin Resource Sharing):
-
The only difference is in step 5 and 6 of the Webex Login Flow. In step 5, the login credentials are validated by the IdP Proxy (rather than XSI) and a SAML Assertion is returned to the client.
-
The flow proceeds through the remaining steps in the two diagrams apply.
-
The SSO Token is not used in this flow.
-
-
SAML SSO Webex Authentication:
-
In step 3 of the Webex Login Flow, the Common Identity service returns the Identity Provider used by Webex authentication.
-
At this point, an alternative SAML SSO login flow for Webex is invoked.
-
User Interactions
Sign In
-
The Webex app launches a browser to Cisco Common Identity (CI) to allow users to enter their email address.
-
CI discovers that the associated customer org has the BroadWorks IDP Proxy (IDP) configured as their SAML IDP. CI redirects to the IDP which presents the user with a sign-in page. (The Service Provider can brand this sign-in page.)
-
The user enters their BroadWorks credentials.
-
Broadworks authenticates the user through the IDP. On success, the IDP redirects the browser back to CI with a SAML Success to complete the authentication flow (not shown in diagram).
-
On successful authentication, the Webex app obtains access tokens from CI (not shown in diagram). The client uses them to request a BroadWorks long-lived Jason Web Token (JWT).
-
The Webex app discovers its calling configuration from BroadWorks and other services from Webex.
-
The Webex app registers with BroadWorks.
Sign In from a User Perspective
This diagram is the typical sign-in flow, as seen by the end user or subscriber:
-
You download and install the Webex app.
-
You may have received the link from your service provider, or you can find the download on Webex downloads page.
-
You enter your email address at the Webex sign-in screen. Click Next.
-
Typically, you’re redirected to a Service Provider branded page.
-
That page may welcome you by your email address.
If there’s no email address, or if the email address is wrong, enter your BroadWorks user name instead.
-
Enter your BroadWorks password.
-
If you signed in successfully, Webex opens.
Call Flow—Corporate Directory
Call Flow—PSTN Number
Presentation and Sharing
Start a Space Meeting
Client Interactions
Retrieve Profile from DMS and SIP Register with AS
-
Client calls XSI to get a device management token and the URL to the DMS.
-
Client requests its device profile from DMS by presenting the token from step 1.
-
Client reads the device profile and retrieves the SIP credentials, addresses, and ports.
-
Client sends a SIP REGISTER to SBC using the information from step 3.
-
SBC sends the SIP REGISTER to the AS (SBC may perform a look-up in the NS to locate an AS if SBC does not already know the SIP user.)
Test and Lab Guidelines
The following guidelines apply to testing and lab organizations:
-
Service Provider partners are limited to a maximum of 50 test users that can be provisioned across multiple orgs.
-
Any users beyond the first 50 test users will be billed.
-
To ensure accurate processing on your invoice, all test orgs must include ‘test’ in the BroadWorks Org name.
-
Internal test organizations must be designated within Webex Control Hub. This is in order to prevent test users from being billed as actual users.
Designating an Organization as a Test Organization
To designate an organization as a test organziation:
-
Sign in to Partner Hub and select Customers.
-
Select the appropriate Customer.
-
In the right control bar, enable the Internal Test Organization toggle.
Voicemail Playback
For voicemail, make sure that you configure the Media Server to use one of the following codes:
-
mp3
-
wav—WAV files are supported in the following formats: PCM (supported on all platforms) and DVI-ADPCM (not supported on Android
If you are using wav files, run the following CLI commands to confiugre the application server and media server:
-
AS_CLI/Service/VoiceMsg>set vmRecordingAudioFileFormat WAV -
MS_CLI/Applications/MediaStreaming/Services/IVR> set sendmail8kHzWavFileDefaultFormat ulaw
Terminology
- ACL
- Access Control List
- ALG
- Application Layer Gateway
- API
- Application Programming Interface
- APNS
- Apple Push Notification Service
- AS
- Application Server
- ATA
- Analog Telephone Adapter, adapter that converts analog telephony to VoIP
- BAM
- BroadSoft Application Manager
- Basic authentication
- A method of authentication where an account (username) is validated by a shared secret (password)
- BMS
- BroadSoft Messaging Server
- BOSH
- Bidirectional-streams Over Synchronous HTTP
- BRI
- Basic Rate Interface BRI is an ISDN access method
- Bundle
- A collection of services as delivered to an end user or subscriber (cf. Package)
- CA
- Certification Authority
- Carrier
- An organization that handles telephony traffic (cf. Partner, Service Provider, Value Added Reseller)
- CAPTCHA
- Completely Automated Public Turing test to tell Computers and Humans Apart
- CCXML
- Call Control eXtensible Markup Language
- CIF
- Common Intermediate Format
- CLI
- Command Line Interface
- CN
- Common Name
- CNPS
- Call Notifications Push Server. A Notification Push Server that runs on an XSP|ADP in your environment, to push call notifications to FCM and APNS. See NPS Proxy.
- CPE
- Customer Premises Equipment
- CPR
- Custom Presence Rule
- CSS
- Cascading Style Sheet
- CSV
- Comma-Separated Value
- CTI
- Computer Telephony Integration
- CUBE
- Cisco Unified Border Element
- DMZ
- Demilitarized Zone
- DN
- Directory Number
- DND
- Do Not Disturb
- DNS
- Domain Name System
- DPG
- Dial Peer Group
- DSCP
- Differentiated Services Code Point
- DTAF
- Device Type Archive File
- DTG
- Destination Trunk Group
- DTMF
- Dual-Tone Multi-Frequency
- End user
- The person who is using the services, that is making calls, joining meetings, or sending messages (cf. Subscriber)
- Enterprise
- A collection of end users (cf. Organization)
- FCM
- Firebase Cloud Messaging
- FMC
- Fixed Mobile Convergence
- Flow-through provisioning
- Creating users in the Webex identity store by assigning the “Integrated IM&P” service in BroadWorks.
- FQDN
- Fully Qualified Domain Name
- Full flow-through provisioning
- Creating and verifying users in the Webex identity store by assigning the “Integrated IM&P” service in BroadWorks and asserting that each BroadWorks user has a unique and valid email address.
- FXO
- Foreign Exchange Office is the port that receives the analog line. It is the plug on the phone or fax machine or the plugs on your analog phone system. It delivers an on-hook/off-hook indication (loop closure). Since the FXO port is attached to a device, such as a fax or a phone, the device is often called the “FXO device”.
- FXS
- Foreign Exchange Subscriber is the port that actually delivers the analog line to the subscriber. In other words, it is the "plug in the wall" that delivers a dial tone, battery current, and ring voltage.
- GCM
- Google Cloud Message
- GCM
- Galois/Counter Mode (encryption technology)
- HID
- Human Interface Device
- HTTPS
- Hypertext Transfer Protocol Secure Sockets
- IAD
- Integrated Access Device
- IM&P
- Instant Messaging and Presence
- IP PSTN
- A service provider that provides VoIP to PSTN services, interchangeable with ITSP, or a general term for internet-connected 'public' telephony, collectively provided by major telecomms providers (rather than by countries, as PSTN is)
- ITSP
- Internet Telephony Service Provider
- IVR
- Interactive Voice Response / Responder
- JID
- The native address of an XMPP entity is called a Jabber Identifier or JID localpart@domain.part.example.com/resourcepart (@ . / are separators)
- JSON
- Java Script Object Notation
- JSSE
- Java Secure Socket Extension; the underlying technology providing secure connectivity features to BroadWorks servers
- KEM
- Key Extension Module (hardware Cisco phones)
- LLT
- Long-lived (or Long Life) Token; a self-describing, secure form of bearer token that enables users to remain authenticated for longer, and is not tied to specific applications.
- MA
- Message Archival
- MIB
- Management Information Base
- MS
- Media Server
- mTLS
- Mutual authentication between two parties, using certificate exchange, when establishing a TLS connection
- MUC
- Multi-User Chat
- NAT
- Network Address Translations
- NPS
- Notification Push Server; see CNPS
- NPS Proxy
-
A service in Webex that supplies short-lived authorization tokens to your CNPS, enabling it to push call notifications to FCM and APNs, and ultimately to Android and iOS devices running Webex.
- OCI
- Open Client Interface
- Organization
- A company or organization representing a collection of end users (cf. Enterprise)
- OTG
- Outgoing Trunk Group
- Package
- A collection of services as delivered to an end user or subscriber (cf. Bundle)
- Partner
- An agent organization that works with Cisco to distribute products and services to other organizations (cf. Value Added Reseller, Service Provider, Carrier)
- PBX
- Private Branch Exchange
- PEM
- Privacy Enhanced Mail
- PLMN
- Public Land Mobile Network
- PRI
- Primary Rate Interface (PRI) is a telecommunications interface standard used on an Integrated Services Digital Network (ISDN)
- PS
- Profile Server
- PSTN
- Public Switched Telephone Network
- QoS
- Quality of Service
- Reseller portal
- A web site that enables the reseller’s administrator to configure their UC-One SaaS solution. It is sometimes referred to as BAM portal, admin portal, or management portal.
- RTCP
- Real-Time Control Protocol
- RTP
- Real-Time Transport Protocol
- SBC
- Session Border Controller
- SCA
- Shared Call Appearance
- SD
- Standard Definition
- SDP
- Session Description Protocol
- SP
- Service Provider; An organization that provides telephony or related services to other organizations (cf. Carrier, Partner, Value Added Reseller)
- SIP
- Session Initiation Protocol
- SLT
- Short-lived (or Short Life) Token (also called BroadWorks SSO Token); a single-use authenticated token that is used to gain secure access to web applications.
- SMB
- Small to Medium Business
- SNMP
- Simple Network Management Protocol
- sRTCP
- secure Realtime Transfer Control Protocol (VoIP call media)
- sRTP
- secure Realtime Transfer Protocol (VoIP call media)
- SSL
- Secure Sockets Layer
- Subscriber
- The person who is using the services, that is making calls, joining meetings, or sending messages (cf. End user)
- TCP
- Transmission Control Protocol
- TDM
- Time Division Multiplexing
- TLS
- Transport Layer Security
- ToS
- Type of Service
- UAP
- User Activation Portal
- UC
- Unified Communications
- UI
- User Interface
- UID
- Unique Identifier
- UMS
- Messaging Server
- URI
- Uniform Resource Identifier
- URL
- Uniform Resource Locator
- USS
- Sharing Server
- UTC
- Coordinated Universal Time
- UVS
- Video Server
- Value Added Reseller (VAR)
- An agent organization that works with Cisco to distribute products and services to other organizations (cf. Carrier, Partner, Service Provider)
- VGA
- Video Graphics Array
- VoIP
- Voice over Internet Protocol (IP)
- VXML
- Voice Extensible Markup Language
- WebDAV
- Web Distributed Authoring and Versioning
- WebRTC
- Web Real-Time Communications
- WRS
- WebRTC Server
- XMPP
- Extensible Messaging and Presence Protocol
Configure Services (with mTLS for the Auth Service)
The following procedures replace the procedures in the topic Configure Services on Your Webex for Cisco BroadWorks XSP|ADPs. Complete these procedures only if you’re using mTLS for the Authentication Service rather than CI Token Validation. These procedures are mandatory if you’re running multiple Webex organizations off the same XSP|ADP server. Otherwise, they are optional.
If you aren't running multiple Webex organizations off the same XSP|ADP server, CI Token Validation (with TLS) is recommended for the Auth Service. Refer to Configure Services on Your Webex for Cisco BroadWorks XSP|ADPs for details on how to configure the Authentication service and other services.
Xsi Interfaces
Install and configure the Xsi-Actions and Xsi-Events applications as described in Cisco BroadWorks Xtended Services Interface Configuration Guide.
Only one instance of the Xsi-Events applications should be deployed on the XSP|ADP used for the CTI interface.
All Xsi-Events used for integrating Broadworks with Webex must have the same callControlApplicationName defined under Applications/Xsi-Events/GeneralSettings. For example:
ADP_CLI/Applications/Xsi-Events/GeneralSettings> get
callControlApplicationName = com.broadsoft.xsi-events
When a user is onboarded to Webex, Webex creates a subscription for the user on the AS in order to receive telephony events for presence and call history. The subscription is associated with the callControlApplicationName and the AS uses it to know to which Xsi-Events to send the telephony events.
Changing the callControlApplicationName, or not having the same name on all Xsi-Events webapps will impact subscriptions and telephony events functionality.
Configure Authentication Service (with mTLS)
BroadWorks long-lived tokens are generated and validated by the authentication service hosted on your XSP|ADPs.
Requirements
-
The XSP|ADP servers hosting the Authentication Service must have an mTLS interface configured.
-
XSP|ADPs must share the same keys for encrypting/decrypting BroadWorks long lived tokens. Copying these keys to each XSP|ADP is a manual process.
-
XSP|ADPs must be synchronized with NTP.
Configuration Overview
The essential configuration on your XSP|ADPs includes:
-
Deploy the authentication service.
-
Configure the token duration to at least 60 days (leave the issuer as BroadWorks).
-
Generate and share RSA keys across XSP|ADPs.
-
Provide the authService URL to the web container.
Deploy the Authentication Service on XSP|ADP
On each XSP|ADP used with Webex:
-
Activate the authentication service application on the path
/authService(you must use this path):XSP|ADP_CLI/Maintenance/ManagedObjects> activate application authenticationService <version> /authService(where
<version>is your BroadWorks version). -
Deploy the application:
XSP|ADP_CLI/Maintenance/ManagedObjects>deploy application /authService
Configure Token Duration
-
Check the existing token configuration (hours):
XSP|ADP_CLI/Applications/authenticationService/TokenManagement>get -
Set the duration to 60 days (max is 180 days):
XSP|ADP_CLI/Applications/authenticationService/TokenManagement>set tokenDurationInHours 1440
Generate and Share RSA Keys
-
You must use the same public/private key pairs for token encryption/decryption across all instances of the authentication service.
-
The key pair is generated by the authentication service when it’s first required to issue a token.
Because of these two factors, you need to generate keys on one XSP|ADP then copy them to all other XSP|ADPs.
If you cycle keys or change the key length, you need to repeat the following configuration and restart all the XSP|ADPs.
-
Select one XSP|ADP to use for generating a key pair.
-
Use a client to request an encrypted token from that XSP|ADP, by requesting the following URL from the client’s browser:
https://<XSP|ADP-IPAddress>/authService/token?key=BASE64URL(clientPublicKey)
(This generates a private / public key pair on the XSP|ADP, if there wasn’t one already)
-
The key store location isn’t configurable. Export the keys:
XSP|ADP_CLI/Applications/authenticationService/KeyManagement>exportKeys -
Copy the exported file
/var/broadworks/tmp/authService.keysto the same location on the other XSP|ADPs, overwriting an older.keysfile if necessary. -
Import the keys on each of the other XSP|ADPs:
XSP|ADP_CLI/Applications/authenticationService/KeyManagement> importKeys
							/var/broadworks/tmp/authService.keys
Provide the authService URL to the web container
The XSP|ADP’s web container needs the authService URL so it can validate tokens.
On each of the XSP|ADPs:
-
Add the authentication service URL as an external authentication service for the BroadWorks Communications Utility:
XSP|ADP_CLI/System/CommunicationUtility/DefaultSettings/ExternalAuthentication/AuthService>set url http://127.0.0.1:80/authService -
Add the authentication service URL to the container:
XSP|ADP_CLI/Maintenance/ContainerOptions> add tomcat
							bw.authservice.authServiceUrl
						http://127.0.0.1:80/authService
This enables Webex to use the Authentication Service to validate tokens presented as credentials.
-
Check the parameter with
get. -
Restart the XSP|ADP.
Configuring TLS and Ciphers on the HTTP Interfaces (for XSI and Authentication Service)
The Authentication Service, Xsi-Actions, and Xsi-Events applications use HTTP server interfaces. Levels of TLS configurability for these applications are as follows:
Most general = System > Transport > HTTP > HTTP Server interface = Most specific
The CLI contexts you use to view or modify the different SSL settings are:
| Specificity | CLI context |
| System (global) |
|
| Transport protocols for this system |
|
| HTTP on this system |
|
| Specific HTTP server interfaces on this system |
|
Reading HTTP Server TLS Interface Configuration on the XSP|ADP
-
Sign in to the XSP|ADP and navigate to
XSP|ADP_CLI/Interface/Http/HttpServer> -
Enter the
getcommand and read the results. You should see the interfaces (IP addresses) and, for each, whether they are secure and whether they require client authentication.
Apache tomcat mandates a certificate for each secure interface; the system generates a self-signed certificate if it needs one.
XSP|ADP_CLI/Interface/Http/HttpServer> getAdding TLS 1.2 Protocol to the HTTP Server Interface
The HTTP interface that is interacting with the Webex Cloud must be configured for TLSv1.2. The cloud does not negotiate earlier versions of the TLS protocol.
To configure the TLSv1.2 protocol on the HTTP Server interface:
-
Sign in to the XSP|ADP and navigate to
XSP|ADP_CLI/Interface/Http/HttpServer/SSLSettings/Protocols> -
Enter the command
get <interfaceIp> 443to see which protocols are already used on this interface. -
Enter the command
add <interfaceIp> 443 TLSv1.2to ensure that interface can use TLS 1.2 when communicating with the cloud.
Editing TLS Ciphers Configuration on the HTTP Server Interface
To configure the required ciphers:
-
Sign in to the XSP|ADP and navigate to
XSP|ADP_CLI/Interface/Http/HttpServer/SSLSettings/Ciphers> -
Enter the command
get <interfaceIp> 443to see which ciphers are already used on this interface. There must be at least one from the Cisco recommended suites (see XSP|ADP Identity and Security Requirements in the Overview section). -
Enter the command
add <interfaceIp> 443
                            <cipherName>
to add a cipher to the HTTP Server interface.The XSP|ADP CLI requires the IANA standard cipher suite name, not the openSSL cipher suite name. For example, to add the openSSL cipher
ECDHE-ECDSA-CHACHA20-POLY1305to the HTTP server interface, you would use:XSP|ADP_CLI/Interface/Http/HttpServer/SSLSettings/Ciphers>add 192.0.2.7 443 TLS_ECDHE_ECDSA_WITH_CHACHA20_POLY1305See https://ciphersuite.info/ to find the suite by either name.
Configure Trust for Authentication Service (with mTLS)
-
Sign in to Control Hub with your partner administrator account.
-
Go to and click Download Webex CA Certificate to get
CombinedCertChain2023.txton your local computer.These files contain two sets of two certificates. You need to split the files before you upload them to the XSP|ADPs. All files are required. -
Split the certificate chain into two certificates -
combinedcertchain2023.txt.-
Open
combinedcertchain2023.txtin a text editor. -
Select and cut the first block of text, including the lines
-----BEGIN CERTIFICATE-----and-----END CERTIFICATE-----, and paste the text block into a new file. -
Save the new file as
root2023.txt. -
Save the original file as
issuing2023.txt. The original file should now only have one block of text, surrounded by the lines-----BEGIN CERTIFICATE-----and-----END CERTIFICATE-----.
-
-
Copy both text files to a temporary location on the XSP|ADP you’re securing, for example,
/var/broadworks/tmp/root2023.txtand/var/broadworks/tmp/issuing2023.txt. -
Sign in to the XSP|ADP and navigate to
/XSP|ADP_CLI/Interface/Http/SSLCommonSettings/ClientAuthentication/Trusts>. (Optional) Run helpUpdateTrustto see the parameters and command format. -
Upload the certificate files to new trust anchors - 2023
XSP|ADP_CLI/Interface/Http/SSLCommonSettings/ClientAuthentication/Trusts> updateTrust webexclientroot2023 /var/broadworks/tmp/root2023.txt
XSP|ADP_CLI/Interface/Http/SSLCommonSettings/ClientAuthentication/Trusts> updateTrust webexclientissuing2023 /var/broadworks/tmp/issuing2023.txt
All aliases must have a different name.
webexclientroot,webexclientroot2023,webexclientissuing, andwebexclientissuing2023are example aliases for the trust anchors; you can use your own as long as all four entries are unique. -
Confirm the anchors are updated:
XSP|ADP_CLI/Interface/Http/SSLCommonSettings/ClientAuthentication/Trusts>
							get
Alias Owner Issuer ============================================================================= webexclientissuing2023 Internal Private TLS SubCA Internal Private Root webexclientroot2023 Internal Private Root Internal Private Root[self-signed]
(Option) Configure mTLS at the HTTP interface/port level
It’s possible to configure mTLS at the HTTP interface/port level or on a per-web application basis.
The way you enable mTLS for your application depends on the applications you’re hosting on the XSP|ADP. If you’re hosting multiple applications that require mTLS, you should enable mTLS on the interface. If you only need to secure one of several applications that use the same HTTP interface, you can configure mTLS at the application level.
When configuring mTLS at the HTTP interface/port level, mTLS is required for all hosted web applications accessed through this interface/port.
-
Sign in to the XSP|ADP whose interface you're configuring.
-
Navigate to
XSP|ADP_CLI/Interface/Http/HttpServer>and run thegetcommand to see the interfaces. -
To add an interface and require client authentication there (which means the same as mTLS):
XSP|ADP_CLI/Interface/Http/HttpServer> add IPAddress Port
							Name true true
See the XSP|ADP CLI documentation for detail. Essentially, the first
truesecures the interface with TLS (server certificate is created if required) and the secondtrueforces the interface to require client certificate authentication (together they are mTLS).
For example:
XSP|ADP_CLI/Interface/Http/HttpServer> get
Interface Port Name Secure Client Auth Req Cluster Fqdn
         =======================================================
         192.0.2.7 443 XSP|ADP01.collab.example.net true false
         192.0.2.7 444 XSP|ADP01.collab.example.net true true
In this example, mTLS (Client Auth Req = true) is enabled on 192.0.2.7 port 444. TLS is enabled on 192.0.2.7 port 443.
(Option) Configure mTLS for specific web applications
It’s possible to configure mTLS at the HTTP interface/port level or on a per-web application basis.
The way you enable mTLS for your application depends on the applications you’re hosting on the XSP|ADP. If you’re hosting multiple applications that require mTLS, you should enable mTLS on the interface. If you only need to secure one of several applications that use the same HTTP interface, you can configure mTLS at the application level.
When configuring mTLS at the application level, mTLS is required for that application regardless of the HTTP server interface configuration.
-
Sign in to the XSP|ADP whose interface you're configuring.
-
Navigate to
XSP|ADP_CLI/Interface/Http/SSLCommonSettings/ClientAuthentication/WebApps>and run thegetcommand to see which applications are running. -
To add an application and require client authentication for it (which means the same as mTLS):
XSP|ADP_CLI/Interface/Http/SSLCommonSettings/ClientAuthentication/WebApps>
							add IPAddress Port ApplicationName true
See the XSP|ADP CLI documentation for detail. The application names are enumerated there. The
truein this command enables mTLS.
For example:
XSP|ADP_CLI/Interface/Http/SSLCommonSettings/ClientAuthentication/WebApps>
					add 192.0.2.7 443 AuthenticationService true
The example command adds the AuthenticationService application to 192.0.2.7:443 and requires it to request and authenticate certificates from the client.
Check with get:
XSP|ADP_CLI/Interface/Http/SSLCommonSettings/ClientAuthentication/WebApps>
					get
Interface Ip Port Application Name Client Auth Req
         ===================================================
         192.0.2.7 443 AuthenticationService      true
Configure Device Management on XSP|ADP, Application Server, and Profile Server
Profile Server and XSP|ADP are mandatory for Device Management. They must be configured according to instructions in the BroadWorks Device Management Configuration Guide.
Where to go next
For configuration, you can rejoin the main document flow at CTI Interface and Related Configuration.
Additional certificate requirements for mutual TLS authentication against AuthService
Webex interacts with the Authentication Service over a mutual TLS authenticated connection. This means Webex presents a client certificate and the XSP|ADP must validate it. In order to trust this certificate, use the Webex CA certificate chain to create a trust anchor on XSP|ADP (or proxy). The certificate chain is available for download via Partner Hub:
- Sign in to Partner Hub at
admin.webex.com. -
Go to Services > Additional links.
-
Click the download certificate link.
You can also get the certificate chain from https://bwks-uap.webex.com/assets/public/CombinedCertChain2023.txt.
The exact requirements for deploying this Webex CA certificate chain depends on how your public facing XSP|ADPs are deployed:
-
Via a TLS bridging proxy
-
Via a TLS pass-through proxy
-
Directly to the XSP|ADP
The following diagram summarizes where the Webex CA certificate chain must be deployed in these three cases.
Mutual TLS Certificate Requirements for TLS-bridge Proxy
-
Webex presents a Webex CA signed client certificate to the proxy.
-
The Webex CA certificate chain is deployed on the proxy trust store, so the proxy trusts the client certificate.
-
The publicly signed XSP|ADP server certificate is also loaded into the proxy.
-
The proxy presents a publicly signed server certificate to Webex.
-
Webex trusts the public CA that signed the proxy’s server certificate.
-
The proxy presents an internally signed client certificate to the XSP|ADPs.
This certificate must have the x509.v3 extension field Extended Key Usage populated with the BroadWorks OID 1.3.6.1.4.1.6431.1.1.8.2.1.3 and the TLS clientAuth purpose. E.g.:
X509v3 extensions:X509v3 Extended Key Usage:1.3.6.1.4.1.6431.1.1.8.2.1.3, TLS Web Client AuthenticationWhen generating internal client certificates for the proxy, note that SAN certificates are not supported. Internal server certificates for the XSP|ADP can be SAN.
-
The XSP|ADPs trust the internal CA.
-
The XSP|ADPs present an internally signed server certificate.
-
The proxy trusts the internal CA.
Mutual TLS Certificate Requirements for TLS-passthrough Proxy or XSP in DMZ
-
Webex presents a Webex CA signed client certificate to the XSPs.
-
The Webex CA certificate chain is deployed on the XSPs’ trust store, so the XSPs trust the client certificate.
-
The publicly signed XSP server certificate is also loaded into the XSPs.
-
The XSPs present publicly signed server certificates to Webex.
-
Webex trusts the public CA that signed the XSPs’ server certificates.
Document Revision History
The following table shows a history of changes to this document over the past 12 months.
|
Date |
Description of Change | |
|---|---|---|
|
July 06, 2026 |
Updated SIP call transfer to Webex Meeting section with new Configure URI dialing steps. | |
|
June 24, 2026 |
Updated Add Webex App configuration templates to BroadWorks Application Server section with Import DITA files steps. | |
|
May 06, 2026 |
Added a section Activate BroadWorks IdP in Control Hub. | |
|
February 17, 2026 |
Added Australia FQDNs in the Configure NPS to use authentication proxy section. | |
|
February 06, 2026 |
Added Saudi Arabia FQDNs in the Configure NPS to use authentication proxy section. | |
|
September 26, 2025 |
Updated the General Limitations section to include Webex for Intune limitation. | |
|
June 04, 2025 |
Updated the Restrictions section to include the Control Hub navigation change for 'Authentication' settings, which moved from 'Organization Settings' to 'Security'. | |
|
May 20, 2025 |
Updated the Disable DND Sync section with the details for creating TAC case to disable the feature. | |
|
April 29, 2025 |
Updated the navigation path as BroadWorks Calling settings moved from Organization settings to Services in Partner Hub. | |
|
April 23, 2025 |
Added a note in the Client Logs under the Troubleshooting section. | |
|
January 13, 2025 |
Updated Featured and Limitations section. | |
|
December 03, 2024 |
Editorial Changes. | |
|
October 04, 2024 |
Added Quiet Hours section. | |
|
September 10, 2024 |
Updated Test and Lab Guidelines section. | |
|
August 09, 2024 |
Added the section 'Select Caller ID'. | |
|
August 01, 2024 |
Added the section 'Enabling Voicemail for Microsoft Teams Integration'. | |
|
June 25, 2024 |
Updated Barge-in section under Deploy Webex for BroadWorks. | |
|
June 14, 2024 |
Added Flexible External Caller ID Selection section under Features and Limitations and Canceling a Subscription from Control Hub section under Managing Webex for BroadWorks. | |
|
May 13, 2024 |
Editorial changes. | |
|
May 10, 2024 |
Pro Pack For Control Hub added under the Features and Limitations section. | |
|
May 6, 2024 |
Updated Partner SSO - SAML section, no need to contact TAC for Identity Provider. | |
|
May 2, 2024 |
Editorial changes. | |
|
April 10, 2024 |
Updated Patch 2 information in the Shared-Line Appearance section. | |
|
March 27, 2024 |
Updated Busy Lamp Field / Call Pickup and Partner SSO - OpenID Connect section. | |
|
March 22, 2024 |
Updated Prerequisites in the Do Not Disturb (DND) Sync section. | |
|
March 07, 2024 |
Updated Control Login flow section in User Login and Configuration Retrieval. | |
|
February 24, 2024 |
Editorial changes. | |
|
February 20, 2024 |
Added Visual Spam Indication section under Deploy Webex for BroadWorks. | |
|
February 07, 2024 |
Added a feature BroadWorks Password Expiration Notification During Login under Webex for BroadWorks Reference. | |
|
January 25, 2024 |
Editorial changes. | |
|
January 23, 2024 |
Made editorial changes in the Move User (with Consent) to Webex for Cisco BroadWorks section under Managing Webex for BroadWorks. | |
|
January 10, 2024 |
Editorial changes. | |


