
Thanks for your feedback.
Synchronize user and organizational contacts
 Feedback?
Understand organizational contacts
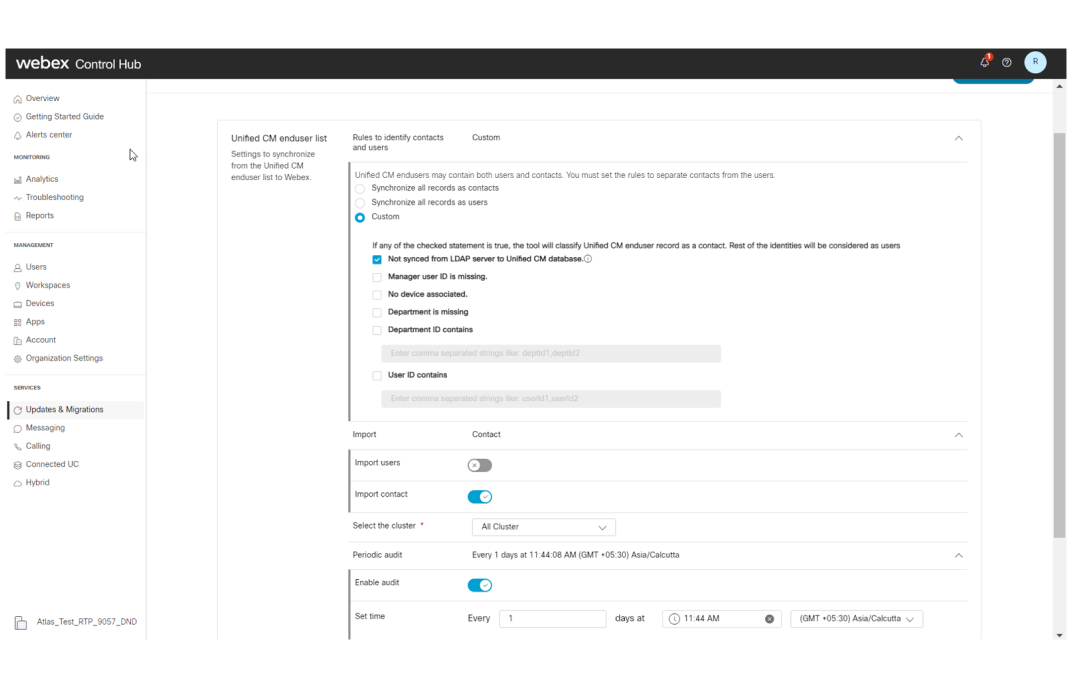
Use Control Hub to migrate or synchronize your organizational contacts to Webex. For on-premises deployments, organizational contacts are configured in the LDAP server as contact objects or in the Cisco Unified Communications Manager as end users. You can configure rules in Control Hub to classify users in the Unified CM database into end users and contacts.
This tool does the following:
-
Synchronizes users and contacts from Unified CM or LDAP server to Webex.
-
Automatically detects updates in Unified CM based users and contacts and updates the changes into Webex.
-
You can set a schedule for the periodic sync to synchronize users and contacts from the LDAP server into Webex.
-
Periodic audit could be configured to make sure Unified CM users and contact data doesn't get out of sync with Webex.
When you configure a periodic sync, the token used to schedule and run the sync may expire. To restart the sync, the admin must follow the steps below.
- Go to settings
- Disable the periodic sync toggle, and save settings.
- Go back to settings.
- Enable the periodic sync toggle.
If you do not have Cisco Cloud connectivity, then use the CSV file through Control Hub to import your org contacts.
The prerequisites, Configure LDAP server search and set your preferences are mandatory sections which will guide you through the initial set up to import and synchronize your organizational contacts into Webex.
-
Get familiar with Control Hub. Control Hub is the management interface for the Webex platform. For more information, see Get started with Control Hub.
-
Access Control Hub with full administrator privileges. With full administrator privileges, you can assign one or more roles to any user in your organization. Ensure to assign a user with administrator privilege so you can migrate the rest of your Jabber custom contacts. For more information, see Assign organizational account roles in Control Hub.
-
Onboard the Unified CM clusters to Webex Cloud-Connected UC. For more information, see Set up Webex Cloud-Connected UC for on-premises devices.
-
On the cluster or clusters that you onboarded to Webex Cloud-Connected UC, enable the Deployment Insights service. For more information, see Enable or disable Webex Cloud-Connected UC services in Control Hub.
-
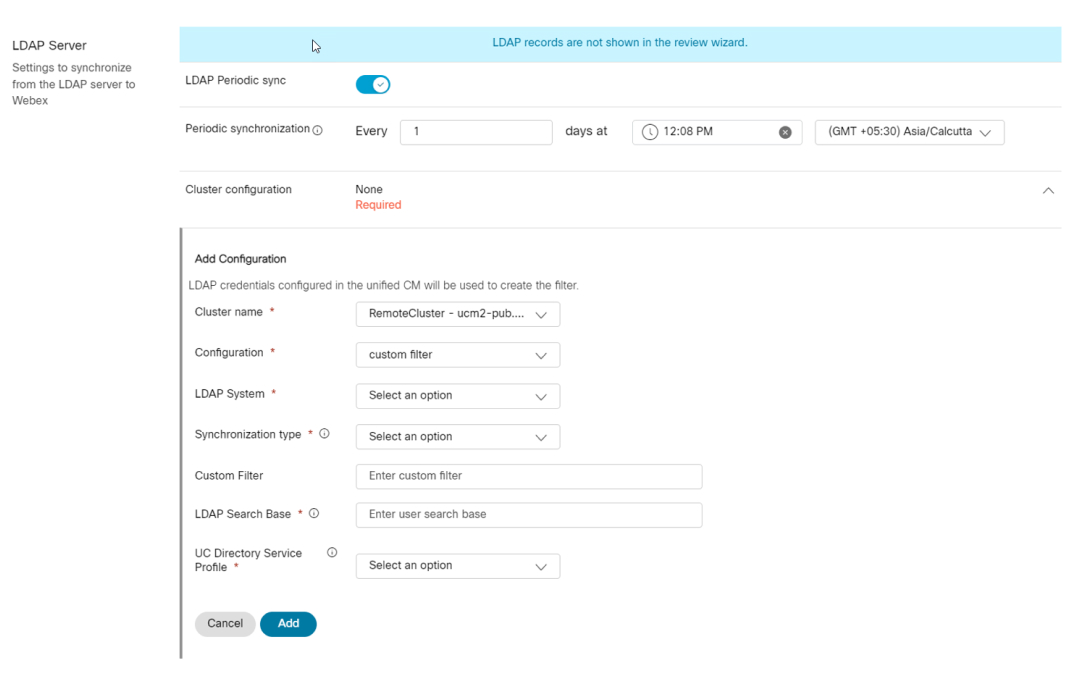
Configure LDAP server search. The LDAP credentials are retrieved from the Unified CM LDAP search configuration page for contact synchronization. For more information, see Configure LDAP server search.
If you don't validate the on-premise configurations for LDAP, the LDAP contact synchronization is not initiated. -
If you sync an end user across multiple clusters, you must ensure that their status is the same in all clusters.
Lightweight Directory Access Protocol (LDAP) synchronization helps you to provision and configure end users for your system.
If you wish to use Unified CM configuration, do the following:
| 1 |
Set the LDAP server Directory Type to Microsoft AD or Open LDAP server on the Unified CM. |
| 2 |
Provide the LDAP search configuration:
By default, the entity type is Contacts. For more information, see Configure LDAP synchronization
|
If you wish to customize the configuration in Control Hub, do the following:
| 1 |
Configure the LDAP server search page on Unified CM and provide the following:
|
| 2 |
Add one or more UC Directory profile. |
| 3 |
Specify the LDAP server directory type explicitly in Control Hub user interface. |
| 4 |
Specify the LDAP server Entity Type as Users or Contacts in the Control Hub user interface. |
| 5 |
Specify the UC service profile as one of the directory profiles created in step 2. |
| 6 |
Specify the LDAP server search base. |
| 7 |
Specify the LDAP server search filter. For more information, see Configure LDAP synchronization
|
| 1 |
From the Control Hub dashboard, Go to Updates and Migration. | ||||||||||||||||||
| 2 |
Select the User/Contact Sync tile and click Go to Settings under Prerequisites. The Settings page appears. | ||||||||||||||||||
| 3 |
Configure either the Unified CM or the LDAP server for user synchronization function. Select the details from the following sections:
| ||||||||||||||||||
| 4 |
Click Save and proceed. The Pending for sync section appears. |
Synchronizing organizational contacts is now an automated process. Webex Cloud-Connected UC can sync contacts from Unified CM or the LDAP server to Webex. This functionality does not require manual upload of CSV file, which was cumbersome and error prone.
You can choose to synchronize data from a single cluster or all clusters. The rules for synchronizing data depend on the configurations set in the Settings page. You can change the rules, if necessary and it applies from the next synchronization task.
On synchronize the organizational contacts data, the following displays:
|
Identities |
Description |
|---|---|
|
Contacts to be synced |
Total number of contacts that are ready to be synchronized to Webex. |
|
Contacts already in Webex |
Total number of contacts that are already synchronized to Webex. |
|
Users to be synchronized |
Total number of users ready to be synchronized to Webex. |
|
User Exists in Webex |
Total number of users who are already synchronized to Webex. |
When syncing users and/or contacts from Unified CM, you can review the records and use the inline editing option to change the imported data. Click Review Unified CM Records.
The following procedure is not applicable when Directory connector are enabled as user synchronization cannot be done.
| 1 |
In the Review users before synchronization page, review the details regarding issues and fix them, if any. The list of issues are as follows:
Use the search field to search for the identities and sort them based on the filters. |
| 2 |
Click Change user/contact rule to change the rules from the Settings page. |
| 3 |
Select a user or contact from the list to make any changes to the identity. You can move the user or contact or remove from the contact sync list. |
| 4 |
You can export the list to a CSV file to manually edit any information and later import the updated file. Click Actions to perform the following tasks:
|
| 5 |
Click Next. Displays the Review contacts before synchronization page. |
| 6 |
In the Review contacts before synchronization page, you can perform the same set of tasks such as Search, Sort, Edit Settings, and Change user/ Contact Rules. Review the details about issues and fix them, if any. The list of issues are as follows:
Use the search field to search for the identities and sort them based on the filters. |
| 7 |
Click Next. The Summary page appears. |
The summary page lists the error and warning messages for the selected users and contacts. It also provides you with the necessary suggestions and solutions to resolve them. Resolve the errors before you proceed. However, you can ignore the warnings.
-
You can also remove the identities (user or contact) with errors and proceed. The removed identities are added back to the unsynchronized list.
-
The errors and warnings can be downloaded.
To resolve the user errors, click View Users and select Remove from sync list.
To resolve errors with the contacts, click View Contacts and select Remove from sync list.
When you use the Remove from sync list option to remove users in the Summary page, the user sync count on Control Hub isn't updated.
|
You can view the count of these invalid identities:
The users and contact details in the review wizard is reverted when the settings page is updated. Export updated records- we recommend updating the Unified CM contact list for any changes that are made to the records. Click Export list, to download the updated records and manually update them in Unified CM. |
The Synchronization tab lists all the synchronization operations that have been done thus far. You can view the following columns:
-
Status
-
Last updated on
-
Total contacts
-
Failed contacts
-
Total users
-
Failed users
-
Initiated by
-
Type
|
In the Logs page, review the message in the System failure column and fix the error. The following table lists the different error scenarios and how to fix them.
|


