- Home
- /
- Article

Get started with the ATA 190-SC
 In this article
 Feedback?
It’s easy to get started with your new Cisco ATA. It adds various call features to any device you attach to it, such as an analog phone or fax machine. You install the ATA, perform the initial setup in Cisco Webex, and activate it.
Your new ATA
Your analog telephone adapter (ATA) allows you to connect an analog device, such as an analog phone or fax machine, to your network. The connected device can then function like the IP phones in your network.
Your new analog telephone adapter (ATA) has two interfaces:
-
A RJ11 port for an analog device
-
Two RJ11 ports for analog devices
-
A RJ45 port for Ethernet
Light-emitting diodes (LEDs) on the ATA provide status.
Install your ATA with the components that are included in the box.
Install your ATA with the components that are included in the box, then sign in to Webex Settings and activate your analog device.
You'll perform these tasks:
-
Install your ATA with the components in the box.
-
Sign in to Webex Settings and complete your initial setup.
-
Activate your analog device.
-
If you need to reset your device, ask your administrator to use Control Hub to do so. Do not use the RESET button on the back of your ATA unless your administrator tells you to.
Devices associated with your ATA
Use your ATA to connect these types of devices to your network:
-
Analog phones
-
Analog phones have no softkeys.
-
The information that analog phones display depends on the model you have.
-
You use the phone’s flash button for hold, resume, transfer, and conference.
-
-
Analog telephony voice devices
-
The ATA supports analog telephony voice devices, such as overhead paging adapters and answering machines, that emulate a regular phone.
-
-
Overhead paging systems
-
Overhead paging systems provide alarms and public-address announcements in buildings.
-
Analog overhead paging systems usually consist of a paging controller, paging amplifiers, and paging speakers. Most analog paging controllers support a Foreign Exchange Office (FXO) interface over an RJ-11 connector, and you can connect these devices to the ATA 190-SC.
Some paging amplifiers and paging speakers don't support the FXO interface, although they use RJ-11 cabling for Class 2 wiring. Devices that don't support the FXO interface don't work with the ATA 190-SC, even if they use an RJ-11 connector. Consult your paging equipment vendor for information about FXO support.
-
-
Fax machines
-
Use a fax machine directly with an ATA. Don’t connect an extension to a fax machine, and don’t use the fax machine with a splitter.
-
To reduce fax failures, use overseas mode, if available; if not, set the fax machine transmission speed to low.
-
Data devices, such as facsimile machines and modems, may not function optimally. For the best fax and modem performance, continue to use a dedicated PSTN line.
-
Install your new ATA
Before you begin
Before you begin the installation, make sure you have the following equipment:
-
Ethernet cable to connect to your network.
-
Analog phone or fax machine to connect to your ATA.
-
Phone cable to connect your phone.
-
Uninterruptible power supply (UPS) to provide backup power.
| 1 |
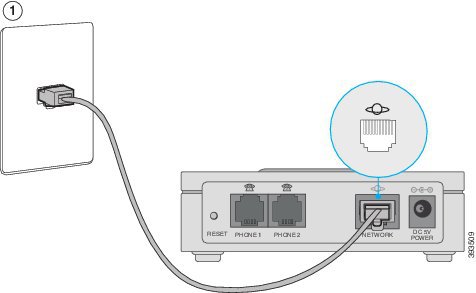
Connect the network cable to your network and to the NETWORK port on the ATA.
 |
| 2 |
Connect the phone cable to the PHONE 1 port on the ATA and to your analog device (phone or fax machine).
 If connecting a fax machine, connect it directly to the ATA. Do not connect an extension to a fax machine, and do not use a splitter. |
| 3 |
(Optional) If you have a second analog device, connect the phone cable to the PHONE 2 port on the ATA and to your second analog device. |
| 4 |
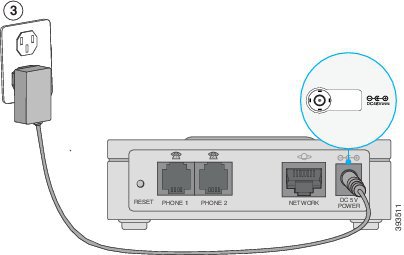
Connect the ATA power cable to the DC 5V POWER port on the ATA, and plug the power cable into your power source.
 |
Complete your initial setup in Webex Settings
To get started, walk through a few short steps in Webex Settings. Accept the terms of service and verify your emergency service address.
Before you begin
By default, your company's address is listed as your emergency service address. Change this value to the address that you work from most often, such as the location of your home office or other remote site.
It's important that your emergency service address match the physical location of your device.
| 1 |
Click the get started link in your welcome email to open Webex Settings in your browser. |
| 2 |
If prompted, set up a new password for your account. |
| 3 |
Accept the terms of service. |
| 4 |
Follow the on-screen instructions to set up your services. |
| 5 |
Follow the on-screen instructions to verify and, if needed, change your emergency service address. |
Get an activation code
To use your device with Cisco Webex, you should have received an email that includes an activation code. You need to enter this code the first time you sign in to your device. If you can't find the email or if the code is already expired, you can create a new one.
If your device has a camera, you can either scan the QR code or enter the code manually. If your device doesn’t have a camera, you must enter the code manually.
|
From Webex Settings, select . |
Activate your ATA
Before you begin
Before you activate your ATA, check with your administrator about interactive voice response (IVR) codes that affect network settings. Any changes to network settings must be configured before you activate your ATA.
Before you activate your ATA, check with your administrator about interactive voice response (IVR) codes that affect network settings. Any changes to network settings must be configured before you activate your ATA. For details of available IVR codes, see IVR Options for Analog Telephone Adapters.
You need the activation code from your welcome message.
If the code from your welcome message has expired, generate an activation code for your device with Webex Settings.
| 1 |
Go off-hook on your analog device and listen for voice prompts. The ATA prompts for entry of your 16-digit activation code. |
| 2 |
Enter your activation code on your analog device. |
| 3 |
Listen to the ATA voice prompts and respond to each prompt to complete the registration of your ATA. Be careful when you enter your activation code: if you enter a wrong digit, you have to start over. |
| 4 |
After you complete the registration steps, check the corresponding port LED. If the corresponding port LED is lit solid green, your ATA is connected to Cisco Webex. If the corresponding port LED is lit solid green, your ATA is activated. |
What to do next
These conditions apply after you activate your ATA:
These conditions apply after you connect your ATA to Cisco Webex:
-
The ATA does not have access to a web portal.
-
IVR is not available.
-
The corresponding port LED is lit a solid green.
-
Your analog device has dial tone when you go off-hook.
-
Your ATA port shows green status in Webex Settings.
Supported ATA call features
Depending on your system configuration, your ATA supports some or all the following call features:
-
Transfer (attended or supervised)—In this type of transfer, you talk to the receiving party before you complete the transfer.
See Transfer a Call from Your Analog Phone for details.
-
Transfer (unattended or unsupervised)—In this type of transfer, you complete the transfer and hang up before the receiving party answers.
See Transfer a Call from Your Analog Phone for details.
-
Conference.
See Make a Conference Call from Your Analog Phone for details.
-
Hold and Resume.
See Put a Call on Hold on Your Analog Phone for details.
-
Caller ID.
-
Call Waiting.
See Answer Call Waiting on Your Analog Phone for details.
-
Call Pickup.
-
Speed Dial.
-
Music On Hold.
-
Shared Lines.
-
Voicemail—This feature has no visual indicator, but a message waiting tone when you go off-hook indicates that you have voice messages. Some analog phones with a large LCD screen may display a voicemail icon.
See Voicemail on Your Analog Phone for details.
-
Call Forward.
See Call Features and Star Codes for Analog Phones for details.
-
Redial.
See Call Features and Star Codes for Analog Phones for details.


