- Home
- /
- Article

Thanks for your feedback.

Enroll Cisco IOS managed gateways to Webex Cloud
 In this article
 Feedback?
Connecting your IOS managed gateway devices to Cisco Webex Control Hub, allows you to manage and monitor them from anywhere, together with the rest of your Unified Communications infrastructure.
Managed gateways
Enrolling your Cisco IOS gateways to the Control Hub helps you to simplify device management and allows you to new Webex Calling services. As the gateways maintain a connection with the Control Hub, you can manage and monitor them from anywhere, along with the rest of your Webex Calling devices. To enroll a gateway, you have to install a management connector application and make sure that there is a secure connection with the Cisco Webex cloud. After you establish this connection, you can enroll the gateway by logging in to the Control Hub.
This process doesn't apply to Cisco IOS Voice Gateways, such as the VG400, which is fully managed as devices in the Control Hub.
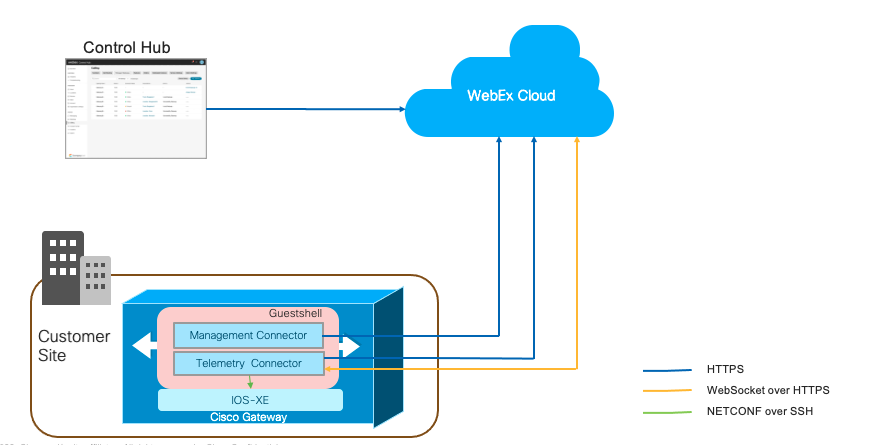
A small connector application, known as the GuestShell, is responsible for establishing and maintaining a connection from the gateway to the Control Hub. The GuestShell and connector applications are configured and set up using a script, which is run on the gateway from the Webex cloud during the enrollment process.
To simplify the installation process, the script adds a number of necessary gateway configurations.
Gateway connectors
Gateway connectors are small applications that run in the gateway GuestShell to maintain a connection to the Control Hub, coordinate events, and collect status information. For more information on GuestShell, see GuestShell.
The gateway connectors are installed on the Cisco IOS XE GuestShell container.
There are two types of connectors:
-
Management connector
-
Telemetry connector
An interactive menu-driven TCL script helps to set up the GuestShell, as well as installation and maintenance of the management connector.
The management connector takes care of gateway enrollment and lifecycle management of the telemetry connector.
After successful completion of enrollment, the management connector downloads and installs the latest telemetry connector.
The following graphic shows how the different components connect in a Webex Calling solution:
As part of TCL script execution, the following information gets collected from the user:
-
External interface
-
DNS server addresses
-
Proxy details
-
Connector IP address
-
Gateway Credentials (username and password)
The TCL script performs the following configurations:
-
Virtual Port Group—Required for guestshell configuration.
-
Guestshell
-
NETCONF Yang
-
SNMP Trap configuration—Required for notifications from Cisco IOS XE.
-
IP Route—To route connector-related traffic through virtual port group.
The TCL script performs the following configurations:
!
interface VirtualPortGroup 0
 ip unnumbered GigabitEthernet1
 no mop enabled
 no mop sysid
!

!
app-hosting appid guestshell
 app-vnic gateway0 virtualportgroup 0 guest-interface 0
  guest-ipaddress 10.65.125.227 netmask 255.255.255.128
 app-default-gateway 10.65.125.142 guest-interface 0
 app-resource profile custom
  cpu 800
  memory 256
  persist-disk 500
 name-server0 72.163.128.140
 name-server1 8.8.8.8
!

!
netconf-yang
netconf-yang cisco-ia snmp-trap-control trap-list 1.3.6.1.4.1.9.9.41.2.0.1
netconf-yang cisco-ia snmp-community-string Gateway-Webex-Cloud
!

!
logging snmp-trap emergencies
logging snmp-trap alerts
logging snmp-trap critical
logging snmp-trap errors
logging snmp-trap warnings
logging snmp-trap notifications
!

!
snmp-server community Gateway-Webex-Cloud RO
snmp-server enable traps syslog
snmp-server manager
!

!
ip route 10.65.125.227 255.255.255.255 VirtualPortGroup0
!
For the sample configuration:
-
GigabitEthernet1 is assigned as the external interface. The IP address of GigabitEthernet1 is 10.65.125.142.
-
The connector IP address must be in the same network as the one chosen for external connectivity. It can be a private network address, but it must have HTTPS access to the internet.
-
The TCL script tracks and saves the configuration changes to the Cisco IOS XE startup configuration.
-
As part of the uninstallation process, the TCL script removes the configuration changes.
Limitations and restrictions
Before installation, consider that the connector application can’t be used with the following:
- Cisco 1100 Integrated Services Router platforms
- Platforms configured in High Availability (HA) mode
- Platforms configured in Controller mode for SD-WAN networks
For Cisco IOS Voice Gateways such as VG400, you needn't install the connector application. You can fully configure and manage it through the Control Hub.
Consider the following when configuring your router for use with a connector application:
-
IOS XE uses proxy ARP to route traffic to the guest shell. Don’t configure no ip proxy-arp comand to disable this feature.
-
Don’t use Network Address Translation (NAT) on platforms that are configured for a Cisco Unified Border Element (CUBE). Therefore, configure the connector application with a routable IP address. That is, it can’t share the router interface address.
Prerequisites
Prepare your device for a gateway enrollment:
-
Access to the Control Hub as an organization administrator
-
IP address, username, and password for the devices that you want to configure.
-
Cisco IOS XE version:
-
Local Gateways—Cisco IOS XE Bengaluru 17.12.3 or later
-
Survivability Gateways—Cisco IOS XE Dublin 17.12.3 or later
For the recommended versions, see Cisco Software Research. Search for the platform and select one of the Suggested releases.
-
- Ensure that the device is configured with NTP server details to synchronize its system clock with the designated NTP server.
-
System Prerequisites
-
Minimum free memory—256 MB
-
Minimum disk space—The hard disk (SSD) attached to the gateway that is used for connector installation must have 2000MB free space. Also, bootflash must have 50MB free space. It’s used to store the logs and RPM files.
If a hard disk isn’t attached to the gateway, then bootflash is used for connector installation. Then, bootflash must have 2000MB free space.
-
If the bootflash of your router is 4GB and there's less than 2GB of available capacity (the minimum capacity), delete all IOS binary (.bin) images except the one that is currently running. After you delete the files, free up extra space.
The following are optional steps to free up bootflash disk space. Perform the following steps and change the boot files to install mode only if:
-
The router is using the bundled boot mode (booting from .bin).
-
The .pkgs isn't already extracted (install mode).
Use the following steps to expand the binary image and boot from components:
-
Create a new directory using.
mkdir bootflash:/image -
Expand the IOS binary image using.
request platform software package expand file bootflash:/<image>.bin to bootflash:/image -
In configuration mode, remove the current boot options using.
no boot system -
Configure a new boot statement:
boot system
                        bootflash:/image/packages.conf
. -
Exit from configuration mode, save the configuration, and reboot.
-
Once the router has restarted, use to
show versionverify that the router booted frombootflash:/image/packages.conf. If so:-
Verify that the
bootflash:/sysbootdirectory is empty. -
Delete the remaining IOS binary image.
-
Delete any core images using.
delete /f /r bootflash:/core/* -
Delete trace log files using.
delete /f /r bootflash:/tracelogs/* -
If there’s still insufficient disk space, review the remaining files in bootflash: and delete any other nonessential files such as logs and CDRs.
-
-
A supported Cisco router, which is connected to a network with a path to the internet. The basic configuration must have the following:
-
The DNS server is configured to resolve public domain names.
-
To configure the DNS server, use the following command:
-
ip name-server <IP address>
-
-
HTTP Proxy server if you want to reach to the internet through a proxy.
-
Gateway credentials: A local credential (username and password) with privilege level 15 access is required by the connector to access the gateway through its NETCONF interface.
To authenticate and authorize NETCONF access, ensure that the default aaa lists are configured as illustrated in the following example. Only the commands listed in this document have been validated and are supported for Managed Gateways. Configurations involving other methods (for example, TACACS or ISE) haven’t been validated and aren’t supported currently.
aaa new-model
aaa authentication login default local
aaa authorization exec default local if-authenticated
username test privilege 15 secret <password>
Network Prerequisites
-
The connector IP address must be in the same network as the one chosen for external connectivity. It can be a private network address, but it must have HTTPS access to the internet.
If you use Virtual CUBE on Amazon Web Services (AWS) as your Local Gateway, refer to Associate a secondary IP address for Virtual CUBE on AWS for steps on how to associate a secondary IP address for connector use.
-
Be connected to the Control Hub and on-premises devices to complete the enrollment process.
-
URLs for Webex services:
-
*.ucmgmt.cisco.com
-
*.webex.com
-
*.wbx2.com
-
-
Transport protocols: Transport Layer Security (TLS) version 1.2
-
Import the IOS public certificate authority bundle. The certificates added to the gateway trust pool are used to verify access to Webex servers. Use the following configuration command to import the bundle.
crypto pki trustpool import url https://www.cisco.com/security/pki/trs/ios.p7b
-
Associate a secondary IP address for Virtual CUBE on AWS
If you use Virtual CUBE on AWS as your Local Gateway, perform the following steps on the AWS interface to associate a secondary IP address for connector use.
We recommend that you perform this activity during a maintenance window.
Before you begin
-
To use Virtual CUBE on the Amazon Web Services (AWS) as your Local Gateway, you must associate a secondary private IP address with the gateway interface. You can use this IP address as the connector IP address.
-
Associate an Elastic public IP address with the secondary IP address so that the secondary IP address is publicly available for gateway enrollment.
-
The associated security group policy must allow HTTPS inbound traffic for successful enrollment. You can remove this once enrollment is complete.
| 1 |
Go to Services > EC2 > Instances, and select the Cisco gateway instance. |
| 2 |
In the Network interfaces window, click eth0. A dialog box displays detailed information about the eth0 interface. |
| 3 |
Click Interface ID Value. |
| 4 |
Click Actions, and choose Manage IP address from the drop-down list. |
| 5 |
Expand eth0 and select assign new IP address and confirm the assignment. Note this secondary IP address. |
| 6 |
Click Actions and select Associate Address from the drop-down list. |
| 7 |
Choose an available public IP address from the Elastic IP address list. Validate that the selected IP address matches with the secondary IP address that you noted. |
| 8 |
(Optional) To reassign a public IP address that is currently in use and it’s mapped to another elastic network interface (ENI), click Allow Reassociation. |
| 9 |
Click Associate Address to associate the public IP address (Amazon elastic IP) with the private IP address of the network interface. |
You can now use this private IP address as the Connector IP address while doing connector installation. Use the corresponding public IP address (Amazon elastic IP address) for enrollment in the Control Hub.
Add a new gateway instance in the Control Hub
If you've already added the gateway to the Control Hub and have installed the management connector, you can skip this procedure. Go to Step 5 of Enroll the gateway to the Control Hub to complete the enrollment process.
| 1 |
Sign in to Control Hub. |
| 2 |
Go to . |
| 3 |
Click Add Gateway. |
| 4 |
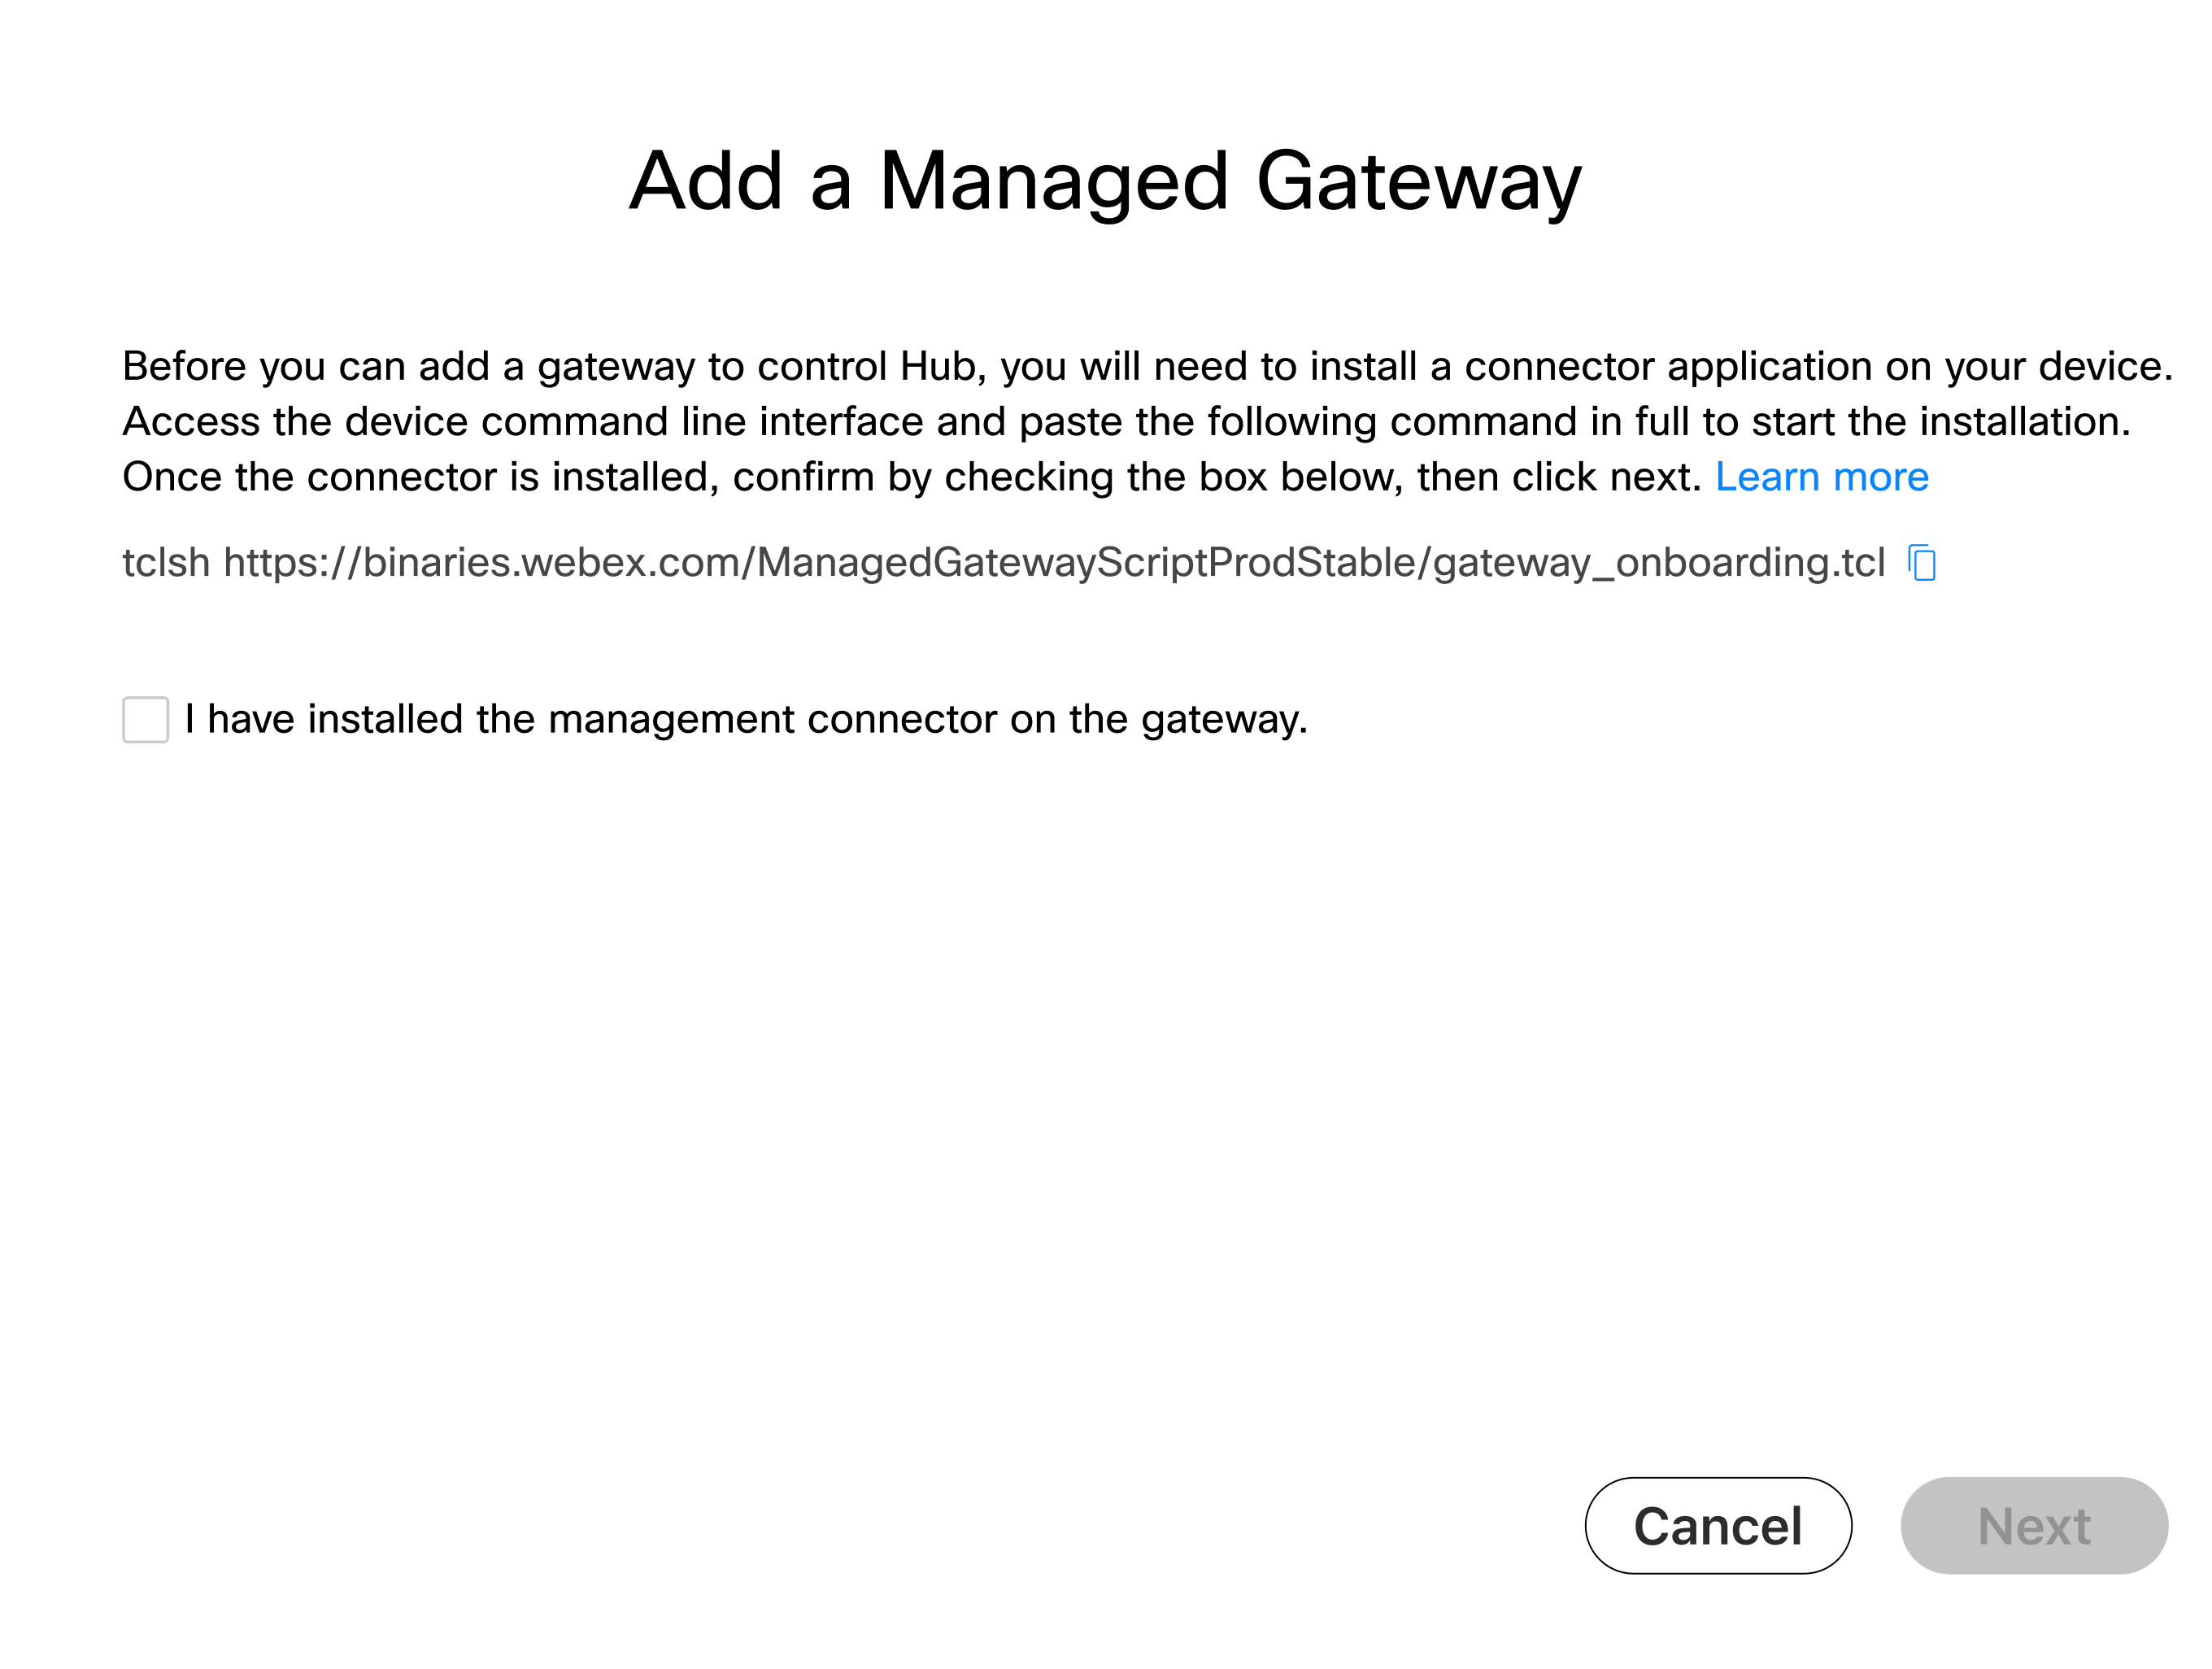
Copy the tclsh command shown in the Add a Managed Gateway window. You must run the command on the gateway CLI during the management connector installation procedure. |
What to do next
You can resume the enrollment process in the Control Hub after the connector is installed on the gateway.
Install the gateway connector
Before proceeding with the installation of the management connector, make sure that you meet all the Prerequisites.
Execute the script
|
Sign in to the gateway using a console or SSH connection, then paste the following string to the router exec command prompt: tclsh https://binaries.webex.com/ManagedGatewayScriptProdStable/gateway_onboarding.tcl
|
Start the installation
If the connector is not set up already, the script takes you to the installation menu; if the connector is set up, it takes you to the home menu.
| 1 |
Choose the interface that's in the same network as the address reserved for the connector.
|
| 2 |
Configure the DNS server to be used by the connector. By default, use the servers configured in IOS.
Y is the default input here. If you press Enter, Y is taken as the input. Detected settings may be overridden if necessary: |
| 3 |
If you need to use a proxy to access the internet, enter the proxy details when prompted. If the gateway has already been configured with a proxy, the following details are used by default. Type n to override these settings, if required.
|
| 4 |
Configure SNMP trap settings. To push notifications to the Cisco Webex cloud, the script updates the SNMP trap configuration level in the router if it is set below the notification level. The system prompts you to confirm whether to change the SNMP trap configuration to the notification level. To retain the current SNMP trap configuration level, select n. |
| 5 |
Enter the connector IP address.
|
| 6 |
Enter the username and password that the connector uses to access the router NETCONF interface.
Type in the password manually. Copy and paste might not work. Enter the gateway credentials that you identified in the Prerequisites section. The connector uses the credentials to access the router IOS NETCONF interface. You get the "Cloud connector is installed successfully" message after the successful installation.
You can quit the script by choosing the 'q' option after successful installation. If there is an installation failure, you can choose the 'h' option to change any settings, collect logs, and so on. Refer to the Post-installation activities section for more details. If you want to retry installation, you can choose uninstallation and then relaunch the script to try installation again. You can launch (or relaunch) the TCL script directly using |
Enroll the gateway to the Control Hub
Before you begin
| 1 |
Sign in to Control Hub. |
| 2 |
Go to . |
| 3 |
Click Add Gateway. |
| 4 |
In the Add a Managed Gateway window, check I have installed the management connector on the gateway and click Next. Make sure that the connector is successfully installed before you perform this step.
|
| 5 |
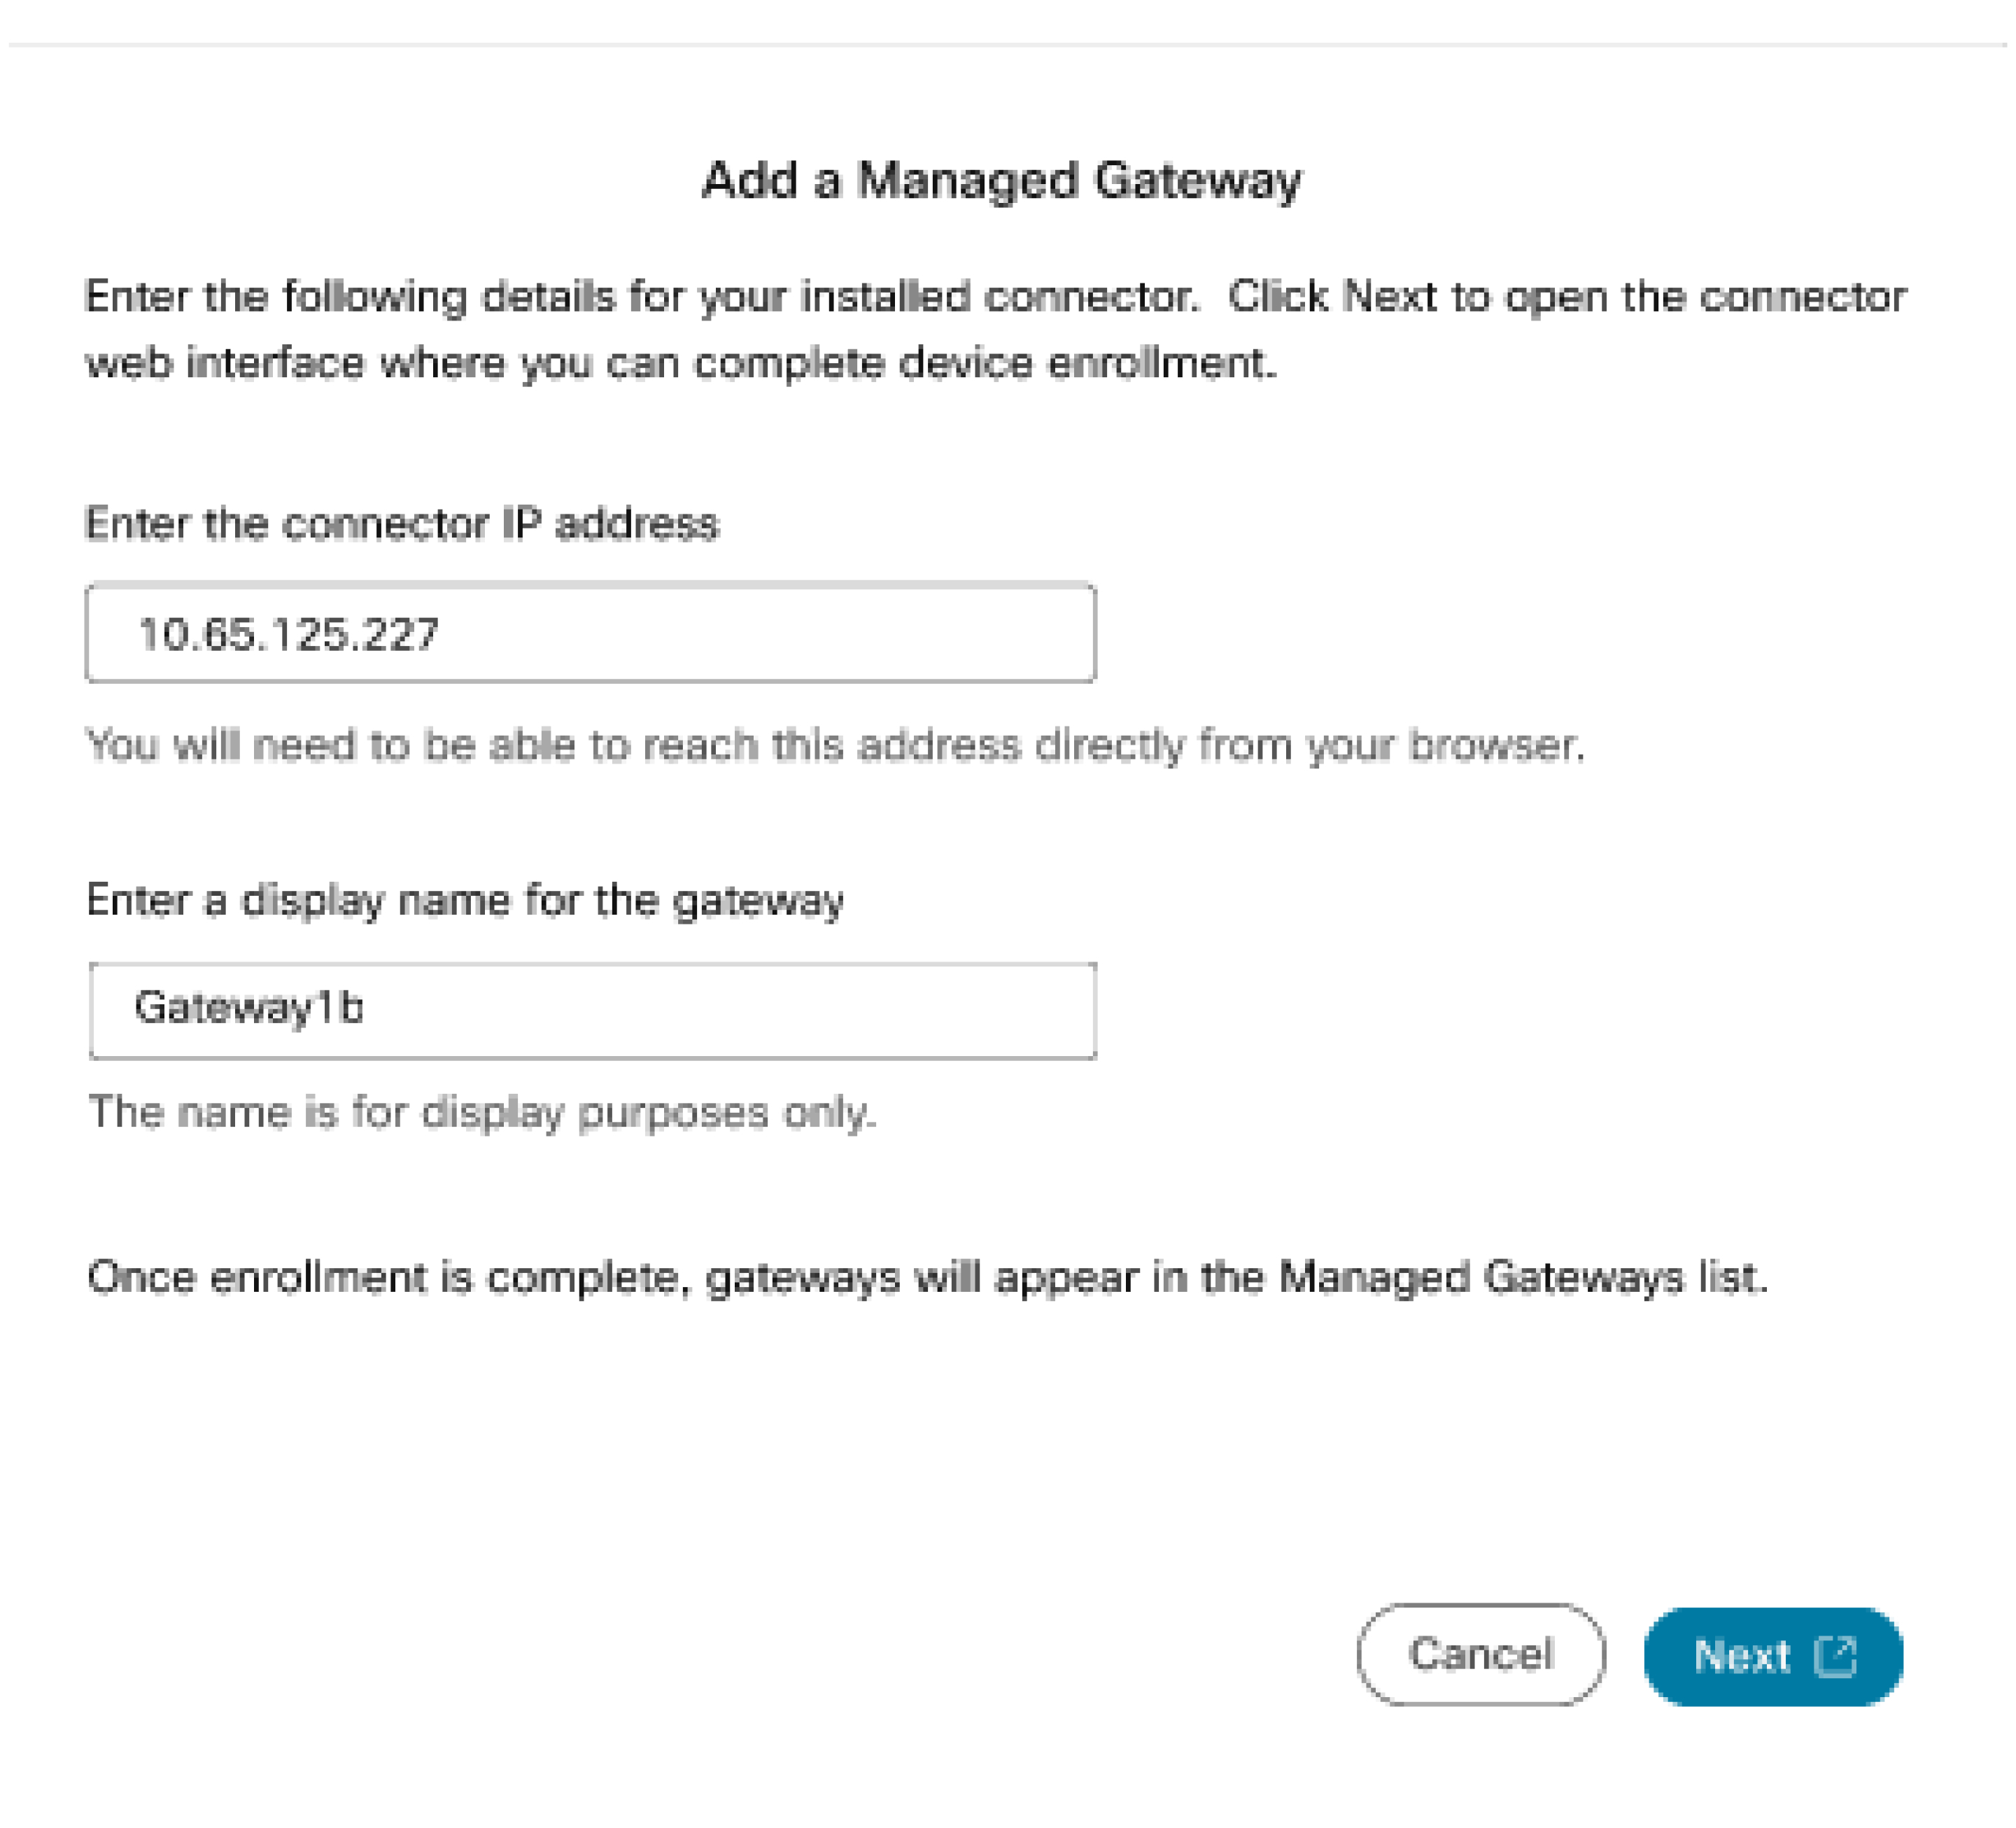
In the Add a Managed Gateway page, enter the following details:
|
| 6 |
Click Next.
A browser tab that connects to the connector management page on the router opens so that you can complete the enrollment.
|
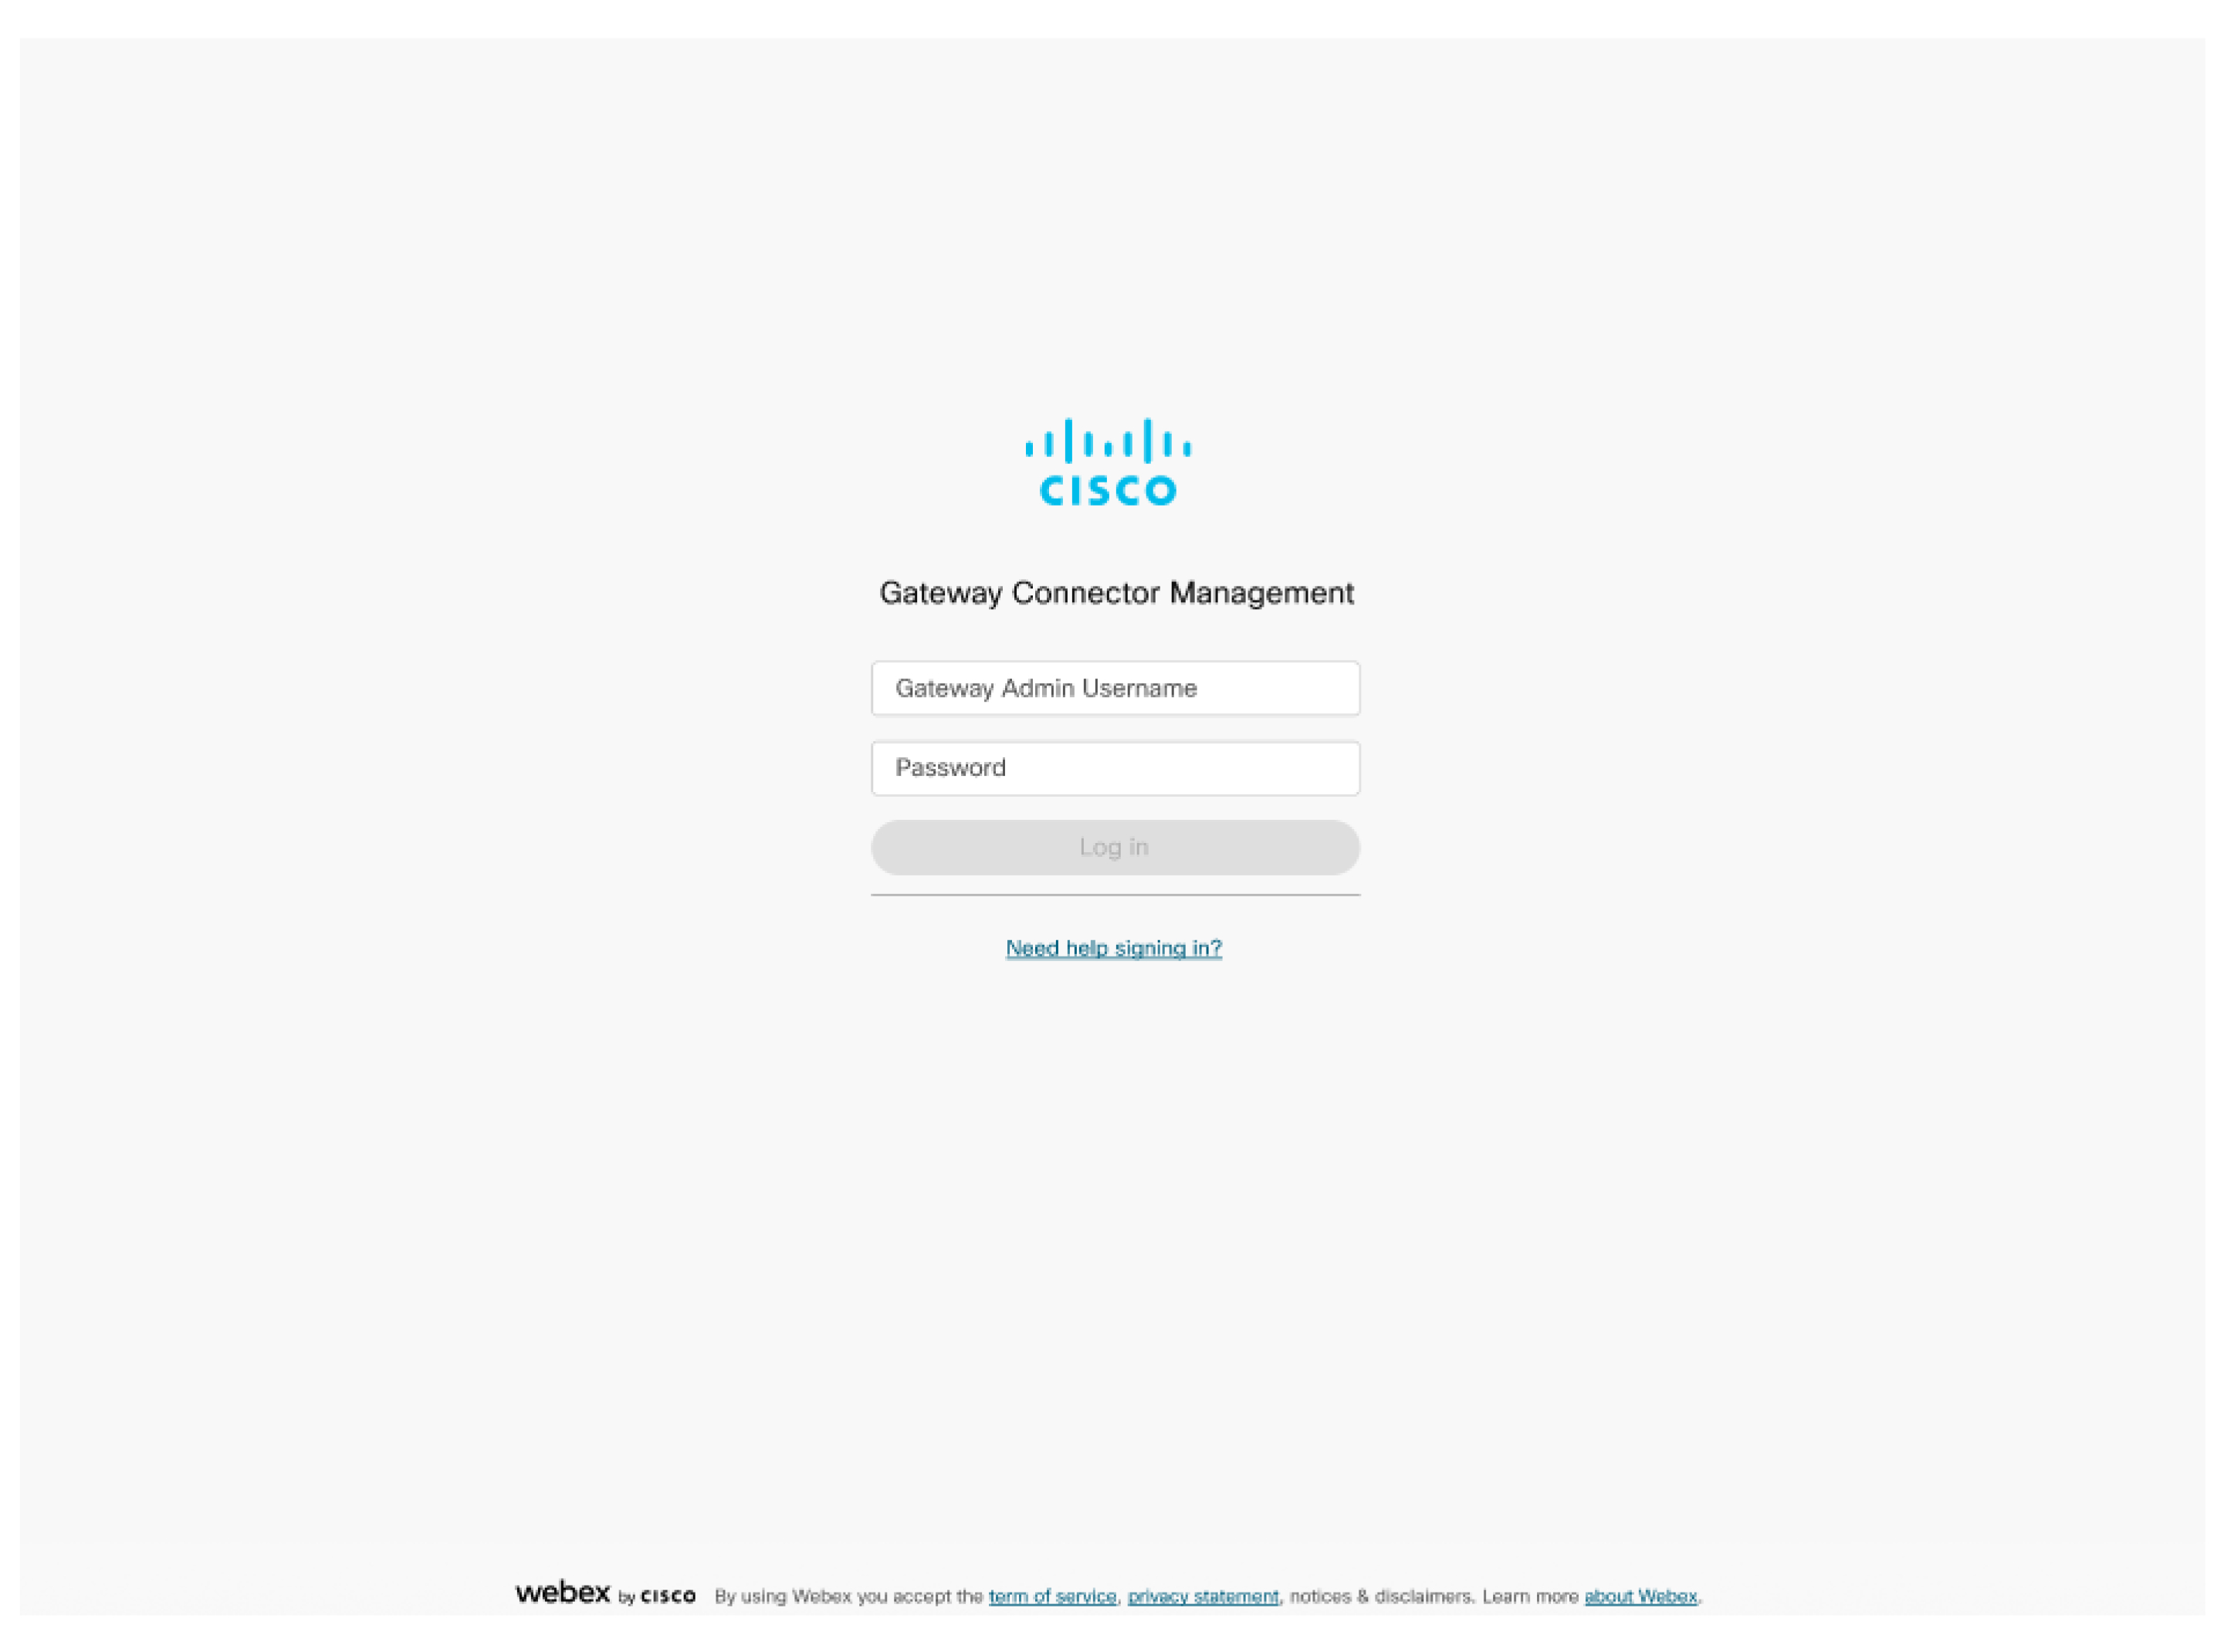
| 7 |
To login, enter the Gateway Admin Username and Password that you used during the connector installation procedure, listed in step 6.
|
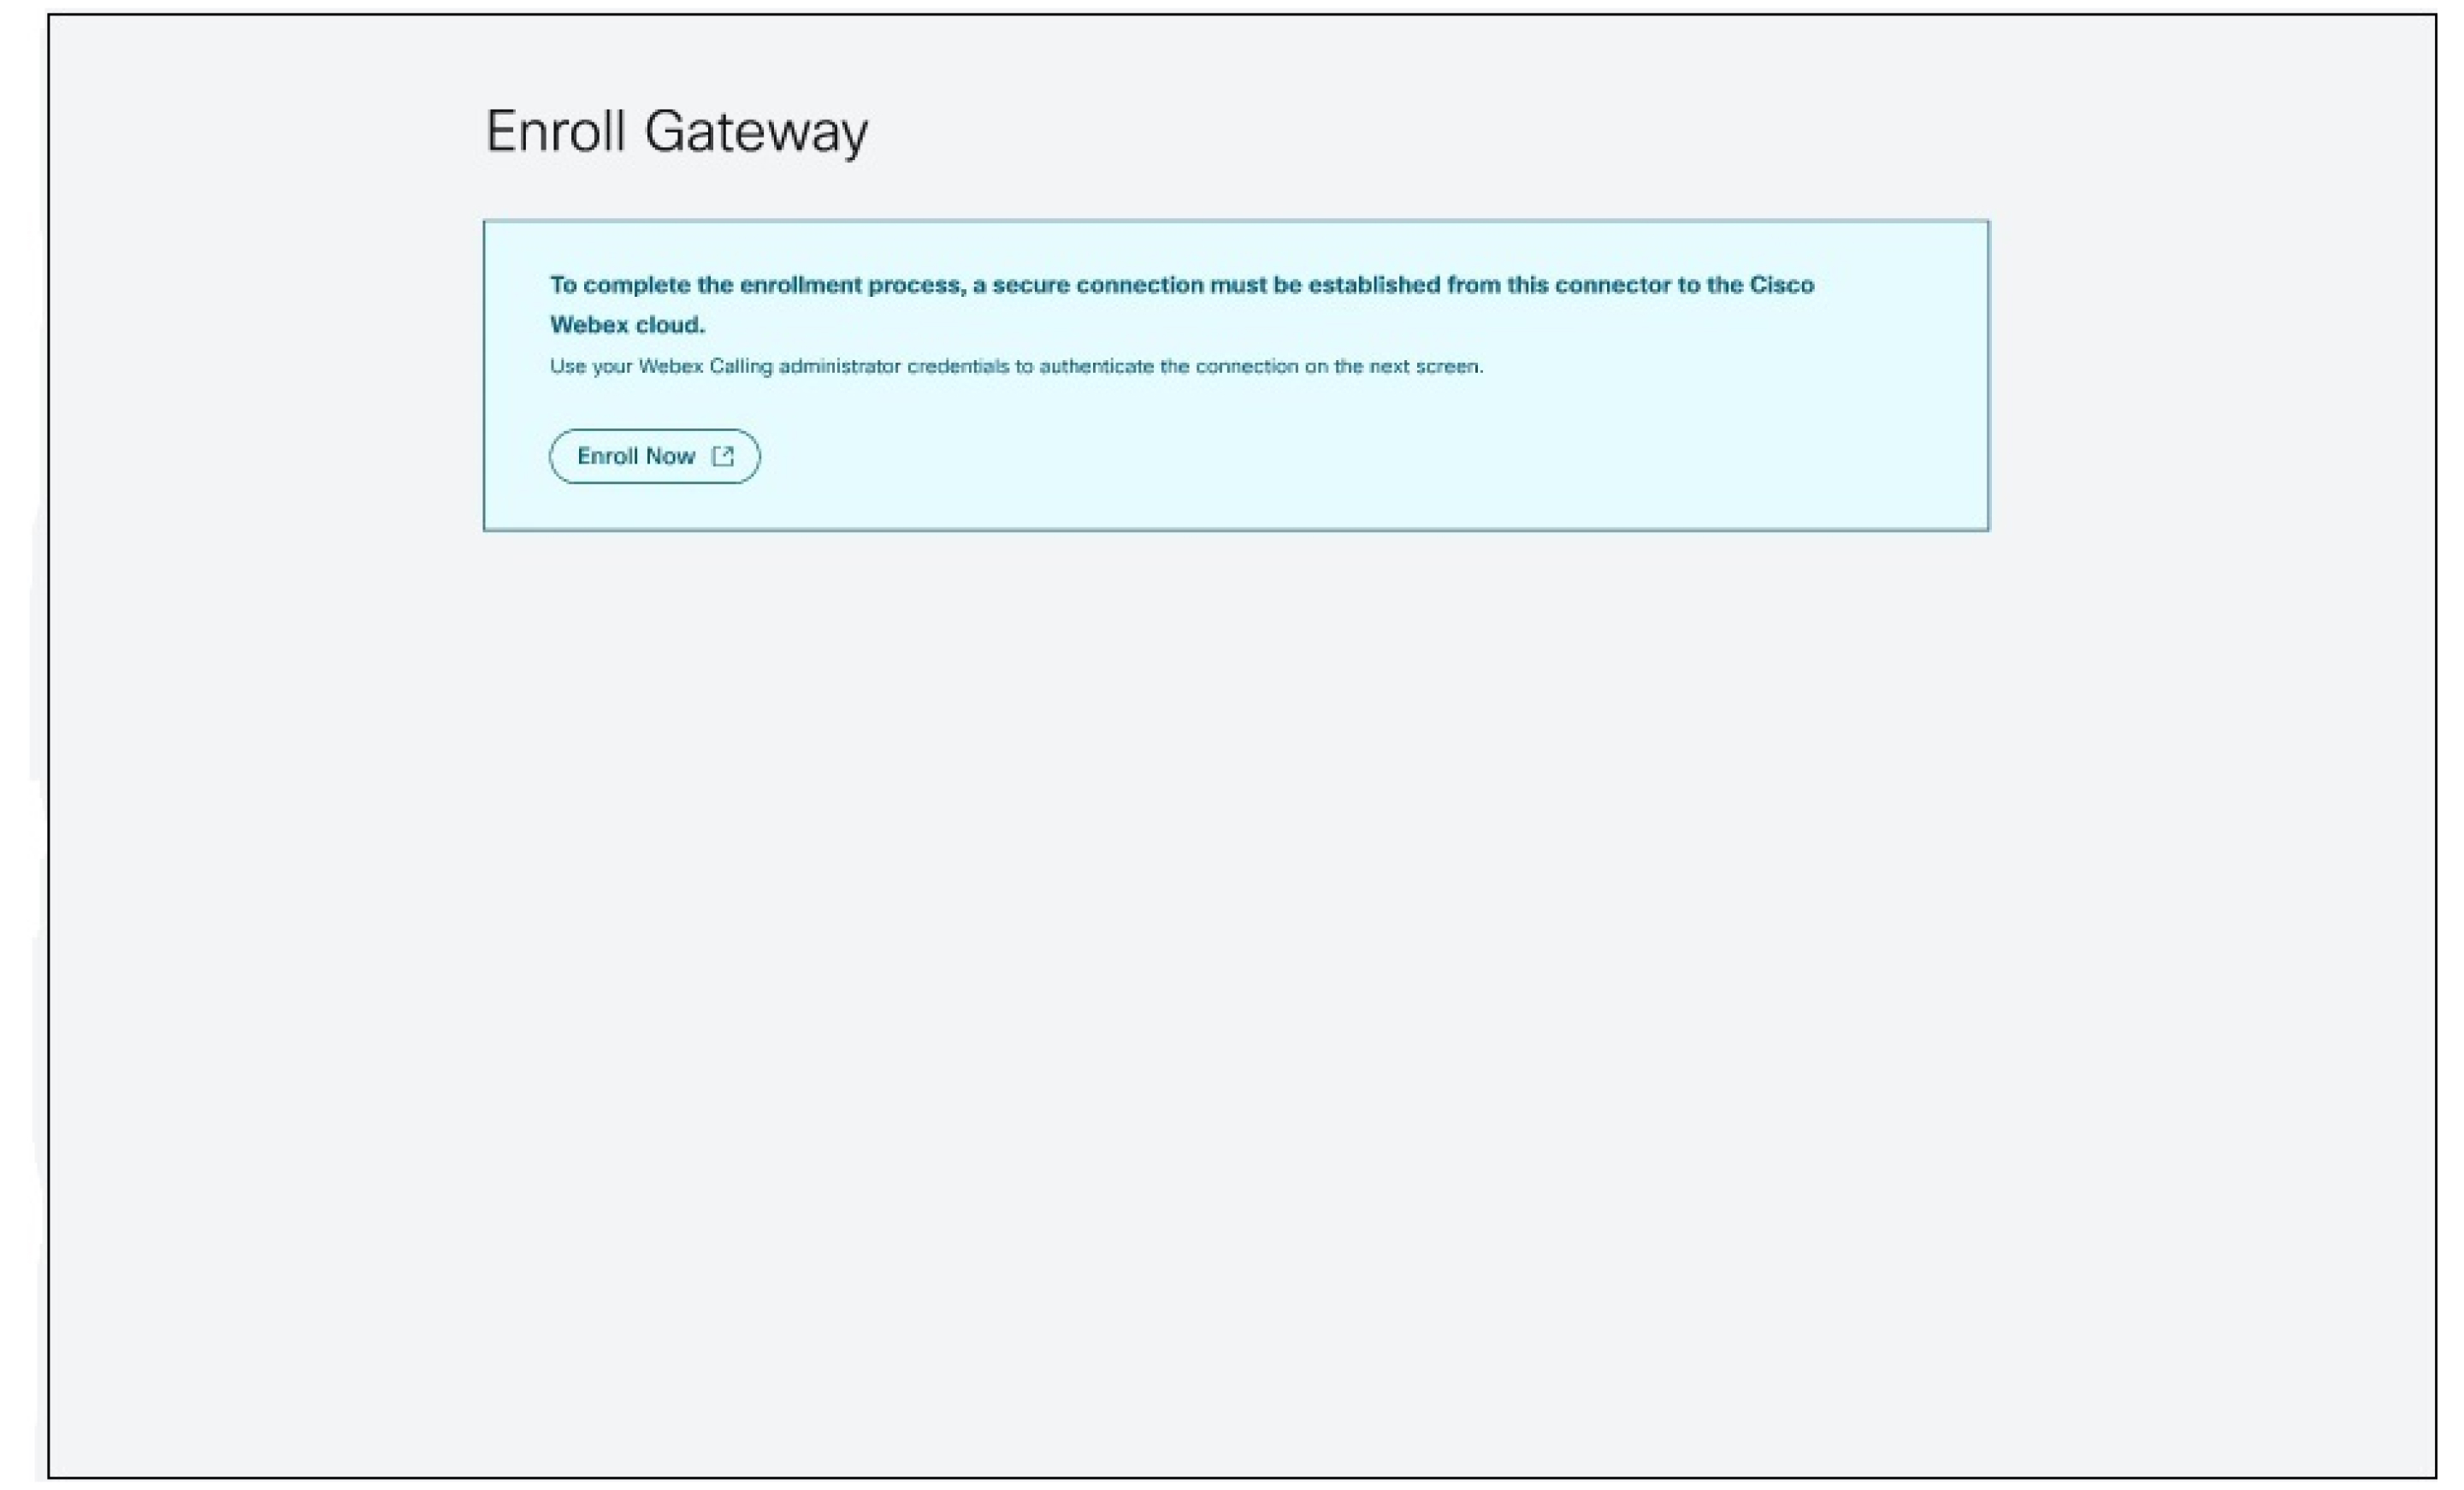
| 8 |
Click Enroll Now to open a new window for authenticating the connector to the Webex cloud. Make sure that your browser allows pop-ups.
|
| 9 |
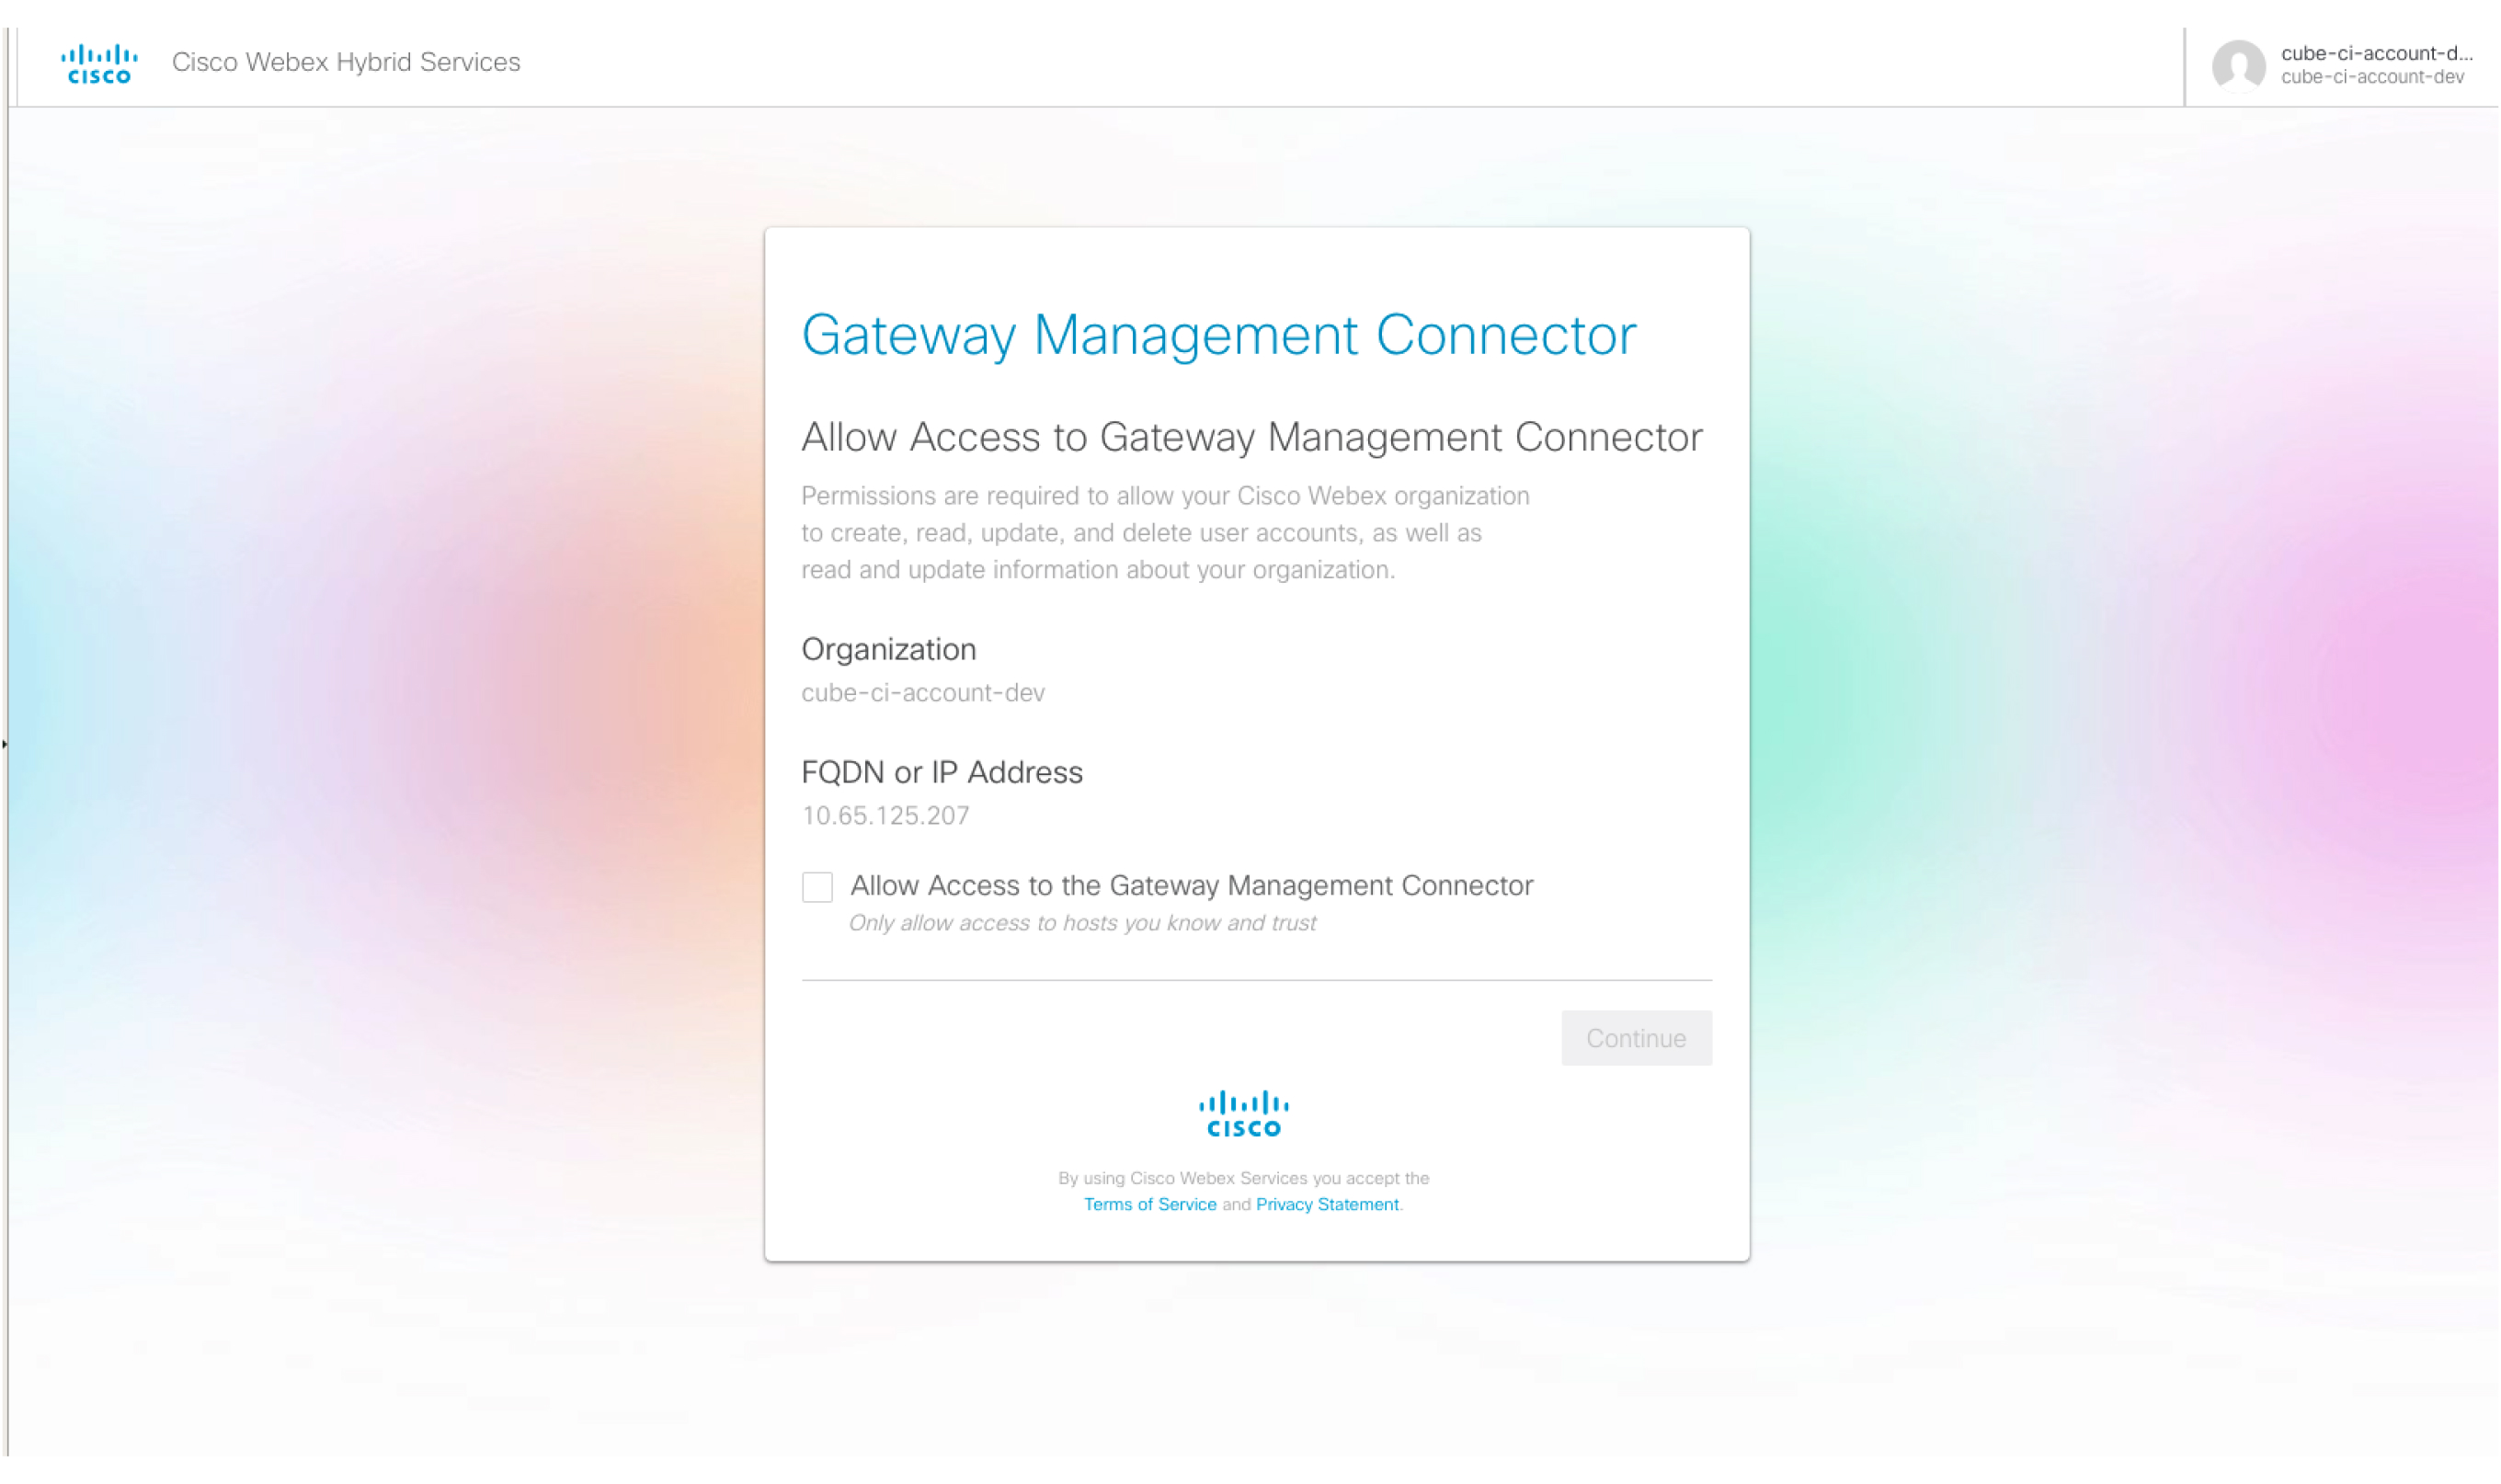
Sign in using a Webex administrator account. |
| 10 |
Check Allow Access to the Gateway Management Connector .
|
Gateway connector states
The overall status of the connector displayed in the Control Hub depends on the state of the telemetry and management connectors on the Managed Gateway.
| Connector states in the Control Hub | Description |
|---|---|
| Online | Indicates that the connector is Connected to the Cisco Webex cloud. |
| Offline | Indicates that the connector is Not Connected to the Cisco Webex cloud. |
| Paused | Indicates that the connector is connected but is Paused temporarily. |
Connector alarms and events
This section describes alarms generated in the telemetry connector module. The Telemetry Connector sends alarms to the Cisco Webex cloud. In the Control Hub, page displays these alarms.
You can use the tracking id displayed in the event details page to correlate with the corresponding logs on the connector side.
The following table describes the connector-related messages:
|
Title |
Description |
Severity |
Solution |
|---|---|---|---|
|
Telemetry module started. |
This message is sent when the Telemetry module becomes functional. |
Alert |
NA |
|
Telemetry module upgraded. |
This message is sent when the Telemetry module has been upgraded from "old_version" to "new_version". |
Alert |
NA |
|
NETCONF connection failure. |
This alarm is raised when the Telemetry module fails to establish NETCONF connection to the gateway. |
Critical |
Verify that NETCONF is enabled on the gateway and that it is reachable from the connector. Try to disable and enable the connector container. If the problem persists, go to https://help.webex.com/contact, click Support, and raise a case. |
|
NETCONF authentication failure. |
This alarm is raised when the Telemetry module fails to establish NETCONF connection to the gateway. |
Critical |
Verify that the username and password are configured correctly on the gateway. Try to disable and enable the connector container. If the problem persists, go to https://help.webex.com/contact, click Support, and raise a case. |
|
NETCONF SNMP events subscription failure. |
This alarm is raised when the Telemetry module fails to create a NETCONF subscription for SNMP events. |
Critical |
Verify that NETCONF is enabled on the gateway and that it is reachable in the connector. Try to disable and enable the connector container. If the problem persists, go to https://help.webex.com/contact, click Support, and raise a case. For more information on how to enable and disable, see Post-installation activities. |
|
Telemetry metrics collection failure. |
This alarm is raised when the Telemetry module fails to collect metrics from the gateway through a NETCONF GET query. |
Critical |
Verify that NETCONF is enabled on the gateway and that it is reachable from the connector. Try to disable and enable the connector container. If the problem persists, go to https://help.webex.com/contact, click Support, and raise a case. For more information on how to enable and disable, see Post-installation activities. |
|
Telemetry gateway connection failure. |
This alarm is raised when the connector fails to establish a web socket connection with the telemetry gateway. |
Critical |
Verify that the telemetry gateway URL (*.ucmgmt.cisco.com) is in the allowed list of the enterprise firewall and reachable from the gateway. If the problem persists, go to https://help.webex.com/contact, click Support, and raise a case. |
|
Failure of telemetry gateway connection through proxy. |
This alarm is raised when the connector fails to establish a connection to the configured proxy. |
Critical |
Verify that proxy details (IP address and port credentials) are configured correctly on the connector and that the proxy is reachable. If the problem persists, go to https://help.webex.com/contact, click Support, and raise a case. |
Connector login
Connector states of both management and telemetry connectors display on the connector details page.
Log in to connector details page at https://<connector-ip-address>
To login, use the credentials entered during the installation.
You can also check the connector status by selecting s : Display Status Page option in the TCL script. See Post-installation activities.
Refer to the tables to understand the states of the connector modules.
Management connector states
|
Management connector states |
Connectivity status |
Description |
|---|---|---|
|
Running |
Connected |
Indicates that the connector is in the running state and the device is connected to the Cisco Webex cloud. |
|
Running |
Not Connected |
Indicates that the connector is in the running state, but the device is not connected to the Cisco Webex cloud. |
|
Running |
Heartbeat Failed |
Indicates that the connector is in the running state, but heartbeat failed for the enrolled device. |
|
Running |
Enrollment Failed |
Indicates that the connector is in the running state, but enrollment of the device to the Cisco Webex cloud failed. |
Telemetry connector states
|
Telemetry Connector States |
Connectivity Status |
Description |
|---|---|---|
|
Not Installed |
Not Available |
Indicates that the telemetry connector is not installed. |
|
Downloading |
Not Available |
Indicates that the telemetry connector download is in progress. |
|
Installing |
Not Available |
Indicates that the telemetry connector installation is in progress. |
|
Not configured |
Not Available |
Indicates that the telemetry connector installation is successful, but services have not started or are configured yet. |
|
Running |
Not Available |
Indicates that the telemetry connector is running but information about its connectivity to the Cisco Webex cloud is not available. |
|
Running |
Connected |
Indicates that the telemetry connector is in the running state and it is connected to the Cisco Webex cloud. |
|
Running |
Not Connected |
Indicates that the telemetry connector is in the running state but it is not connected to the Cisco Webex cloud. |
|
Running |
Heartbeat Failed |
Indicates that the telemetry connector is in the running state and the telemetry heartbeat to the Cisco Webex cloud failed. |
|
Disabled |
Not Available |
Indicates that the telemetry connector is in the maintenance mode (disabled state) and information about its connectivity to the cloud is not available. |
|
Stopped |
Disconnected |
Indicates that the telemetry connector is in the stopped state (may be partial or both telemetry service and WebSocket broker services are stopped) and it is not connected to the Cisco Webex cloud. |
Post-installation activities
Local Administration of the Management Connector
You can use Webex Calling with your gateway after installing the connector successfully. If required, you can update a number of connector settings using the options available in the script menu:
You can relaunch the script at any time using the following command:
tclsh
                    bootflash:/gateway_connector/gateway_onboarding.tcl
.
===============================================================
Webex Managed Gateway Connector
===============================================================
Options
s : Display Status Page
v : View and Modify Cloud Connector Settings
e : Enable Guestshell
d : Disable Guestshell
l : Collect Logs
r : Clear Logs
u : Uninstall Connector
q : Quit
===============================================================
Select an option from the menu:
Display Status
Use the s: Display Status Page menu option. The system displays the
status of different connector modules.
===============================================================
                 Webex Managed Gateway Connector
===============================================================
     -------------------------------------------------------
                     *** Interface Status ***
     -------------------------------------------------------
       Interface               IP-Address          Status
     -------------------------------------------------------
       GigabitEthernet1        10.123.221.224        up
       Connector               10.123.221.223        up
     -------------------------------------------------------
                       *** App Status ***
     -------------------------------------------------------
		Service                   Status
     -------------------------------------------------------
            Guestshell                  RUNNING
            Management Connector        RUNNING
     -------------------------------------------------------
===============================================================
          Select option h for home menu or q to quit: q
Enable Guestshell
Enable the cloud connector using the e: Enable Guestshell menu
option. This changes the status of the connector from INACTIVE to
ACTIVE.
Disable Guestshell
Disable the cloud connector using the d: Disable Guestshell menu
option. This changes the status of the connector from ACTIVE to
INACTIVE.
Uninstall Connector
Uninstall the cloud connector using the u: Uninstall Connector menu
option. This deletes all the data in the Guestshell container and removes all
configurations that are related to the cloud connector.
Collect Logs
Collect the logs using the l: Collect Logs menu option. The system
displays the location where these logs are stored after collecting the logs.
If you have an active support case with Cisco TAC, you can attach the logs
directly to your service request using the command copy
bootflash:/guest-share/<log-filename>
scp://<case-number>:<cxd-token>@cxd.cisco.com.
The following is a sample command:
vcubeprod#copy bootflash:/guest-share/gateway_webex_cloud_logs_2022114090628.tar.gz scp://123456789:a1b2c3d4e5@cxd.cisco.comClear Logs
Clear all log files in the device using the r: Clear Logs menu
option. This deletes all existing logs except the latest logs of the TCL script and
connectors.
View and Modify Cloud Connector Settings
Make the following changes to the existing settings of a cloud connector using the
v: View and Modify Cloud Connector Settings menu option.
===============================================================
                Webex Managed Gateway Connector
===============================================================
		Script Version         : 2.0.2
		Hostname/IP Addr       : 10.65.125.188
		DNS Server(s)          : 10.64.86.70
		Gateway Username       : lab
		External Interface     : GigabitEthernet1
		Proxy Hostname/IP Addr : proxy-wsa.esl.cisco.com:80
===============================================================
             Options
               c :  Update Gateway Credentials
               e :  Update External Interface
               p :  Update Proxy Details
               n :  Update DNS Server
               k :  Update Connector Package Verification Key
               l :  Modify log level for Cloud Connector
               h :  Go to home menu
               q :  Quit

===============================================================
                        Select an option from the menu: c
Update Gateway Credentials
Update the gateway username and password using the c: Update Gateway
Credentials menu option.
Update External Interface
Change the interface to which the connector is bound and the connector IP address
using the v: View and Modify Cloud Connector Settings menu
option.
Update Proxy Details
You can perform the following tasks using the p: Update Proxy
Details menu option:
-
i: Update Proxy IP and Port -
c: Update Proxy Credentials -
r: Remove Proxy Credentials -
a: Remove All Proxy Details -
h: Go to home menu
Update Connector Package Verification Key
In the case of a technical issue if the support engineer requests to replace your
package verification key, upload the new
gateway-webex-connectors.gpg file to
bootflash:/gateway_connector/ and use the k: Update
Connector Package Verification Key menu option to verify.
Modify the Log Level for the Management Connector
Change the logging level for the connector using the l: Modify log level for
Cloud Connector menu option and then select one of the following
options:
=====================================
  Number      Log Level
=====================================
   1           DEBUG
   2           INFO
   3           WARNING
   4           ERROR
   5           CRITICAL
======================================
Manage your gateway instance in the Control Hub
To manage your gateway instance:
-
Sign in to Control Hub.
-
Go to
-
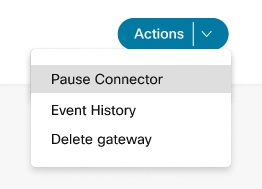
For the applicable gateway instance, click
 and select the applicable action.
Pause or resume connector
The Pause Connector instructs the management connector to stop the telemetry connector. You can use this option to stop the telemetry connector temporarily while troubleshooting any issues with a gateway. When you pause the connector, services such as configuration validation doesn’t work. Use the Resume Connector action to restart the telemetry connector.
| 1 |
From the Actions menu, select Pause
Connector to pause your management connector. |
| 2 |
To resume the connector that you paused, click Resume Connector in the Actions menu. |
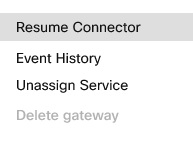
Event history
The Control Hub records and displays the event history for your managed gateways. View the details of an individual gateway or the consolidated details of all your managed gateways.
| 1 |
Click Event History in the Calling page for the event details of all your managed gateways. |
| 2 |
For event details specific to a gateway, click Event History in the Actions menu for that gateway. |
Delete gateway
| 1 |
From the Actions menu, click Delete Gateway to delete any of your gateway instances. |
| 2 |
Click Confirm. 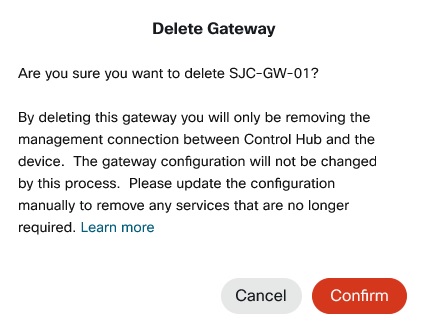
You can’t delete a gateway instance with assigned services. Unassign the services first. |
Where to go next
After the gateway is enrolled, you can continue the configuration at Assign Services to Managed Gateways.


