- 홈
- /
- 문서

피드백을 보내 주셔서 감사합니다.

Webex Calling의 사이트 지속 가능성
 이 문서에서
 피드백이 있습니까?
사이트 생존성은 Webex 연결이 끊어지더라도 비즈니스에 계속 접근할 수 있도록 보장합니다. 이 시스템은 로컬 네트워크 게이트웨이를 사용하여 네트워크 장애 발생 시 현장 엔드포인트에 대한 대체 통화 서비스를 제공합니다.
배포 시 고려 사항
기본적으로 Webex 통화 엔드포인트는 활성 모드로 작동하며 SIP 등록 및 통화 제어를 위해 Webex 클라우드에 연결됩니다. Webex와의 네트워크 연결이 끊어지면 엔드포인트는 자동으로 생존 모드로 전환되어 로컬 생존 게이트웨이에 등록됩니다. 이 모드에서 게이트웨이는 기본적인 백업 통화 서비스를 제공합니다. Webex와의 네트워크 연결이 복구되면 통화 제어 및 등록 기능이 Webex 클라우드로 다시 전환됩니다.
생존 모드에서 지원되는 호출은 다음과 같습니다.
-
지원되는 Webex 통화 엔드포인트 간의 내부 통화(사이트 내 통화)
-
지역 PSTN 회선 또는 SIP 트렁크를 사용하여 외부 번호 및 E911 서비스 제공업체로의 외부 통화(수신 및 발신)
이 기능을 사용하려면 로컬 네트워크에서 Cisco IOS XE 라우터를 서바이벌 게이트웨이로 구성해야 합니다. 서바이벌 게이트웨이는 해당 위치의 엔드포인트에 대한 통화 정보를 Webex 클라우드에서 매일 동기화합니다. 엔드포인트가 생존 모드로 전환되면 게이트웨이는 이 정보를 사용하여 SIP 등록을 인계받고 기본 통화 서비스를 제공할 수 있습니다.
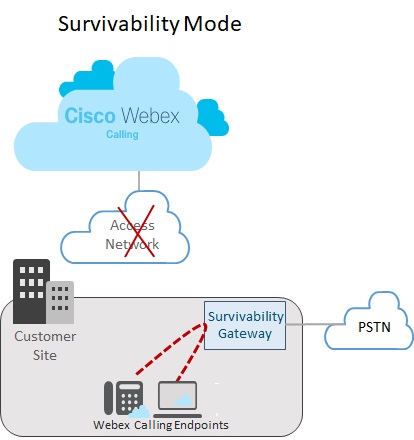
단일 위치 설정
다음 이미지는 Webex와의 연결이 끊어지고 Webex 사이트의 엔드포인트가 생존 모드로 작동하는 네트워크 장애 시나리오를 보여줍니다. 이미지에서 Survivability Gateway는 Webex에 연결할 필요 없이 두 온사이트 엔드포인트 간의 내부 통화를 라우팅합니다. 이 경우, 생존성 게이트웨이는 로컬 PSTN 연결로 구성됩니다. 결과적으로, 생존 모드에 있는 현장 엔드포인트는 외부 번호 및 E911 제공업체와의 수신 및 발신 통화에 PSTN을 사용할 수 있습니다.
다중 위치 설정
다음 이미지는 Webex 연결이 끊어지고 서로 다른 위치에 있는 엔드포인트가 생존 모드로 작동하는 네트워크 장애 시나리오를 보여줍니다. LAN 네트워크 내에는 여러 개의 소규모 위치가 있으며, 이들은 하나의 생존성 게이트웨이에 매핑됩니다. 이 배포 방식은 게이트웨이 리소스 활용도를 최적화하는 동시에 통화 라우팅에 대한 위치별 구성을 유지합니다.
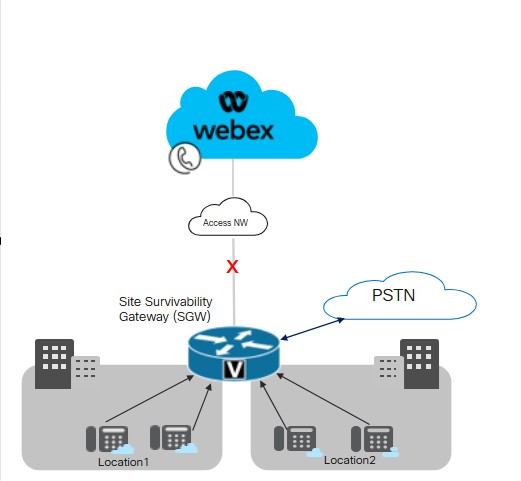
Cisco는 LAN 내 여러 위치에 있는 Survivability Gateway와 엔드포인트 간의 연결에 대해 50밀리초의 지연 시간 임계값을 유지할 것을 권장합니다.
사이트 생존성을 위한 핵심 조건
생존성 게이트웨이에는 다음과 같은 조건이 적용됩니다.
-
Webex 클라우드에는 장치 구성 파일에 Survivability Gateway의 IP 주소, 호스트 이름 및 포트가 포함되어 있습니다. 결과적으로 엔드포인트는 Webex와의 연결이 끊어질 경우 Survivability Gateway에 연결하여 등록할 수 있습니다.
-
Webex 클라우드와 Survivability Gateway 간의 일일 통화 데이터 동기화에는 등록된 사용자의 인증 정보가 포함됩니다. 결과적으로 엔드포인트는 생존 모드에서 작동하는 동안에도 안전한 등록을 유지할 수 있습니다. 동기화에는 해당 사용자에 대한 라우팅 정보도 포함됩니다.
-
Survivability Gateway는 Webex에서 제공하는 라우팅 정보를 사용하여 내부 통화를 자동으로 라우팅할 수 있습니다. 외부 통화를 제공하기 위해 서바이벌 게이트웨이에 PSTN 트렁크 구성을 추가합니다.
-
사이트 생존성(Site Survivability)을 배포하는 각 사이트는 로컬 네트워크 내에 생존성 게이트웨이(Survivability Gateway)를 필요로 합니다.
-
등록 및 통화 제어는 Webex 네트워크 연결이 최소 30초 동안 재개되면 모두 Webex 클라우드로 다시 연결됩니다.
Unified SRST와의 코로케이션
Survivability Gateway는 Webex Survivability 구성과 Unified SRST 구성을 동일한 게이트웨이에 함께 배치할 수 있도록 지원합니다. 게이트웨이는 Webex 통화 엔드포인트와 통합 커뮤니케이션 관리자(UCM)에 등록하는 엔드포인트 모두에 대한 서비스 생존성을 지원할 수 있습니다. 코로케이션을 구성하려면 다음 단계를 따르세요.
-
Unified Communications Manager에 등록하는 엔드포인트에 대해 Unified SRST 지원을 구성합니다. 구성에 대한 자세한 내용은 Cisco Unified SRST 관리 가이드를 참조하십시오.
-
동일한 게이트웨이에서 이 문서의 사이트 생존성 구성 작업 흐름 을 따라 Webex 통화 엔드포인트에 대한 사이트 생존성을 사용하여 게이트웨이를 구성하십시오.
코로케이션 관련 통화 라우팅 고려 사항
코로케이션 시나리오에서 통화 라우팅을 구성할 때 다음 사항을 고려하십시오.
-
Survivability Gateway는 호출에 참여하는 양쪽 엔드포인트가 모두 Survivability Gateway에 등록되어 있는 경우 내부 호출을 자동으로 라우팅합니다. 내부 통화는 등록된 클라이언트(SRST 또는 Webex Calling) 간에 자동으로 연결됩니다.
-
한 통화 제어 시스템과의 연결은 끊어지지만 다른 통화 제어 시스템과의 연결은 유지되는 상황이 발생할 수 있습니다. 결과적으로, 동일 사이트의 엔드포인트 세트 중 하나는 생존성 게이트웨이에 등록되고, 다른 엔드포인트 세트는 기본 통화 제어에 등록됩니다. 이 경우 두 엔드포인트 간의 통화를 SIP 트렁크 또는 PSTN 회선으로 라우팅해야 할 수 있습니다.
-
외부 통화 및 E911 통화는 SIP 트렁크 또는 PSTN 회선으로 연결될 수 있습니다.
지원되는 기능 및 구성 요소
다음 표는 지원되는 기능에 대한 정보를 제공합니다.
| 기능 | MPP 장치 및 Webex 앱 | VG4xx ATA |
|---|---|---|
|
사이트 내 확장 호출 |
Survivability Gateway에서 별도의 라우팅 구성 없이 자동으로 지원됩니다. |
Survivability Gateway에서 별도의 라우팅 구성 없이 자동으로 지원됩니다. 대체 번호는 지원되지 않습니다. |
|
사이트 간 통화 및 PSTN 통화(수신 및 발신) |
PSTN 통화는 통신 사업자 회선 또는 SIP 트렁크를 기반으로 합니다. |
PSTN 통화는 통신 사업자 회선 또는 SIP 트렁크를 기반으로 합니다. |
|
E911 신고 처리 |
E911 긴급 전화에는 PSTN 회선 또는 SIP 트렁크가 필요합니다. 발신 전화는 지정된 비상 대응 위치(ERL)에 대한 특정 등록된 비상 위치 식별 번호(ELIN)를 사용합니다. 긴급 구조대원이 연결이 끊긴 전화를 다시 걸 경우, 생존성 게이트웨이는 해당 전화를 긴급 번호로 마지막으로 전화를 건 장치로 연결합니다. |
E911 긴급 전화에는 PSTN 회선 또는 SIP 트렁크가 필요합니다. 발신 전화는 지정된 비상 대응 위치(ERL)에 대한 특정 등록된 비상 위치 식별 번호(ELIN)를 사용합니다. 긴급 구조대원이 연결이 끊긴 전화를 다시 걸 경우, 생존성 게이트웨이는 해당 전화를 긴급 번호로 마지막으로 전화를 건 장치로 연결합니다. |
|
통화 대기 및 재시작 |
지원됨 대기음악(MOH)을 사용하는 경우, MOH 파일을 사용하여 Survivability Gateway를 수동으로 프로비저닝하십시오. |
VG4xx ATA 아날로그 회선은 통화를 보류하거나 재개할 수 없습니다. 이 기능은 VG4xx ATA에서 수신 전화가 수신된 경우에만 지원됩니다. |
|
통화 연결 |
지원됨 |
이 기능은 VG4xx ATA에서 수신 전화가 수신된 경우에만 지원됩니다. |
|
블라인드 통화 전환 |
지원됨 |
이 기능은 VG4xx ATA에서 수신 전화가 수신된 경우에만 지원됩니다. |
|
인바운드 발신자 ID (이름) |
지원됨 |
지원됨 |
|
수신 발신자 번호 표시(이름) & 숫자) |
지원됨 |
지원됨 |
|
일대일 영상 통화 |
지원됨 |
지원되지 않음 |
|
3자 통화 |
지원되지 않음 |
지원되지 않음 |
|
공유된 라인 |
지원됨 |
지원됨 |
|
가상 라인 |
지원됨 |
지원되지 않음 |
|
통화 착신 전환 |
모든 통화 착신 전환, 응답 없음 및 통화 중 시에 지원됩니다. |
지원됨 |
|
헌트 그룹 |
다음 항목에 대해 지원됩니다: 순차, 병렬, 피어 방식, 최장 유휴 시간 방식. |
지원됨 |
|
자동 전화 교환 |
내선 번호로 전화를 걸 수 있도록 지원됩니다. |
지원됨 |
해당 기능을 구성하면 다음과 같은 지원되는 엔드포인트에서 사이트 생존성 기능을 사용할 수 있습니다.
| 유형 | 모델 | 최소 버전 |
|---|---|---|
| 멀티플랫폼(MPP) 펌웨어가 탑재된 시스코 IP폰 |
6821, 6841, 6851, 6861, 6861 와이파이, 6871 7811, 7821, 7841, 7861 8811, 8841, 8851, 8861 8845(오디오 전용), 8865(오디오 전용), 8875(비디오) 9800 멀티플랫폼(MPP) 펌웨어를 지원하는 Cisco IP 전화기에 대한 자세한 내용은 다음을 참조하십시오. |
12.0(1) 8875 모델용 - Phone OS 3.2 이상 버전 9800 시리즈용 - PhoneOS 3.2(1) |
|
Cisco IP Conference Phone |
7832, 8832 |
12.0(1) |
|
Cisco Webex 앱 |
Windows, Mac |
43.2 |
|
아날로그 엔드포인트 |
VG400 ATA, VG410 ATA, VG420 ATA Cisco ATA 191 및 192 |
17.16.1a ATA 191 및 192의 경우 11.3(1) |
Survivability Gateway는 타사 장치를 지원하지 않습니다.
다음 표는 Cisco IOS XE 라우터를 서바이벌 게이트웨이로 구성하는 데 도움이 됩니다. 이 표는 각 플랫폼에서 지원하는 최대 엔드포인트 수와 최소 iOS XE 버전을 나열합니다.
Webex 통화 생존 게이트웨이 기능은 Cisco IOS XE Dublin 17.12.3 버전 이상에서 사용할 수 있습니다. 헌트 그룹, 착신 전환 및 자동 응답 기능은 iOS 17.18.2 이상 버전에서 사용할 수 있습니다.
| 모델 | 최대 엔드포인트 등록 수 | 최소 버전 |
|---|---|---|
|
통합 서비스 라우터 4321 | 50 |
Cisco IOS XE Dublin 17.12.3 이상 버전 |
|
통합 서비스 라우터 4331 | 100 | |
|
통합 서비스 라우터 4351 | 700 | |
|
통합 서비스 라우터 4431 | 1200 | |
|
통합 서비스 라우터 4451-X | 2000 | |
|
통합 서비스 라우터 4461 | 2000 | |
|
카탈리스트 엣지 8200L-1N-4T | 1500 | |
|
촉매 엣지 8200-1N-4T | 2500 | |
|
촉매 엣지 8300-1N1S-6T | 2500 | |
|
촉매 엣지 8300-2N2S-6T | 2500 | |
|
촉매 엣지 8300-1N1S-4T2X | 2500 | |
|
촉매 엣지 8300-2N2S-4T2X | 2500 | |
|
Catalyst Edge 8000V 소프트웨어 소형 구성 | 500 | |
|
Catalyst Edge 8000V 소프트웨어 중간 구성 | 1000 | |
|
Catalyst Edge 8000V 소프트웨어 대규모 구성 | 2000 |
Survivability Gateway에 대한 포트 참조 정보
|
연결 목적 |
소스 주소 |
소스 포트 |
프로토콜 |
대상 주소 |
대상 포트 |
|---|---|---|---|---|---|
|
생존성 게이트웨이로의 통화 신호 전송(SIP TLS) |
장치 |
5060-5080 |
TLS |
지속 가능 게이트웨이 |
8933 |
|
언론 매체를 생존성 게이트웨이(SRTP)로 연결하세요. |
장치 |
19560-19660 |
UDP |
지속 가능 게이트웨이 |
8000-14198 (UDP를 통한 SRTP) |
|
PSTN 게이트웨이로의 통화 신호(SIP) |
지속 가능 게이트웨이 |
사용 후 삭제 |
TCP 또는 UDP |
귀사의 ITSP PSTN 게이트웨이 |
5060 |
|
PSTN 게이트웨이에 대한 통화 미디어 (SRTP) |
지속 가능 게이트웨이 |
8000-48198 |
UDP |
귀사의 ITSP PSTN 게이트웨이 |
사용 후 삭제 |
|
시간 동기화(NTP) |
지속 가능 게이트웨이 |
사용 후 삭제 |
UDP |
NTP 서버 |
123 |
|
이름 확인(DNS) |
지속 가능 게이트웨이 |
사용 후 삭제 |
UDP |
DNS 서버 |
53 |
|
클라우드 관리 |
커넥터 |
사용 후 삭제 |
HTTPS |
Webex 서비스 |
443, 8433 |
클라우드 모드에 대한 운영 지침은 Webex 통화용 포트 참조 정보 도움말 문서를 참조하십시오.
Cisco IOS XE 라우터에서는 포트 설정값을 사용자 지정할 수 있습니다. 이 표는 기본값을 사용하여 지침을 제공합니다.
기능 구성
사이트 생존성 구성 작업 흐름
기존 Webex 통화 위치에 사이트 생존성을 추가하려면 다음 작업을 완료하십시오. Webex 클라우드와의 연결이 끊어지면 로컬 네트워크의 서바이벌 게이트웨이가 해당 위치의 엔드포인트에 대한 백업 통화 제어 기능을 제공할 수 있습니다.
시작하기 전에
Survivability Gateway 역할을 할 새 게이트웨이를 프로비저닝해야 하는 경우 Control Hub에 게이트웨이를 추가하려면 Webex 문서 Enroll Cisco IOS Managed Gateways to Webex Cloud 를 참조하십시오.
| 단계 | 명령 또는 작업 | 목적 |
|---|---|---|
|
1 | 게이트웨이에 생존성 서비스를 할당합니다. |
Control Hub에서 Survivability Gateway 서비스를 게이트웨이에 할당합니다. |
|
2 | 구성 템플릿 다운로드 |
Control Hub에서 구성 템플릿을 다운로드하십시오. 게이트웨이 명령줄을 구성할 때 템플릿이 필요합니다. |
|
3 |
Survivability Gateway에 대한 라이선스를 구성합니다. | |
|
4 |
Survivability Gateway에 사용할 인증서를 구성합니다. | |
|
5 |
이전에 다운로드한 구성 템플릿을 참고하여 게이트웨이 명령줄을 구성하십시오. 템플릿에 있는 모든 필수 설정을 완료하십시오. |
게이트웨이에 생존성 서비스를 할당합니다.
시작하기 전에
| 1 |
서비스 ] 아래의 통화로 이동한 다음 관리형 게이트웨이 탭을 클릭합니다. 관리형 게이트웨이 보기에는 Control Hub를 통해 관리하는 게이트웨이 목록이 표시됩니다.
|
| 2 |
생존성 게이트웨이로 지정할 게이트웨이를 선택하고 서비스 필드의 값에 따라 다음 중 하나를 선택하십시오.
|
| 3 |
서비스 유형 드롭다운 메뉴에서 Survivability Gateway 를 선택하고 다음 필드를 작성하십시오.
등록을 완료하면 관리형 게이트웨이 페이지에 위치 정보가 표시됩니다. |
| 4 |
지정을 클릭합니다. 관리형 게이트웨이 보기에는 게이트웨이에 할당된 위치 목록이 표시됩니다.
|
구성 템플릿 다운로드
라이선스 구성
| 1 |
라우터에서 전역 설정 모드로 진입하십시오. |
| 2 |
사용 중인 플랫폼에 맞는 명령어를 사용하여 라이선스를 구성하십시오.
250Mbps 이상의 처리량을 구성하려면 HSEC 플랫폼 라이선스가 필요합니다. |
인증서 구성
Cisco IOS XE에서 인증서를 구성합니다.
Survivability Gateway용 인증서를 요청하고 생성하려면 다음 단계를 완료하십시오. 공개적으로 알려진 인증 기관에서 서명한 인증서를 사용하십시오.
Survivability Gateway 플랫폼은 공개적으로 알려진 CA 인증서만 지원합니다. 개인 또는 기업 CA 인증서는 Survivability Gateway에 사용할 수 없습니다.
Webex 통화에 지원되는 루트 인증 기관 목록을 보려면 Cisco Webex 오디오 및 비디오 플랫폼 통화에 지원되는 루트 인증 기관은 무엇입니까?를 참조하세요.
Survivability Gateway 플랫폼은 와일드카드 인증서를 지원하지 않습니다.
샘플 코드의 명령어를 실행하여 단계를 완료하세요. 이러한 명령에 대한 추가 정보와 더 많은 구성 옵션을 보려면 Cisco Unified Border Element Configuration Guide의 “ SIP TLS 지원” 장을 참조하세요.
| 1 |
다음 명령어를 실행하여 전역 구성 모드로 진입하십시오. |
| 2 |
다음 명령어를 실행하여 RSA 개인 키를 생성하십시오. 개인 키 모듈러스는 최소 2048비트 이상이어야 합니다. |
| 3 |
Survivability Gateway 인증서를 저장할 트러스트포인트를 구성하십시오. 게이트웨이의 정규화된 도메인 이름(FQDN)은 게이트웨이에 서비스 생존성을 할당할 때 사용한 값과 동일해야 합니다. |
| 4 |
메시지가 나타나면 CSR이 화면에 표시되면 메모장을 사용하여 인증서를 파일로 복사한 다음 지원되는 인증 기관(CA)에 전송하십시오. 인증서 서명 제공업체에서 PEM(개인 정보 보호 강화 메일) 형식의 CSR(인증서 서명 요청)을 요구하는 경우, 제출하기 전에 헤더와 푸터를 추가하십시오. 예를 들면, |
| 5 |
CA에서 인증서를 발급받은 후, 메시지가 나타나면 base 64 값을 붙여넣으세요. CER/PEM CA 인증서 내용(기기 인증서가 아님)을 단말기에 발급합니다. |
| 6 |
메시지가 나타나면 base 64 값을 붙여넣으세요. CER/PEM 인증서를 단말기에 입력합니다. |
| 7 |
루트 CA 인증서를 사용할 수 있는지 확인하십시오. Webex 통화 솔루션에서는 공개적으로 알려진 인증 기관만 지원됩니다. 개인 또는 기업 CA 인증서는 지원되지 않습니다. |
| 8 |
번들에 루트 CA 인증서가 포함되어 있지 않은 경우, 인증서를 발급받아 새 트러스트포인트로 가져오세요. Cisco IOS XE 게이트웨이에 공개적으로 알려진 CA 루트 인증서를 사용할 수 없는 경우 이 단계를 수행하십시오. 메시지가 나타나면 base 64 값을 붙여넣으세요. CER/PEM 인증서 내용을 터미널에 입력합니다. |
| 9 |
구성 모드를 사용하여 다음 명령으로 기본 트러스트 포인트, TLS 버전 및 SIP-UA 기본값을 지정합니다. |
키 쌍과 함께 인증서를 가져옵니다.
PKCS12 형식(.pfx 또는 .p12)을 사용하여 CA 인증서와 키 쌍을 묶음으로 가져올 수 있습니다. 번들 파일은 로컬 파일 시스템이나 원격 서버에서 가져올 수 있습니다. PKCS12는 특별한 유형의 인증서 형식입니다. 이 패키지는 루트 인증서부터 ID 인증서에 이르는 전체 인증서 체인과 RSA 키 쌍을 함께 제공합니다. 즉, 가져오는 PKCS12 번들에는 키 쌍, 호스트 인증서 및 중간 인증서가 포함됩니다. 다음 시나리오에 대해 PKCS12 번들을 가져옵니다.
-
다른 Cisco IOS XE 라우터에서 내보내기를 수행하고 Survivability Gateway 라우터로 가져오기를 수행합니다.
-
OpenSSL을 사용하여 Cisco IOS XE 라우터 외부에서 PKCS12 번들 생성
Survivability Gateway 라우터용 인증서 및 키 쌍을 생성, 내보내기 및 가져오려면 다음 단계를 완료하십시오.
| 1 |
(선택 사항) Survivability Gateway 라우터에 필요한 PKCS12 번들을 내보냅니다. 이 단계는 다른 Cisco IOS XE 라우터에서 내보낼 경우에만 적용됩니다. |
| 2 |
(선택 사항) OpenSSL을 사용하여 PKCS12 번들을 생성합니다. 이 단계는 OpenSSL을 사용하여 Cisco IOS XE 외부에서 PKCS12 번들을 생성하는 경우에만 적용됩니다. |
| 3 |
PKCS12 형식의 파일 묶음을 가져옵니다. 다음은 명령에 대한 샘플 구성과 구성 가능한 매개변수에 대한 세부 정보입니다.
crypto pki import 명령은 인증서를 수용하도록 트러스트포인트를 자동으로 생성합니다. |
| 4 |
구성 모드를 사용하여 다음 명령으로 기본 트러스트 포인트, TLS 버전 및 SIP-UA 기본값을 지정합니다. |
생존성 게이트웨이 구성
게이트웨이를 생존성 게이트웨이로 구성합니다.
이전에 다운로드한 구성 템플릿을 참고하여 게이트웨이 명령줄을 구성하십시오. 템플릿에서 필수 설정을 완료하세요.
다음 단계에는 예시 명령어와 해당 명령어에 대한 설명이 포함되어 있습니다. 배포 환경에 맞게 설정을 수정하세요. 꺾쇠괄호(예: )는 배포 환경에 적용되는 값을 입력해야 하는 설정을 나타냅니다. 다양한 <tag> 설정은 숫자 값을 사용하여 구성 세트를 식별하고 할당합니다.
- 달리 명시되지 않는 한, 이 해결 방법을 사용하려면 이 절차의 모든 구성을 완료해야 합니다.
- 템플릿에서 설정을 적용할 때는 게이트웨이로 복사하기 전에 대괄호
%tokens%([])를 원하는 값으로 바꾸십시오. - 명령에 대한 자세한 내용은 Webex Managed Gateway 명령 참조를 참조하십시오. 명령 설명에서 다른 문서를 참조하라고 하지 않는 한 이 안내서를 사용하십시오.
| 1 |
전역 설정 모드로 들어갑니다. -
|
| 2 |
음성 서비스 구성을 수행하십시오.
명령어에 대한 설명:
|
| 3 |
라우터에서 생존성 기능을 활성화하세요: 명령어 설명:
|
| 4 |
NTP 서버를 구성합니다.
|
| 5 |
(선택 과목). 일반적인 클래스 제한 호출 권한을 구성합니다. 앞의 예는 categories라는 이름의 사용자 지정 제한 클래스 집합을 생성합니다(예: |
| 6 |
선호하는 코덱 목록을 구성하십시오. 예를 들어, 다음 목록은 g711ulaw를 선호하는 코덱으로 지정하고 그 다음으로 g711alaw를 지정합니다. 명령어 설명:
|
| 7 |
기본 음성 레지스터 풀을 구성합니다. 명령어에 대한 설명:
|
| 8 |
긴급 전화 설정: 명령어 설명:
Wi-Fi 오버레이가 IP 서브넷과 정확하게 일치하지 않으면 이동형 기기의 긴급 전화 기능에 올바른 ELIN 매핑이 적용되지 않을 수 있습니다. |
| 9 |
PSTN용 다이얼 피어를 구성합니다. 다이얼 피어 구성의 예는 PSTN 연결 예제를 참조하세요. |
| 10 |
선택 사항. 라우터에서 대기 음악을 활성화하세요. 라우터의 플래시 메모리에 음악 파일을 G.711 형식으로 저장해야 합니다. 해당 파일은 .au 또는 .wav 파일 형식일 수 있지만, 8비트 8kHz 데이터(예: ITU-T A-law 또는 mu-law 데이터 형식)를 포함해야 합니다. 명령어에 대한 설명:
|
온디맨드 동기화 완벽 지원
선택 사항. 즉시 동기화를 완료하려는 경우에만 이 절차를 완료하십시오. Webex 클라우드가 통화 데이터를 하루에 한 번 자동으로 Survivability Gateway에 동기화하므로 이 절차는 필수 사항이 아닙니다.
| 1 |
파트너 기관인 경우 파트너 허브가 실행됩니다. Control Hub를 열려면 파트너 허브에서 고객 보기를 클릭하고 해당 고객을 선택하거나 내 조직 을 선택하여 파트너 조직의 Control Hub 설정을 엽니다. |
| 2 |
. |
| 3 |
해당 생존성 게이트웨이를 클릭하여 해당 게이트웨이에 대한 생존성 서비스 보기를 엽니다. |
| 4 |
동기화 버튼을 클릭하세요. |
| 5 |
제출을 클릭합니다. 동기화가 완료되는 데 최대 10분이 소요될 수 있습니다.
|
생존성 게이트웨이 속성 편집
| 1 |
파트너 기관인 경우 파트너 허브가 실행됩니다. Control Hub를 열려면 파트너 허브에서 고객 보기를 클릭하고 해당 고객을 선택하거나 내 조직 을 선택하여 파트너 조직의 Control Hub 설정을 엽니다. |
| 2 |
. |
| 3 |
해당 생존성 게이트웨이를 클릭하여 해당 게이트웨이에 대한 생존성 서비스 보기를 엽니다. |
| 4 |
편집 버튼을 클릭하고 다음 항목에 대한 설정을 업데이트하세요.
|
| 5 |
제출을 클릭합니다. Control Hub에서 Survivability Gateway를 삭제하려면 먼저 Survivability Gateway 서비스의 할당을 해제하십시오. 자세한 내용은 관리형 게이트웨이에 서비스 할당을 참조하세요. |
생존성 게이트웨이에서 CDR을 활성화하기 위한 구성
커넥터는 통화량 측정 항목 수집을 용이하게 하기 위해 CDR 관련 명령을 자동으로 구성합니다.
생존성 이벤트가 종료되면 커넥터는 이벤트 기간 동안 생성된 통화 기록(CDR)과 구성 데이터를 처리하여 다양한 통화 횟수를 식별합니다. 해당 지표에는 총 통화 수, 긴급 통화 수, 외부 통화 수가 포함되며, 내부 기능 사용량을 모니터링하는 데 사용됩니다. 실제 통화기록(CDR)은 전송되지 않고 통화 횟수 지표만 Webex 클라우드로 전송됩니다.
다음은 샘플 구성입니다.
!
gw-accounting file
primary ifs bootflash:guest-share/cdrs/
acct-template callhistory-detail
maximum cdrflush-timer 5
cdr-format detailed
!
명령어에 대한 설명:
-
primary ifs bootflash:guest-share/cdrs/- 이 명령은 커넥터가 접근할 수 있도록 CDR 파일을 게스트 공유 폴더 아래에 저장하는 것입니다. -
acct-template callhistory-detail- 이 명령은 통화기록(CDR)에 다이얼 피어 태그를 포함하기 위해 필요합니다. -
maximum cdrflush-timer 5- 기본값은 60분이지만, 5분으로 설정하면 통화기록(CDR)이 파일에 더 빠르게 기록됩니다. -
cdr-format detailed- 이것이 기본 형식입니다. 해당 컴팩트 형식은 다이얼 피어 태그가 포함되어 있지 않으므로 적합하지 않습니다.
착신 전환을 활성화하기 위한 설정
착신 전환 기능은 Webex 클라우드 연결이 끊어지는 네트워크 장애 발생 시에도 지속적인 통화 처리를 보장하는 서비스 유지 기능의 일부입니다. 생존성 게이트웨이는 로컬 폴백 게이트웨이 역할을 하여 엔드포인트가 로컬에 등록하고 필수 통화 기능을 유지할 수 있도록 합니다.
-
생존 모드에서의 착신 전환 동작은 생존 게이트웨이가 풀 구성, 다이얼 피어 구성 및 라우팅 정책을 사용하여 관리하며, 이러한 정책은 통화를 로컬에서 처리하거나 PSTN 또는 SIP 트렁크를 통해 외부로 라우팅합니다.
-
생존성 게이트웨이는 Webex Calling이 생존성 모드에서 이러한 방법을 사용하지 않으므로 SIP REFER, SIP moved-temparily for call forward 및 call transfer 부가 서비스를 비활성화합니다.
착신 전환 시나리오에 대한 음성 등록 풀을 구성합니다.
|
착신 전환 기능을 사용하려면 각 전화기의
|
헌트 그룹을 활성화하기 위한 구성
이 표는 Control Hub에서 헌트 그룹 기능 구성을 Survivability 게이트웨이 명령과 비교하여 매핑 정보를 제공합니다.
| 헌트 그룹 특징 | 컨트롤 허브를 사용한 구성 | 생존성 게이트웨이 명령 |
|---|---|---|
|
통화 라우팅 패턴을 선택하세요 |
Top-Down/Simultaneous/Circular/Longest-idle | Sequential/Parallel/Peer/Longest-idle |
|
헌트 그룹 추가 |
각 지역별로 사냥 그룹의 이름과 전화번호를 추가하세요. | 헌트 그룹을 추가하려면 voice hunt-group 를 사용하십시오. 다음으로 pilot 명령어를 사용하여 전화번호를 추가하고, description 명령어를 사용하여 헌트 그룹 이름을 추가합니다. |
|
추가할 사용자, 작업 공간 또는 가상 회선을 선택하세요. |
헌트 그룹에 참여할 에이전트를 선택하세요. |
|
|
설정된 벨 소리 후에 넘어가기 |
링 개수 설정 옵션을 사용하여 구성하십시오. |
벨소리 횟수 대신 다음 상담원에게 연결되도록 |
|
통화 중일 때 넘어가기 |
사용 중일 때 고급 설정 옵션을 사용하여 구성하세요. |
|
|
모든 에이전트에게 연결할 수 없을 때 통화를 전환 | 모든 상담원에게 연결할 수 없을 때 통화를 전환하는 옵션을 사용하여 구성합니다. 옵션을 사용하여 통화를 전환합니다. |
|
|
모든 에이전트가 통화 중이거나 헌트 그룹이 통화 중인 경우 통화 전환 |
모든 상담원이 통화 중이거나 헌트 그룹이 통화 중일 때 통화를 착신 전환합니다 옵션을 사용하여 구성하십시오. |
구성하려면 다음을 사용하십시오. |
-
헌트 그룹 순차 링을 구성합니다.
voice hunt-group 1 sequential pilot 1111 number 1 1001 number 2 1002 number 3 7089001 number 4 7089002 number 5 +1210903443 ..... ..... timeout 20 final 1009 statistics collect description present-call idle-phone -
헌트 그룹 병렬 링을 구성합니다.
voice hunt-group 2 parallel pilot 2222 number 1 2001 number 2 2002 number 3 2089001 number 4 2089002 number 5 +12109034433 ..... ..... timeout 60 final 1009 statistics collect description
명령어에 대한 설명:
-
voice hunt-group- 이 명령어는 헌트 그룹을 정의하고 구성 모드로 진입하는 데 사용됩니다. -
parallel- 이 키워드는 시스템이 수신 전화를 이 헌트 그룹의 구성원들에게 분배하는 데 사용할 헌트 그룹 방식 또는 알고리즘을 지정합니다. -
number- 목록을 생성합니다 extensions/e164 numbers/ESN 그들은 보이스 헌팅 그룹의 구성원입니다. 목록에 있는 어떤 번호도 다른 사냥 그룹의 조종사 번호일 수 없습니다. -
pilot- 이 번호는 사냥단의 대표 번호 또는 연락처입니다. 사냥꾼들과 연락하려면 이 번호로 전화를 걸어주세요. -
timeout- 사냥 그룹이 다음 행동을 취하기 전에 구성원들에게 연락을 시도하는 최대 시간을 초 단위로 설정합니다. -
final- 이 명령은 대체 번호를 지정합니다. -
statistics collect- 사냥 그룹에 대한 운영 통계 수집을 가능하게 합니다. -
descriptin- 사냥 그룹 설명 -
present-call idle-phone- 통화는 유휴 상태인 상담원에게만 연결해 주세요.
다음은 show voice hunt-group statistics 명령어의 샘플 출력입니다. 출력에는 음성 헌트 그룹 번호로의 직접 통화와 대기열 또는 B-ACD에서 이루어진 통화가 포함됩니다.
Router# show voice hunt-group 1 statistics last 1 h
Wed 04:00 - 05:00
Max Agents: 3
Min Agents: 3
Total Calls: 9
Answered Calls: 7
Abandoned Calls: 2
Average Time to Answer (secs): 6
Longest Time to Answer (secs): 13
Average Time in Call (secs): 75
Longest Time in Call (secs): 161
Average Time before Abandon (secs): 8
Calls on Hold: 2
Average Time in Hold (secs): 16
Longest Time in Hold (secs): 21
Per agent statistics:
Agent: 5012
From Direct Call:
Total Calls Answered: 3
Average Time in Call (secs): 70
Longest Time in Call (secs): 150
Totals Calls on Hold: 1
Average Hold Time (secs): 21
Longest Hold Time (secs): 21
From Queue:
Total Calls Answered: 3
Average Time in Call (secs): 55
Longest Time in Call (secs): 78
Total Calls on Hold: 2
Average Hold Time (secs): 19
Longest Hold Time (secs): 26
Total Loged in Time (secs): 3000
Total Loged out Time (secs): 600
Agent: 5013
From Direct Call:
Total Calls Answered: 3
Average Time in Call (secs): 51
Longest Time in Call (secs): 118
Totals Calls on Hold: 1
Average Hold Time (secs): 11
Longest Hold Time (secs): 11
From Queue:
Total Calls Answered: 1
Average Time in Call (secs): 4
Longest Time in Call (secs): 4
Total Loged in Time (secs): 3000
Total Loged out Time (secs): 600
Agent: 5014
From Direct Call:
Total Calls Answered: 1
Average Time in Call (secs): 161
Longest Time in Call (secs): 161
From Queue:
Total Calls Answered: 1
Average Time in Call (secs): 658
Longest Time in Call (secs): 658
Total Loged in Time (secs): 3000
Total Loged out Time (secs): 600
Queue related statistics:
Total calls presented to the queue: 5
Calls handoff to IOS: 5
Number of calls in the queue: 0
Average time to handoff (secs): 2
Longest time to handoff (secs): 3
Number of abandoned calls: 0
Average time before abandon (secs): 0
Calls forwarded to voice mail: 0
Calls answered by voice mail: 0
Number of error calls: 0
Router# sh voice hunt-group
Group 1
type: sequential
pilot number: 4444, peer-tag 2147483647
list of numbers:
Member Used-by State Login/Logout
====== ======= ===== ============
1001 1001 up -
1003 1003 up -
preference: 0
preference (sec): 0
timeout: 15
final_number:
auto logout: no
stat collect: no
phone-display: no
hlog-block: no
calls in queue: 0
overwrite-dyn-stats: no
members logout: no
present-call idle-phone: no
webex-sgw-bgl14#
기본 자동 통화 분배(B-ACD)를 활성화하기 위한 구성
기본 자동 통화 분배(B-ACD) 및 자동 응답(AA) 서비스는 외부 전화를 자동으로 응대하고, 발신자가 적절한 부서를 선택하거나 알려진 내선 번호를 누를 수 있는 메뉴를 제공합니다.
B-ACD는 대화형 메뉴와 로컬 헌트 그룹을 사용하여 통화에 대한 자동 응답 및 통화 분배 기능을 제공합니다. B-ACD 애플리케이션은 자동응답(AA) 서비스와 통화 대기열 서비스로 구성됩니다. B-ACD 자동응답 시스템은 g711ulaw 코덱을 사용하는 수신 SIP 트렁크와 협상된 PSTN 통화를 지원합니다.
B-ACD는 순차, 병렬, 피어, 최장 유휴 통화 블래스트를 지원하는 음성 헌트 그룹을 지원하며, SIP 공유 회선 및 혼합 공유 회선을 지원합니다.
수신 전화가 B-ACD AA 조종사 번호로 연결되면 발신자가 자동으로 통화를 연결할 수 있도록 인사말과 안내 메시지가 나옵니다.
제한 사항
통화 전환 시 수신 및 발신 다이얼 피어에 동일한 코덱을 사용하십시오. 서로 다른 코덱을 사용하는 것은 지원되지 않습니다. iOS는 TCL 애플리케이션에서 처리하는 호출에 대해 트랜스코더를 호출하지 않습니다.
B-ACD 구성 요소
B-ACD 애플리케이션은 통화 대기열 서비스와 하나 이상의 AA 서비스로 구성됩니다. 이러한 서비스의 구성 가능한 구성 요소는 다음과 같습니다.
-
파일럿 번호
-
환영 메시지 및 기타 오디오 파일
-
메뉴 옵션
-
내선으로 다이얼
파일럿 번호
각 AA 서비스에는 발신자가 AA에 연결하기 위해 다이얼하는 고유한 AA 조종사 번호가 있습니다. 이 숫자는 param aa-pilot 명령에 지정됩니다. AA 조종사 번호는 상담원 전화번호나 실제 전화기와 연결되어 있지 않지만, 외부 발신자가 해당 번호로 전화를 걸 수 있도록 AA 조종사 번호를 수신 번호로 사용하는 다이얼 피어를 정의해야 합니다.
환영 메시지 및 기타 오디오 파일
환영 메시지는 조종사 번호로 전화가 연결될 때 재생되는 오디오 파일입니다. 이 오디오 파일은 B-ACD 서비스에서 발신자에게 현재 상태와 취할 수 있는 조치를 알리기 위해 사용되는 여러 오디오 파일 중 하나입니다. 발신자에게 제공되는 메뉴 선택 사항을 설명하는 맞춤형 오디오 파일을 만들 수 있습니다. B-ACD 오디오 파일에 대한 설명은 다음 섹션에서 확인할 수 있습니다.
기본 오디오 파일 다시 녹음
스크립트의 각 항목에 대한 기본 오디오 파일이 제공되며, 이는 발신자에게 전달됩니다. 링크 에서 기본 오디오 파일을 다운로드하고 플래시 메모리 또는 TFTP 서버와 같이 B-ACD 라우터가 접근할 수 있는 위치에 복사합니다. 웹사이트에서는 오디오 파일과 스크립트 파일을 tar 파일로 묶어서 제공합니다. 기본 파일과 해당 메시지는 표에 나열되어 있습니다. 기본 메시지 위에 개인화된 메시지를 다시 녹음할 수는 있지만, 언어 코드 및 파일 이름 변경에 특별히 설명된 경우를 제외하고는 오디오 파일의 이름을 변경할 수 없습니다.
B-ACD 서비스를 처음 사용하기 전에 기본 오디오 프롬프트를 다시 녹음하고 설치하려면 Tcl 스크립트 및 오디오 프롬프트 다운로드의 단계를 따르십시오. 기존 B-ACD 서비스에서 오디오 프롬프트를 다시 녹음하려면 스크립트 매개변수 및 오디오 프롬프트 업데이트(내선 번호로만 다이얼)의 단계를 따르십시오.
| 기본 파일 이름 | 기본 알림 | 기본 알림 길이 |
|---|---|---|
en_bacd_welcome.au |
전화 주셔서 감사합니다. 메시지 후 2초간의 일시 정지가 포함됩니다. |
3초 |
en_bacd_options_menu.au |
판매 문의는 1번을 누르세요 (잠시 멈춤). 고객 서비스 센터를 이용하시려면 2번(잠시 멈춤)을 누르세요. 내선번호로 전화를 걸려면 3번(잠시 멈춤)을 누르세요. 상담원과 통화하려면 0번을 누르세요. 메시지 후 4초간의 일시 정지가 포함됩니다. |
15seconds |
en_bacd_disconnect.au |
"지금은 전화를 받을 수 없습니다." 잠시 후에 다시 시도하십시오. 전화 주셔서 감사합니다. 메시지 후 4초간의 일시 정지가 포함됩니다. |
10seconds |
en_bacd_invalidoption. au |
"잘못된 옵션을 입력하셨습니다." 다시 시도해 주세요. 메시지 후 1초간의 일시 정지가 포함됩니다. 발신자가 잘못된 메뉴 옵션을 선택하거나 잘못된 내선 번호를 입력했을 때 이 안내 메시지가 재생됩니다. |
7seconds |
en_bacd_enter_dest.au |
"연결하려는 내선 번호를 입력하세요." 메시지 후 5초간의 일시 정지가 포함됩니다. 발신자가 |
7seconds |
en_bacd_allagentsbusy. au |
"현재 모든 상담원이 다른 고객을 응대하고 있습니다." 지원팀이 올 때까지 기다려 주십시오. 곧 담당자가 연락드리겠습니다. 메시지 후 2초간의 일시 정지가 포함됩니다. 이 안내 메시지는 두 번째 인사말이라고도 합니다. |
7seconds |
en_bacd_music_on_hol d.au |
B-ACD 발신자에게는 대기 음악(MOH)이 재생됩니다. |
60seconds |
오디오 파일을 다시 녹음하는 경우, B-ACD 프롬프트는 8비트, 뮤 법칙, 8kHz 인코딩의 G.711 오디오 파일(.au) 형식을 요구한다는 점에 유의하십시오. 다음과 같은 오디오 도구 또는 이와 유사한 품질의 도구를 추천합니다.
-
Adobe Systems Inc.에서 개발한 Microsoft Windows용 Adobe Audition(이전에는 Syntrillium Software Corp.에서 개발한 Cool Edit이라는 이름으로 판매됨)
-
Sun Microsystems Inc.에서 개발한 Solaris용 AudioTool
B-ACD 구성
다음은 몇 가지 구성 예시입니다.
application
service aa bootflash:app-b-acd-aa-3.0.0.8.tcl
paramspace english index 1
param handoff-string aa
param dial-by-extension-option
paramspace english language en
param aa-pilot
paramspace english location flash:
param welcome-prompt _bacd_welcome.au
param voice-mail
param service-name queue
!
service queue bootflash:app-b-acd-3.0.0.8.tcl
param queue-len 30
param queue-manager-debugs 1
!
! SIP PSTN Dial-Peers for Auto Attendant(BACD) service called aa associated with incoming voice port
dial-peer voice 500 voip
description Inbound dial-peer for Auto Attendant
service aa
session protocol sipv2
incoming called-number
dtmf-relay rtp-nte
codec g711ulaw
no vad
!
! TDM PSTN Dial-Peers if not using SIP for Auto Attendant(BACD) service called aa associated with incoming voice pots
dial-peer voice 500 voip
description Inbound dial-peer for Auto Attendant
service aa
incoming called-number
port %tdm_port%
! | Command | 설명 |
|---|---|
param dial-by-extension-option |
지정된 메뉴 번호를 누른 후 발신자가 내선 번호를 누를 수 있도록 합니다. 메뉴 번호—메뉴 옵션의 식별자입니다. 범위는 1부터 9까지입니다. 기본값은 없습니다. |
param aa-pilot |
자동응답 다이얼 피어에 연결된 파일럿 번호를 지정합니다. |
param voice-mail |
AA 상담원이 응답하지 않는 통화에 대한 대체 연결 주소를 지정합니다. |
paramspace english language en |
IVR 애플리케이션에서 동적 안내 메시지에 사용되는 오디오 파일의 언어 코드를 정의합니다.
이 언어 코드는 파일에서 실제로 사용되는 언어와 관계없이 오디오 프롬프트 파일 이름에 사용된 두 글자 언어 접두사와 일치해야 합니다. 자세한 내용은 환영 메시지 및 기타 오디오 파일을 참조하십시오. |
param welcome-prompt
audio-filename |
이 AA 서비스에서 사용하는 환영 인사말 오디오 파일을 지정합니다.
|
언어 코드 및 파일 이름 변경
-
파일 이름의 접두사는 ch, en, sp 또는 aa로 변경할 수 있습니다. 접두사는 파일에서 실제로 사용된 언어와 관계없이 paramspace language 명령의 language-code 매개변수에 지정된 코드와 일치해야 합니다.
-
접두사 뒤에 오는 환영 메시지 파일 이름(기본값은 en_bacd_welcome.au)은
param welcome-prompt명령에 정의된 대로 식별 가능한 이름을 가질 수 있습니다. -
접두사 다음에 오는 드롭스루 프롬프트 파일 이름(기본값 없음)은
param drop-through-prompt명령에 정의된 대로 식별 가능한 이름을 가질 수 있습니다.
오디오 파일에는 원하는 언어로 안내 메시지를 녹음할 수 있습니다. 다른 언어로 된 프롬프트가 포함된 파일의 접두사를 변경할 필요는 없습니다. 언어 코드 접두사는 B-ACD 서비스의 일부가 아닌 기능에 사용되기 때문입니다. 하지만 오디오 파일에서 실제로 사용된 언어와 관계없이 파일의 언어 코드 접두사가 paramspace language 명령의 language-code 매개변수에 지정된 언어 코드와 일치하는 것이 중요합니다.
_bacd_welcome.au 파일을 제외하고 오디오 파일 이름의 식별자 부분을 변경하지 마십시오. 스크립트는 테이블 에 있는 것과 동일한 식별 이름을 가지고 있고 paramspace 언어 명령에서 지정한 것과 동일한 접두사를 가진 오디오 파일을 식별합니다.
일반적인 파일 이름 지정 규칙의 두 가지 예외는 환영 메시지 오디오 파일(기본값은 en_bacd_welcome.au)과 drop-through-option 프롬프트 오디오 파일(기본값 없음)입니다. 이 두 오디오 안내 메시지의 파일 이름에 대한 식별 부분은 구성 중에 명시적으로 지정되며 사용자가 완전히 구성할 수 있습니다. 이 파일들은 다음 규칙을 준수하는 한 어떤 파일 이름이든 사용할 수 있습니다.
-
파일 이름의 접두사 부분은 paramspace language 명령에 지정된 언어 코드와 동일해야 합니다. 예를 들어, 영어.
-
파일 이름의 식별자 부분은 반드시 밑줄(_)로 시작해야 합니다. 예를 들어,
_welcome_to_xyz.au.
오디오 파일을 사용하여 메뉴 선택 항목을 설명합니다.
기본적으로 발신자에게 초기 안내 및 사용 가능한 메뉴 선택 사항에 대한 안내를 제공하기 위해 두 개의 오디오 파일이 제공됩니다. en_welcome_prompt.au 그리고 en_bacd_options_menu.au. 표에 설명된 대로 이러한 파일에 제공된 기본 메시지 위에 사용자 지정 메시지를 다시 녹음할 수 있습니다.
B-ACD 서비스에서 단일 AA 서비스를 사용하는 경우 환영 인사를 en_welcome_prompt.au 에 녹음하고 메뉴 선택에 대한 지침을 en_bacd_options_menu.au에 녹음하십시오.
B-ACD 서비스에서 여러 AA 서비스를 사용하는 경우, 다음 지침에 따라 각 AA에 대한 별도의 인사말과 안내 사항이 필요합니다.
-
각 AA 서비스마다 별도의 환영 메시지를 녹음하고, 각 환영 메시지 오디오 파일에 서로 다른 이름을 사용하십시오. 예를 들면,
en_welcome_aa1.au그리고en_welcome_aa2.au. 이 파일에 녹음하는 환영 메시지에는 인사말과 메뉴 옵션에 대한 안내가 모두 포함되어야 합니다. -
en_bacd_options_menu.au오디오 파일에 무음을 녹음합니다. 최소 1초간의 침묵이 기록되어야 합니다. 참고로, 이 파일에는 AA 서비스가 여러 개 있는 경우의 메뉴 안내는 포함되어 있지 않습니다.
메뉴 옵션
B-ACD 서비스의 목적은 조직 내에서 통화를 자동으로 올바른 목적지로 연결하는 것입니다. 대화형 AA 서비스를 이용하면 발신자에게 메뉴 옵션을 제공하여 통화에 적합한 선택을 할 수 있도록 할 수 있습니다. B-ACD에서 사용 가능한 메뉴 옵션 유형은 표에 설명되어 있습니다. 메뉴 옵션은 음성 안내를 통해 발신자에게 알려지며, 이는 환영 안내 및 기타 오디오 파일에 설명되어 있습니다.
| 유형 | 설명 | 요구 사항 | 예제 |
|---|---|---|---|
Dial-by-extension |
발신자가 알려진 내선 번호로 전화를 걸 수 있도록 허용하려면 숫자를 누릅니다. 이 옵션에 사용되는 메뉴 번호는 통화 대기 서비스에 사용되는 메뉴(aa-hunt) 번호와 동일해서는 안 됩니다. |
요구 사항 없음. |
메뉴 선택 사항을 들은 후, 발신자는 4번을 눌러 내부 내선 번호를 걸 수 있습니다. |
내선번호를 이용한 전화 걸기 옵션
B-ACD 서비스는 내선 번호로 전화를 걸 수 있는 옵션도 제공하는데, 이를 통해 발신자는 내선 번호를 이미 알고 있는 경우 내부 내선 번호로 전화를 걸 수 있습니다. 내선번호를 이용한 전화 걸기 옵션이 메뉴 옵션으로 표시됩니다.
내선번호로 전화를 거는 옵션은 내선번호로 전화를 거는 매개변수에 메뉴 옵션 번호를 지정하여 구성합니다. 다음 명령어를 사용하면 발신자는 1번을 누른 후 내선 번호를 누를 수 있습니다.
param dial-by-extension-option 1 B-ACD 통화 대기열 서비스 내에서 내선 번호로 전화를 거는 옵션 번호와 헌트 그룹 옵션 번호는 서로 배타적이어야 합니다. 이 제한 사항은 내선 번호로 전화를 거는 옵션에 사용되는 옵션 번호가 aa-hunt 옵션에 사용되는 옵션 번호와 동일할 수 없음을 의미합니다. 예를 들어, 통화 대기열 서비스 구성에서 헌트 그룹을 지정하기 위해 aa-hunt1부터 aa-hunt5까지를 사용하는 경우, 내선 번호로 전화를 거는 옵션에는 6번을 사용할 수 있지만 1부터 5까지의 숫자는 사용할 수 없습니다.
통화 대기 서비스에서 헌트 그룹에 10개의 aa-헌트 번호가 모두 사용되는 경우, 내선 번호로 전화를 거는 옵션을 사용할 수 없습니다. 이 제한 사항은 AA 애플리케이션에 사용되는 옵션 번호가 아니라 통화 대기 서비스에 사용되는 모든 옵션 번호(AA 헌트 번호)를 기준으로 한다는 점에 유의하십시오.
Tcl 스크립트 및 오디오 프롬프트 다운로드
B-ACD 서비스에 필요한 스크립트 파일과 프롬프트 파일을 준비하려면 다음 단계를 따르십시오.
-
tar 파일을 SGW 라우터 부트플래시에 복사합니다.
다음 명령어를 사용하여 tcl 및 오디오 파일의 압축을 해제하세요.
archive tar /xtract bootflash:cme-b-acd-3.0.0.8.tar bootflash:- 필요한 경우 오디오 파일을 다시 녹음하세요.
명령어에 대한 설명:
| Command | 설명 |
|---|---|
|
B-ACD tar 파일을 다운로드하세요. |
이 tar 파일에는 AA Tcl 스크립트, 통화 대기열 Tcl 스크립트 및 B-ACD 서비스에 필요한 기본 오디오 파일이 포함되어 있습니다. |
enable |
SGW 라우터에서 관리자 권한 EXEC 모드를 활성화합니다. 암호를 묻는 메시지가 나타나면 암호를 입력하십시오. |
archivetar/xtract flash: |
B-ACD 파일 아카이브의 압축을 풀고 플래시 메모리에 복사합니다.
|
|
필요한 경우 기록하십시오. | 사용자 지정 메시지를 넣어 오디오 파일을 다시 녹음하되, 오디오 파일 이름은 변경하지 마십시오. |
예제
다음 예제는 192.168.1.1 서버에 있는 cme-b-acd-2.1.0.0이라는 아카이브에서 파일을 추출하여 B-ACD 라우터의 플래시 메모리에 복사합니다.
archive tar /xtract tftp://192.168.1.1/cme-b-acd-2.1.0.0.tar flash:스크립트 매개변수 및 음성 안내 업데이트 (내선 번호로 전화 걸기만 가능)
Cisco IOS 구성을 변경하여 B-ACD 스크립트 매개변수를 업데이트할 수 있습니다. 매개변수 변경 사항을 적용하려면 변경한 B-ACD 스크립트를 중지했다가 다시 로드해야 합니다. 음성 안내를 다시 녹음하는 경우, 변경된 음성 안내 파일을 다시 로드해야 합니다.
-
활성화된 세션의 세션 ID를 확인합니다.
관리자 권한으로 실행 중인 EXEC 모드에서
showcall application sessions명령을 사용하여 AA 및 통화 대기열 서비스의 세션 ID(SID) 번호를 얻을 수 있습니다. AA 세션에 활성 통화가 없으면show call application sessions명령의 출력에 AA 스크립트 이름이 나타나지 않습니다. - 필요한 경우 B-ACD AA 및 통화 대기열 서비스 세션을 중지하십시오. 1단계에서 얻은 세션 ID 번호를 사용하여 B-ACD AA 서비스 및 통화 대기열 서비스 세션을 중지합니다. 관리자 권한으로 실행 중인 EXEC 모드에서
call application session stop명령어를 사용하여 AA 및 통화 대기열 세션을 중지하십시오. - AA 스크립트 및 통화 대기열 스크립트를 다시 로드하려면 관리자 권한 EXEC 모드에서
call application voice load명령을 사용하십시오. - 오디오 프롬프트 파일이 변경된 경우 다시 로드하십시오. 관리자 권한으로 실행된 EXEC 모드에서
audio-prompt load명령을 사용하여 오디오 파일을 다시 로드할 수 있습니다. 변경된 각 오디오 파일에 대해 이 명령을 반복하십시오.
B-ACD 상태 확인 중
show call application sessions 명령어를 사용하여 B-ACD가 활성화되어 있는지 확인하십시오.
다음 예시는 AA 및 통화 대기열 애플리케이션이 활성화된 세션을 보여줍니다. "App" 필드는 서비스 이름이고, "Url" 필드는 애플리케이션 스크립트 파일의 위치입니다.
Session ID 17
App: aa
Type: Service
Url: flash:app-b-acd-aa-2.1.0.0.tcl
Session ID 12
App: queue
Type: Service
Url: flash:app-b-acd-2.1.0.0.tcl 다음 예시는 큐 애플리케이션만 활성화된 세션을 보여줍니다. 활성 통화가 없으므로 AA 스크립트는 show call application sessions 명령의 출력에 나타나지 않습니다. AA 서비스 이름은 활성 통화가 있을 때만 출력에 나타납니다. 통화 대기열 스크립트는 첫 번째 수신 전화가 들어온 후 활성화되며, 활성 통화가 없더라도 계속 활성화 상태를 유지합니다.
Router# show call application sessions
Session ID 12
App: queue
Type: Service
Url: flash:app-b-acd-2.1.0.0.tclCisco IOS 구성을 변경하여 B-ACD 스크립트 매개변수를 업데이트할 수 있습니다. 매개변수 변경 사항을 적용하려면 다음 단계에 설명된 대로 변경한 B-ACD 스크립트를 중지하고 다시 로드해야 합니다. 음성 안내를 다시 녹음하는 경우, 변경된 음성 안내 파일을 다시 로드해야 합니다.
-
활성 세션의 세션 ID를 확인합니다. :
관리자 권한으로 실행 중인 EXEC 모드에서
show call application sessions명령을 사용하여 AA 및 통화 대기열 서비스의 세션 ID(SID) 번호를 얻을 수 있습니다. AA 세션에 활성 통화가 없으면show call application sessions명령의 출력에 AA 스크립트 이름이 나타나지 않습니다.다음 예시는 활성 통화가 있는 세션을 보여줍니다. "앱" 필드는 통화 대기열 스크립트 및 AA 스크립트에 지정된 서비스 이름입니다. show running-config 명령의 출력에서도 서비스 이름을 확인할 수 있습니다.
Router# show call application sessions Session ID 17 App: aa Type: Service Url: bootflash:app-b-acd-aa-3.0.0.8.tcl Session ID 12 App: queue Type: Service Url: bootflash:app-b-acd-3.0.0.8.tcl - 필요한 경우 B-ACD AA 및 통화 대기열 서비스 세션을 중지하십시오.
1단계에서 얻은 세션 ID 번호를 사용하여 B-ACD AA 서비스 및 통화 대기열 서비스 세션을 중지합니다. 관리자 권한으로 실행 중인 EXEC 모드에서
call application session stop명령어를 사용하여 AA 및 통화 대기열 세션을 중지하십시오.Router# call application session stop id 17 Router# call application session stop id 12AA 서비스에 대해 호출 애플리케이션 세션 중지 명령을 사용하면 다음과 같은 작업이 수행됩니다.
AA 서비스가 중단되었습니다.
AA 서비스에 연결된 모든 통화가 끊어집니다.
show call application sessions명령의 출력에서 AA 서비스 이름이 제거됩니다.통화 끊김 가능성을 없애려면, 업무 시간 이후와 같이 수신 전화가 없을 때까지 기다렸다가 스크립트를 다시 로드하십시오.
show call application sessions명령의 출력에 AA 서비스 이름이 나타나지 않으면 통화 세션이 없으므로 해당 서비스에 대해call application session stop명령을 실행할 필요가 없습니다. -
AA 스크립트와 통화 대기열 스크립트를 다시 로드하세요.
관리자 권한으로 실행한 EXEC 모드에서
call application voice load명령어를 사용하여 스크립트를 다시 로드하십시오.Router# call application voice load aa Router# call application voice load queue -
음성 안내 파일이 변경된 경우 다시 로드하십시오.
관리자 권한으로 실행한 EXEC 모드에서
audio-prompt load명령어를 사용하여 오디오 파일을 다시 로드하십시오. 변경된 오디오 파일마다 이 명령을 반복하십시오.Router# audio-prompt load flash:en_bacd_welcome.au Reload of flash:en_bacd_welcome.au successful
제한 및 제약 사항
-
공중 교환 전화망(PSTN) 서비스 이용 가능 여부는 네트워크 장애 발생 시 사용 가능한 SIP 트렁크 또는 PSTN 회선에 따라 달라집니다.
-
4G 및 5G 연결을 지원하는 기기(예: 모바일 또는 태블릿용 Webex 앱)는 네트워크 장애 중에도 Webex 통화에 등록할 수 있습니다. 결과적으로, 정전이 발생할 경우 동일한 위치에서 다른 번호로 전화를 걸 수 없게 될 수도 있습니다.
-
생존 모드에서의 다이얼링 패턴은 활성 모드와 다르게 작동할 수 있습니다.
-
생존성 게이트웨이는 IPv4 주소를 사용해야 합니다. IPv6는 지원되지 않습니다.
-
사용자는 Survivability Gateway에 성공적으로 등록하려면 내선 번호와 전화번호를 모두 설정해야 합니다.
-
컨트롤 허브에서 요청 시 동기화 상태 업데이트가 완료되는 데 최대 30분이 소요될 수 있습니다.
-
생존 모드에서는 호출 도크가 지원되지 않습니다.
-
음성 서비스 VoIP 구성 모드에서
SIP bind명령어를 구성하지 마십시오. 이는 서바이벌 게이트웨이에 엔드포인트가 등록되지 않는 문제를 야기합니다. -
충돌을 방지하고 추적성, 중복성 및 장애 조치 신뢰성을 향상시키기 위해 서로 다른 물리적 위치에 있는 기업 중요 번호(ESN)가 고유해야 합니다.
생존 모드에서는 다음과 같은 제한 사항이 적용됩니다.
-
MPP 소프트키: 통화 보류, 통화 보류 해제, 통화 연결, 통화 수신, 그룹 통화 수신 및 통화 연결 요청과 같은 소프트키는 지원되지 않지만 기기에서 비활성화된 것으로 표시되지는 않습니다.
-
공유 라인: 공용 회선으로 걸려온 전화는 모든 기기에서 벨이 울리지만, 원격 회선 상태 모니터링, 통화 보류, 통화 재개, 동기화된 방해 금지 모드(DND), 착신 전환 설정과 같은 다른 공용 회선 기능은 사용할 수 없습니다.
-
회의: 회의 통화 또는 3자 통화는 지원되지 않습니다.
-
기본 자동 통화 분배(B-ACD): Survivability Gateway와 Local Gateway가 동일 위치에 설치된 서비스는 지원되지 않습니다.
-
통화 내역: 통화 내역은 MPP 장치와 Webex 앱 모두의 통화 기록에 로컬로 저장됩니다.
-
사냥 그룹: 최대 100개의 헌트 그룹을 구성할 수 있으며, 각 그룹은 최대 32명의 사용자를 지원합니다.
-
향상된 공유 통화 표시: 회선 상태 알림, 공유 회선과 같은 기능 hold/remote 이력서 제출 및 기본 통화, 헌트 그룹 또는 착신 전환을 사용하는 기타 통화는 지원되지 않습니다.
-
헌트 그룹 통화 라우팅: 가중치 기반 통화 라우팅 패턴은 지원되지 않습니다.
장애 조치 중 사용자 경험
회사의 사이트에 있을 때 인터넷 연결이 끊기는 경우에도 여전히 내/외부적으로 고객에게 전화를 걸고 받을 수 있습니다. Webex 앱 | 사이트 생존성을 참조하세요.
구성 예시
PSTN 연결 예시
외부 통화를 하려면 PSTN에 연결을 설정하십시오. 이 항목에서는 몇 가지 옵션을 간략하게 설명하고 샘플 구성을 제공합니다. 주요 옵션은 두 가지입니다.
-
음성 인터페이스 카드(VIC)와 공중전화망(PSTN) 연결
-
SIP 트렁크에서 PSTN 게이트웨이로
음성 인터페이스 카드와 PSTN 연결
라우터에 음성 인터페이스 카드(VIC)를 설치하고 PSTN에 대한 포트 연결을 구성할 수 있습니다.
-
라우터에 VIC를 설치하는 방법에 대한 자세한 내용은 해당 라우터 모델의 하드웨어 설치 가이드를 참조하십시오.
-
VIC 구성 방법에 대한 자세한 내용과 예제는 음성 포트 구성 가이드, Cisco IOS 릴리스 3S를 참조하세요.
SIP 트렁크에서 PSTN 게이트웨이로
PSTN 게이트웨이를 가리키는 SIP 트렁크 연결을 구성할 수 있습니다. 게이트웨이에서 트렁크 연결을 구성하려면 voice-class-tenant 구성을 사용하십시오. 다음은 구성 예시입니다.
voice class tenant 300
sip-server ipv4::
session transport udp
bind all source-interface GigabitEthernet0/0/1
다이얼 피어 구성
트렁크 연결의 경우, 트렁크 연결에 대한 수신 및 발신 다이얼 피어를 구성하십시오. 구성 방식은 사용자의 요구 사항에 따라 달라집니다. 자세한 구성 정보는 다이얼 피어 구성 가이드, Cisco IOS 릴리스 3S를 참조하십시오.
다음은 샘플 구성입니다.
UDP 및 RTP를 사용하는 PSTN으로의 발신 다이얼 피어
dial-peer voice 300 voip
description outbound to PSTN
destination-pattern +1[2-9]..[2-9]......$
translation-profile outgoing 300
rtp payload-type comfort-noise 13
session protocol sipv2
session target sip-server
voice-class codec 1
voice-class sip tenant 300
dtmf-relay rtp-nte
no vad
UDP와 RTP를 사용하는 PSTN에서 들어오는 다이얼 피어
voice class uri 350 sip
host ipv4:
!
dial-peer voice 190 voip
description inbound from PSTN
translation-profile incoming 350
rtp payload-type comfort-noise 13
session protocol sipv2
voice-class codec 1
voice-class sip tenant 300
dtmf-relay rtp-nte
no vad
숫자 번역
PSTN 연결의 경우, 내부 내선 번호를 PSTN에서 라우팅할 수 있는 E.164 번호로 변환하기 위해 변환 규칙을 사용해야 할 수 있습니다. 다음은 샘플 구성입니다.
PSTN 변환 규칙에서 비 +E164
voice translation-rule 350
rule 1 /^\([2-9].........\)/ /+1\1/
voice translation-profile 300
translate calling 300
translate called 300
전화 시스템 번역 규칙에서 +E164
voice translation-rule 300
rule 1 /^\+1\(.*\)/ /\1/
voice translation-profile 300
translate calling 300
translate called 300
긴급 전화 예시
다음 예시는 비상 호출 설정의 예입니다.
Wi-Fi 오버레이가 IP 서브넷과 정확하게 일치하지 않으면 이동형 기기의 긴급 호출에 대한 ELIN 매핑이 올바르지 않을 수 있습니다.
응급 대응 위치(ERL)
voice emergency response location 1
elin 1 14085550100
subnet 1 192.168.100.0
									/26
!
voice emergency response location 2
elin 1 14085550111
subnet 1 192.168.100.64 /26
!
voice emergency response zone 1
location 1
location 2
발신 다이얼 피어
voice class e164-pattern-map 301
 description Emergency services numbers
  e164 911
  e164 988
 !
voice class e164-pattern-map 351
 description Emergency ELINs
  e164 14085550100
  e164 14085550111
 !
dial-peer voice 301 pots
 description Outbound dial-peer for E911 call
 emergency response zone 1
 destination e164-pattern-map 301
 !
 dial-peer voice 301 pots
 description Inbound dial-peer for E911 call
 emergency response callback
 incoming called e164-pattern-map 351
 direct-inward-dial


