- Start
- /
- Artikel


Cisco Call configureren voor Microsoft Teams
 In dit artikel
 Feedback?
Stel Cisco Call in als de standaard beloptie voor alle gebruikers in uw organisatie.
Gebruik dit artikel om uw Microsoft Teams-app te configureren met Cisco Call-opties. Het ![]() -pictogram wordt toegevoegd aan de linkernavigatie en als een berichtenextensie. Als de optie Voor teams bellen is uitgeschakeld, gebruikt iedereen in de organisatie hetzelfde platform om oproepen te maken en te ontvangen.
-pictogram wordt toegevoegd aan de linkernavigatie en als een berichtenextensie. Als de optie Voor teams bellen is uitgeschakeld, gebruikt iedereen in de organisatie hetzelfde platform om oproepen te maken en te ontvangen.
Voorwaarden
-
Zorg ervoor dat u een Microsoft Teams-beheerder bent.
-
Zorg ervoor dat u toegang hebt tot de Control Hub.
-
Controleer of gebruikers licentieshebben toegewezen in Control Hub en geregistreerd zijn bij Cisco Unified Communications Manager of Webex Calling om te kunnen bellen.
-
Gebruikers moeten de Webex-app en Microsoft Teams geïnstalleerd hebben.
-
Om de Cisco Call voor Microsoft Teams-integratie te laten werken met de Unified CM-gespreksbeheerbackend (on-premises, Webex Calling Dedicated Instance of UCM Cloud), moet u Unified CM 12.5 SU7 of 14 SU3, Cisco Unity Connection (CUC) 12.5 of 14 gebruiken.
-
Voor Unified CM-klanten die het on-premise gebruiken, dient u ervoor te zorgen dat Unified CM is ingeschakeld. & CUC-clusters worden geïntegreerd in Webex Cloud-Connected UC (CCUC).
-
De gebruikers moeten worden gesynchroniseerd vanuit Active Directory op locatie of vanuit Cloud AD, zoals Azure, naar Control Hub Common Identity (CI).
-
Voor klanten met on-premises installaties, Webex Calling Dedicated Instance en UCM Cloud: Cisco Unified CM configureren— Het lijnnummer in Cisco Unified CM moet gekoppeld zijn aan de gebruikers-ID, zodat de gecentraliseerde gespreksgeschiedenis met de gebruikersnaam wordt gevuld. Ga vanuit Cisco Unified CM Administration naarApparaat→Telefoon, selecteer de telefoon en klik opApparaatnaam (lijn)en klik vervolgens op de gewenste lijn in het paneelKoppelingom naarGebruiker gekoppeld aan lijnte gaan.
-
Zorg ervoor dat de Unified CM Mail ID overeenkomt met het Control Hub primaire e-mailadres dat wordt gebruikt om de Universally Unique Identifier (UUID) te verkrijgen.
-
Virtuele desktopinfrastructuur (VDI): Wanneer Cisco Call-integratie voor Microsoft Teams wordt gebruikt in een VDI-omgeving, moeten zowel Cisco Call als Microsoft Teams in dezelfde virtuele machine draaien.
Microsoft Teams-configuratie
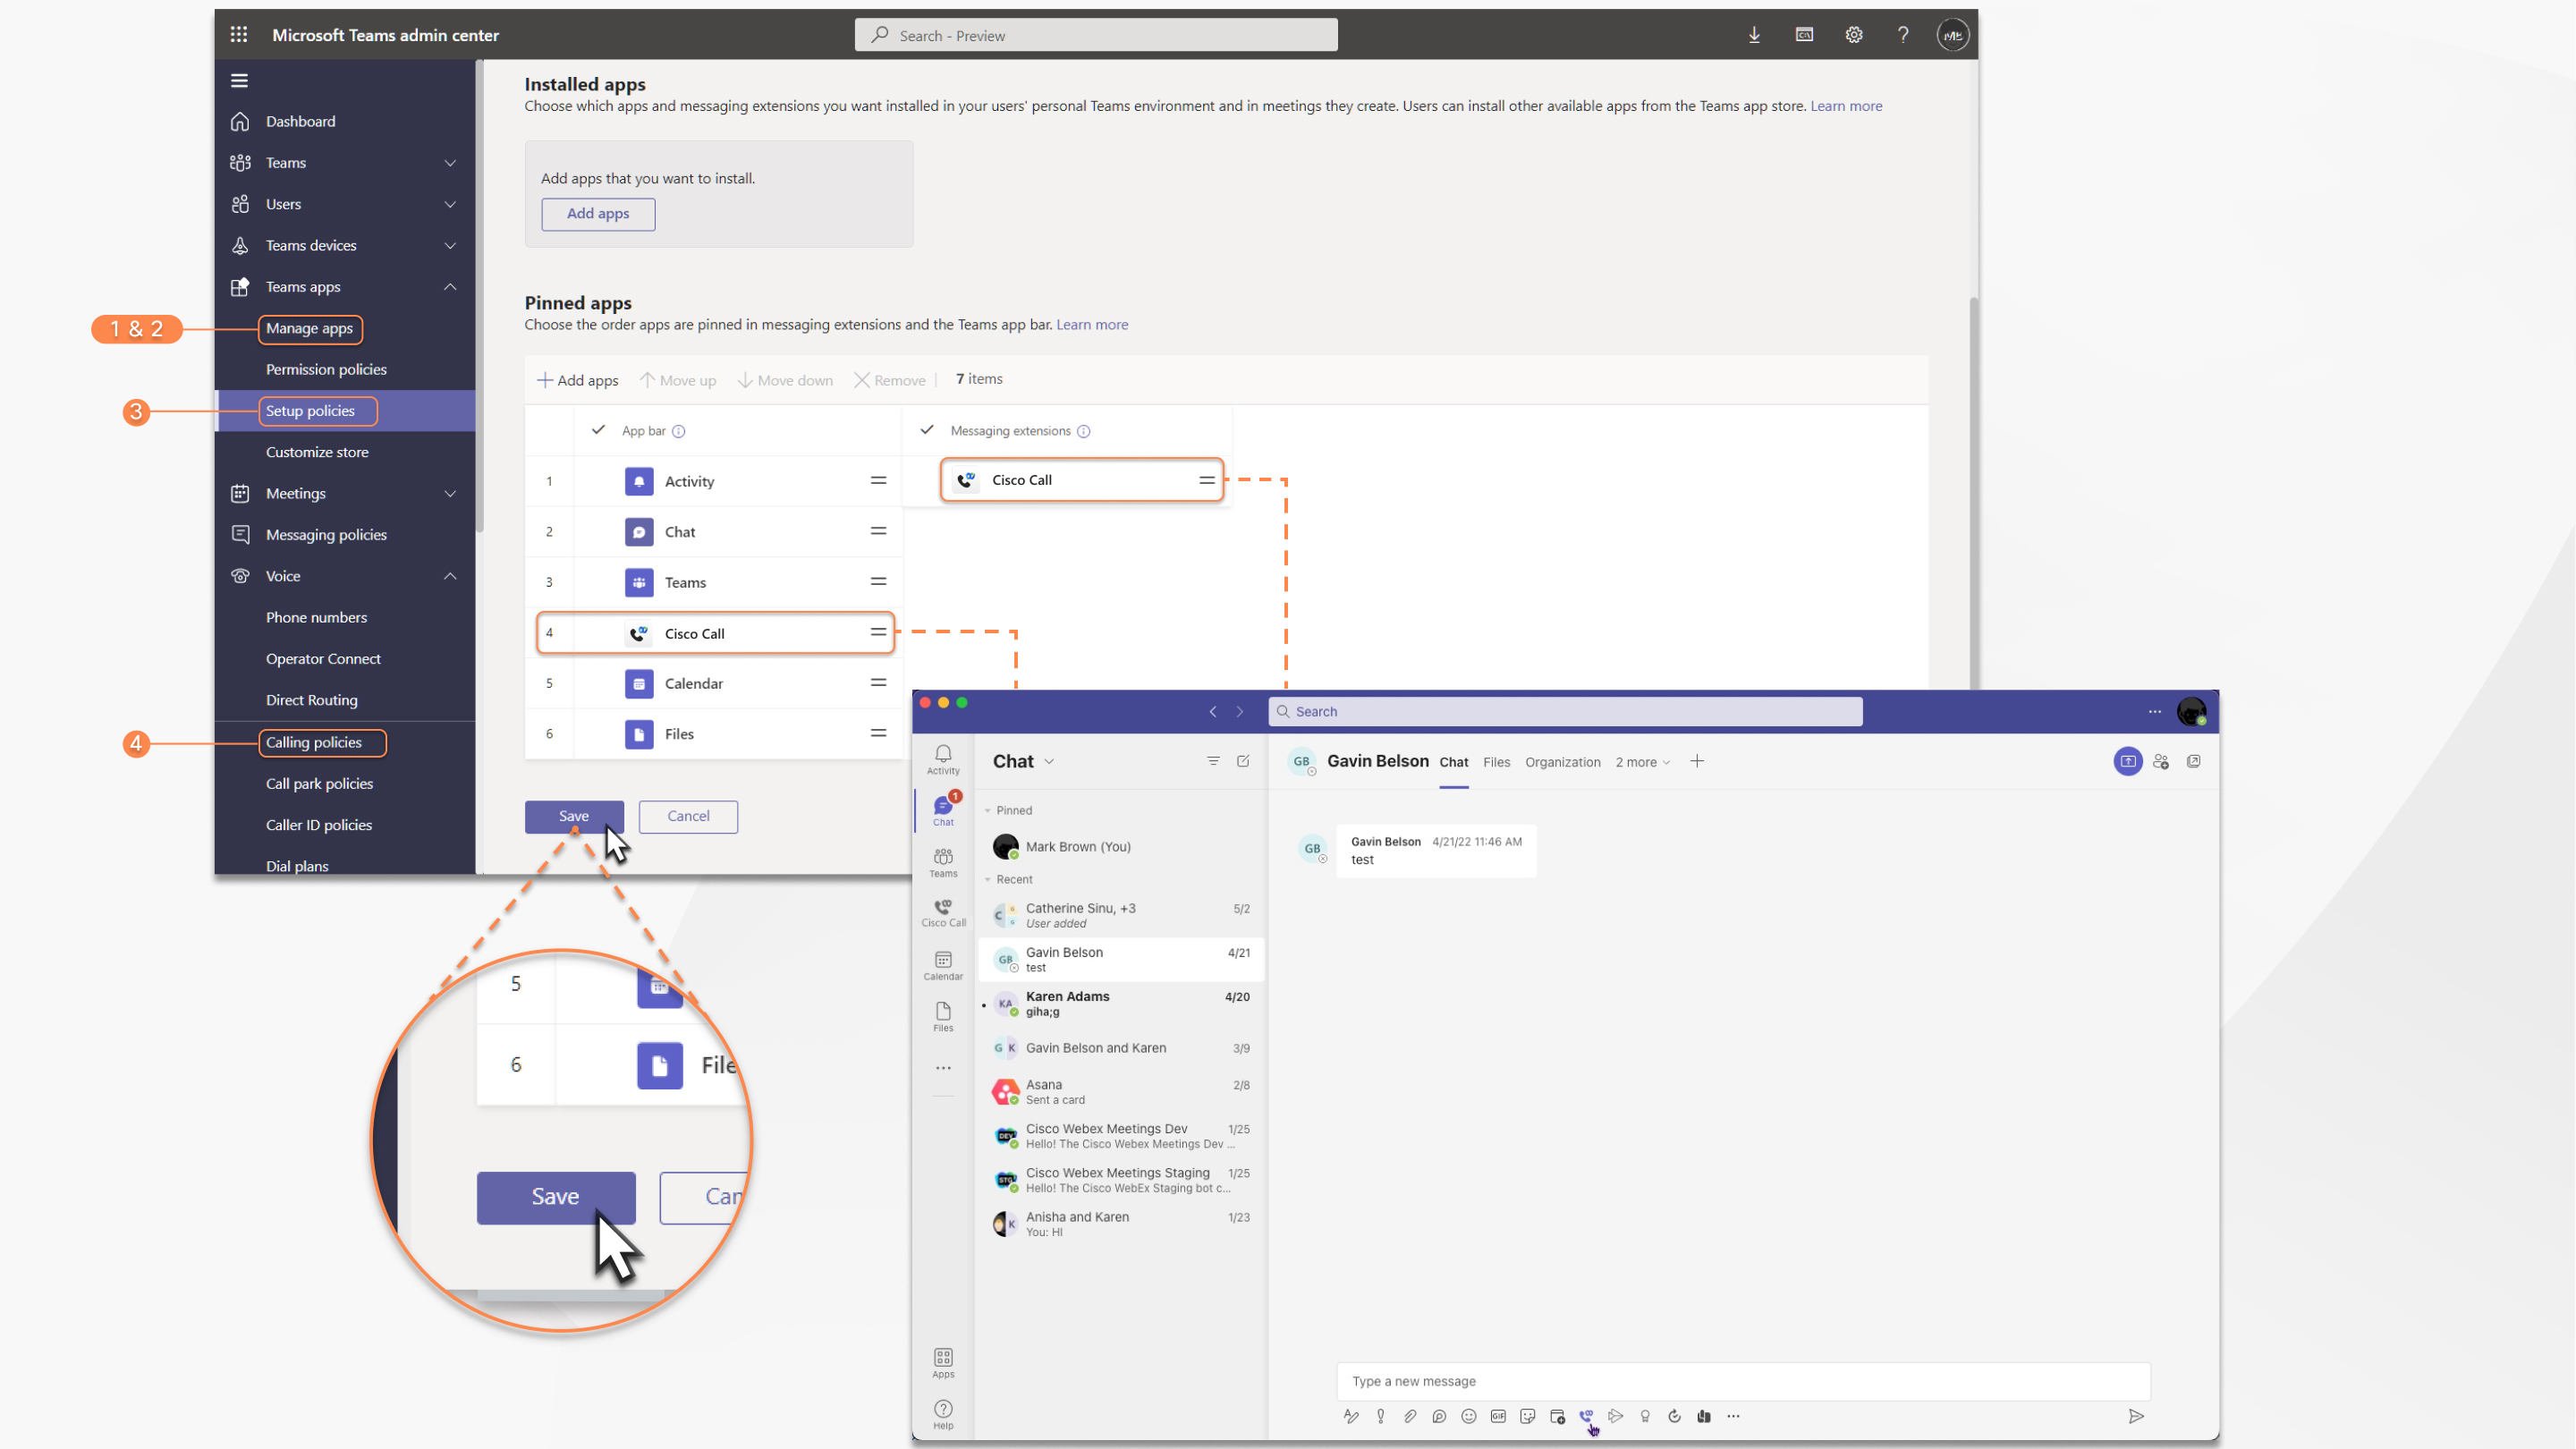
| 1 |
Meld u aan bij het Teams -beheercentrum om uw apps te beheren en Cisco Call in te schakelen. |
| 2 |
Beheer wie Cisco Call mag installeren. |
| 3 |
Installeer Cisco Call, voeg vervolgens het pictogram toe aan de Webex-app en ontkoppel de ingebouwde beloptie. |
| 4 |
Optioneel: schakel de ingebouwde belfunctie voor de hele organisatie uit en maak Cisco Call de enige beloptie.
|
Accepteer de synchronisatierechten voor aanwezigheidsstatus.
Controleer en accepteer de synchronisatiemachtigingen voor aanwezigheid in Microsoft Teams om de aanwezigheidsstatus van de gebruiker bidirectioneel te synchroniseren tussen Microsoft Teams en Webex.
Om de aanwezigheidssynchronisatie te laten werken, moeten gebruikers de Cisco Call-integratie minstens eens per 90 dagen gebruiken.
| 1 |
Ga in het menu Dashboard naar |
| 2 |
Voer in het zoekvak |
| 3 |
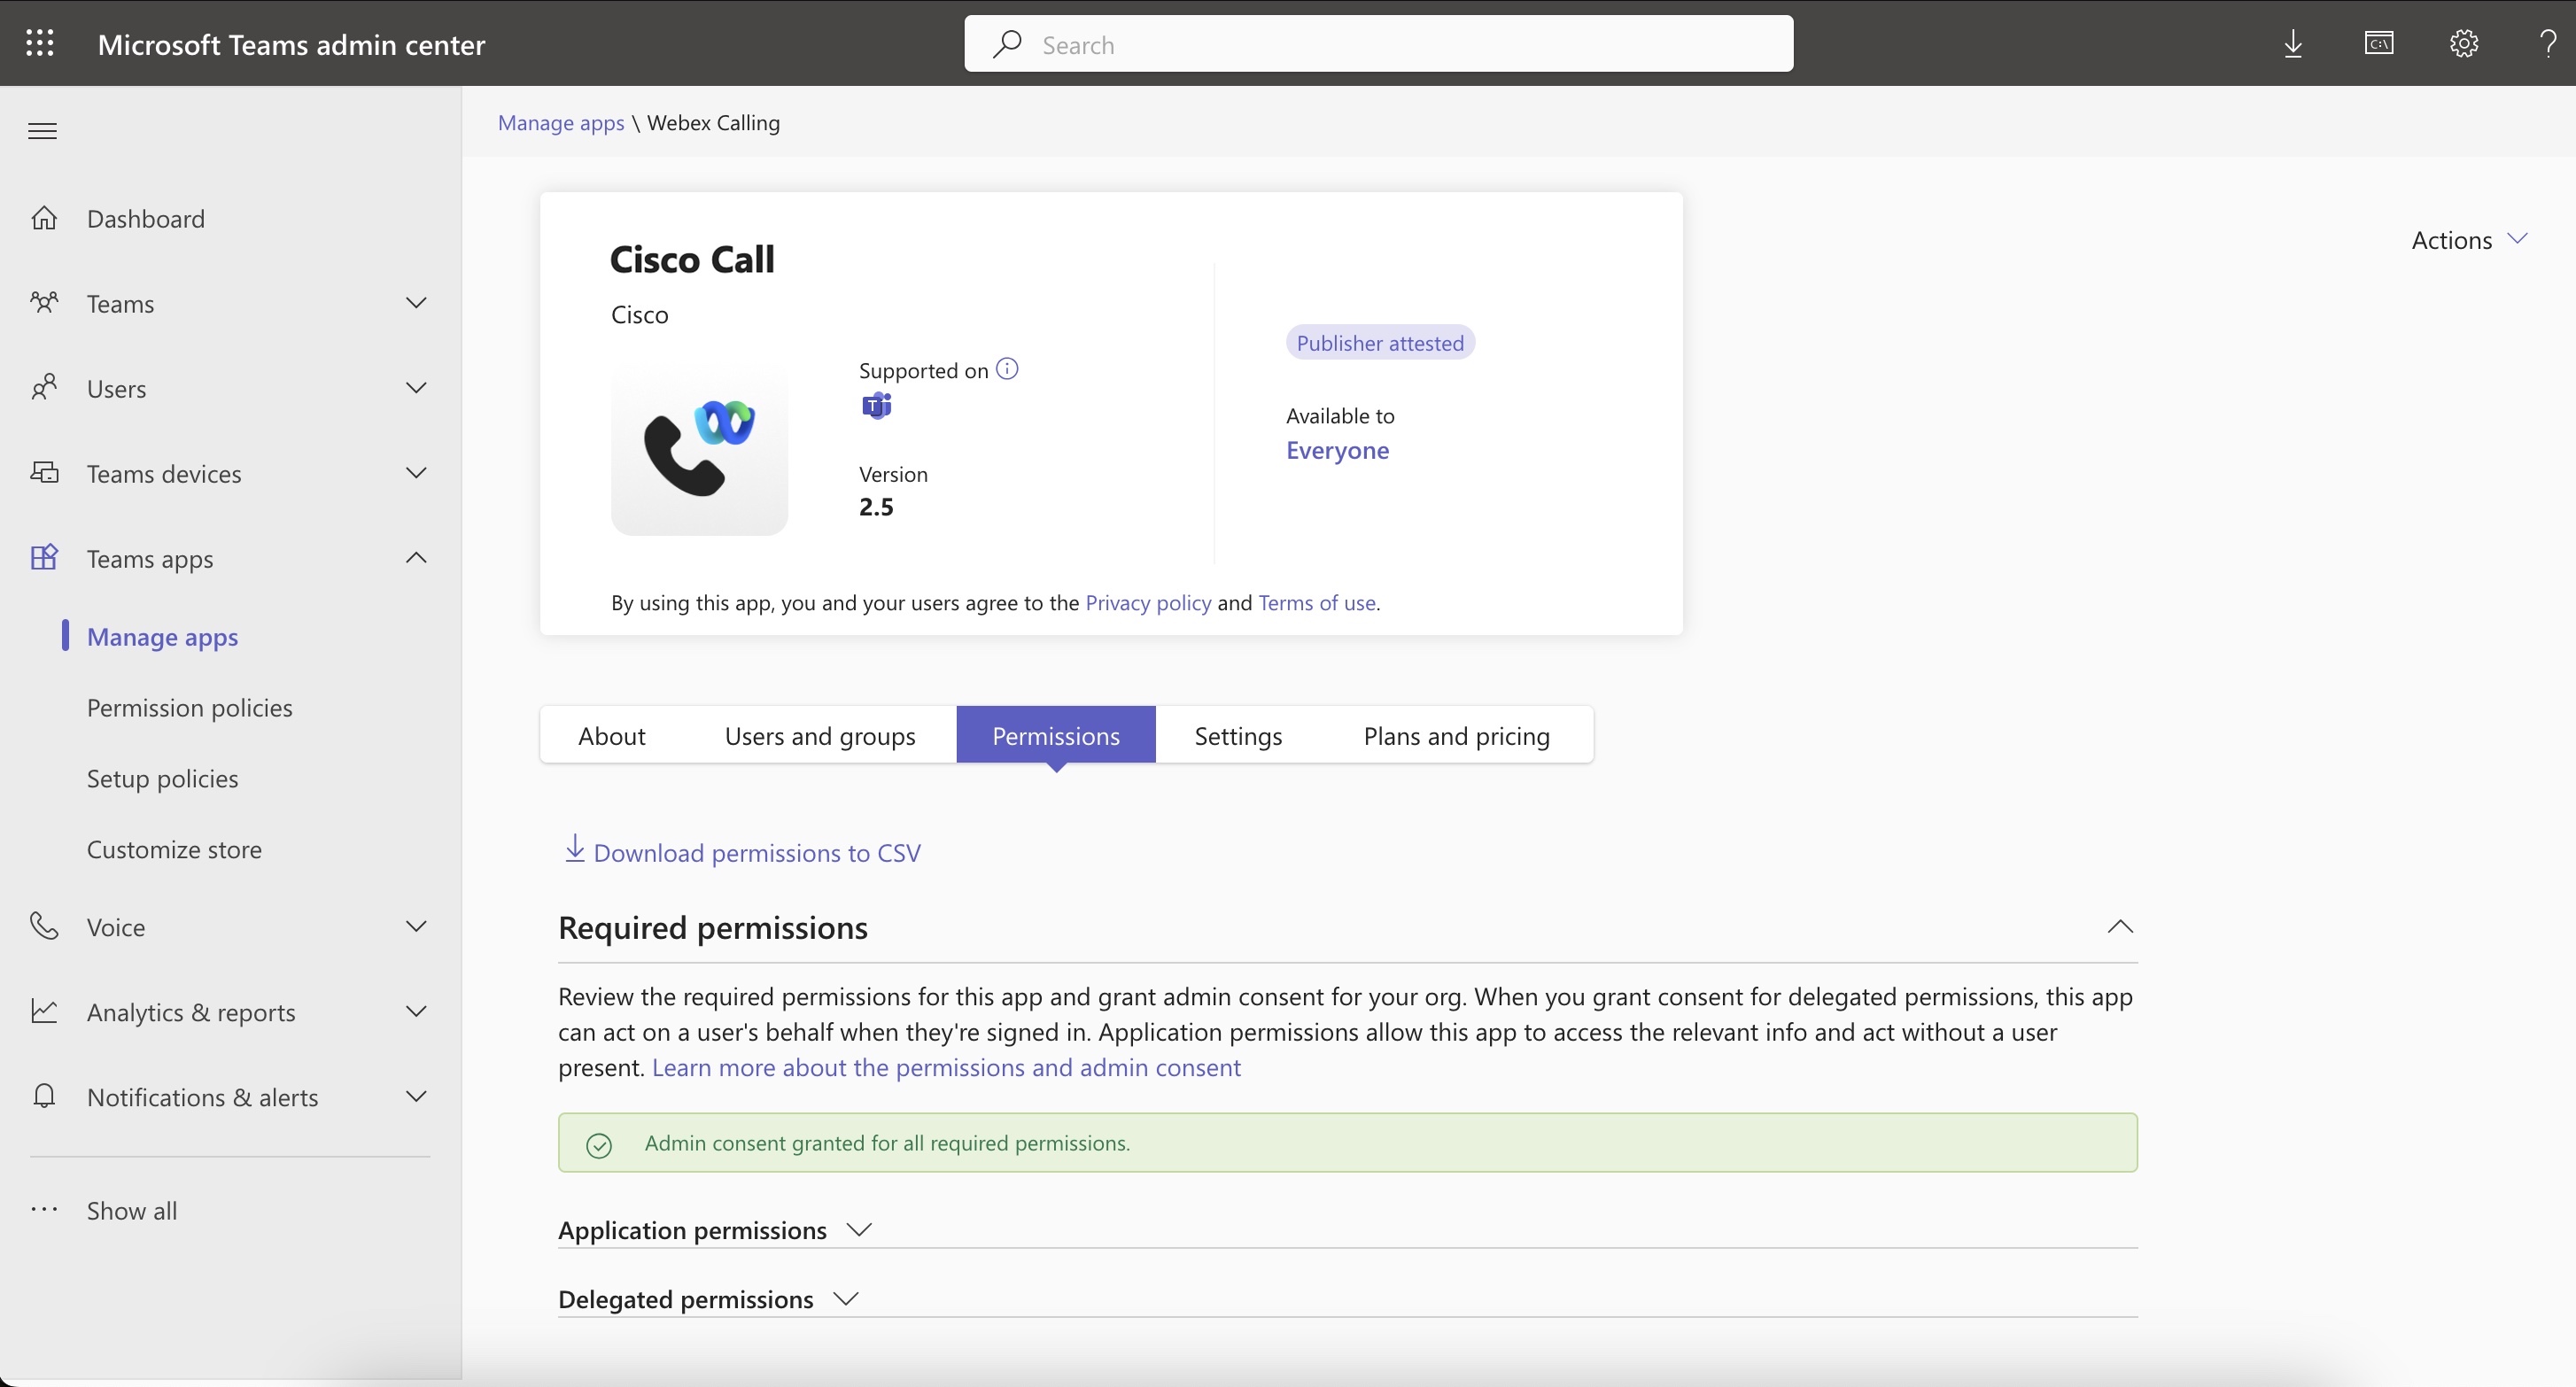
Klik op het tabblad Machtigingen en vervolgens op Beheerderstoestemming verlenen. |
| 4 |
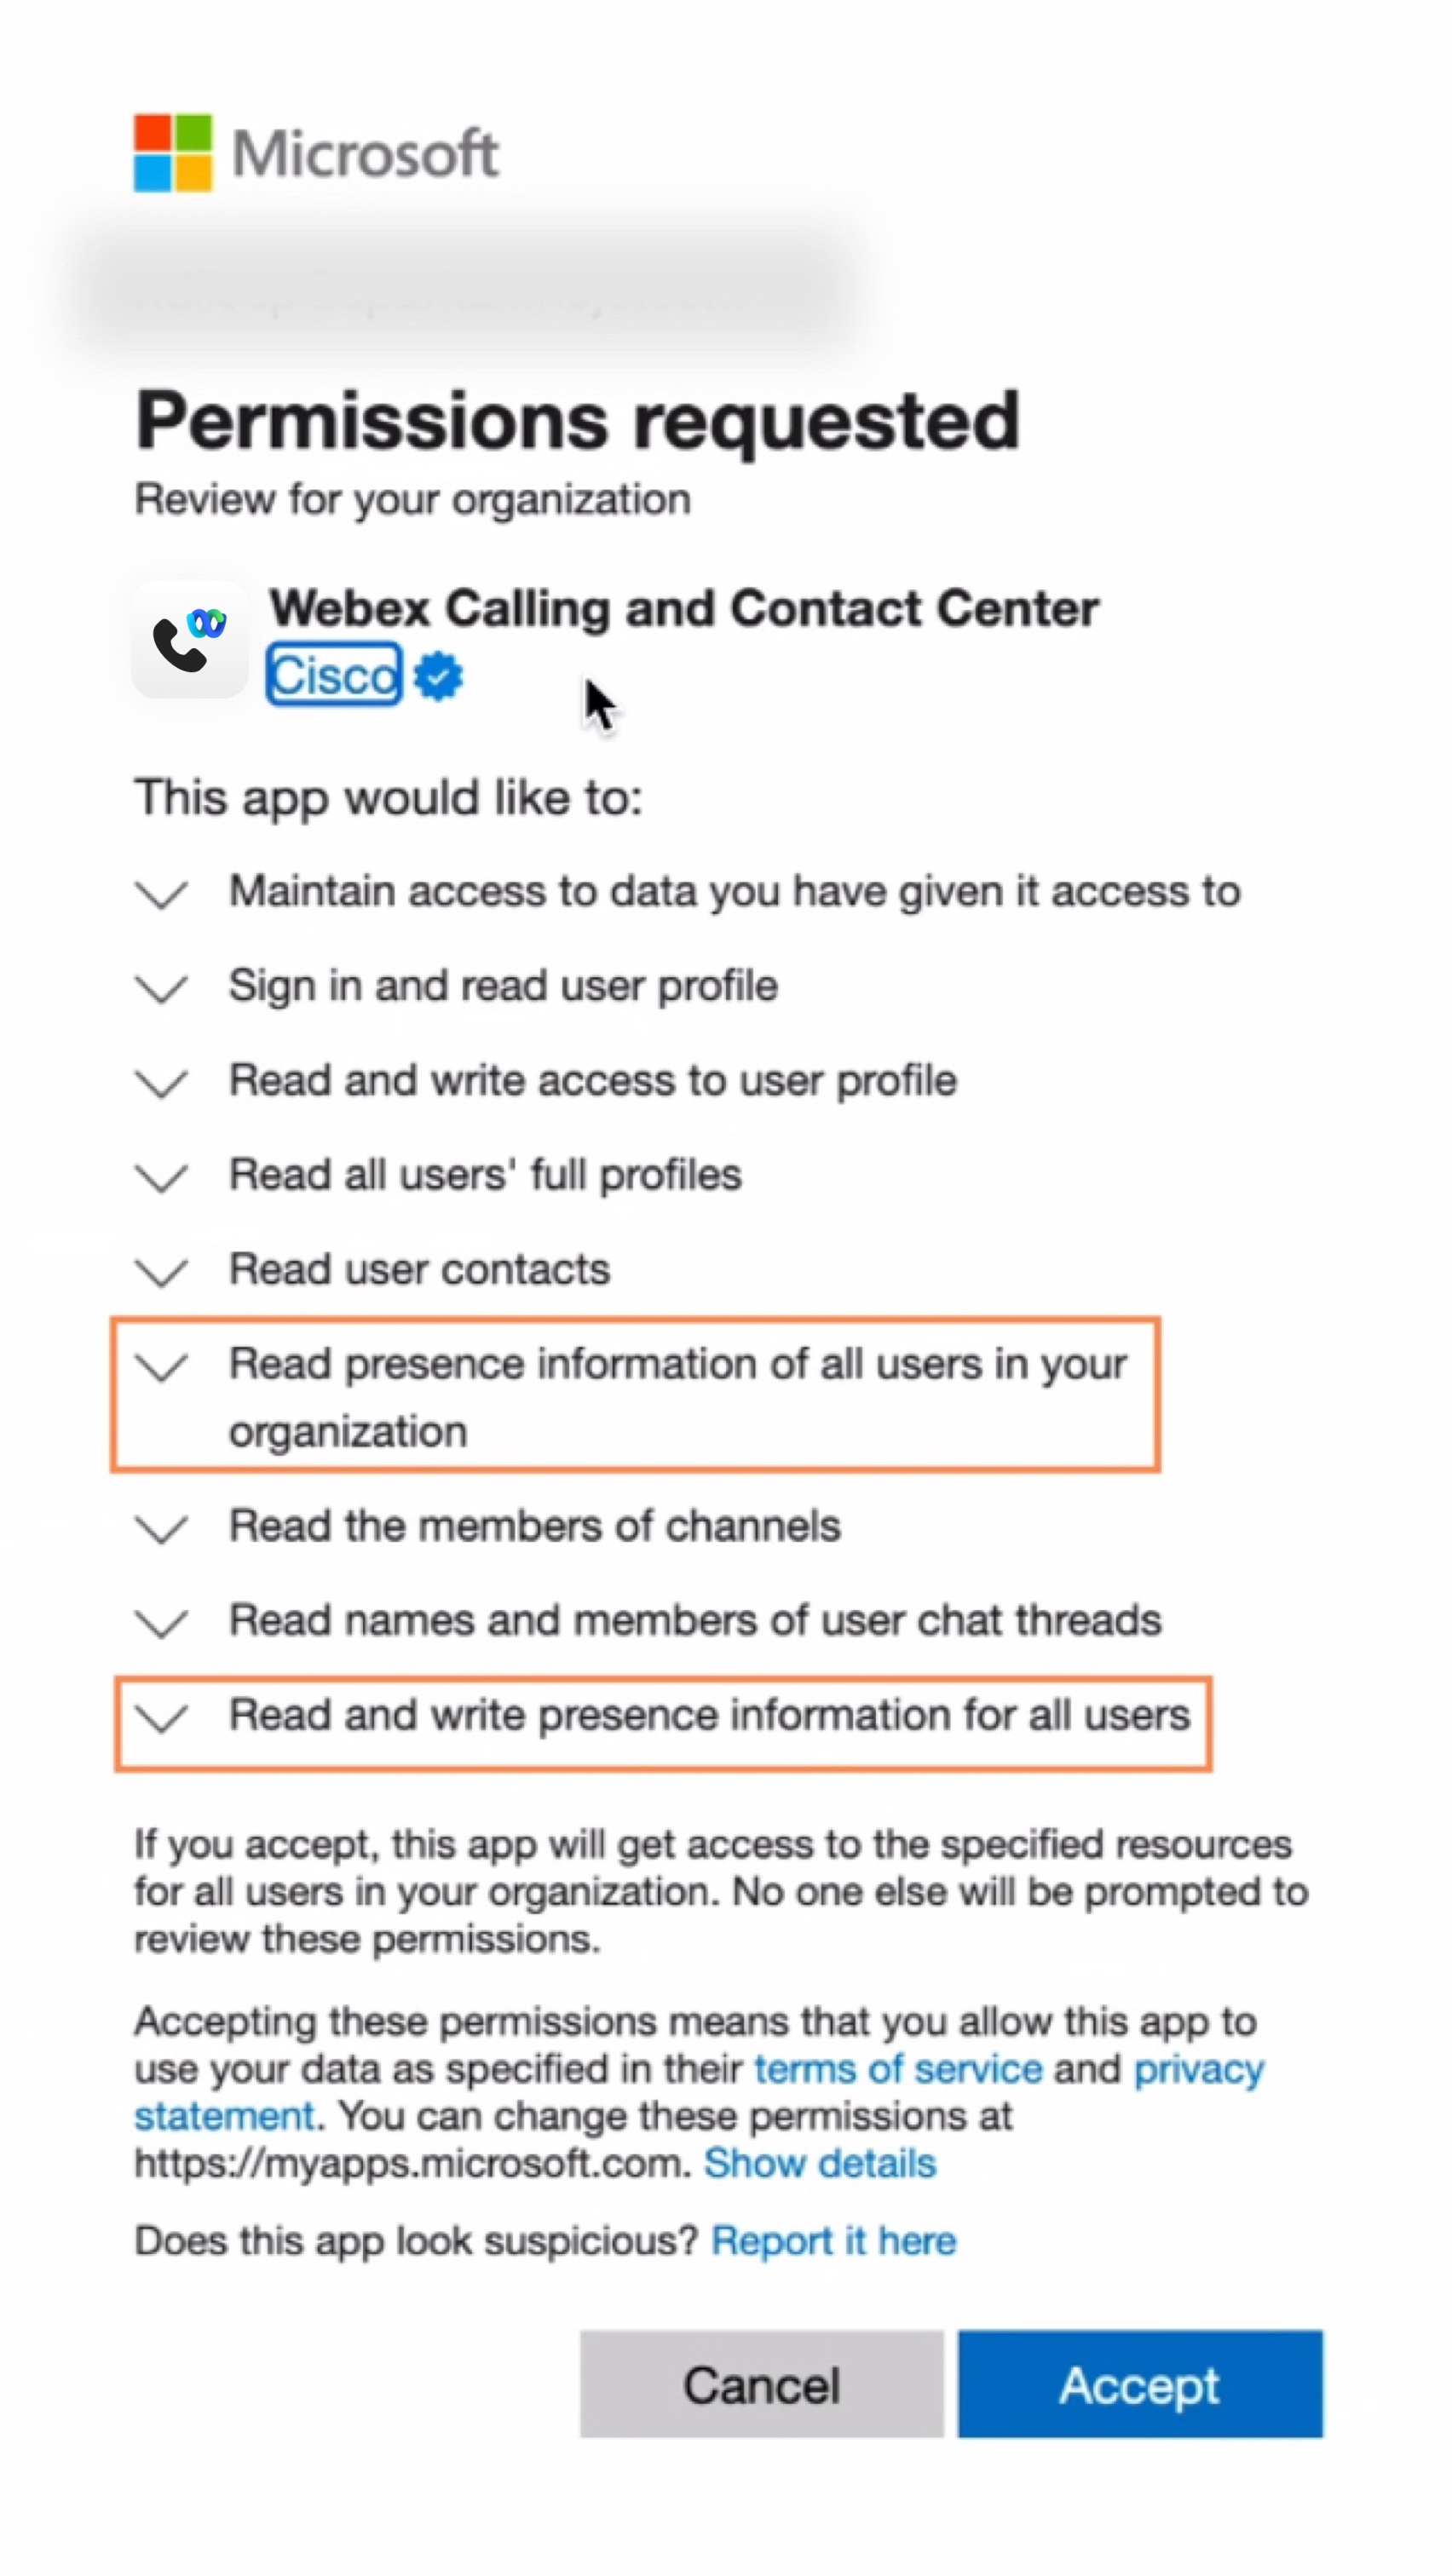
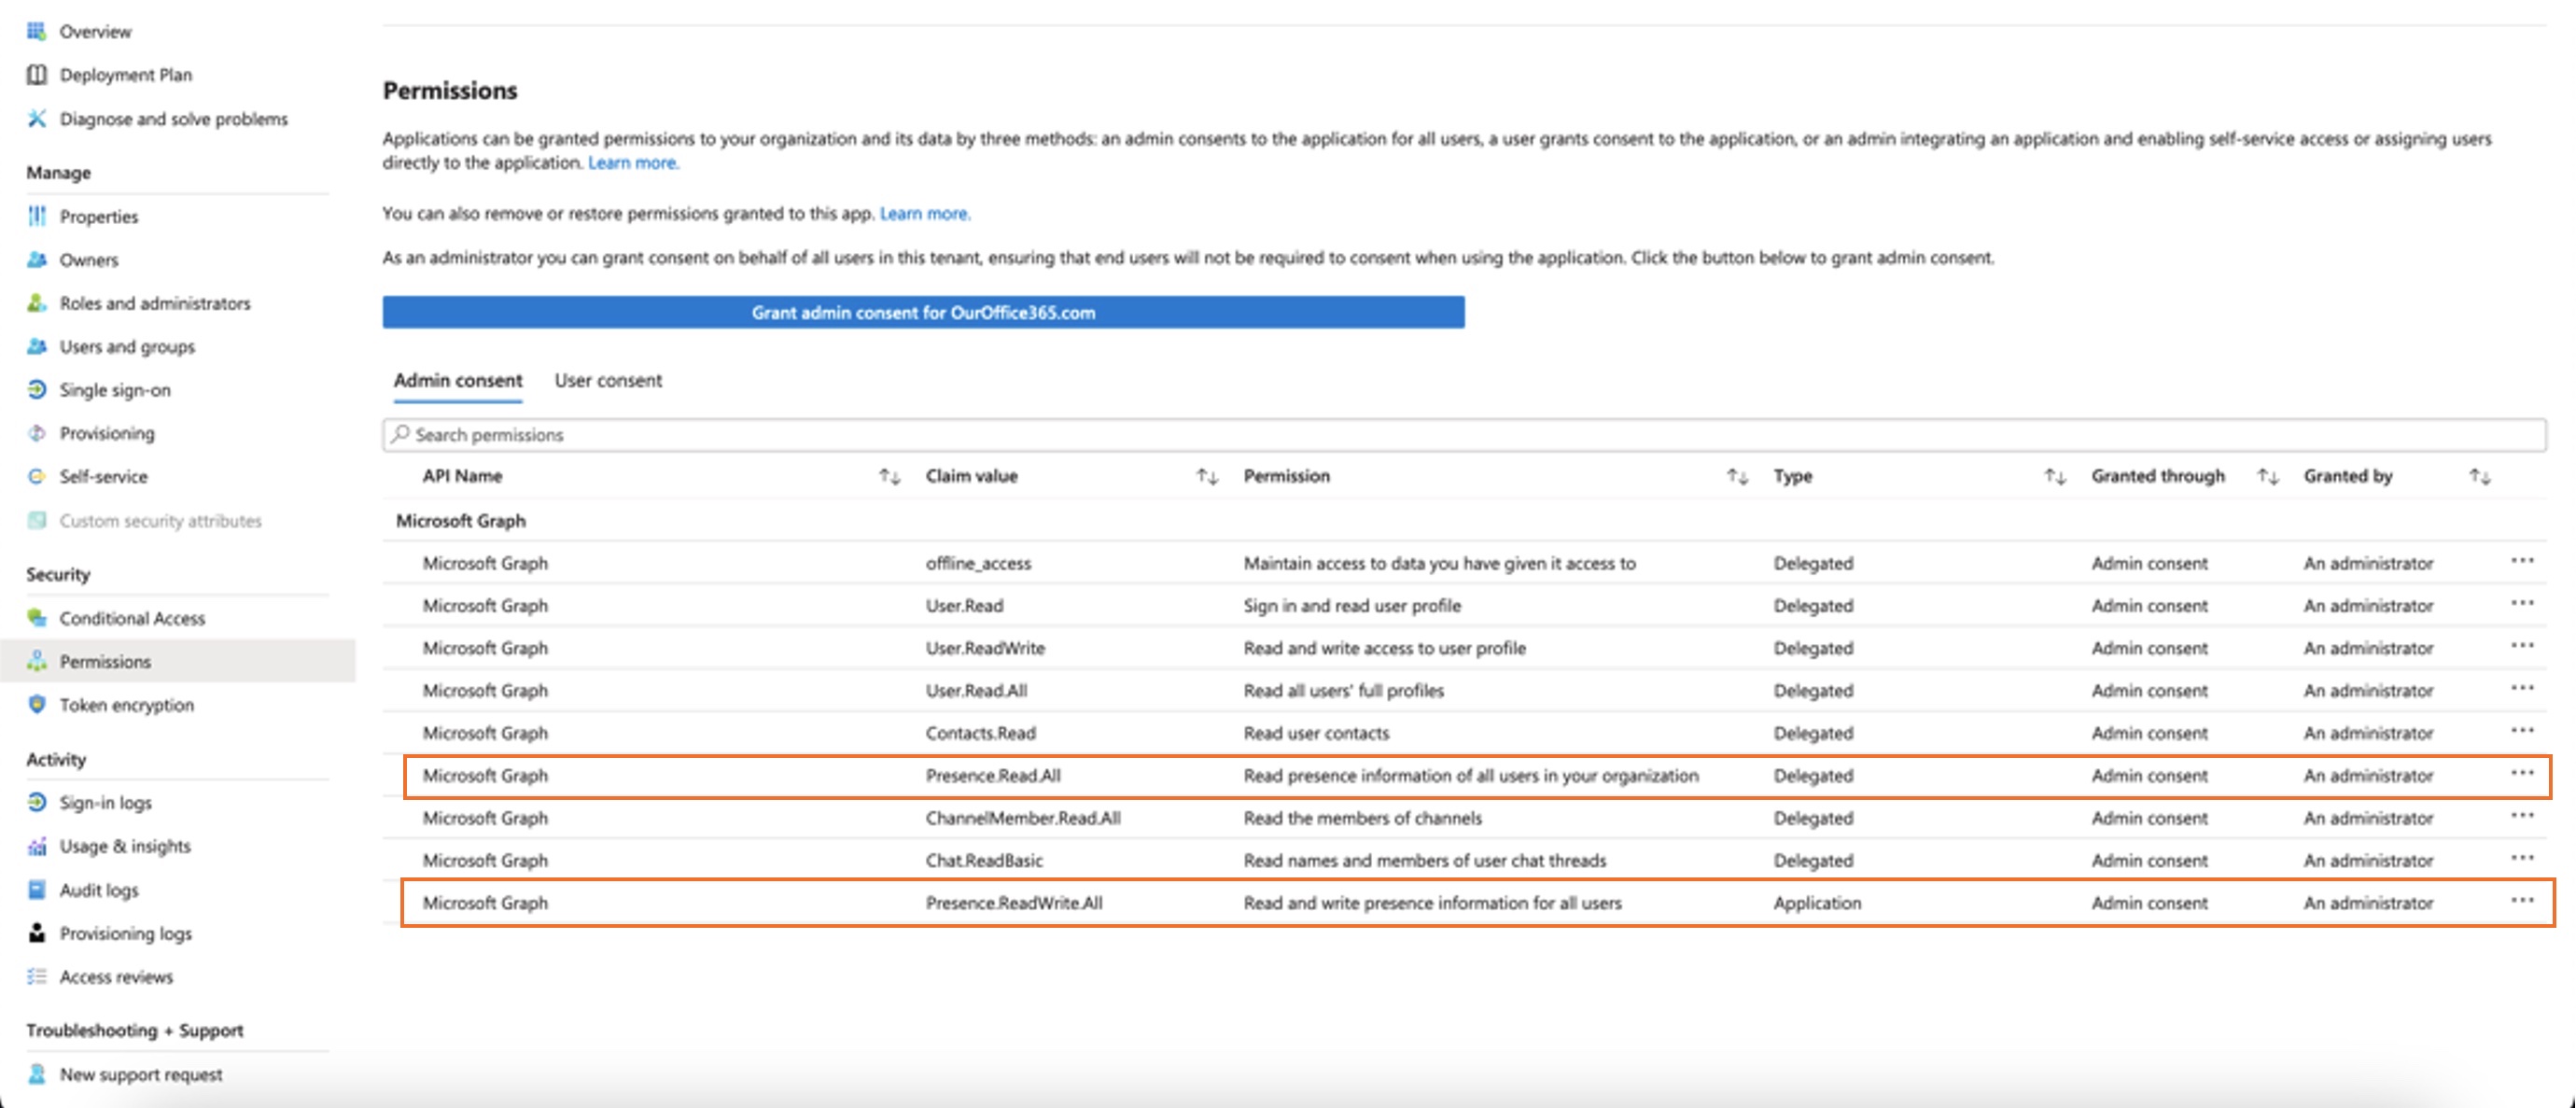
Controleer of de volgende machtigingen zijn inbegrepen.
 |
| 5 |
Klik op Accepteren om de machtigingen te accepteren. |
| 6 |
Zorg ervoor dat nieuwe machtigingen als verleend worden weergegeven:
De volgende machtigingen moeten in de beheerdersinstellingen in acht worden genomen:
Zowel
Als uw organisatie momenteel Als je alleen van Nadat je de machtigingen hebt geverifieerd, schakel je de aanwezigheidssynchronisatie in via de Control Hub. Zie sectie 'Bidirectionele aanwezigheidssynchronisatie inschakelen'. Om problemen met de synchronisatie van de aanwezigheidsstatus tussen Microsoft Teams en Webex te voorkomen, raden we u aan de instelling Toewijzing vereist op Neete zetten. Om de instelling bij te werken, gaat u naar het Microsoft Entry-beheercentrum of de Azure-portal en vervolgens naar en selecteer Nee. Als u deze instelling om welke reden dan ook op 'Ja' moet laten staan, zorg er dan voor dat u de gebruikers correct toewijst volgens de stappen in deze Microsoft-documenten: App-rollen toewijzen aan applicaties & Beheer de toewijzing van gebruikers en groepen aan een applicatie. |
De Cisco Call-app aanpassen
Je kunt de Cisco Call-app voor Microsoft Teams-gebruikers op verschillende manieren aanpassen aan de behoeften van je organisatie. Je kunt een standaardaanpassing van de app maken voor alle gebruikers, of 10 extra aanpassingen van één app maken en deze toewijzen aan specifieke gebruikers of groepen.
Voor meer informatie zie De Cisco Call-app aanpassen voor Microsoft Teams-gebruikers.
Machtigingen voor Cisco Call- en Microsoft Teams-integratie
De integratieservice maakt gebruik van Webex- en Microsoft-API's om toegang te krijgen tot gegevens, zoals een gecentraliseerde gespreksgeschiedenis, voor het weergeven en bijwerken van statussen, bijvoorbeeld het markeren van voicemails als gelezen, zonder gebruikersgegevens op te slaan. Alle gegevensoverdrachten tussen de integratie en de Webex/Microsoft De backends werken via versleutelde HTTPS-kanalen. Daarmee zorgt de dienst ervoor dat gebruikersgegevens niet in de cloud worden opgeslagen, wat de privacy en veiligheid van de gegevens versterkt.
We vragen Microsoft om de minimaal vereiste machtigingen om de Microsoft API aan te roepen, zodat de integratiefunctie kan worden ingeschakeld. De volgende tabel beschrijft elke toestemming die we aanvragen en waarom deze nodig is.
| Toestemming | Reden |
|---|---|
|
offline_access |
Hiermee kan de integratieservice een nieuw toegangstoken genereren zonder dat de gebruiker vaak opnieuw hoeft te autoriseren. |
|
Gebruiker.Lezen |
Hiermee kan de integratieservice basisinformatie van de gebruiker lezen, zoals het e-mailadres. |
|
Gebruiker.LezenSchrijven |
Hiermee kan de integratieservice snelkiesnummers opslaan in gebruikersprofielen. |
|
Gebruiker.Read.All |
Hiermee kan de integratieservice in Active Directory naar gebruikers zoeken om oproepen te plaatsen. |
|
Contacten.Lees |
Hiermee kan de integratieservice de Outlook-contactpersoon van de gebruiker opzoeken om te bellen. |
|
ChannelMember.Read.All |
Hiermee kan de integratieberichtuitbreiding leden van een kanaal uitlezen, zodat de gebruiker naar een specifiek kanaallid kan zoeken om te bellen. |
|
Chat.LeesBasis |
Hiermee kan de integratie-berichtenextensie de leden van een groepschat lezen, zodat de gebruiker naar een specifiek lid kan zoeken om te bellen. |
|
Aanwezigheid.Lees.Alles |
Hiermee kan de integratieservice de aanwezigheidsinformatie van alle gebruikers in de directory uitlezen. |
|
Aanwezigheid.LezenSchrijven.Alles |
Hiermee kan de integratieservice alle aanwezigheidsinformatie lezen en de activiteit en beschikbaarheid van alle gebruikers in de directory vastleggen. |
|
Aanwezigheid.LezenSchrijven |
Hiermee kan de integratieservice de aanwezigheidsinformatie lezen en de activiteit en beschikbaarheid van een gebruiker vastleggen. |
Configuratie van de Control Hub
U kunt de volgende functies in Control Hub configureren en inschakelen om ze beschikbaar te maken voor Microsoft Teams-gebruikers.
Webex-appvenster verbergen
Voor organisaties die ervoor hebben gekozen om de Cisco Call-integratie met Microsoft Teams te gebruiken, is deze integratie de primaire interface voor gebruikers om toegang te krijgen tot Webex-diensten. Na de configuratie blijft de Webex-app geïnstalleerd en actief op de computers van uw gebruikers, maar het venster ervan wordt standaard gesloten. Acties die worden uitgevoerd in de Cisco Call-integratie kunnen specifieke functies in de Webex-app activeren, maar over het algemeen hoeven gebruikers niet met de Webex-app te interageren.
Via Control Hub kunt u het Webex-appvenster op de volgende niveaus verbergen:
-
Organisatieniveau
-
Gebruikersgroepniveau
-
Gebruikersniveau
Het Webex-appvenster voor een organisatie verbergen
De instellingen die op organisatieniveau zijn geconfigureerd, worden automatisch toegepast op alle gebruikers binnen die organisatie.
| 1 | |
| 2 |
Ga naar . |
| 3 |
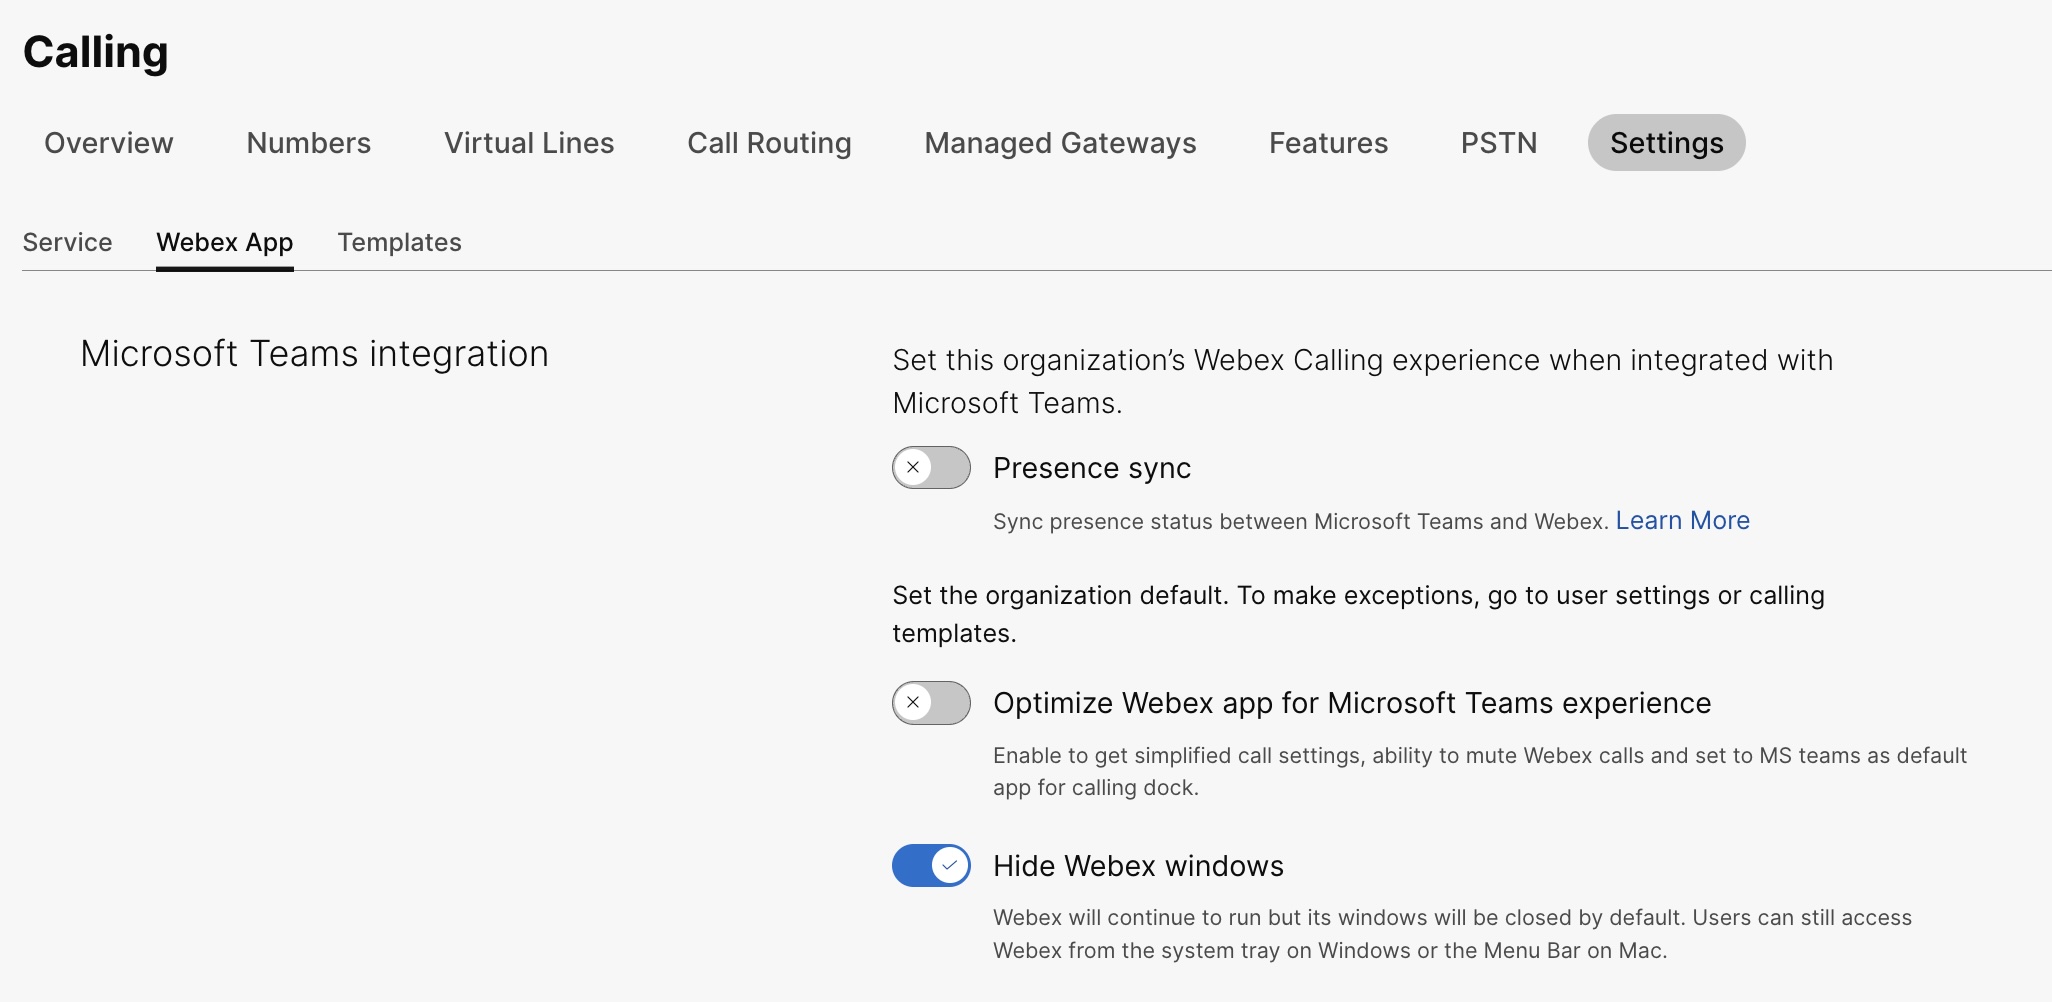
Klik op het tabblad Webex-app, ga naar het gedeelte Microsoft Teams-integratie en schakel Webex-vensters verbergenin.
Je kunt de openbare API ook gebruiken om het Webex-appvenster te verbergen voor alle gebruikers in een organisatie die de Cisco Call-integratie met Microsoft Teams gebruiken. Zie voor meer informatie De MS Teams-instellingen van een organisatie bijwerken op developer.webex.com. |
Het Webex-appvenster verbergen voor een gebruikersgroep
Om het Webex-appvenster voor een gebruikersgroep te verbergen, maakt u een oproepsjabloon aan en wijst u deze toe aan een gebruikersgroep. De configuratie in de sjabloon is van toepassing op alle gebruikers in de groep.
Om een nieuwe sjabloon te maken waarmee het Webex-appvenster wordt verborgen:
| 1 | |
| 2 |
Ga naar . |
| 3 |
Klik op Sjabloon maken, kies Een sjabloon maken en klik op Volgende. Als Onderwijs uw bedrijfssector is, kunt u vooraf gedefinieerde sjablonen toepassen met aangepaste instellingen voor leerlingen of docenten. |
| 4 |
Typ in het gedeelte Algemeen de Sjabloonnaam en Beschrijving. |
| 5 |
Ga naar het gedeelte Microsoft Teams-integratie en schakel Webex-vensters verbergenin. |
| 6 |
Klik op Sjabloon maken en daarna. |
| 7 |
Zoek en selecteer een groep voor deze sjabloon en klik op Klaar. Een sjabloon wijzigen of verwijderen:
Om een sjabloon te wijzigen, klikt u op de sjabloon, wijzigt u de schakelaars en klikt u op Opslaan. Om een sjabloon te verwijderen, klikt u op de sjabloon en kiest u Verwijderen in de vervolgkeuzelijst Acties. Op de pagina Sjabloon verwijderen vinkt u het vakje aan waarmee u wordt geïnformeerd dat het verwijderen van een sjabloon permanent is, en klikt u vervolgens op Verwijderen. |
Aandachtspunten bij het toepassen van oproepsjablonen op een gebruikersgroep
-
Als een gebruiker is geïntegreerde bij een organisatie, neemt de gebruiker de instellingen over van het organisatieniveau.
-
Als de gebruiker aan een gebruikersgroep wordt toegevoegd, zijn de instellingen in het Belsjabloon van toepassing.
-
Als een gebruiker tot meerdere gebruikersgroepen behoort, heeft de sjabloon met de hoogste rang (Rang 1) de hoogste prioriteit en zijn de instellingen van die sjabloon van toepassing.
-
Als een gebruiker individuele gebruikersinstellingen heeft, hebben deze instellingen voorrang op instellingen op gebruikersgroep- of organisatieniveau.
Zie Instellingensjablonen configureren voor meer informatie over het beheren van uw sjablonen.
Je kunt de bestaande sjabloon toepassen vanuit het gedeelte Groep of vanuit het gedeelte Aanroep.
- Om een sjabloon uit de sectie Groep toe te passen, zie Instellingensjabloon configureren.
- Om te solliciteren via de rubriek 'Oproepen', volg je de onderstaande stappen.
| 1 | |
| 2 |
Ga naar . |
| 3 |
Klik op |
| 4 |
Typ de groepsnaam waarop u de sjabloon wilt toepassen en selecteer vervolgens de groep. |
| 5 |
Klik op Gereed. |
Verberg het Webex-appvenster voor een gebruiker.
De individuele gebruikersinstellingen hebben voorrang op de instellingen op organisatie- en gebruikersgroepniveau.
| 1 | |
| 2 |
Ga naar . |
| 3 |
Selecteer een gebruiker en klik op Aanroepen. |
| 4 |
Ga naar Gebruikerservaring bij het bellen en klik op Microsoft Teams-integratie. |
| 5 |
Schakel Webex-vensters verbergenin. 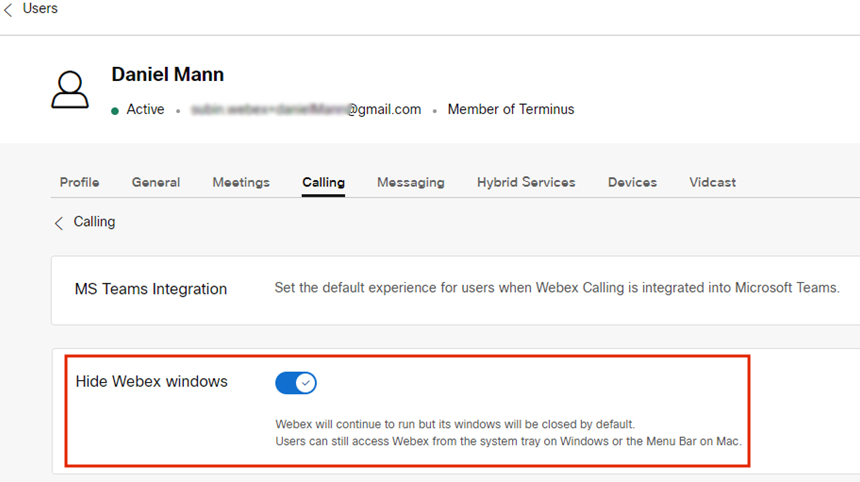 Nadat u de instellingen voor een gebruiker hebt geconfigureerd, kunt u de instellingen op gebruikersniveau verder wijzigen. Gebruikersinstellingen worden niet automatisch teruggezet naar de standaardinstellingen van een organisatie. Je kunt de openbare API gebruiken om het Webex-appvenster voor een individuele gebruiker te verbergen in de Microsoft Teams-client. Zie De MS Teams-instellingen van een persoon configureren en De toepassingsservice-instellingen van een persoon ophalen op developer.webex.com. |
Nadat u de instellingen hebt geconfigureerd, moeten gebruikers hun Webex-app opnieuw opstarten en zich aanmelden om de wijziging te bekijken.
Gebruikers die rechtstreeks met de Webex-app willen werken, kunnen deze openen via het systeemvak op Windows en de menubalk op Mac. De Webex-app is alleen zichtbaar in de Windows-taakbalk of het macOS-dock wanneer een venster actief is en in gebruik.
|
Webex-app in het systeemvak van Windows |
Webex-app in de menubalk van de Mac |
Het oproepen van het dockvenster inschakelen
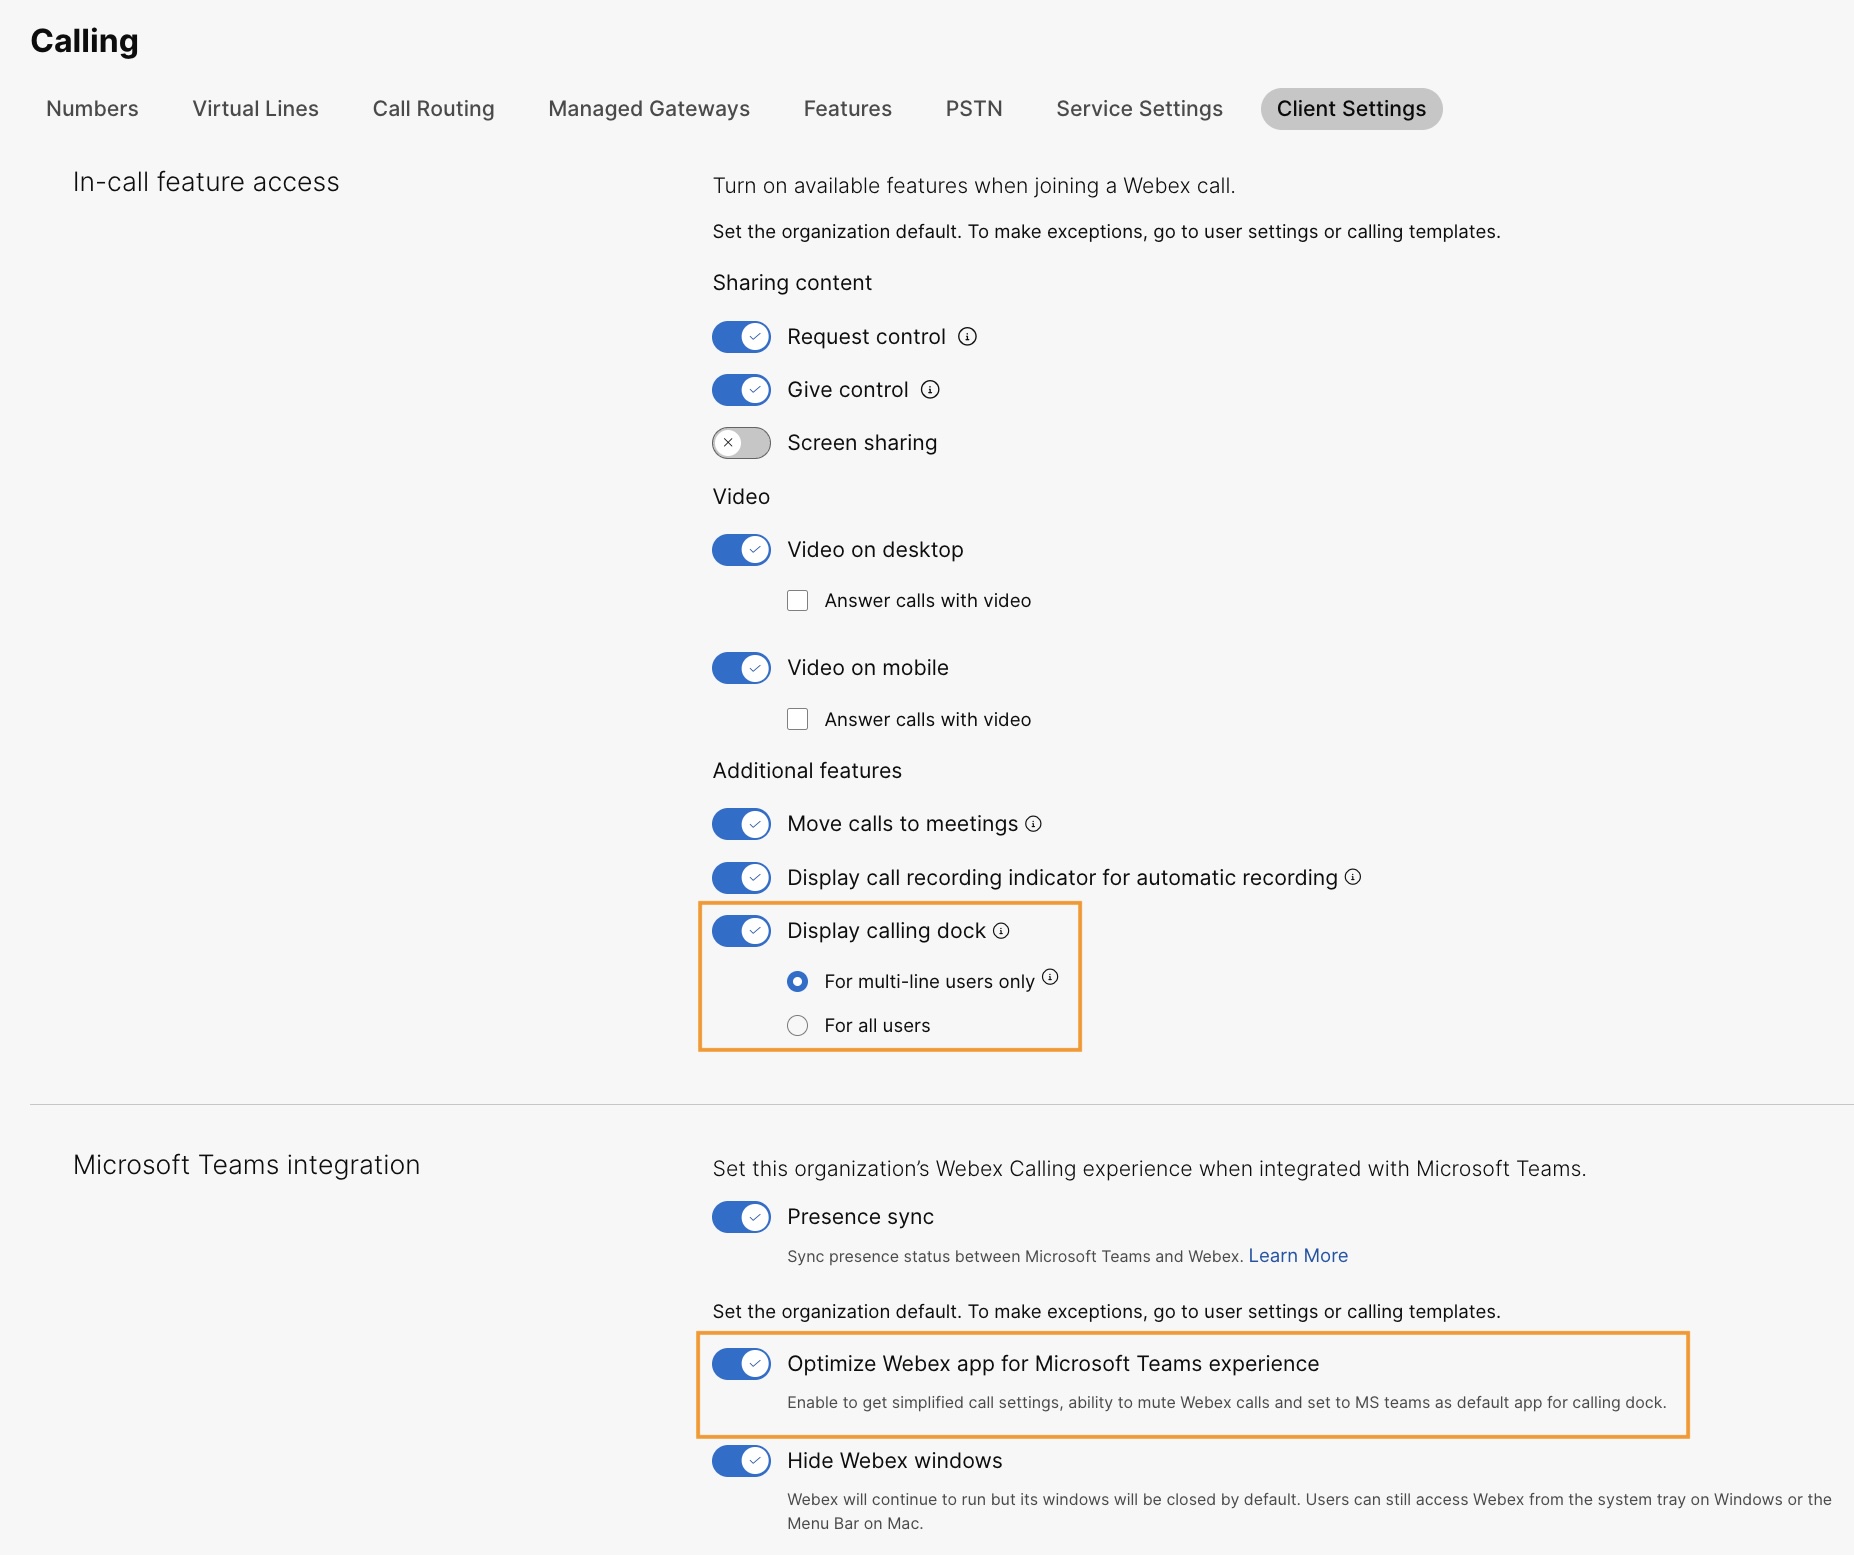
Het belvenster (voor meerdere gesprekken) is een apart, zwevend venster waarmee gebruikers meerdere of gedeelde lijnen in één venster kunnen beheren. Gebruikers kunnen bellen en gebeld worden, de status van alle lijnen bekijken en hebben betere toegang tot functies zoals in de wacht zetten, doorverbinden en meeluisteren, zonder naar een ander venster te hoeven overschakelen.
| 1 | |
| 2 |
Ga naar . |
| 3 |
Klik op het tabblad Webex-app, ga naar het gedeelte Toegang tot functies tijdens een gesprek en schakel onder Aanvullende functiesGespreksdock weergeven in en kies een van de volgende opties:
Je kunt deze functie ook configureren op gebruikersgroepniveau en op gebruikersniveau.
|
Optimaliseer de Webex-app voor een optimale Microsoft Teams-ervaring.
Deze functie biedt gebruikers de volgende ervaringen:
-
Vereenvoudigde gespreksinstellingen: de gespreksinstellingen tonen alleen de opties die nodig zijn voor de integratie. Door deze functie in te schakelen worden alleen de belinstellingen vereenvoudigd die toegankelijk zijn via het belmenu. De gespreksinstellingen die toegankelijk zijn via de Cisco Call-integratie blijven standaard vereenvoudigd.
-
Cisco-gesprekken dempen: Inkomende Cisco-gesprekken worden gedempt wanneer een gebruiker deelneemt aan een Microsoft Teams-gesprek of -vergadering. Om deze functie te laten werken, moet u deze inschakelen in Control Hub en moet de gebruiker de optie Alleen meldingen dempen wanneer ik in een vergadering of tijdens een gesprek ben inschakelen in de gespreksinstellingen van Cisco Call Integration.
Als u deze functie in Control Hub uitschakelt, werken de gebruikersinstellingen alleen wanneer de gebruiker deelneemt aan een Cisco-gesprek of -vergadering. Als u deze functie inschakelt, werken de gebruikersinstellingen wanneer de gebruiker deelneemt aan een Microsoft Teams-gesprek of -vergadering, of aan een Cisco-gesprek of -vergadering.
-
Eén app-ervaring: wanneer een gebruiker op de pictogrammen voor voicemail en gecentraliseerde gespreksgeschiedenis in het belmenu klikt, wordt hij of zij doorgestuurd naar Microsoft Teams Cisco Call in plaats van de Webex-app.
Voor Windows-gebruikers: Als je op de Webex-app in het systeemvak klikt, wordt het beldock geopend in plaats van de Webex-app zelf.
| 1 | |
| 2 |
Ga naar . |
| 3 |
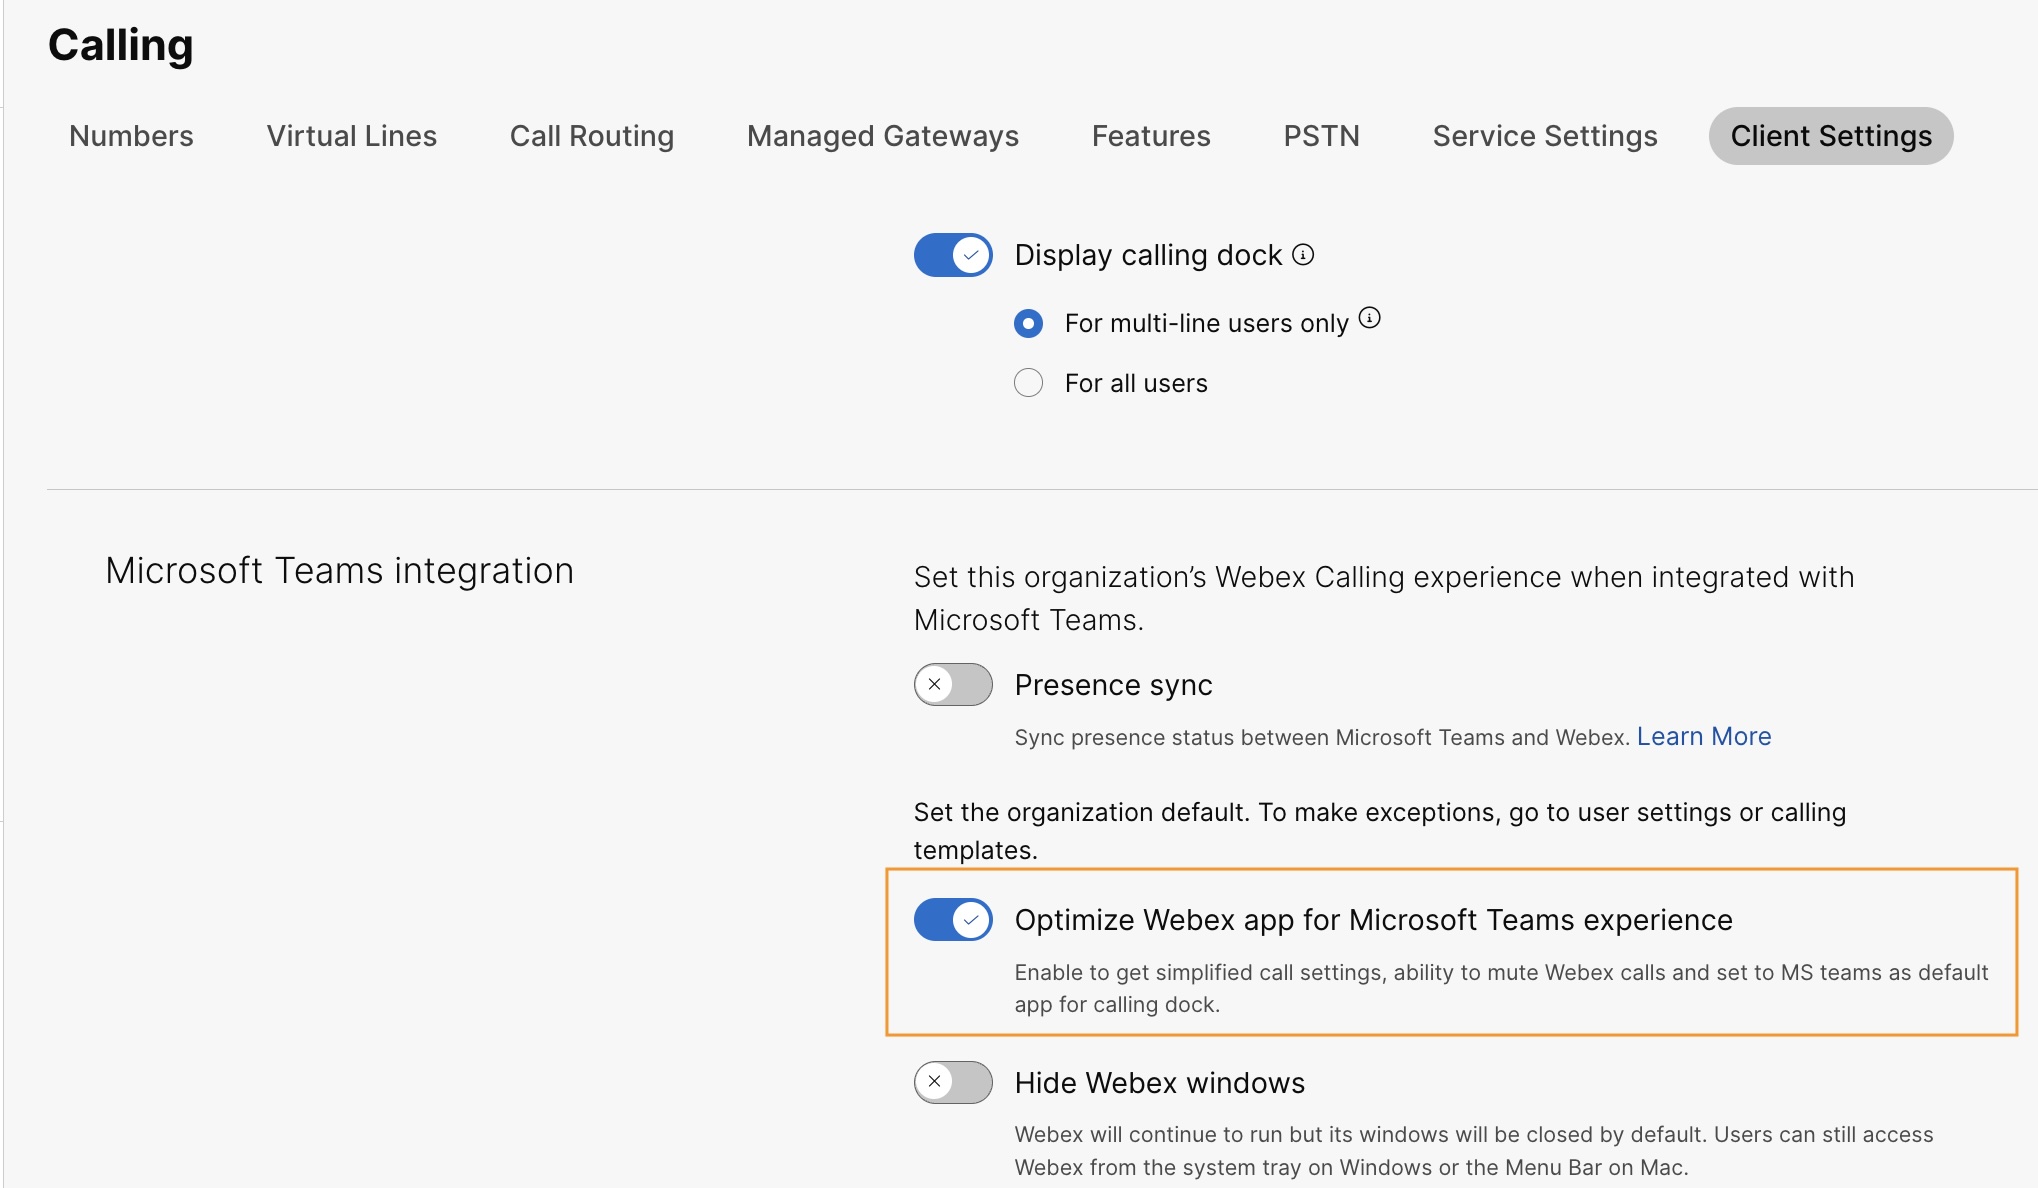
Klik op het tabblad Webex-app, ga naar het gedeelte Microsoft Teams-integratie en schakel Optimaliseer de Webex-app voor de Microsoft Teams-ervaringin.
Deze schakelaar is uitgeschakeld als u de schakelaar Display calling dock onder het gedeelte In-call feature access niet hebt ingeschakeld. Je kunt deze functie ook configureren op gebruikersgroepniveau en op gebruikersniveau.
|
Schakel voicemail, gecentraliseerde gespreksgeschiedenis en aanwezigheidssynchronisatie in.
Voicemail en gecentraliseerde gespreksgeschiedenis
De voicemail- en gecentraliseerde gespreksgeschiedenisfuncties zijn standaard ingeschakeld voor Webex Calling-, Dedicated Instance- en UCM Cloud-klanten.
Voor meer informatie over het inschakelen van voicemail voor Webex Calling-gebruikers, zie: Configureer en beheer de voicemailinstellingen voor een Webex Calling-gebruiker.
Voor meer informatie over het inschakelen van voicemail voor BroadWorks-gebruikers, zie Voicemail inschakelen voor Microsoft Teams-integratie.
BroadWorks-beheerders moeten de uniforme, gecentraliseerde gespreksgeschiedenis inschakelen om ervoor te zorgen dat deze functie correct werkt. Zie De configuratiehandleiding van Webex voor Cisco BroadWorks voor meer informatie.
Bidirectionele aanwezigheidssynchronisatie
Deze functie maakt bidirectionele synchronisatie van de aanwezigheidsstatus tussen Microsoft Teams en Webex mogelijk, en ondersteunt meerdere Microsoft Teams-tenants binnen dezelfde Webex-organisatie. De aanwezigheidsstatus omvat In gesprek, In een vergadering, Aan het presenteren, en Niet storen.
Nadat deze functie is ingeschakeld, wordt de Microsoft Teams-status van een gebruiker gewijzigd in In een gesprekwanneer een gebruiker een Webex-gesprek voert of ontvangt. Wanneer ze Niet storen inschakelen in de Webex-app of op een Webex-apparaat, wordt de status automatisch gesynchroniseerd met Microsoft Teams. Op dezelfde manier worden de statussen In een vergadering en Presenteren gesynchroniseerd tussen applicaties.
Wanneer Niet storen is ingeschakeld in de Webex-app van de gebruiker of op een Webex-apparaat, ontvangt de gebruiker geen meldingen van inkomende oproepen en berichten in de Webex-app, op het Webex-apparaat of in Microsoft Teams.
Je kunt ook de openbare API gebruiken om de aanwezigheidsstatus van Webex te synchroniseren met de Microsoft Teams-client. Zie voor meer informatie De MS Teams-instellingen van een organisatie bijwerken op developer.webex.com.
De volgende tabel toont de weergave van de bidirectionele statussynchronisatie tussen Webex en Microsoft Teams.
|
Webex-status |
Status van Microsoft Teams |
|---|---|
|
|
|
|
|
|
|
|
|
|
|
|
Momenteel kunt u deze functie alleen op organisatieniveau configureren.
| 1 | |
| 2 |
Ga naar . |
| 3 |
Klik op het tabblad Webex-app, ga naar het gedeelte Microsoft Teams-integratie en schakel Aanwezigheidssynchronisatiein. Voor de beste ervaring kunt u de schakelaar Webex-vensters verbergen inschakelen, maar dit is optioneel. |
| 4 |
Ga naar het gedeelte Niet storen (DND) Statussynchronisatie en schakel de schakelaar in. 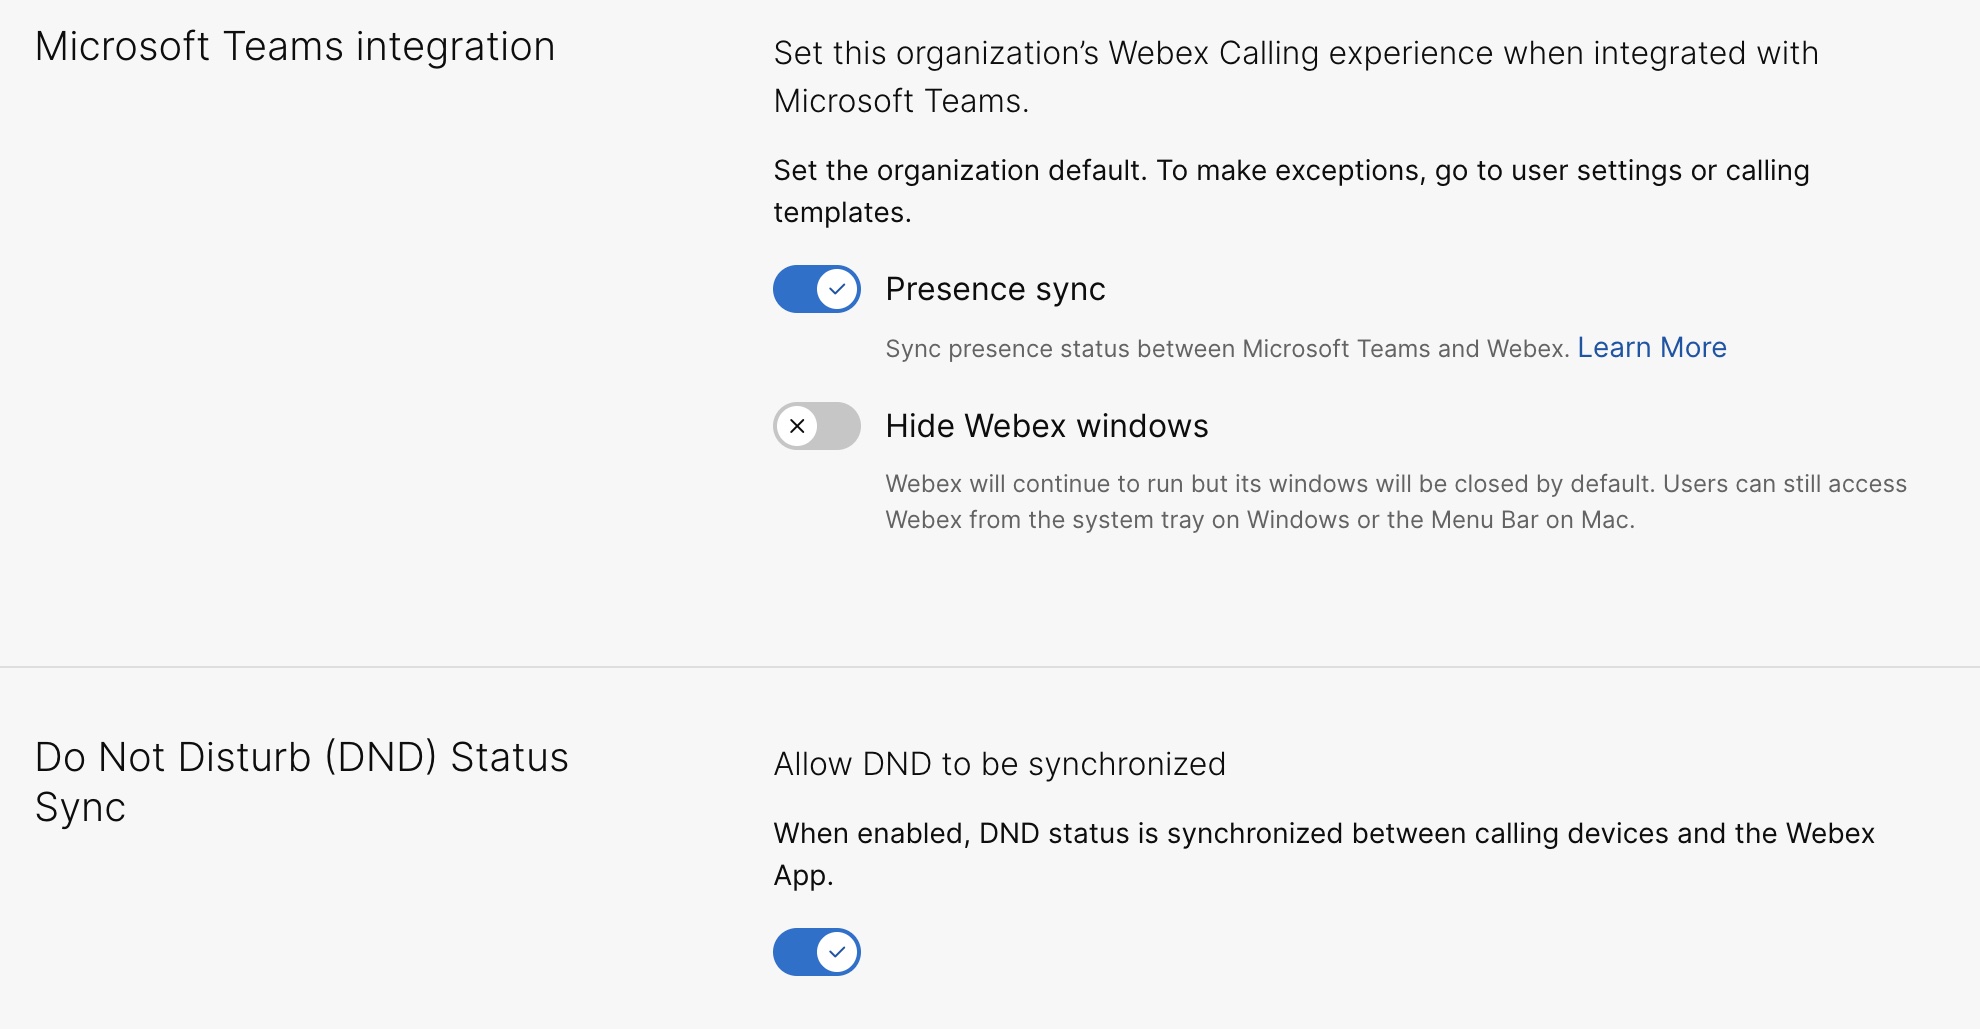 |
Aanvullende configuratie voor Unified CM-gebruikers
Om voicemail, gecentraliseerde gespreksgeschiedenis en bidirectionele aanwezigheidssynchronisatie in te schakelen voor Unified CM-klanten die on-premise werken, voert u de volgende stappen uit:
De activering van de voicemailservice voor klanten met een on-premise oplossing duurt maximaal 12 uur.
| 1 | |||||
| 2 |
Ga naar . Klik op de kaart UC-beheer op Inventaris. De lijst met clustergroepen wordt weergegeven met de beschrijving, status, clusters en knooppunten. | ||||
| 3 |
Voer de volgende acties uit:
De pagina Inventaris wordt weergegeven met de lijst met clusters die bij de geselecteerde clustergroep horen. | ||||
| 4 |
Klik op Details naast het cluster waartoe het specifieke productknooppunt behoort. De naam van het knooppunt met de versie, het product en de status wordt weergegeven. | ||||
| 5 |
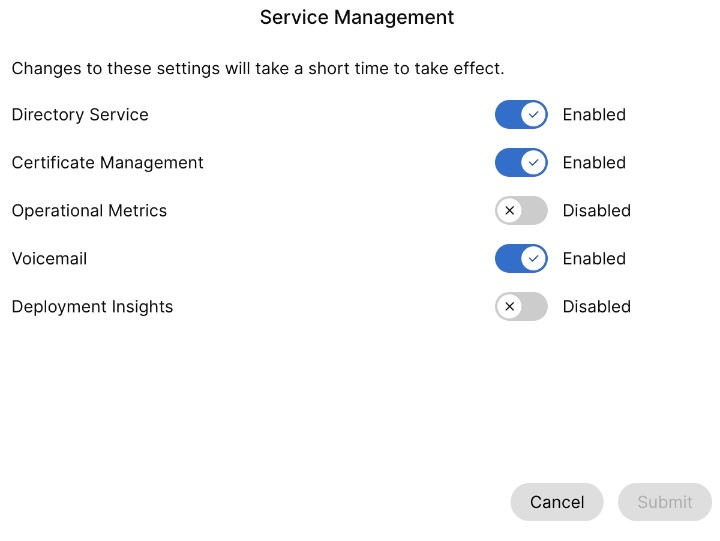
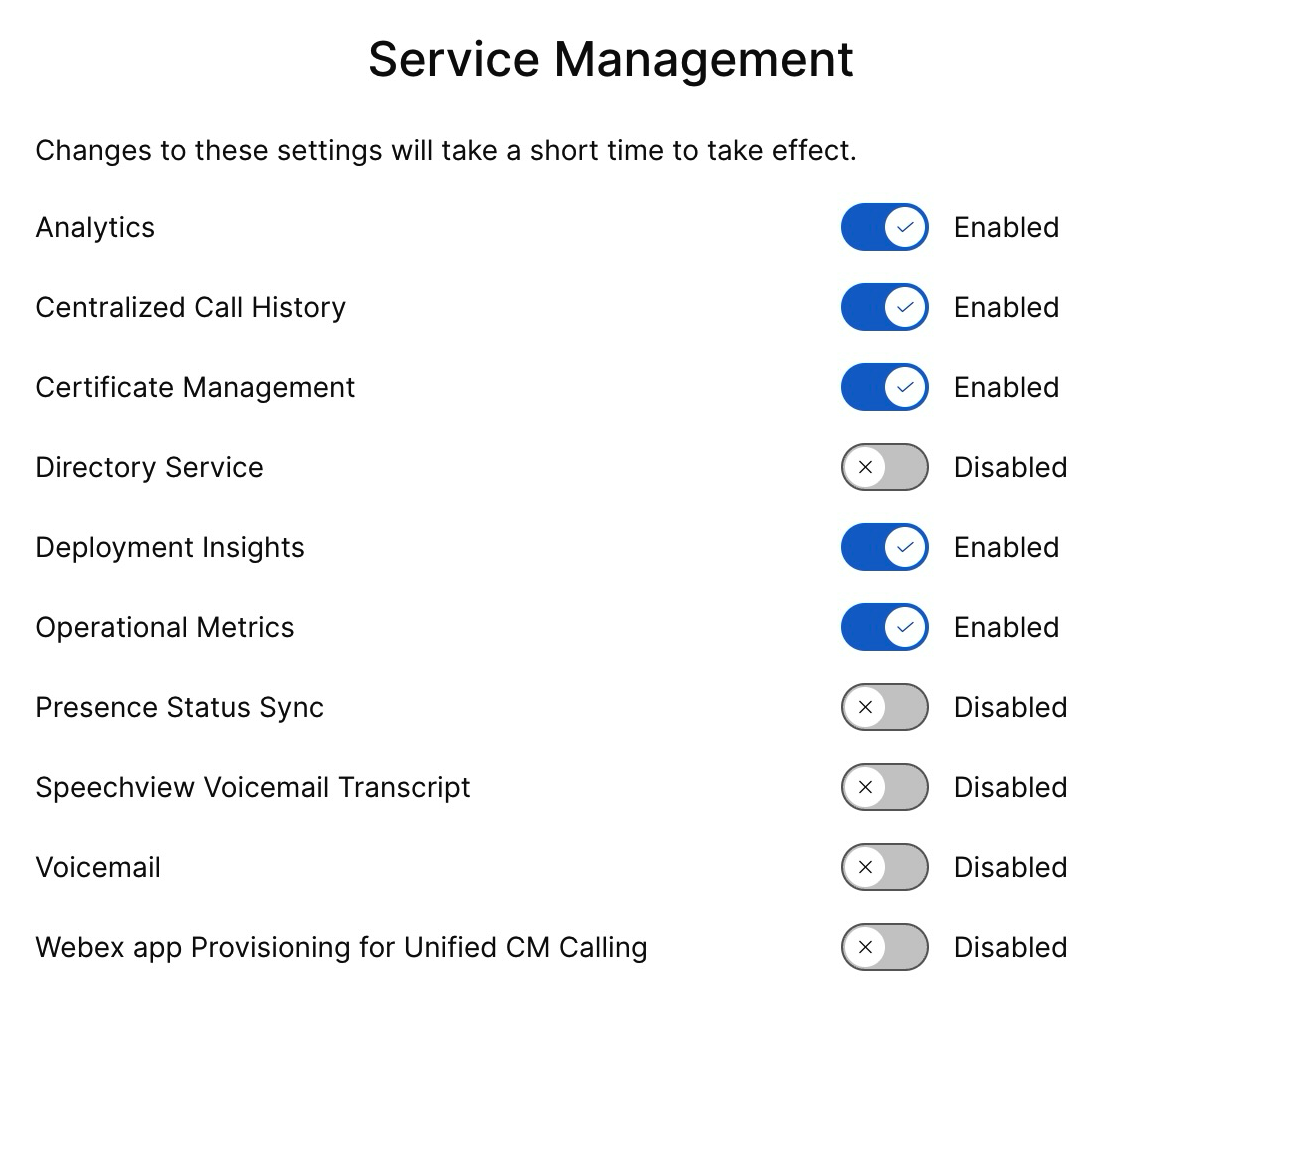
Klik op het ellipsvormige ⋮-pictogram naast Evenementgeschiedenis en kies Servicebeheer. De pagina Servicebeheer wordt weergegeven met de lijst met services. | ||||
| 6 |
Gebruik de schakelaar om de synchronisatievan de voicemail , de gecentraliseerde gespreksgeschiedenis en de aanwezigheidsstatus in te schakelen.
| ||||
| 7 |
Klik op Verzenden. | ||||
| 8 |
Als het pop-upvenster Gegevensverzameling Bevestiging wordt weergegeven, ga hiermee akkoord door het selectievakje in te schakelen en klik op Verzenden. |

 naast een bestaande sjabloon en klik op