- 主页
- /
- 文章

感谢您的反馈。

管理自动话务员
 在此文章中
在此文章中 反馈?
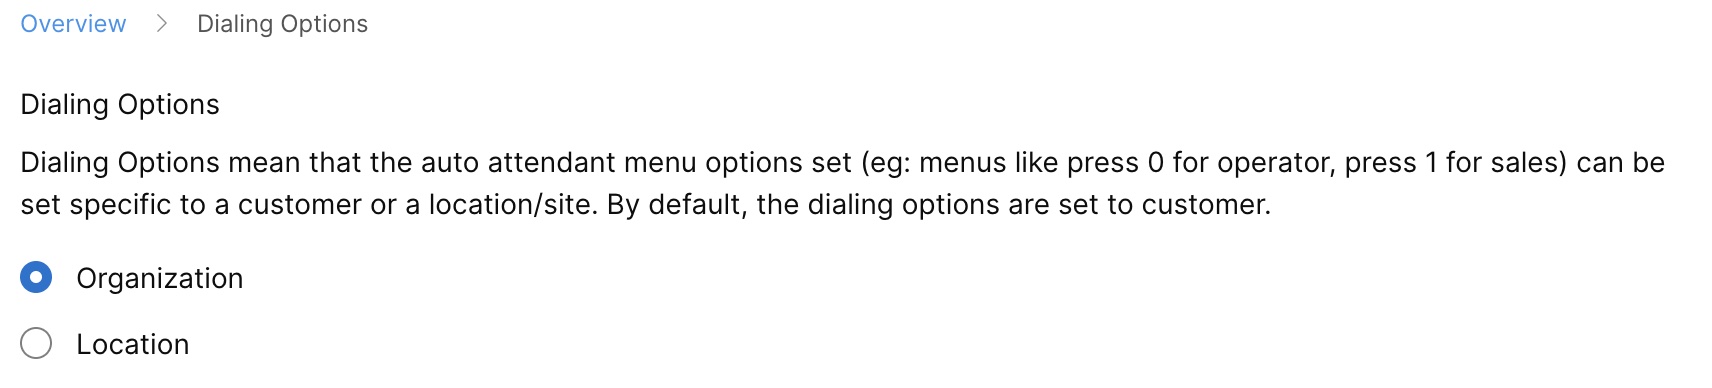
反馈?设置自动话务员来接听来电,并提供菜单选项,以便将呼叫者引导至正确的人员、搜索组或语音信箱,而无需接待员的帮助。
An auto attendant is an automated system that allows you to offer 24/7 call handling. The system answers the incoming calls and routes the callers to an answering service, a live person, or voicemail without the intervention of an operator or receptionist. With this feature, you can ensure efficient call handling and callers' needs are met.
Here are some of the key features of an auto attendant:
-
Create business hours schedules during which your auto attendant operates.
-
Create after hours, holiday, or any special closure schedules during which your holiday auto attendant operates.
-
Provide dialing menu options to direct your customers where they need to go when they enter a specific number.
-
Customize greetings to address your caller’s needs.
新建自动助理
| 1 | |
| 2 |
Go to . |
| 3 |
Go to the Auto Attendant card and click Add New .
|
| 4 |
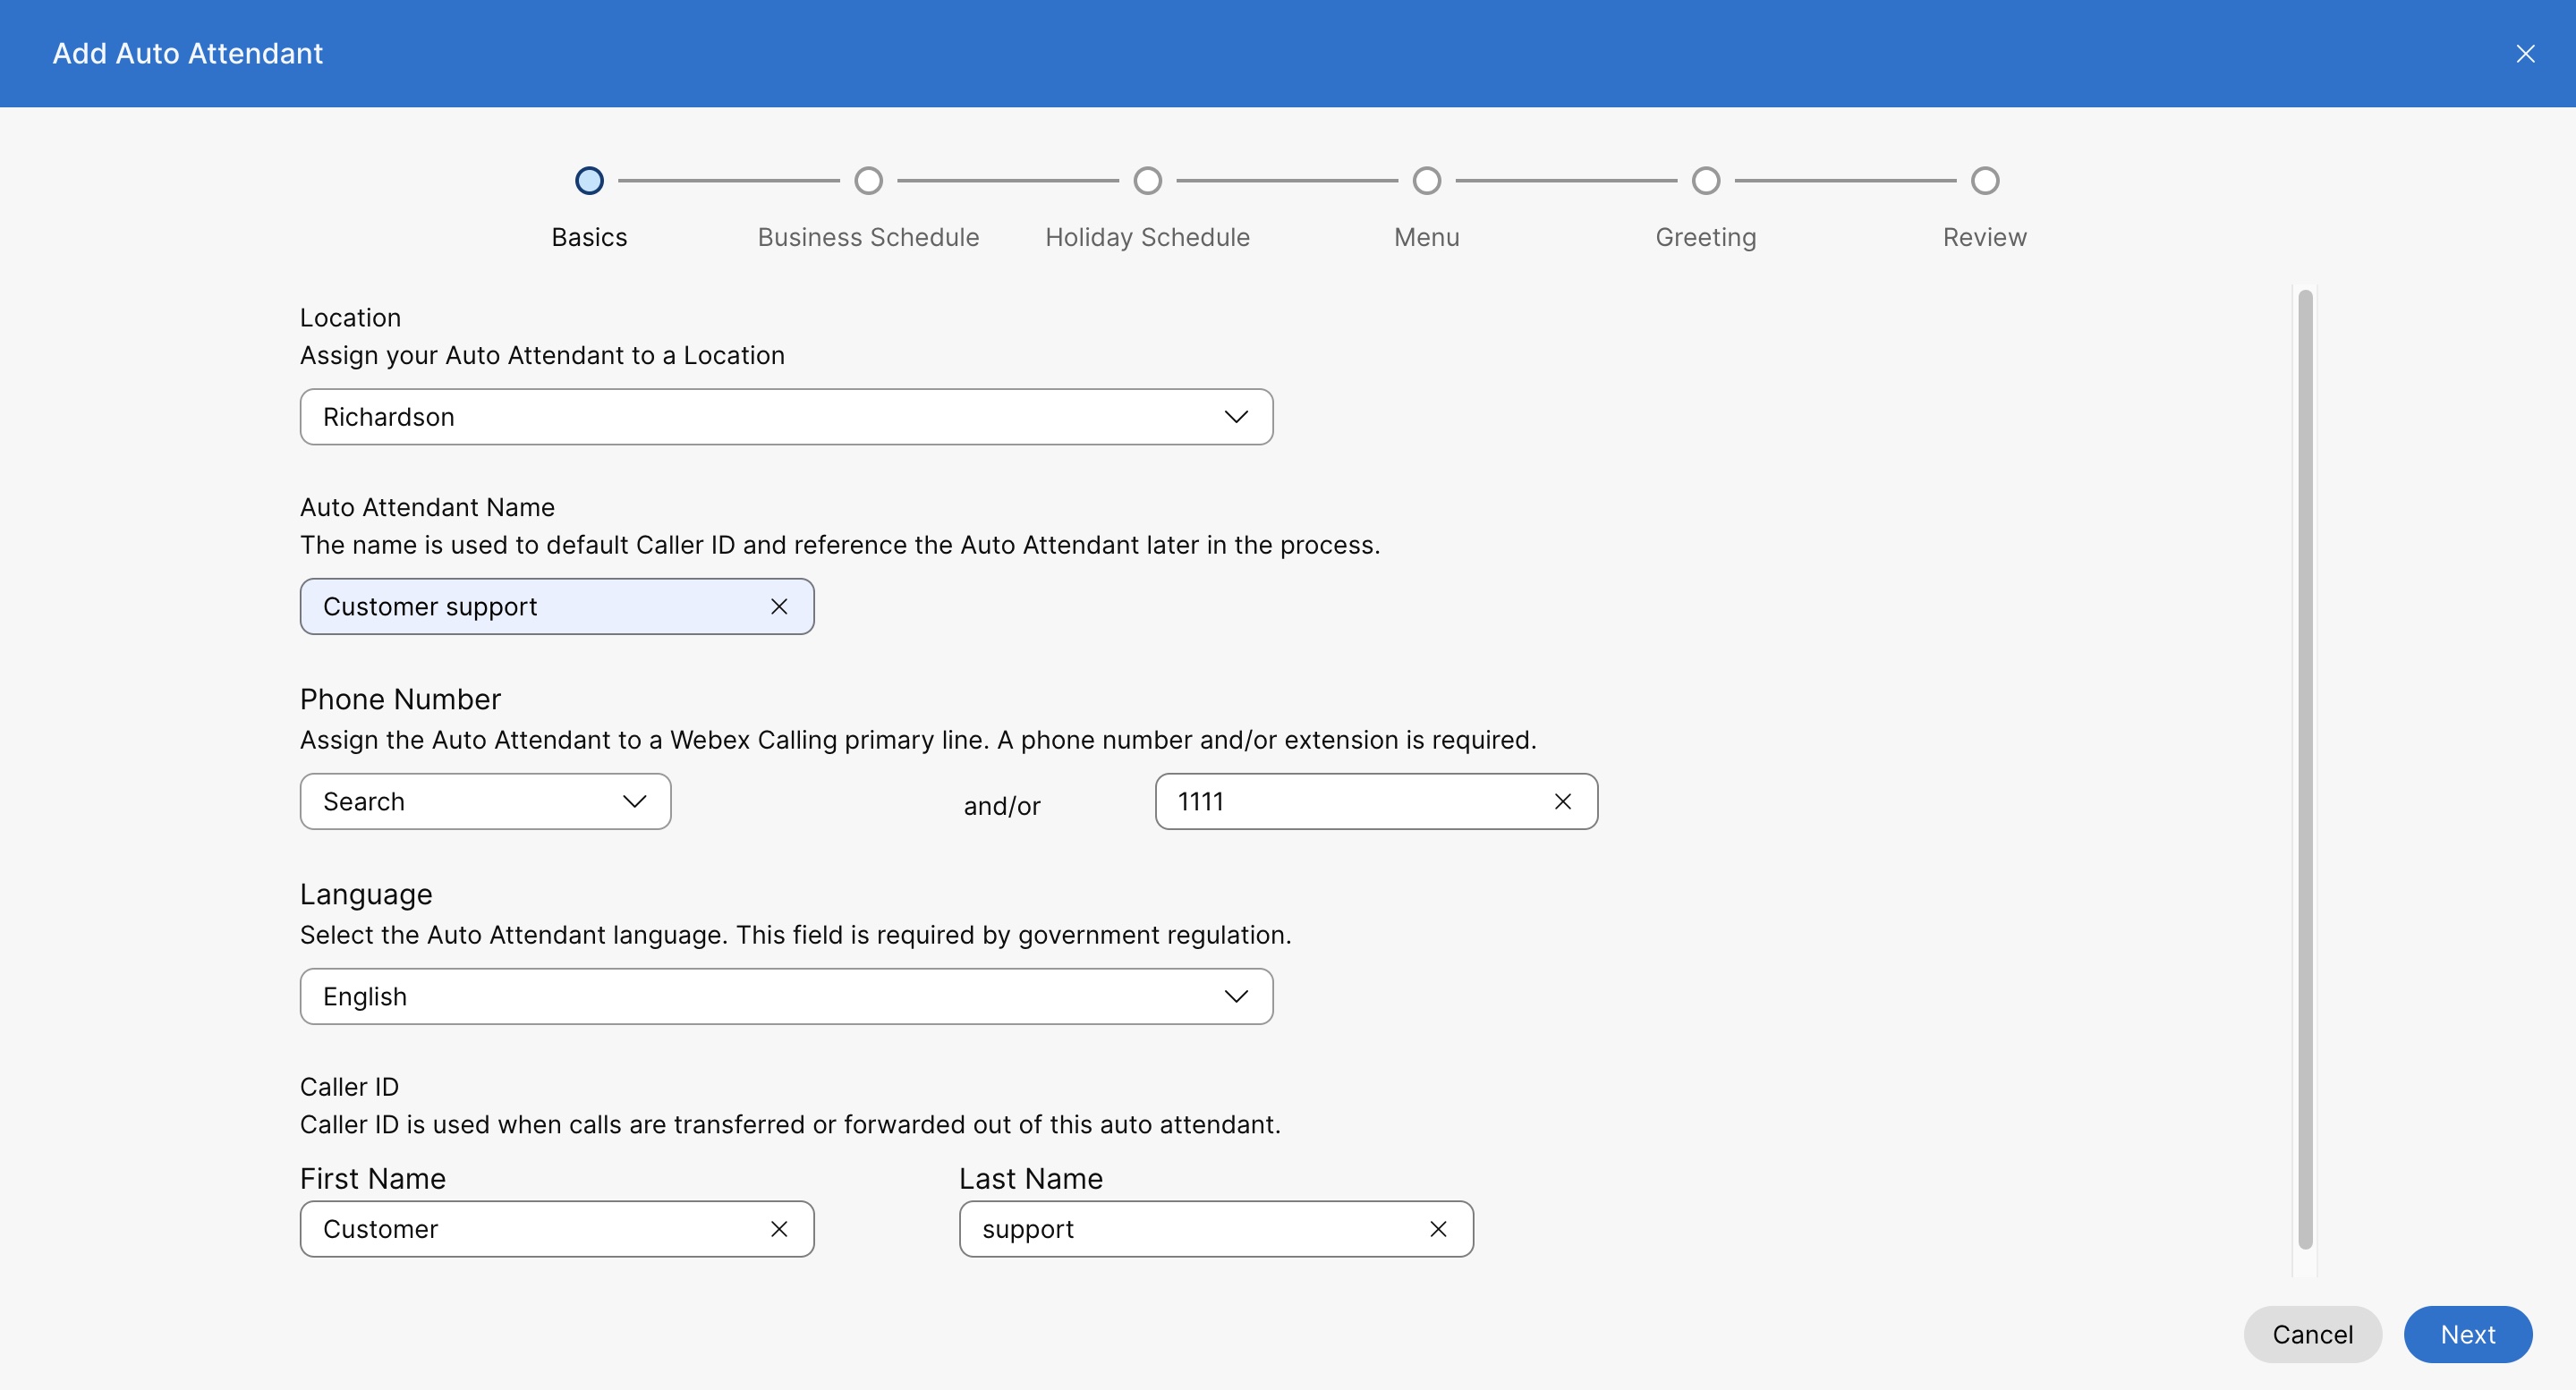
Select a Location from the drop-down menu. Once the auto attendant is created, you can't change the location later. A location is a container with a location-specific calling configuration. 请参阅配置组织 Cisco Webex Calling 获取更多信息。 在配置自动助理时,您可以为各个位置或组织预配置自动与会者的数量。 |
| 5 |
Auto Attendant Name—Enter a name for the auto attendant. |
| 6 |
Phone Number and Extension—Assign a primary phone number and an extension to the auto attendant. If you leave the extension field blank, the system automatically assigns the last four digits of the phone number as an extension for this auto attendant. To modify it, see Edit auto attendant phone numbers section. |
| 7 |
Enter Caller ID First Name and Last Name. The Caller ID is used for calls that are forwarded outside of this auto attendant. For customers in the Asia-Pacific region, the Caller ID Name field is auto-populated with the username. 您无法修改主叫号码的名称字段。 |
| 8 |
Language—Select a language from the drop-down menu. The selected language is used for default voice greetings and other voice prompts based on menu settings. |
| 9 |
单击下一步。 |
| 10 |
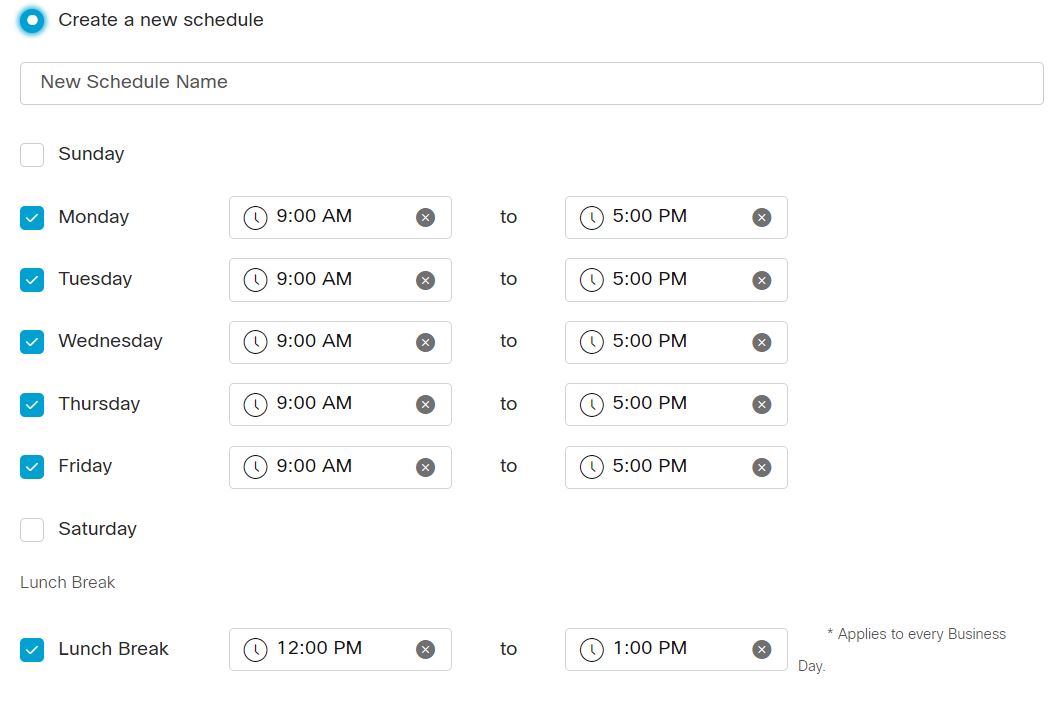
On the Business Hours Schedule page, set the hours during which your business hours auto attendant operates. You can choose an existing schedule from the drop-down, or create a new schedule. 单击下一步。 The existing schedule drop-down displays all the business hours schedules that you created for the location. To create a new schedule for location, see Create a schedule. |
| 11 |
On the Holiday Schedule page, set the days during which your holiday auto attendant operates. You can choose an existing schedule from the drop-down, or create a new schedule. 单击下一步。 The existing schedule drop-down displays all the holiday schedules that you created for the location. To create a new schedule for location, see Create a schedule. |
| 12 |
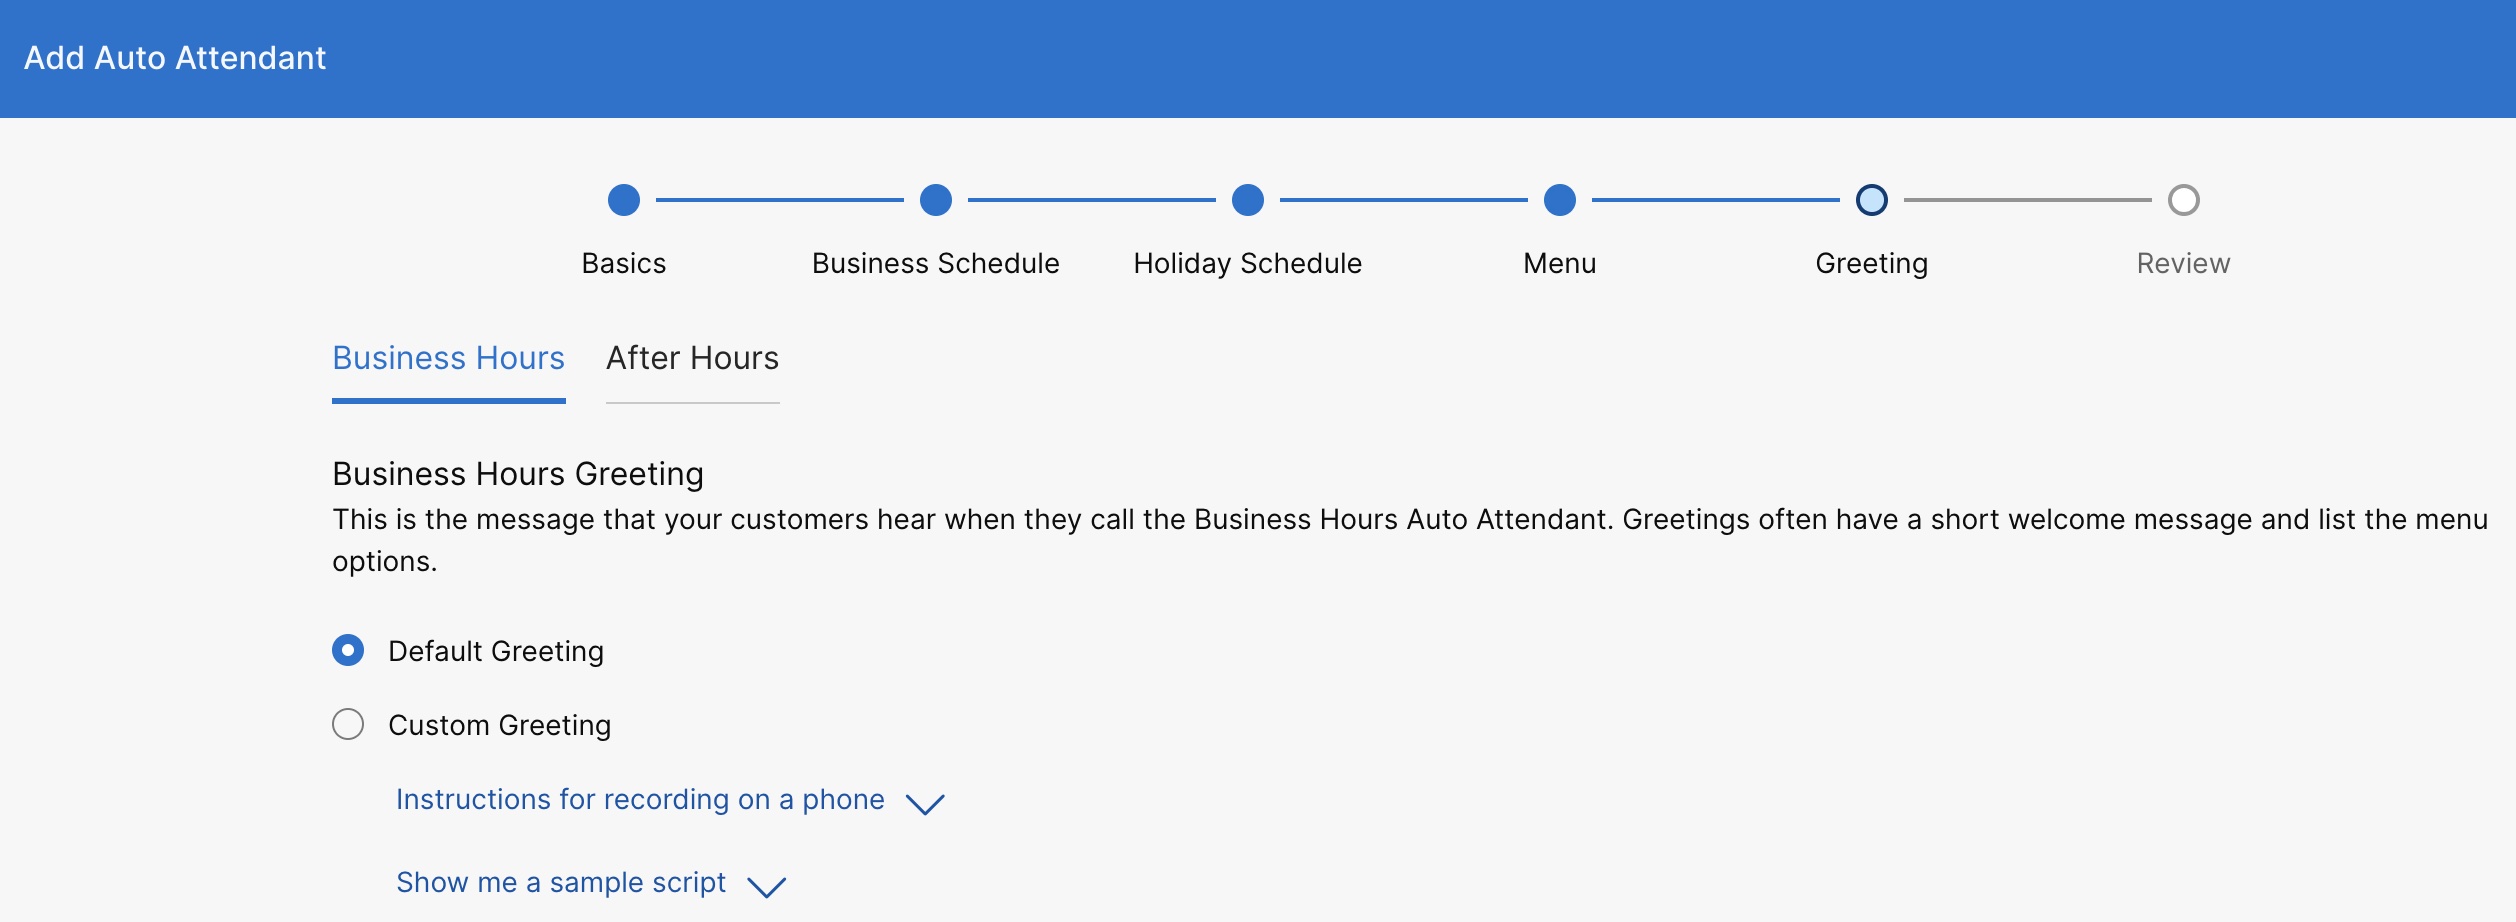
On the Greeting page, set the greetings or announcement that's played for both business hours and after hours. Under both the Business Hours and After Hours tabs, you can choose to play the default greeting or you can choose a custom greeting to upload an audio recording, or record your own greeting. 单击下一步。
您可以单击电话录音说明和展示示例脚本,获得更多有关电话录音说明和问候语示例脚本的内容。To record by phone, first you need to set up your voice portal number and passcode for the location this auto attendant is associated with. For details, see Configure voice portals for Webex Calling. |
| 13 |
在查看页面,在各标签页下,查看新的自动助理设置以确保所有设置正确。Click Create to save. |
禁用自动助理
编辑自动助理常规设置
| 1 | |
| 2 |
Go to . |
| 3 |
Go to the Auto Attendant card and click Manage. |
| 4 |
Select an auto attendant. |
| 5 |
Go to Overview section and click General Settings. |
| 6 |
View or edit the Language from the Language drop-down. |
| 7 |
从时区下拉列表中查看或编辑时区。 |
| 8 |
View or edit the Caller ID which is used when calls are transferred out of this auto attendant. |
| 9 |
单击保存。 |
编辑自动助理电话号码
You can change your auto attendant phone numbers and add up to 10 alternate numbers.
| 1 | |
| 2 |
Go to . |
| 3 |
Go to the Auto Attendant card and click Manage. |
| 4 |
Select an auto attendant. |
| 5 |
Go to Overview section and click Phone numbers. |
| 6 |
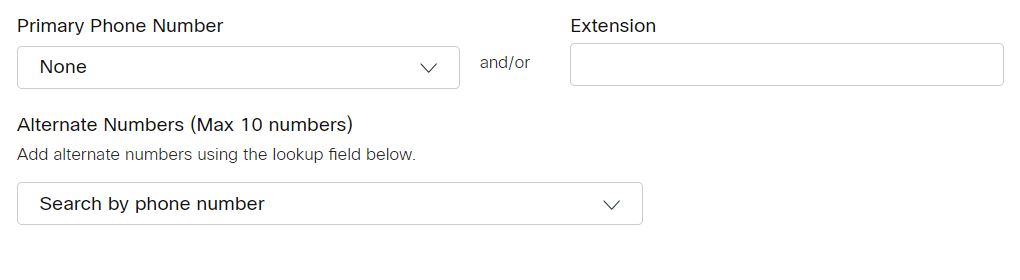
Edit the Primary Phone Number and Extension. If you've left the extension field blank when creating the auto attendant, the system automatically assigns the last four digits of the phone number as an extension for this auto attendant. |
| 7 |
Search and add Alternate Numbers. |
| 8 |
单击保存。
|
Configure auto attendant call forwarding
You can forward all incoming calls based on a set of criteria that you define.
| 1 | |
| 2 |
Go to . |
| 3 |
Go to the Auto Attendant card and click Manage. |
| 4 |
Select an auto attendant. |
| 5 |
Go to Overview section and click Call Forwarding. |
| 6 |
Turn on the Call Forwarding toggle. |
| 7 |
选择以下选项之一:
If you choose Selectively Forward Calls, you need to have at least one rule for call forwarding to be active.
|
| 8 |
If you choose Always Forward Calls, choose a number click Save. When choosing Always Forward or Selectively Forward, select Send to Voicemail to forward all calls to an internal voicemail. The Send to Voicemail option is disabled when you enter an external number. A virtual line number can also be added as a number to forward the calls to. |
| 9 |
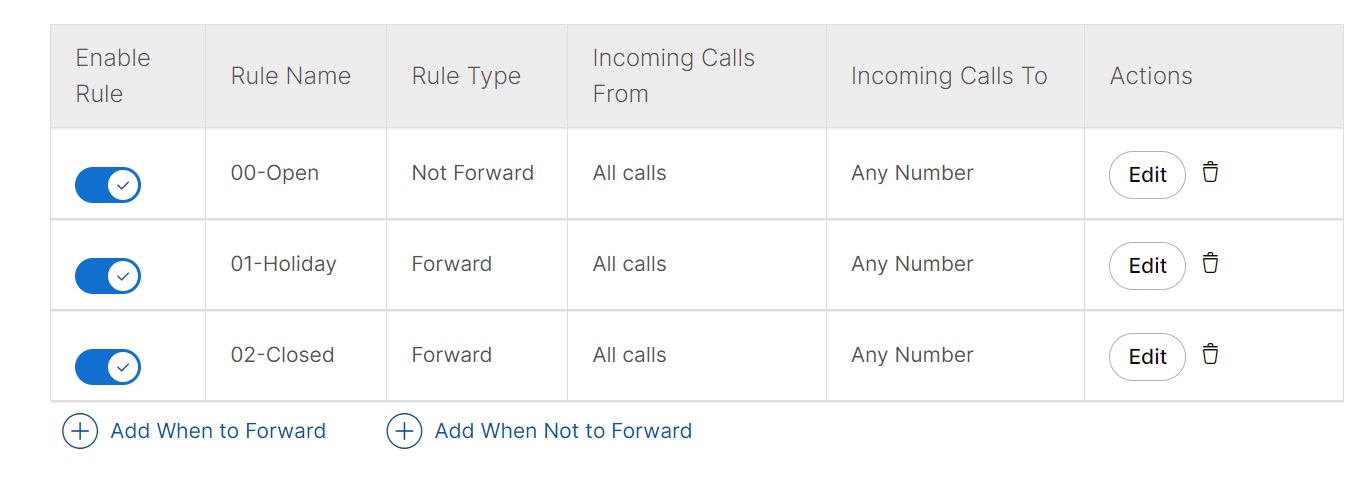
如果您选择选择性转发,则通过单击添加时间以转发或添加不转发时间来创建规则。 On provisioning the Selectively Forward Calls option, the Add When Not to Forward rule takes precedence over the Add When to Forward rule. |
| 10 |
Enter a Rule Name. |
| 11 |
For When to Forward or When Not to Forward, select a Business Hours Schedule and Holiday Schedule from the drop-down. |
| 12 |
For Forward To, choose a Default Phone Number or Different Phone Number to forward the calls to. |
| 13 |
For Calls From, choose to forward calls from Any Number or Selected Numbers. If you choose Selected Numbers, select the following options:
|
| 14 |
对于 呼叫至,从下拉列表中选择一个号码或备用号码,以在组织中通过该号码接收呼叫时进行呼叫转发。 |
| 15 |
单击保存。 |

-
The rules are sorted in the table by rule name character. 例如:00_rule, 01_rule, and so on.
-
The "Not to Forward" rule always takes precedence over the "Forward" rule.
-
The rules are processed based on the order they are listed in the table.
-
You can create multiple rules. However, if a rule is satisfied, the system no longer checks the next rule. If you want the specific rule to check first, we suggest that you update the rule name with numbers. 例如:If you want the holiday rule to check before the business closed hours rule, then name the rule as 01-Holiday and 02-Closed.
To know more about the basic functionality and examples of the selectively forward call, see Configure Call Forwarding Selective for Webex Calling.
下一步
Edit auto attendant dialing options
Edit business hours auto attendant
Edit business hours schedules
您可以分配先前创建的工作时间安排,或为自动助理创建您自己的工作时间安排。
| 1 | |
| 2 |
Go to . |
| 3 |
Go to the Auto Attendant card and click Manage. |
| 4 |
Select an auto attendant to edit from the list. |
| 5 |
Go to Business hours auto attendant section and click Schedule. |
| 6 |
选择以下选项之一:
|
| 7 |
单击保存。 |

Edit business hours menu options
为每个键盘号码分配不同的功能。当客户在电话上输入特定号码时,这些设置会将他们接入相应的线路。
| 1 | |
| 2 |
Go to . |
| 3 |
Go to the Auto Attendant card and click Manage. |
| 4 |
Select an auto attendant to edit from the list. |
| 5 |
Go to Business hours auto attendant section and click Menu. |
| 6 |
Select Enable extension dialing without requiring a menu item to allow callers to directly dial an extension at any time. The Extension Dialing option for Auto Attendant applies only to Webex Calling subscribers. |
| 7 |
单击保存。 |
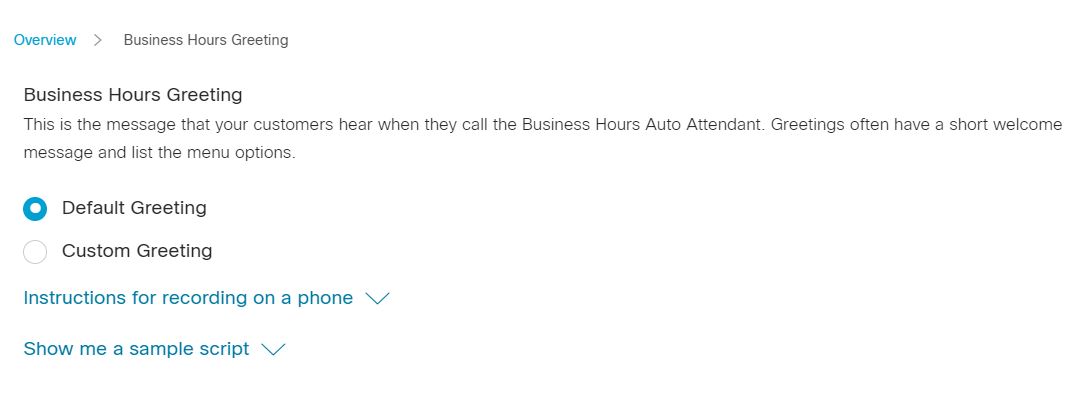
Edit business hours greeting
这是您的客户在工作时间呼叫时将听到的留言。问候语通常包含简短的欢迎语并列举菜单选项。
| 1 | |
| 2 |
Go to . |
| 3 |
Go to the Auto Attendant card and click Manage. |
| 4 |
Select an auto attendant to edit from the list. |
| 5 |
Go to Business hours auto attendant section and click Greeting. |
| 6 |
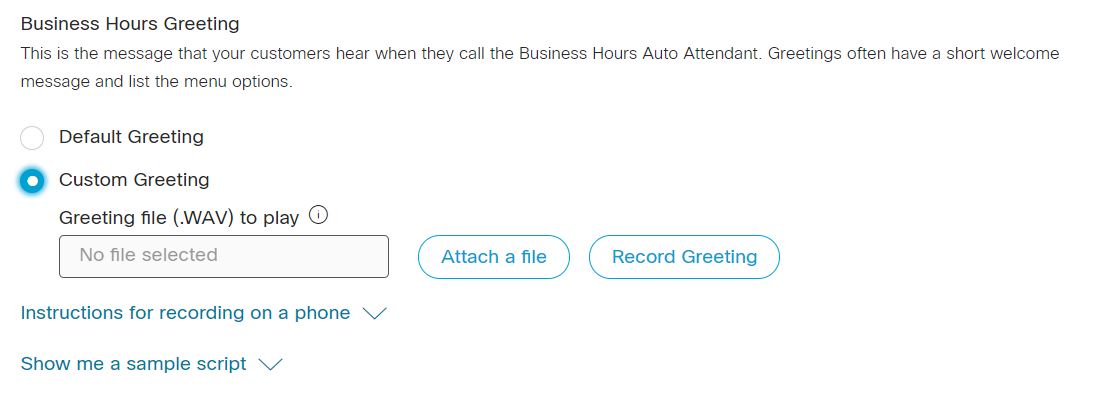
选择以下选项之一:
音频 (WAV) 文件必须满足以下要求:
您可以单击电话录音说明和展示示例脚本,获得更多有关电话录音说明和问候语示例脚本的内容。To record by phone, first you need to set up your voice portal number and passcode for the location this auto attendant is associated with. For details, see Configure voice portals for Webex Calling. |
| 7 |
单击保存。 |
Edit after hours auto attendant
Edit after hours menu options
为各键盘数字分配不同功能,以便当客户在电话上输入特定号码时,这些设置会将客户引导至目的方向。为非工作时间设置的菜单同样适用于节假日安排。
| 1 | |
| 2 |
Go to . |
| 3 |
Go to the Auto Attendant card and click Manage. |
| 4 |
Select an auto attendant to edit from the list. |
| 5 |
Go to After hours auto attendant section and click Menu. |
| 6 |
Select Enable extension dialing without requiring a menu item to allow callers to directly dial an extension at any time. |
| 7 |
单击保存。 |
Edit after hours greeting
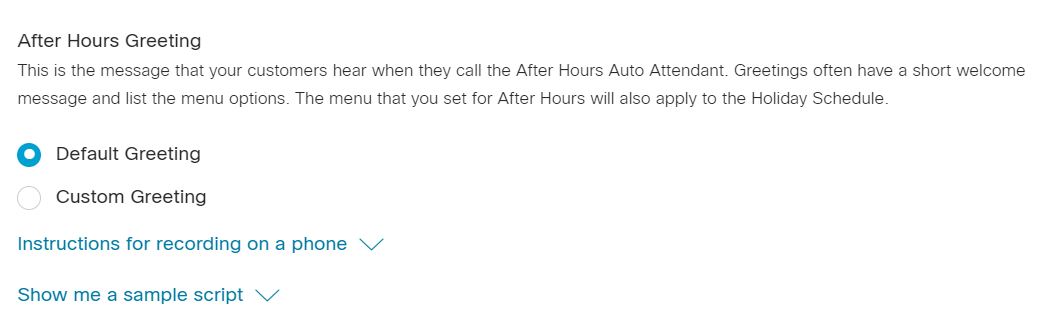
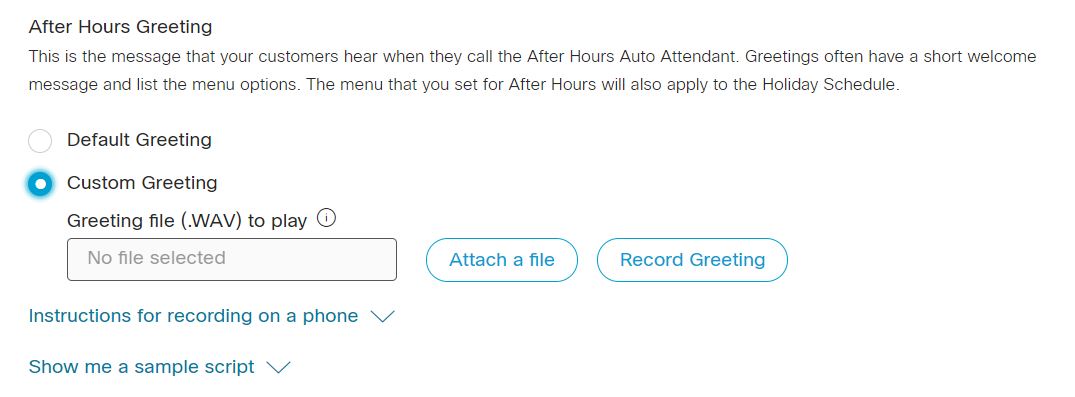
这是您的客户在非工作时间呼叫时将听到的留言。问候语通常包含简短的欢迎语并列举菜单选项。为非工作时间设置的菜单同样适用于节假日安排。
| 1 | |
| 2 |
Go to . |
| 3 |
Go to the Auto Attendant card and click Manage. |
| 4 |
Select an auto attendant to edit from the list. |
| 5 |
Go to After hours auto attendant section and click Greeting. |
| 6 |
选择以下选项之一:
音频 (WAV) 文件必须满足以下要求:
您可以单击电话录音说明和展示示例脚本,获得更多有关电话录音说明和问候语示例脚本的内容。To record by phone, first you need to set up your voice portal number and passcode for the location this auto attendant is associated with. For details, see Configure voice portals for Webex Calling. |
| 7 |
单击保存。 |
Edit auto attendant holiday schedules
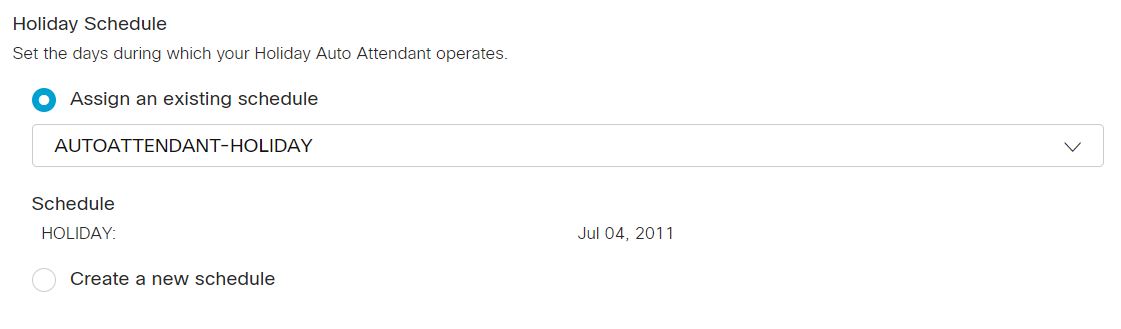
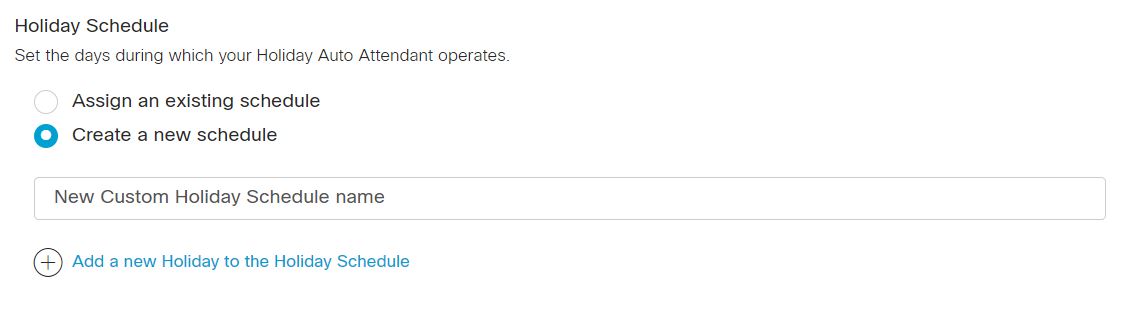
设置节假日自动助理的运行天数。您可以分配先前创建的节假日安排,或为自动助理创建您自己的节假日安排。
| 1 | |
| 2 |
Go to . |
| 3 |
Go to the Auto Attendant card and click Manage. |
| 4 |
Select an auto attendant to edit from the list. |
| 5 |
Go to Holiday auto attendant section and click Schedule. |
| 6 |
选择以下选项之一:
|
| 7 |
单击保存。 |
Bulk manage auto attendant
您可以通过批量插入/更新自动助理来批量管理自动助理。Administrators can import/export auto attendants with a CSV file.
Exporting CSV file into ZIP file format: 将数据导出到 CSV 文件时,记录数可能超过 1000。In such cases, the ZIP file is downloaded, where the ZIP file contains the full set of record(s) in a single CSV file. A separate folder containing all the data is broken down into multiple CSV files with less than 1000 records. 这些文件是为管理员快速导入任何更新和上传而生成的。
If you have many auto attendants to add, the bulk manage auto attendant option is convenient and the CSV support reduces effort for deployment and migration.
Every auto attendant created in the Control Hub requires populating a wizard with many parameters and the CSV support streamlines the process.
The following functionalities are coming soon:
-
删除整个自动助理实例
-
创建/修改/删除呼叫转发规则
-
将批量 CSV 操作作为外部 API 显示于 Hydra 门户
-
创建新计划
准备 CSV
|
列 |
Add an auto attendant |
Edit an auto attendant |
描述 |
支持的值 |
|---|---|---|---|---|
|
姓名 |
强制 |
强制 |
Enter the name of the auto attendant. |
1-30 个字符 |
|
电话号码 |
Mandatory if the extension is left blank |
Mandatory if the extension is left blank |
请输入电话号码。必须提供电话号码或分机号。 |
Use E.164 numbers for CSV import. Example: +12815550100 注:Ensure the location is on the Locations tab in the Control Hub. |
|
分机号 |
Mandatory if the phone number is left blank |
Mandatory if the phone number is left blank |
输入分机。必须提供电话号码或分机号。 |
Two to ten digit extension. 例如:00-999999. Extensions that match emergency numbers in the location country aren’t allowed. 例如:You can't use 911 as an extension in the U.S. |
|
地点 |
强制 |
强制 |
输入要添加自动与会者的位置。 |
例如:圣何塞。 注:Ensure the location is on the Locations tab in the Control Hub. |
|
时区 |
可选 |
可选 |
输入自动与会者时区密钥。此时区适用于应用于自动与会者的计划。 |
例如:美洲/芝加哥。 字符长度:1-127 |
|
语言代码 |
可选 |
可选 |
输入自动助理的公告语言。 |
例如: en_us |
|
主叫号码名字 |
强制 |
强制 |
输入要显示给自动助理的名字。启用呼叫转移并转出呼叫时,系统会使用主叫号码。 |
例如:三。 字符长度:1-30 注:Only UTF-8 characters are supported. |
|
主叫号码姓氏 |
强制 |
强制 |
Enter the last name to display for the auto attendant. 启用呼叫转移并转出呼叫时,系统会使用主叫号码。 |
例如:何塞。 字符长度:1-30 注:Only UTF-8 characters are supported. |
|
工作时间安排 |
强制 |
强制 |
输入业务安排名称。 |
例如:00_Closed |
|
假日安排 |
强制 |
强制 |
输入节假日安排名称。 |
例如:01_Holiday |
|
拨号类型 |
可选 |
可选 |
Enter the dialing type. |
ENTERPRISE,GROUP |
|
Business Hours Menu Extension Enabled |
可选 |
可选 |
Enter TRUE to enable the business hours menu extension. Enter FALSE to disable the business hours menu extension. |
TRUE 和 FALSE |
|
After Hours Menu Extension Enabled | 可选 | 可选 |
Enter TRUE to enable the after hours menu extension. Enter FALSE to disable the after hours menu extension. |
TRUE 和 FALSE |
|
Auto Attendant Enable |
可选 |
可选 |
Enter ENABLED to enable the option. Enter DISABLED to disable the option. |
ENABLED, DISABLED |
|
备用号码操作 |
可选 |
可选 |
输入 ADD 可添加此行中列出的备用号码。 输入 REMOVE 可删除此行中列出的备用号码。 Enter REPLACE if you want to remove all previously entered alternate numbers and replace it with the alternate numbers you’re adding in this row only. |
ADD, REMOVE,REPLACE |
|
Business Hours Greeting Type |
可选 |
可选 |
Enter the business hours greeting type as Default or Custom. If you enter Custom, then enter the business hours announcement name, media type, and level details. |
DEFAULT, CUSTOM |
|
Business Hours Announcement Name |
可选 |
可选 |
Enter the business hours announcement name. |
例如: Service-outage_loc.wav |
|
Business Hours Announcement Media Type |
可选 |
可选 |
Enter the business hours announcement media type. |
WAV |
|
Business Hours Announcement Level |
可选 |
可选 |
Enter the level (organization, location, or auto attendant/entity) at which the custom announcement is defined. |
LOCATION, ORGANIZATION, ENTITY |
|
After Hours Greeting Type |
可选 |
可选 |
Enter the after hours greeting type as Default or Custom. If you enter Custom, then enter the after hours announcement name, media type, and level details. |
DEFAULT, CUSTOM |
|
After Hours Announcement Name |
可选 |
可选 |
Enter the after hours announcement name. |
例如: Holiday-announcement-org.wav |
|
After Hours Announcement Media Type |
可选 |
可选 |
Enter the after hours announcement media type. |
WAV |
|
After Hours Announcement Level |
可选 |
可选 |
Enter the level (organization, location, or auto attendant/entity) at which the custom announcement is defined. |
LOCATION, ORGANIZATION, ENTITY |
| Business Hours Press 0–9, * and # Description |
Mandatory if Business Hours Press 0–9, * and # Description is left blank |
Mandatory if Business Hours Press 0–9, * and # Description is left blank |
选择工作时间类型。 |
例如:说明 Character Length: 1-20 |
|
Business Hours Press 0–9, * and # Action |
Mandatory if Business Hours Press 0–9, * and # Action is left blank |
Mandatory if Business Hours Press 0–9, * and # Action is left blank |
选择工作时间类型。 | 播放_公告 TRANSFER CALL_WITH_PROMPT TRANSFER CALL_WITHOUT_PROMPT TRANSFER CALL_TO_OPERATOR TRANSFER_TO_VOICEMAIL DIAL_BY_NAME DIAL_BY_EXTENSION 重复_菜单 EXIT_MENU |
|
Business Hours Press 0–9, * and # Value |
Mandatory for few Actions such as PLAY_ANNOUNCEMENT, TRANSFER_WITH_PROMPT, TRANSFER_WITHOUT_PROMPT, TRANSFER_TO_OPERATOR, TRANSFER_TO_VOICEMAIL |
Mandatory for few Actions such as PLAY_ANNOUNCEMENT, TRANSFER_WITH_PROMPT, TRANSFER_WITHOUT_PROMPT, TRANSFER_TO_OPERATOR, TRANSFER_TO_VOICEMAIL |
Additional value is needed to perform certain actions. |
The format for the Play announcement file is Announcement Name | Announcement Type | Announcement Level 例如:CycloneAlert.wav | WAV | LOCATION 注:Enter Type in ALL CAPS Other supported actions require a valid phone number or extension. |
|
After Hours Press 0–9, * and # Description |
Mandatory if After Hours Press 0–9, * and # Description is left blank |
Mandatory if After Hours Press 0–9, * and # Description is left blank |
选择“工作时间”类型。 |
例如:说明 Character Length: 1-20 |
| After Hours Press 0-9, * and # Action |
Mandatory if After Hours Press 0–9, * and # Action is left blank |
Mandatory if After Hours Press 0–9, * and # Action is left blank |
选择“工作时间”类型。 |
播放_公告 TRANSFER CALL_WITH_PROMPT TRANSFER CALL_WITHOUT_PROMPT TRANSFER CALL_TO_OPERATOR TRANSFER_TO_VOICEMAIL DIAL_BY_NAME DIAL_BY_EXTENSION 重复_菜单 EXIT_MENU |
|
After Hours Press 0-9, * and # Value |
Mandatory for few Actions such as PLAY_ANNOUNCEMENT, TRANSFER_WITH_PROMPT, TRANSFER_WITHOUT_PROMPT, TRANSFER_TO_OPERATOR, TRANSFER_TO_VOICEMAIL |
Mandatory for few Actions such as PLAY_ANNOUNCEMENT, TRANSFER_WITH_PROMPT, TRANSFER_WITHOUT_PROMPT, TRANSFER_TO_OPERATOR, TRANSFER_TO_VOICEMAIL |
Additional value is needed to perform certain actions |
The format for the Play announcement file is: Announcement Name | Announcement Type | Announcement Level 例如: CycloneAlert.wav | WAV | LOCATION 注:Enter Type in ALL CAPS Other supported actions require a valid phone number or extension. |
|
Alternate Number 1, Alternate Number 2… Alternate Number 10 |
可选 |
可选 |
Enter the alternate numbers to assign to the auto attendants. |
例如:1112223333 字符长度:1-23 注:Enter Type in ALL CAPS Other supported actions require a valid phone number or extension. |
|
Alternate Number 1 Ring Pattern, Alternate Number 2 Ring Pattern... Alternate Number 10 Ring Pattern |
可选 |
可选 |
If distinctive ringing is enabled for alternate numbers, enter the distinctive ringing ring pattern. |
NORMAL、LONG_LONG、SHORT_SHORT_LONG 和 SHORT_LONG_SHORT |
批量管理自动与会者
| 1 | |
| 2 |
Go to . |
| 3 |
Go to the Auto Attendant card. |
| 4 |
The Manage Auto Attendant window displays. |
| 5 |
从网络选择一下拉列表下载该位置自动助理的数据,或选择所有位置来下载所有自动助理的数据。 |
| 6 |
单击 下载数据 或 下载 .csv 模板以验证 CSV 文件格式是否正确,确保填写必填信息。 |
| 7 |
Add or edit the first and last name, phone number, and so on, and upload the updated CSV file. |
| 8 |
Click View Import history/Tasks to view the status of your CSV import and see whether you've encountered any errors. |
View auto attendant analytics
| 1 | |
| 2 |
Go to . |
| 3 |
Go to the Auto Attendant card and click Manage. |
| 4 |
On the Auto Attendant page, click . 将显示分析页面。 |
| 5 |
Click the Auto-Attendant tab to find the auto attendant call details. 有关更多信息,请参阅适用于云协作产品组合的 Analytics。
|
生成自动语音应答报告
您可以生成一个报告,其中列出所有连接到自动助理服务的入站呼叫。
| 1 | |
| 2 |
Go to . |
| 3 |
Under Templates, click Calling and click the following reports:
For more information, see Reports for Your Cloud Collaboration Portfolio.
|
Access the auto attendant launch kit
Download the Launch Kit to see what an auto attendant can do. Access the greeting samples and email templates to get you started.


