- Home
- /
- Article

Thanks for your feedback.

 In this article
 Feedback?
When you integrate Webex Contact Center with Dynamics, the gadget will appear within the Dynamics apps.
Requirements
Before you integrate Webex Contact Center with Microsoft Dynamics 365 console, ensure you have the following:
-
Access to Webex Contact Center.
-
Administrator access to the Control Hub at https://admin.webex.com and the Webex Contact Center Management Portal.
- An agent with access to the Desktop.
-
An agent with access to the Desktop. The URL for the Desktop is specific to your region:
-
North America: https://desktop.wxcc-us1.cisco.com
-
Singapore: https://desktop.wxcc-sg1.cisco.com/
-
-
Agent access to the following domain that is added in the Content Security Policy Allowed List:
-
*.dynamics.com
-
-
Webex Contact Center for Microsoft Dynamics uses the Microsoft Channel Integration Framework (CIF) to integrate with Agent desktop. Single Session Dynamics app requires CIF version 1 and Multi Session Dynamics apps require CIF version 2.
-
We don't support integrations with Microsoft Dynamics on-premise versions.
-
A Microsoft Dynamics 365 service or instance.
Integrate
Digital channels such as chat and email are not supported with CRM connectors. This applies to all CRM integrations using these connectors. Please plan your deployment and customer engagement workflows accordingly.
You do not need to create a new Webex App. To integrate Webex Contact Center with the Microsoft Dynamics 365 console, complete the following tasks:
Start a Dynamics 365 Customer Service Trial
| 1 |
Go to the Dynamics 365 Sales page at: https://dynamics.microsoft.com/en-us/dynamics-365-free-trial/. |
| 2 |
Click Try for free. |
| 3 |
Follow the on-screen guidance to enter your email and contact information. |
| 4 |
Set up your account and click the email to start your free trial. |
| 5 |
Log in to the Power Platform admin center with your trial instance at: https://admin.powerplatform.microsoft.com/environments/<your instance>. |
| 6 |
In the site map, select Environments. |
| 7 |
Select the environment you created and note the environment in the Environment URL Use this URL when you configure the Dynamics 365 Desktop layout on Webex Contact Center. |
Install Webex Contact Center CRM Connector for Microsoft Dynamics 365
Before you begin
Ensure that you install the Channel Integration Framework application before you install Webex Contact Center CRM Connector for Microsoft Dynamics 365. If the framework is not yet installed, follow the installation steps outlined on the official documentation to install it.
| 1 |
Sign in to Dynamics 365. |
| 2 |
Click the gear icon at the upper right of the window and select Advanced Settings. |
| 3 |
On the Settings page, click Microsoft AppSource. |
| 4 |
In the Search field, search for and select Webex Contact Center CRM Connector for Microsoft Dynamics 365. |
| 5 |
Click Get it now. |
| 6 |
Sign in to Microsoft AppSource with the account that was used to create the Dynamics instance. |
| 7 |
Accept the Legal Terms and Privacy Statement. |
| 8 |
Click Agree. The installation takes some time to complete. |
| 9 |
To check the status of the installation, log in to the Power Platform admin center at: https://admin.powerplatform.microsoft.com/environments/<your instance>. |
| 10 |
Select Environments > Customer Service Trial. |
| 11 |
On the Sales Trial page, go to the Resources pane and click Dynamics 365 Apps. |
What to do next
Ensure that the status of the following applications is Installed:
-
Webex Contact Center Webex Contact Center CRM Connector for Microsoft Dynamics 365
- Dynamics 365 Channel Integration Framework
Set Up the Webex Contact Center Connector for Microsoft Dynamics 365
Multisession applications such as Omnichannel for Customer Service or Customer Service Workspace provide agents with a unified workspace experience allowing them to multitask on various customer issues simultaneously.
To configure the Webex Contact Center for Microsoft Dynamics on a single session app, such as Customer Service Hub, refer to Single Session Configuration.
Customer Service Admin Center (Channel integration framework version v2 configurations)
Multisession is configured in the Customer Service admin center.
| 1 |
Open the Apps overview and select the Customer Service admin center app. 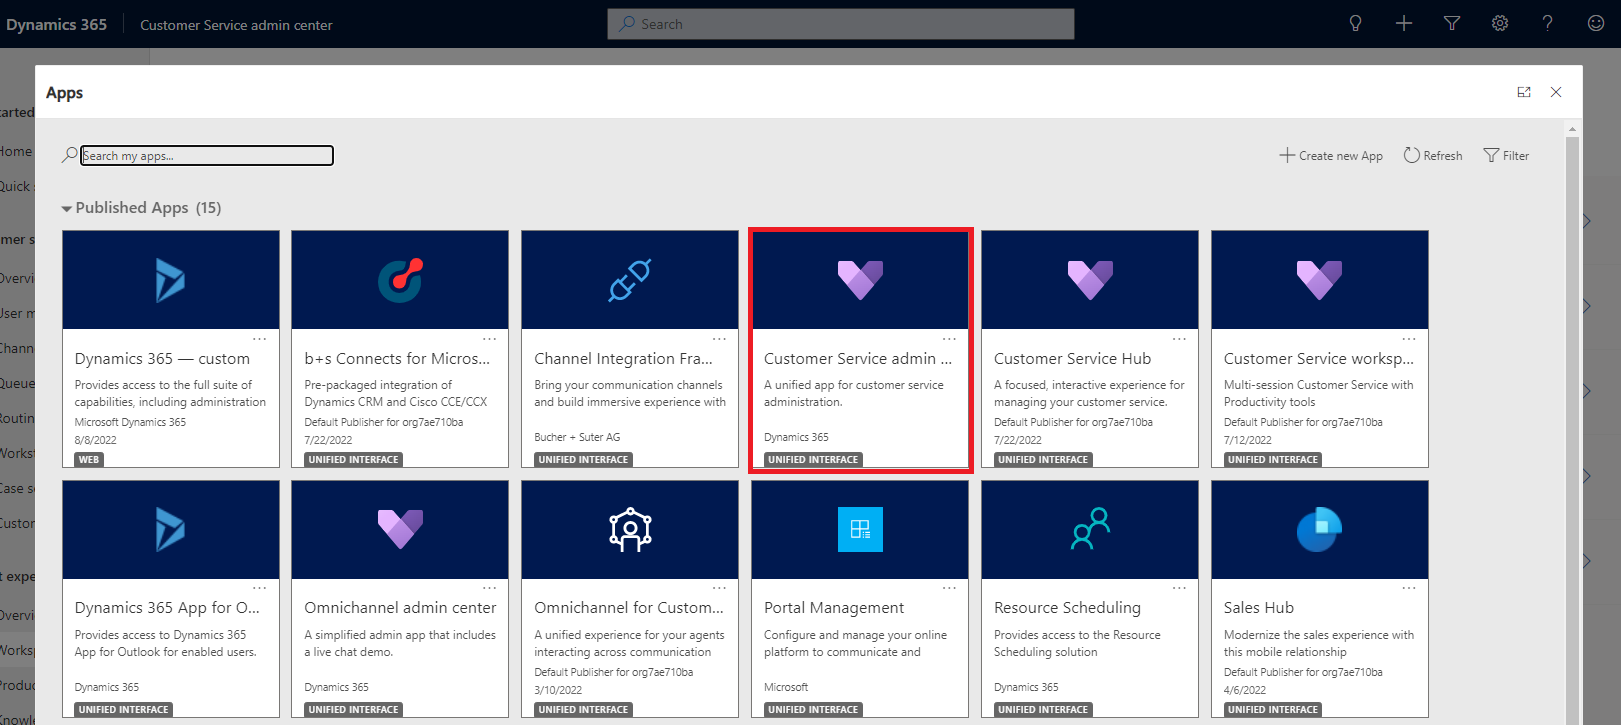
|
| 2 |
Select Workspaces. 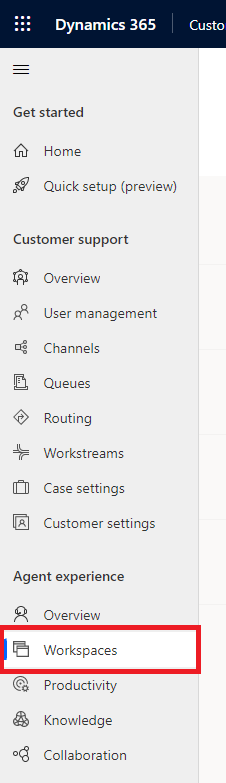
|
| 3 |
Navigate to Agent experience profiles. 
|
| 4 |
Create a new profile. 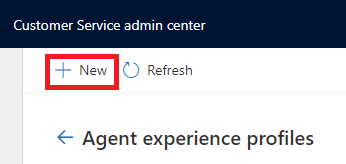
|
| 5 |
The new agent experience profile dialog appears. 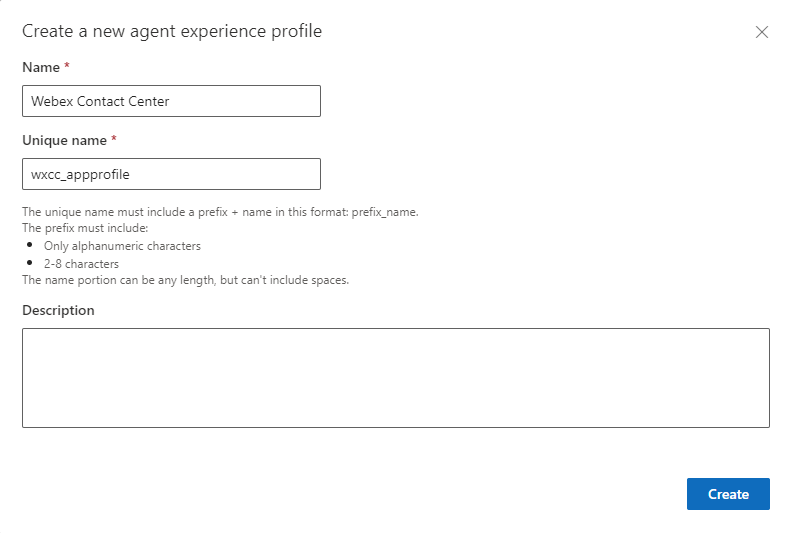
|
| 6 |
Specify the following values—
|
| 7 |
Click Create to create the agent experience profile. |
| 8 |
Edit channel providers. 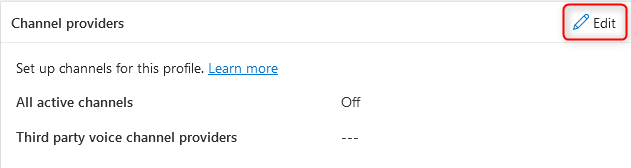
|
| 9 |
Create a new channel provider. 
|
| 10 |
Specify the values as shown in the screenshot below. 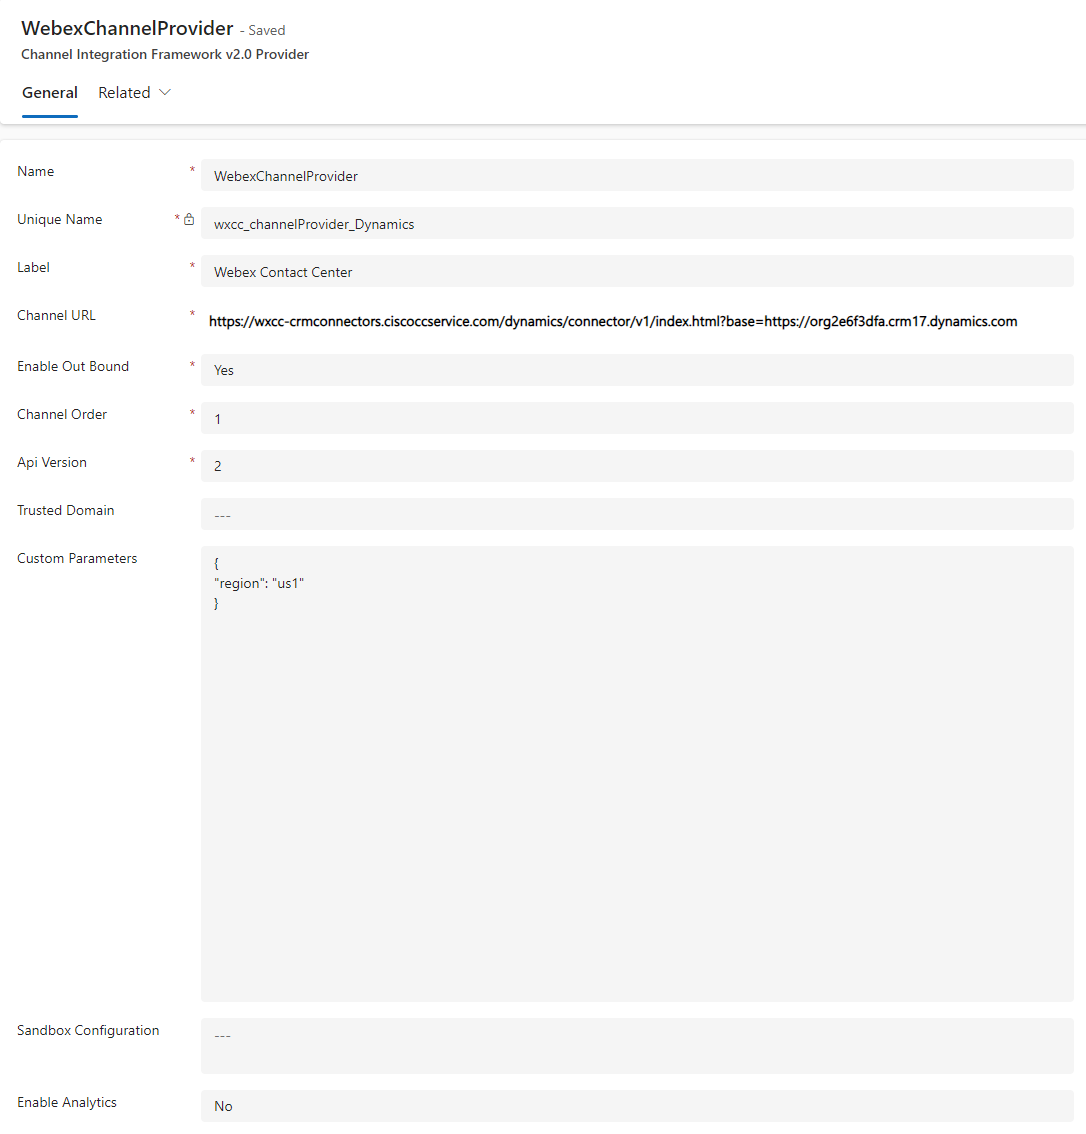
|
| 11 |
Specify the following values—
|
| 12 |
Click Save and Close to update your changes. |
| 13 |
Edit channel providers again. 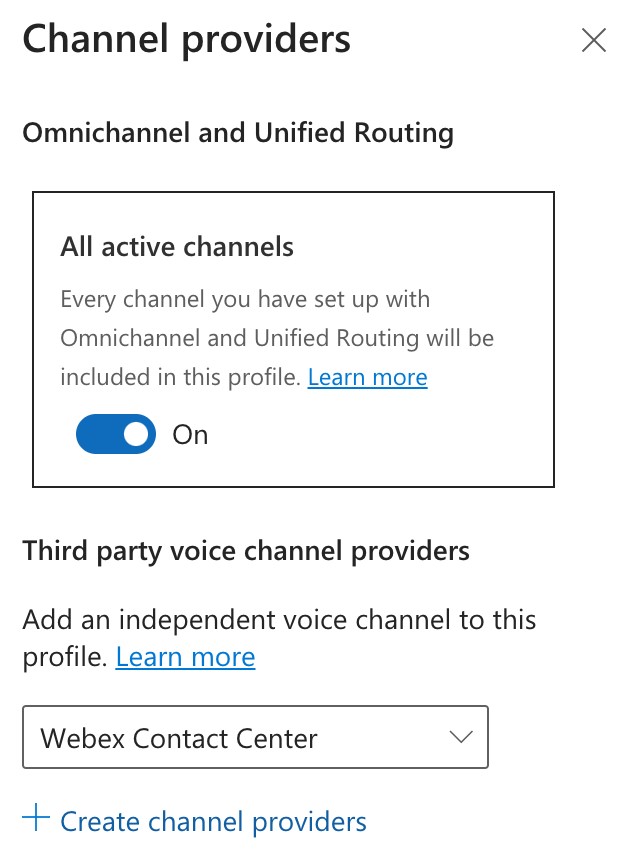
|
| 14 |
If the profile contains other channels such as chat, enable On toggle for all active channels. |
| 15 |
Click Save and Close to update your changes. |
| 16 |
Edit users. 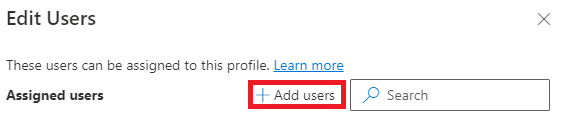
|
| 17 |
Add the user entries. 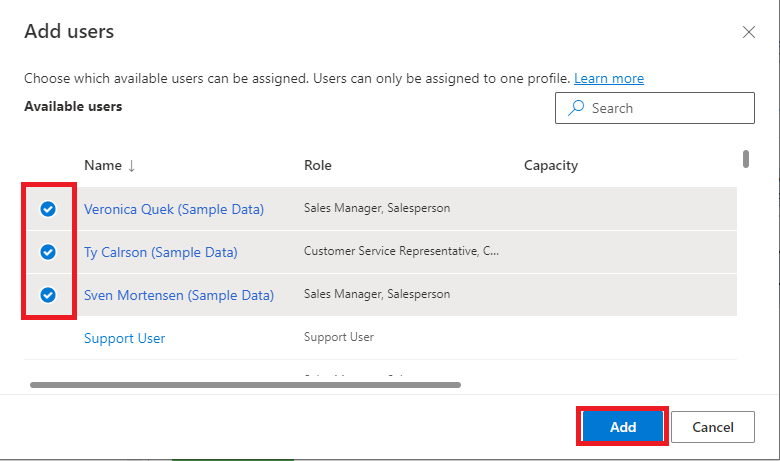
|
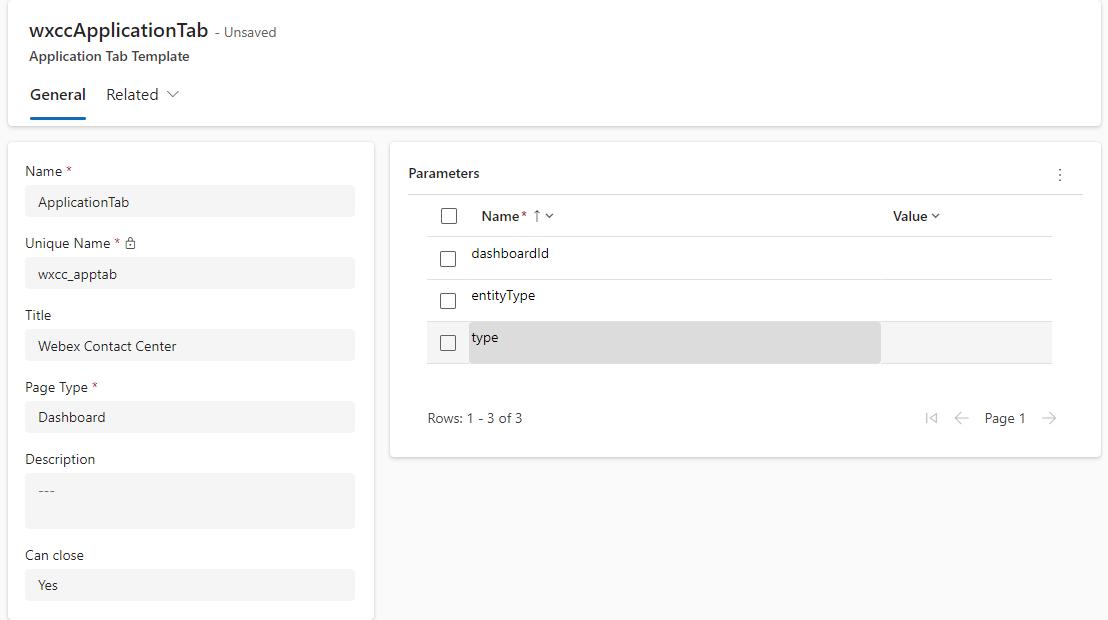
Set Up Application tab and Session templates
| 1 |
Navigate back to Workspace and choose Manage next to Application tab templates. 
|
| 2 |
Create a new application tab template. 
|
| 3 |
Specify the following values:
|
| 4 |
Click Save to save your changes. |
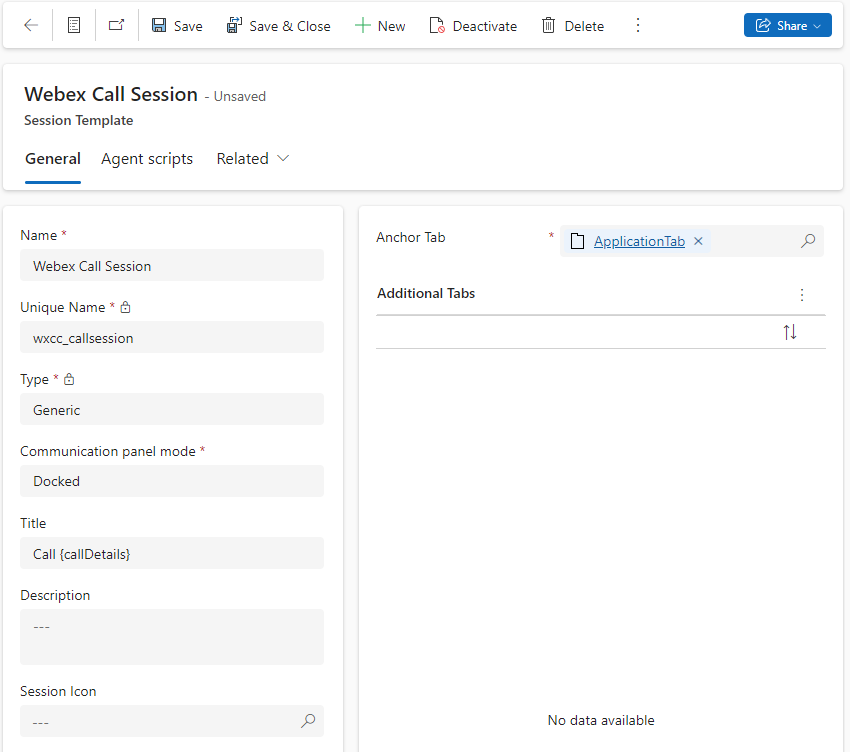
Session templates
This section describes how to configure the appearance and functionality of the session that includes the WxCC for Microsoft Dynamics connector. It also covers the configuration for sessions that are initiated by incoming calls.
| 1 |
Navigate back to Workspaces and choose Manage next to Session templates. 
|
| 2 |
Select Newto create a session template for the Default Session. 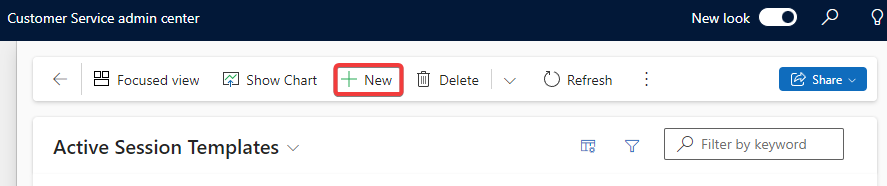
|
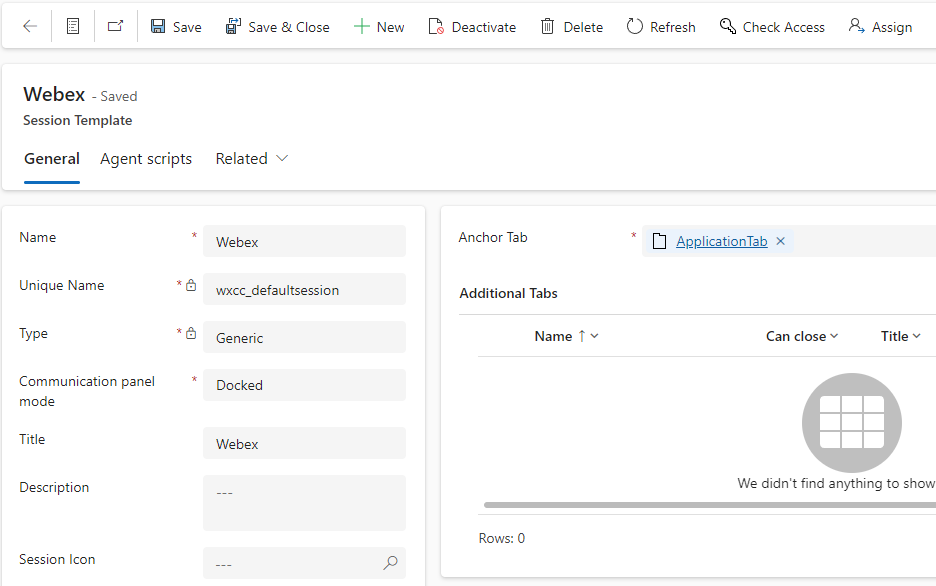
| 3 |
Specify the following values:
|
| 4 |
Click Save and Close. |
| 5 |
Select New to create another session template for the Call Session.
|
| 6 |
Specify the following values:
|
| 7 |
Click Save to save your changes. |
Configure Channel Provider (Channel integration framework version v1 configurations)
| 1 |
Navigate to Channel Integration Framework. 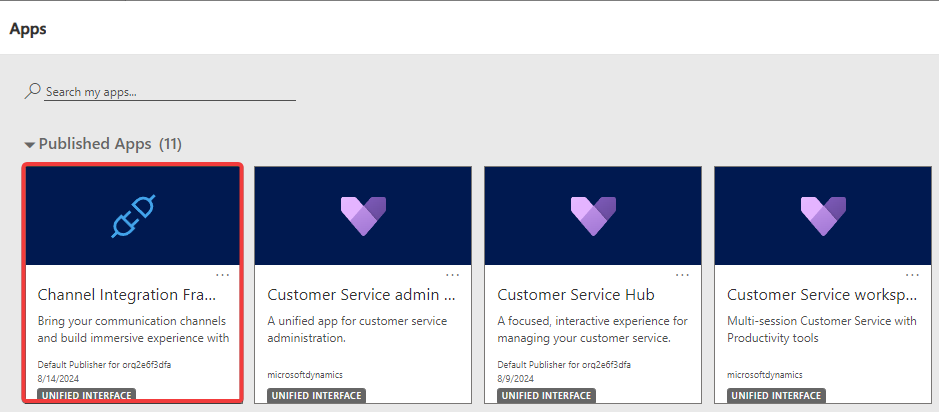
|
| 2 |
Create new channel provider. 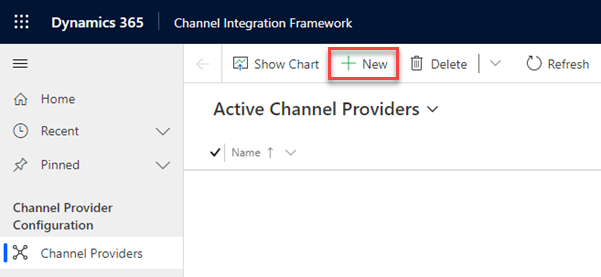
|
| 3 |
Specify the following values: 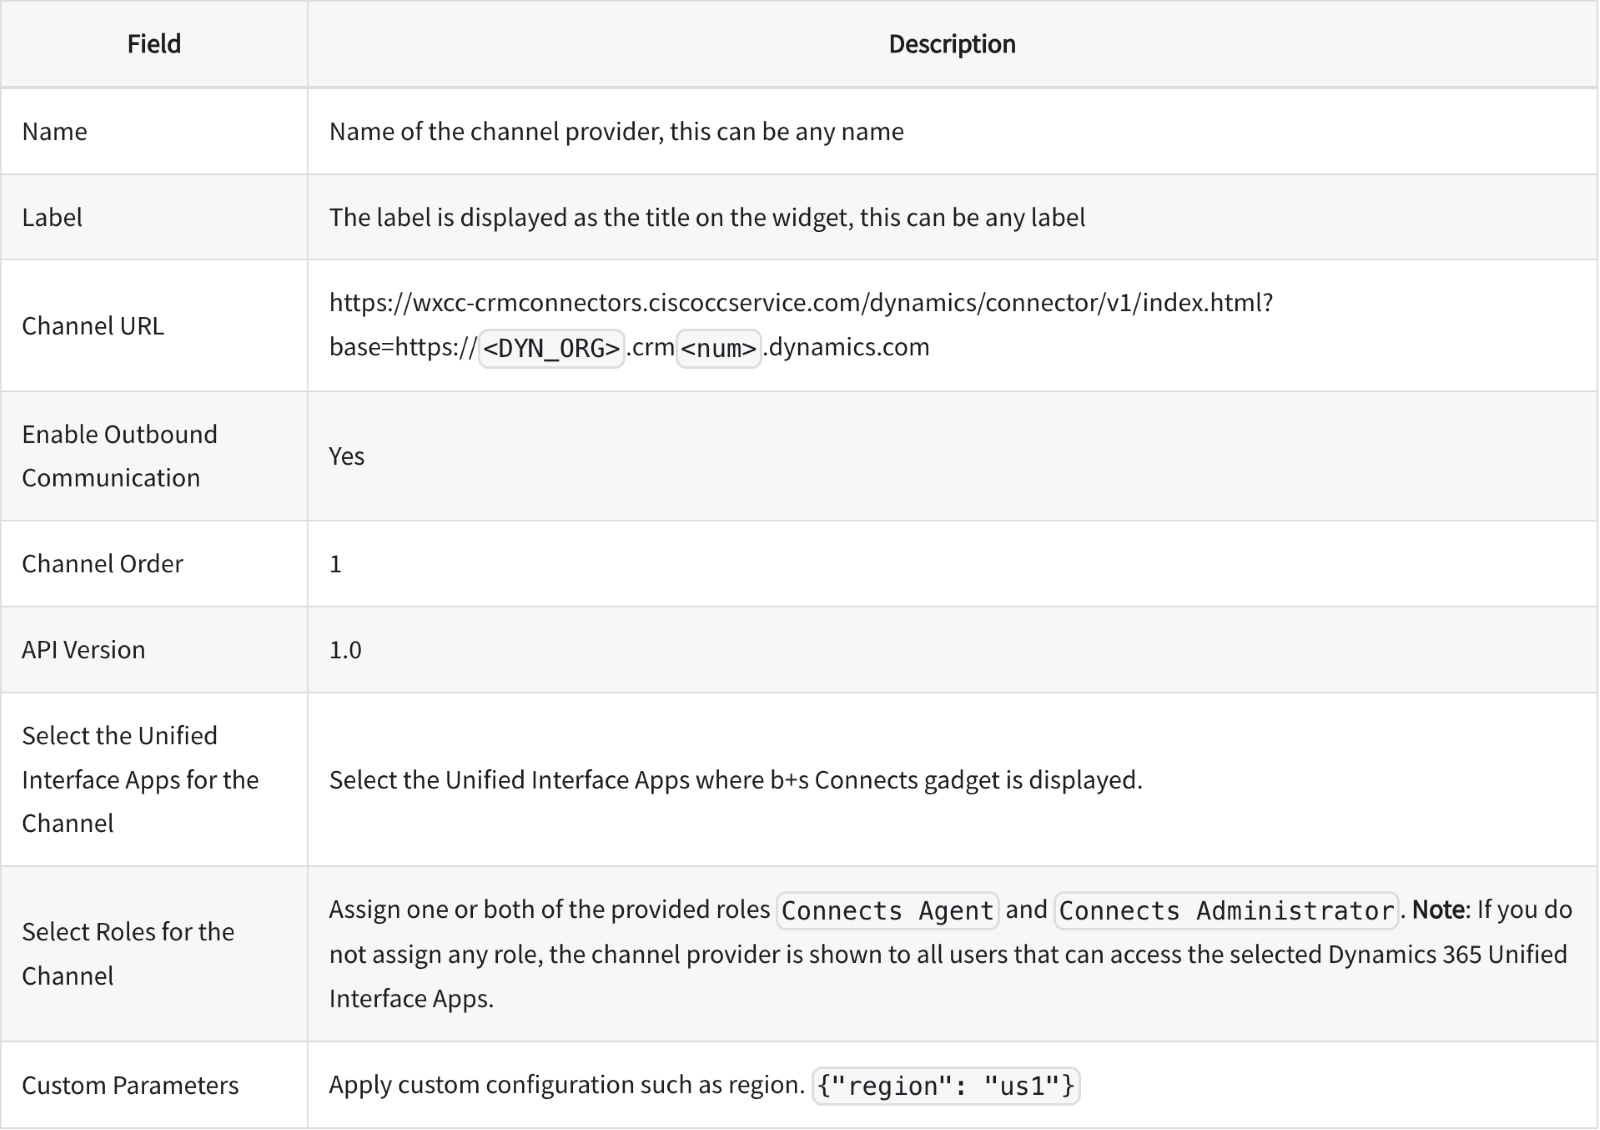
|
| 4 |
Click Save to save your changes. |
Customize
The table below details how to customize the properties of the custom desktop layout file. Tailor the behavior of WxCC for Microsoft Dynamics to fit your specific business needs.
Channel Integration Framework customizations
| Desktop layout property | Description | Values |
|---|---|---|
| region | Defines the WxCC Region used by agents |
|
| shareRecordVariable | Defines the CAD variable to store records for transfers which allows sharing of a record in consultation call scenarios. | Name of the CAD variable Example: ssShareVariable |
| screenPopOnNoMatch | Defines whether to open a new record for if the search returns no result |
true or false Default: false |
| screenPopIncomingMode |
Defines which record type should be opened in the CRM and which information is displayed in the connector when the agent receives a call. For customer and disabled, the record type defined in customerTable will be applied. |
customer, case, activity or disabled Default: customer |
| customerTable |
Defines the record type to search in Microsoft Dynamics Search in the customerTable is applied when screenPopIncomingMode is set to customer or disabled When screenPopIncomingMode is set to case, this setting is ignored for the search. |
account or contact Default: contact |
| lookupFields |
Defines the fields that are searched in the configured record type. The field names must be separated by commas. Always used in connection with lookupVariable |
All available fields on customerTable or case of type string and memo. Example: mobilephone, telephone1 |
| lookupVariable |
Defines the CAD variables to be used for caller identification. They are always used in connection with lookupFields |
CAD Variable See chapter “List of Variables” for available variables Default: ani |
| countryCodeRemoval | Defines if the leading country code of a telephone number should be removed for the search |
true or false Default: false |
| customerRecordMapping |
Defines what data is stored in which field when a new record is created via the Create New tab. The parameter customerTable defines if a new account or contact form is being opened If nothing is defined, a new record is opened without data. CAD variables need to be in curly brackets. |
Example: mobilephone={ani}&telephone1={CAD} See chapter “List of Variables” for available variables |
| caseRecordMapping |
Defines what data is stored in which field when a new case record is created via the connector. This setting is used to open a new case:
If nothing is defined, a new record is opened without data. CAD variables need to be in curly brackets. |
Example: title=Case {ani}&description=Hotline {CAD} See chapter “List of Variables” for available variables |
| activityRecordMapping |
Defines what data is stored in which field when a new phonecall record is created via the connector. This allows WxCC CAD variables to be saved on the phonecall record in Microsoft Dynamics. Variables need to be in curly brackets. |
Example: Example subject=Call – {due_date_cti} See chapter “List of Variables” for available variables. |
| omniReasonCrm | Defines the Microsoft Dynamics presence status (presence text) which should be set when the agent receives a voice call. |
Example: "omniReasonCrm": “Busy" |
| omniReasonVoice | Defines which WxCC idle reason the agent should be set to when the Microsoft Dynamics presence status changes to either Busy or Busy – DND. |
GUID of the WxCC idle reason Example: "omniReasonVoice": "d7b8cc8a-ea3c-41cc-9bc7-3dca6cd549c0" |
| enableNotifications | Defines if browser-based desktop notifications are shown. |
true or false Default: false |
| enableSubjectEdit | Defines the field of a phonecall record where the notes should be stored. This field must not be the same as one used in activityRecordMapping. |
true or false Default: false |
| noteField | Defines the field of a phonecall record where the notes should be stored | All simple string columns of the phonecall record |
| webRtcDomain | Domain needed for webRtc connection. |
Not set by default. Possible values are—
|
| speedDialNumbers | Enables and shows the speed dial card in the connector |
Array structure consisting of the following parameters
Example: "speedDialNumbers":[{"label":"DIAL to 1234","phone":"1234","type":"0"},{"l":"SST to 4567","p":"4567","t":"1"},{"label":"Consult to 99999","phone":"99999","type":"3"}] See Speed Dial Limitations for additional limitations. |
Example Configuration 1 Screenpop of an existing case
- Webex Contact Center region is set to eu2
- Share record variable is set to ssShareVariable
- Doing a lookup on the CRM field ticketnumber based on the CAD variable testCaseId
- If no record is found a new form is opened
- State change for OmniChannel
- Notes are stored on the description of the phonecall record
- Microsoft Dynamics presence state is set to busy when a call comes in
- WxCC status is set to idle when the Microsoft Dynamics presence state changes to Busy or Busy DND
{
  "region": "eu2",
  "shareRecordVariable": "ssShareVariable",
  "lookupFields": "ticketnumber",
  "screenPopIncomingMode": "case",
  "screenPopOnNoMatch": true,
  "lookupVariable": "testCaseId",
  "activityRecordMapping": "description={notes},
  "noteField": "description",
  "omniReasonCrm": "Busy",
  "omniReasonVoice": "d7b8cc8a-ea3c-41cc-9bc7-3dca6cd549c0"
}
Example Configuration 2 Screenpop of a contact based on the ANI
- Webex Contact Center region is set to us1
- Share record variable is set to ssShareVariable
- Doing a lookup on the CRM fields mobilephone and telephone1 in the contact table based on the ANI
- Desktop notifications are enabled
- No screenpop when the search returns no result
- The mobilephone field is prefilled with the ANI when using the create new contact link
- The case title is prefilled with “Case from {ani}” when using the create new case link
- Notes are stored in the description field of the phonecall record
{
  "region": "us1",
  "shareRecordVariable": "ssShareVariable",
  "lookupFields": "mobilephone, telephone1",
  "customerTable": "contact",
  "screenPopIncomingMode": "customer",
  "screenPopOnNoMatch": false,
  "enableNotifications": true,
  "lookupVariable": "ani",
  "customerRecordMapping": "mobilephone={ani}",
  "caseRecordMapping": "title=Case from {ani}"
  "noteField": "description"
}
List of variables
These variables can be used on the custom parameter configuration with the following parameters:
| Variable name | Variable description |
|---|---|
| ani | Calling number |
| dn | Called number |
| wrapUpAuxCodeId | ID of the wrapup reason selected by the agent |
| wrapUpAuxCodeName | Name of the wrapup reason selected by the agent |
| virtualTeamName | Name of the team assigned to the call |
| ronaTimeout | Value of the Ring On No Answer parameter |
| Custom Webex CC variables | Name of the variable defined on the Webex CC flow designer |
| due_date_cti |
The date of call establishment as string provided from WxCC (UTC). Only available for activityRecordMapping |
| due_date |
The date of call establishment as string provided from WxCC as local time of the server. Only available for activityRecordMapping |
Speed Dial Limitations
Within the same object, the same parameter format must be used. The shortened parameters can’t be used together with long parameters. For example, {'label','p','t'} isn’t a valid combination and is ignored.
Dials to Entry Point numbers from the home screen (calls without an established customer call) aren’t supported.
Screen Pop
A "Screen Pop" node is available in the WxCC Flow. It can be used to trigger a screen pop inside Microsoft Dynamics or in a separate window.
Further information on this function can be found in the Flow Designer documentation.
Screen Pop in a separate window
The queryParameters will be appended as search parameters to the URL.
The following modes are supported:
- New browser tab: Always opens a new browser tab.
- Existing browser tab: On the first `Existing browser tab` screen pop, a new browser tab is opened. That tab will be the dedicated tab for subsequent `Existing browser tab` screen pops and the URL will be refresh within that specific browser tab.
- Inside Desktop: It is handled the same way as *New browser tab*.
The currently opened page can prevent a redirect. In that case an `Existing browser tab` screen pop opens in a new browser tab.
Screen Pop in Microsoft Dynamics
To open a record in Microsoft Dynamics, a **relative** URL must be provided.
The following parameters needs to be defined in the "Screen Pop" node via the queryParameters or as search parameters in the URL (e.g. `/some/relative/url.html?recordType=incident&crmId=00000000-0000-0000-0000-000000000000`).
| Key | Description |
|---|---|
| recordType | Microsoft Dynamics table name of the record (e.g. `incident`). |
| crmId | Unique identifier of the Microsoft Dynamics record. |
WebRTC
The Microsoft Dynamics connector supports WebRTC on the following browsers—
- Microsoft Edge
- Google Chrome
To enable WebRTC, enure that:
- Webex CC Desktop profile allows Desktop.
- Configure the WxCC WebRTC Domain in custom parameters by adding the following entry for (EU2): "webRtcDomain": "rtw.prod-gm1.rtmsprod.net" .
- Browser refresh requires you to logout and login again.
- Single session Dynamics app for multitab is not supported.
- Device selection (micro/headset) is possible from the Options menu.
Limitation
If an agent unplugs an active default device while on a call, they must select a new device manually through the "Speaker and Microphone" settings.
Desktop Timeout
To enable automatic agent logout after a specified inactivity threshold, the Desktop Profiles Desktop Timeout setting must be configured with a custom value
Limitation
The global Tenant Settings Desktop Inactivity Timeout does not affect the behavior of the CRM connector and will not automatically log out an agent once the inactive duration is reached.
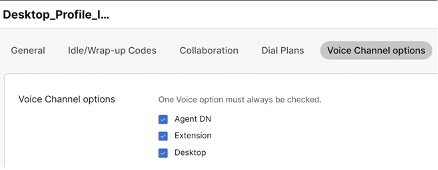
WxCC DN restrictions in gadget
In WxCC Control Hub, under Desktop Profiles > Voice Channel Options, you can configure how Agent DN (Directory Number) is validated. There are three available options:
-
Unrestricted (Allow any value)—Agents can enter any DN of their choice.
-
Provisioned DN (Restrict login DN to provisioned agent DN)—The DN is predefined and cannot be changed by the agent. The DN field in the gadget is pre-filled and disabled.
-
Validate using Dial Plans (Select from list)—Agents can select a DN from a list of predefined options configured by the administrator.
Limitation
Currently, the gadget does not enforce this option. Even if Validate using Dial Plans is selected in Control Hub, the gadget does not check or restrict the DN based on the dial plan list. This setting has no effect with the current gadget.
Synchronize Agent State with Webex App
To enable the Webex App agent state synchronization, the feature must be enabled in the Desktop tenant settings (Desktop) or in the desktop experience (desktop profile Collaboration settings).
Limitation
If agent state synchronization with Webex App is enabled during runtime, logged in agents have to refresh the browser window in order to apply the setting.
Wrap-up time extension
To enable or cancel the auto-wrapup timer, you must select Auto wrap-up extension in the Desktop Profile in Webex Control Hub.
Limitation
If the agent refreshes the browser after canceling the auto wrap-up timer, the outcome depends on whether the original timer has expired:
- If the original timer has expired, the system ends the wrap-up state and sets the agent to Available.
- If the original timer has not expired, the agent can cancel the auto wrap-up timer again.
If the Webex Contact Center Agent Desktop is used in parallel with the Webex Contact Center Integration for Microsoft Dynamics, the wrap-up must be extended on both; otherwise, the wrap-up time ends once the time expires.
Outbound Campaigns
The supported modes are Predictive and Progressive. Other modes are currently not supported.
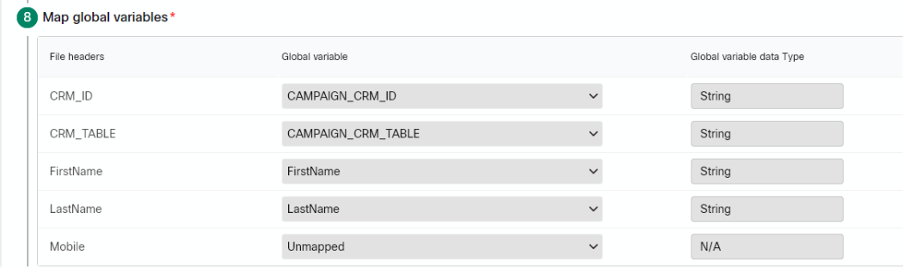
Acqueon Campaigns Requirement
The Global Business Parameters Business Fields CAMPAIGN_CRM_ID and CAMPAIGN_CRM_TABLE must be created. These two fields serve as identifiers for the customer CRM record which should be displayed to the agent. The Business Fields LastName and FirstName are optional.
These business fields must be added to the campaign group, campaign business parameters and campaign Contact business data mapping.
On the Webex Contact Center Control Hub side these fields must be declared as global variables and marked as visible for the agents flows.
Cisco Campaigns Requirement
In The Webex Contact Center Control Hub the global variables CAMPAIGN_CRM_ID and CAMPAIGN_CRM_TABLE must be created and marked as visible for the agents flows. These two variables serve as identifiers for the customer CRM record which should be displayed to the agent. The variables FirstName and LastName are optional.
In the Voice campaign administration field mappings, the global variables must be mapped to the example files header which contains the data for the two global variables CAMPAIGN_CRM_ID and CAMPAIGN_CRM_TABLE.
Webex Directory Search
To enable Webex directory search functionality within the connector, the feature must first be enabled in Webex Control Hub at both the tenant settings level and within the desktop profile (Display User Details setting). Additionally, a Primary Work Number must be configured in the user settings.
Limitations
-
Only users with a Primary Work Number configured in Webex Control Hub are searchable.
-
The feature does not expose presence information.
Post integration verification
To verify that the Webex Contact Center integration is installed and configured successfully, sign in as a test agent through the Microsoft Dynamics 365 connector and place several test calls to that agent. Confirm that agent sign-in and call handling work as expected.
For guidance on using the connector, see Access and use Webex Contact Center within Microsoft Dynamics 365.
Release updates
This update (relevant on May 05, 2026) addresses the following enhancements:
- No new package install required.
Features and Improvements
- Extend Search to Webex Directory
Archives
May 2026
- Enable agents to decline incoming WebRTC calls
March 2026
Features and Improvements
- Webex Calling and Contact Center state synchronization.
- Enhanced progressive and predictive campaign handling.
- Cancel Auto-Wrapup Timer flexibility.
December 2025
Features and Improvements
- Agents can now share the opened record during consultation and conference calls
- Agents can now use a dialpad during to initiate a consulation or transfer call
- Agents are now automatically logged out if they are inactive
November 2025
Features and Improvements
- Enable Agents to start outgoing calls from the Home screen using a dialpad
- Edit call subject field from within the connector
- Send DTMF Tones via keypad when using WebRTC
October 2025
Features and Improvements
- Send DTMF Tones via keypad when using WebRTC.
September 2025
- Enabled direct transfers to entry points for more seamless call routing.
- Provided the ability to update Outdial ANI settings.
- Introduced WebRTC mute and unmute functionality for better call control.
August 2025
Features and Improvements
- Added the ability to mute and unmute the microphone during active WebRTC calls.
- Pre-filled the dial number field on the login screen with the default dial number for quicker access.
- Enabled changing Team, DN, and Telephony options on the fly for increased flexibility.
- Enhanced CRM lookups by including related records for improved context.
July 2025
Features and Improvements
- Enabled selection of a phone number as the caller ID for outgoing calls.
- Added support for WebRTC in Microsoft Dynamics OEM.
- Provided the option to switch microphone and speaker devices during calls with WebRTC.
- Enabled rejecting incoming calls for better call management.
June 2025
Features and Improvements
- Switched event tracking for improved analytics and reporting.
- Automatically populated customer information into forms when creating new cases.
- Displayed queued consultation calls for enhanced visibility.
- Enabled selection of audio input and output devices.
- Improved the accuracy of the Disconnect Reason field on voice call records.
March 2025
Features and Improvements
- Improved data privacy by sanitizing actions for LogRocket.
- Enabled screen pops for existing CRM cases.
- Allowed initiating screen pops by a Webex Contact Center flow within Microsoft Dynamics.
- Enhanced voice channel login options based on Webex Contact Center configuration.
- Updated API endpoints for Webex Contact Center requests.
- Added support for consult, conference, and warm transfer to entry points.
- Improved integration by updating to the latest List Contact Service Queues API.
- Enhanced user experience by automatically closing open drawers when an alert is shown.
- Updated menu options to a sidebar layout for easier navigation.


