- Home
- /
- Article

Thanks for your feedback.

Outgoing call permissions for Webex Calling locations
 In this article
 Feedback?
You can determine the types of calls that users or workspaces or virtual lines at a location are allowed to make.
Outgoing call permissions
Outgoing call permissions refer to the specific privileges granted for initiating outbound calls. These permissions maintain security, prevent misuse, and ensure compliance with company policies. Use this feature to manage the behavior of the outgoing calls to different destinations.
You can set the outgoing call permissions at various entity levels, such as:
-
Locations
-
Users
-
Workspace
-
Virtual Lines
You can modify the call permissions, granting the option to either allow or block outgoing calls for a location. These permissions are available for users, workspaces, and virtual lines in a location. These defaults also apply to features within the location. Custom settings are also available for users, workspaces, and virtual lines. For user, workspace, and virtual line outgoing call permission configurations, see Configure-calling-permissions-in-Control-Hub
You can manage the outgoing calls with the following permissions:
-
Permissions by Call Type: You can define outgoing call permissions to allow or block calls by call types such as international, national, toll-free, and others. For example, you can use the calling permission Block to keep users from making National calls from the San Jose location.
-
Permissions by Digit Patterns: You have the flexibility to define digit patterns to allow or block matching numbers. This includes the ability to allow calls to specific countries, allow or block calls to a range of numbers, restrict users to dial only a few approved external numbers, or block a specific range of premium numbers. It's important to note that the defined digit patterns have precedence over permissions by call type.
-
You can control outbound call types or digit patterns with the following:
-
Allow—Callers at this location can make these types of calls.
-
Block—Callers at this location can’t make these types of calls.
-
Require Authorization Code—Callers must enter a valid authorization code before placing these types of calls. You can configure up to 1000 authorization codes per location and 1000 for each user or workspace or virtual line for an outbound calling plan.
-
Auto-transfer to number 1, 2, or 3—If you select this, then these types of calls are transferred automatically to the number you choose.
Set the authorization codes and transfer numbers before you can apply them.
The following precedence rules apply to outgoing calls:
-
If your organization does not have the Cisco calling plan, only internal calls are allowed and all other call types are blocked.
-
For location and custom settings, custom digit patterns for user, workspace, or virtual lines are applied first. If no configurations match, the system defaults to applying the location settings.
-
The digit pattern configurations take precedence over permissions by call type.
-
The Verify Call Routing feature in the Control Hub allows you to test and to verify outgoing call permissions. For more information, see Verify call routing.
The following allows you to navigate to the respective outgoing call permission pages:
-
Sign in to Control Hub.
-
Go to Management and select Locations.
-
Select the location that you want to update the calling permissions for.
-
Select Calling, and then scroll down to Call Handling. Click to expand Outgoing Call Permissions.
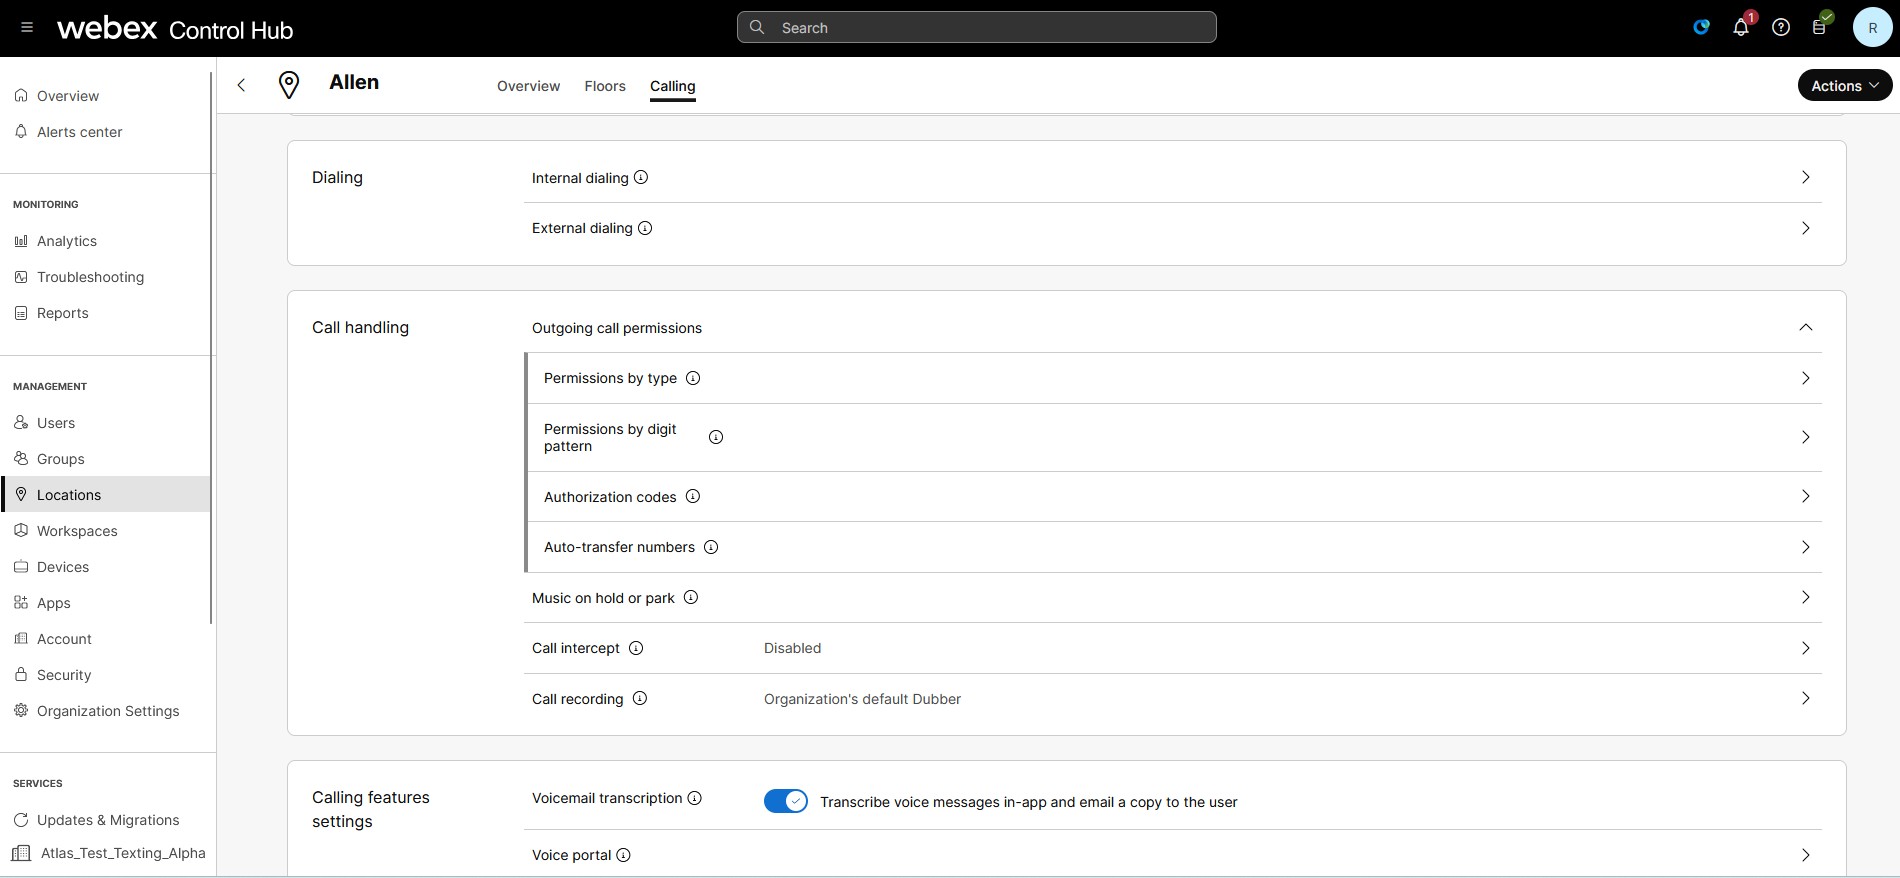
-
Click the permissions type and navigate to the respective configuration page.
Permissions by call type
The following is a list of different outbound call types available for Webex Calling in the Control Hub:
-
Internal Calls—are calls within your own company. It includes calls to others within your own site and to other locations as well.
-
Toll Free Calls—are calls to a telephone number that is billed for all arriving calls instead of incurring charges to the originating caller, it is free of charge from a landline.
-
National Calls—are calls within your country of origin, both within and outside of your local area code.
-
International Calls—are calls to locations outside of your country that require an international calling code before the number is dialed. Calls between the US, Canada, and Puerto Rico are an exception as calls among these countries aren’t treated as international currently.
-
Operator Assistance Calls—are any calls starting requiring Operator Assistance.
-
Chargeable Directory Assistance Calls—are calls to Directory Assistant companies that require a charge to connect the call.
-
Special Services I and Special Services II—are calls to carrier-specific number assignments to special services or destinations.
-
Premium Services I and Premium Services II—provides information or entertainment for a fee charged directly to the caller.
For each of the call types, you can choose to Allow, Block, require an Authorization Code, or Auto-transfer to the first, second, or third number.
Allow transfer/ forwards determines if you’re allowed to transfer or forward a specific outgoing call type.
Use the following steps to configure outgoing call permissions as per call type:
| 1 |
Sign in to Control Hub. | |||||||||||||||||||||||||||||||||
| 2 |
Go to Management and select Locations. Select the location to update the Calling permissions. | |||||||||||||||||||||||||||||||||
| 3 |
Select Calling, and then scroll down to Call Handling. Click to expand Outgoing Call Permissions. | |||||||||||||||||||||||||||||||||
| 4 |
Click the right arrow against the Permissions by type option to expand and choose the Call Type that you want to update. Following are the call types and the default values:
| |||||||||||||||||||||||||||||||||
| 5 |
You can control each of the call types with the following permissions:
| |||||||||||||||||||||||||||||||||
| 6 |
(Optional) Check Allow transfer/ forwards to redirect the outbound calls. You can redirect the outbound calls with Allow transfer/ forwards, which determines if you’re allowed to transfer or forward a specific outgoing call type.
| |||||||||||||||||||||||||||||||||
| 7 |
(Optional) Click Reset All to restore initial default settings. |
Permissions by digit pattern
Pattern match
The system matches the outbound dial number with the configured pattern and selects the best match to process the call further.
Following are the pattern expansion algorithm for weighting the pattern choice:
-
Exact digit = 1
-
Digit range = number of digits in the range
-
X wildcard = 10
-
! = 10 for each digit after the prefix match
For example, if the dial number is 123456, then based on the pattern
expansion criteria, the expansion for the pattern 12X[0-5]! is 6000
(1 * 1 * 10 * 6 * 10^2). If there are no other patterns with lesser expansion
weight than 6000, then 12X[0-5]! is selected as the matching
pattern.
For multiple matches, the best matching pattern is determined based on the following rules:
-
Selects the pattern with the lesser number of possible expansions.
For example, the dial number
1234matches with two patternsP1: XXXXandP2: 123!, then compute the possible expansions for the patternsP1: 10*10*10*10= 10^4andP2: 1*1*1*10=10. The number of possible expansions for P2 is lesser than P1. Based on the rule, P2 is selected as the best pattern. -
If the number of possible expansions for a pattern are the same, then a wildcard precedence of the pattern is compared with a precedence order of exact digit, digit range, 'X' wildcard, and '!' wildcard.
For example, the dial number
1234matches with two patternsP1: 123XandP2: X234, then compute the possible expansions for the patternsP1: 1*1*1*10 = 10andP2: 10*1*1*1 = 10. The number of possible expansions for both P1 and P2 are the same. But P1 has an exact digit match at digit position 1 while P2 has wildcard X. Based on the rule, P1 is selected as the best pattern. -
If the number of possible expansions and wildcard precedence is the same, then the string in the patterns compared and the lexicographically lesser pattern is selected.
For example, the dial number
1234matches with two patternsP1: 1[0-5]3XandP2: 1[1-6]3X, then compute the possible expansions for the patternsP1: 1*6*1*10 = 60andP2: 1*1*6*10 = 60. The number of possible expansions and wildcard precedence is the same, but P1 is lexicographically lesser than P2. Based on the rule, P1 is selected as the best pattern.
Add digit pattern
| 1 |
Sign in to Control Hub. |
| 2 |
Go to Management and select Locations. Select the location to update the Calling permissions. |
| 3 |
Select Calling, and then scroll down to Call Handling. Click to expand Outgoing Call Permissions. |
| 4 |
Click on the right arrow against the Permissions by digit pattern field. The Permissions by digit pattern page displays. 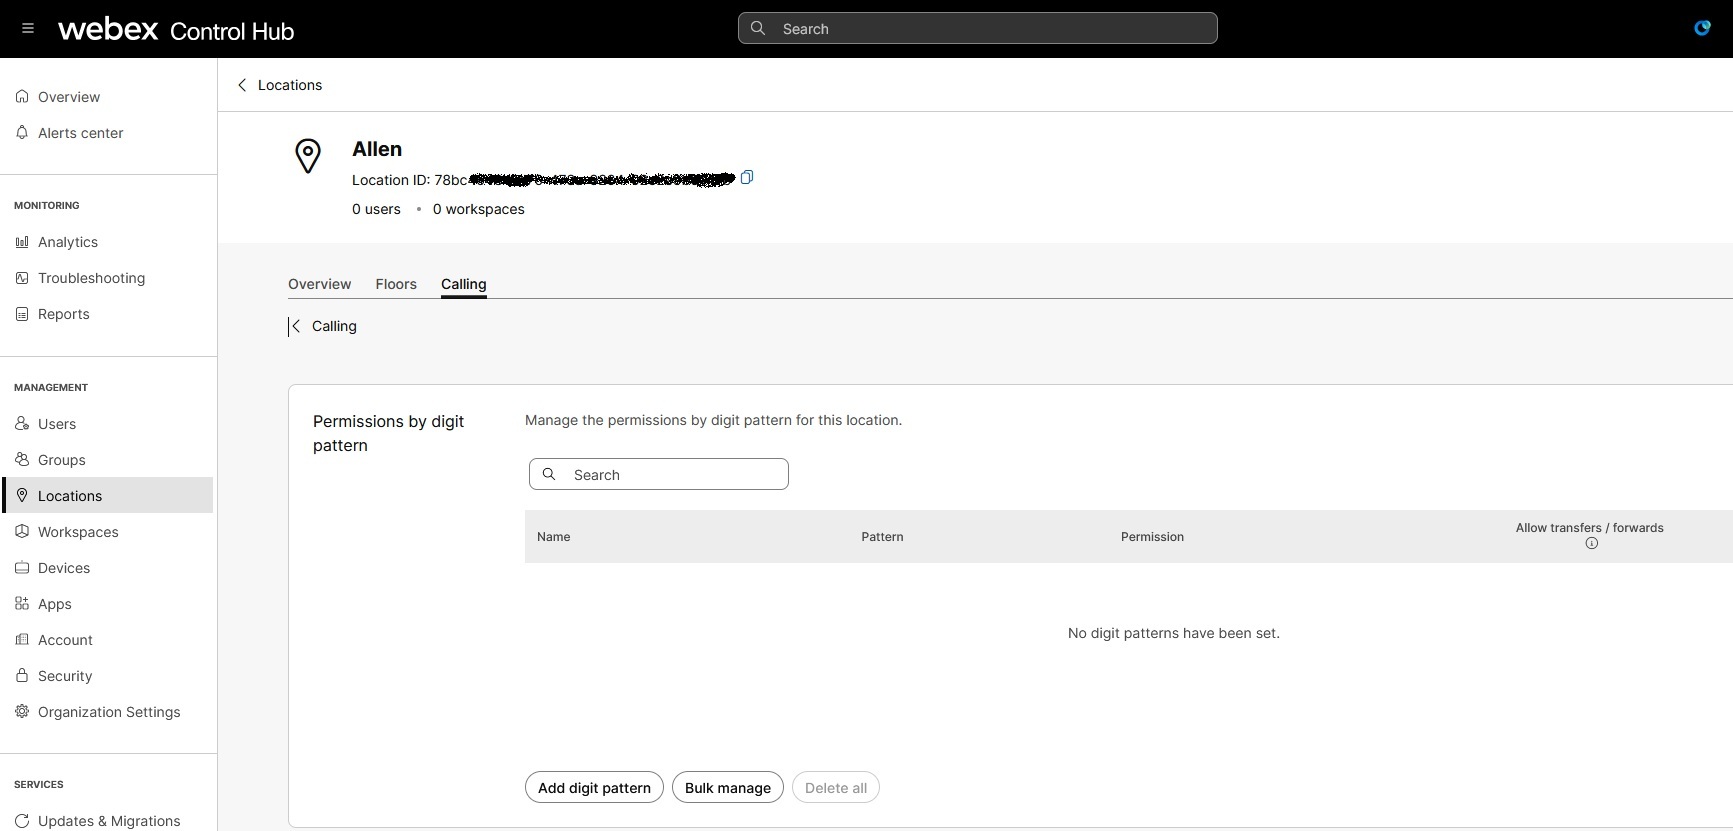
|
| 5 |
Click Add digit pattern to add a new digit pattern. Enter a unique Name for the pattern. Follow the constraints while adding a pattern name:
|
| 6 |
Enter a unique Pattern. Follow the constraints while adding the digit pattern:
|
| 7 |
From the Permission drop-down, choose the type of permission. Supported permissions are—Allow, Block, Requires authorization code, and Autotransfer to number 1, 2, or 3. |
| 8 |
(Optional) Check Allow transfers/forwards for the defined digit pattern. You can redirect the outbound calls with Allow transfer/
forwards, which determines if you are allowed to transfer or forward a
specific outgoing call type.
|
| 9 |
Click Add. |
Delete or delete all digit pattern
| 1 |
Go to Permissions by digit pattern page and select an instance from the existing list. |
| 2 |
Click Delete to delete a specific digit pattern from the list. |
| 3 |
(Optional) Click Delete All to delete all the patterns from the list. |
Bulk manage permissions by digit pattern
With Bulk Manage, you can use CSV files to provision a maximum of 500-digit patterns. You can efficiently add or modify the digit patterns for each entity, such as a location, user, workspace, or virtual line. Each CSV file may contain up to 1000 rows, and every row can include up to 25-digit patterns.
You can configure a maximum of 500-digit patterns per location, user, workspace, or virtual line.
| 1 |
Go to Permissions by digits pattern page and click Bulk Manage. | ||||||||||||||
| 2 |
In the Manage permissions by digit pattern screen, from the drop-down choose the Location. Click Download data and download the current .csv data. Edit the digit patterns in the spreadsheet. | ||||||||||||||
| 3 |
(Optional) Click Download .csv template and download a blank .csv template. Add the digit patterns as required. | ||||||||||||||
| 4 |
Edit the following columns in the CSV template for bulk management of location: Never remove columns and header from the CSV file. If you don’t wish to modify, then you can clear values from the columns. Blank cells in CSV during import mean "no change."
| ||||||||||||||
| 5 |
Drag and drop your .csv file or click choose a file to upload the modified .csv file. You can upload the modified .csv file to apply all the changes made to the digit patterns. | ||||||||||||||
| 6 |
Click Upload. Webex processes your modified CSV file and updates your digit
patterns.
|
Authorization Codes
Add an authorization code
| 1 |
Sign in to Control Hub. |
| 2 |
Go to Management and select Locations. Select the location to update the Calling permissions. |
| 3 |
Select Calling, and then scroll down to Call Handling. Click to expand Outgoing Call Permissions. |
| 4 |
Click the right arrow against the Authorization Codes field, and the Authorization Codes page displays. Click on Add code. 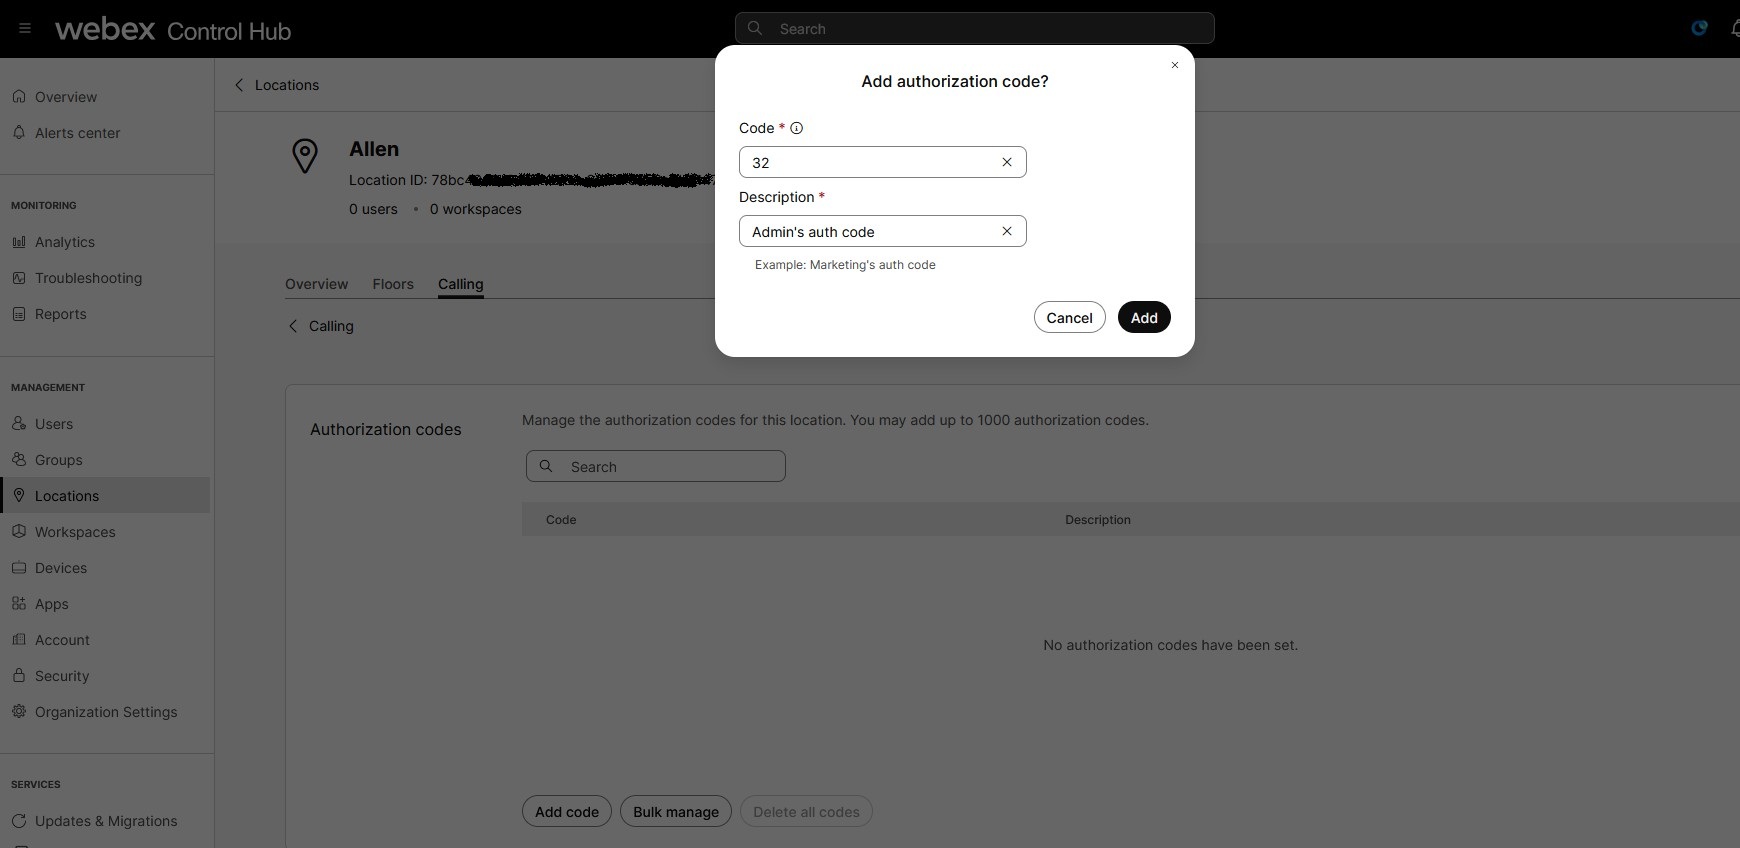
|
| 5 |
Enter a description and the code that you want to add. The maximum length for an authorization code is 14 digits. You can configure authorization codes of up to 1000 per location and 1000 for each user or workspace or virtual line. |
| 6 |
Click Add. |
Delete an authorization code
| 1 |
Go to Authorization Codes page and select a code from the existing list. |
| 2 |
Click Delete. |
| 3 |
(Optional) Click Delete All to delete all the codes from the list. |
Bulk manage authorization codes
With the bulk manage, you can add up to 1000 authorization codes at a time.
| 1 |
Go to Authorization codes page and click Bulk Manage. | ||||||||||
| 2 |
Select the Location from the dropdown list, and click Download data. You get a CSV file with all the authorization codes for your
location.
| ||||||||||
| 3 |
(Optional) Click Download .csv template and download a blank .csv template. | ||||||||||
| 4 |
Edit the following columns in the CSV template for bulk management of location: Never remove columns and header from the CSV file when preparing. But, you can clear values from columns you don’t wish to modify and the blank cells in CSV during import means "no change".
| ||||||||||
| 5 |
Drag and drop your .csv file or click choose a file to upload the modified .csv file. | ||||||||||
| 6 |
Click Upload. |
Auto-transfer number
Add an auto-transfer number
You can add up to three auto-transfer numbers.
| 1 |
Go to Auto-transfer numbers page and enter auto-transfer numbers. |
| 2 |
Enter the transfer numbers 1, 2, 3. |
| 3 |
Click Save. |
Delete an auto-transfer number
| 1 |
Go to Auto-transfer numbers page and click x located next to the number. |
| 2 |
Click Delete and confirm. |


