- Home
- /
- Article

Thanks for your feedback.

Anti-malware scanning of files in Webex App
 In this article
 Feedback?
Protect users by scanning all file uploads for Trojan attacks, viruses, malware, and other malicious threats.
Anti-malware protection
With Extended Security Pack, you can choose to enable anti-malware scanning for files uploaded in Webex App. Webex anti-malware capabilities are powered by Cisco Talos ClamAV.
When people upload files in Webex App, the files are scanned for malware and if the files are infected, people won't be able to download or preview the file. When files are first uploaded, they are automatically quarantined for evaluation and users can't download or preview the file during the evaluation period.
Supported versions
Anti-malware is supported on the following versions of Webex App:
-
Webex App for Windows 3.0.14375.0 or later
-
Webex App for Mac 3.0.14375.0 or later
-
Webex App for iPhone and iPad 4.9 or later.
When a user uploads an infected file with an older Webex App, or from Webex App for Android, the file is quarantined but the uploader won't see a file infected error message.
Things to keep in mind
-
The scanner does not work on previously uploaded files; we check all files that users upload from the time when you enable anti-malware scanning.
-
The scanner does not check or recheck previously uploaded files, even when new malware signatures are available to the scanning engine.
-
The scanner checks all files uploaded to spaces owned by your organization. This includes group spaces and one-on-one spaces with external users.
-
Users in organizations with anti-malware protection are always protected from malware.
-
The previous point has implications for your users in spaces owned by external organizations that do not have anti-malware protection:
-
We scan all files uploaded by your organization's users, because your organization has malware protection. This includes files that your users upload to group spaces and one-on-one spaces in the external organization.
-
If a user from an organization without malware protection uploads a file to a group space, we do not scan that file at the time of upload - because neither the user nor the space-owning organization has malware protection.
We scan that file at the time that your user attempts to download that file.
-
Enable anti-malware protection
| 1 |
Sign in to Control Hub at https://admin.webex.com/, and open the Messaging page. |
| 2 |
Scroll to Anti-Malware File Scanning and enable Virus and Malware Protection. |
View anti-malware scan history
| 1 |
Sign in to Control Hub at https://admin.webex.com/, and open the Messaging page. |
| 2 |
Scroll to Anti-Malware File Scanning and choose a date range.
The page automatically updates to show the count of files scanned in that period, and how many of those files were infected. 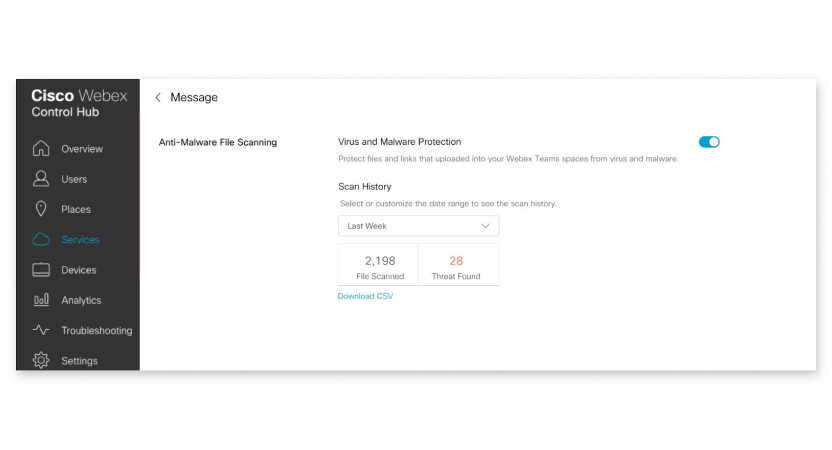
|
| 3 |
Click Download CSV to get a report with details of the files and scan results. |
Report issues
| 1 |
To report an issue with the anti-malware scan, choose one of these options:
The malware engine support team processes your request.
|
| 2 |
If your reported issue persists beyond 48 hours after you reported it, contact the Cisco Technical Assistance Center (TAC). |


