Salesforce を Webex アプリに連携させる
 フィードバックがある場合
-
通話—Salesforce レコード内の関連する連絡先に電話をかけたり、グローバルダイヤラーを使用して任意の番号にダイヤルしたり、着信通話を受信したりします。
-
メッセージ—Salesforce オブジェクトに関連付けられたスペースを作成および管理します。インプレース メッセージングを使用して、コンテンツをメッセージに添付し、以前のスペース コンテンツにアクセスします。
-
会議—Salesforce を離れずに会議を管理します。ワンクリックでミーティングをスケジュールして参加し、関連するミーティング情報を Salesforce オブジェクトに関連付けます。
Webex App integration for Salesforceで利用できる主な機能の設定に関する詳細は、次のガイドを参照してください:
- Salesforceのインバウンドコール機能を有効にする
- Salesforceの外線発信機能を有効にする
- Salesforceで営業案件のコラボレーション機能を有効にする
- SalesforceでWebexスペース通知を有効にする
操作方法に関 するビデオも必ず確認してください。Salesforce と Webex アプリのインテグレーションのあらゆる局面をカバーするビデオを作成しました。
Webex for Salesforce 統合に関する重要な変更とお知らせ。
承認フローの変更
管理の複雑さを軽減するために、Webex Salesforce 認証フローがバージョン 1.19.0 から変更されました。既存の承認構成を更新するには、次の手順を実行する必要があります。
- Salesforce から既存の Webex 接続アプリを削除します。
- 名前付き資格情報をすべて削除します。
- 既存の承認プロバイダーを削除します。
- 新しい Webex 接続アプリを作成します。
続行する前に、次の前提条件を満たしていることを確認してください。
- セットアップを実行するユーザーは、統合がインストールされる Salesforce 組織の管理者である必要があります。
-
このインテグレーションでは、少なくとも Salesforce エンタープライズ エディションをインストールする必要があります。詳細については、「Salesforce エディション」をご覧ください。
- 組織では、メッセージング、会議、通話などの必要な機能に対応する適切なライセンスで Webex を設定する必要があります。
- 統合を使用するすべてのユーザーは、Salesforce へのアクセスと必要な Salesforce ライセンスを持っている必要があります。
- Salesforce 内から Webex Meetings や Webex Calling などの特定の Webex 機能を使用するには、すべてのユーザーが必要な Webex ライセンスを持っている必要があります。
CUCM および Broadworks は部分的な機能でサポートされています。詳細については、 通話 タブの 通話制限 を参照してください。
- この統合は Salesforce Lightning で利用できます。
Lightning コンポーネントを使用するには、「私のドメイン」を組織内に展開する必要があります。詳細については、Salesforce の「私のドメイン」のドキュメントを参照してください。
-
組織内のインテグレーションへのユーザー アクセスを構成する必要があります。
-
Pro Pack なし—基本的な Control Hub をお持ちの場合は、すべてのユーザーに対してすべての統合へのアクセスを許可するか拒否するかを選択できます。
-
Pro Packを使用 — Pro Packを使用すると、ユーザーの統合へのアクセスを管理するための高度な機能が利用できます。
詳細については、「インテグレーションへのユーザー アクセスを設定する」を参照してください。
-
Webex Salesforce 統合のバージョン 1.14 以降では、Salesforce Exchange を使用してアップグレードできるようになりました。
重要: v1.14 より古いバージョンのパッケージを使用している場合は、既存のパッケージをアンインストールし、この記事の手順に従って Salesforce AppExchange から最新のパッケージに更新する必要があります。既存のパッケージをアンインストールするときには、 データを保持する を選択して、Salesforce オブジェクトへの既存のスペースおよび会議のリンクが削除されないようにしてください。アンインストール後、データは最大 48 時間保存されます。
Salesforce Exchange 経由で Webex 統合をインストールするには:
- AppExchange の Webex App for Salesforce に移動します。
- 今すぐ入手を選択します。
- 統合をインストールする 接続された組織 を選択します。
- 管理者専用のアプリをインストールしてください。
- [インストールと管理] タブで [] Webex 統合を承認する に進みます。
構成手順に従う前に、 まずアプリケーションに移動して、リリース ノートWebex App Salesforce Packageの最新バージョンをダウンロードする必要があります。
要件
Salesforce エンタープライズ エディション
このインテグレーションでは、少なくとも Salesforce エンタープライズ エディションをインストールする必要があります。詳細については、「Salesforce エディション」をご覧ください。
Salesforce.org の「私のドメイン」
Lightning コンポーネントを使用するには、「私のドメイン」を組織内に展開する必要があります。詳細については、Salesforce の「私のドメイン」のドキュメントを参照してください。
Control Hub のユーザー アクセス
組織内のインテグレーションへのユーザー アクセスを構成する必要があります。
-
Pro Pack なし—基本的な Control Hub をお持ちの場合は、すべてのユーザーに対してすべての統合へのアクセスを許可するか拒否するかを選択できます。
-
Pro Packを使用 — Pro Packを使用すると、ユーザーの統合へのアクセスを管理するための高度な機能が利用できます。
詳細については、「インテグレーションへのユーザー アクセスを設定する」を参照してください。
通話
-
Webex Calling は Salesforce 内の通話コントロールで、着信と発信が完全にサポートされています。
-
Webex (Unified CM) での通話は部分的にサポートされています。発信コールのときにのみ、Salesforce へのロギング ポップアップが表示されます。着信の場合、Webex アプリの着信音が鳴りますが、Salesforce での通話のインターセプトは行えないため、ロギング ポップアップは表示されません。
始める前に
最新の Webex App Salesforce パッケージをダウンロードします。
| 1 |
管理者の資格情報を使用して、本番環境の Salesforce 環境にサインインします (インストール URL には |
| 2 |
[管理者のみにインストール]を選択し、[確認]にチェックを入れます。次に、[インストール] をクリックします。 |
| 3 |
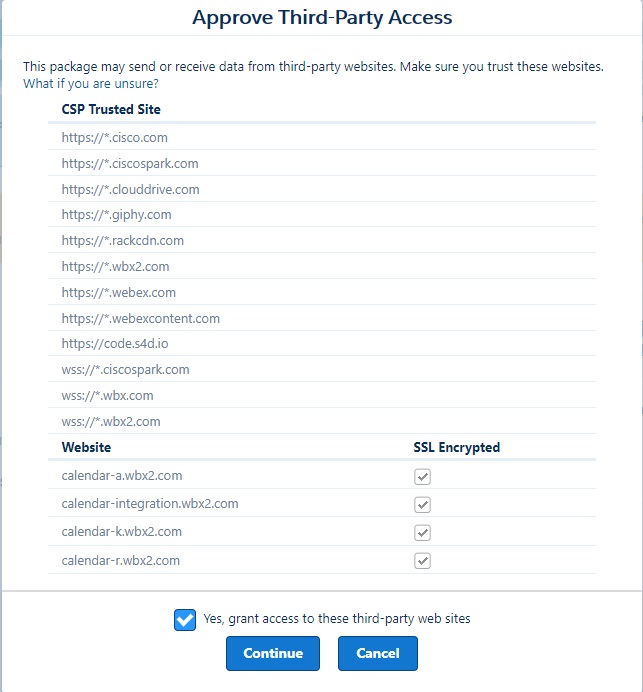
[はい、これらの第三者の Web サイトへのアクセスを許可します] をクリックして、CSP の信頼済みサイトのリストにある[続行] をクリックします。 Webex サービスに必要な信頼済みサイトの詳細については、「Webex サービスのネットワーク要件」を参照してください。 |
| 4 |
パッケージがインストールされたら、Salesforce で [Webex 管理] タブに移動します。 後の設定手順で必要になるため、[Webex 管理] タブを開いたままにします。 |
始める前に
これらのステップでは、Cisco 開発者アカウント アクセス () が必要です https://developer.webex.com。
| 1 |
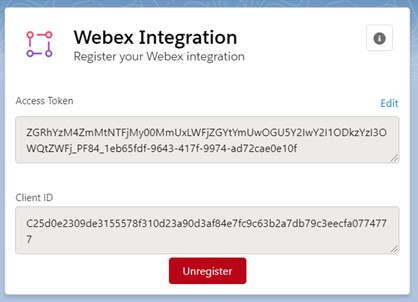
(詳細については「自分の詳細を取得ドキュメント」を参照) に移動し、アクセス トークンを承認のためにコピーします。
|
| 2 |
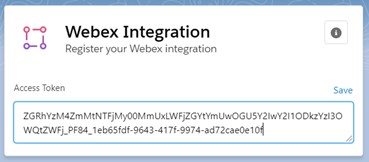
salesforce.com の Webex 管理者ページの [Webex インテグレーションの設定] ウィンドウにある [アクセストークン] フィールドにアクセストークンを貼り付けて、[保存] をクリックします。
|
| 3 |
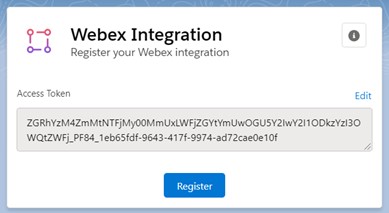
[登録] をクリックします。
統合が正常に完了すると、完了メッセージが表示されます。 メジャー リリースについては、Salesforce でアクセス トークンを再度登録する必要があります。 |
| 4 |
(オプション) 統合の状態を確認するには、同じユーザーのアクセス トークンを入力して、[保存] をクリックします。 統合のステータスを確認するには、最初に使用したユーザーと同じユーザーのアクセス トークンを使用する必要があります。 開発者ポータルからコピーしたアクセストークンの有効期限は 12 時間です。 統合のステータスとともに次のウィンドウが表示されます。
|
Webex for Salesforce バージョン 1.18 以前を使用している場合は、Salesforce 内で Webex Calling を使用する前に、Salesforce 認証を設定する必要があります。この記事のセクションに従って、起動して実行してください。
これらの手順は、Webex Salesforce 統合のバージョン 1.18 以前を使用している顧客に適用されます。バージョン 1.19 以降の更新された手順を参照してください。インストールと管理 タブで Salesforce 認証 (1.19 以降) を構成します。
1. 接続されたアプリを作成する
新しい接続アプリを作成するには:
- セットアップで アプリマネージャ を検索し、 新しい接続アプリを選択します。

- 接続アプリケーション名を入力します (例: MyExampleApp) 。
- 連絡先メールアドレス を入力してください。
- OAuth設定を有効にするをチェックします。
- プレースホルダーのコールバック URL を指定します (これは後で更新されます) (例:
https://localhost/placeholder) 。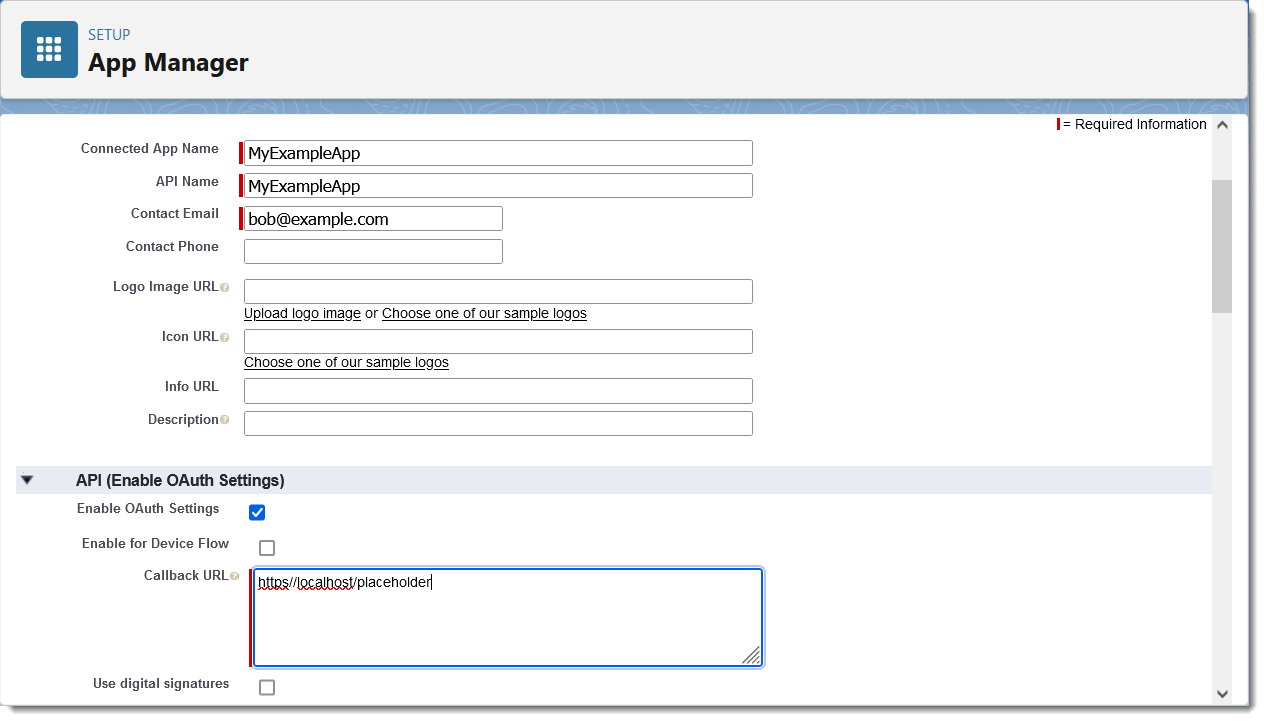
- 下にスクロールして、次の OAuth スコープを選択します。
- フルアクセス(フル)
- いつでもリクエストを実行 (refresh_token、 offline_access)
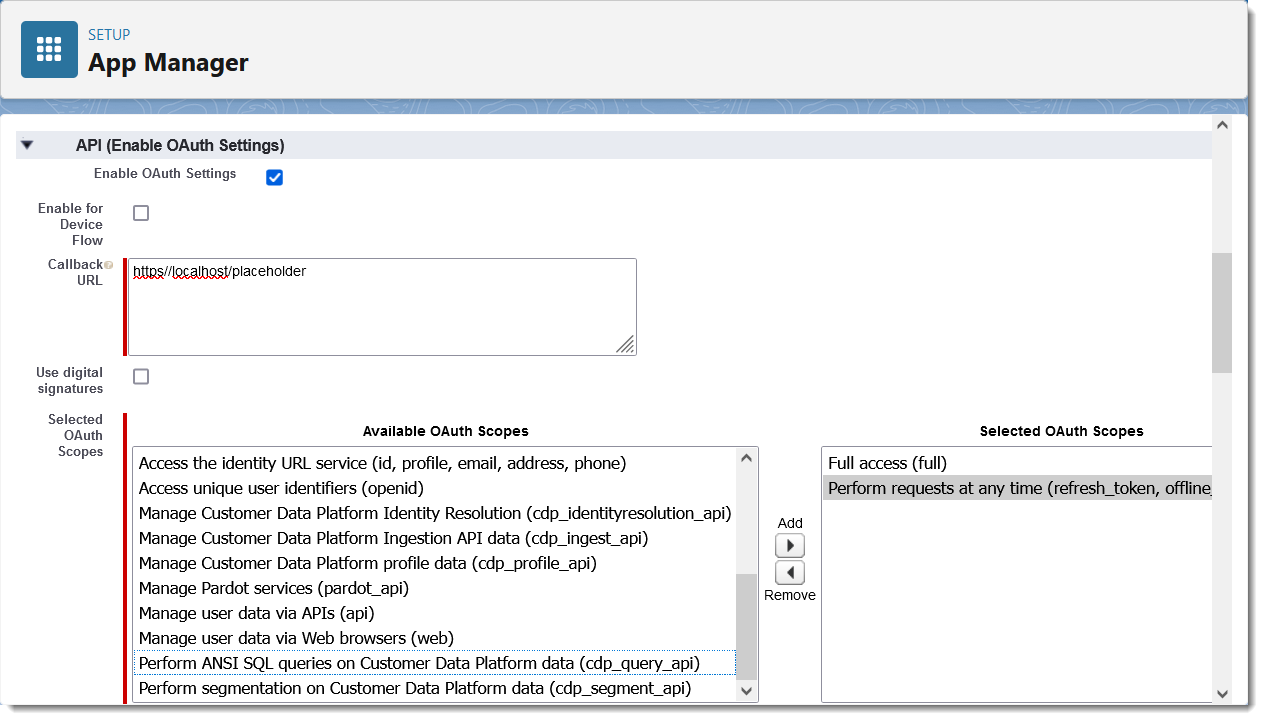
いつでもリクエストを実行 スコープにより、セッションの有効期限が切れたときに名前付き資格情報でアクセス トークンを更新できるようになります。
- ページの一番下までスクロールして 保存 をクリックし、 続行をクリックします。
- 次のページで、 API (OAuth 設定の有効化) までスクロールし、 コンシューマーの詳細の管理をクリックします。

Salesforce での再認証が必要になる場合があります。
- コンシューマーキー と コンシューマーシークレットをメモします。
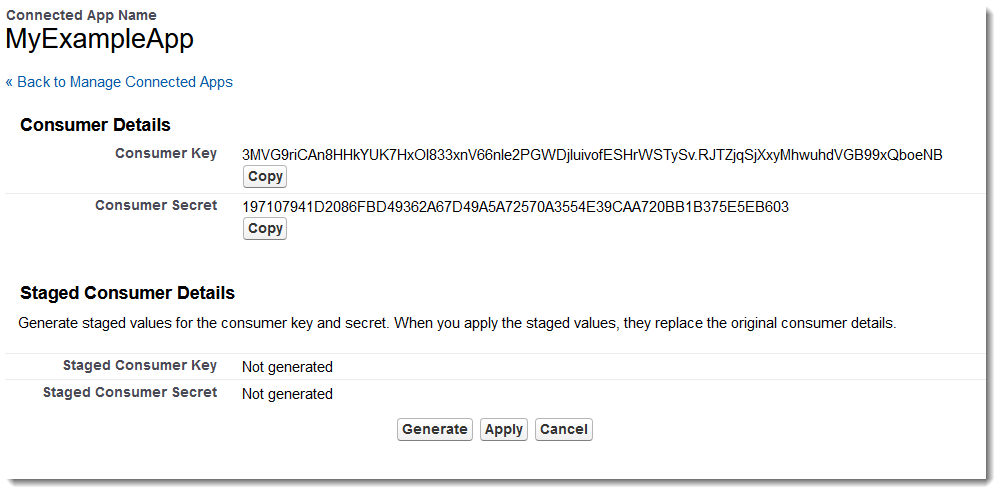
2. 認証プロバイダーを作成する
次に、Salesforce 組織との認証を容易にする認証プロバイダーを作成する必要があります。
認証プロバイダーを作成するには:
- セットアップで、 認証 を検索し、 認証 を選択します。プロバイダー。[新規] をクリックします。
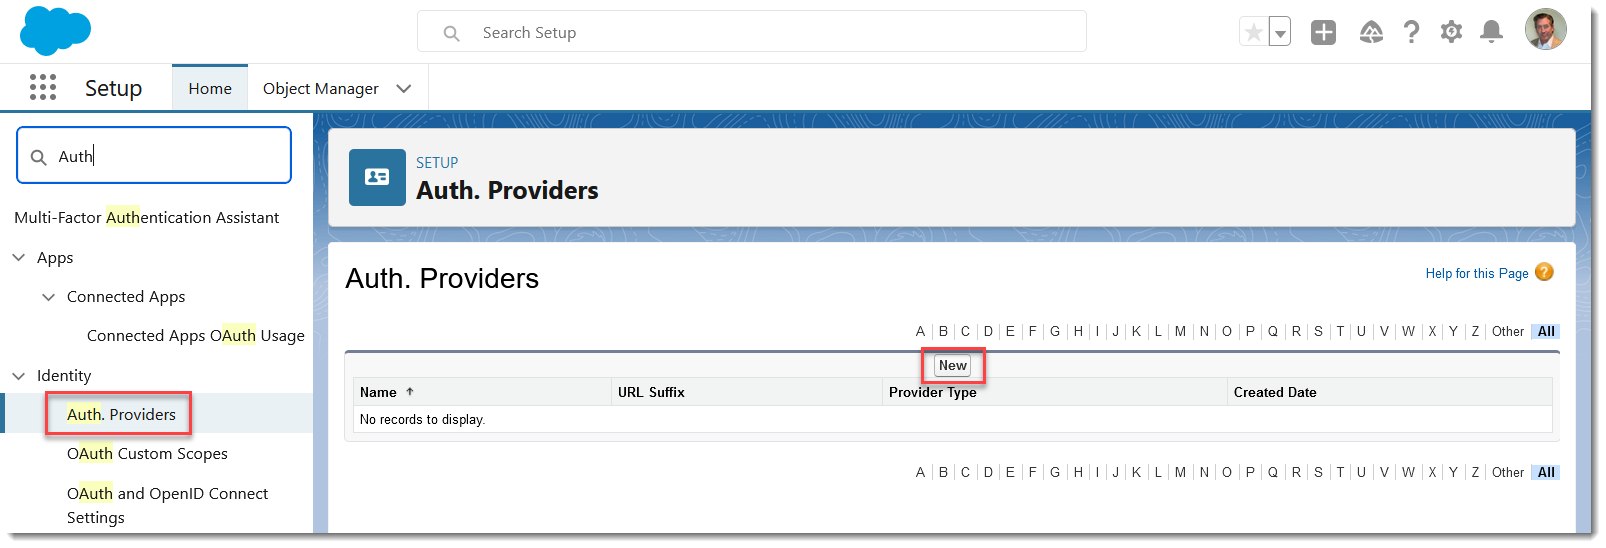
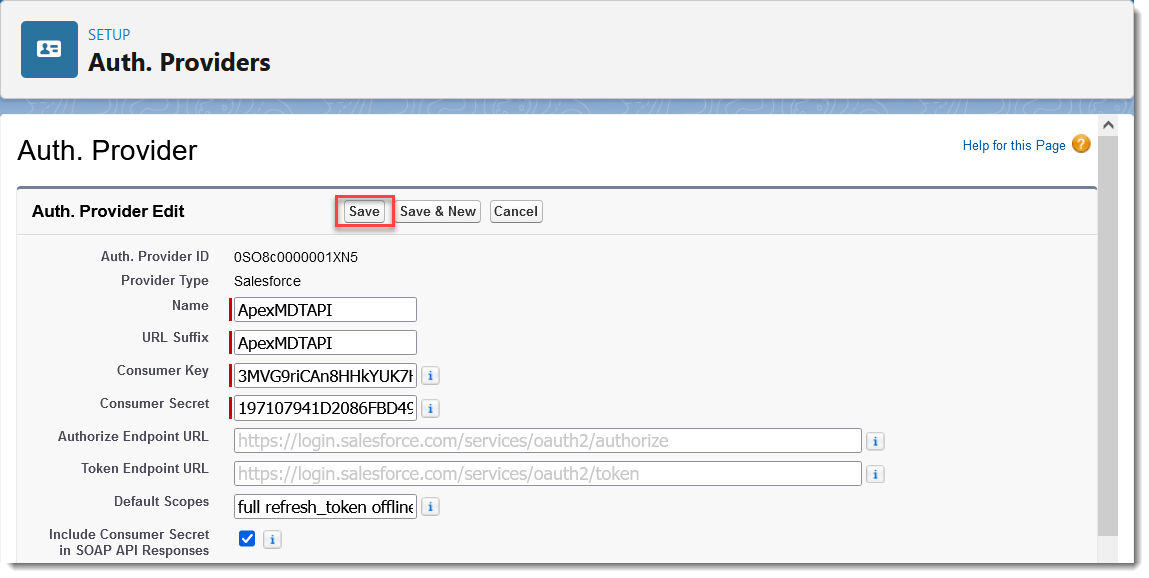
- プロバイダータイプとして Salesforce [ を選択します。
- 認証プロバイダーの名前を入力します(例: ApexMDTAPI) 。
- 接続されたアプリを構成するときに保存した コンシューマー キー と コンシューマー シークレット を貼り付けます。
- デフォルトスコープ、 フル refresh_token offline_accessに次のスコープを入力します。
- その他はすべて空白のままにして、 保存をクリックします。
- Salesforce 構成 セクションから [ コールバック URL をコピーします。
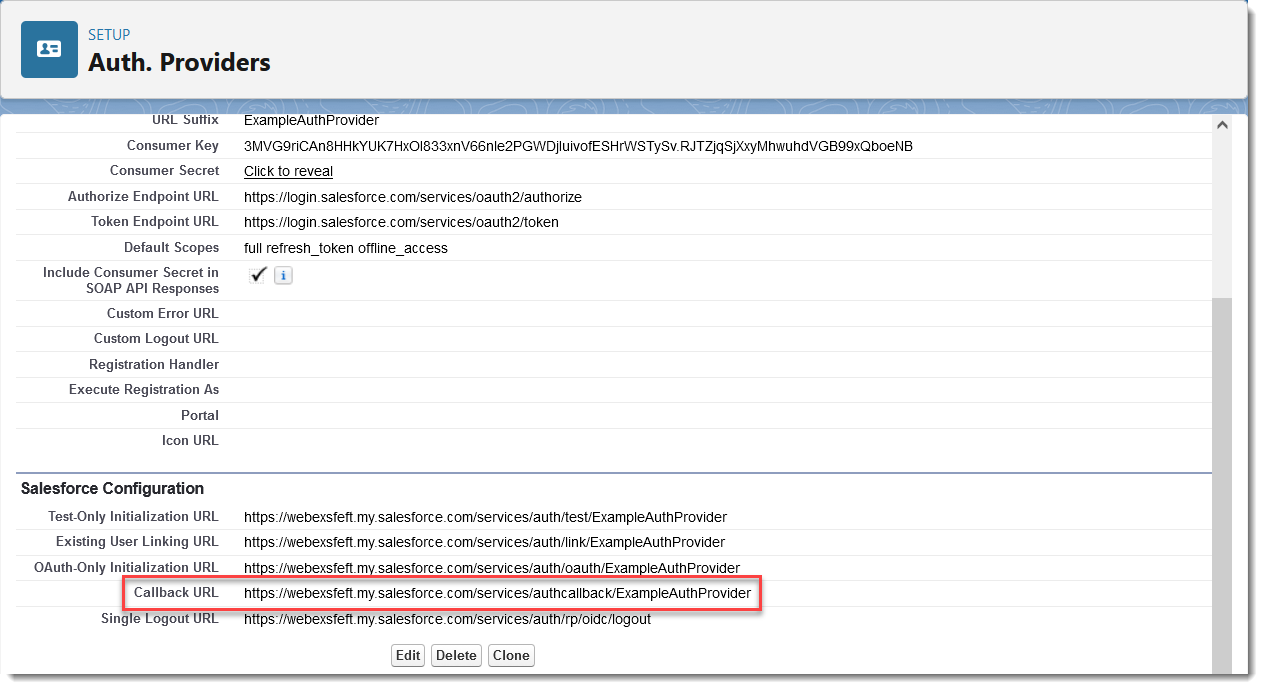
- 接続されたアプリケーションを編集し、プレースホルダー URL を上記の Salesforce 構成 からコピーした コールバック URL に置き換えます。
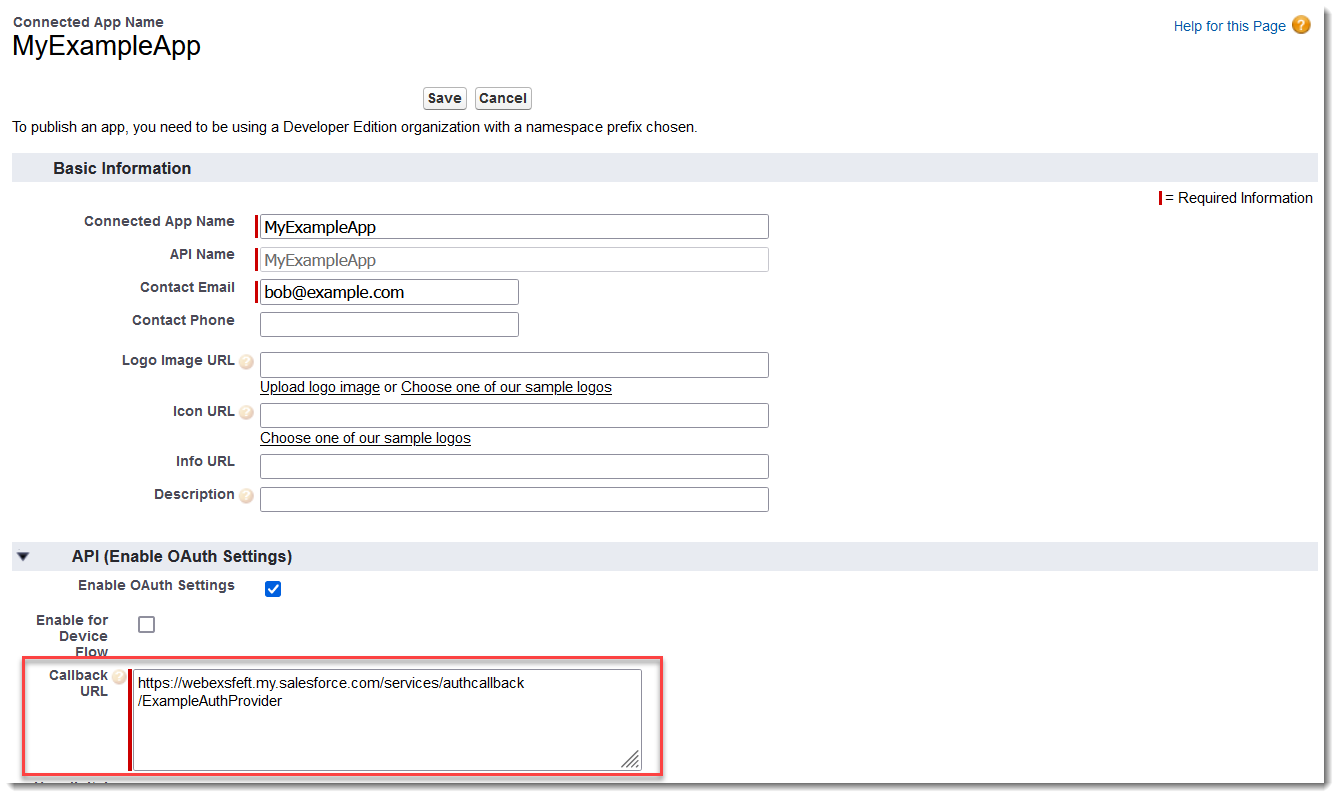
- 接続されたアプリを保存します。
設定が有効になり、Salesforce のインフラストラクチャ全体に伝播されるまで、最大 10 分ほど待つ必要がある場合があります。
3. 名前付き認証情報を作成する
次に、名前付き資格情報を作成する必要があります。
名前付き資格情報を作成するには:
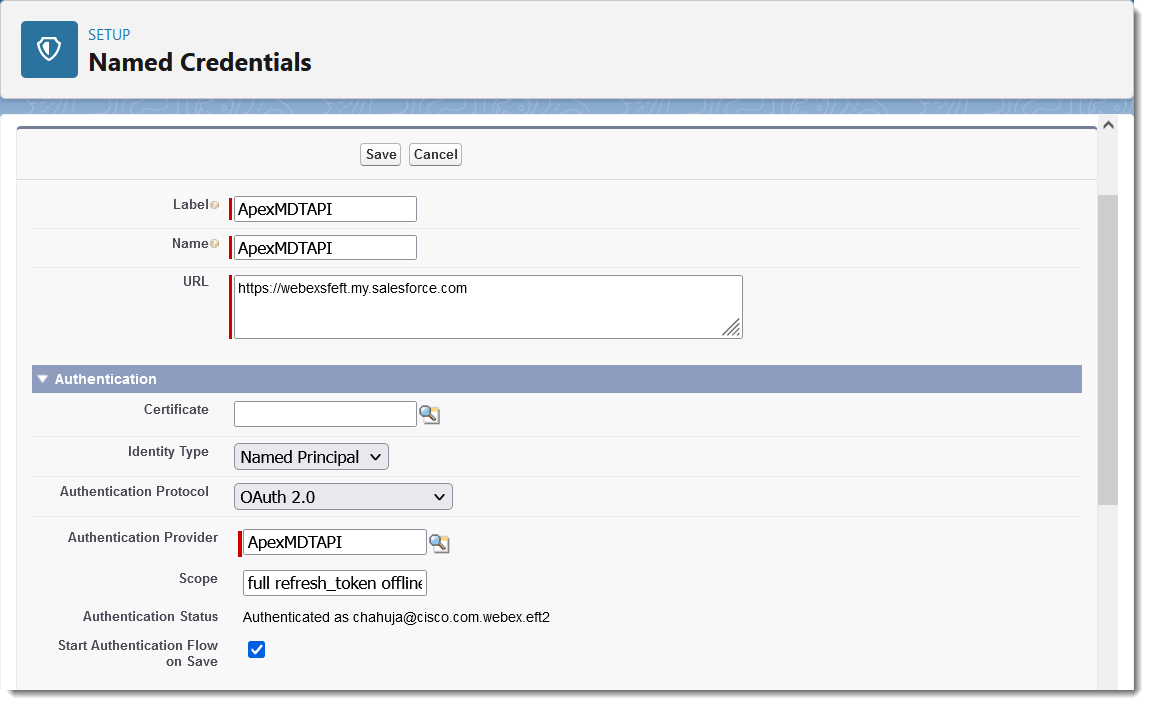
- セットアップで、 名前付き を検索し、 名前付き資格情報を選択します。 新しいレガシーをクリックします。

- Label、 ApexMDTAPIに次の値を入力します。
- URLには、組織のインスタンスの URL(例: https://na1.salesforce.com)を入力するか、 My Domainを使用している場合は、完全修飾された My Domain ドメイン名(例: https://mycompany.my.salesforce.com)を入力します。
- ID タイプには、 名前付きプリンシパルを選択します。
- 認証プロトコル には OAuth 2.0を選択します。
- 認証プロバイダーには、先ほど作成した認証プロバイダーを選択します。
- スコープには、 full refresh_token offline_accessと入力します。
- 保存時に認証フローを開始するを有効にします。
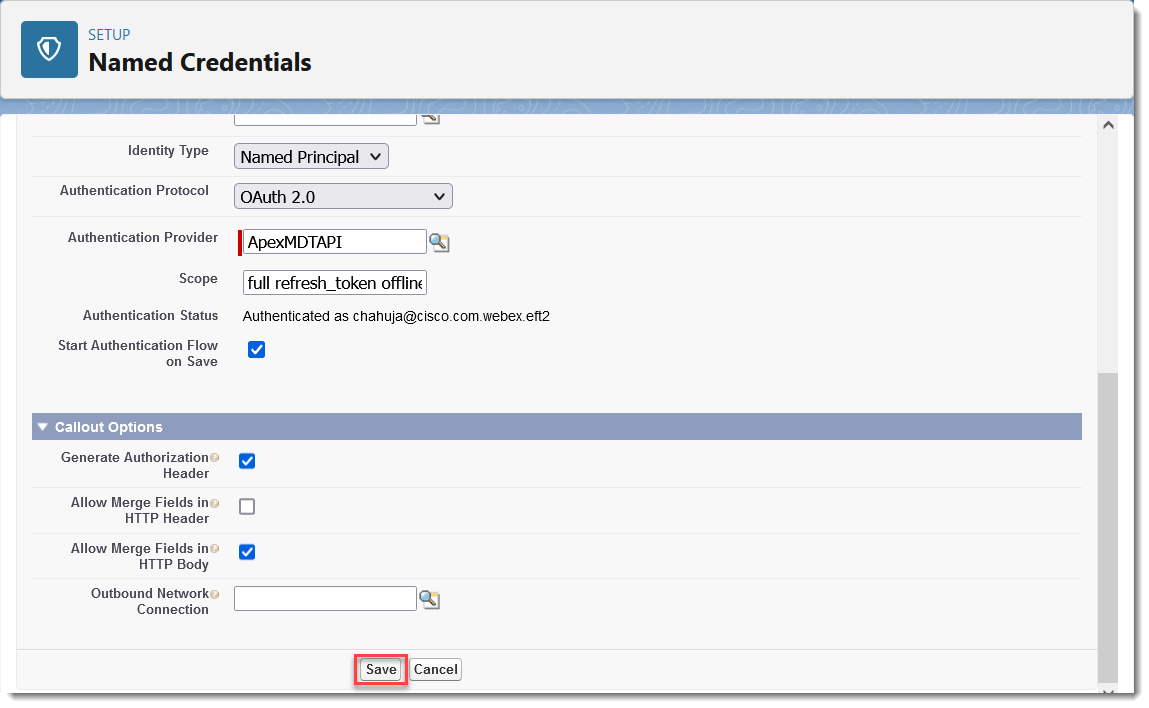
- コールアウト オプションで、 HTTP 本文での結合フィールドの許可 を有効にし、 保存をクリックします。
- 組織にログインするように求められます。ログインすると、 アクセスを許可 ダイアログが表示されます。許可をクリックします。
- その後、 名前付き認証情報 画面にリダイレクトされ、 認証ステータス に 認証済みと表示されます。 your-email@domain.com.
4. Webex管理画面でサイトを作成する
最後に、 通話 タブの次のトピック「 通話用サイトの作成」に進みます。
重要: サイト構成中は上記の命名規則に従ってください。
Webex for Salesforce 統合バージョン 1.19 以降の場合、この記事の手順に従って、認証、名前付き認証情報、認証プロバイダー用の既存の Webex 接続アプリを削除し、Salesforce 認証用の新しい Webex 接続アプリを作成します。
既存の Webex Connected アプリ、名前付き認証情報、認証プロバイダーを削除します。
以前に Webex 接続アプリの認証、名前付き資格情報、または認証プロバイダーを作成している場合は、続行する前にそれらを削除する必要があります。それ以外の場合は、以下の 新しい Webex 接続アプリの作成 に進みます。
既存の Webex Connected アプリを削除します。
- Salesforce ランディング ページの右上隅にある歯車アイコンを選択し、 セットアップを選択します。
- クイック検索 テキストボックスに App Manager と入力し、リストから選択します。
- リスト内の Webex Connected App までスクロールし、エントリの右側にある下矢印アイコンをクリックして、 表示を選択します。
- 削除 を選択し、確認を求められた場合はもう一度 削除 を選択します。
既存の Webex 名前付き資格情報を削除します。
- クイック検索 テキストボックスに 「名前付き資格情報 」と入力し、リストから選択します。
- 2. Webex 名前付き認証情報エントリの右側にある下矢印をクリックし、 削除を選択します。
- 3. 確認を求められた場合は、もう一度 削除 を選択します。
既存の Webex 認証プロバイダーを削除します。
- クイック検索 テキストボックスに 認証と入力します。プロバイダー をクリックし、リストから選択します。
- Webex 認証プロバイダー エントリの先頭にある Del リンクを選択します。
- 確認を求められた場合は OK を選択します。
次のセクションに進み、Salesforce 認証用の新しい Webex Connected App を作成します。
Salesforce 認証用の新しい Webex Connected App を作成する
Salesforce 認証用の新しい Webex Connected App を作成するには:
- Salesforce ランディング ページの右上隅にある歯車アイコンを選択し、 セットアップを選択します。
- ドメイン URL を取得します: クイック検索で ドメインを検索して選択し、 マイドメインから URL を保存します。
- クイック検索 テキストボックスに App Manager と入力し、リストから選択します。
- 接続アプリケーション名を入力します (例: Webex Salesforce 認証) 。
- 連絡先メールアドレスにメールアドレスを入力してください。
- OAuth設定を有効にするをチェックします。
- 先ほど取得した URL を使用して、2 つのコールバック URL を 1 行に 1 つずつ入力し、サフィックスとして
/apex/ webexsfdcauthと/apex/ cisco_webex__webexsfdcauthを追加します。たとえば、次のようなものです。https://my-company.my.salesforce.com/apex/webexsfdcauthhttps://my-company.my.salesforce.com/apex/cisco_webex__webexsfdcauth - 選択された OAuth スコープ の 利用可能な OAuth スコープリストから次のスコープを選択します。 :
- フルアクセス(フル)
- いつでもリクエストを実行 (refresh_token、 offline_access)
- サポートされている承認フローにコード交換用証明キー (PKCE) 拡張を必要とするのチェックを外します。
- 接続されたアプリケーションを [] 保存 し、生成された コンシューマー キー と コンシューマー シークレット を後で使用するためにメモしておきます。
サイトの作成はインバウンドとアウトバウンドの Calling 機能に必要です。
始める前に
サイトを作成するために、アカウントには Salesforce System Admin プロファイルと Webex Admin 権限セットが必要です。
|
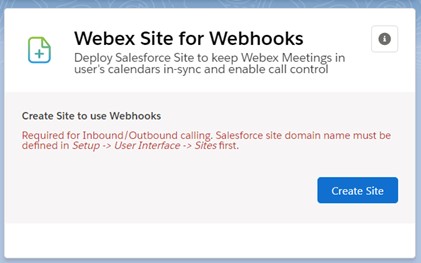
[Webex 管理] から [Webhooks 用 Webex サイト] までスクロールし、[サイトを作成] をクリックします。
以前のサイト ドメイン名の定義が必要です。提供できない場合、エラーが発生します。 サイトが正常に作成されると、画面の上部に緑色のメッセージが表示され、Webhooks コンポーネントの Webex サイトに「サイトが正常に作成されました」というメッセージが表示されます。 |
次にやる必要
次のセクションでアプリのセットアップを続行します。
コンポーネントをレイアウトに追加したら、権限セットを使用してコンポーネントにアクセスを許可します。
| 1 |
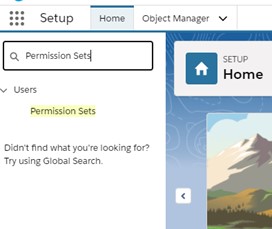
の順に移動し、Webex 権限セットを以下のように管理します。
|
| 2 |
たとえば「Cisco Webex ユーザー」の権限セットをすべてのユーザーに割り当てるには、「Cisco Webex ユーザー」権限セットをクリックし、[割り当てを管理]、[割り当てを追加] の順にクリックしてリストからユーザーを選択し、[割り当て] をクリックします。 権限セットが正常に割り当てられると次のメッセージが表示されます。
|
新しいパックが公開されたら、「Salesforce に Webex アプリをインストールする」の手順に従ってください。最初に古いバージョンをアンインストールする必要はなく、設定した内容が失われることもありません。
新しいインストール パックの情報とダウンロード場所については、「Webex Salesforce インテグレーションのリリース ノート」をご覧ください。
始める前に
Webex for Salesforce パックをアンインストールする前に、Lightning ページ レイアウト、ユーティリティ アイテム、オブジェクト ページレイアウト、権限セットおよびサイトの Lightning Webex コンポーネントもすべて削除しください。
| 1 |
Salesforce セットアップから、 の順に移動します。 |
| 2 |
「Salesforce 版 Webex」パッケージに関連する [アンインストール] をクリックし、「はい、このパッケージをアンインストールして、関連するすべてのコンポーネントを完全に削除します」にチェックを入れます。 アンインストールが完了すると、メールで通知が届きます。 |
| 3 |
アプリからコンポーネントを削除できなかった場合は、アクティブな要素とともにエラー メッセージが表示されます。
|
| 1 |
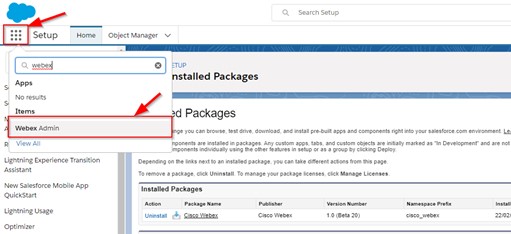
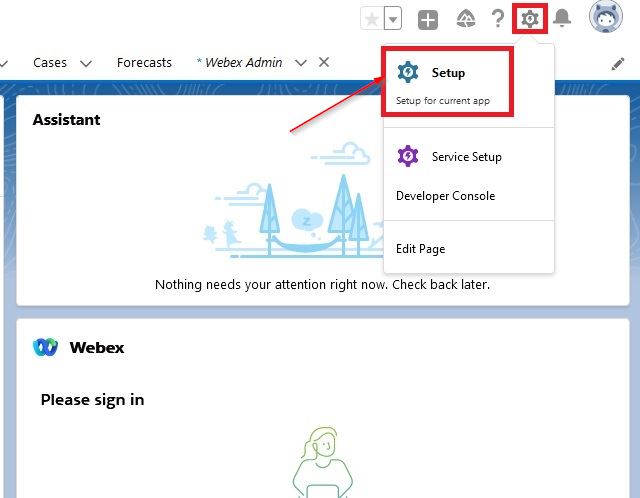
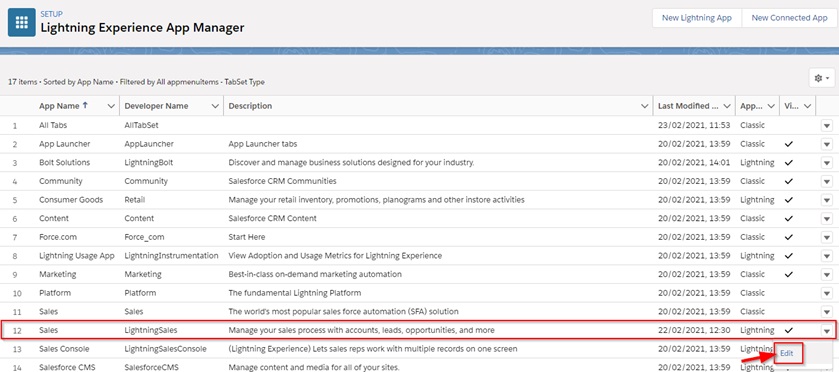
右上の [セットアップ] をクリックします。
|
| 2 |
セットアップ ページでアプリ マネージャーを検索し、検索結果から希望するオプションを選択します。 |
| 3 |
アプリ マネージャーを使用して、どの Webex 機能を Salesforce アプリのどの部分に適用するかを設定し、Salesforce ユーザーが自分のアプリで Webex 機能をテストできるようにします。この統合は、Lightning Apps でのみ使用できます。
|
| 4 |
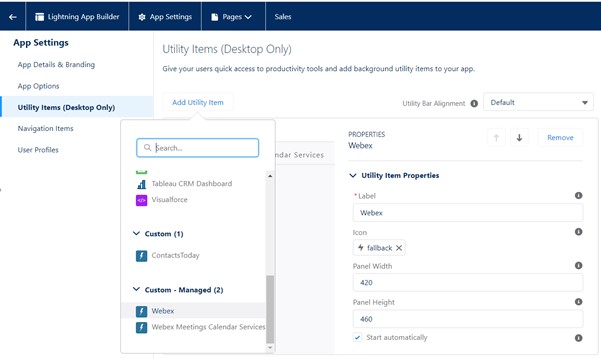
ウェブエックス Calling/Chat コンポーネント—Salesforce ユーティリティバーに追加できます。 から、目的のアプリケーションを選択、編集します。[ユーティリティ アイテム] に進み、[ユーティリティアイテムの追加] から Webex を選択します。パネルの幅を 420 に設定し、パネルの高さを 460 に設定し、[自動的に開始] を true に設定し、[ 保存] をクリックします。
|
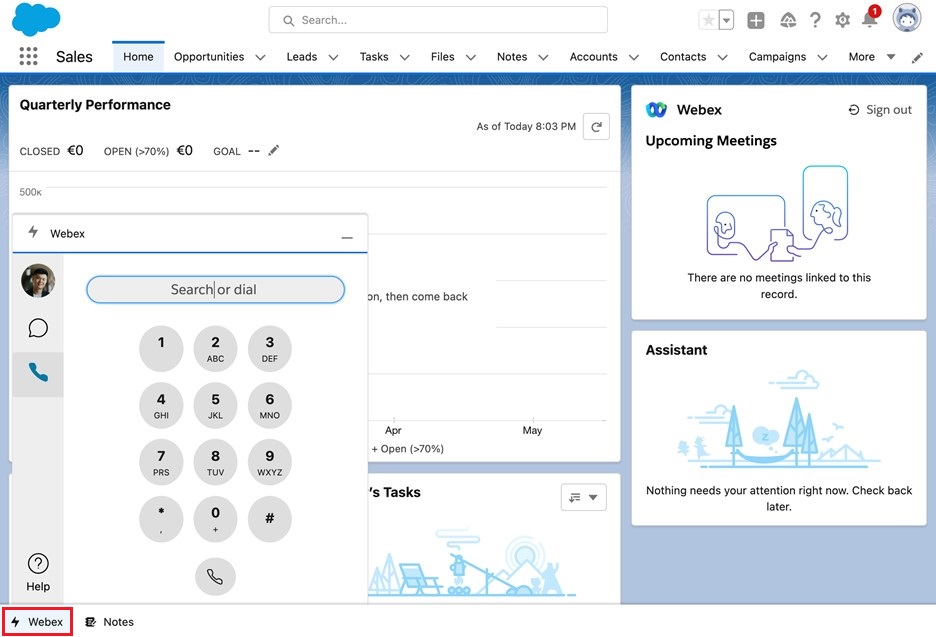
通話履歴を有効または無効にするには:
- [Webex 管理] に移動します。
- Webex 通話履歴まで下にスクロールします。
- トグルを、有効または無効のいずれかの希望の設定に切り替えます。
有効にすると、通話履歴はすべてのユーザーとプロファイルで利用できるようになります。
| 1 |
[Webex 管理] に移動します。 |
| 2 |
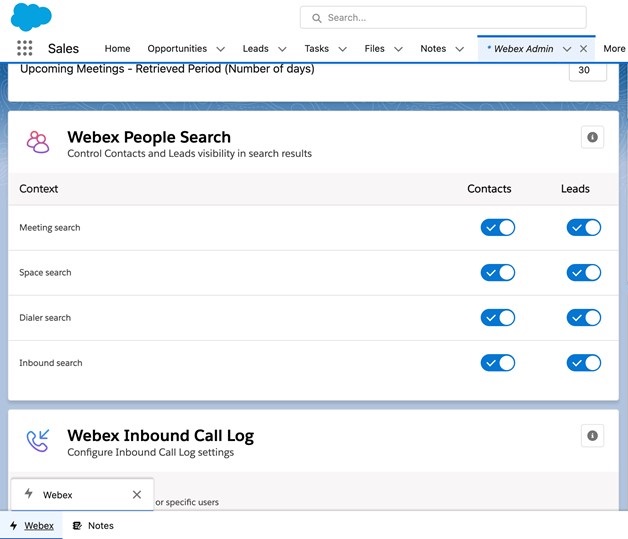
[Webex ユーザー検索 ] までスクロールします。 |
| 3 |
ダイヤ ラー検索では、[連絡先] と [ リード] をトグルして、通話を行う際に検索結果に表示されます。
|
| 4 |
インバウンド 検索では、Salesforceが着信の発信者 を既存のリードまたは連絡先と一致させ、連絡先とリードを切り替えできます。 |
| 1 |
リードやコンタクトなどのオブジェクトの外線発信を有効にするには、まずオブジェクトページに移動してください。歯車アイコンをクリックして、[ページの編集] を クリックします。 |
| 2 |
ページのヘッダーをクリックして、[ハイライト] パネルを 開きます。 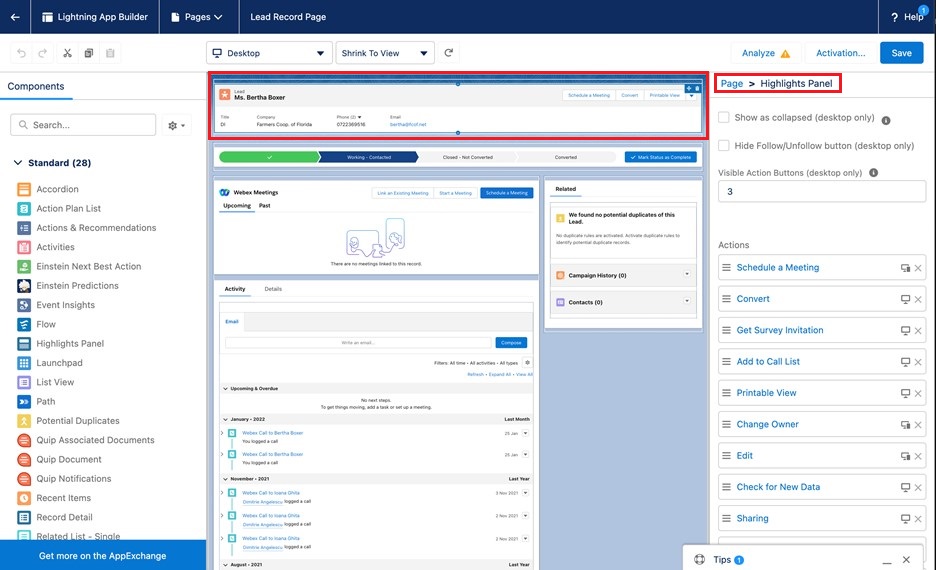 |
| 3 |
[折り たたみ表示] および [ フォローを非表示]/[次を解除] ボタンが 選択されていないか確認します。 |
| 4 |
[アクション ボタンを表示] を 3 に設定します。 |
| 5 |
[アクション] リストの一番下までスクロール して 、[アクションの追加] を クリックします。 |
| 6 |
を検索し、[通話 ] を選択し、[完了] をクリック します。 |
| 7 |
[通話を 行う] アクション を上にドラッグすると、リストの上位 3 つのアクションに表示されます。 リストの最初の 3 つのアクションだけがコンポーネントに表示されます。 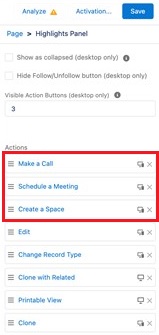 |
| 8 |
[保存] をクリックします。 |
| 1 |
[Webex 管理] に移動します。 |
| 2 |
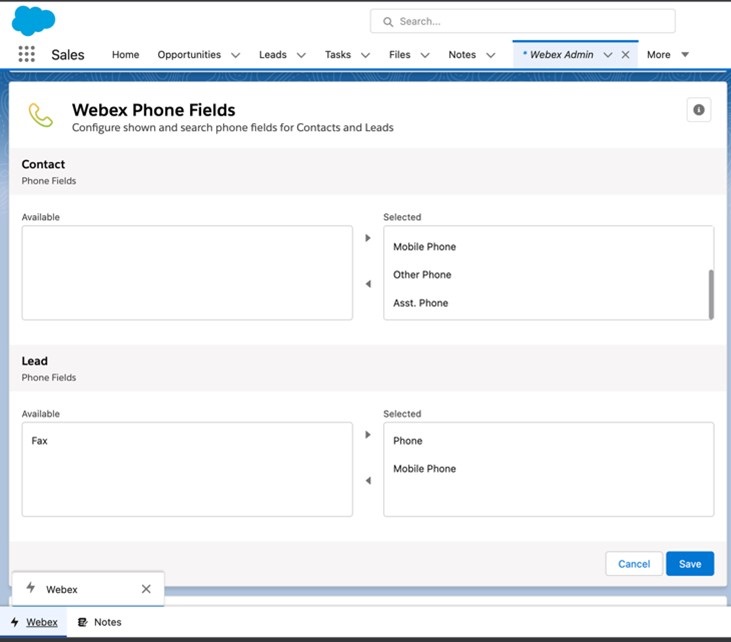
[Webex 電話のフィールド ] までスクロールします。 |
| 3 |
連絡先またはリードに発信するときに使用する電話フィールド を選択し、[利用可能] リストに 移動 します。
|
| 4 |
[保存] をクリックします。 |
| 1 |
[Webex 管理] に移動します。 |
| 2 |
[Webex アウトバウンド 通話ログ] までスクロールします。 |
| 3 |
[すべてのプロファイル/ユーザー の外線通話ログを有効にする] 設定をトグル します。 |
| 4 |
外線通話ログに関連付けるオブジェクトを選択し、[利用可能] リストに 移動 します。 たとえば、アカウント、ケース、機会を利用可能な リストに 移動 します。 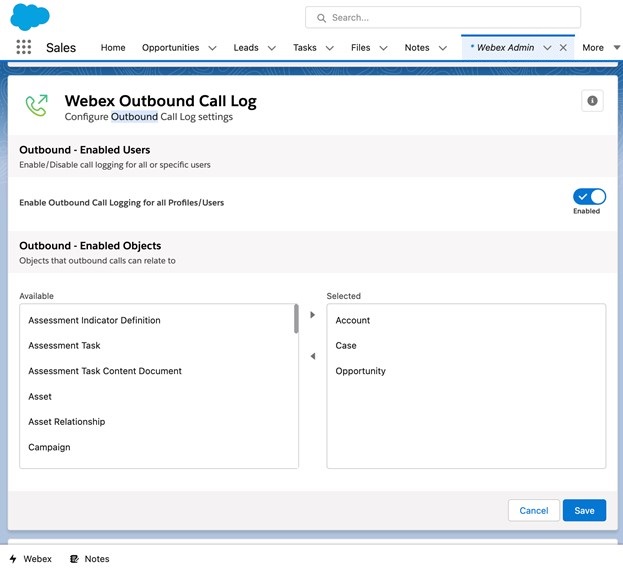 |
| 5 |
[保存] をクリックします。 |
| 1 |
[Webex 管理] に移動します。 |
| 2 |
[Webex 着信 通話ログ] までスクロールします。 |
| 3 |
[すべてのプロファイル/ユーザー の着信通話ログを有効にする] 設定をトグル します。 |
| 4 |
インバウンド通話ログに関連付けるオブジェクトを選択し、[利用可能] リストに 移動 します。 たとえば、アカウント、ケース、機会を利用可能な リストに 移動 します。 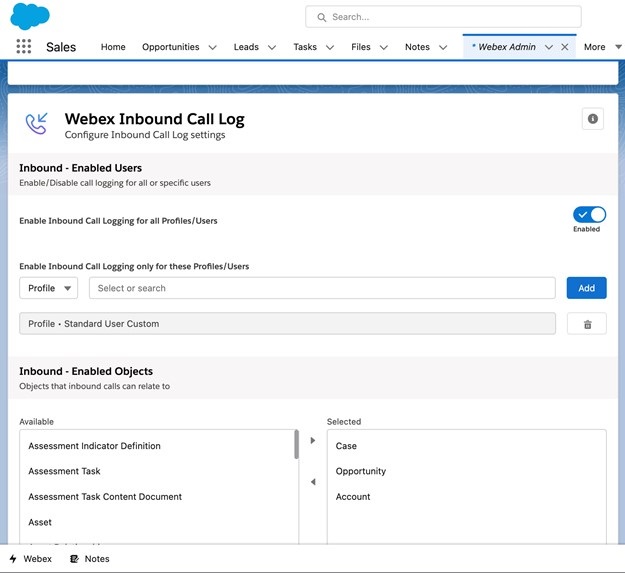 |
| 5 |
[保存] をクリックします。 |
| 1 |
[Webex 管理] に移動します。 |
| 2 |
[ログ - その 他Webex Call ] までスクロールします。 |
| 3 |
[オブジェクト] リストからオブジェクトを 選択 します。 アカウントレコードに関連するオブジェクトが一覧に表示されます。 |
| 4 |
リストから [アカウント関係フィールド] を選択します。このフィールドは、選択したオブジェクトに基づいて自動的に入力されます。このフィールドは、選択されたオブジェクトがアカウントと関連する方法を決定します。 |
| 5 |
[フィールド ] を選択し、[利用可能] リストから [ 選択したリスト] に移動 します。 これらの選択されたフィールドは、着信または発信の 間の [詳細] タブに表示されます。 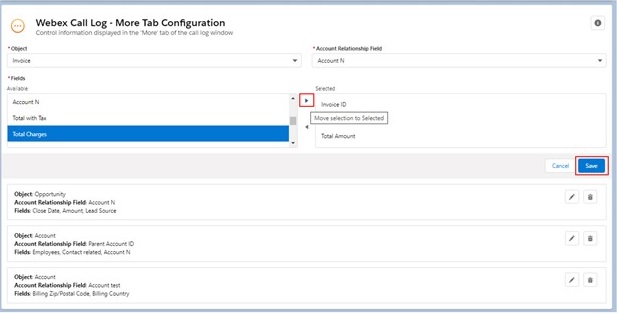 |
| 6 |
[保存] をクリックします。 オブジェクトは 1 つの構成設定のみを持つ場合があります。 |
| 7 |
既存の 構成 を削除 または変更 するには、[編集] または [削除] をクリックします。 |
CUCM および Broadworks ユーザーの場合、次の機能はサポートされていません。
- Salesforce グローバルダイヤラーで着信コールを受信する (Webex アプリでは引き続き着信コールを受信します)
- 発信コールが正常に行われた後、Salesforce の通話ログウィンドウで通話時間を表示する
- 発信コールが正常に行われた後、Salesforce コールログウィンドウのボタンを使用してコールを終了する
- 発信通話終了後、Salesforce 通話ログ ウィンドウに通話時間を自動的に入力する
すべての Salesforce 統合では、次の制限に注意してください。
-
Salesforce ではイベント数の制限 (25,000) が適用されるため、使用量が多すぎると統合が失敗する可能性があります。この制限を増やすには、Salesforce パッケージを利用できます。詳細については、https://developer.salesforce.com/docs/atlas.en-us.platform_events.meta/platform_events/platform_event_limits.htm を参照してください。
- Webex 通話ユーティリティ コンポーネントは、Salesforce モバイル アプリでは使用できません。
| 1 |
右上の [セットアップ] をクリックします。 |
| 2 |
セットアップ ページでアプリ マネージャーを検索し、検索結果から希望するオプションを選択します。 |
| 3 |
アプリ マネージャーを使用して、どの Webex 機能を Salesforce アプリのどの部分に適用するかを設定し、Salesforce ユーザーが自分のアプリで Webex 機能をテストできるようにします。この統合は、Lightning Apps でのみ使用できます。 |
| 4 |
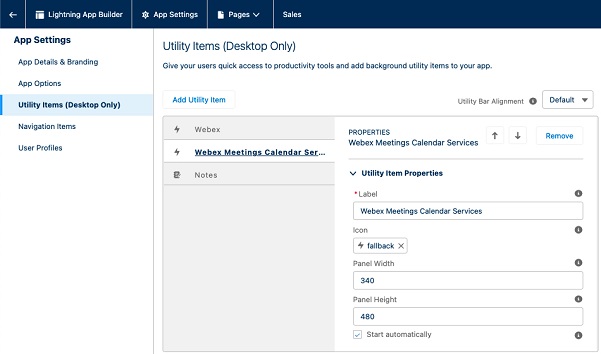
Webex Meetings カレンダー サービス— ユーティリティ アイテムに移動し、 ユーティリティ アイテムの追加から Webex Meetings カレンダー サービスを選択します。パネルの 幅を 340 に設定し、パネルの高さを 480 に設定し、[自動的に開始] を true に設定し、[保存] をクリック します。 このコンポーネントは通常、ユーティリティ バーに追加されます。お使いアプリがSalesalesのユーティリティバーを使用する場合は、「サポート」コンポーネントを各ページWebex Meetings カレンダー サービス追加する必要はありません。 お使いアプリがSalesalesのユーティリティバーを使用しない場合は、「Webex Meetings カレンダー サービス」コンポーネントを含む各ページに「Webex Meetings カレンダー サービス」コンポーネントを追加Webex Meetingsがあります。そのためには、記録ページに移動し、ツールバーの歯車アイコンを押して [ページを編集] をクリックします。Lightning App Builder ページで、Webex Meetings カレンダー サービスをコンポーネント パネルからページ レイアウトにドラッグ アンド ドロップします。 |
| 1 |
ページの順に移動し、歯車のアイコンをクリックします。 |
| 2 |
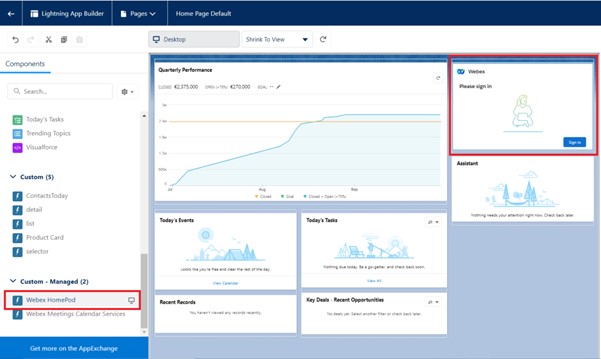
ホームページについては、Webex HomePod コンポーネントを ページにドラッグ アンド ドロップし、[保存] をクリック します。
|
| 3 |
ページを保存する際は、他のユーザーに表示されるようにアクティベートする必要があります。[アクティベート] をクリックし、[組織のデフォルトとして指定]、[保存] の順にクリックします。 Webex HomePod コンポーネント は、ホームページのセクションに追加するためにのみ利用できます。ユーザーはこの場所からのみ Webex アカウントからサインアウトできます。
|
| 4 |
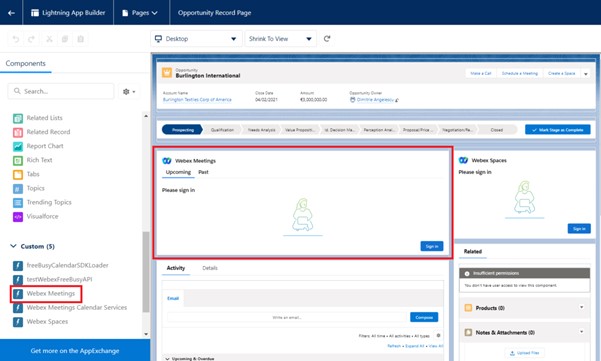
オブジェクトにWebex Meetings コンポーネントを追加するには、まずオブジェクトページに移動します。歯車アイコンをクリックして、[ページの編集] を クリックします。 |
| 5 |
ドラッグ アンド ドロップし、Webex Meetings に移動します。
|
| 6 |
ページのヘッダーをクリックして、[ハイライト] パネルを 開きます。  |
| 7 |
[折り たたみ表示] および [ フォローを非表示]/[次を解除] ボタンが 選択されていないか確認します。 |
| 8 |
[アクション ボタンを表示] を 3 に設定します。 |
| 9 |
[アクション] リストの一番下までスクロール して 、[アクションの追加] を クリックします。 |
| 10 |
を検索して、[ミーティングのスケジュール ] を選択し、[完了] を クリックします。 |
| 11 |
[ミーティングの スケジュール] アクションを 上にドラッグすると、リストの上位 3 つのアクションに表示されます。 リストの最初の 3 つのアクションだけがコンポーネントに表示されます。  |
| 12 |
[保存] をクリックします。 |
| 1 |
[Webex 管理] に移動します。 |
| 2 |
[下へ] まで Webex Meetings。 |
| 3 |
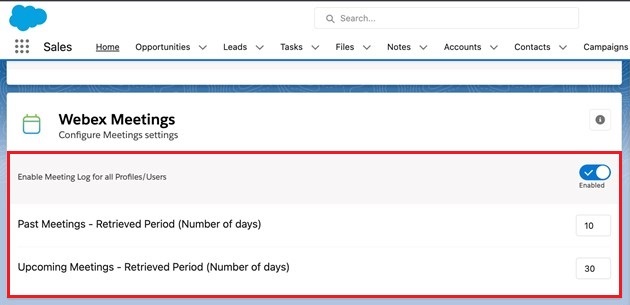
[すべてのプロファイル/ ユーザーのミーティング ログを有効にする] をトグルします。 |
| 4 |
過去 のミーティングの取得 – 取得期間 を過去のミーティングの取得が必要な日数に設定します。 |
| 5 |
今後 のミーティングのセットアップ – 取得した 期間を将来のミーティングを取得するために必要な日数に指定します。
|
| 6 |
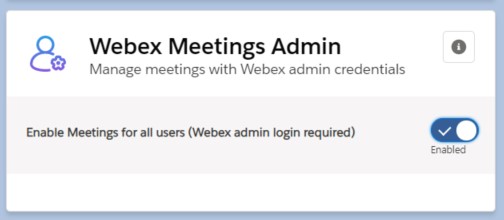
右側Webex Meetings 管理者の 下で、 すべてのユーザーに対して [ミーティングを有効にする] をトグルします (Webex 管理ログインが必要)。
この機能を有効にした後で、Cisco 認証ページで資格情報を入力する必要があります。 |
| 1 |
[Webex 管理] に移動します。 |
| 2 |
[Webex ユーザー検索 ] までスクロールします。 |
| 3 |
ミーティング 検索では、[連絡先] と [ リード] をトグルして、ミーティングのスケジュール時に検索に表示します。
|
| 1 |
右上の [セットアップ] をクリックします。
|
| 2 |
セットアップ ページでアプリ マネージャーを検索し、検索結果から希望するオプションを選択します。 |
| 3 |
アプリ マネージャーを使用して、どの Webex 機能を Salesforce アプリのどの部分に適用するかを設定し、Salesforce ユーザーが自分のアプリで Webex 機能をテストできるようにします。この統合は、Lightning Apps でのみ使用できます。
|
| 4 |
Webex Chat コンポーネント—Salesforce ユーティリティ バーに追加できます。 から、目的のアプリケーションを選択、編集します。[ユーティリティ アイテム] に進み、[ユーティリティアイテムの追加] から Webex を選択します。パネルの幅を 420 に設定し、パネルの高さを 460 に設定し、[自動的に開始] を true に設定し、[ 保存] をクリックします。
|
| 5 |
[Webex 管理] に移動します。 |
| 6 |
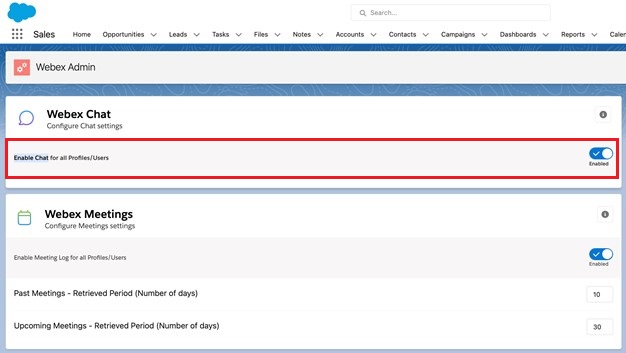
[Webex チャット] までスクロールします。 |
| 7 |
[すべてのプロファイル/ ユーザーのチャットを有効にする] をトグルします。
|
| 1 |
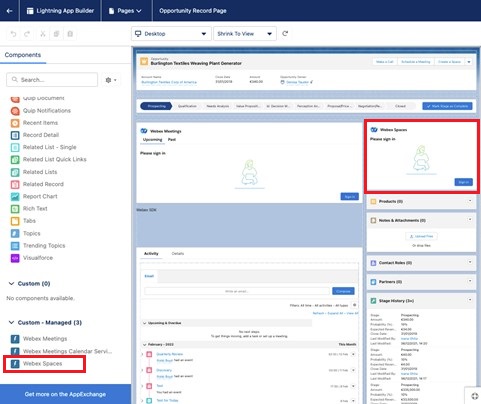
オブジェクトに Webex Spaces コンポーネント を追加するには、まずオブジェクトページに移動します。歯車アイコンをクリックして、[ページの編集] を クリックします。 |
| 2 |
Webex Spaces コンポーネント をページに ドラッグ アンド ドロップします。
|
| 3 |
ページのヘッダーをクリックして、[ハイライト] パネルを 開きます。  |
| 4 |
[折り たたみ表示] および [ フォローを非表示]/[次を解除] ボタンが 選択されていないか確認します。 |
| 5 |
[アクション ボタンを表示] を 3 に設定します。 |
| 6 |
[アクション] リストの一番下までスクロール して 、[アクションの追加] を クリックします。 |
| 7 |
を検索し、[スペースの作成 ] を選択し、[完了] をクリック します。 |
| 8 |
[スペースの 作成] アクションを 上にドラッグすると、リストの上位 3 つのアクションに表示されます。 リストの最初の 3 つのアクションだけがコンポーネントに表示されます。  |
| 9 |
[保存] をクリックします。 |
| 1 |
[Webex 管理] に移動します。 |
| 2 |
[Webex ユーザー検索 ] までスクロールします。 |
| 3 |
スペース 検索については、[連絡先] と [ リード] をトグルして、スペースを作成するときに検索に表示されます。
|
始める前に
に移動して https://developer.webex.com/ 新しいボットを作成してください。ボット アクセス トークンのコピーを保存します。通知を構成する必要があります。
| 1 |
[Webex 管理] に移動します。 |
| 2 |
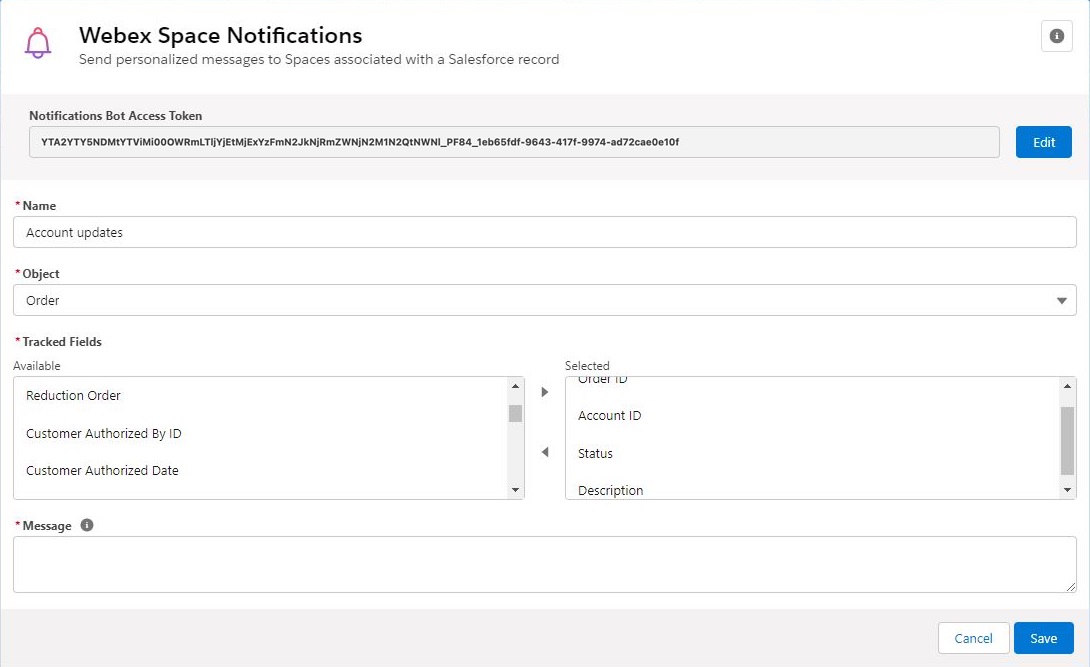
[Webex スペースの通知 ] までスクロールします。 |
| 3 |
[Notifications Bot Access Token] フィールド にボット アクセス トークンを貼 り付けて、[保存] をクリック します。 |
| 4 |
[名前] フィールドで通知の名前を 入力 します。 |
| 5 |
[オブジェクト ] リスト から、トラックしたいオブジェクトを選択します。 オブジェクトを選択すると 、トラッキングフィールドの リストが自動的に更新されます。 |
| 6 |
通知を 受け取る 追跡フィールドを選択したリストに 移動 します。
|
| 7 |
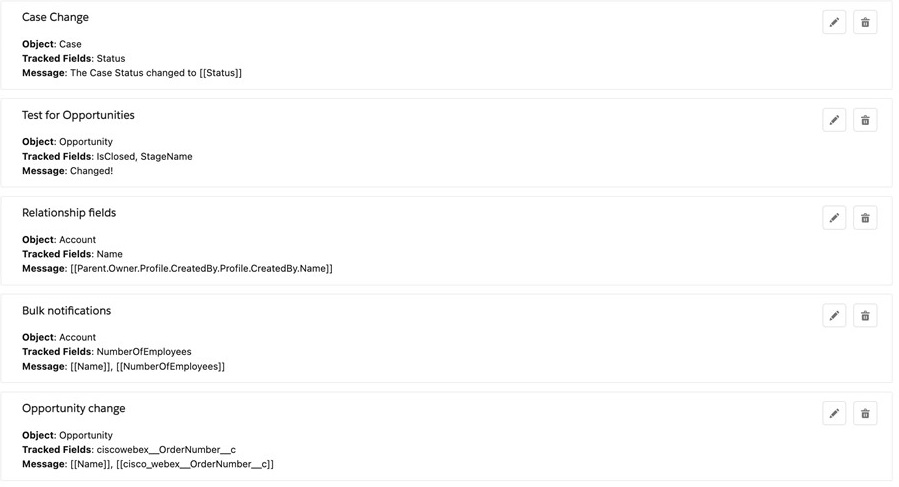
追跡フィールド への 更新がある場合に表示する [メッセージ] を入力します。 動的フィールドを四角括弧で囲みます。この例のように検索フィールドを入力します。 |
| 8 |
[保存] をクリックします。 |
| 9 |
必要に応じて既存の通知を編集または削除します。
|
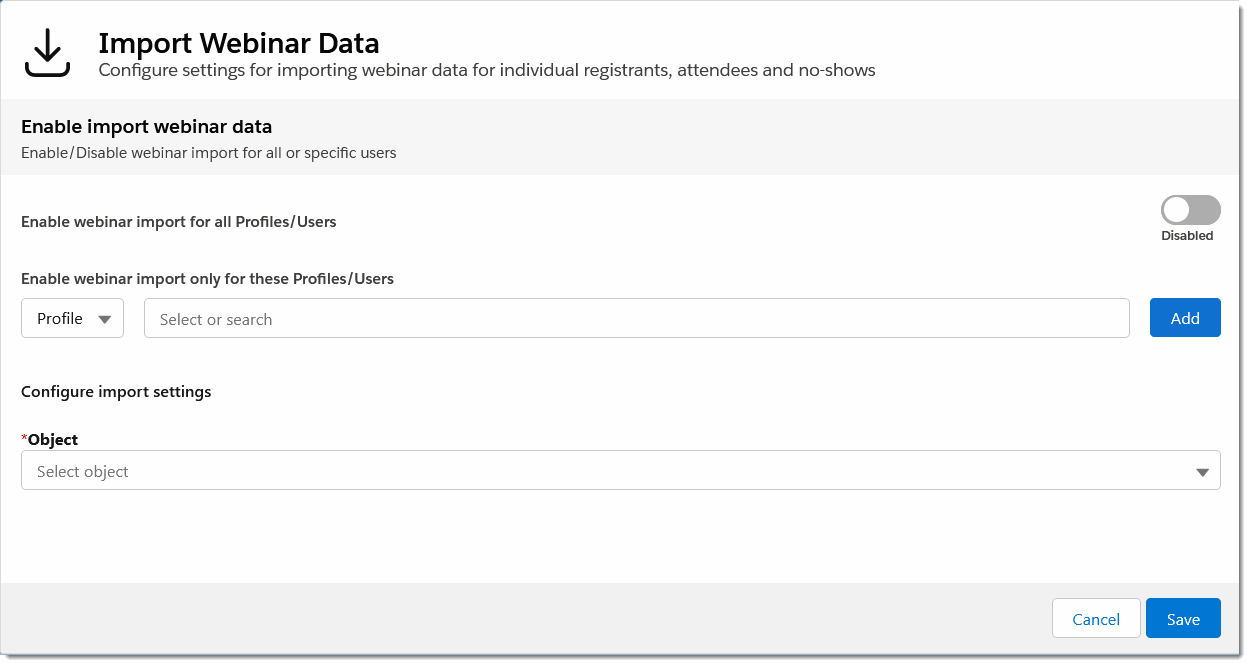
WebexウェビナーのインポートWebセミナーデータ設定パネルを使用して、認定されたSalesalesユーザーはWebexウェビナーの招待者、登録者、および出席者をリードや連絡先などのSalesalesオブジェクトに直接インポートできます。
Webex 管理ページから ウェビナー データのインポートの設定 インターフェイスが利用 できます。
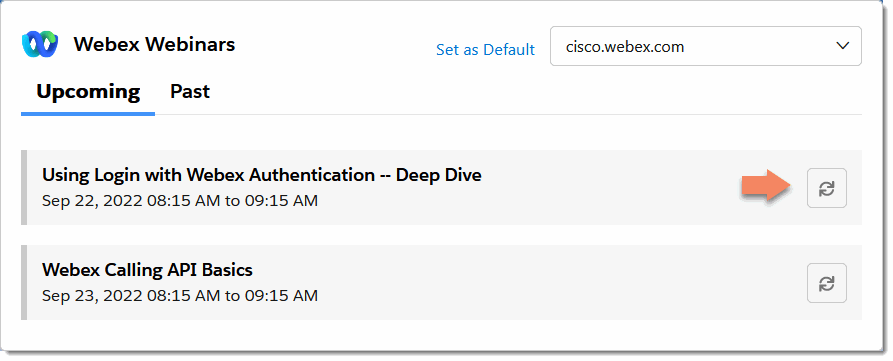
ウェビナーのインポートが有効になると、権限のあるユーザーは Webex ウェ ビナー ウィジェットを使用して Webex ウェビナー のデータをインポート することができます。
SalesforceユーザーにWebexウェビナーの権限を割り当てる
ユーザーが Webex ウェビナーのインポート機能にアクセスするには、Webex インポート管理者権限を各 に割り 当てる必要があります。
ユーザーに権限を割り当てるには:
- [Salesforce を Webex アプリと統合する] に移動します。
- 記事の下部 にある [管理] タブを選択し、[アクセスを提供する] を展開します。
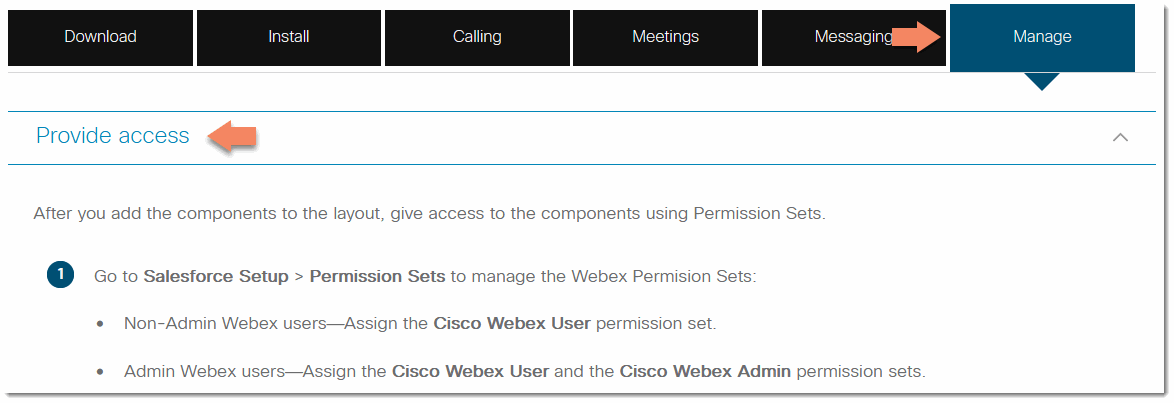
- 指示に従って、 Webex インポート管理者権限を Salesforce ユーザーアカウントに追加します。
Webex Webinar の時間範囲表示を設定する
表示する Webex ウェビナーの時間範囲を設定するには:
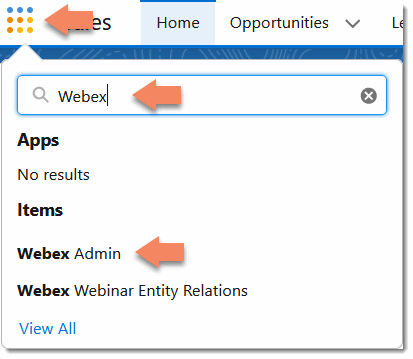
- [Salesforceアプリ]ボタンをクリックして、検索フィールド にWebex を入力し、[Webex管理] を選択します。
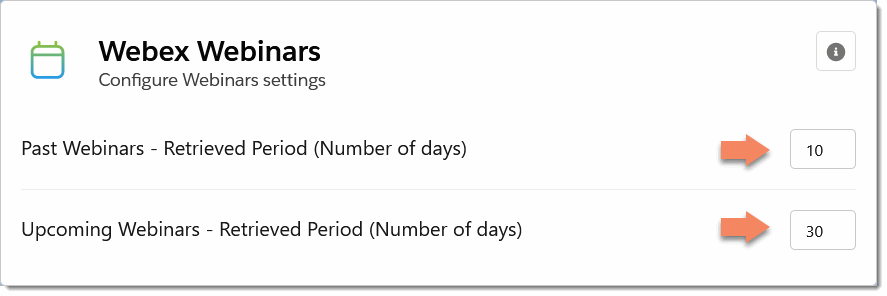
- Webex ウェビナー パネルを見つけ、ホームページの Webex ウェビナー ウィジェットで過去と今後予定されるウェビナーを表示したい日数を入力します。
Webex ウェビナー インポート フィールド マッピングの構成を続行します。
Webex ウェビナー インポート フィールド マッピングを設定する
Webex ウェビナーインポート設定を使用して、Salesforce オブジェクトと Webinar オブジェクトフィールド間のマッピングを定義します。例えば、Salesforce Contact オブジェクトの名とラストネームを、ウェビナーの招待者、登録者、および出席者の並列フィールド名にマップできます。firstName そして lastName。
Webex ウェビナー インポート設定を構成するには:
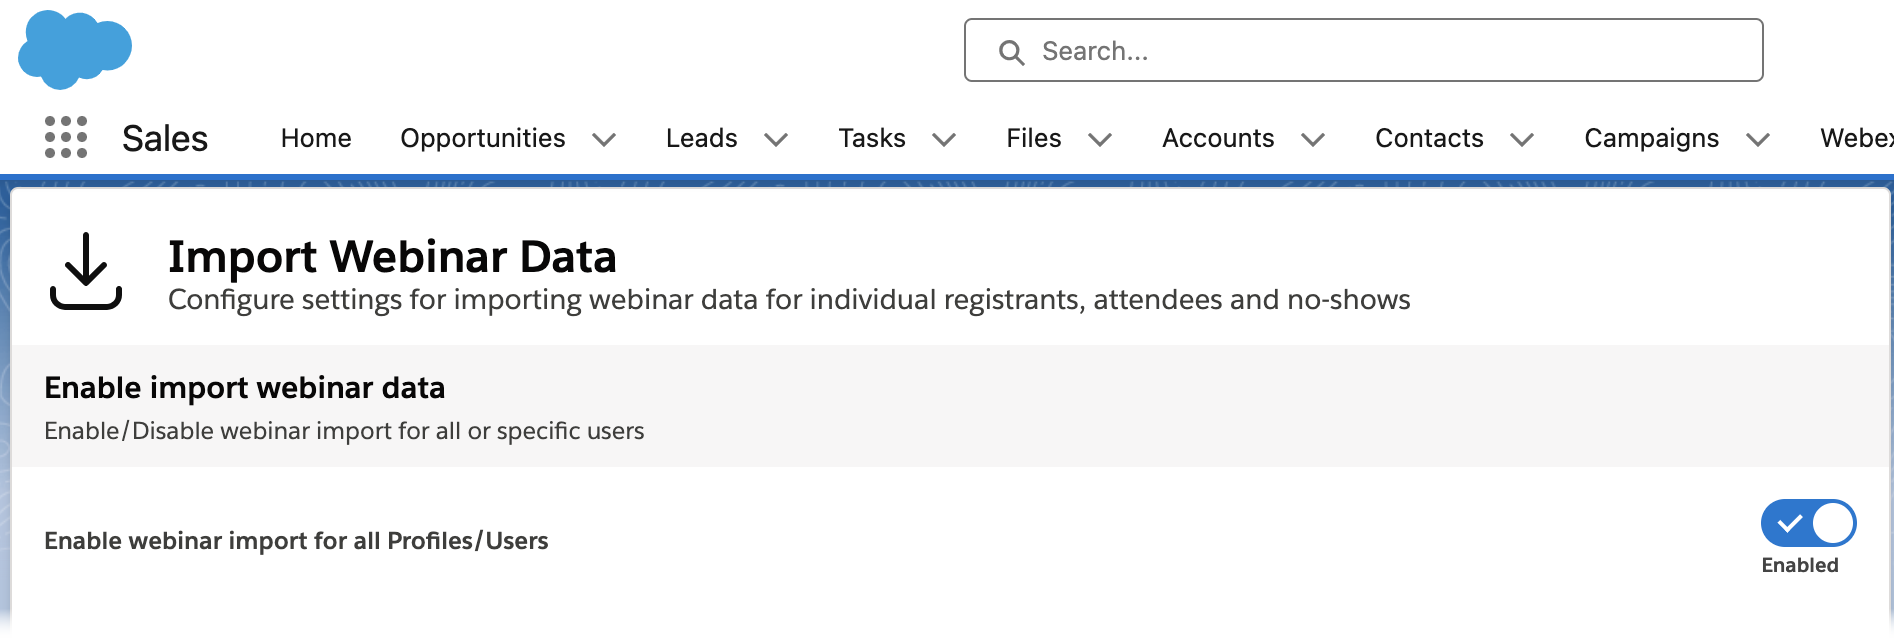
- Webex 管理 ページで 、[ウェビナー データのインポート] パネル までスクロールダウン します。
- オブジェクトドロップダウンリストからSalesales オブジェクト を選択します:
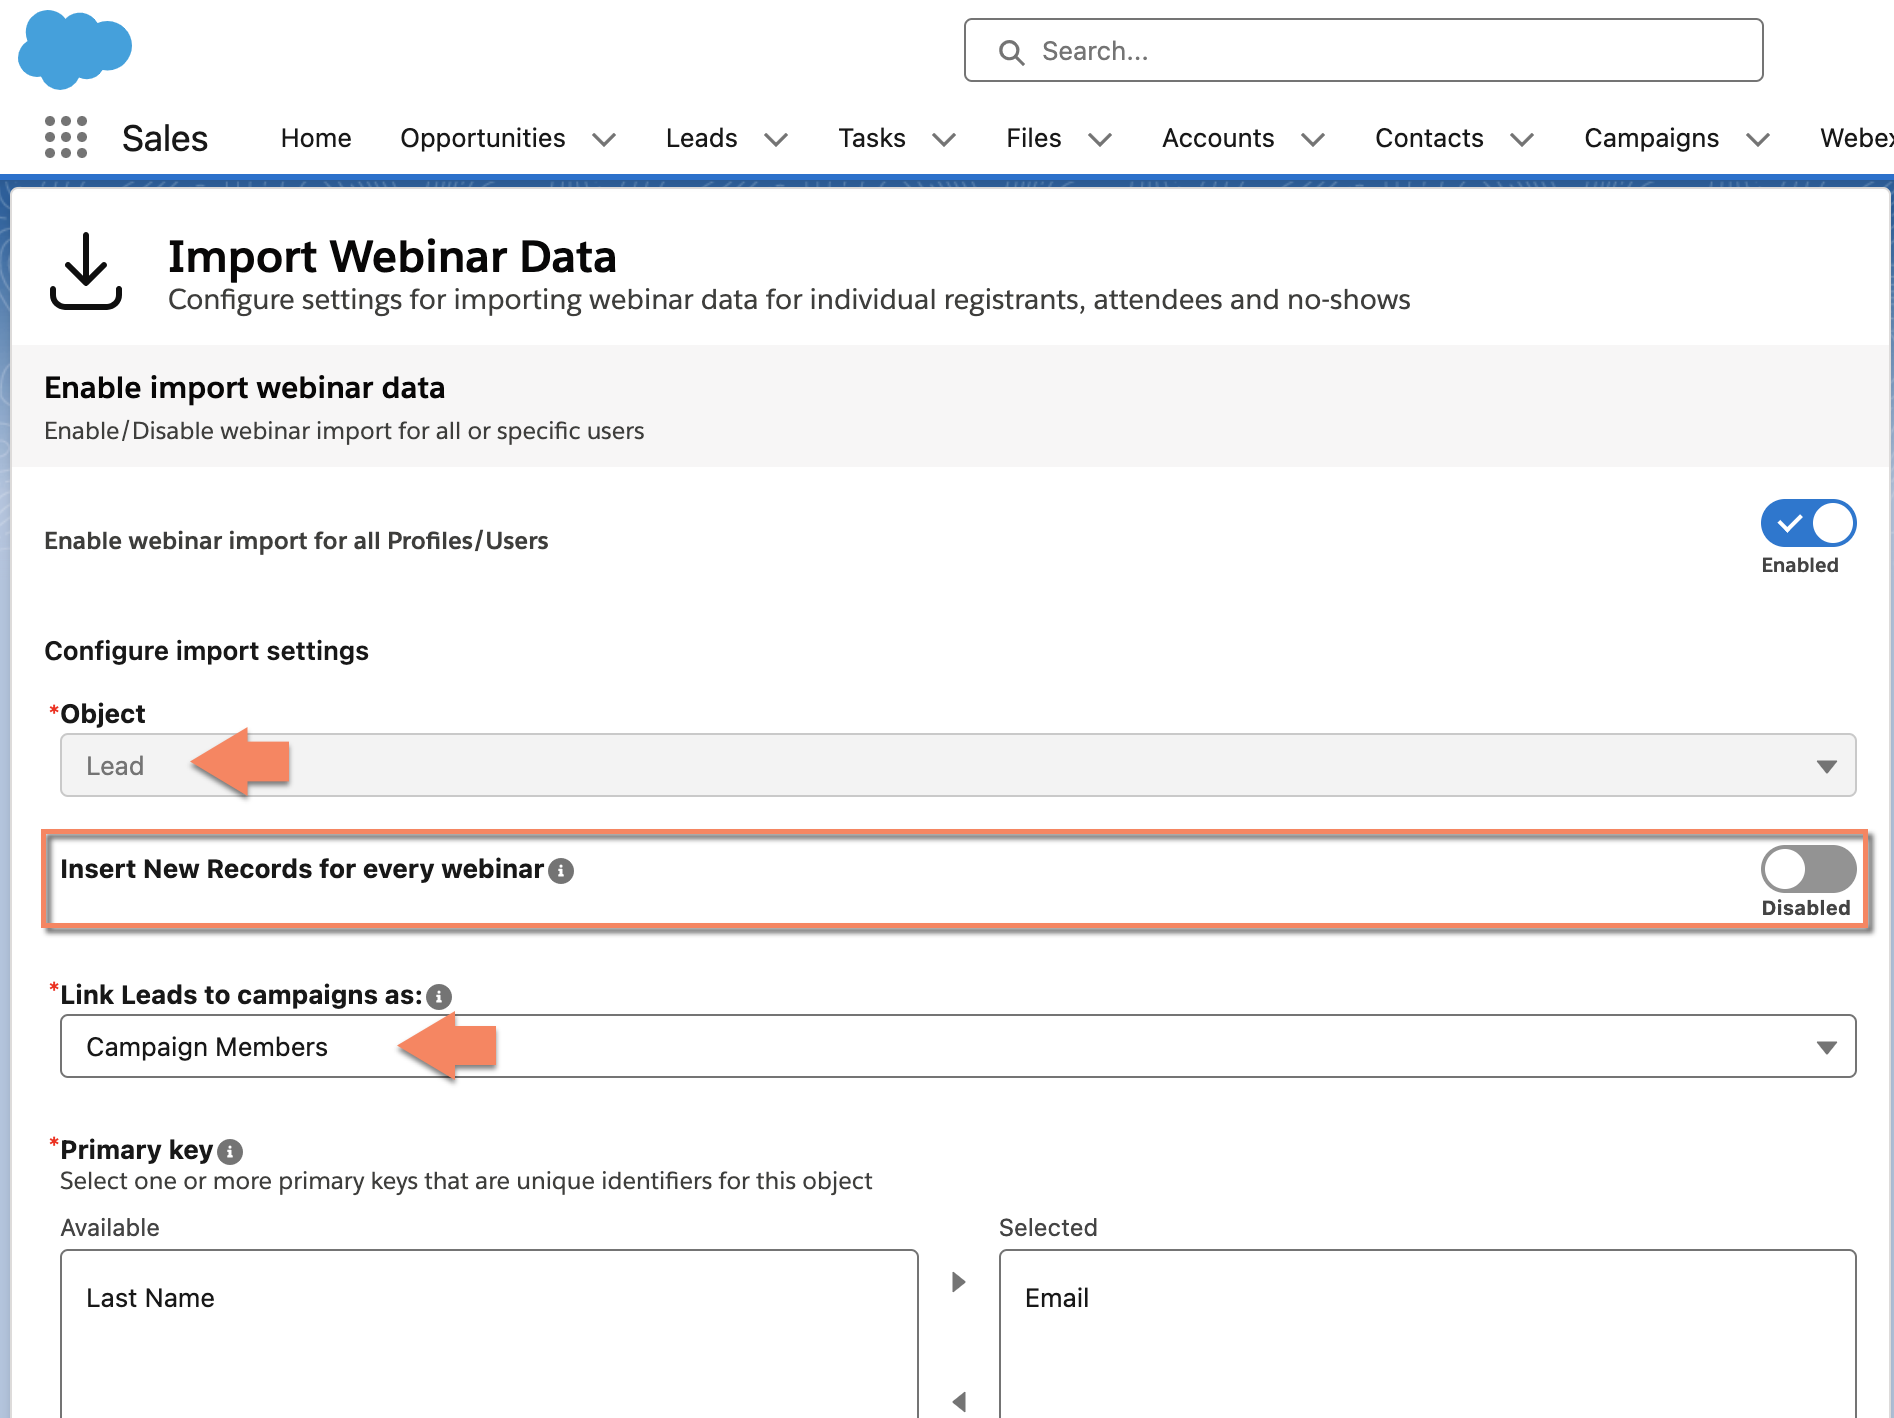
オブジェクトでは、使用可能な設定済みの カスタム オブジェクトに加えて、次の標準 Salesforce オブジェクトを選択できます。
- 連絡先
- リード
インポートされたすべてのウェビナー参加者を新しいオブジェクト レコードとして作成する場合は、選択した主キーに基づいて、同じウェビナーに既にインポートされていない限り、すべてのウェビナーに新しいレコードを挿入 [] トグルを選択します。同じ Webex ウェビナーにインポートされない限り、主キーが一致しても既存のレコードは更新されません。
これらの標準オブジェクトについては、次のように Salesforce キャンペーンにリンクすることを選択できます。
- キャンペーンメンバー: インポートされたリードと連絡先は、対象の Salesforce キャンペーンの キャンペーンメンバー セクションで利用できます。これは、Salesforce の標準機能です。(バージョン 1.16 以降で利用可能)
- Webexウェビナーキャンペーンメンバー: インポートされたリードと連絡先は、カスタム Webex 機能である対象の Salesforce キャンペーンの Webex ウェビナー キャンペーン メンバー セクションで利用できます。
- キャンペーンメンバーとWebexウェビナーキャンペーンメンバーの両方: インポートされたリードと連絡先は、Salesforce キャンペーン内の と の両方の場所で利用できます。(バージョン 1.16 以降で利用可能)
リストから選択したその他の カスタム オブジェクトは、対象の Salesforce キャンペーンの Webex ウェビナー キャンペーン メンバー セクションにインポートされます。 - [プライマリ キー の選択 インターフェイス] で、プライマリ キーとして一意のフィールドを選択し、右矢印を使用して、[選択したリスト ] に移動 します。
 主キーには、各レコードに一意となる使用可能なフィールドを選択します。例えば、Mark という名前の連絡先が多い場合がありますが、各連絡先には一意のメールアドレスが付きます。
 - データフィールド マッピングインターフェイスで 、選択したSalesalesオブジェクトからフィールドを選択し、ウェビナーオブジェクトの対応するフィールドにマッピングします。[+ 新しい フィールド] ボタンを 使用して、必要に応じてフィールドを追加します。
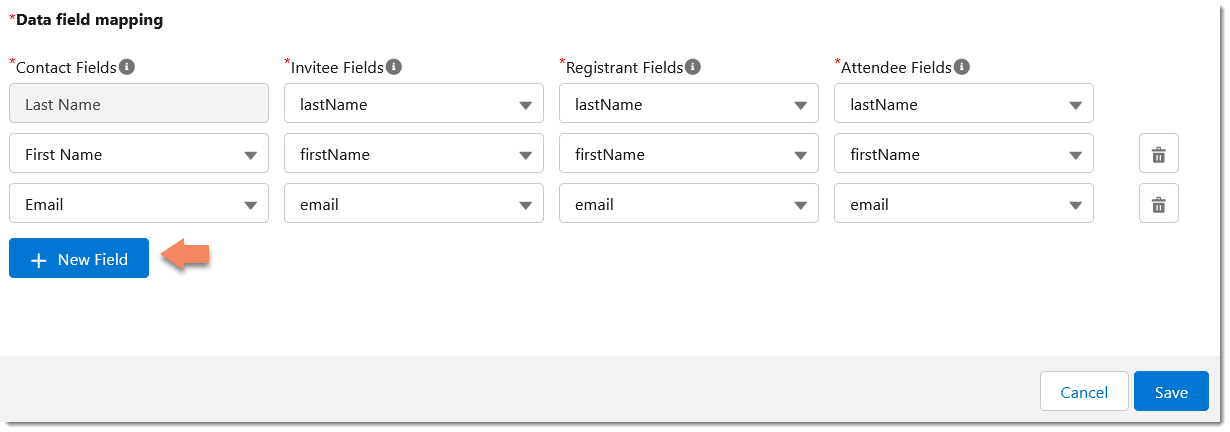 すべての Salesforce オブジェクト フィールドは、上記のように対応するウェビナー フィールドにマッピングする必要があります。Webex ウェビナー登録フォームからの標準的な質問のみを Salesforce フィールドにマッピングできます。カスタム Webex ウェビナーの質問はサポートされていません。
 - 右側のフィールドに隣接するごみ箱アイコンを使用して、追加したフィールドを削除できます。
- 終了 したら 、[保存] をクリックし、プライマリ キーを確認したら、確認 ダイアログで [保存] をクリックします。

マッピングはアップデートされたパネルに表示されます。
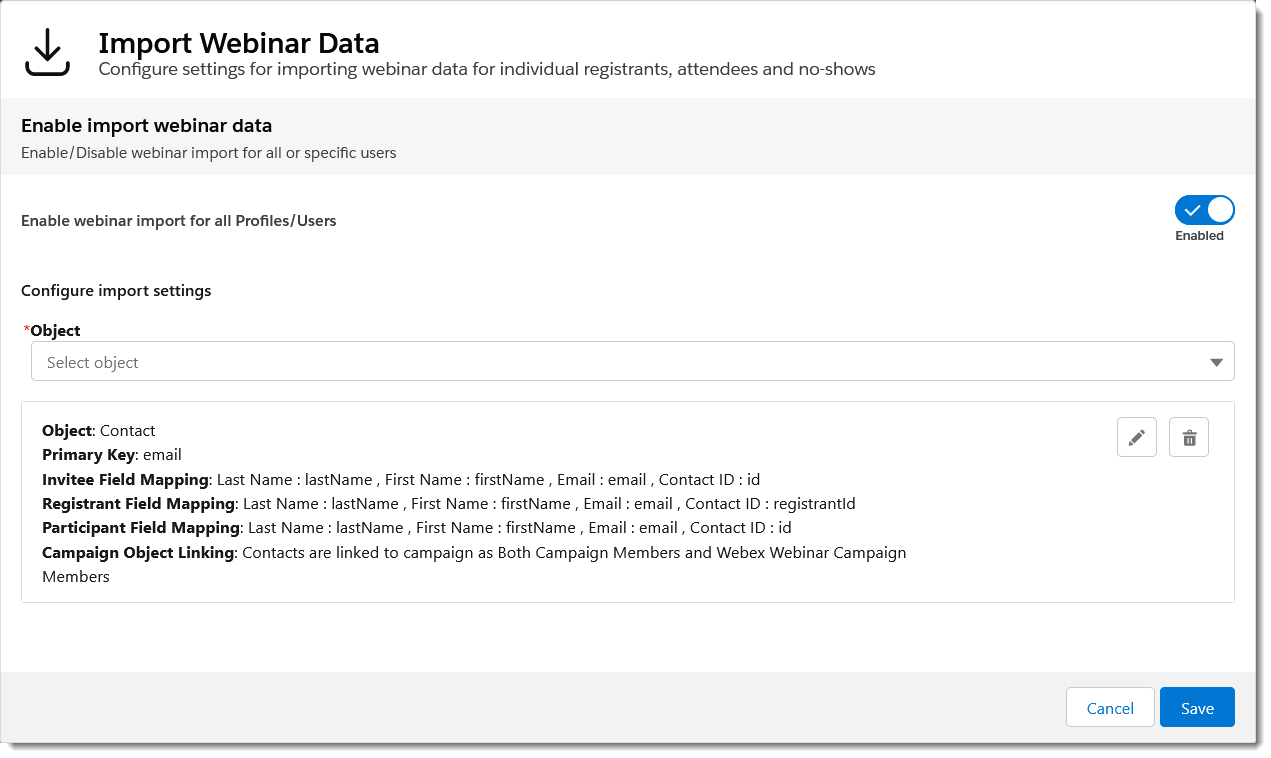 ゴミ箱アイコンを使用してオブジェクトのマッピングを削除し、追加の確認ダイアログを表示するか、鉛筆アイコンを使用して既存のマッピングを変更できます。いつでもここに戻って主キーを変更できますが、これによって] システムに既にインポートされているレコード の主キーは更新されません。結果として、重複する可能性が生じ、プライマリ キーを一般的に変更します。
ウェビナー フィールド マッピングを設定したら、ウェビナー データ インポート機能にアクセスできる人を選択します。
Salesforceユーザーにウェビナーデータのインポートを有効にする
ウェビナーフィールドのマッピングが確立されると、ウェビナーデータインポート機能にアクセスできる人を選択できます。オプションには、適切な権限を持つすべてのユーザーアカウント、個々のユーザーアカウント、特定のSalesalesプロフィールのメンバーのユーザーが含まれます。
すべてのユーザーに対してウェビナー データインポートを有効にする
Salesforce 組織のすべてのユーザーに対してウェビナー データのインポートを有効にするには、[ すべてのプロファイルとユーザーに対してウェビナー インポートを有効にする ] をトグル します。

選択したユーザーまたはプロファイルのウェビナー データインポートを有効にする
選択した個々のユーザーまたは特定の Salesforce 組織に一致する特定のユーザーセットに対してウェビナー データインポートユーザー プロファイル。
選択したユーザーまたはプロファイルにウェビナー データインポートを有効にするには:
- [すべてのプロファイル とユーザーに対しウェビナー インポートを有効にする] が無効 になっている必要 があります。

- [これらのプロファイル/ユーザーに対のみウェビナー インポートを有効にする] ドロップダウンから、[プロファイル] または [ユーザー] のいずれかを選択します。
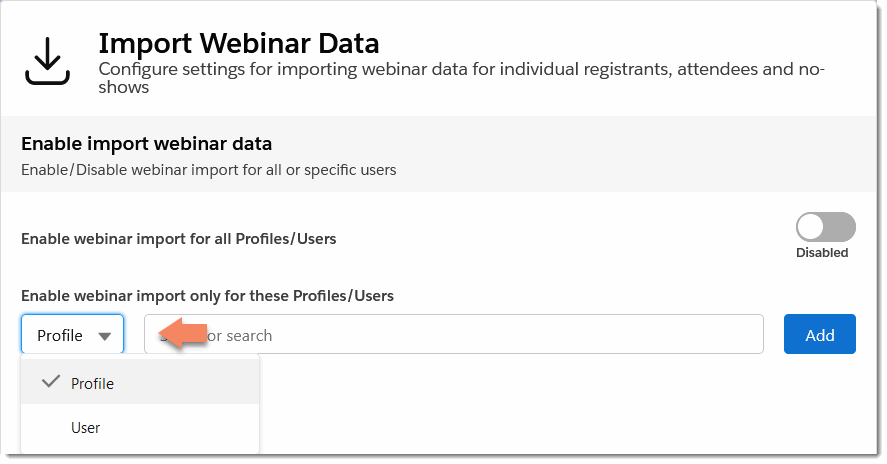
- プロファイルを追加するには、[プロファイル] を 選択し、検索テキストボックスをクリックし、顧客サポートページから Salesforce ロールをドロップダウン リスト。[追加] をクリックして、ロールを追加します。

- 個人のユーザーを追加するには、[ユーザー] を選択し、テキストボックスにユーザー名を入力します。[追加] をクリックしてユーザーを追加します。

ユーザーまたはプロファイルを削除するには、エントリの隣にあるごみ箱アイコンをクリックします。 - プロファイルを追加するには、[プロファイル] を 選択し、検索テキストボックスをクリックし、顧客サポートページから Salesforce ロールをドロップダウン リスト。[追加] をクリックして、ロールを追加します。
| 1 |
ホームページの [ツールバー] メニューの [編集> 、歯車アイコンをクリックします。 |
| 2 |
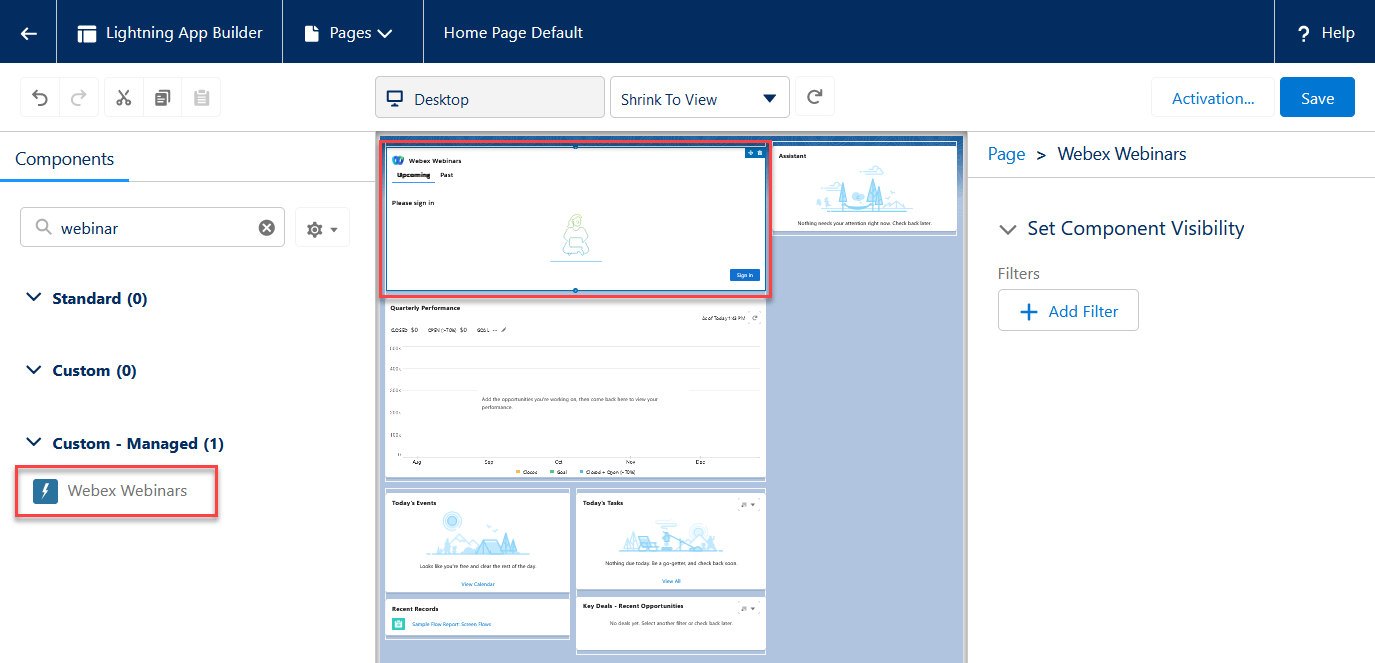
コンポーネント検索 ボックスにウェビ ナーを 入力します。 |
| 3 |
Webex Webinar コンポーネント をページにドラッグ アンド ドロップし、[保存] をクリック します。 |
| 4 |
ページを保存する際に、まだ有効にしていない場合は、それをアクティブ化して、他のユーザーが参照えるようにする必要があります。[アクティベート] をクリックし、[組織のデフォルトとして指定]、[保存] の順にクリックします。 Webex Webinar コンポーネント は、ホームページのセクションに追加するためにのみ利用できます。 |

