Thanks for your feedback.
Integrate Salesforce with Webex App
 Feedback?
-
Call—Call relevant contacts within the Salesforce record, dial any number with the global dialer, or receive inbound calls.
-
Message—Create and manage spaces associated with a Salesforce object. Use in-place messaging to attach content to a message and access previous space content.
-
Meet—Manage meetings without leaving Salesforce. Schedule and join meetings with one click, and associate relevant meeting information to the Salesforce object.
Check out the following guides for more information about configuring some of the main features available with the Webex App integration for Salesforce:
- Enabling inbound calling features in Salesforce
- Enabling outbound calling features in Salesforce
- Enabling opportunity collaboration features in Salesforce
- Enabling Webex space notifications in Salesforce
Be sure to also check out our instructional videos. We've made videos that cover all aspects of the Salesforce integration with Webex App.
Important changes and announcements for the Webex for Salesforce integration.
Authorization flow changes
The Webex Salesforce authorization flow has changed from version 1.19.0 to reduce administration complexity. To update existing authorization configurations you will need to:
- Remove any existing Webex Connected Apps from Salesforce.
- Remove any named credentials.
- Remove the existing authorization provider.
- Create a new Webex Connected App.
Before continuing, please make sure you meet the following prerequisites:
- The user performing the setup must be an administrator for the Salesforce organization where the integration is to be installed.
-
This integration requires a minimum of Salesforce Enterprise Edition. See Salesforce Editions for more information.
- The organization must have Webex configured with the correct licenses for the functionality required including, messaging, meeting, and calling.
- All users using the integration must have Salesforce access and the required Salesforce licenses.
- All users must have the requisite Webex licenses in order to use specific Webex
functionality such as Webex Meetings and Webex Calling from within Salesforce.
CUCM and Broadworks are supported with partial functionality. See Calling limitations in the Calling tab for more details.
- This integration is available for Salesforce Lightning.
You must deploy My Domain in your org if you want to use Lightning components. See the My Domain Salesforce documentation for more information.
-
You must configure user access to integrations in your organization.
-
Without Pro Pack—When you have the basic Control Hub, you can choose to allow or deny access to all integrations for all of your users.
-
With Pro Pack—With Pro Pack, you have advanced functionality to manage access to integrations for users.
See Configure User Access to Integrations for more information.
-
For versions of the Webex Salesforce integration later than 1.14, you can now upgrade using Salesforce Exchange.
IMPORTANT: If you are using any version of the package older than v1.14, then you must to uninstall the existing package and follow the steps in this article to update to the latest package from Salesforce AppExchange. Make sure you choose to retain data when uninstalling existing packages, so that existing space and meetings linkages to Salesforce objects are not removed. Data can be saved for up to 48 hours following an uninstall.
To install the Webex integration via Salesforce Exchange:
- Navigate to Webex App for Salesforce in the AppExchange.
- Select Get It Now.
- Select the Connected Org in which you want to install the integration.
- Install the app for Administrators only.
- Continue with Authorize the Webex integration in the Install and administer tab.
Before you follow the configuration steps, you must first go to the release notes and download the latest version of the Webex App Salesforce Package.
Requirements
Salesforce Enterprise Edition
This integration requires a minimum of Salesforce Enterprise Edition. See Salesforce Editions for more information.
My Domain in Salesforce org
You must deploy My Domain in your org if you want to use Lightning components. See the My Domain Salesforce documentation for more information.
User access in Control Hub
You must configure user access to integrations in your organization.
-
Without Pro Pack—When you have the basic Control Hub, you can choose to allow or deny access to all integrations for all of your users.
-
With Pro Pack—With Pro Pack, you have advanced functionality to manage access to integrations for users.
See Configure User Access to Integrations for more information.
Calling
-
Webex Calling is fully supported for inbound and outbound calls for call control within Salesforce.
-
Calling in Webex (Unified CM) is partially supported. Only outbound calls open up a logging pop-up into Salesforce. For inbound, the Webex App rings but Salesforce cannot intercept the call, so the logging pop-up does not appear.
Before you begin
| 1 |
Use your admin credentials to sign into your production Salesforce environment
(the installation URL contains the |
| 2 |
Choose Install for Admins Only, and then check I acknowledge. Next, click Install. |
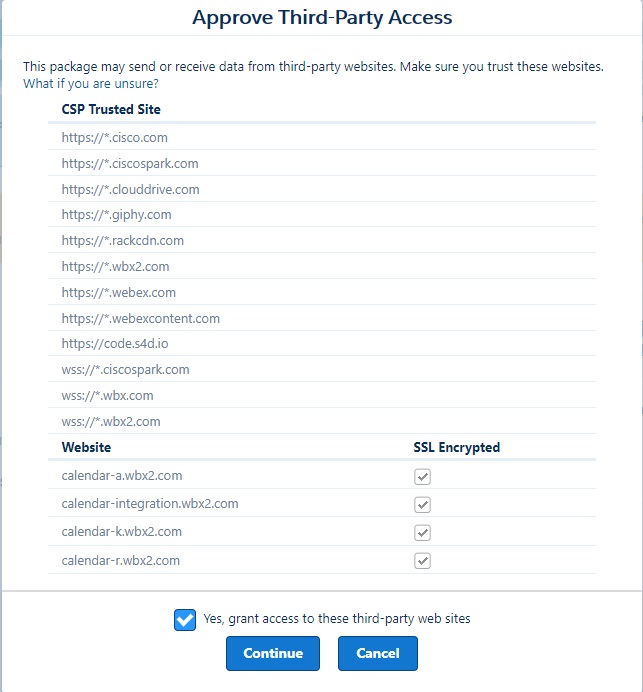
| 3 |
Click Yes, grant access to these third-party web sites, and then click Continue below the CSP Trusted Site list.
For more information about the trusted sites required for Webex services, see Network requirements for Webex services. |
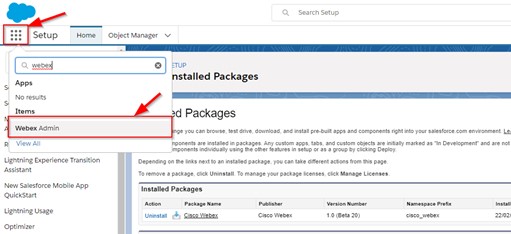
| 4 |
After the package installs, go to the Webex Admin tab in Salesforce. Keep the Webex Admin tab open, as you’ll need it for the later configuration steps.
|
Before you begin
These steps require Cisco developer account access ( https://developer.webex.com).
| 1 |
Go to (See the Get My Own Details documentation for more information) and copy your access token for Authorization.
|
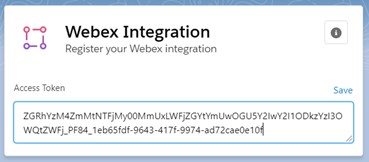
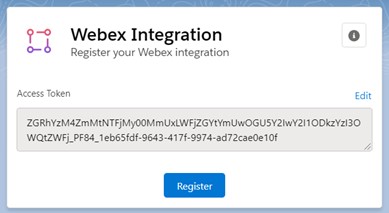
| 2 |
Paste the access token in the Access Token field in the Webex Integration Settings window on the Webex Admin page on salesforce.com, and then click Save.
|
| 3 |
Click Register.
A success message appears if the integration is successful. For major releases, you need to register the access token again in Salesforce. |
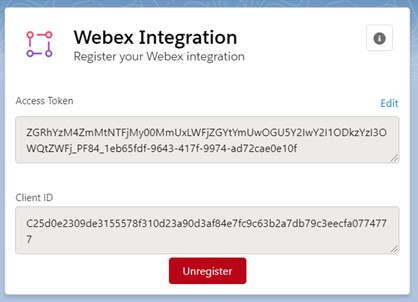
| 4 |
(Optional) To check the Integration status, enter the same user's access token and then click Save. You can check the integration status only by using an access token belonging to the same user that you initially used. Access tokens copied from the developer portal are valid for 12 hours. The following window is shown with the integration status:
|

If you're working with Webex for Salesforce version 1.18 or earlier, before you can work with Webex Calling within Salesforce, you'll need to configure a Salesforce authorization. Follow the sections in this article to get up and running.
These procedures apply to customers using version 1.18 and earlier of the Webex Salesforce integration. See the updated instructions for versions 1.19 and later: Configure a Salesforce authorization (1.19 and later) in the Install and administer tab.
1. Create a Connected App
To create a new Connected App:
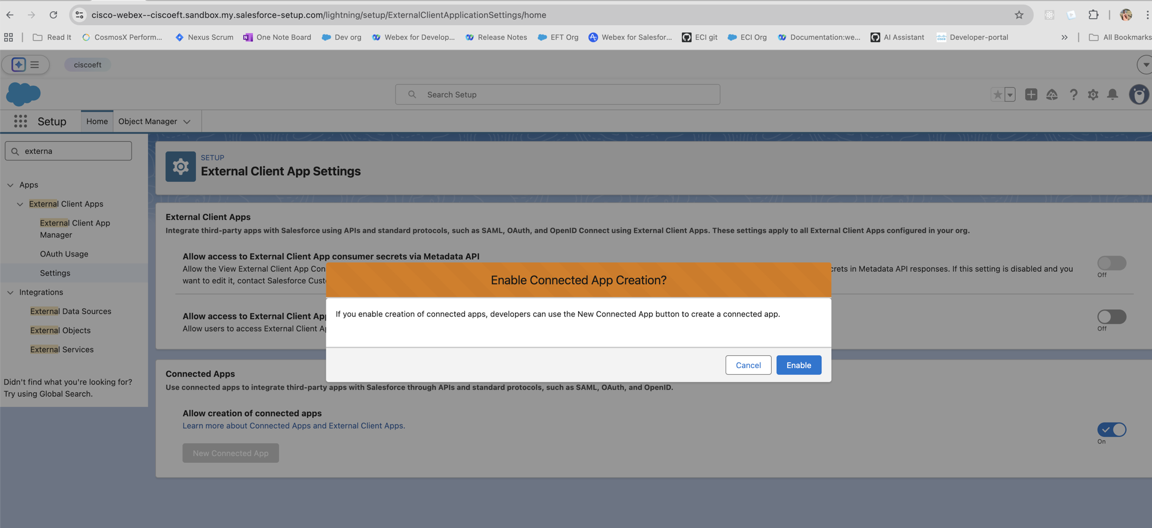
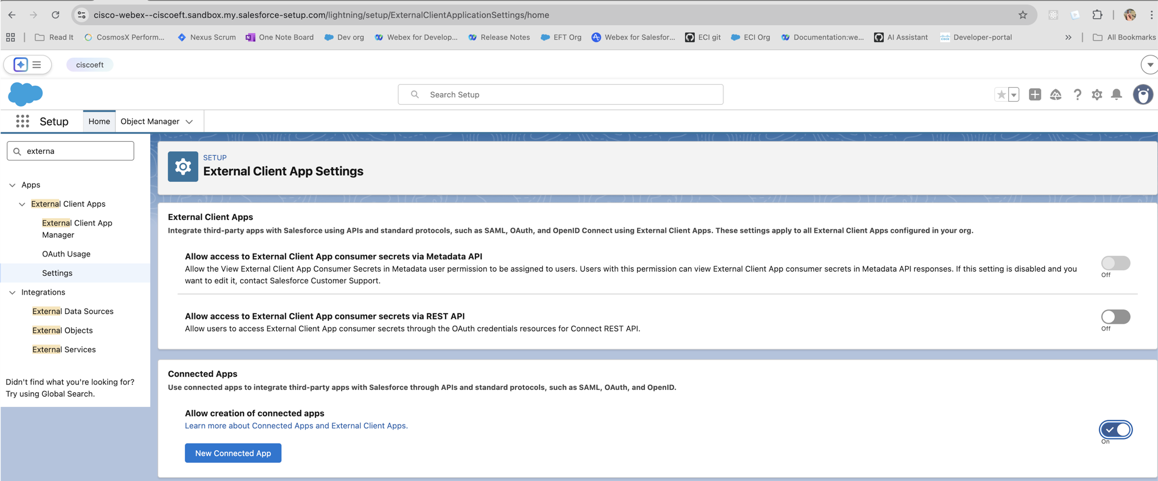
- In Setup, search for External client App.
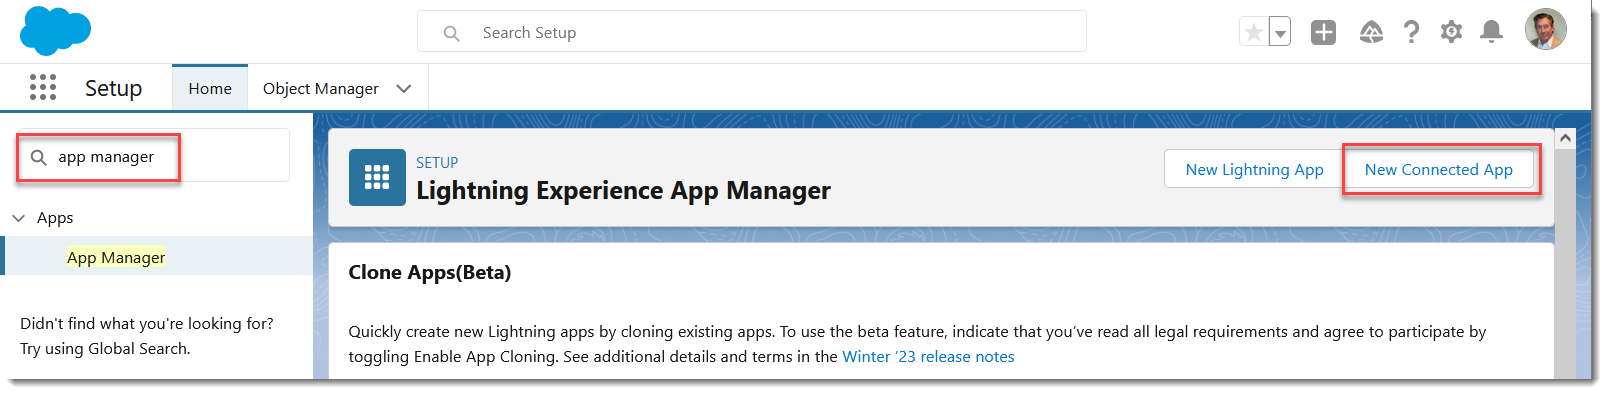
- Under External client app, choose Settings.
- Enable the toggle button for Allow creation of connected apps. If
the new connected app button is already enabled then no need for new action. You can
create a new connected app.
- To create a new connected app, click the New Connected App button
and enter the required details.
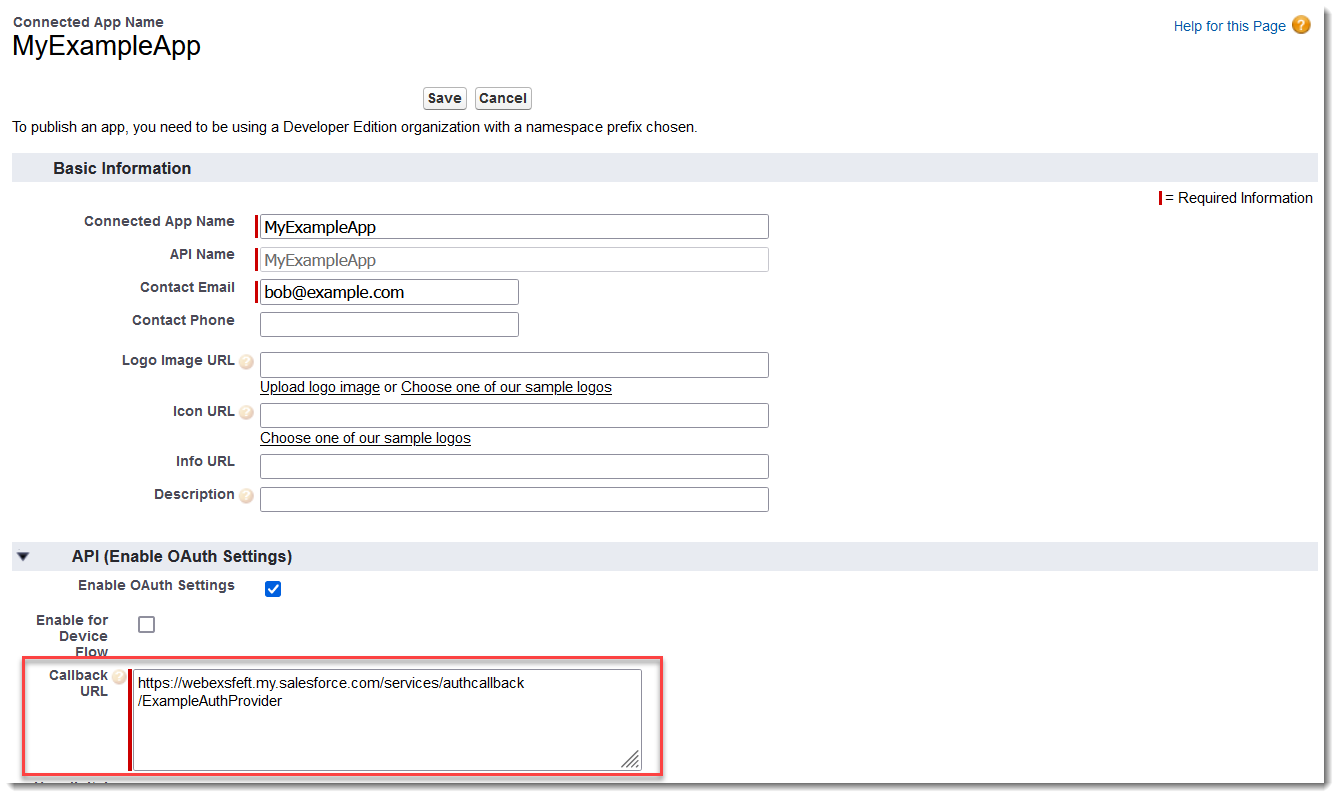
- Enter a Connected App Name, for example, MyExampleApp.
- Enter a Contact Email address.
- Check Enable OAuth Settings.
- Specify a placeholder Callback URL (we’ll update this later), for example,
https://localhost/placeholder.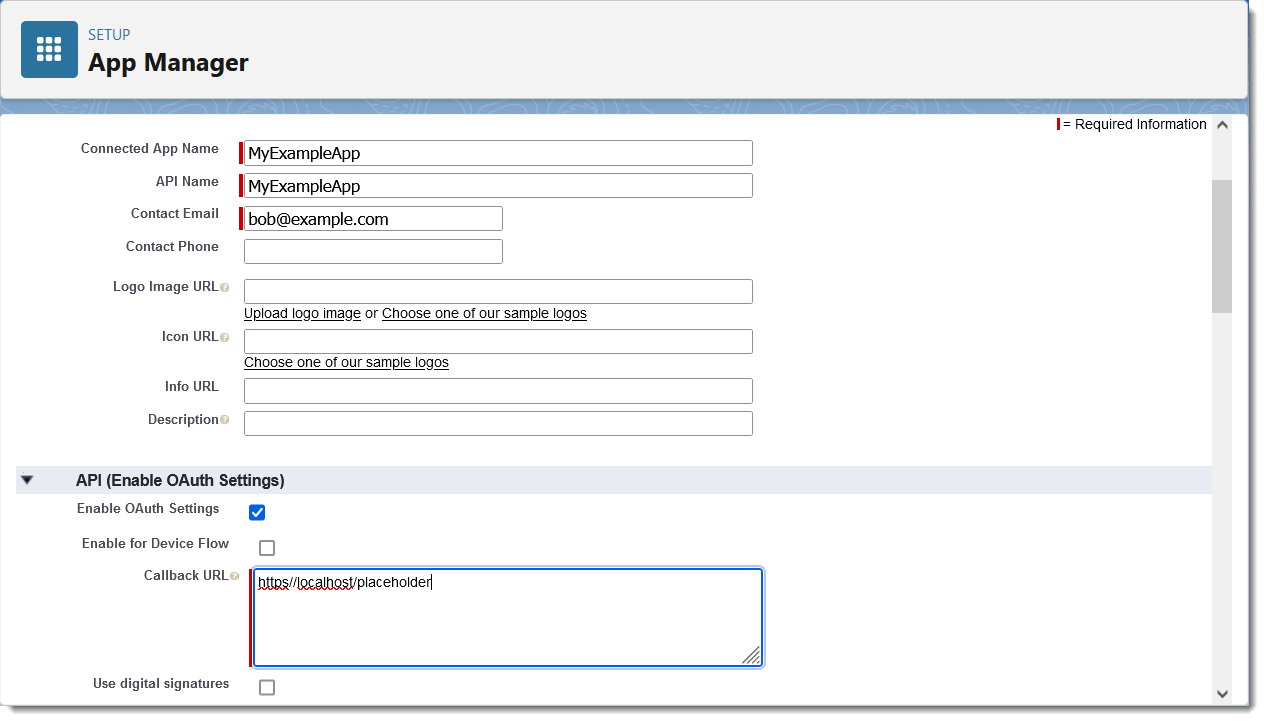
- Scroll down and choose the following OAuth Scopes:
- Full access (full)
- Perform requests at any time (refresh_token, offline_access)
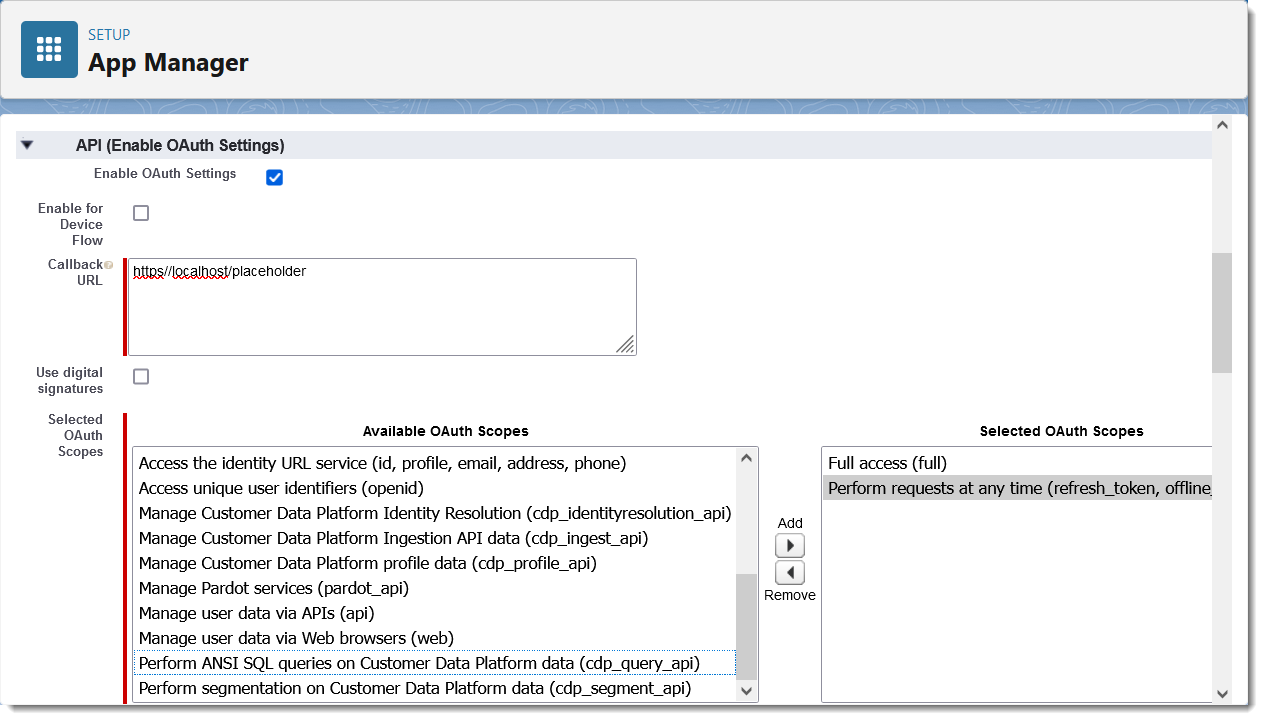
The Perform requests at any time scope allows Named Credentials to refresh your access token when a session expires.
- Scroll to the bottom of the page and click Save and then click Continue.
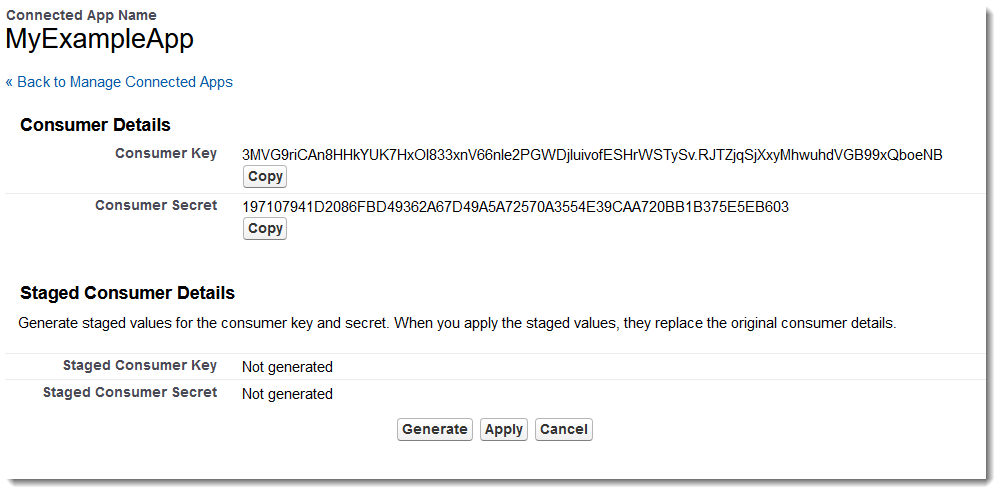
- In the next page, scroll to API (Enable OAuth Settings) and click Manage
Consumer Details.
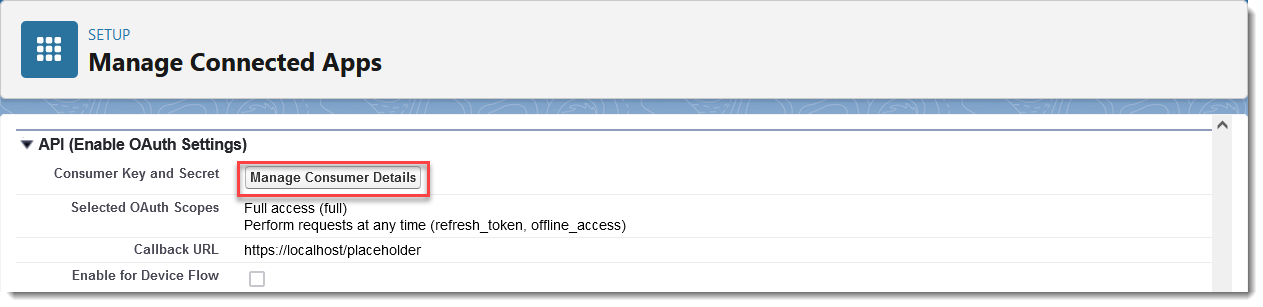
You may need to reauthenticate with Salesforce.
- Make a note of the Consumer Key and the Consumer Secret.
2. Create an Auth Provider
Next you'll need to create an authentication provider, which facilitates the authentication with your Salesforce organization.
To create an auth provider:
- In Setup, search for Auth and select Auth. Providers. Click
New.
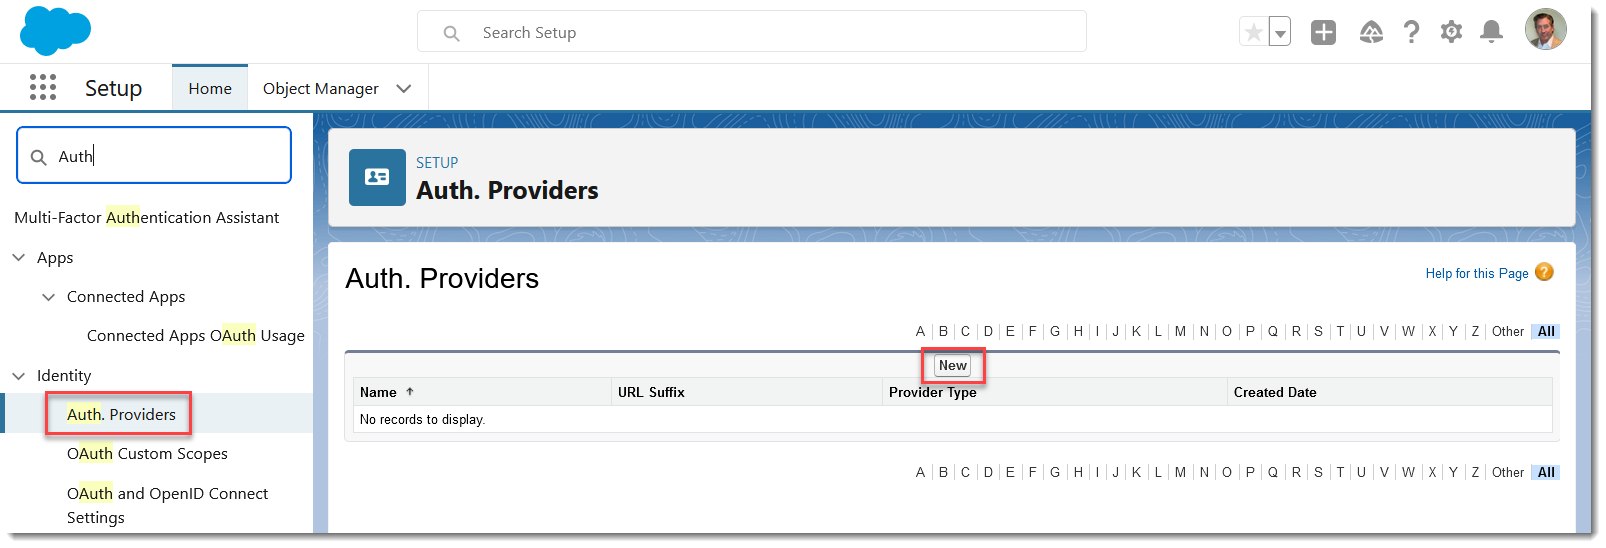
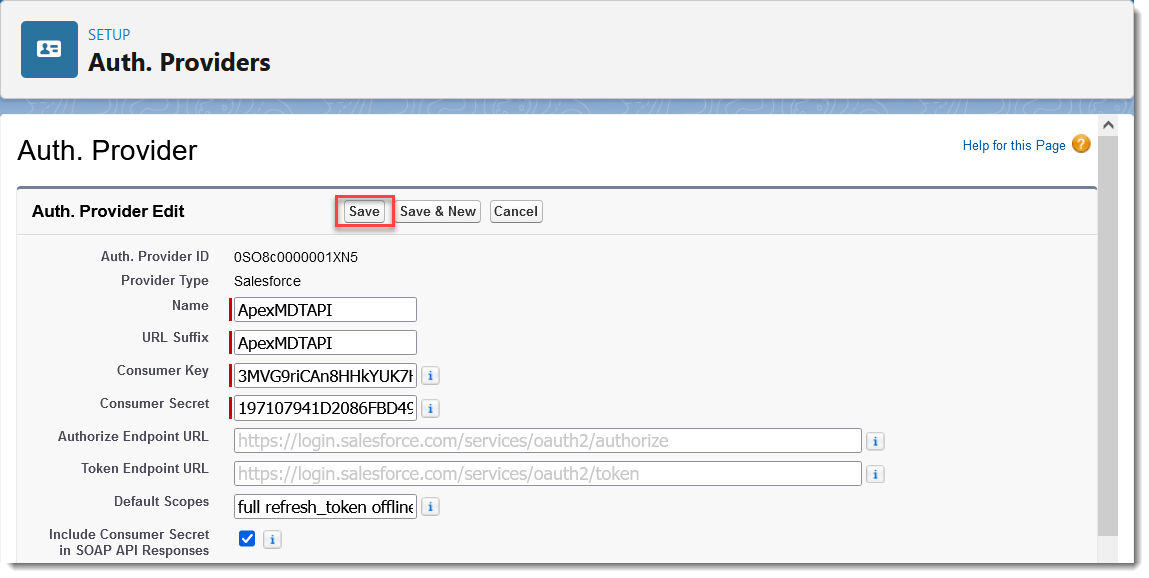
- Select Salesforce as the Provider Type.
- Enter a name for the Auth provider, for example, ApexMDTAPI.
- Paste in the Consumer Key and Consumer Secret you saved when configuring your Connected app.
- Enter the following scopes in Default Scopes, full refresh_token offline_access.
- Leave everything else blank and click Save.
- Copy the Callback URL from the Salesforce Configuration section.
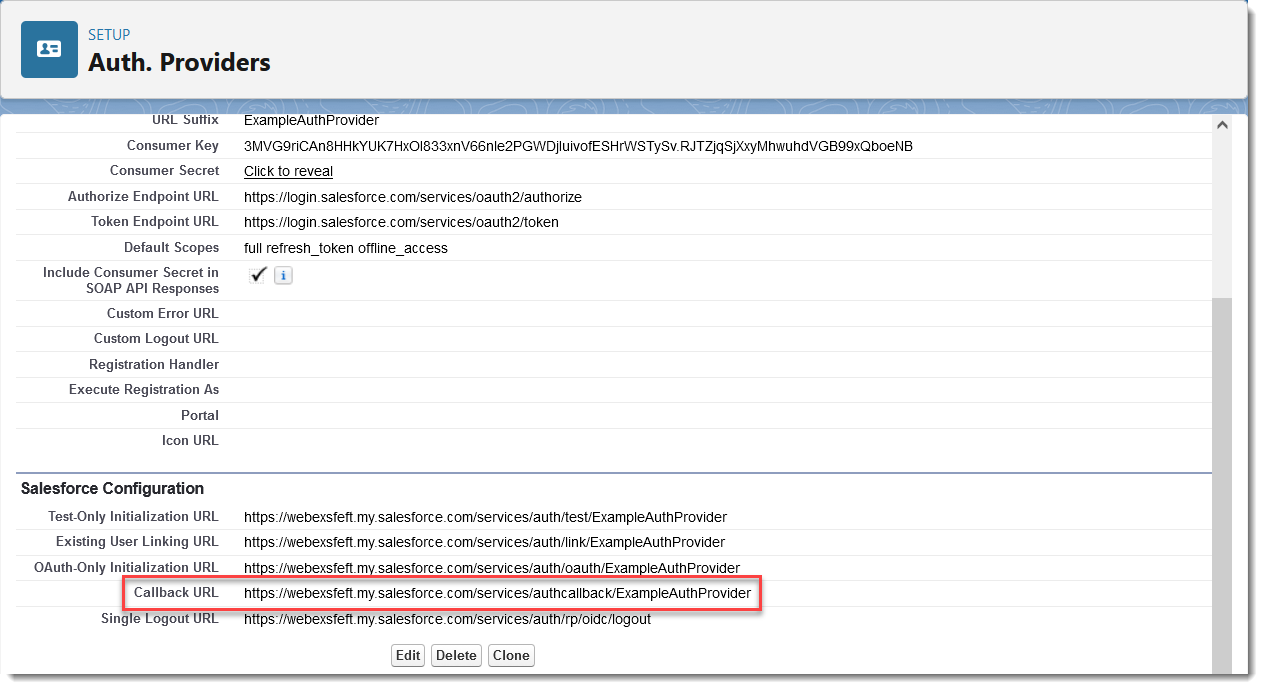
- Edit your Connected App and replace the placeholder URL with the Callback URL you
copied from the Salesforce Configuration above.
- Save your Connected App.
You may need to wait up to 10 minutes to allow the settings to take effect and propagate throughout Salesforce’s infrastructure.
3. Create a named credential
You'll then need to create a named credential.
To create a named credential:
- In Setup, search for Named and select Named Credentials. Click
New Legacy.
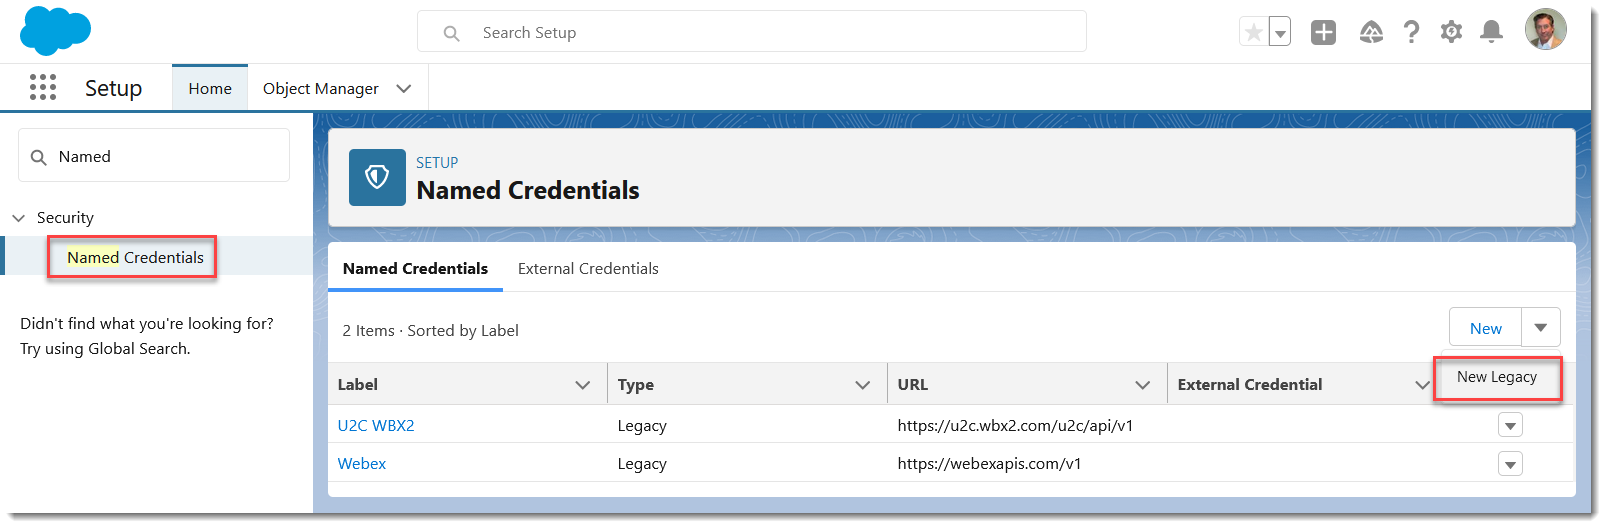
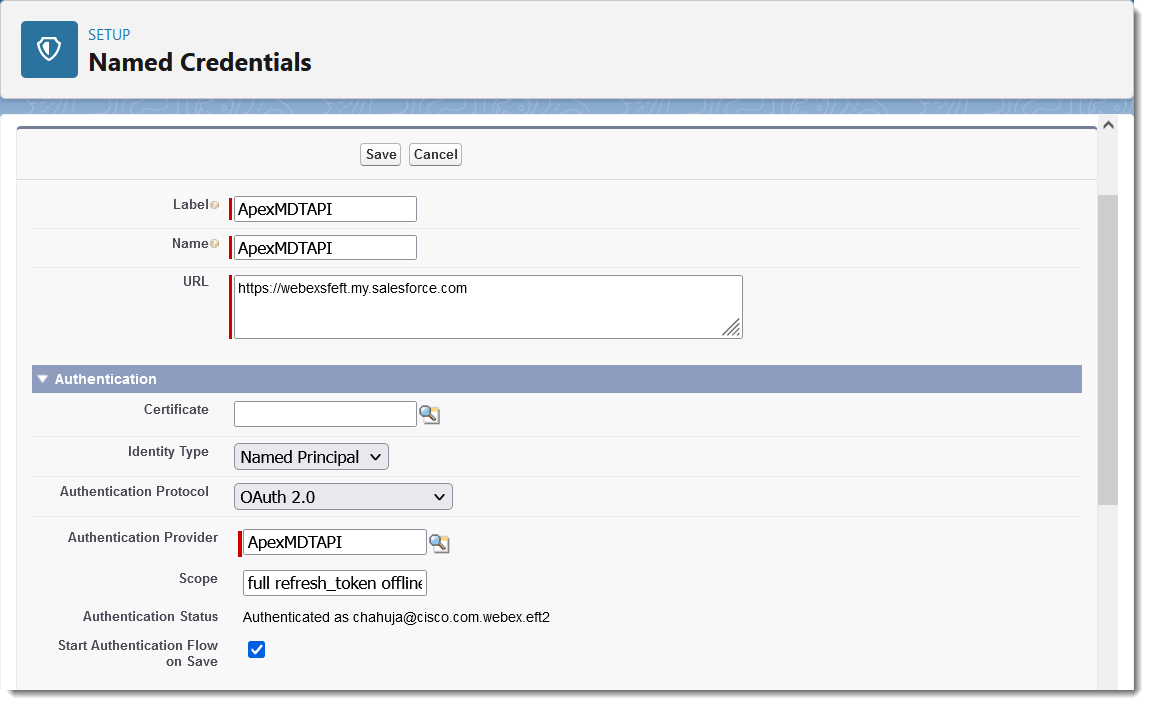
- Enter the following value for Label, ApexMDTAPI.
- For the URL, enter your organization’s instance URL, for example, https://na1.salesforce.com, or, if you are using My Domain, your fully qualified My Domain domain name, for example, https://mycompany.my.salesforce.com.
- For Identity Type, choose Named Principal.
- For Authentication Protocol choose OAuth 2.0.
- For Authentication Provider, choose the auth provider you created earlier.
- For Scope, enter, full refresh_token offline_access.
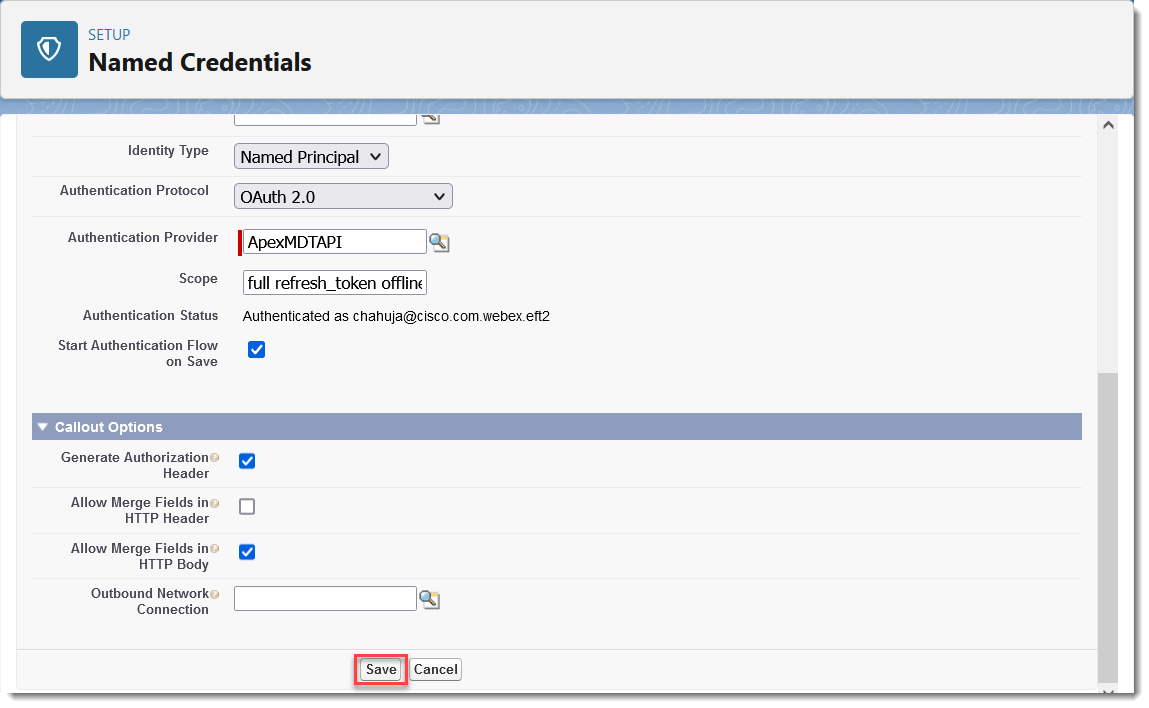
- Enable Start Authentication Flow on Save.
- In Callout Options, enable Allow Merge Fields in HTTP Body and then click
Save.
- You’ll be prompted to login to your organization. After you login, you’ll see an Allow Access dialog. Click Allow.
- You’ll then be redirected the Named Credential Screen and the Authenticated Status will indicate Authenticated as your-email@domain.com.
4. Create your site in the Webex Admin Screen
Finally, continue to the next topic in the Calling tab, Create site for calling, below.
IMPORTANT: Please follow the naming conventions above during site configuration.
For Webex for Salesforce integrations version 1.19 and later, follow the instructions in this article to remove any existing Webex Connected App for authorizations, named credentials, and auth providers, and then create a new Webex Connected App for Salesforce authorization.
Remove any existing Webex Connected apps, named credentials, and auth providers
If you have previously created a Webex Connected App authorizations, named credential, or auth provider, you’ll need to remove them before continuing. Otherwise, continue to Create a new Webex Connected App below.
Remove your existing Webex Connected app:
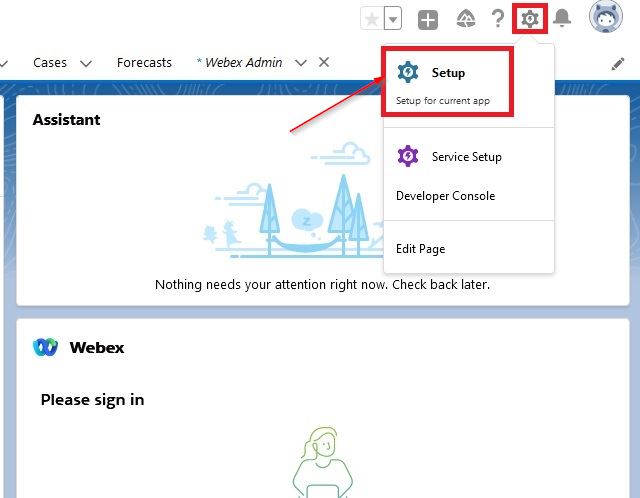
- In the upper right corner of your Salesforce landing page, select the gear icon and choose Setup.
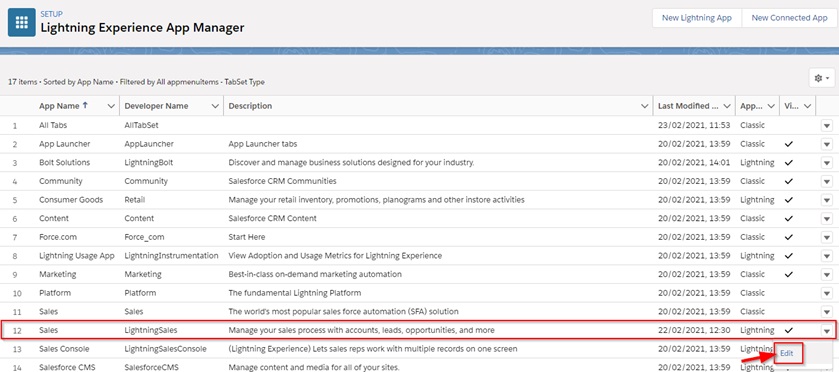
- In the Quick Find text box enter App Manager and select it from the list.
- Scroll to your Webex Connected App in the list, click the down arrow icon at the right of the entry and choose View.
- Select Delete and then select Delete again when asked to confirm.
Remove any existing Webex Named Credentials:
- In the Quick Find text box enter Named Credentials and select it from the list.
- 2. Click the down arrow at the right of the Webex named credentials entry and choose Delete.
- 3. Choose Delete again when asked to confirm.
Remove any existing Webex Auth Providers:
- In the Quick Find text box enter Auth. Providers and select it from the list.
- Select the Del link at the beginning of the Webex auth provider entry.
- Select OK when asked to confirm.
Continue to the next section to create a new Webex Connected App for Salesforce authorization.
Create a new Webex Connected App for Salesforce authorization
To create a new Webex Connected App for Salesforce authorization:
- In the upper right corner of your Salesforce landing page, select the gear icon and choose Setup.
- Retrieve your domain URL: in Quick Find, search for and select Domains, and save the URL from My Domain.
- In Setup, search for External client App.
- Under External client app, choose Settings.
- Enable the toggle button for Allow creation of connected apps. If
the new connected app button is already enabled then no need for new action. You can
create a new connected app.
- To create a new connected app, click the New Connected App button
and enter the required details.
- In the Quick Find text box enter App Manager and select it from the list.
- Enter a Connected App Name, for example, Webex Salesforce Authorization.
- Enter an email address for Contact Email.
- Check Enable OAuth Settings.
- Enter two callback URLs using the URL you retrieved earlier, one per line, and adding
/apex/ webexsfdcauthand/apex/ cisco_webex__webexsfdcauthas suffixes. For example:https://my-company.my.salesforce.com/apex/webexsfdcauthhttps://my-company.my.salesforce.com/apex/cisco_webex__webexsfdcauth - Choose the following scopes from the Available OAuth Scopes list in Selected
OAuth Scopes:
- Full access (full)
- Perform requests at any time (refresh_token, offline_access)
- Uncheck Require Proof Key for Code Exchange (PKCE) Extension for Supported Authorization Flows.
- Save the Connected App and make a note of the generated Consumer Key and Consumer Secret for later use.
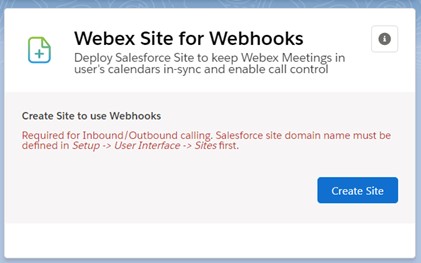
Creating a site is required for inbound and outbound calling functionality.
Before you begin
To create the site, your account requires a Salesforce System Admin profile and the Webex Admin Permission Set.
|
From Webex Admin, scroll to Webex Site for Webhooks and then click Create Site.
A previous site domain name definition is required, otherwise an error occurs. If the site is successfully created, a green message is displayed at the top of the screen and the Webex Site for Webhooks component shows a “Site successfully created” message. |
What to do next
Continue with app setup in the next section.
After you add the components to the layout, give access to the components using Permission Sets.
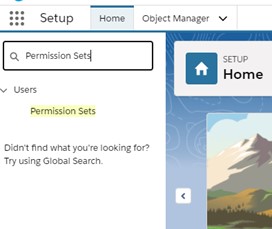
| 1 |
Go to to manage the Webex Permision Sets:
|
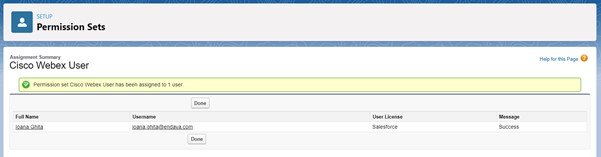
| 2 |
For example, to assign the ‘Cisco Webex User’ permission set to all users, click the ‘Cisco Webex User’ permission set, click Manage Assignments, click Add Assignments, select the users from the list, and then click Assign. If the permission sets are successfully assigned, you'll see this message:
|
When a new pack is available, follow the steps in Install the Webex App in Salesforce. You don't need to uninstall the old version first and you won't lose your configured settings.
To see information on the new installation packs and where to download them, see the Webex Salesforce integration release notes.
Before you begin
Before you uninstall the Webex for Salesforce pack, make sure that you also remove any Lightning Webex components in the lightning page layouts, utility items, object page layouts, permission sets, and sites.
| 1 |
From Salesforce Setup, go to . |
| 2 |
Click Uninstall related to the ‘Webex for Salesforce’ package, check Yes, I want to uninstall this package and permanently delete all associated components. You'll receive an email notification when the uninstall is complete. |
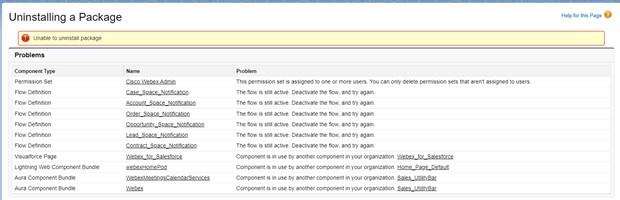
| 3 |
If you missed removing component from the app, an error message containing active elements is be displayed.
|
| 1 |
Click Setup on the top right.
|
| 2 |
From the Setup page, search for App Manager and select the option you want from the results. |
| 3 |
Use the App Manager to configure which Webex features to apply to which parts of the Salesforce apps, so that Salesforce users can test the Webex features in their app. The Integration can be used only in Lightning Apps.
|
| 4 |
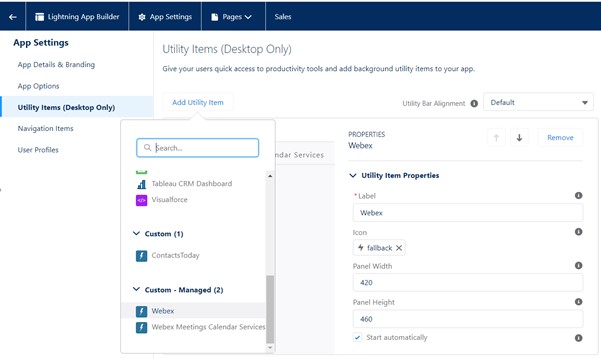
Webex Calling/Chat Component—Available to add to the Salesforce Utility Bar. From , choose and edit the desired application. Go to Utility Items, then from Add Utility Item, select Webex. Set Panel Width to 420, set Panel Height to 460, and set Start automatically to true, then click Save.
|
To enable or disable call history:
- Go to Webex Admin.
- Scroll down to Webex Call History.
- Switch the toggle to the desired setting, either enabled or disabled.
When enabled, Call History is available to all users and profiles.
| 1 |
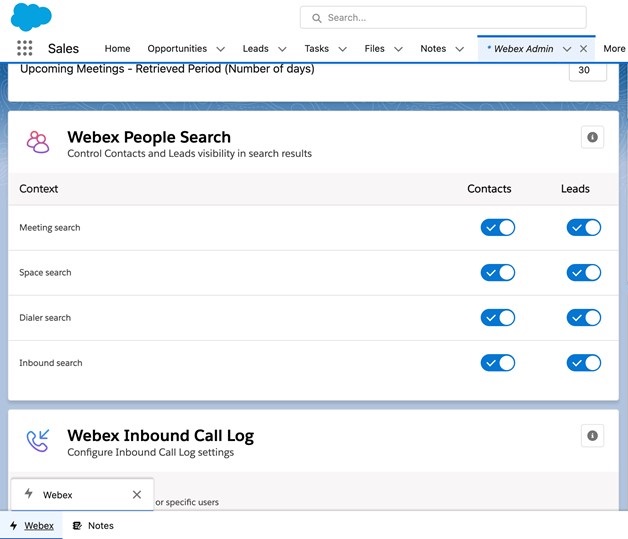
Go to Webex Admin. |
| 2 |
Scroll down to Webex People Search. |
| 3 |
For Dialer search, toggle on Contacts and Leads so that they appear in the search results when making a call.
|
| 4 |
For Inbound search, toggle on Contacts and Leads so that Salesforce matches inbound callers with existing leads or contacts. |
| 1 |
To enable outbound calling for an object such as a lead or contact, first go to the object page. Click the gear icon and then click Edit Page. |
| 2 |
Click the page header to open the Highlights Panel. 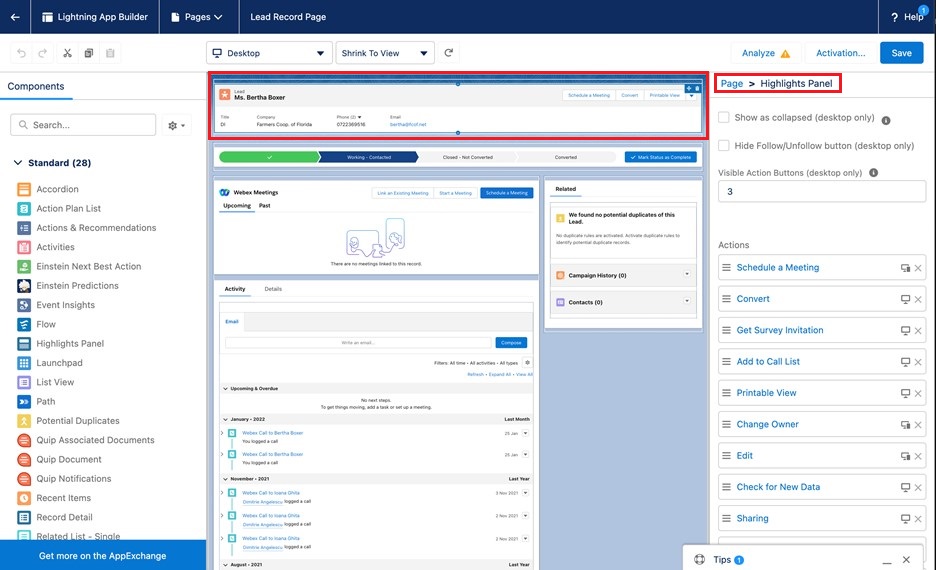
|
| 3 |
Ensure that Show as collapsed and Hide Follow/Unfollow button are not selected. |
| 4 |
Set Visible Action Buttons to 3. |
| 5 |
Scroll to the bottom of the Actions list, and then click Add Action. |
| 6 |
Search for and select Make a Call, and then click Done. |
| 7 |
Drag the Make a Call action up to appear in the top three actions in the list. Only the first three actions in the list appear on the component. 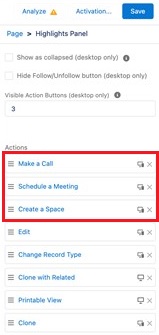
|
| 8 |
Click Save. |
| 1 |
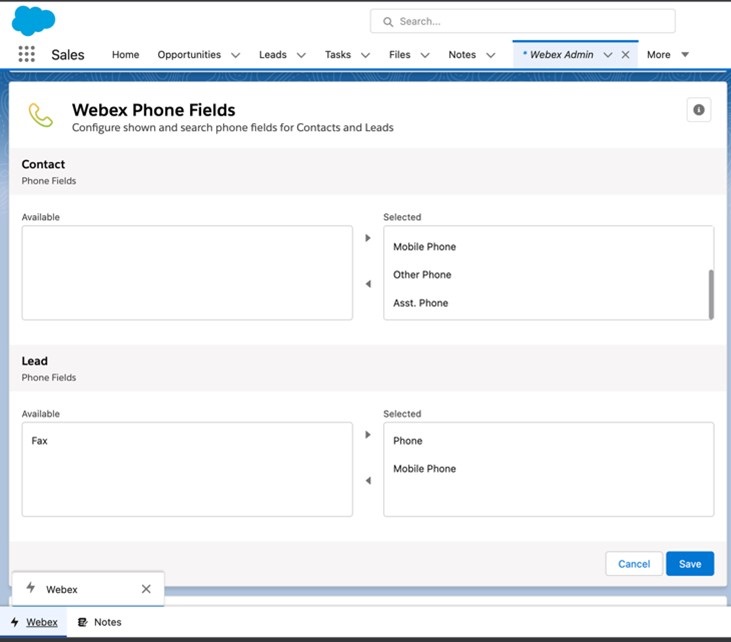
Go to Webex Admin. |
| 2 |
Scroll down to Webex Phone Fields. |
| 3 |
Select the phone fields that you want to use when calling a Contact or Lead, and move them to the Available list.
|
| 4 |
Click Save. |
| 1 |
Go to Webex Admin. |
| 2 |
Scroll down to Webex Outbound Call Log. |
| 3 |
Toggle on the Enable Outbound Call Logging for all Profiles/Users setting. |
| 4 |
Select the objects to relate outbound call logs to, and move them to the Available list. For example, move Account, Case, and Opportunity to the Available list. 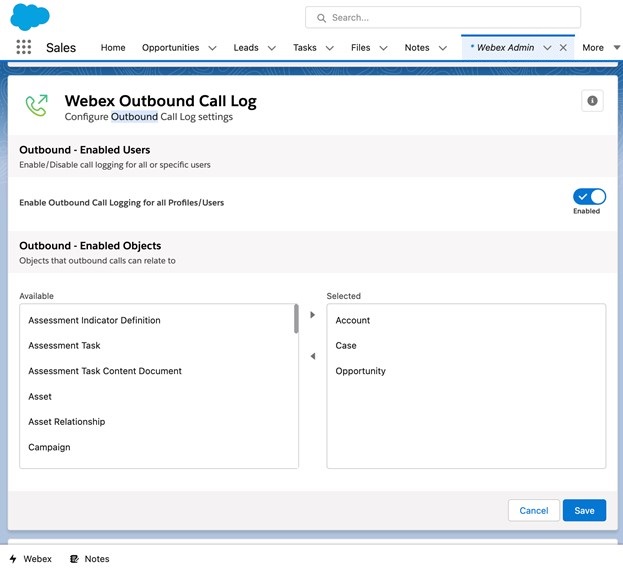
|
| 5 |
Click Save. |
| 1 |
Go to Webex Admin. |
| 2 |
Scroll down to Webex Inbound Call Log. |
| 3 |
Toggle on the Enable Inbound Call Logging for all Profiles/Users setting. |
| 4 |
Select the objects to relate inbound call logs to, and move them to the Available list. For example, move Account, Case, and Opportunity to the Available list. 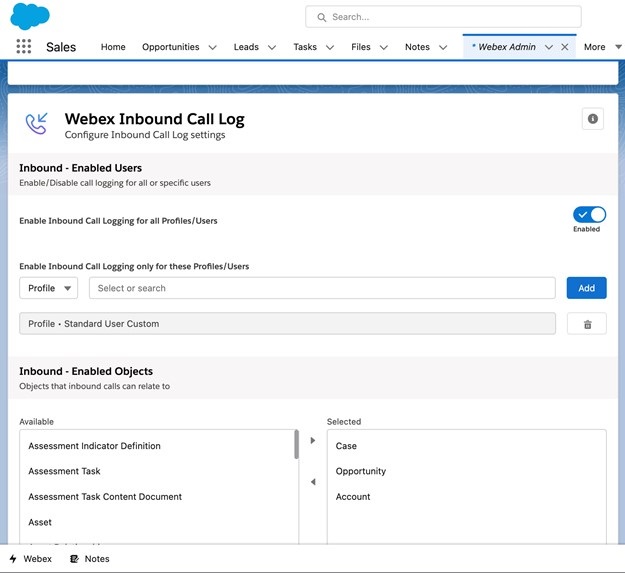
|
| 5 |
Click Save. |
| 1 |
Go to Webex Admin. |
| 2 |
Scroll down to Webex Call Log - More Tab Configuration. |
| 3 |
Select an object from the Object list. Objects related to account records appear in the list. |
| 4 |
Select an Account Relationship Field from the list, which automatically populates based on the selected object. This field determines how the selected object is related to the account. |
| 5 |
Select Fields and move them from the Available list to the Selected list. These selected fields appear on the More info tab during inbound or outbound calls. 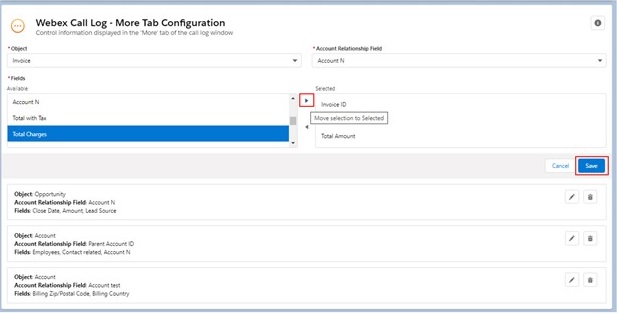
|
| 6 |
Click Save. An object can have one configuration setting only. |
| 7 |
Click Edit or Delete to delete or change an existing configuration. |
For CUCM and Broadworks users, the following functionality is unsupported:
- Receiving inbound calls in the Salesforce global dialer (Webex App will still receive inbound calls)
- Viewing call durations in the Salesforce call log window after successfully placing an outbound call
- Ending calls via the button in the Salesforce call log window after successfully placing an outbound call
- Automatically populating call durations in the Salesforce call log window after ending an outbound call
For all Salesforce integrations, note the following limitation:
-
Salesforce enforces an event count limitation (25,000) which may cause integrations to fail under heavy usage. Salesforce packages are available to increase that limit. For more information, see https://developer.salesforce.com/docs/atlas.en-us.platform_events.meta/platform_events/platform_event_limits.htm.
- Webex calling utility components are not available in the Salesforce mobile app.
| 1 |
Click Setup on the top right.
|
| 2 |
From the Setup page, search for App Manager and select the option you want from the results. |
| 3 |
Use the App Manager to configure which Webex features to apply to which parts of the Salesforce apps, so that Salesforce users can test the Webex features in their app. The Integration can be used only in Lightning Apps.
|
| 4 |
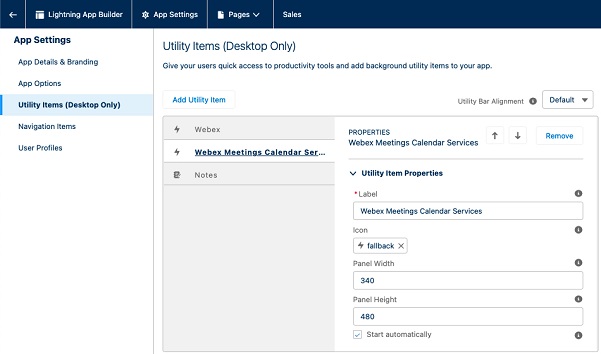
Webex Meetings Calendar Service—Go to Utility Items, then from Add Utility Item, select Webex Meetings Calendar Service. Set Panel Width to 340, set Panel Height to 480, and set Start automatically to true, then click Save.
This component is usually added in the Utility bar. If your app uses the Salesforce utility bar, you don't need to add the ‘Webex Meetings Calendar Service’ component to each page. If your app does not use the Salesforce utility bar, you must add the ‘Webex Meetings Calendar Service’ component to each page containing the ‘Webex Meetings’ component. To do so, go to a record page, press the gear icon from the toolbar and click Edit page. In the Lightning App Builder page, drag and drop the Webex Meetings Calendar Services from the Components panel to the page layout. |
| 1 |
From the page, click the gear icon. |
| 2 |
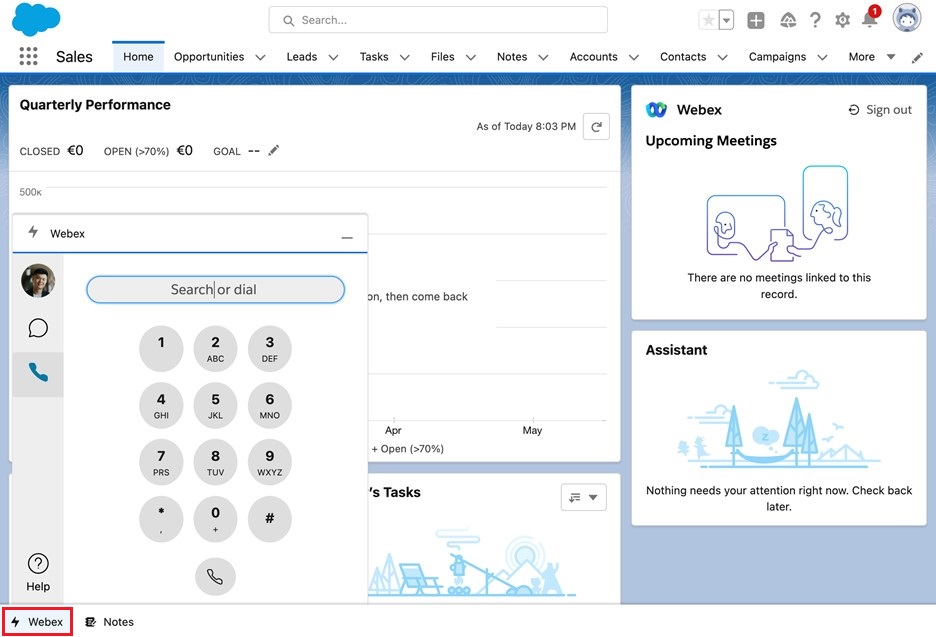
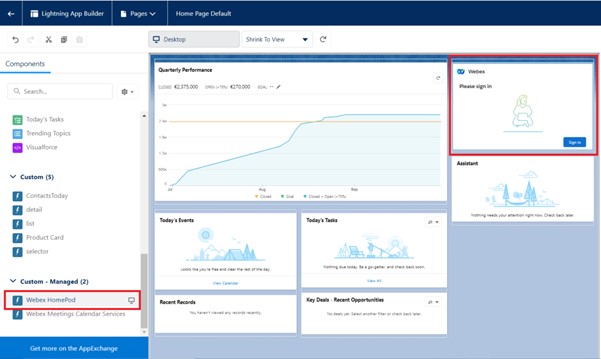
For the Home page, drag and drop the Webex HomePod component onto the page and then click Save.
|
| 3 |
When saving the page, you must activate it to make it visible for other users: click Activate, click Assign as Org Default and then click Save. The Webex HomePod component is only available to add to the Home page section. That's the only place users can sign out from their Webex accounts.
|
| 4 |
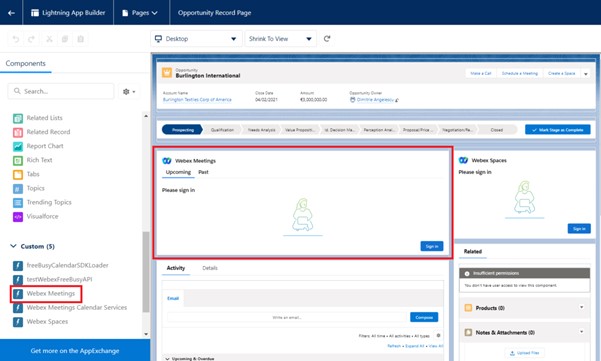
To add the Webex Meetings component to an object, first go to the object page. Click the gear icon and then click Edit Page. |
| 5 |
Drag and drop the Webex Meetings component onto the page.
|
| 6 |
Click the page header to open the Highlights Panel.
|
| 7 |
Ensure that Show as collapsed and Hide Follow/Unfollow button are not selected. |
| 8 |
Set Visible Action Buttons to 3. |
| 9 |
Scroll to the bottom of the Actions list, and then click Add Action. |
| 10 |
Search for and select Schedule a Meeting, and then click Done. |
| 11 |
Drag the Schedule a Meeting action up to appear in the top three actions in the list. Only the first three actions in the list appear on the component.
|
| 12 |
Click Save. |
| 1 |
Go to Webex Admin. |
| 2 |
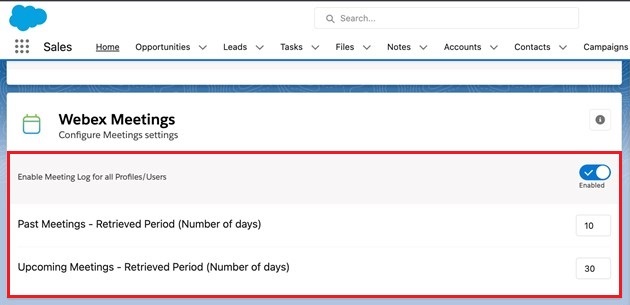
Scroll down to Webex Meetings. |
| 3 |
Toggle on Enable Meeting Logs for all Profiles/Users. |
| 4 |
Set Past Meetings – Retrieved Period to the desired number of days for retrieving past meetings. |
| 5 |
Set Upcoming Meetings – Retrieved Period to the desired number of days for retrieving future meetings.
|
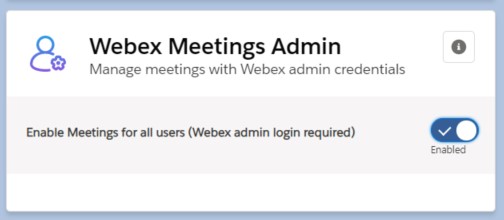
| 6 |
Under Webex Meetings Admin on the right, toggle on Enable Meetings for all users (Webex admin login required).
After enabling this feature, you must enter your credentials on the Cisco authentication page. |
| 1 |
Go to Webex Admin. |
| 2 |
Scroll down to Webex People Search. |
| 3 |
For Meeting search, toggle on Contacts and Leads so that they appear in searches when scheduling a meeting.
|
| 1 |
Click Setup on the top right.
|
| 2 |
From the Setup page, search for App Manager and select the option you want from the results. |
| 3 |
Use the App Manager to configure which Webex features to apply to which parts of the Salesforce apps, so that Salesforce users can test the Webex features in their app. The Integration can be used only in Lightning Apps.
|
| 4 |
Webex Chat Component—Available to add to the Salesforce Utility Bar. From , choose and edit the desired application. Go to Utility Items, then from Add Utility Item, select Webex. Set Panel Width to 420, set Panel Height to 460, and set Start automatically to true, then click Save.
|
| 5 |
Go to Webex Admin. |
| 6 |
Scroll down to Webex Chat. |
| 7 |
Toggle on Enable Chat for all Profiles/Users.
|

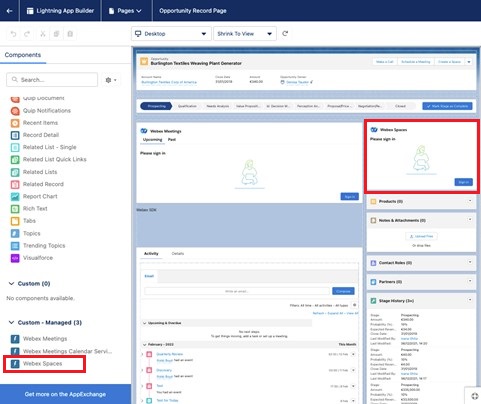
| 1 |
To add the Webex Spaces component to an object, first go to the object page. Click the gear icon and then click Edit Page. |
| 2 |
Drag and drop the Webex Spaces component onto the page.
|
| 3 |
Click the page header to open the Highlights Panel.
|
| 4 |
Ensure that Show as collapsed and Hide Follow/Unfollow button are not selected. |
| 5 |
Set Visible Action Buttons to 3. |
| 6 |
Scroll to the bottom of the Actions list, and then click Add Action. |
| 7 |
Search for and select Create a Space, and then click Done. |
| 8 |
Drag the Create a Space action up to appear in the top three actions in the list. Only the first three actions in the list appear on the component.
|
| 9 |
Click Save. |
| 1 |
Go to Webex Admin. |
| 2 |
Scroll down to Webex People Search. |
| 3 |
For Space search, toggle on Contacts and Leads so that they appear in searches when creating a space.
|
Before you begin
Go to https://developer.webex.com/ and create a new bot. Keep a copy of the bot access token, you need it to configure notifications.
| 1 |
Go to Webex Admin. |
| 2 |
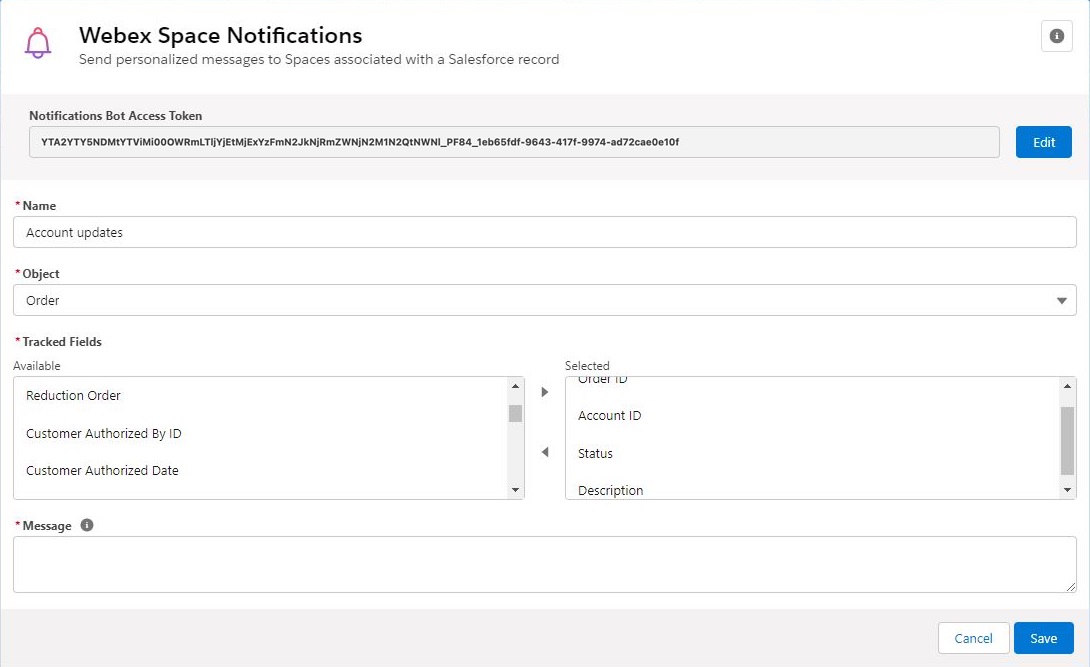
Scroll down to Webex Space Notifications. |
| 3 |
Paste the bot access token in the Notifications Bot Access Token field, and then click Save. |
| 4 |
Enter a name for the notification in the Name field. |
| 5 |
From the Object list, select the object you want to track. The list of Tracked Fields updates automatically after you select an object. |
| 6 |
Move the Tracked Fields you want to receive notifications for to the Selected list.
|
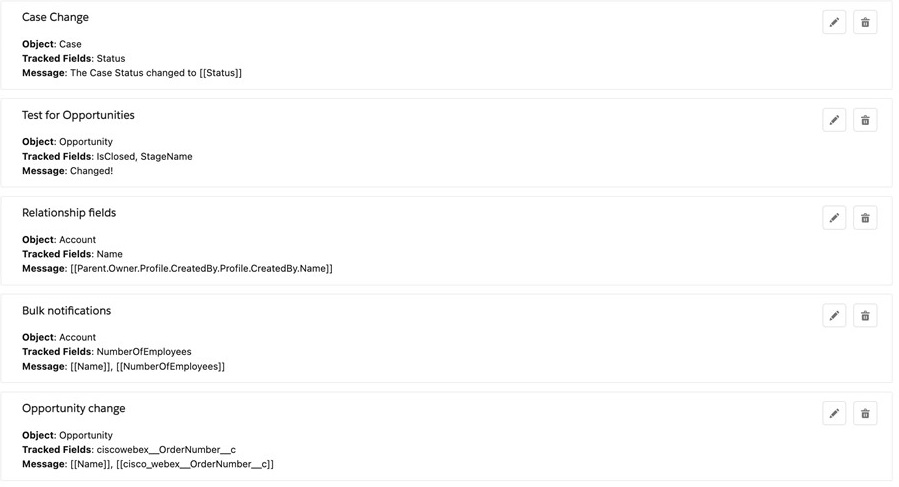
| 7 |
Enter the Message to display when there is an update to a tracked field. Enclose dynamic fields in square brackets. Enter lookup fields like in this example: |
| 8 |
Click Save. |
| 9 |
Edit or delete existing notifications as required.
|
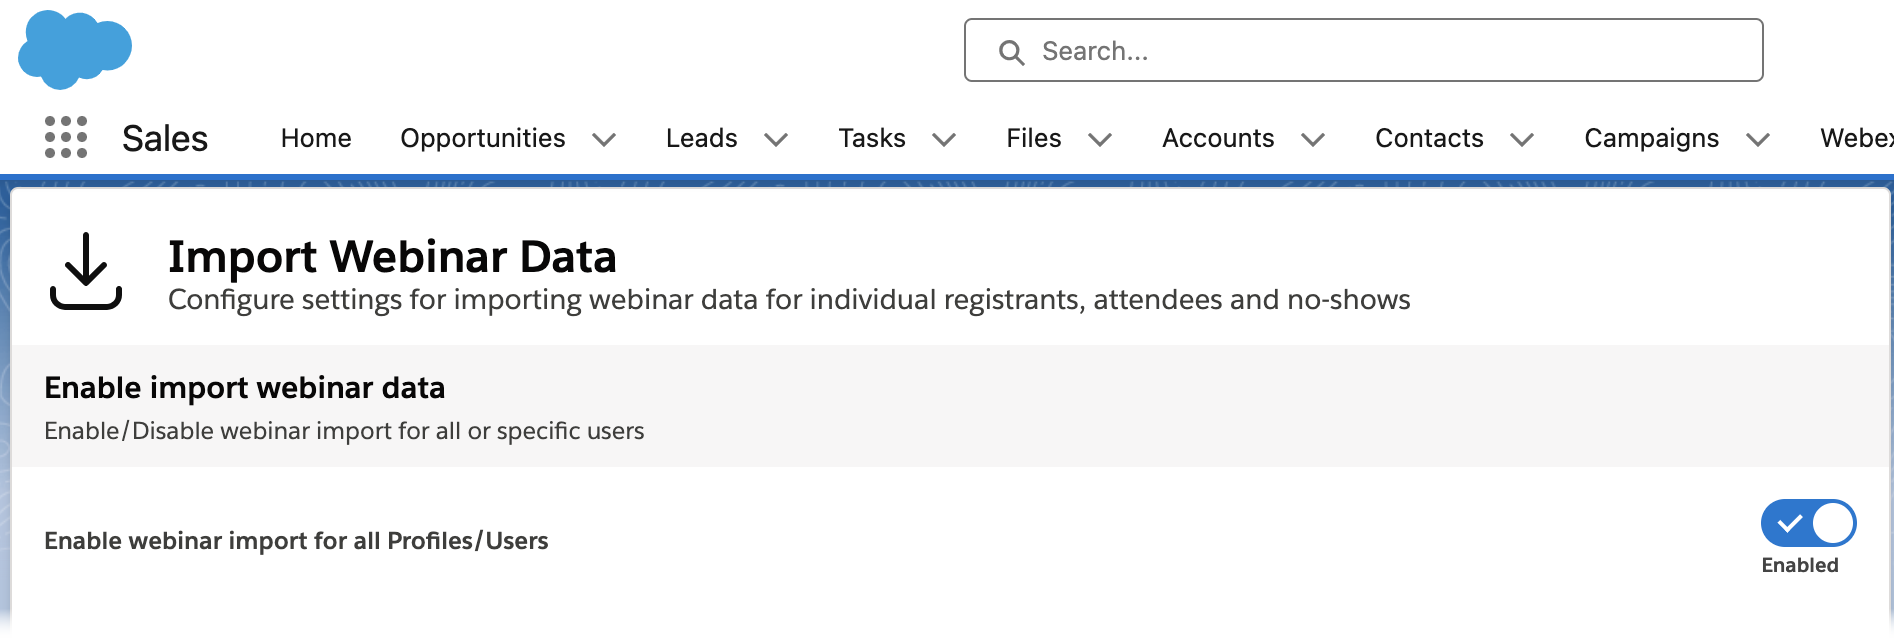
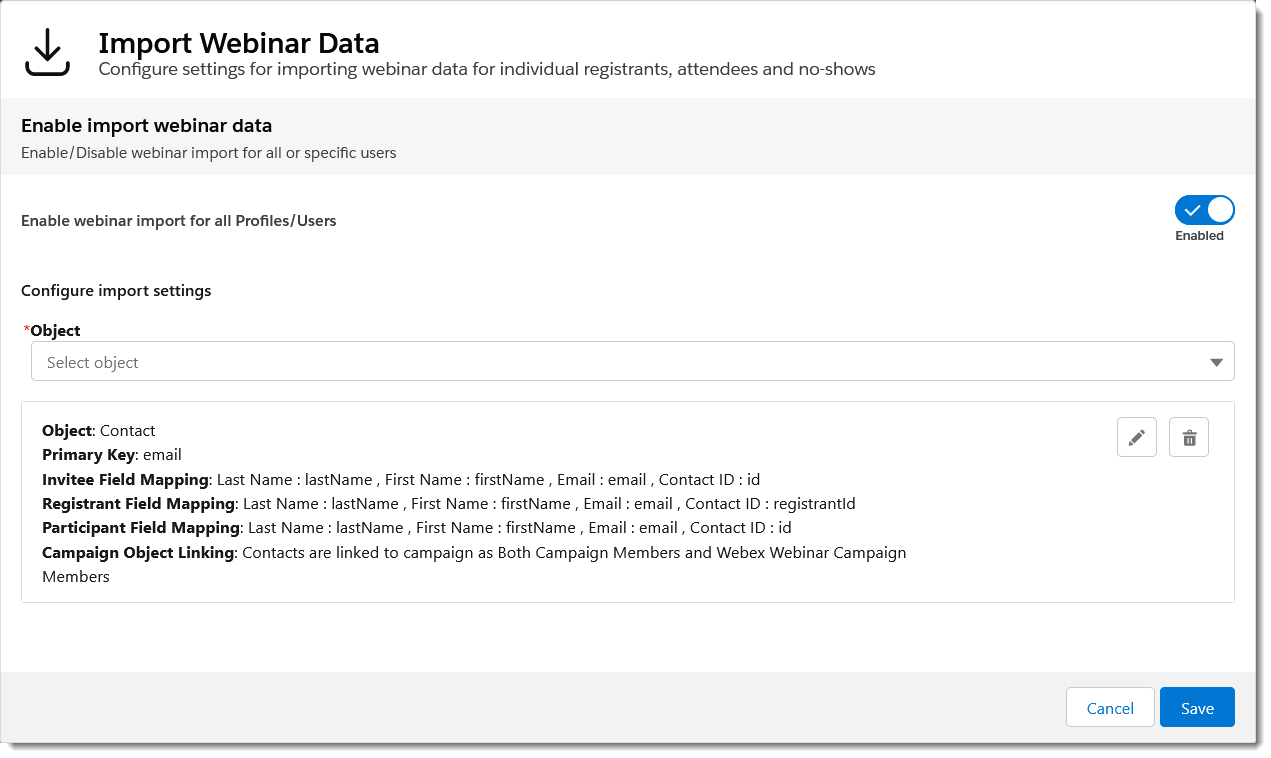
Using the Webex Webinars Import Webinar Data configuration panel, authorized Salesforce users can import Webex webinar invitees, registrants, and attendees directly into Salesforce objects such as leads and contacts.
The Import Webinar Data configuration interface is available from the Webex Admin page:
Once webinar import is enabled, authorized users can import Webex webinar data using the Webex Webinars widget:
Assign Webex webinar permissions to Salesforce users
Before your users can access the Webex webinar import functionality, you’ll need to assign the Webex Import Admin permission to each.
To assign permissions to a user:
- Navigate to Integrate Salesforce with Webex App.
- Choose the Manage tab at the bottom of the article and then expand Provide access:
- Follow the instructions to add the Webex Import Admin permission to your Salesforce user accounts.
Configure the Webex webinar time range display
To configure the time range of Webex webinars displayed:
- Click the Salesforce Apps button, enter Webex in the search field and then choose Webex Admin:
- Find the Webex Webinars panel and enter the number of days for which you want to display past and upcoming webinars in the home page Webex webinars widget:
Continue to configure the Webex webinar import field mappings.
Configure Webex webinar import field mappings
Using the Webex webinar import settings, you define mappings between Salesforce objects and Webinar object fields. For instance, you can map first and last names of a Salesforce Contact object to the parallel field names for webinar invitees, registrants, and attendees: firstName and lastName.
To configure Webex webinar import settings:
- In the Webex Admin page, scroll down to the Import Webinar Data
panel:
- Choose a Salesforce object from the Object drop down list:
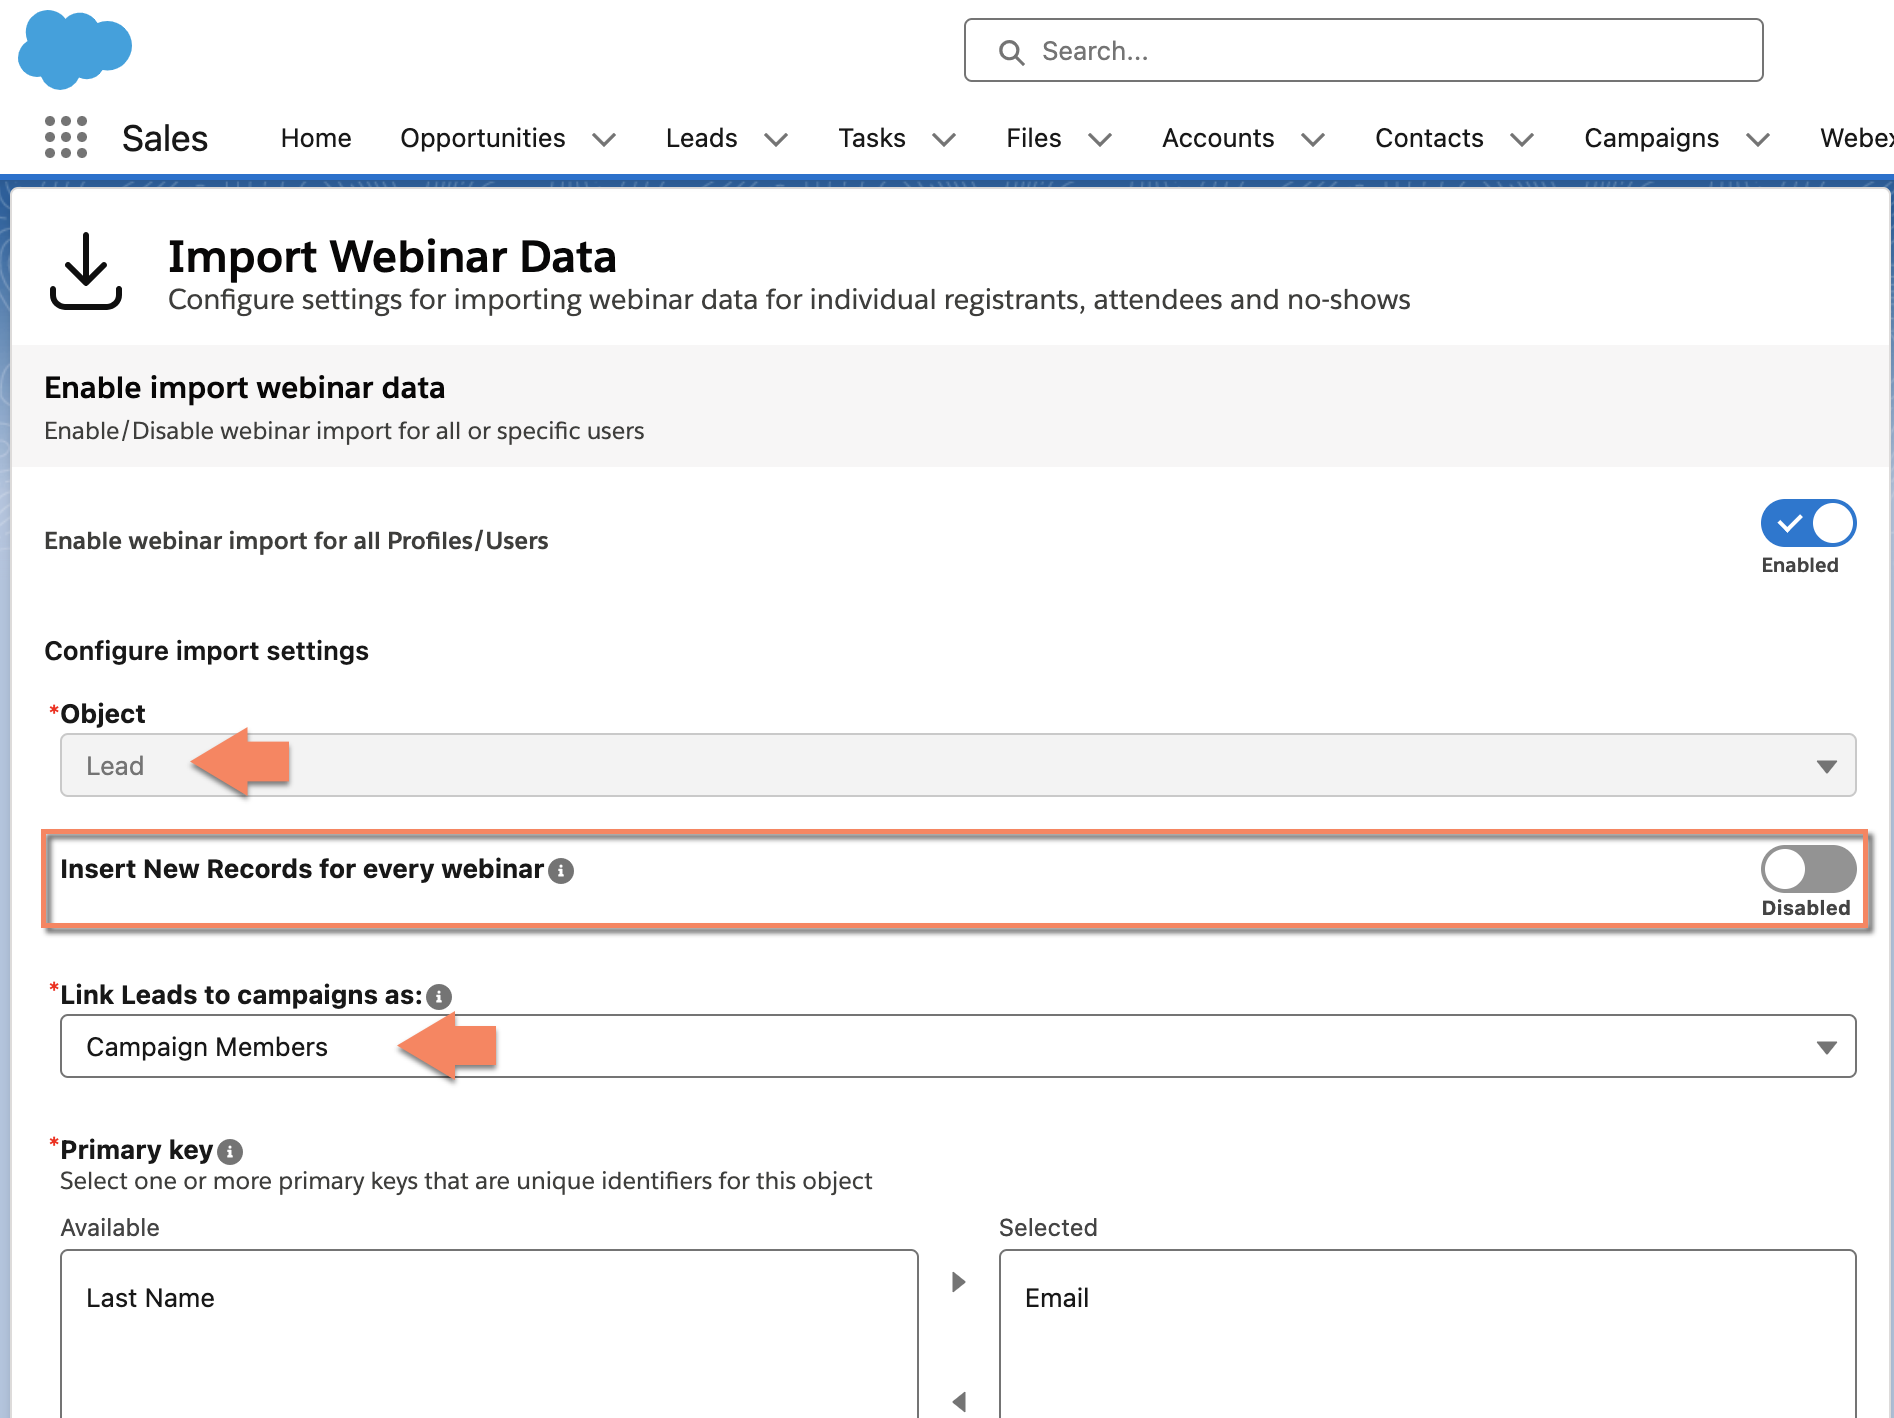
For the Object, you can choose from the following standard Salesforce objects in addition to any available configured Custom objects:
- Contacts
- Leads
Choose the Insert New Records for every Webinar toggle if you want all imported Webinar participants to be created as new object records, unless they have already been imported for the same Webinar (based on the selected primary key). Existing records will not be updated, even if the primary key matches, unless they are imported for the same Webex Webinar.
For those standard objects, you can choose to link them to your Salesforce campaigns as:
- Campaign Members: Imported Leads and Contacts are available in a target Salesforce Campaign's Campaign Members section, which is a standard Salesforce feature. (Available in version 1.16 and later)
- Webex Webinar Campaign Members: Imported Leads and Contacts are available in a target Salesforce Campaign's Webex Webinar Campaign Members section, which is a custom Webex feature.
- Both Campaign Members and Webex Webinar Campaign Members: Imported Leads and Contacts are available in both locations within a Salesforce Campaign. (Available in version 1.16 and later)
Any other Custom object you choose from the list will be imported into the target Salesforce Campaign's Webex Webinar Campaign Members section. - In the Primary key selection interface, choose a unique field as a primary key
and use the right arrow to move it to the Selected list:
 For the Primary key, choose an available field that will be unique to each record. For instance, you may have many contacts with the first name Mark, but each contact will have a unique email address.
 - In the Data field mapping interface, choose a field from the Salesforce object
you’ve selected and map it to a corresponding field for the webinar object. Use the +
New Field button to add additional fields as required.
 All Salesforce object fields must be mapped to corresponding webinar fields as shown above.Only standard questions from Webex webinar registration forms can be mapped to Salesforce fields. Custom Webex webinar questions are not supported.
 - You can remove fields you’ve added using the trash can icon adjacent the field on the right.
- Click Save when you’re finished, and once you’ve verified your primary key, click
Save in the confirmation dialog:
The mappings are displayed in the updated panel:
 You can delete object mappings using the trash can icon, which will display an additional confirmation dialog, or modify existing mappings using the pencil icon.You can always return here and change the primary key, but this will not update the primary key for records already imported in the system. As a result, this may lead to duplicates, so modify primary keys cautiously.
Once you’ve configured the webinar field mappings, choose who has access to the webinar data import functionality.
Enable webinar data import for your Salesforce users
With the webinar field mappings established, you can then choose who has access to the webinar data import feature. Options include global access for every user account with the correct permissions, individual user accounts, and users who are members of particular Salesforce profiles.
Enable webinar data import for all users
To enable webinar data import for everyone in your Salesforce organization, toggle Enable webinar import for all Profiles/Users to Enabled:
Enable webinar data import for selected users or profiles
You can enable webinar data import for selected individual users or for specific sets of users matching a particular Salesforce user profile.
To enable webinar data import for selected users or profiles:
- Make sure Enable webinar import for all Profiles/Users is Disabled:
- From the Enable webinar import only for these Profiles/Users drop down, select either Profile or User:
- To add a profile, select Profile, and click in the search text box and choose a Salesforce role from the drop-down list. Click Add to add the role:
- To add an individual user, select User, and enter a username in the text box. Click Add to add the user:

To delete a user or profile, click the trash can icon adjacent the entry. - To add a profile, select Profile, and click in the search text box and choose a Salesforce role from the drop-down list. Click Add to add the role:
| 1 |
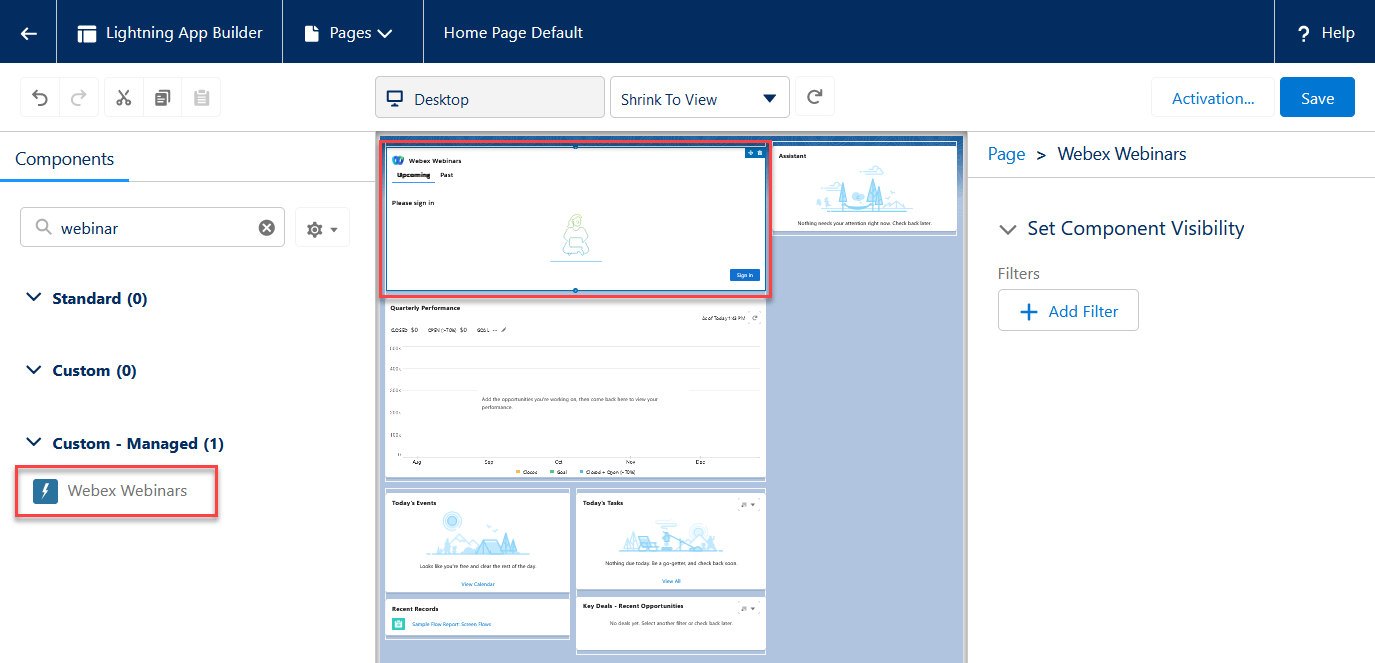
On your home page, from the page, click the gear icon. |
| 2 |
Enter webinar in the Components search box. |
| 3 |
Drag and drop the Webex Webinar component onto the page and then click Save.
|
| 4 |
When saving the page, if you haven't already, you must activate it to make it visible for other users: click Activate, click Assign as Org Default and then click Save. The Webex Webinar component is only available to add to the Home page section. |