Конфігурація віртуального додаткового номера в Control Hub
 Надіслати відгук?
У вас можуть бути віддалені працівники, які користуються окремою телефонною системою, або ключовий клієнт, з яким ви хочете легко зв’язатися. По-перше, ви можете пов’язати додатковий номер із їхнім зовнішнім номером телефону. Потім ви можете зв’язатися з ними, використовуючи їхній додатковий номер, так само, як ви б зв’язалися з будь-ким іншим у вашій організації, кому призначено додатковий номер. Для викликів із зовнішніх номерів телефонів, пов’язаних із віртуальним розширенням, віртуальне розширення та ім’я, призначене цьому віртуальному розширенню, відображаються на телефонному номері, до якого викликають, у Webex Calling.
Існує два режими роботи для віртуальних розширень. Вибраний вами режим застосовується до всієї організації. Більшість клієнтів використовують режим за замовчуванням (Стандартний). Наведені тут кроки стосуються стандартного режиму. Ви можете вибрати інший доступний режим (Покращений). Однак віртуальні розширення не працюватимуть належним чином, якщо ваш постачальник PSTN не підтримує певні розширення мережевої сигналізації (граничний випадок). Для отримання додаткової інформації див. розділ Зміна режиму віртуального розширення.
У стандартному режимівіртуальні розширення повинні бути пов'язані з дійсним E.164.
Ви можете налаштувати віртуальні розширення на рівні організації або місцезнаходження. Рівень організації дозволяє всім користувачам вашої організації набирати один і той самий додатковий номер, щоб зв 'язатися з кимось. Ви можете використовувати віртуальний додатковий номер на рівні місцезнаходження, як і будь-який інший додатковий номер, призначений певному місцезнаходженню.
Користувачі у певному місці можуть набрати додатковий номер. Однак користувачі в інших місцях можуть зв’язатися з віртуальним розширенням, набравши префікс маршрутизації розташування плюс додаткове значення.
| 1 |
Увійдіть у Центркерування. |
| 2 |
Перейти до , а потім натисніть Додати нове, щоб створити віртуальне розширення.
|
| 3 |
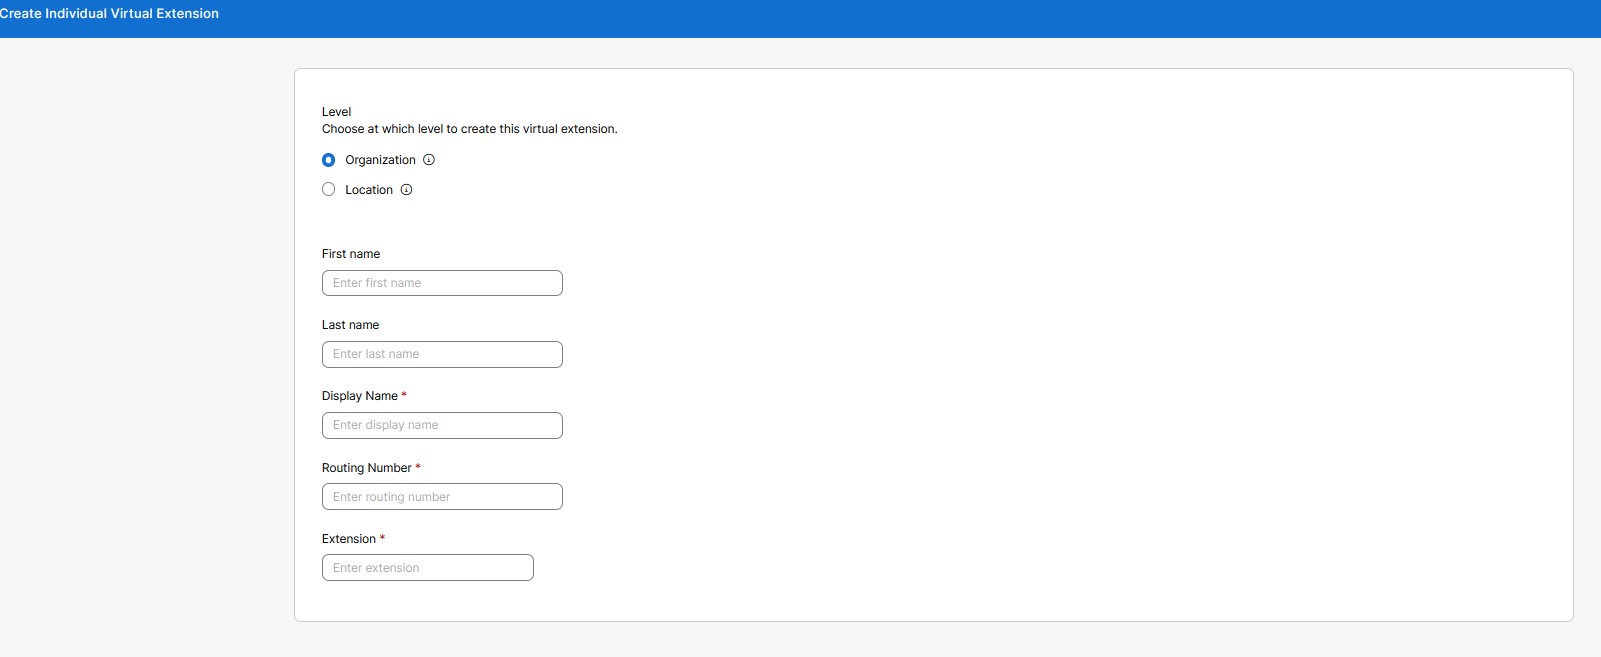
Виберіть, на якому рівні створити це віртуальне розширення:
|
| 4 |
Заповніть ці дані для відображення в телефонних довідниках та ідентифікатора абонента для вхідних дзвінків:
Визначте додатковий номер особи, з якою ви хочете зв’язатися, та номер телефону E.164. Потім натисніть кнопку Зберегти. Поля Відображуване ім'я, Маршрутний номерта Додатковий номер є обов'язковими для заповнення. Поля імені та прізвища необов 'язкові. Функція пошуку базується на Короткометражному імені, Ім'ята Прізвище.
|
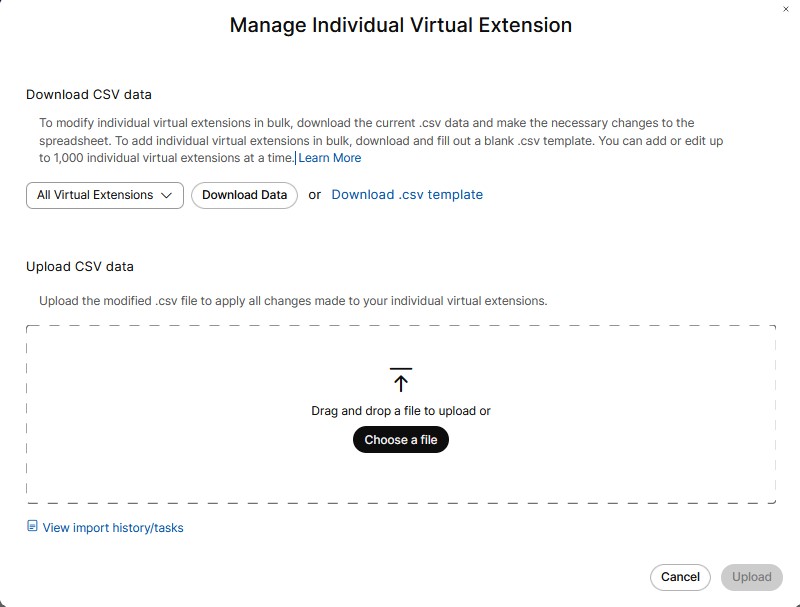
Щоб створити масові розширення для зовнішніх номерів, скористайтеся цією опцією. Ви можете створити до 1 000 віртуальних розширень для своєї організації та 1 000 розширень для кожного розташування.
| 1 |
Увійдіть у Центркерування. |
| 2 |
Перейти до У повідомленні «Перевага надається масовому створенню віртуальних розширень» натисніть «Відкрити масовий редактор. Відобразиться вікно «Керування окремими віртуальними розширеннями».  |
| 3 |
Зі спадного меню виберіть розташування, щоб зручно додати кілька розширень. |
| 4 |
Натисніть Завантажити дані або Завантажити шаблон .csv, щоб перевірити правильність форматування вашого CSV-файлу та переконатися, що ви заповнили необхідну інформацію. |
| 5 |
Обов’язково заповніть додаткове поле на рівні організації або місцезнаходження. Назва розташування, якщо розширення призначається на рівні розташування. Введіть ім'я та прізвище, ім'я для відображення, номер телефону та додатковий номер. Передайте файл CSV, перетягнувши його або клацнувши Вибрати файл. |
| 6 |
Натисніть Переглянути імпорт history/Tasks, щоб переглянути стан імпорту CSV-файлу та перевірити, чи виникли помилки. Назва стовпця, що відображається, є обов’язковою у файлі virtual-extension-template.csv, тоді як стовпці з ім’ям та прізвищем є необов’язковими. |
| 1 |
Увійдіть у Центркерування. |
| 2 |
Перейти до . |
| 3 |
На сторінці Віртуальне розширення виберіть потрібне ім'я віртуального розширення зі списку. Це відображає бічну панель. Ви можете редагувати будь-яке конкретне віртуальне розширення. |
| 4 |
Натисніть Зберегти, щоб зберегти зміни. Або Натисніть Скасувати, щоб вийти. |
Ви можете видалити один або кілька записів віртуальних розширень.
| 1 |
Увійдіть у Центркерування. |
| 2 |
Перейти до . |
| 3 |
На сторінці Віртуальне розширення можна вибрати кілька віртуальних розширень, щоб видалити записи віртуальних розширень. У розділі Діїнатисніть ... та виберіть Видалити. Це видаляє одне віртуальне розширення. Або Виберіть кілька прапорців, натисніть Видалити. З’явиться повідомлення з підтвердженням. |
| 4 |
Натисніть Видалити, щоб видалити віртуальне розширення. Або Натисніть Скасувати, щоб вийти. |
За замовчуванням віртуальні розширення, які ви створюєте, використовують стандартний режим. Інший режим, покращений режим сигналізації, доступний для всіх клієнтів, однак віртуальні розширення не працюватимуть належним чином в цьому режимі, якщо тільки ваш провайдер PSTN не підтримує спеціальні розширення мережевого сигналізації, і не так багато провайдерів PSTN, які це роблять.
| 1 |
У розділі "Перегляд клієнта" перейдіть до розділу https://admin.webex.com. |
| 2 |
Прокрутіть униз до режиму віртуальних розширень, виберіть Розширений режим сигналізації, а потім натисніть Зберегти. |
Віртуальний додатковий номер інтегрує віддалених працівників окремої телефонної системи в Webex Calling та дозволяє здійснювати набір додаткових номерів. Поточне обмеження віртуальних розширень становить 1000 на місцезнаходження або рівень організації. Віртуальні діапазони розширення допомагають масштабувати маршрутизацію для діапазону, що перевищує 1000. Використовуючи ці діапазони, можна визначити шаблони, які можна використовувати для маршрутизації викликів на рівні розташування або на рівні організації. Окрім окремих розширень, ви можете визначати діапазони. Це працює як у режимах «Стандартний», так і в режимах «Покращений».
Діапазони віртуальних розширень дозволяють масштабування понад 1000 окремих віртуальних розширень. Це також зменшує зусилля на налаштування, оскільки один діапазон може охоплювати багато розширень.
Основні відмінності:
|
|
Пошук у каталозі |
Додатковий номер, маршрутний номер |
|---|---|---|
|
Індивідуальні віртуальні розширення |
Контакти можна шукати за іменем у кожному записі. |
Для кожного запису налаштовується певний додатковий номер та номер маршрутизації. |
|
Діапазони віртуальних розширень |
Пошук контактів не здійснюється, оскільки це загальні шаблони. |
Розширення динамічно зіставляється за допомогою шаблону розширення, а номер маршрутизації динамічно створюється або зіставляється за допомогою префікса. + узгоджений візерунок розширення. |
| 1 |
Увійдіть у Центркерування. |
| 2 |
Перейти до та натисніть Керування. |
| 3 |
Натисніть Діапазон віртуальних розширень. |
| 4 |
На сторінці «Створити діапазон віртуальних розширень » виберіть, на якому рівні потрібно створити віртуальне розширення. Як і у випадку з окремими віртуальними розширеннями, ви можете створити цей діапазон на рівні організації або розташування. |
| 5 |
У полі Назва введіть назву, яку ви хочете визначити. Ви можете ввести до 1–40 символів Юнікоду. Ім'я має бути унікальним. Інший діапазон віртуальних розширень не може його дублювати. |
| 6 |
У полі Префікс введіть префікс. Дотримуйтесь цих інструкцій під час введення значень:
Префікс працює у двох режимах -
|
| 7 |
У розділі Шаблони розширення введіть шаблон розширення. Ви можете додати до 100 візерунків одночасно. Шаблони розширення можуть містити один або декілька вирівняних праворуч символів підстановки «X», що відповідають будь-якій цифрі.
Шаблони розширення мають різні обмеження довжини залежно від рівня діапазону.
Ви можете додати кілька шаблонів розширення в межах діапазону розширення. Шаблони розширення
Порядок пріоритетуідентичний у межах збігу діапазону віртуальних розширень та в межах збігу окремого віртуального розширення.
Найточніше збіг (найменша кількість символів підстановки «X») на кожному кроці використовується, коли знайдено кілька збігів. |
Ви можете змінювати візерунки. Ви також можете змінити префікс, що використовується для діапазону розширень, та шаблони розширень, пов’язані з префіксом.
| 1 |
Увійдіть у Центркерування. |
| 2 |
Перейти до . На цій сторінці перелічено визначені діапазони, і ви можете вибрати для них область дії. |
| 3 |
На сторінці Діапазон віртуальних розширень виберіть у розкривному меню «Усі діапазони віртуальних розширень» або «Місцезнаходження» або «Організація». Це відображає список місць розташування.
|
| 4 |
Виберіть потрібну назву діапазону віртуальних розширень зі списку. Це відображає бічну панель. Ви можете редагувати певний діапазон віртуальних розширень. |
| 5 |
Клацніть Зберегти. Або Натисніть Скасувати, щоб вийти. |
Ви можете видалити один або кілька записів діапазону віртуальних розширень.
| 1 |
Увійдіть у Центркерування. |
| 2 |
Перейти до . |
| 3 |
На сторінці Діапазон віртуальних розширень можна встановити кілька прапорців Ім'я, щоб видалити записи діапазону віртуальних розширень. У розділі Діїнатисніть ... та виберіть Видалити. Це видаляє один запис діапазону віртуальних розширень. Або Поставте прапорці поруч із кількома пунктами, натисніть Видалити, щоб видалити вибрані записи. З’явиться повідомлення з підтвердженням. |
| 4 |
Натисніть Видалити діапазон розширень, щоб видалити записи. Або Натисніть Скасувати, щоб вийти. |
Масове завантаження стосується змін, виконаних за допомогою шаблону значень, розділених комами (CSV). Ви можете масово додавати, змінювати або експортувати операції за допомогою шаблону CSV. Поля у веб-інтерфейсі користувача зіставлені з певними стовпцями в шаблоні CSV. Ви можете завантажувати та завантажувати діапазони, а також шаблони. Нижче наведено список стовпців, що відповідають відповідним полям у шаблоні CSV.
Адміністратори можуть масово керувати даними викликів користувачів за допомогою масових вставок або оновлень функцій за допомогою CSV-файлу, див. Керування даними викликів користувачів.
|
Назва поля або стовпця |
Опис |
|---|---|
|
Наступні поля або стовпці не можна змінювати за допомогою масового керування: Назва, рівень та назва місця розташування. | |
|
Ім’я |
Назва діапазону віртуальних розширень. |
|
Рівень |
Рівень (розташування або організація) діапазону віртуальних розширень. |
|
Назва місця розташування |
Назва розташування для діапазону віртуальних розширень на рівні розташування. Не встановлено для діапазону віртуальних розширень на рівні організації. |
|
Префікс |
Префікс для діапазону віртуальних розширень. |
|
Дія шаблону розширення |
Вказує дію, яку потрібно виконати для шаблонів розширення:
|
|
Схема розширення 1-20 |
20 стовпців, кожен з яких може містити шаблон розширення. |
Ви також можете виконувати такі завдання:
Завантажити дані у форматі CSV
Ви можете завантажити поточні дані у форматі .csv, щоб внести масові зміни до діапазонів віртуальних розширень. Ви також можете завантажити та заповнити порожній шаблон .csv, щоб одночасно додати діапазони віртуальних розширень. Можна додати до 1000 рядків CSV. CSV-файл може містити кілька рядків для одного діапазону, оскільки кожен рядок може містити максимум 20 шаблонів розширення. Отже, для одного діапазону може знадобитися кілька рядків.
-
Перейти до .
-
Виберіть Місцезнаходження або Організація зі списку випадаючого меню.
-
Натисніть Завантажити дані або Завантажити шаблон .csv, щоб завантажити дані у форматі .csv.
Передати дані у форматі CSV
Ви можете завантажити змінений файл .csv, щоб застосувати всі зміни до діапазонів віртуальних розширень.
Ви можете перетягнути файл для завантаження або вибрати файл для завантаження. Клацніть Передати.
Перегляд історії імпорту або завдань
Ви можете переглянути історію імпорту або завдання.


