- Home
- /
- Article

Thanks for your feedback.

Configure Advanced Branding Customizations
 In this article
 Feedback?
You can change the way Webex looks for your users by adding your logo and color palette, and linking the app to your "fine print", help, and feedback resources. You have an option to enable customers to override some of this branding. Two branding settings are available: Basic customization and Advanced customization. You can choose the branding type that applies to your company.
Partner administrators can use Advanced Branding Customizations to customize how Webex App looks for the customer organizations that they manage. Partner administrators can customize the following settings to ensure that Webex App reflects their company brand and identity:
-
Company logos
-
Unique Color Schemes for Light mode or Dark mode
-
Customized Support URLs
By default, partner-level branding gets applied to all customer organizations that the partner manages. Partners can also specify whether customer administrators can override their settings for their own organization.
Partner Hub currently displays two branding tabs: Basic customization and Advanced customization. By default, the Basic customization tab is selected. You can configure one of the options only—not both. We recommend Advanced customization to configure a wider range of options.
Advanced Branding Configuration Overview
Advanced Branding settings can be applied in the following contexts, with each context setting branding for different groups of users:
-
Partner Organization only—Applies only to users in partner organization (the organization titled "My Organization" in Partner Hub).
-
Partner-level Branding (all customers)—Sets default branding for all customers that inherit the partner's branding.
-
Partner-defined Branding (for single customer)—If needed, sets branding for a single customer. Overrides partner-level defaults.
-
Customer Branding—Customer administrators can override Partner Branding only if the partner administrator enables this option.
Recommended configuration order
Following is the recommended order for applying branding to customer organizations:
-
Partner-defined Branding (for single customer)—If you want to define unique settings for a single customer organization, configure branding for that customer before you set partner-level defaults.
-
Partner-level Branding (all customers)—Configure partner-level branding that applies as default branding for all customer organizations.
-
Customer Branding—If partner administrator enables the override option, customer administrators can apply branding to their own organization, overriding partner settings.
Branding for the partner’s own organization is applied separately from settings for customer organizations and does not need to follow this order.
Configure Advanced Branding
Partner administrators can use this procedure to configure Advanced Branding settings that apply either to customer organizations that the partner manages or to the partner organization itself.
Note that Branding for the partner's own organization (the organization titled "My Organization" in Partner Hub) must be configured separately from Branding that gets applied to customer organizations that the partner manages.
Before you begin
| 1 |
Sign in to Partner Hub and then complete one of the following steps, depending on the group to which you want to apply settings:
|
| 2 |
Under Branding, select the Advanced customization tab and click Customize Branding to configure the settings. By default, the Basic customization tab is selected. |
| 3 |
On the General tab, edit the following settings:
|
| 4 |
On the Logos tab, add the logos that you want to use for Light mode and Dark mode. |
| 5 |
On the Colors tab, input the hexadecimal color schemes that you want to apply for Light mode and Dark mode. You can input a separate color scheme for each mode. The image maps how each color setting gets applied to the Webex App. You can use the toggle and the tabs to switch the image between Light mode and Dark mode on various platforms (for example, Windows, iOS, Android). For a detailed summary of the settings, see Branding Outcomes for Users. |
| 6 |
On the Support Links tab, enter the customized URLs that you want to use for various legal disclaimers and forgotten passwords. |
| 7 |
On the Emergency Call Disclaimer tab, configure settings for the disclaimer. For details on how to configure the disclaimer, see Emergency Call Disclaimer. |
| 8 |
Click Publish Changes. The new branding is not immediately visible to users whose organizations are in
different datacenters to your partner organization. There is a daily refresh across the
datacenters, so the branding can take up to 24 hours to propagate to all
users.
|
| 9 |
Optional. Check the Enable all customers (this customer) to use their own logo and color check box if you want to allow customer administrators to override your settings (the default is unchecked). |
| 10 |
Repeat the procedure if you want to configure Advanced Branding for one of the other options outlined in Step 1. |
-
Your logo gets added to both the Navigation bar and to the About window in Webex on Desktop. Logos do not display for either Mobile or Tablet applications.
-
Click Reset to default branding to return to the default branding settings. For partner administrators configuring partner-level branding for customer organizations, this button resets branding to Cisco default settings. For customer administrators, the button returns branding to partner-level brading settings.
-
The Reset to default branding button is not available to partner administrators when configuring branding that applies to the partner organization.
-
Partner-level branding gets applied only to customer organizations that the partner manages. Partner branding does not get applied to the partner organization itself, titled “My Organization” in Partner Hub.
-
If you disable customer branding altogether, customer administrators do not see the Branding section in their organization settings.
-
Webex for Cisco BroadWorks only. The Colors tab contains additional buttons: Sign-in (for the User Activation Portal) and Email (for Email login). However, this option must be turned on by Cisco TAC or these settings do not appear.
Rules for Customer Inheritance of Partner Branding
As partner administrator, you must decide whether you want customer administrators to be able to override your Branding settings and add their own logos and colors. The following conditions apply:
-
By default, customer organizations inherit partner-level Branding as the default branding settings.
-
Once unique Branding settings are applied to a specific customer organization (whether by a customer administrator or by a partner administrator), the relationship is broken. Any further edits to partner-level branding have no effect on branding settings for the customer organization.
-
To reset a customer organization’s branding to partner-level branding defaults, a partner administrator or customer administrator must open the Advanced Branding settings for that customer organization and click Reset to default branding.
Branding Settings Access for Admins
The following table outlines the level of access partner administrators and customer organization administrators have to edit or view Branding settings. There are three levels of access: Editable, Read Only, and Not visible (cannot read or edit settings).
For customer organization administrators, edit access depends on whether the partner administrator gives that customer organization the ability to override Partner Branding. The following settings determine whether the override is enabled:
-
Enable all customers to use their own logo and color—Configured by partner administrator in partner-level Branding settings. When enabled, customer administrators at all customer organizations that inherit the partner-level Branding defaults can override the partner settings. By default, this setting applies to all customer organizations the partner manages unless a unique Branding configuration is applied to that specific organization).
This setting exists separately for Basic and Advanced Customization. The Basic setting applies only to customer organizations that are assigned Basic Branding while the Advanced setting applies only to customer organizations that are assigned Advanced Customization.
-
Enable this customer to use their own logo and color—Configured by partner administrator in Branding settings for a specific customer organization. When this option is checked, customer administrators for this customer organization can override the partner-defined setting.
|
Administrator |
Basic Customization (Logo + Primary Color) |
Advanced Customization | ||||
|---|---|---|---|---|---|---|
|
General Tab |
Logo Tab |
Colors Tab |
Support Links |
Emergency Call Disclaimer | ||
|
Partner admin (viewing own organization) |
Editable |
Editable |
Editable |
Editable |
Editable |
Editable |
|
Partner admin (viewing customer organization from partner portal) |
Editable |
Editable |
Editable |
Editable |
Editable |
Editable |
|
Customer admin (viewing own organization when Branding override is On for that org). |
Editable |
Editable |
Editable |
Editable |
Read only |
Read only |
|
Customer admin (viewing own organization when Branding override is disabled for that org). |
Read only |
Read only |
Read only |
Read only |
Read only |
Read only |
|
Customer admin (when organization is not assigned to a partner) |
Not visible |
Not visible |
Not visible |
Not visible |
Not visible |
Not visible |
Webex for Cisco BroadWorks only. The Advanced Customization Sign-in and Email window color customizations are available only if they are turned on by Cisco TAC. After they are turned on, administrator access is the same as in the Colors tab in the above table.
Branding Outcomes for Users
List of Partner Brandable Controls
|
Image reference number |
Setting name |
Path to the setting in Partner Hub |
|---|---|---|
|
|
Logo choice This setting applies only to Webex on desktops. It affects the About page and the menu bar:
|
Settings > Branding > Basic customization |
|
|
Custom color in Webex app |
Settings > Branding > Basic customization |
|
|
Branding The name you enter becomes part of the offering name on the About page, e.g. "Acme on Cisco Webex" |
Settings > Branding > Advanced customization > View Branding > General |
|
|
Dark mode visibility This toggle gives users the ability to deploy the Webex App in Dark mode or Light mode (the default is Light mode). |
Settings > Branding > Advanced customization > View Branding > General |
|
|
Light mode logo Dark mode logo |
Settings > Branding > Advanced customization > View Branding > Logos |
|
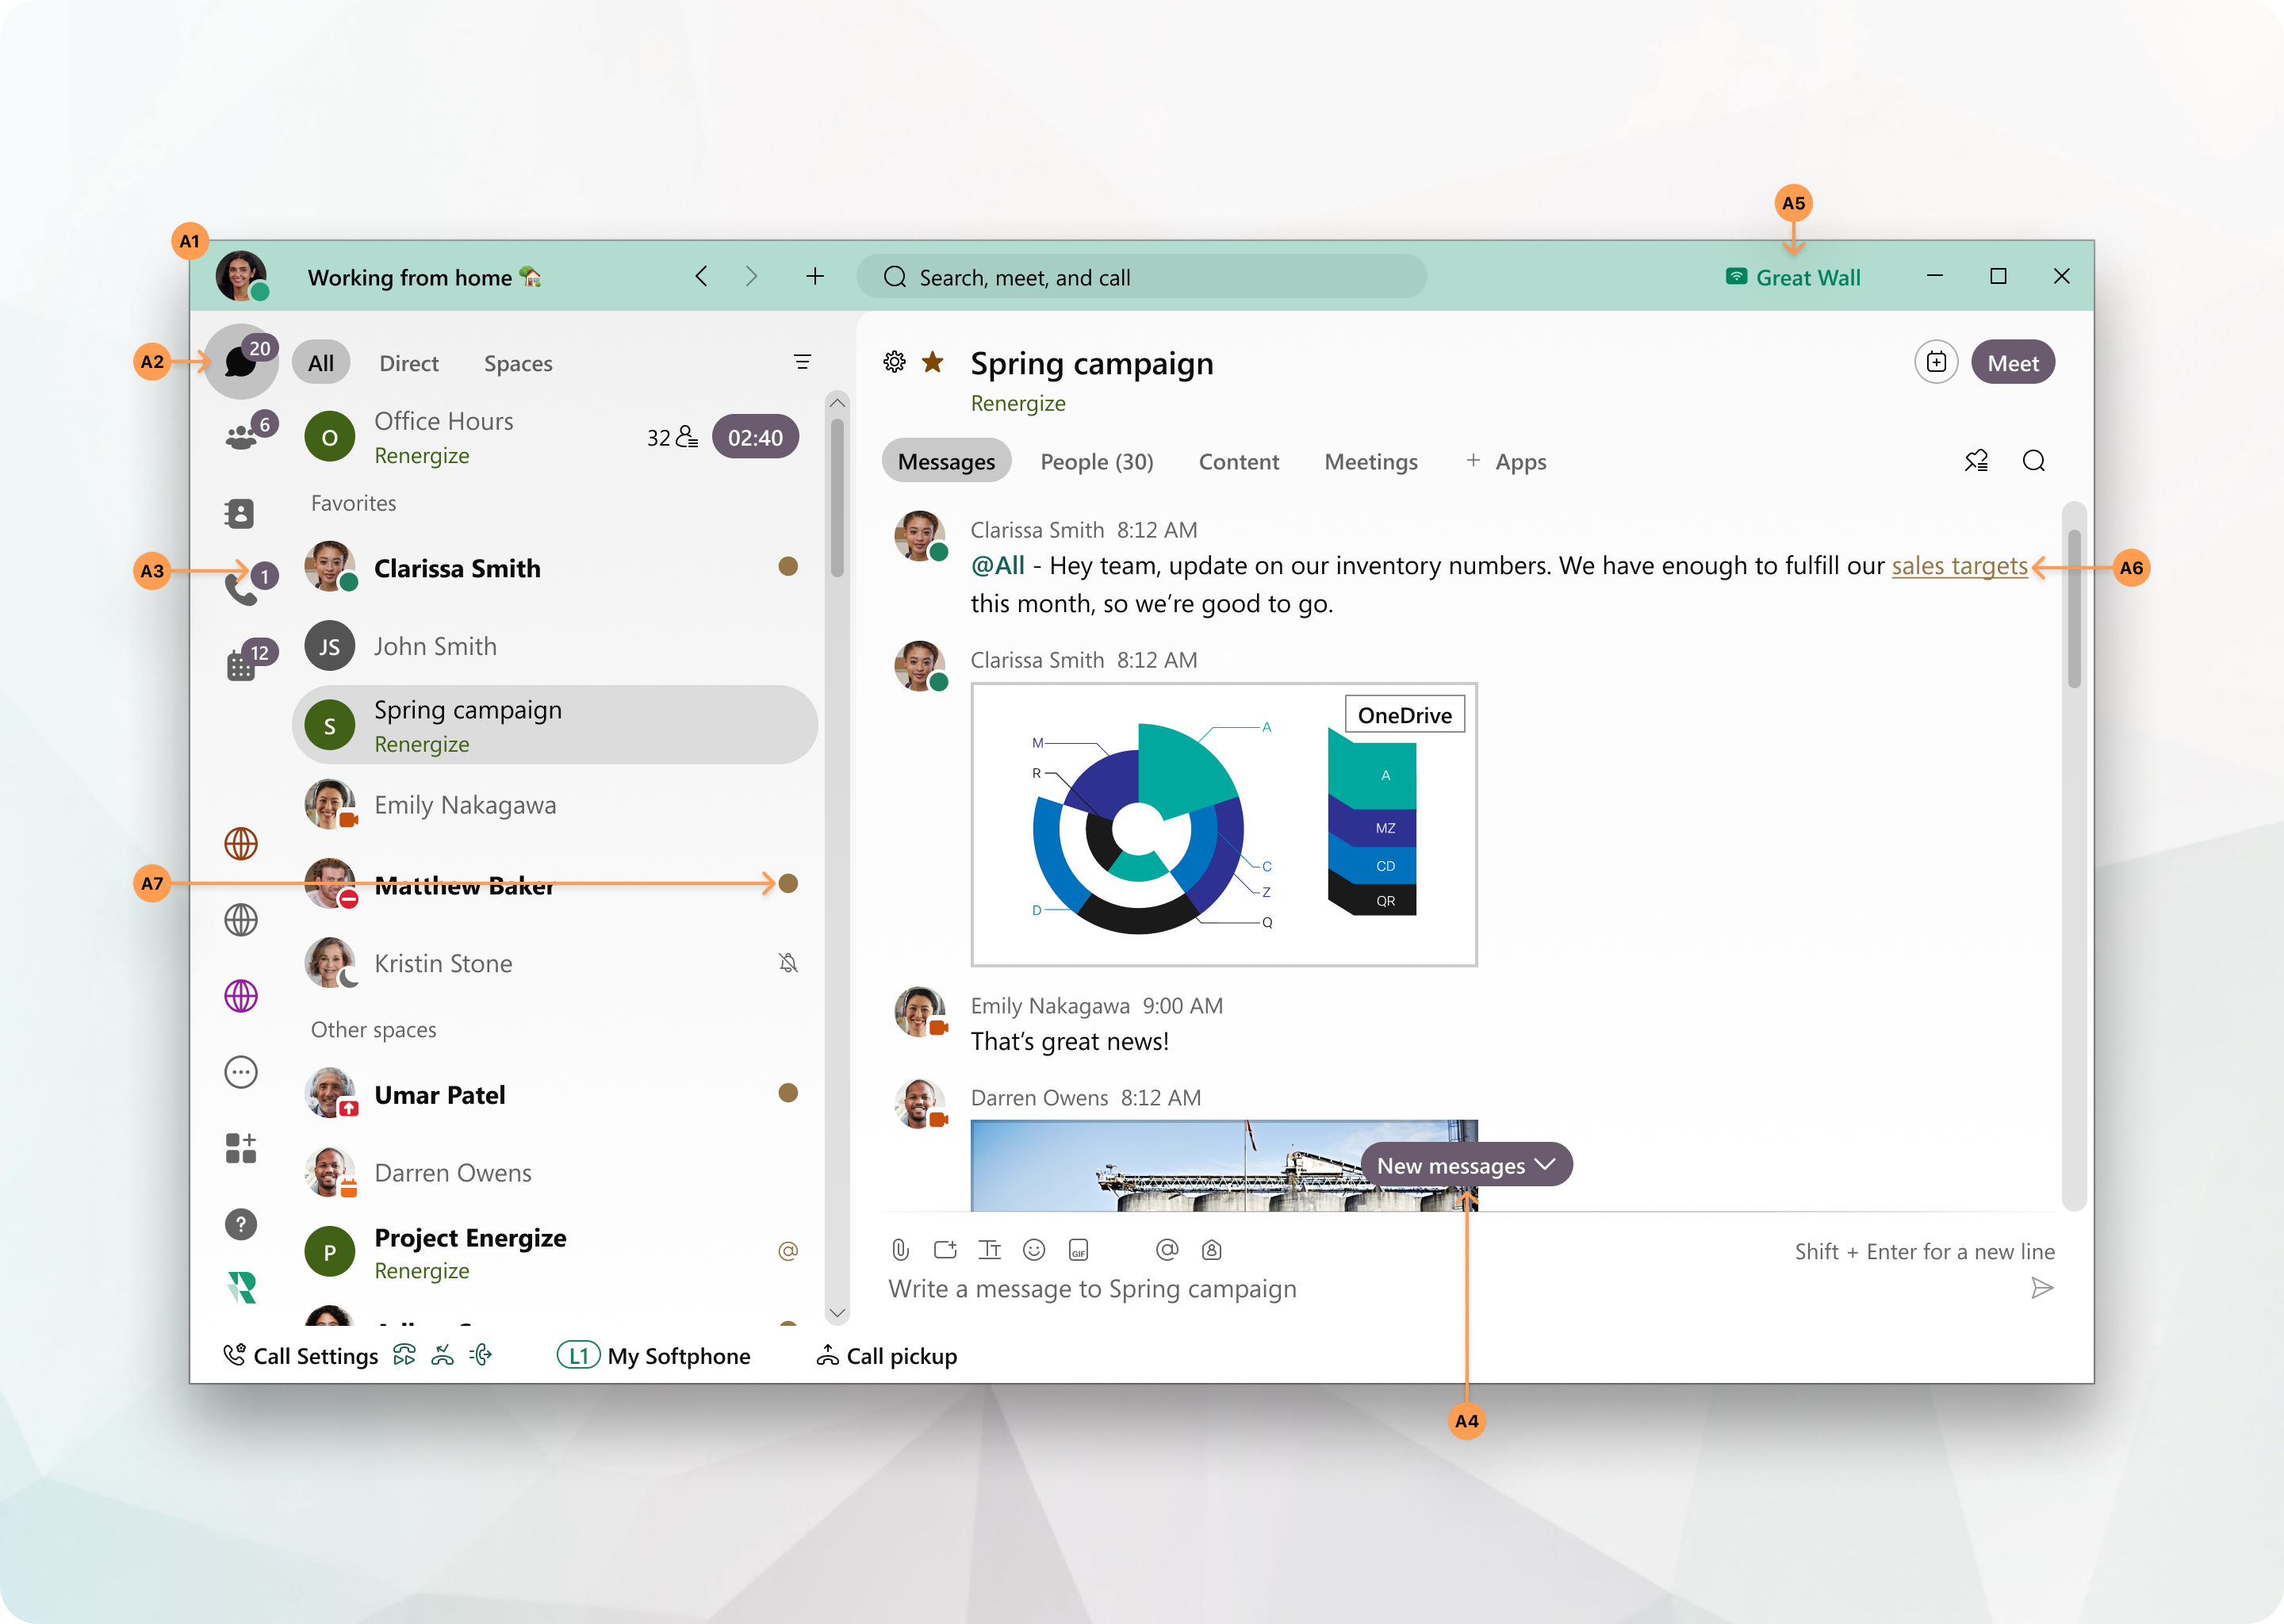
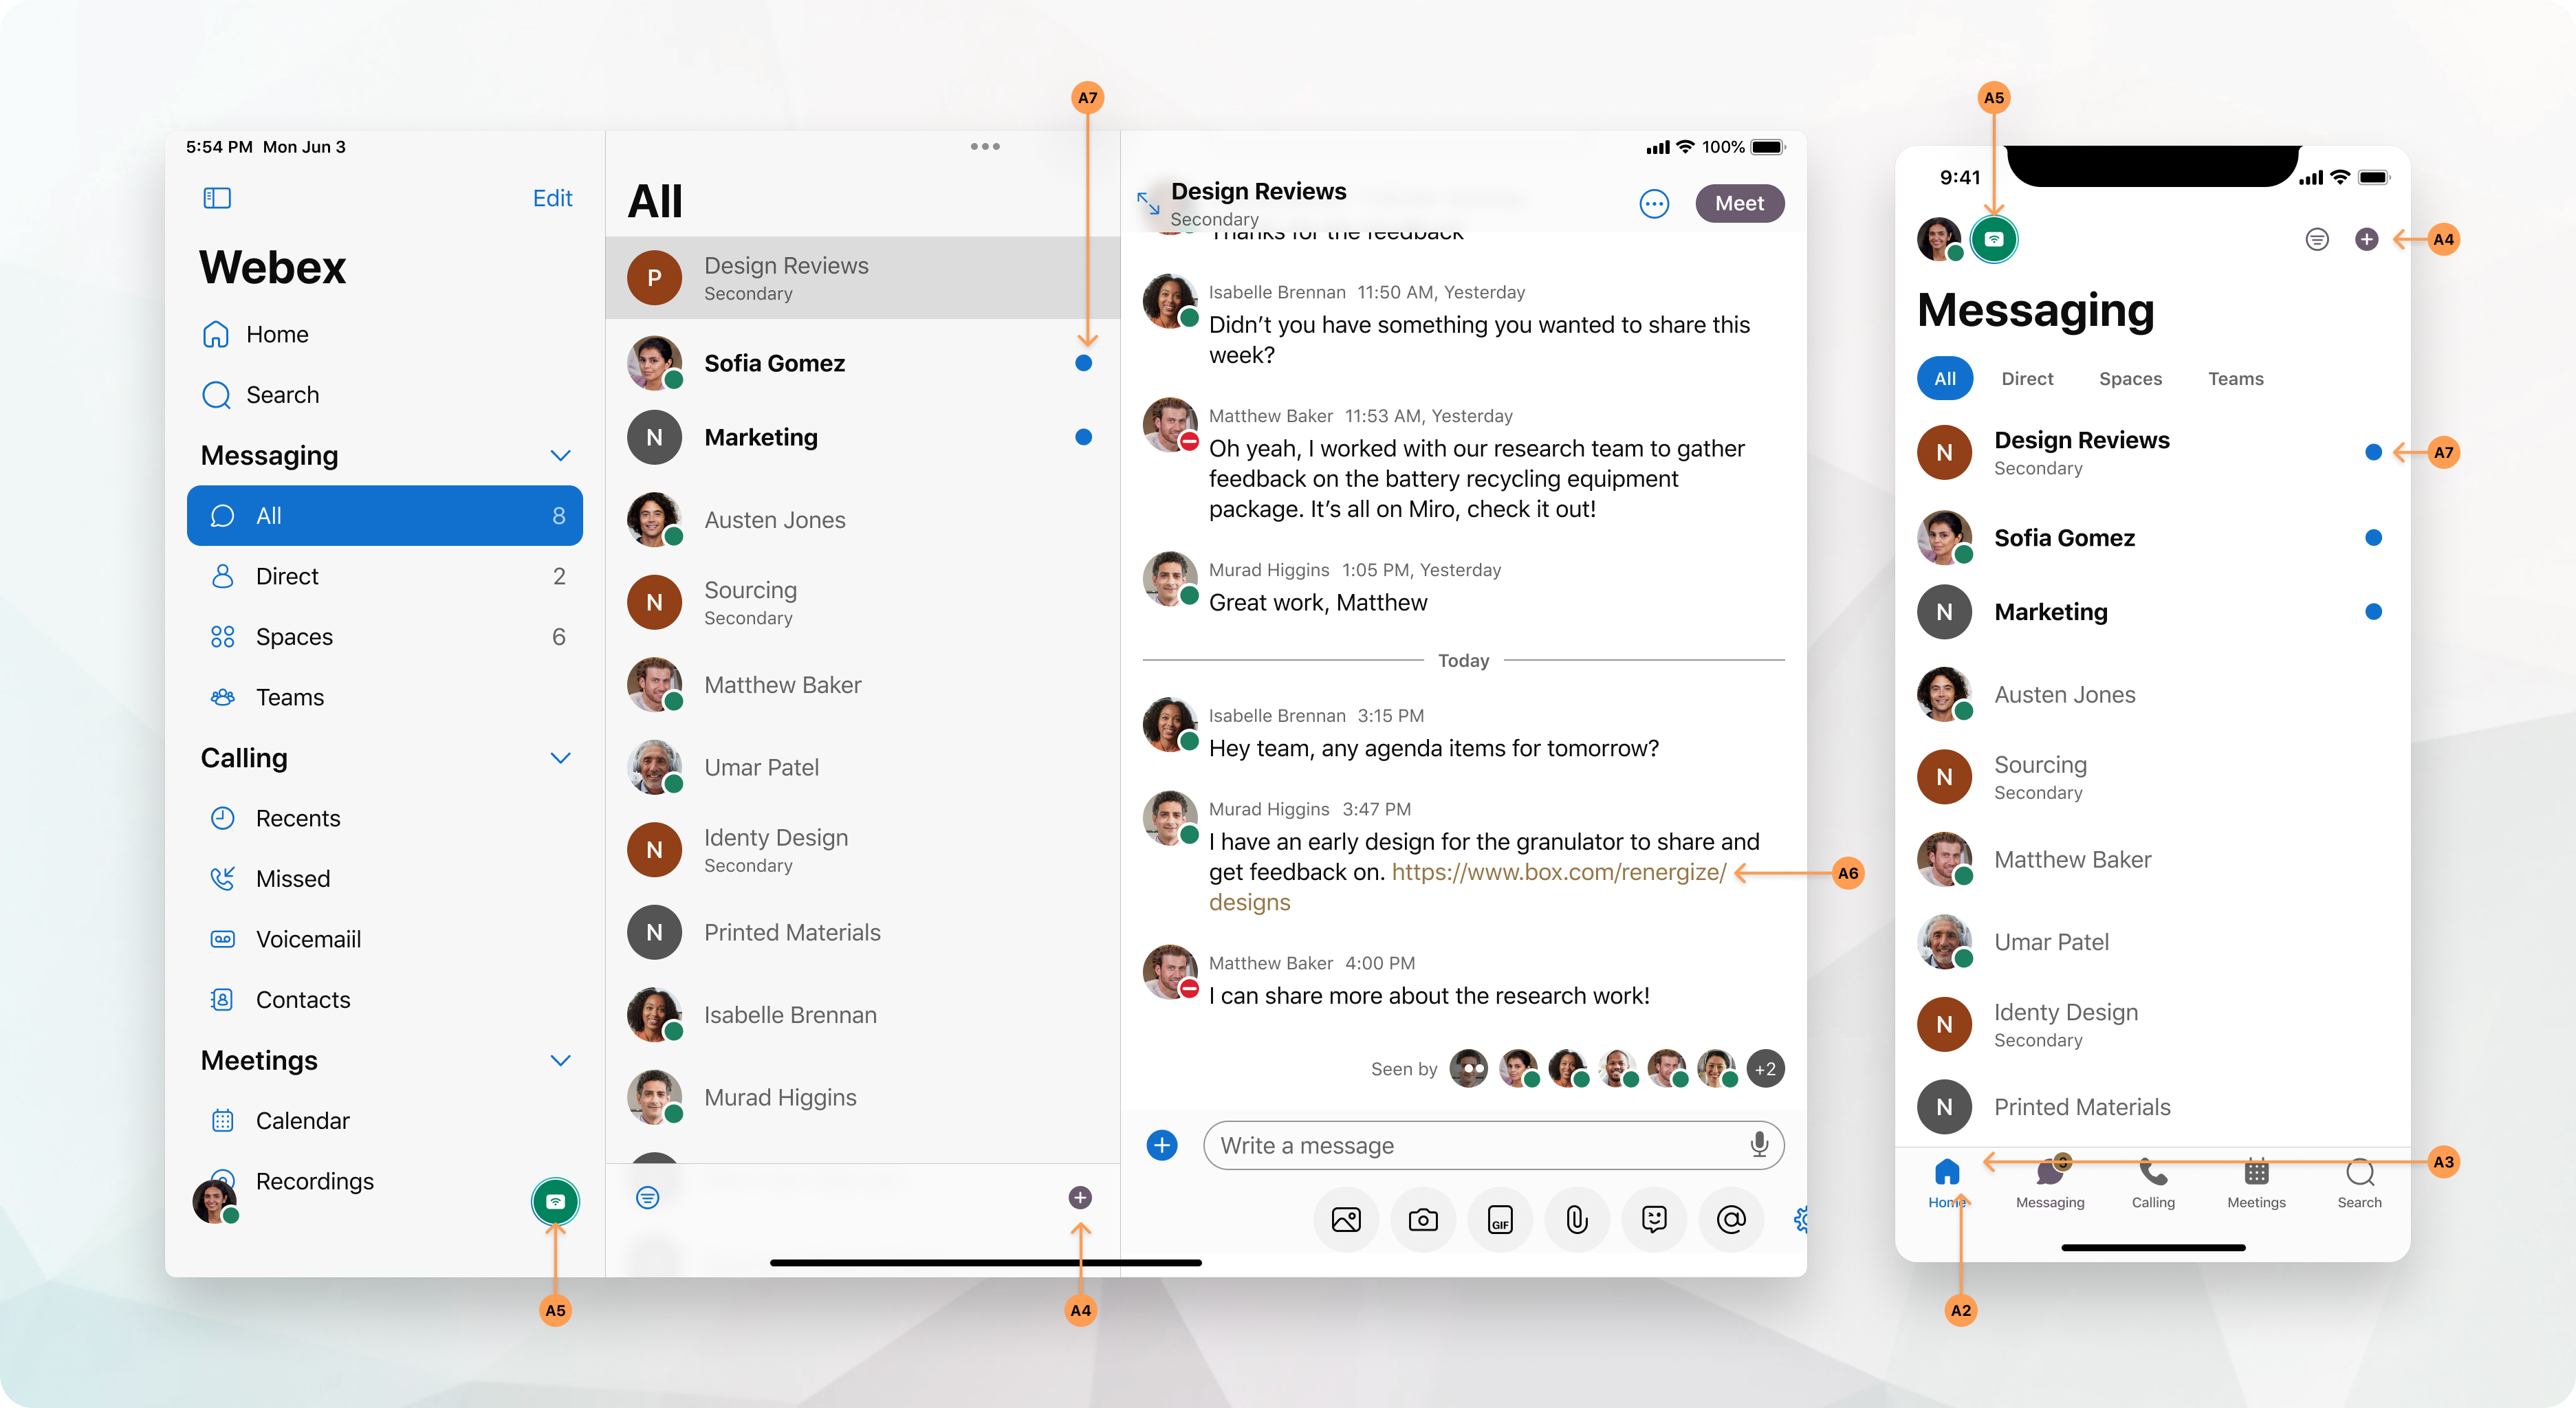
A1 |
Primary color |
Settings > Branding > Advanced customization > View Branding > Colors |
|
A4 |
Buttons This control applies only to primary buttons such as Add and Save. Meet, Call and Chat buttons are not included in Advanced customization. |
Settings > Branding > Advanced customization > View Branding > Colors |
|
A2 |
Navigation icons (active) |
Settings > Branding > Advanced customization > View Branding > Colors |
|
A3 |
Navigation badges |
Settings > Branding > Advanced customization > View Branding > Colors |
|
A5 |
Connect to a device (connected) |
Settings > Branding > Advanced customization > View Branding > Colors |
|
A6 |
Hyperlinks / New Banner |
Settings > Branding > Advanced customization > View Branding > Colors |
|
A7 |
Indicators |
Settings > Branding > Advanced customization > View Branding > Colors |
|
Image reference number |
Setting name |
Path to the setting in Partner Hub |
|---|---|---|
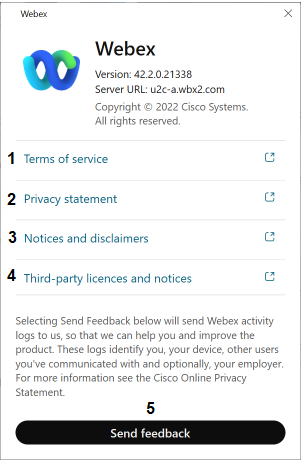
|
1 |
Terms of service |
Settings > Branding > Advanced customization > View Branding > Support Links |
|
2 |
Privacy statement |
Settings > Branding > Advanced customization > View Branding > Support Links |
|
3 |
Notices and disclaimers |
Settings > Branding > Advanced customization > View Branding > Support Links |
|
4 |
Third-party licences and notices | Settings > Branding > Advanced customization > View Branding > Support Links |
|
|
Reset Password
|
Settings > Branding > Advanced customization > View Branding > Support Links |
|
5 |
Send Feedback (from About window) This setting also appears by selecting from the toolbar. |
Organization Settings > Help and support information |
|
6 |
(?) icon This setting also appears by selecting from the toolbar. |
Organization Settings > Help and support information |

Branding Conflicts
If a branding conflict exists, we display only the Cisco branding in the Webex App. Branding conflicts occur when two partners, both of whom have branding set up, deliver non-conflicting services to the same customer organization. For example, one partner assigns Webex Calling to a customer organization while a different partner assigns Webex for BroadWorks services to the same customer organization. Either partner can open a TAC case in order to determine which partner branding applies. Also note that if only one of the two partners has configured branding, then no branding conflict exists.
Add Help and support information
Partner administrators can use this procedure to assign support information for their customers that will be displayed on their Webex site, Webex App, and TAC case open tools.
| 1 |
Sign in to Partner Hub and then complete one of the following options, depending on which set of users will use these settings:
|
| 2 |
In the Help and support information section, you can:
|
| 3 |
Enter the following support details for your customer:
You may use internal-only URLs for the Contact Support URL and Help Site URL. To access them the user must be connected to the Enterprise network or connected through a VPN. |
| 4 |
Click Save. |
Customize Email
Logos and Support Links
-
Sign in to Partner Hub. Click on Organisation settings.
-
Under Branding, select the Advanced customization tab and click Customize Branding to configure the settings.
-
In the Logos tab, configure logo for bright mode. (Dark mode is not used for emails).
-
In the Support links tab, configure the Terms of service and/or the Privacy statement links if you want to have your own settings.
-
Click Publish Changes button. It may take some time for these settings to apply, but you can proceed with the rest of the configuration. If this is already set up, no further action is required.
-
To change the "Contact us" link in emails, go to the Customize support information section in Organization Settings and enter the desired URL.
- In the Personalized Email Settings section, apply the following customizations to emails:
- Show the customized logo displays your logo to the right of the Webex logo.
- Show the customized help site link changes the Contact us link in emails to the URL configured earlier.
- Show the customized legal support links updates the Privacy Statement and/or Terms of Service links to the custom settings configured previously.
Email Settings
Signature
Webex emails include a default signature: ‘Thank you, The Webex Team.’ Partner administrator can personalize this signature by replacing ‘The Webex Team’ with custom text for onboarding emails via the Email Settings in Webex Partner Hub.
-
Login to your Webex Partner Hub as a Partner Administrator.
-
Go to Organizational settings and click Email Settings.
-
Under Email Signature add your custom Email signature (e.g. The Vidcast Team) within the text box.
-
Click Save.
- The custom signature will replace the default "The Webex Team" in onboarding emails (e.g., ‘Thank you, The Vidcast Team’).
- Character Limit: The signature text is limited to 100 characters.
- Plain Text Only: The signature appears as plain text—formatting options like bold or italics are not supported.
- Example: If you enter The <b> Vidcast <b> Team, it will display as The <b> Vidcast <b> Team.
- Language Limitations: Custom signatures do not support automatic translation, unlike the default Webex signature. Create the signature in the required language if emails are sent in non-English languages.
This feature is partner-configurable only, meaning customer admins cannot modify email signatures in Webex Control Hub.
Reply-To
Webex emails, by default, direct replies to a Webex-managed mailbox. Partners can customize the 'Reply-To' address, allowing recipient replies to be sent to a specified custom mailbox.
Partner administrator can configure this setting through Email Settings in Webex Partner Hub.
-
Login to your Webex Partner Hub as a Partner Administrator.
-
Go to Organizational settings and click Email Settings.
-
3. Under Reply-To-email address add your custom reply-to address within the text box.
-
Click Save.
- The ‘Reply-To’ email address must use a verified domain associated with the partner organization in Webex. Emails with unverified domains are not supported for security reasons.
- Partners are responsible for securely managing and monitoring the custom ‘Reply-To’ mailbox.
- This setting is exclusive to partners—customer admins cannot configure their own ‘Reply-To’ addresses, and the configuration option will not be available in Webex Control Hub.
Contact Us
Webex emails contain a 'Contact Us' link that directs users to the Webex Help Center by default. Partner and customer administrators can customize this link to point to their own support pages, similar to logo customizations.
Configure the Contact Us Link
- Sign in to Webex Partner Hub as a Partner Administrator.
- Navigate to Organization Settings > Customize Support Information > Help Site and enter your custom support link.
- Click Save.
Apply the Custom Contact Us Link in Webex Emails
- In Organization Settings, go to Email Settings.
- Turn on the Apply the custom Contact Us link toggle.
This toggle is only available if a Help Site link has already been configured.
- 3. Click Save.
The custom Contact Us link will now appear in Webex onboarding emails for managed customers, replacing the default Webex Help Center link.
Allow Customers to Customize Contact Us Links
- In Webex Partner Hub, navigate to Advanced Branding Settings.
- Enable the option Allow all customers to use their own logo and color.
- Save your changes.
For Managed Customer Administrators:
- Go to Webex Control Hub > Organization Settings > Help and Support Information > Help Site.
- Enter the custom Contact Us link and click Save.
- Turn on the Show Help Site URL toggle in Email Settings and click Save.
Partner-Assisted Configuration for Specific Customers
If partners want to enable custom contact links for specific customer organizations:
- Cross-launch into the customer’s Webex Control Hub from the Partner Hub.
- Navigate to Organization Settings > Customize Branding for Webex.
- Select the option Enable this customer to use their own logo and color and save the changes.
Customer administrators can now configure their own custom Contact Us links, which will override the partner-level configuration for applicable Webex emails.
Key Considerations
- Partners should configure individual customer contact links before setting up partner-level branding.
- Changes to branding settings may take up to 8 hours to apply across data centers.
- Partners can verify customer-specific configurations by cross-launching into their Webex Control Hub and checking the Email Settings page. Hover over the info icon beside the Show Help Site URL toggle for details.
Email Branding Considerations
- Application Scope:
- Branding and email settings apply at the partner organization level and extend to customers managed by that partner.
- Sub-partner settings take precedence if sub-partners manage customer organizations.
- Multiple Partner Management:
- If a customer is managed by multiple partners, the branding settings from the partner who configured them are applied.
- In cases of branding conflicts (multiple partners configuring settings), Cisco default branding is enforced.
- Branding Priority Recommendations:
- Partner-defined branding: Configure unique branding for individual customer organizations before setting partner-level defaults.
- Partner-level branding: Apply branding as the default for all customer organizations.
- Customer branding: If enabled, customer admins can override partner branding for their organization.
- Branding for Partner's Own Organization:
- Branding for the partner's own organization (‘My Organization’) is managed separately and does not follow customer branding rules.
- Reset to default Branding:
- For partner admins managing customer branding, this resets to Cisco default settings. o For customer admins, it reverts to partner-level branding settings.
- This option is not available for branding the partner's own organization.
- Branding Visibility:
- Branding changes may take up to 24 hours to propagate across data centers.
- Additional Considerations:
- Disabling customer branding hides the branding section from customer admins.
- Partner branding is only applied to managed customer organizations, not the partner's own organization.
How the Help and support information options are used
Webex App
The Webex App makes use of the Contact support and Help Site URL natively within the Help menu of the Webex App. Once a user clicks the Contact Support URL, the logs from their Webex App are automatically uploaded to Control Hub. The logs can be retrieved by an administrator in Control Hub by navigating to .
If the Contact support URL isn't configured, users will see Report an issue under the Help menu instead of Send Feedback. Report an Issue will ask them to select a Product area and description before clicking send.
- Contact Support URL—Launches when a user clicks Send Feedback from the About window or when a user selects from the toolbar.
- Help Site URL—Launches when a user clicks the (?) icon and chooses Help Center or when the user selects from the toolbar.
In emails sent to users, the Help and Support Information Options ensure that customers can easily access support and relevant resources. The following customizations are applied:
- Contact Support URL: This link appears in the email footer, enabling users to reach your designated support team directly. Clicking this link can redirect users to your custom support page, providing quick access to troubleshooting resources.
- Help Site URL: This link provides users with a direct path to your organization's Help Center. It ensures that users can find step-by-step guides, FAQs, and other self-help resources tailored to their needs.
- Customized Legal Links: Emails will reflect your organization’s Privacy Statement and Terms of Service to ensure compliance with your company policies and build user trust.
- Email Signature: Customize the email sign-off to reflect your company branding, creating a more professional and personalized user experience.
- Reply-To email address: Specify the email address for customer replies to ensure responses reach the right contact in your organization.
These customizations enhance user experience by offering seamless access to support and reinforcing your organization's branding in all communications.
Webex site
The Webex Site makes use of the Contact support URL, Support description, and Help Site URL under the Support Option on your Webex site. These settings apply to every site associated with your Webex organization. For more details, review Specify contact information for Webex site administrator.
TAC case open tools
If your customer has the Redirect user support option enabled, the Contact support URL, Contact description, and Help Site URL are displayed when a user of the Webex organization attempts to open a case in Support Case Manager or Webex Chat Assistant. The information is presented to them after taking the following steps:
- Sign in to Support Case Manager.
- Click the Webex option.
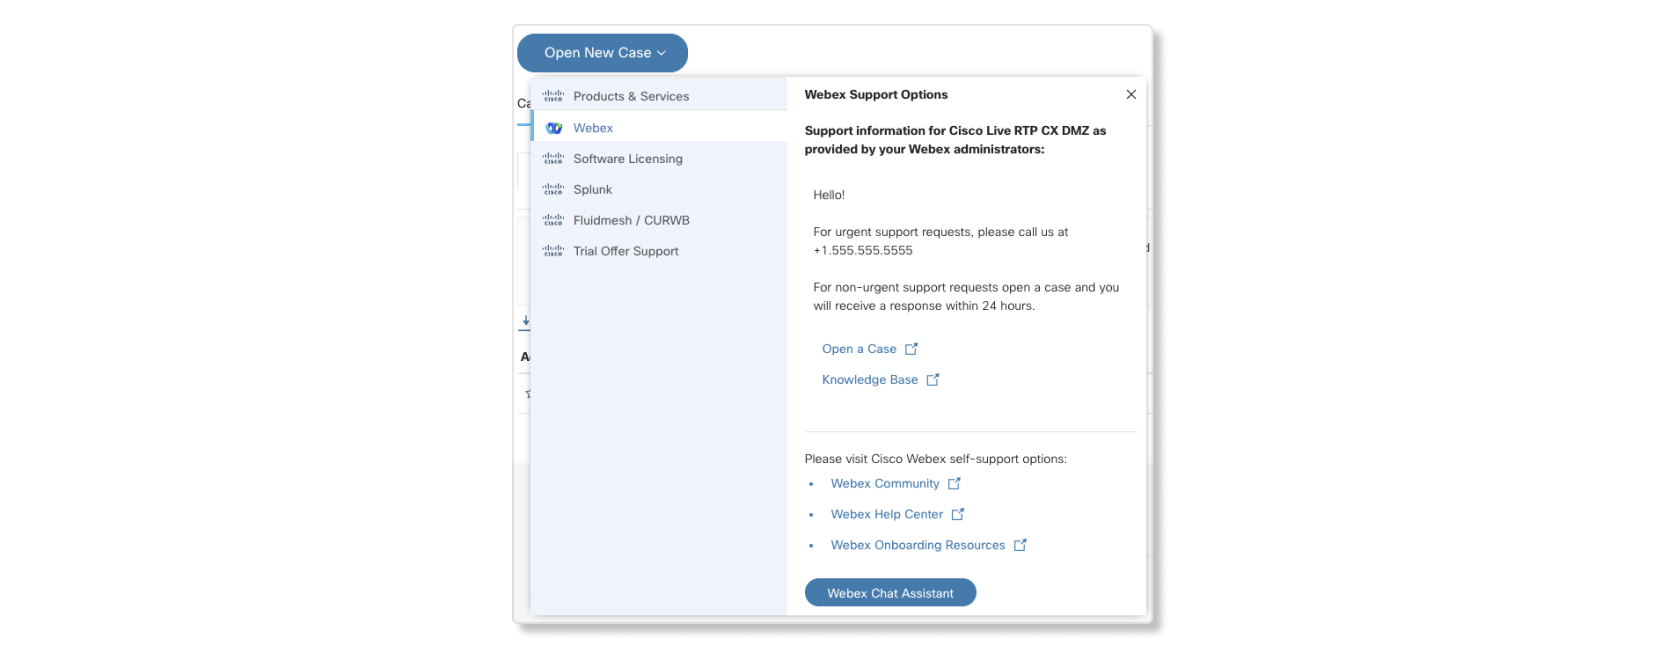
The information presented in this window corresponds in Control Hub as follows:
- Support information details—Fills in the details from the description configured in Help and support information.
- Open Case—Opens the Contact support URL configured in Help and support information.
- Knowledge Base—Opens the Help Site URL configured in Help and support information.
Related Branding Articles
The following articles are related to the Branding configuration in this article:
-
Emergency Call Disclaimer—Partner administrators can use this article to configure the Emergency Call Disclaimer.
-
Add Your Company Branding to Webex—Customer administrators can use this article to configure Branding for their own customer organizations. The partner administrator must have enabled this option for the customer administrator. Otherwise, the customer administrator cannot override partner branding defaults.


