Webex Monitoring Service in Control Hub
 Feedback?
End of life notice
As of June 18, 2024, Webex Monitoring Service went end of life. We recommend that you switch to using the ThousandEyes integration in Troubleshooting for similar data.
Getting started
To use the Webex Monitoring Service, you need to download the Webex Monitoring Service software in Control Hub, and then install the software on the computer or server that you're going to use as an agent to monitor your organization's network connectivity with Webex services. You can reuse the software to install on multiple computers or servers to create more agents. Once you’ve set up agents in your organization, you can view the Webex Monitoring Service data in the Troubleshooting tab.
Requirements
Proxy isn't supported.
To use the Webex Monitoring Service, you must use a dedicated machine that meets these minimum requirements:
-
64-bit Windows 10 or 64-bit Windows Server 2016 or later
-
Physical or virtual machine must have an audio driver enabled
-
A 4-core processor or higher
-
8 GB of RAM
-
20 GB of free storage
You must download the Webex Monitoring Service software in Control Hub and then install the software to a computer or server to set up an agent.
Set up a Webex Monitoring Service agent
Set Up a Webex Monitoring Service Agent
The Webex Monitoring Service agent must be able to reach the Cisco Webex Cloud IPv4 addresses, and port 443 with SSL directly through any existing organization's NATs or firewalls. The monitoring agent doesn’t support communicating through web proxies to reach the Webex Cloud and IPv6 addresses. See this article for a list of IP addresses that the Webex services use.
The Webex Monitoring Service uses Internet Control Message Protocol (ICMP) to perform some of the network tests. If ICMP messages are blocked, then the test results might have little to no metrics in Control Hub.
Make sure any anti-virus solution that is used on the machine doesn’t interfere with the monitoring agent. The agent must also be deployed outside of your organization's demilitarized zone (DMZ).
Before you begin
The physical or virtual machine that you want to set up as an agent must have an audio driver enabled for the installation to complete successfully.
If you're signing in remotely to install the Webex Monitoring Service software on a virtual machine, make sure to set the sound setting to output through the virtual machine. For example, if you're using Microsoft Remote Desktop, set the Play sound setting to On the remote PC in the Devices & Audio tab.
You can have up to four agents per organization.
| 1 |
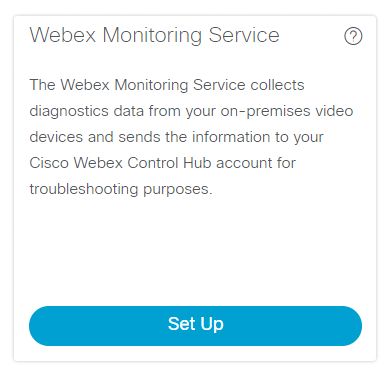
From the customer view in https://admin.webex.com, select Hybrid, and in the Webex Monitoring Service card, click Set Up.
|
| 2 |
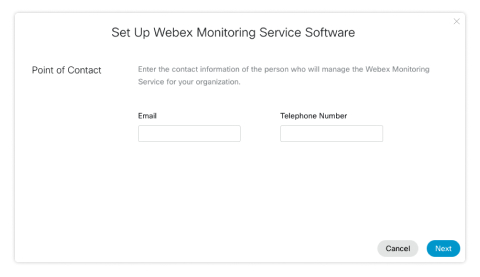
Enter the email and phone number of the Point of Contact, and click Next. The Point of Contact is the person who Cisco contacts about the quality of your network if an issue is detected.
|
| 3 |
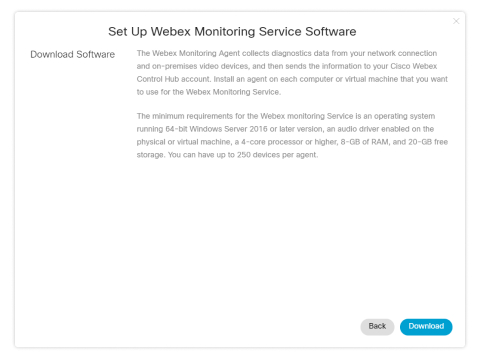
Click Download to download the Webex Monitoring Service software, and then install the software on the computer or server that you want to set up as an agent. When the download completes, the software should automatically install. If it doesn't, open the software to start the installation.
After setting up the first agent, you can go back to the Webex Monitoring
Service card if you want to download the software again to add
more agents.
|
Now that you've installed the Webex Monitoring Service agent on a computer or server, you can manage them in Control Hub.
Manage Webex Monitoring agents
Manage Webex Monitoring Agents
| 1 |
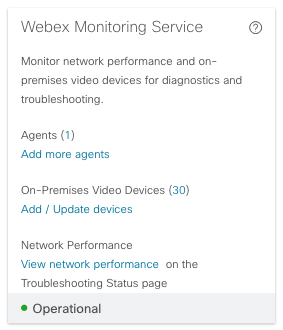
From the customer view in https://admin.webex.com, select Hybrid, and in the Webex Monitoring Service card, click on the number next to Agents. |
| 2 |
Click More
|
| 3 |
Select the action you want to perform. To remove an agent, you can either:
|


 next to an agent.
