- Home
- /
- Article

Thanks for your feedback.

Call routing based on operating modes in Webex Calling
 In this article
 Feedback?
Call routing based on operating modes allows businesses to efficiently direct calls to various destinations, users, and departments within an organization while also giving authorized users the ability to manage the routing process.
It's important for businesses to effectively route incoming calls to different users or groups of users based on the time of the day and day of the week. For example, during business hours, calls may be routed to a receptionist, during off business hours; weekend and holiday calls may be routed to an auto attendant or a voicemail. By using time of day routing businesses can ensure efficient management of calls and resources during different hours of the day.
Call routing based on operating modes allows businesses to:
-
Automatically direct incoming calls to the right destination.
-
Manage call flow efficiently based on time, day, and business needs.
-
Provides flexibility in handling different call scenarios by enabling an authorized user to change modes from desk phone and User Hub.
Operating mode
An operating mode is a flexible call routing configuration that determines how calls are handled during different times and scenarios. For example:
-
Day mode- Normal business hours routing
-
Night mode- After-hours call handling
-
Holiday/Special closure mode - Routing during weekends or holidays
Operating mode types:
The following operating modes are designed to address specific scheduling and operational requirements:
-
Scheduled mode:
-
Same hours every day
-
Different hours every day
-
Holiday-specific routing
-
-
Non-scheduled mode– Standard operation without specific time constraints. If a schedule is defined for the customer, the nonscheduled mode becomes active outside the scheduled hours.
Benefits
Call routing based on modes provides the following capabilities to enhance call management efficiency and ensure a seamless customer experience:
-
Flexibility: Customize call routing to match your business needs.
-
Efficiency: Automatically route calls to the right department.
-
Professionalism: Ensure calls are always handled appropriately.
Setting up operating modes
To create an operating mode:
-
Sign in to Control Hub.
-
Go to Calling > Features > Operating Mode.
-
Click Add new.
-
Choose Organization or Location level to create a mode.
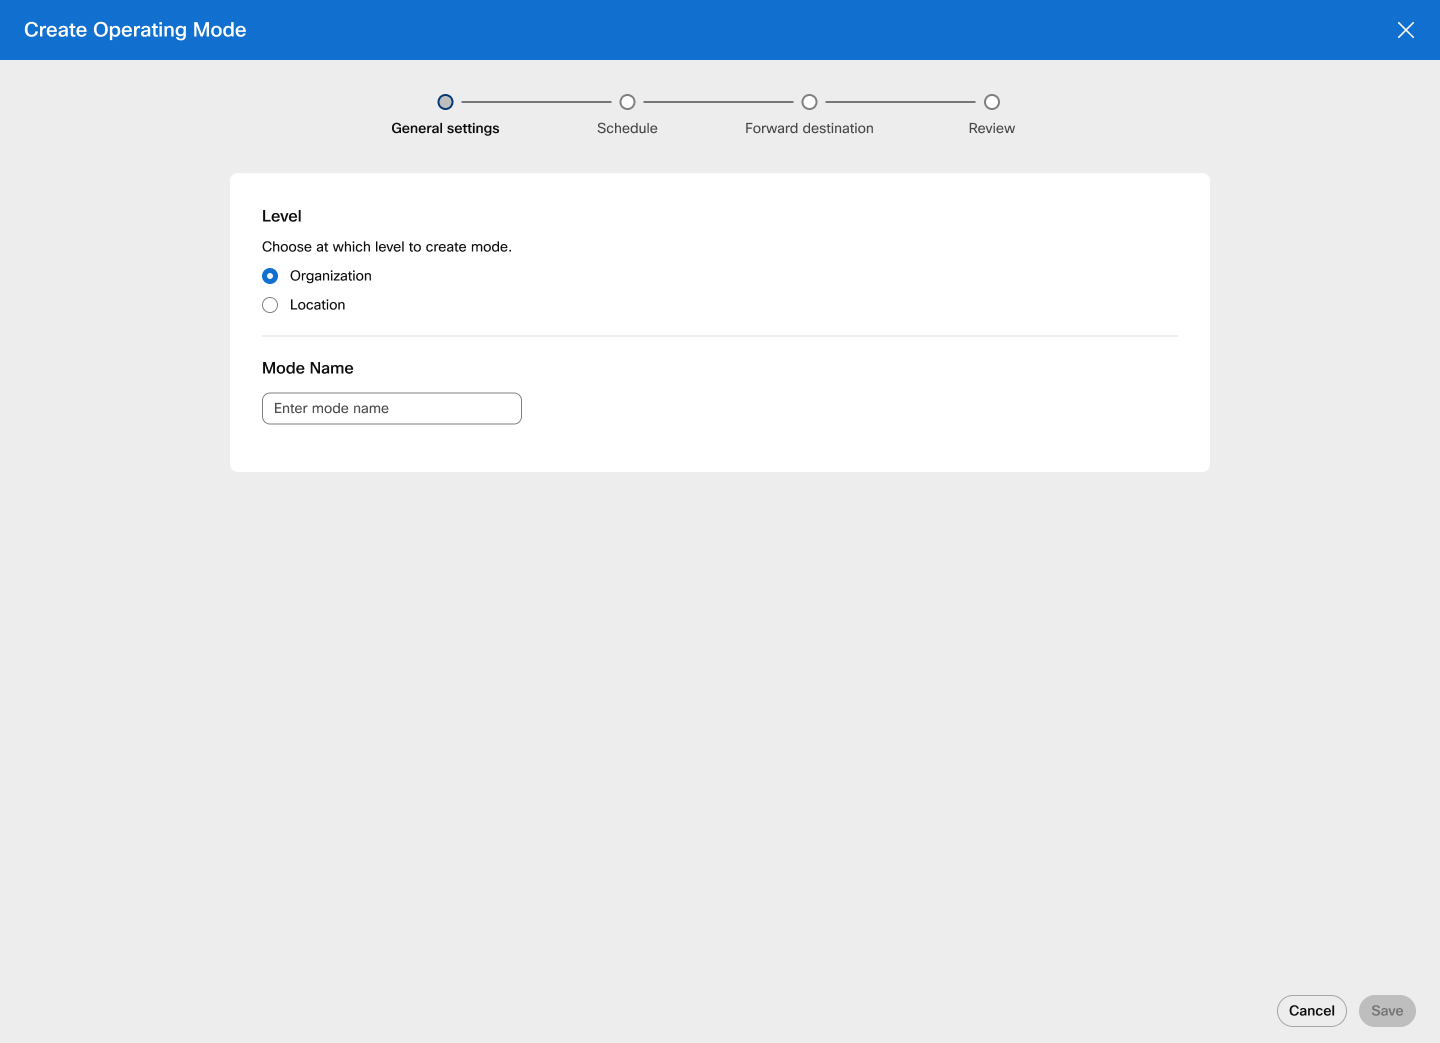
If selecting Location, search for or select the location from the list.
-
Enter the mode name and click Next.
-
If the operating mode includes a schedule, toggle on Define Schedule and select a schedule type from the list.
-
Schedule as Same hours every day - Select this option from the dropdown list and check the box next to Monday-Friday or Sat & Sun. Specify the time range, and select All day if applicable.
-
Schedule as different hours every day - Select this option from the dropdown list and check the box next to the days of the week. Specify the time range, and select All day if applicable.
-
Schedule as Holiday - Select this option from the dropdown list and enter the holiday name, recurrence, and duration. Select All day if applicable.
When switching to recurrence Yearly, the duration start and end date is the same and the all day toggle is on by default.
Select Next. The new holiday is saved to the table. You can add multiple holiday entries by clicking Add new holiday. Hover over the holiday and click
 to edit the holiday, or
  to delete it.
 -
-
Click Next. The Forward destination page appears. Enter the destination, and check the box send to voicemail if applicable. Or, select Do not forward and click Next.
-
Review the settings for the new operating mode.
Schedule type operating mode can’t be changed once the mode is created.
-
Click Create.
Location admin restrictions
Location level administrators can create, update, and delete modes for their location.
Operating modes can be configured in bulk using the Bulk Manage dropdown list in Manage button.
Feature call forward modes provisioning
A forward call by mode option is added to the call forwarding configuration for Customer Experience Essentials Call Queue, Auto Attendant, Call Queue, and Hunt Group. Organization level modes and modes from the feature's location can be assigned to Call Forwarding by mode.
The normal operating schedule for a feature consists of one or more modes enabled for normal operation through which calls are routed based on the order of these modes and their schedules.
The Normal operating schedule also includes any periods not covered by the modes enabled for normal operation. During these times, the feature is still considered to be in “normal operation” but without a current mode.
A mode is considered to be in exception mode when its normal operation is manually overridden. For instance, if an authorized user, such as an office manager, extends business hours beyond 4 PM, the business hour mode enters exception mode. An exception mode can either automatically revert to the normal operating mode or be manually switched back to the normal operating mode.
Each assigned mode can be configured to use the mode's default forwarding configuration or specify its own custom forwarding (a different forwarding destination or do not forward).
The order of the assigned modes controls their precedence order for the feature's normal operation, and an administrator can rearrange the list using drag-and-drop from Control Hub.
-
The feature must have at least one mode assigned to enable mode-based forwarding.
-
A scheduled/holiday mode's dates/times are applied as per the feature's time zone.
Feature means a Webex Calling customer assists Call Queue, Call Queue, Auto Attendant, or Hunt Group the mode is assigned to.
The feature's current mode (if any) is tagged in the list with a colored dot indicating the mode's status:
-
Green = normal operation.
-
Amber = automatic switch back (early start or extension) exception.
-
Red = manual switch back exception.
When the current mode's status isn't normal operation, the admin can switch the feature back to normal operation.
Assigning mode based forwarding to features
Call routing based on modes is enabled by assigning modes to a feature like Call Queue, which has the associated number for which the call routing needs to be modified.
To assign features of mode-based routing:
-
Sign in to Control Hub.
-
Go to Calling > Call Queues.
-
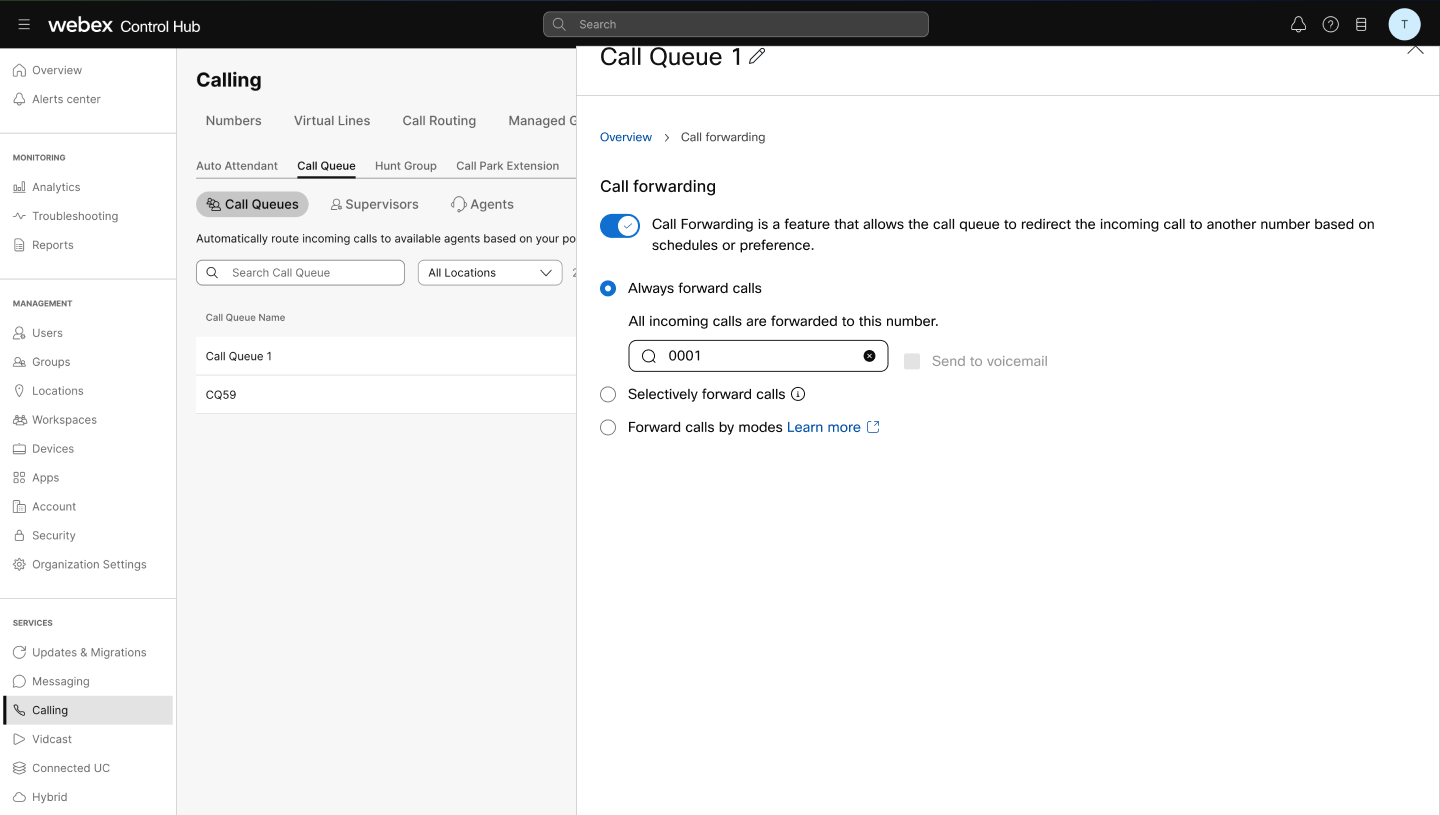
Select a call queue from the list and click Call forwarding.
-
Toggle Call forwarding and select Forward calls by modes.
-
Select an existing mode.
-
If the mode is scheduled, the Normal operation toggle is selected by default.
-
Select an option: default phone number, different phone number, or do not forward. Specify a destination if choosing any option other than do not forward. Toggle send to voicemail if applicable.
Click Save. The new mode appears in the call forwarding list.
Select the normal operation toggle.-
Click Add operating mode to add additional modes.
-
Select
 to edit the mode or
  to delete it.
Location admin restrictions
The following restrictions apply to location admins:
-
A location admin can manage modes for features in their location, including viewing, assigning, editing, and unassigning.
-
The existing bulk management for Customer Experience Essentials, Auto Attendants, Call Queues, and Hunt Groups doesn't support call forwarding.
Grant a user permission to manage modes
Administrators can grant users, such as an office manager or receptionist, the authority to manage modes for specific features. Users can select features individually, either within a specific office location or across the entire organization.
Assign mode management capabilities to a user
-
An authorized user can manage call routing of numbers that are assigned to a managed feature like Call Queue, if the forward calls by modes option is enabled for the feature.
-
If an admin later disables forward calls by modes on a managed feature, by either disabling call forwarding entirely or switching to a different call forwarding mode such as selective call forwarding, the feature remains in the list but is flagged as having mode-based forwarding disabled.
-
The features are presented to the user for mode management in User Hub and on supported MPP and PhoneOS devices in the same order as assigned.
Users must manually reorder the managed features by deleting and readding features through the Control Hub or replacing the list of managed features using bulk management.
-
Only up to the first 5 features in the list are available for user management on MPP and PhoneOS devices while all are available for user management in User Hub.
To set a user’s mode switch permissions:
-
Sign in to Control Hub.
-
Go to Users and select a user.
-
Click on Calling and select Mode Management under Call handling.
-
Search for features by name, number, or extension to add them and allow the user to manage mode-based forwarding of the specified features.
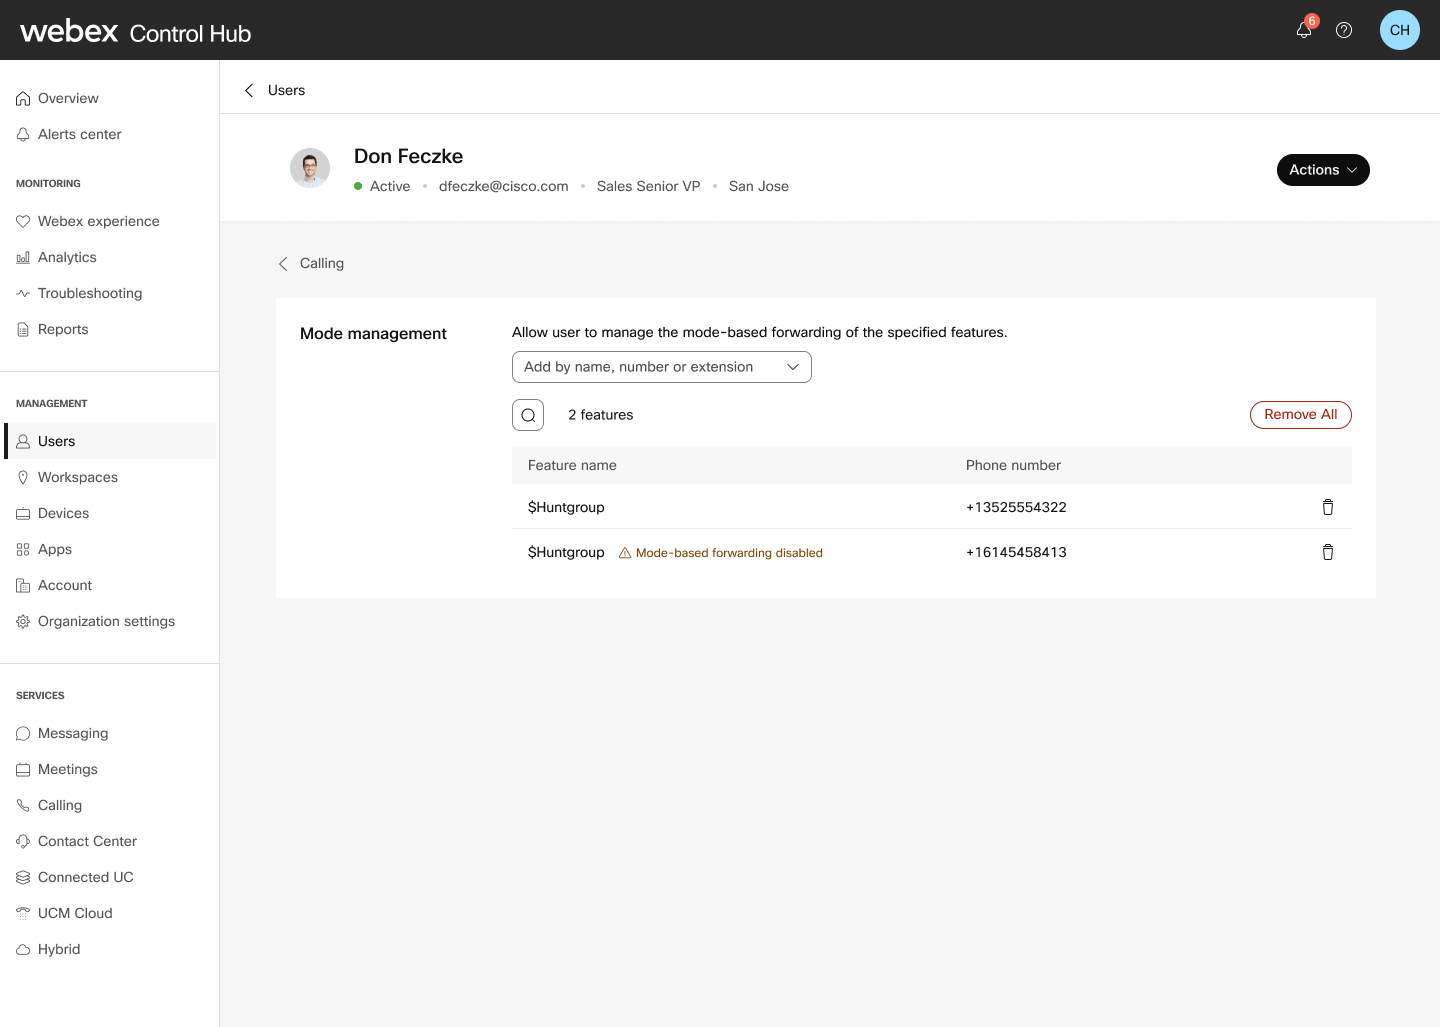
- Click to delete a feature, or click Remove
All to remove all the features for the specified user.
- The new features appear in the list. Use
 to filter the features.
Manage modes in User Hub
An administrator or office manager can manage modes through User Hub and manage the call-forwarding settings of features with the scheduled operation mode.
- Sign in to User Hub.
- Click
 > > .
> > . The feature names, phone numbers, extension, forward destinations, and current modes are shown in the table.
- Select a feature to view its details and manage its modes.
Use the chevron buttons to expand the schedule name (mode) and view its schedule information.
- Click Edit mode to switch the mode or extend the mode.
For more information, see the Examples section.
Perform a bulk mode switch
An administrator or office manager can select multiple features or departments to perform a bulk or batch mode switch. This applies the same applicable mode to all selected features.
If you select features that don't include a universally applicable mode, adjust your selections based on the location to continue with the bulk mode switch.
- Click > > .
- Select the features and click Switch mode.
- Select the common mode you want to switch for the selected features.
In batch switch mode, you can only revert to normal manually.
- Click Switch mode.
Device support
Users authorized to manage modes can view and manually override the administrator-defined schedule from their assigned 98xx and 88xx devices (except 8831, 8832). Up to 5 mode management line keys per device is supported.
The authorized user doesn't have to be part of the feature to manage the mode. For example, the user doesn't have to be assigned as an agent in the call queue.
The device line key layout and line key templates in Control Hub are enhanced to support the mode management line key assignment value.
-
Mode managed features only appear on line keys with the mode management value assigned.
-
Mode managed features don’t appear on line keys assigned with the open value assigned.
-
A device must use a custom layout for Mode Management line keys to appear.
-
Mode management line keys aren't supported on workspace devices. API requests to set a mode management line key on a workspace device are rejected. If a device template containing mode management line keys is applied to a workspace device, the mode management line keys are treated as open line keys instead.
-
A warning is presented if more mode management appearances are configured for a device than there are features assigned to the device's owner for mode management. A warning isn’t presented if fewer mode management appearances are configured for a device than there are features assigned to the device's owner for mode management.
Provision mode management on user-assigned devices
To apply the default layout:
-
Sign in to Control Hub.
-
Go to > > .
-
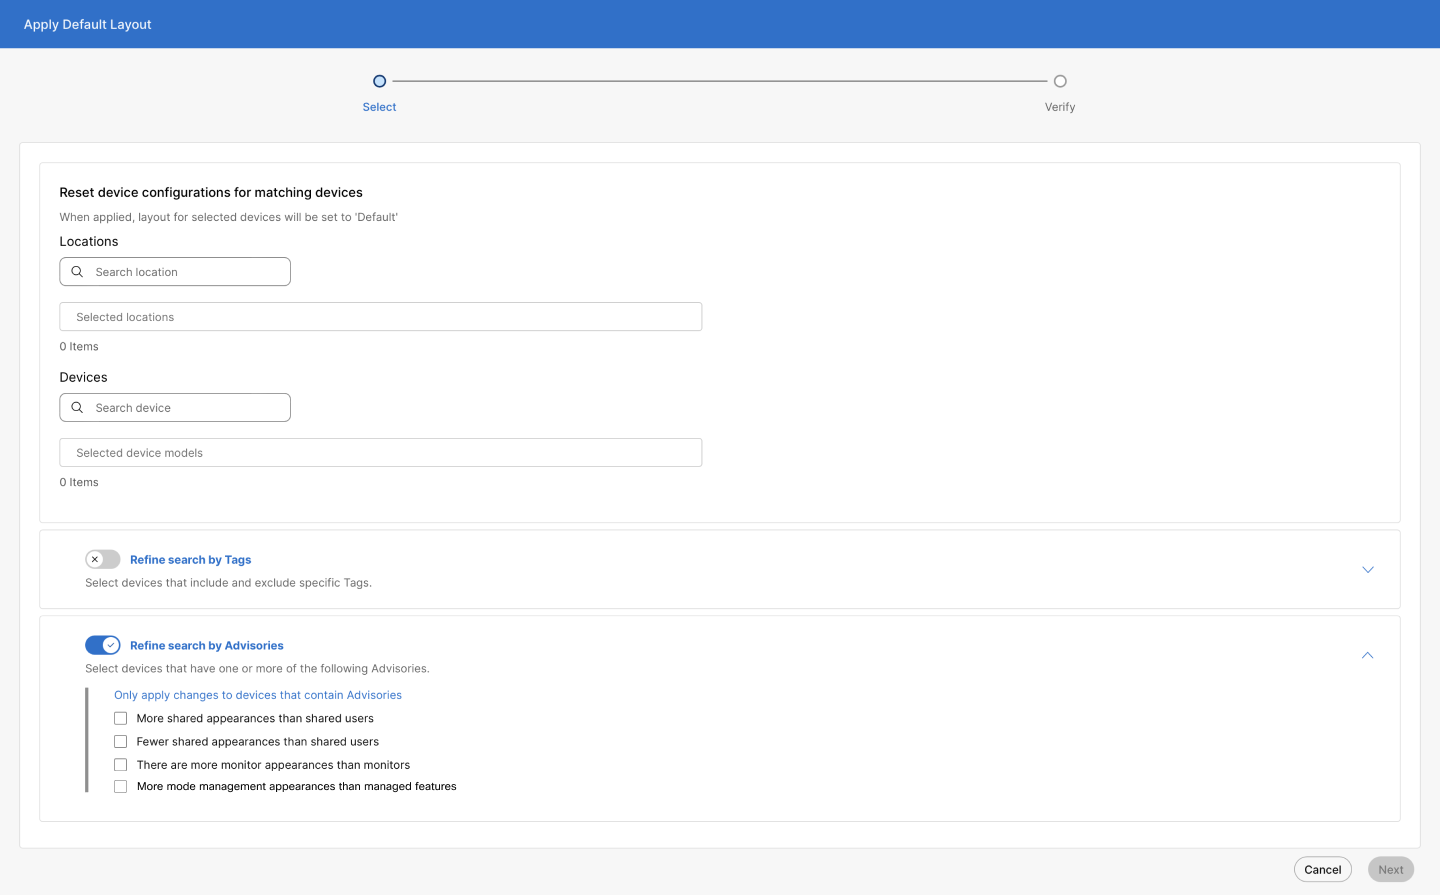
Select Reset Line key template to reset configurations for matching devices to their default templates. This will also override any custom line key settings.
-
Enter the locations and devices. Select Refine search by Tags or Refine search by Advisories to search by these methods. Check the boxes as needed.
-
Click Next. The configuration layout of the selected devices will be set to default layout once applied. Changes take effect once devices are synced.
-
Select Reset to default.
To apply a custom layout:
-
Select the apply custom layout icon to find and apply a template to all matching devices.
-
Enter the locations and devices. Select Refine search by tags or refine search by advisories to search by these methods. Check the boxes as needed.
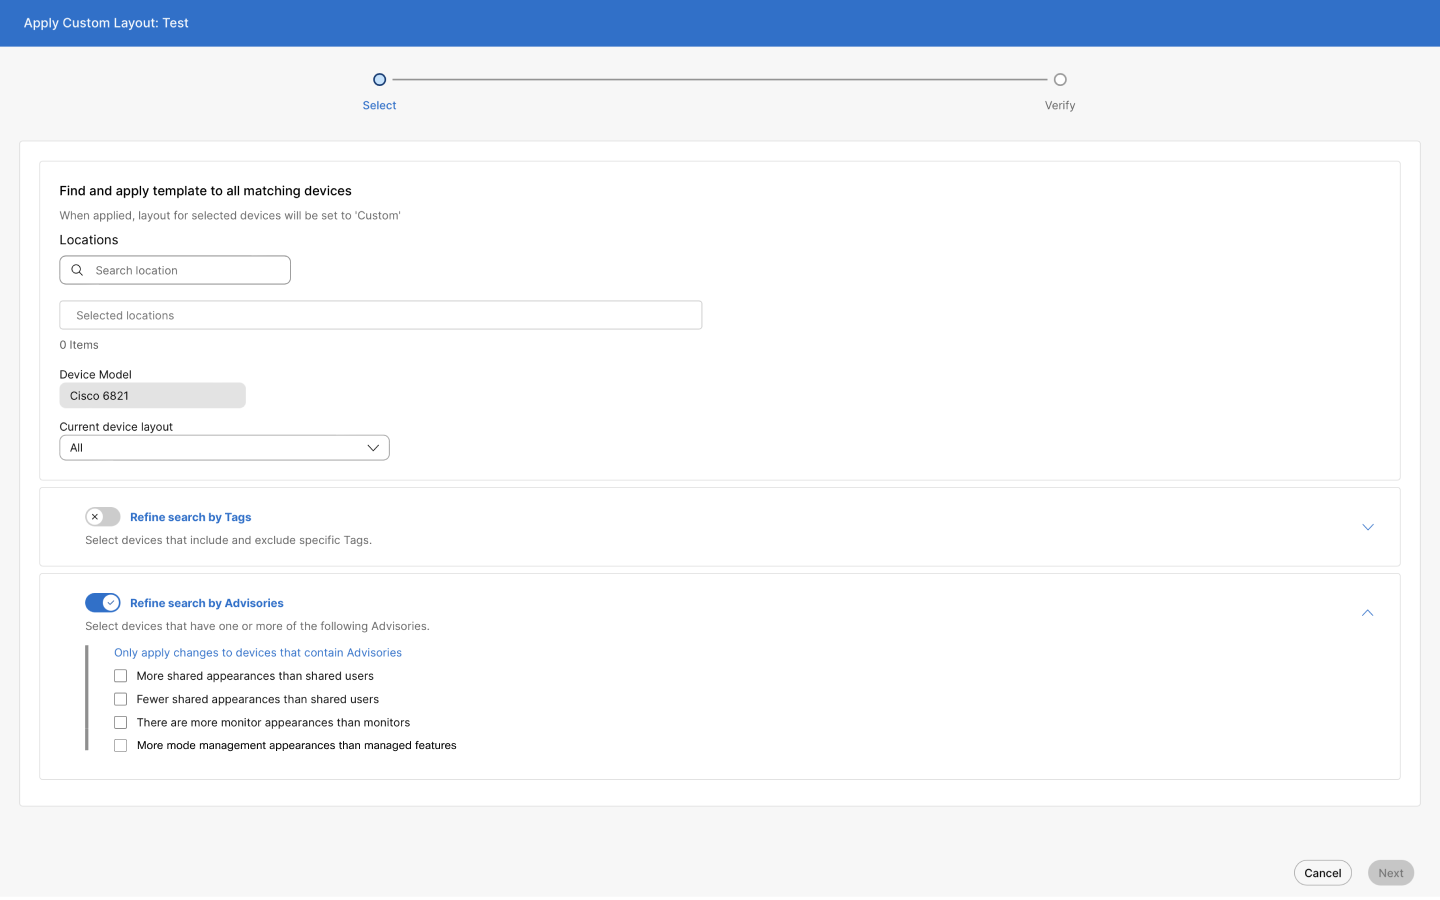
If the default layout from current device layout is selected, the mode management check box is disabled. If All is selected, the mode management check box is enabled.
-
Click Next. The configuration layout of the selected devices will be set to custom layout once applied. Changes take effect once devices are synced.
-
Select Apply custom layout.
To edit a template:
-
Click
. -
The line key assignments and their order appear. Expand each dropdown to select the line key assignments.
-
Select Mode Management and click Save.
To assign Mode Management to devices individually:
-
Go to Devices and select a device.
-
Click Manage next to Configure Layout.
-
Program the line keys with primary, shared lines, or Calling functions and save the changes to override current configurations. Select Custom Layout. Use the dropdown list to select Mode Management for the line keys.
-
Check the Preview Layout box to view the line configurations in preview mode. This is how they appear on the device once provisioned.
-
Click Save.
Limitations
-
A maximum of 100 organization-level operating modes can be configured.
-
A maximum of 100 location-level operating modes per location can be configured.
-
Up to 150 holiday configurations is supported.
-
8831 and 8832 device models aren’t supported.
-
The key expansion module isn’t supported.
-
Mode management line keys aren't supported on workspace devices.
Real-world example: Electrician's office call routing
An electrician's office demonstrates how operating modes provide flexible call handling:
Standard operations
|
Mode |
Schedule |
Call routing |
|
Day |
9 AM – 4 PM (M-F) |
Agents in queue |
|
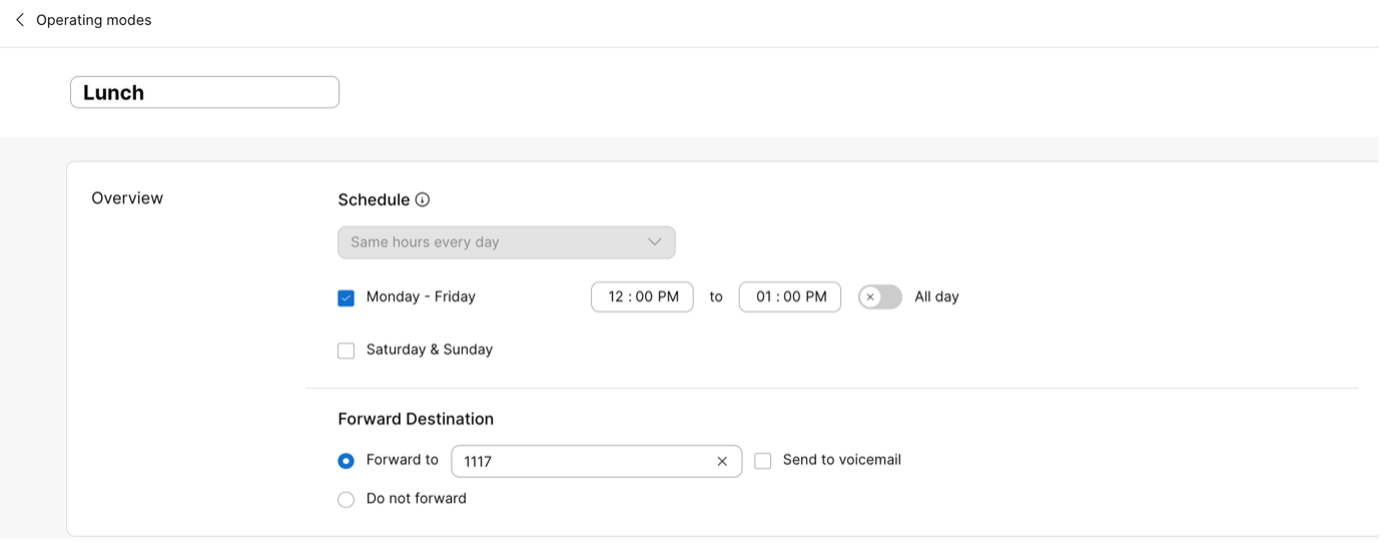
Lunch |
12 PM – 1 PM (M-F) |
Receptionist |
|
Night |
4 PM – 9 AM next morning (M-F) |
Night manager |
|
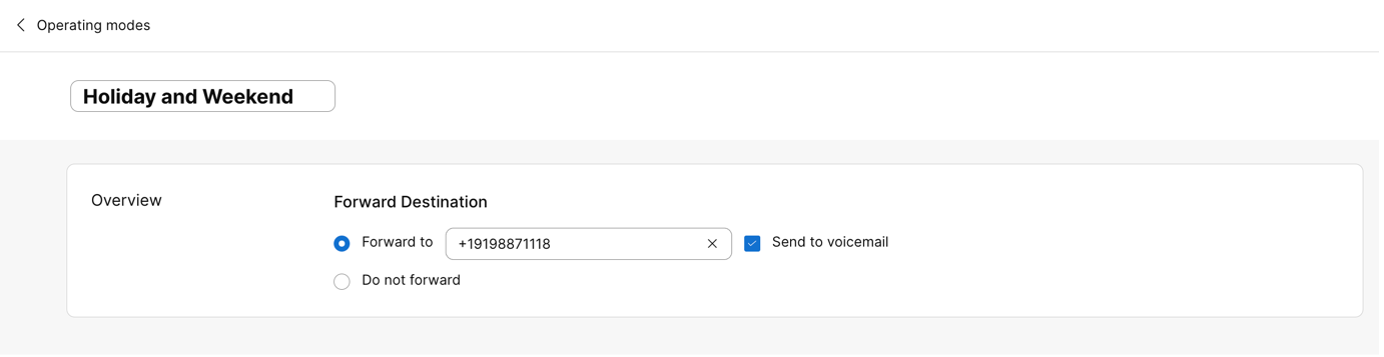
Holiday and Weekend |
Ad hoc |
Voicemail |
Monitoring and modifying calls
Office Manager can manage call routing through:
-
Assigned desk phone
-
User Hub
Setup
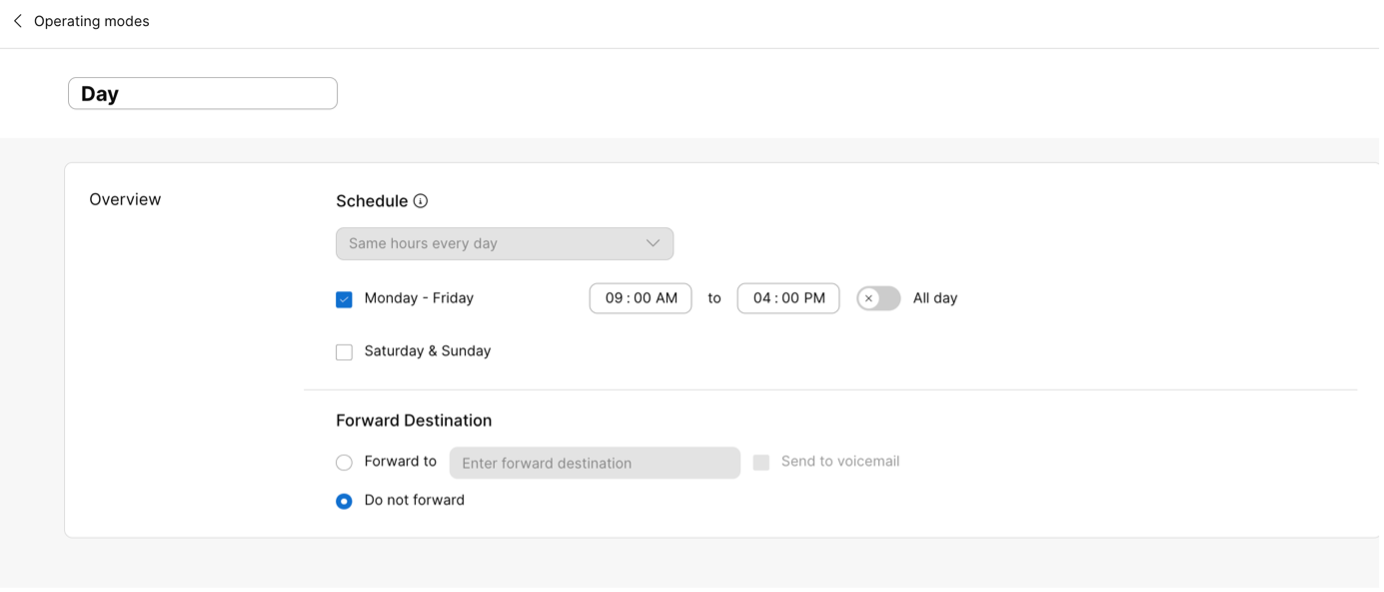
Create 4 operating modes–Day, Lunch, Night, and Holiday and Weekend. Day, Lunch, and Night modes are scheduled modes. Holiday and Weekend are nonscheduled modes.
-
Day mode
-
Lunch mode
-
Night mode

-
Holiday and Weekend
Configure a mode-based forwarding on the electrician office’s main line
The electrician’s office main line is assigned to a Call Queue with mode-based forwarding configured.
-
Go to and select Call Queue.
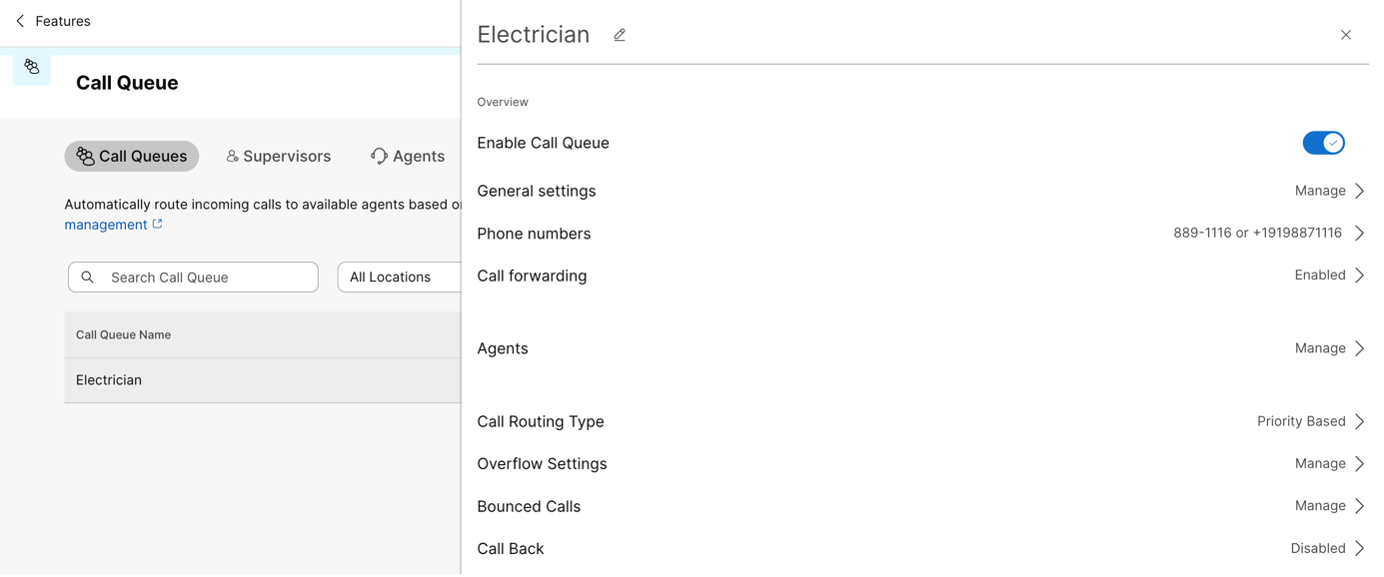
-
Under Call Forwarding, enable Forward calls by modes.
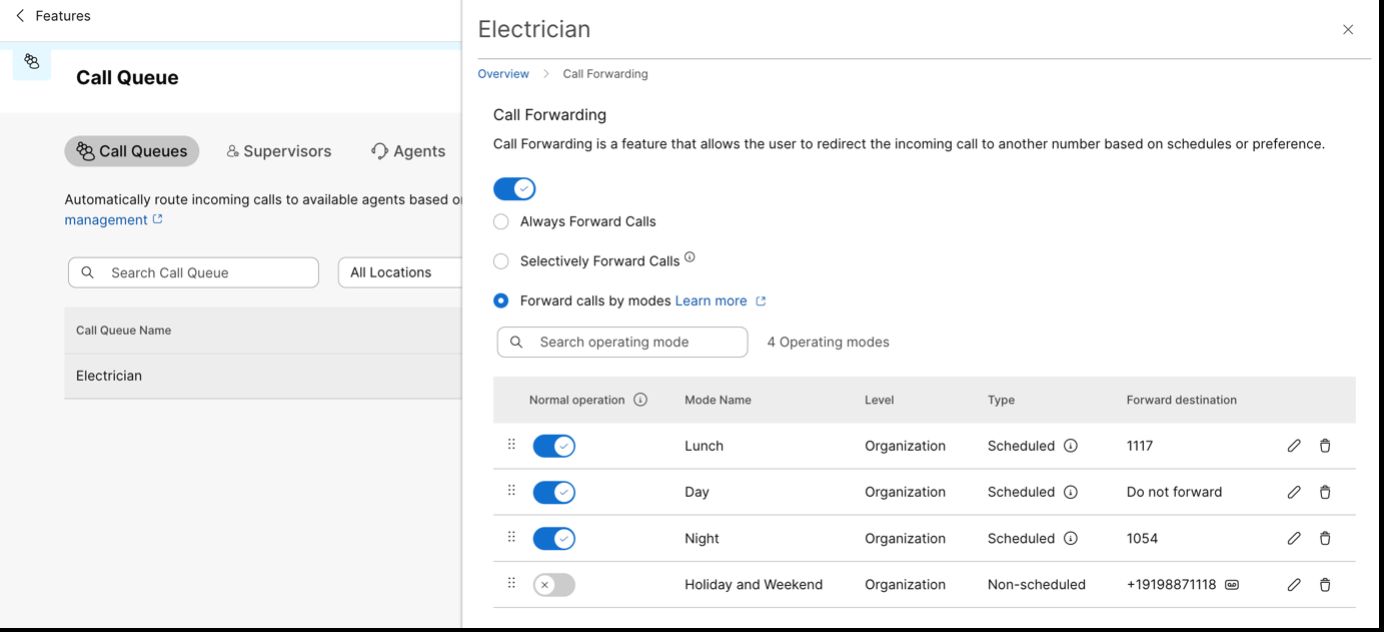
Day, Lunch, Night, Holiday, and Weekend modes are added in sequence. Since Day mode and Lunch mode have overlapping schedules, Lunch mode is prioritized higher that Day mode.
Day mode doesn’t have any forward destination defined, so calls will be routed to the agents in the Call Queue
-
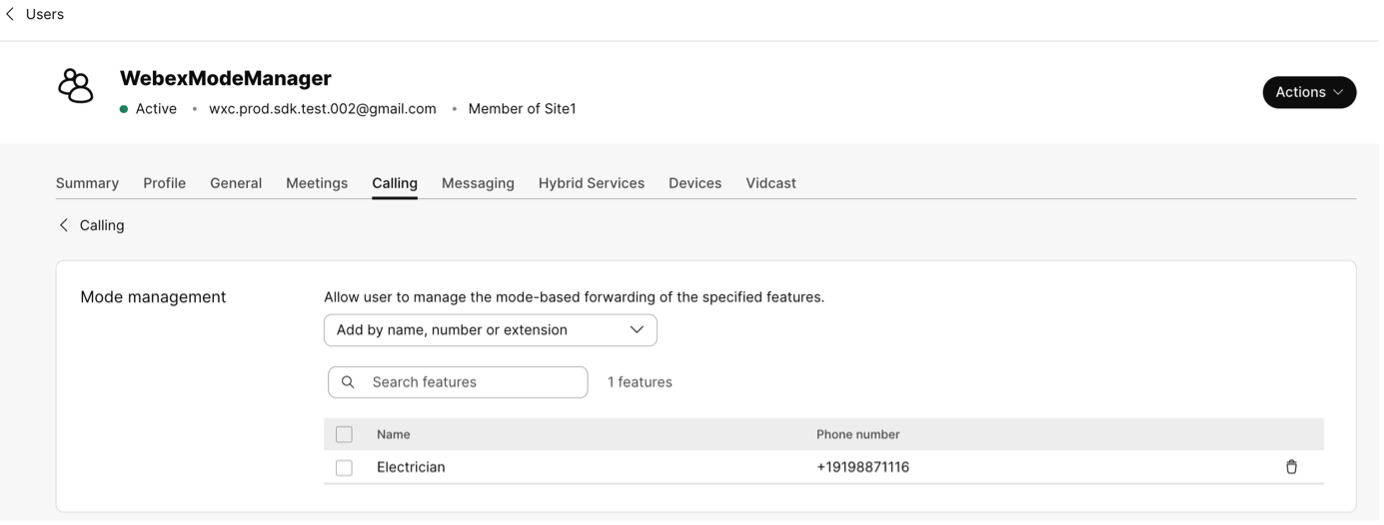
Assign a Mode manager.
Go to and select Mode Management. Locate and choose the Call Queue (or the features which the number for which the call routing needs to be modified), then click Save.
-
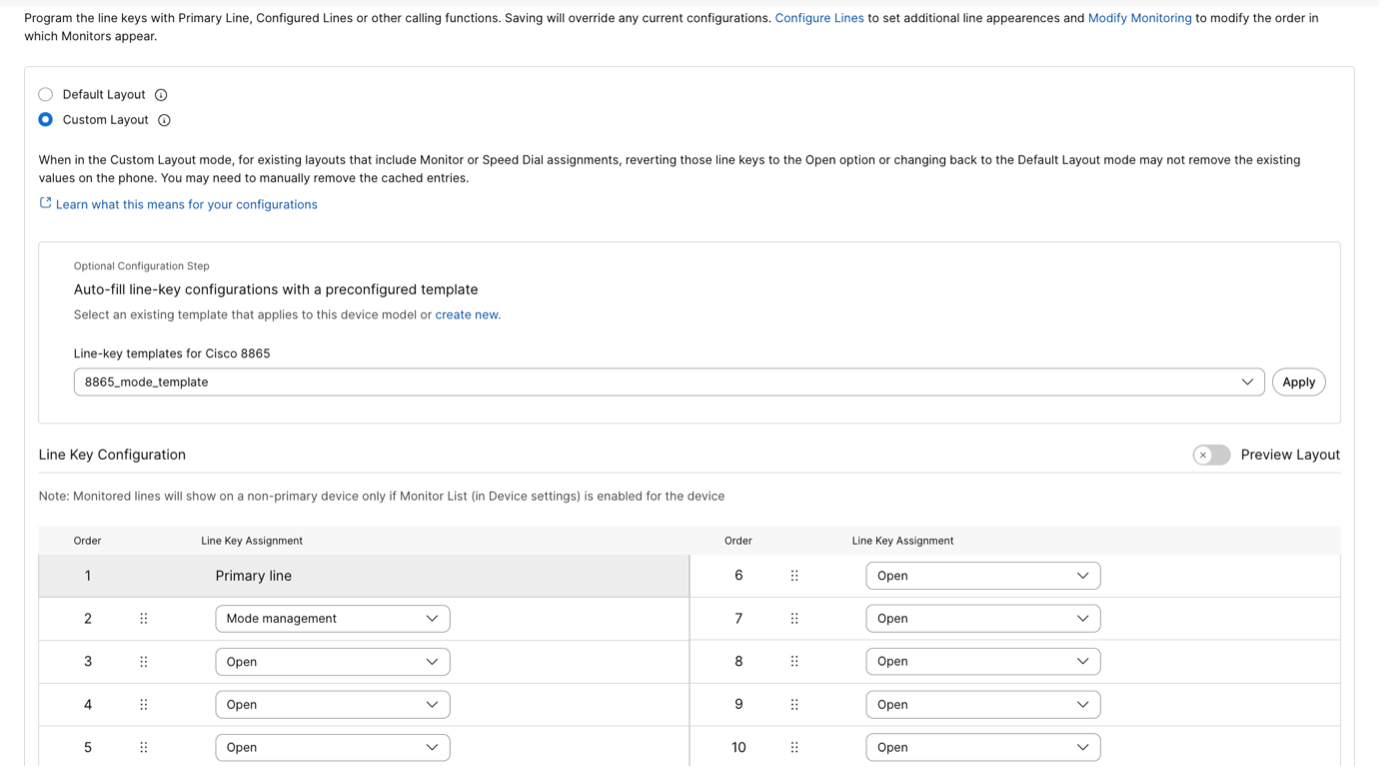
Modify the device’s line key template.
If a device is assigned to the Mode Manager, update the line-key template and assign Mode Management to the appropriate nonprimary line key.
To perform this, access the associated device, choose Configure Layout, and select the Custom Layout option. Pick the custom template you previously created with Mode Management and click Apply.
Alternatively, you can choose Mode Management from the dropdown list. Click Save and Apply configuration for the changes to take effect.
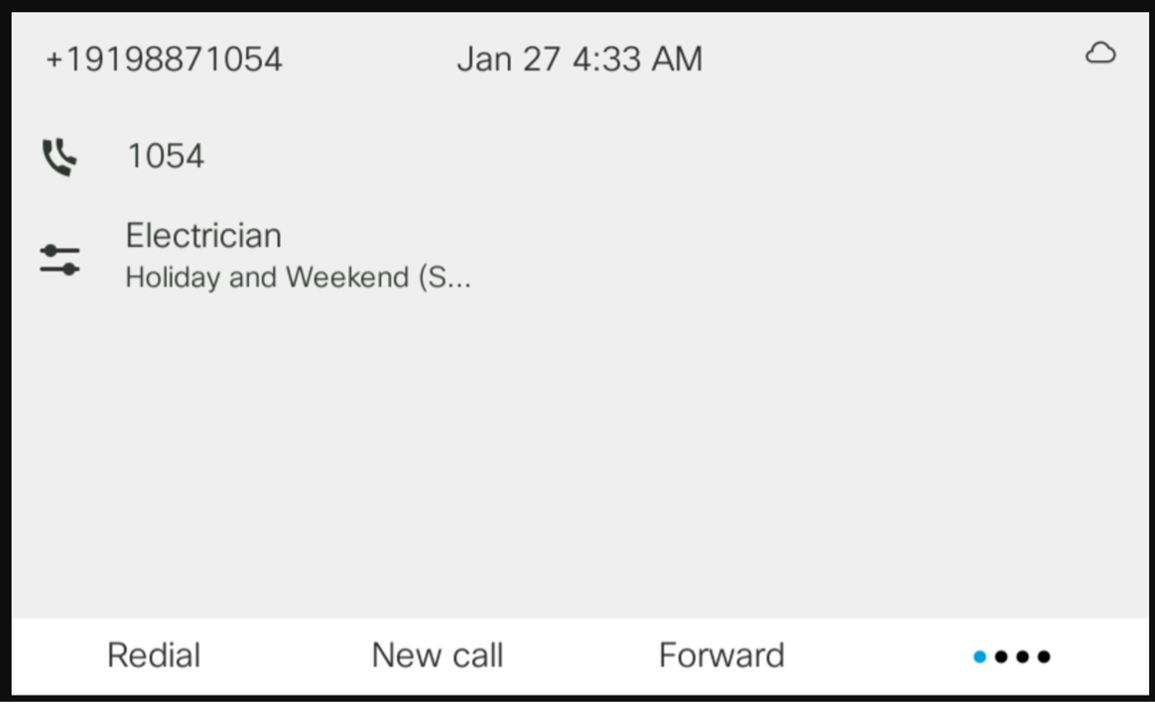
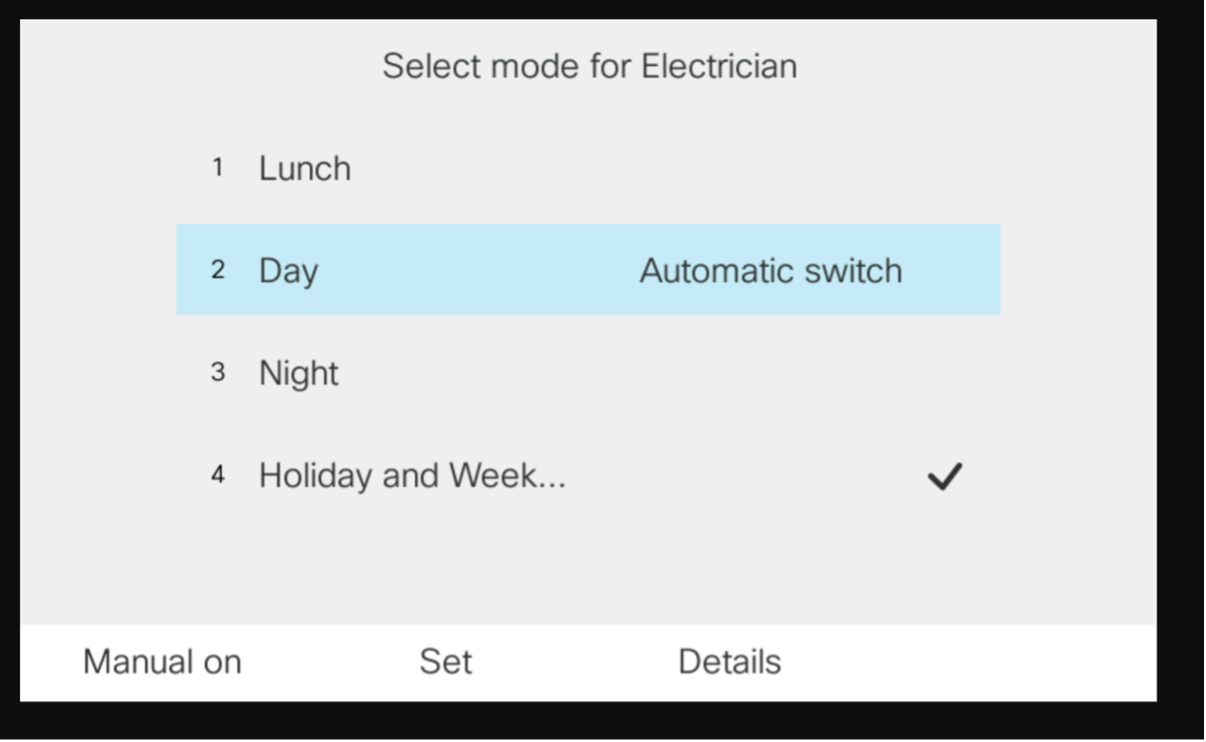
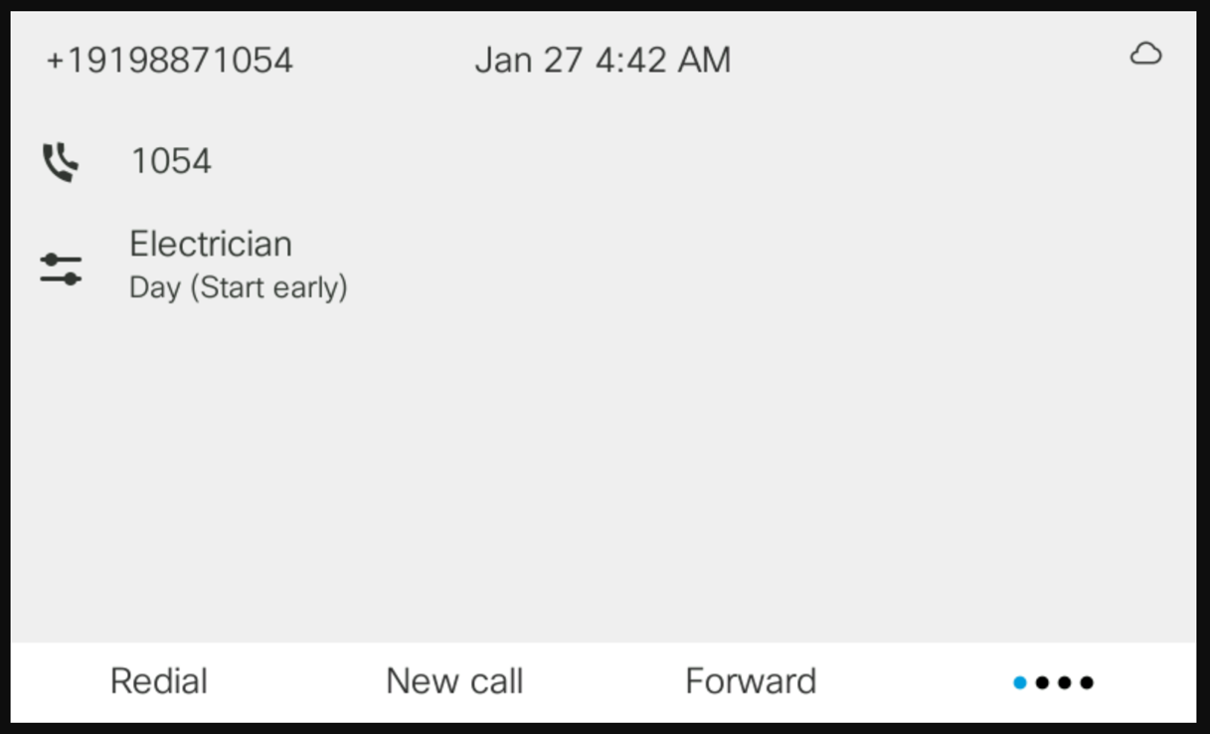
Modifying operating modes from the desk phone
Scenario 1
The current operating mode is set to Holiday and Weekend. However, due to a heavy workload, the electrician's office has returned early from the weekend. As a result, the office manager has set the mode to Day mode.
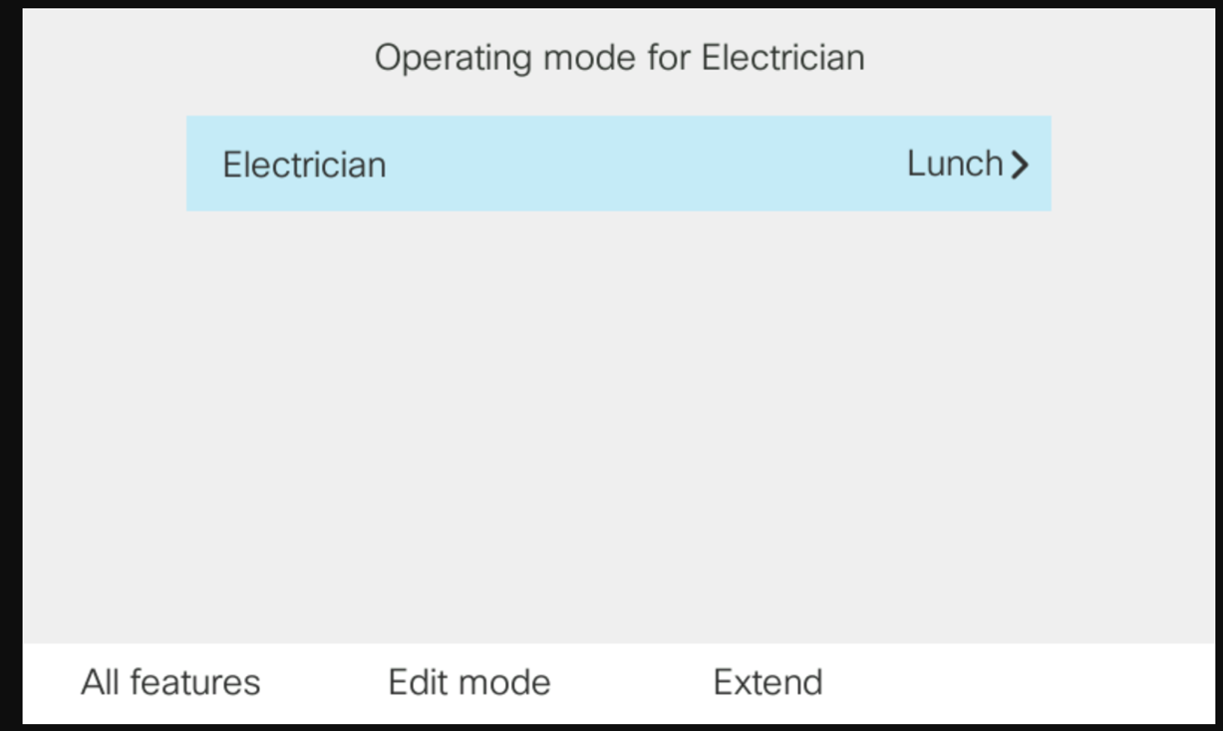
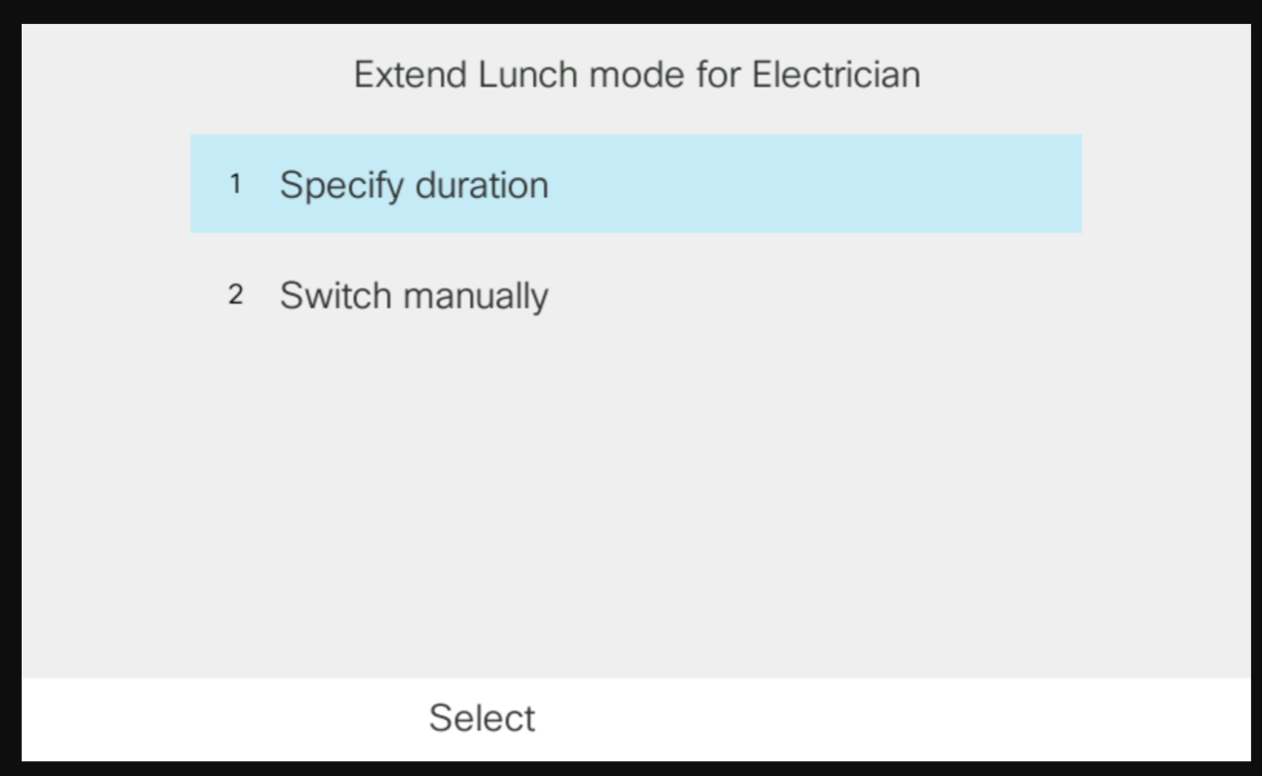
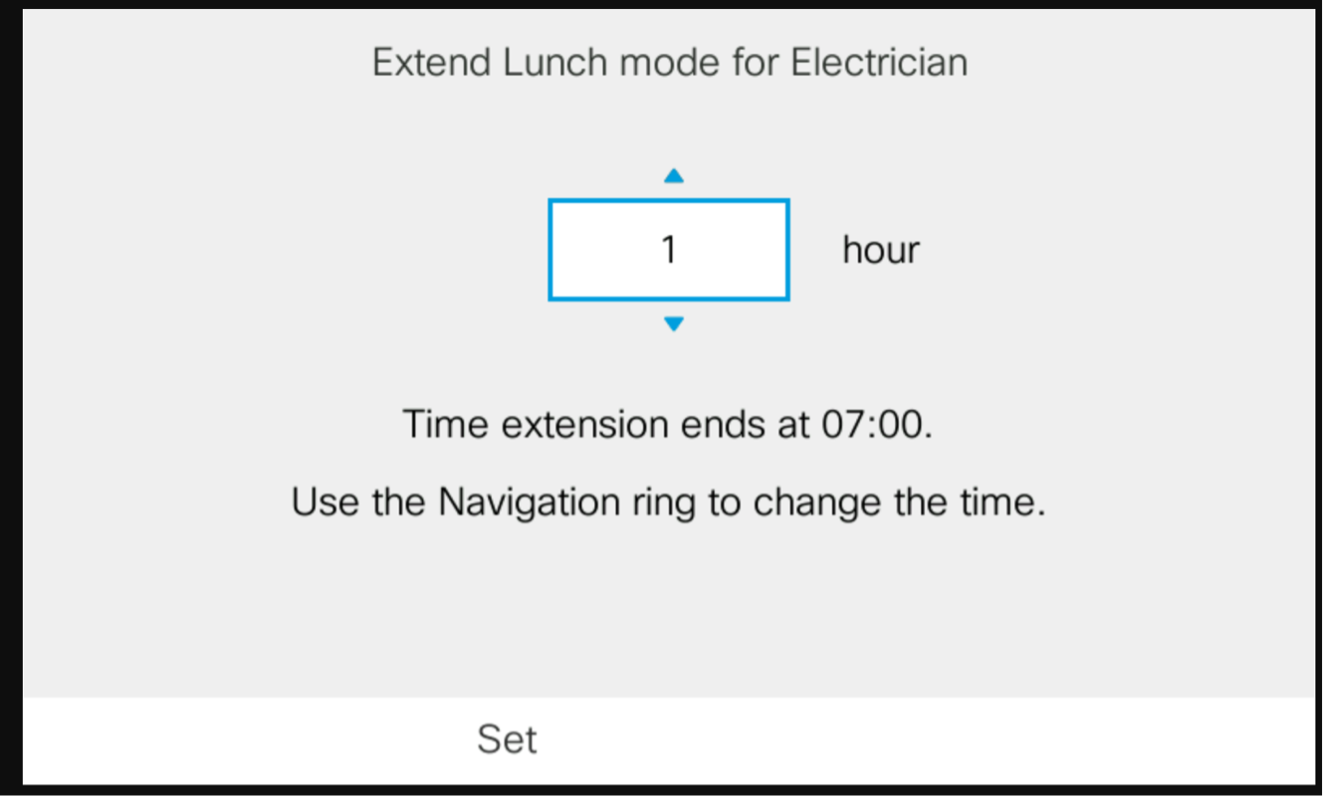
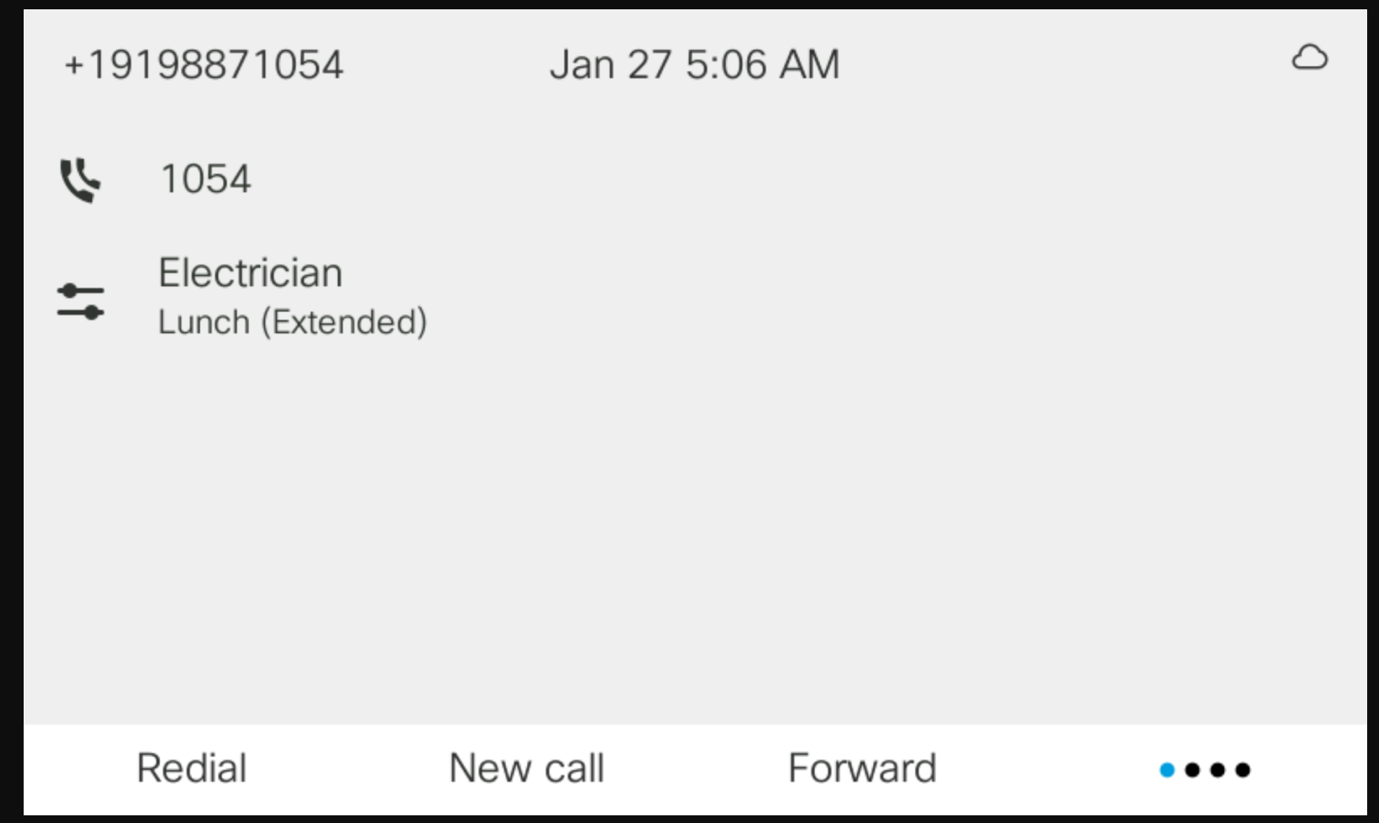
Scenario 2
The employees at the electrician's office are still on their lunch break, as it’s taking longer than expected. Hence they want to extend it by an hour. The office manager extends the existing lunch break by an hour.