- Home
- /
- Articolo

Grazie per il feedback.

Gestione dei gruppi di risposta in Control Hub
 In questo articolo
 Feedback?
È possibile utilizzare i gruppi di risposta per assicurarsi che tutte le chiamate in arrivo riceveranno risposta dalle persone giuste o inoltrate alla casella vocale per una risposta successiva.
I gruppi di risposta indirizzano le chiamate in ingresso a specifici dipendenti in una sequenza predeterminata. La chiamata viene instradata assegnando un numero di telefono a un gruppo di dipendenti e definendo regole quali le modalità di risposta, la durata dell'attesa e a chi inoltrare la chiamata.
Puoi impostare i gruppi di risposta nei seguenti casi:
-
Un team di vendita che desidera un instradamento sequenziale. Una chiamata in arrivo squilla un telefono, ma se non è presente alcuna risposta, la chiamata passa al gruppo di risposta successivo nell'elenco.
-
Un team di supporto che desidera che i telefoni squillino tutti contemporaneamente, in modo che il primo membro disponibile possa rispondere alla chiamata.
Crea una gruppo di risposta
Quando un gruppo di ricerca riceve una chiamata e la inoltra a un agente, la funzione di inoltro chiamata dell'agente non funziona.
| 1 | |
| 2 |
Vai a . |
| 3 |
Vai alla scheda Gruppo di caccia e fai clic su Aggiungi nuovo per creare un nuovo gruppo di caccia. |
| 4 |
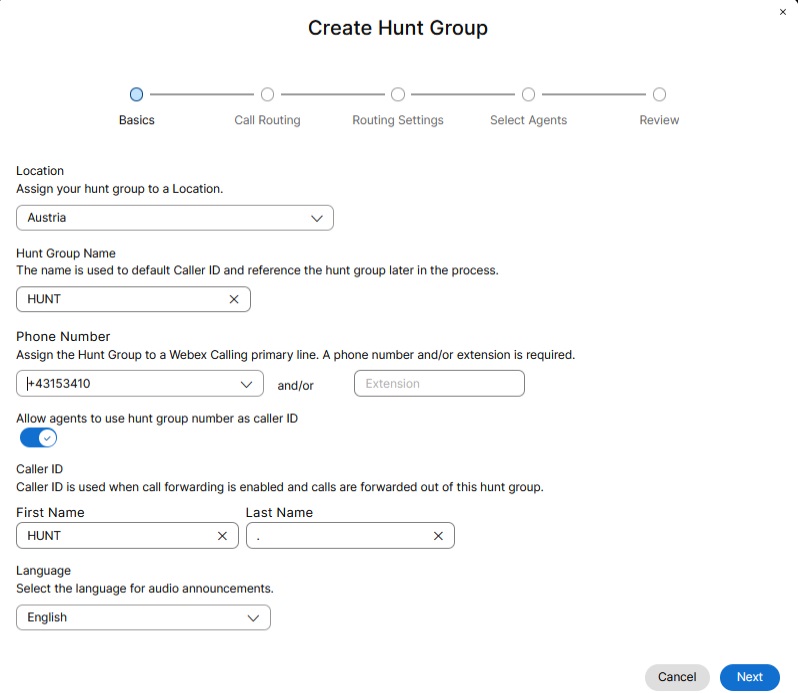
Nella pagina Informazioni di base, inserisci i seguenti dettagli e fai clic su Avanti.
|
| 5 |
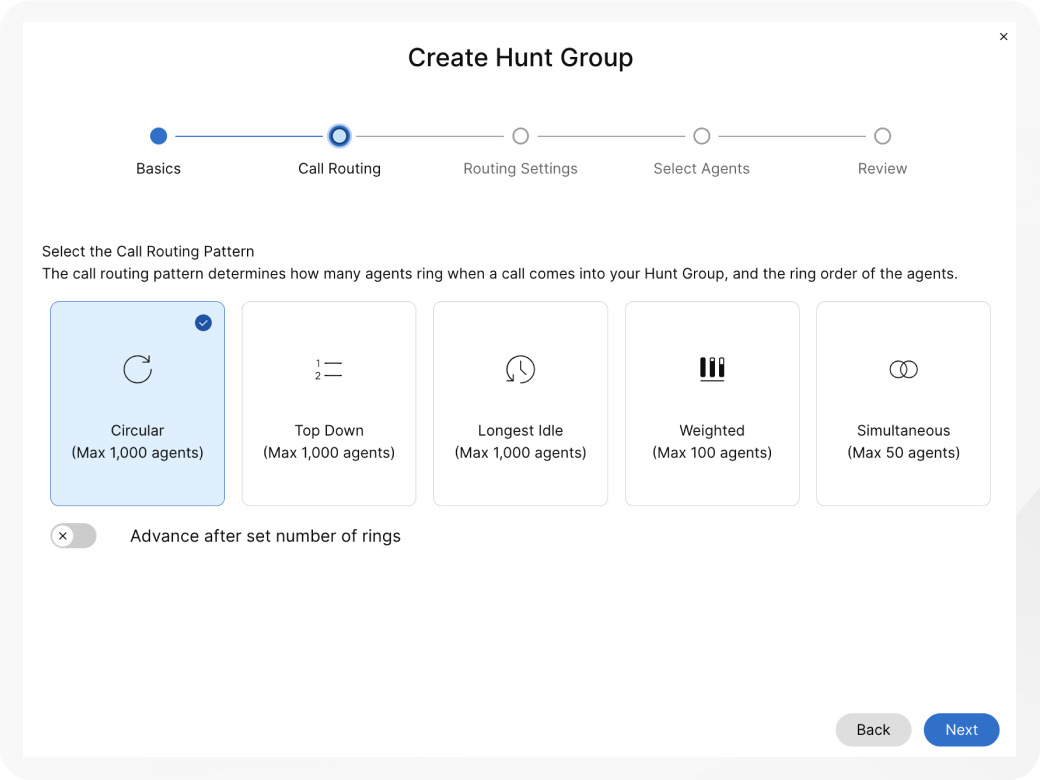
Nella pagina Instradamento chiamate, scegli una delle seguenti opzioni e fai clic su Avanti.
Se necessario, è possibile attivare l'opzione Avanza dopo il numero di squilli impostato e impostare il numero di squilli da applicare alla scelta di instradamento della chiamata.
|
| 6 |
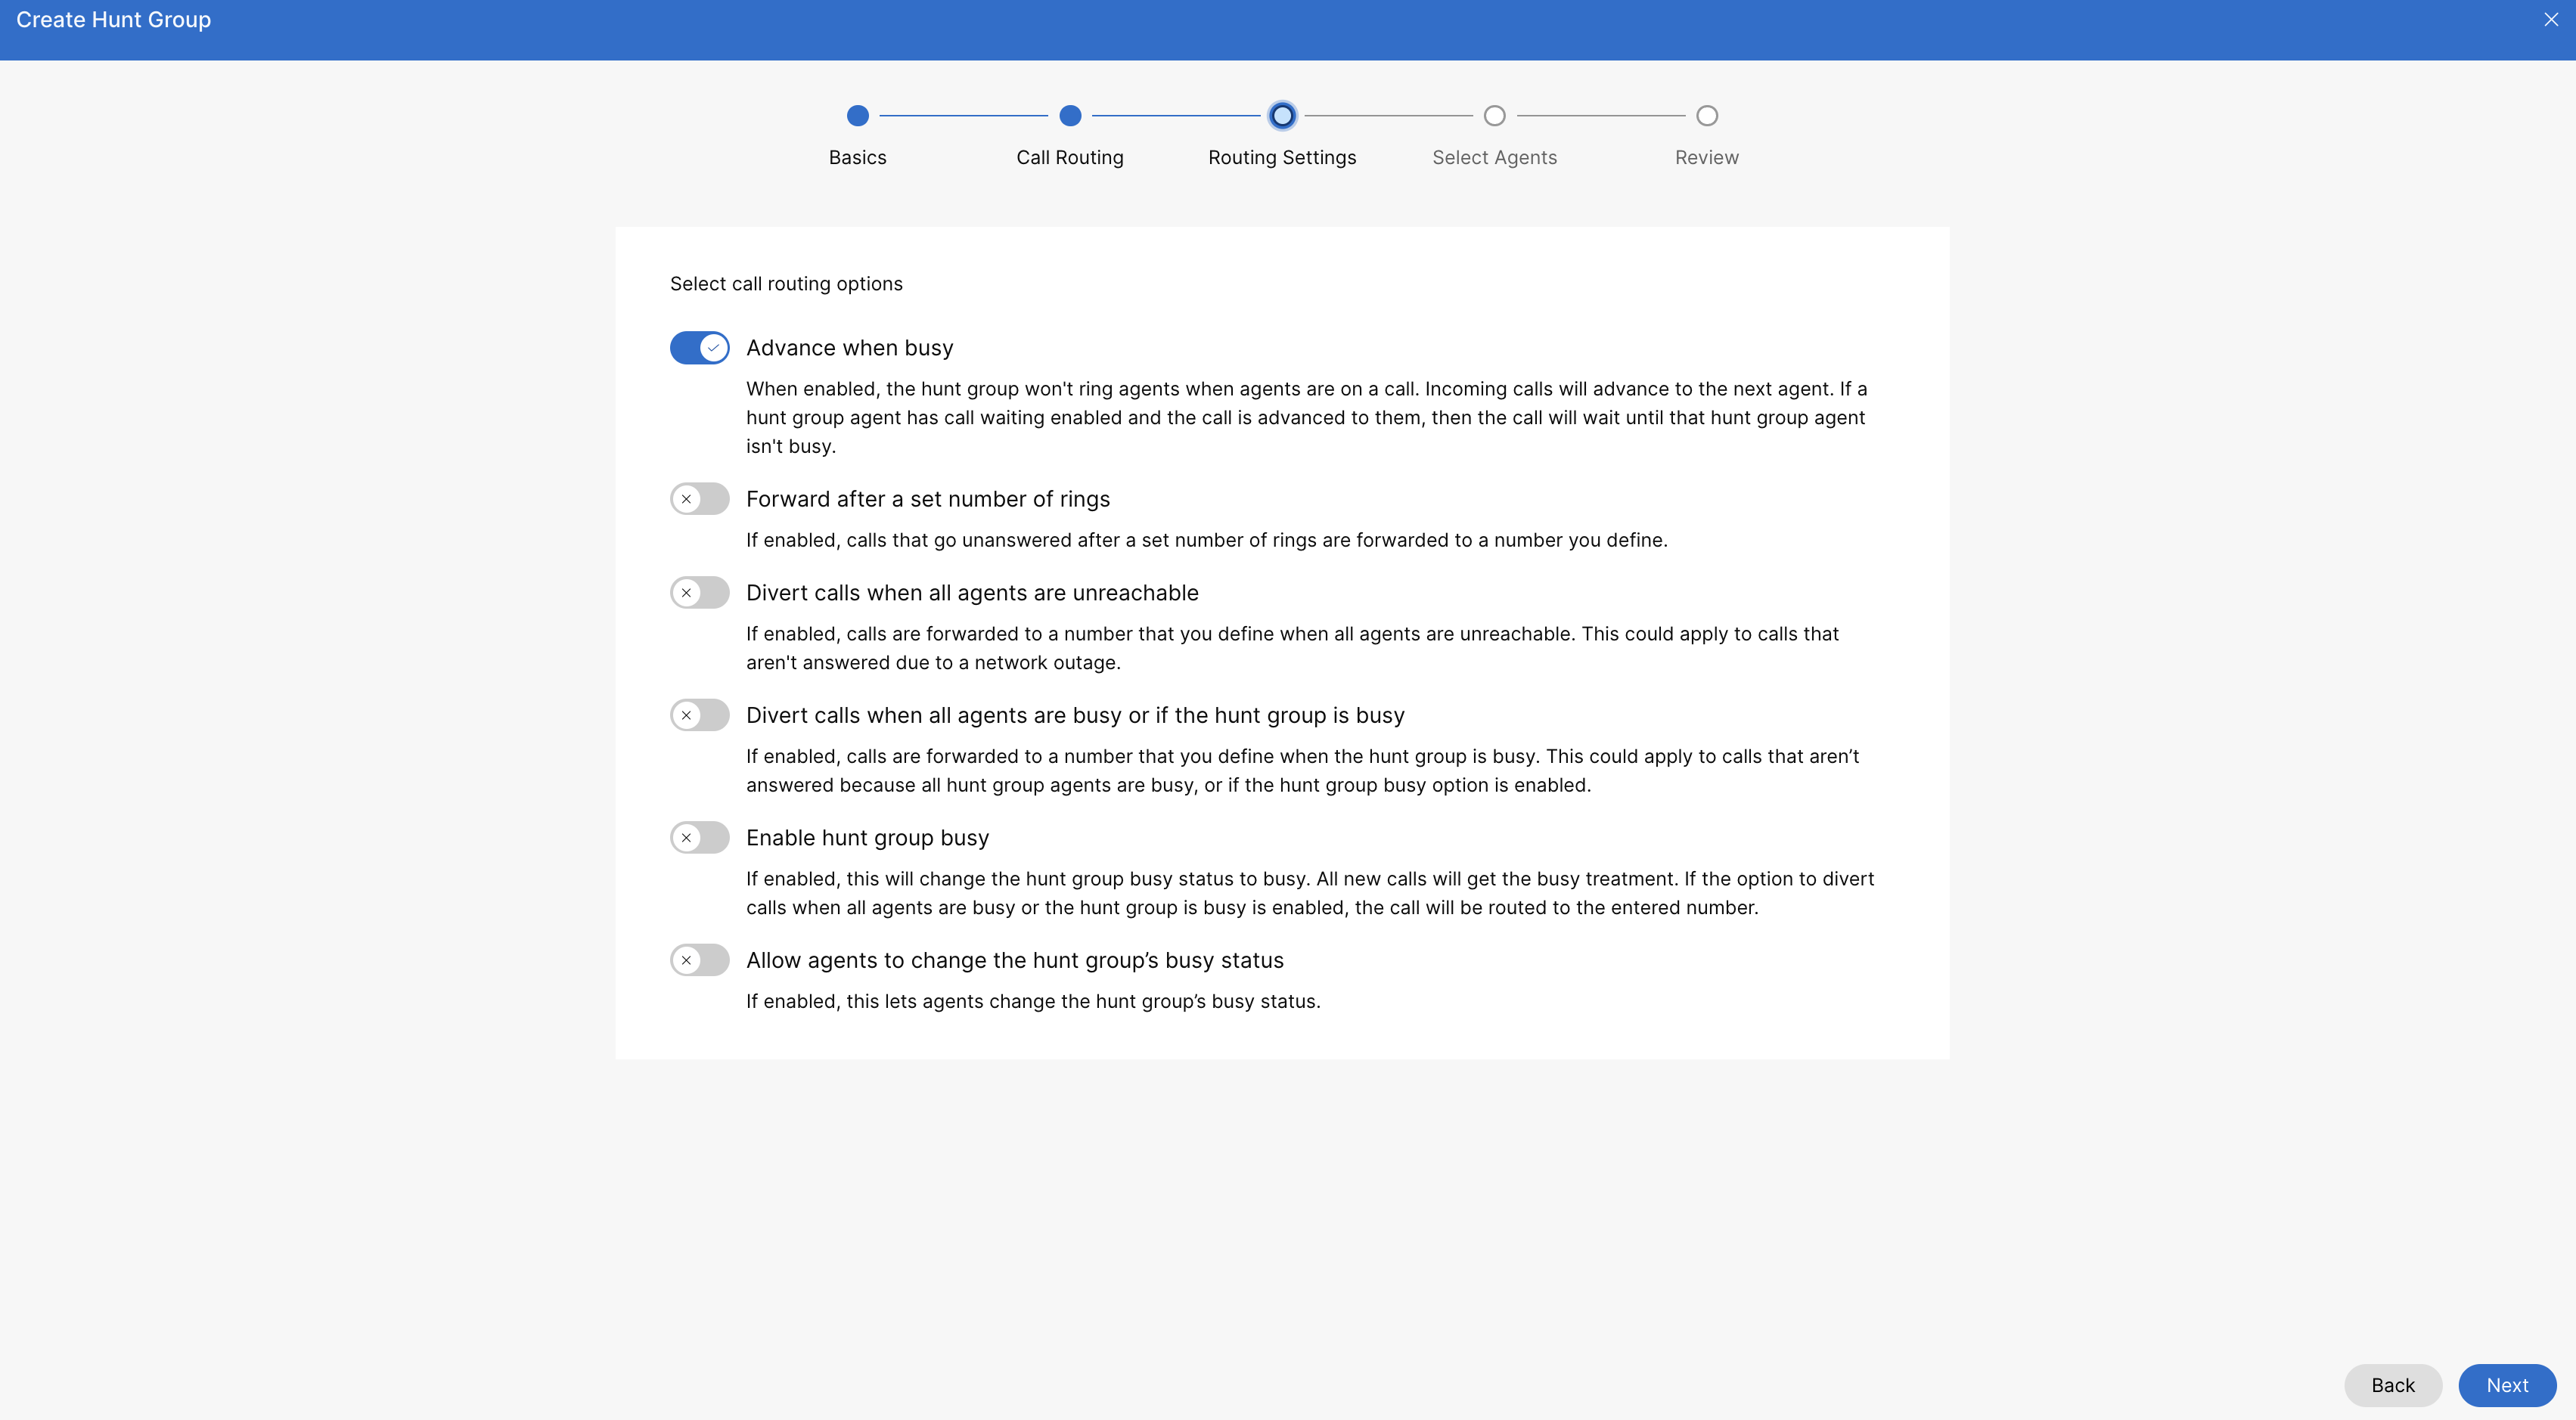
Nella pagina Impostazioni di routing, abilita una o più delle seguenti opzioni, se necessario, e fai clic su Avanti.
|
| 7 |
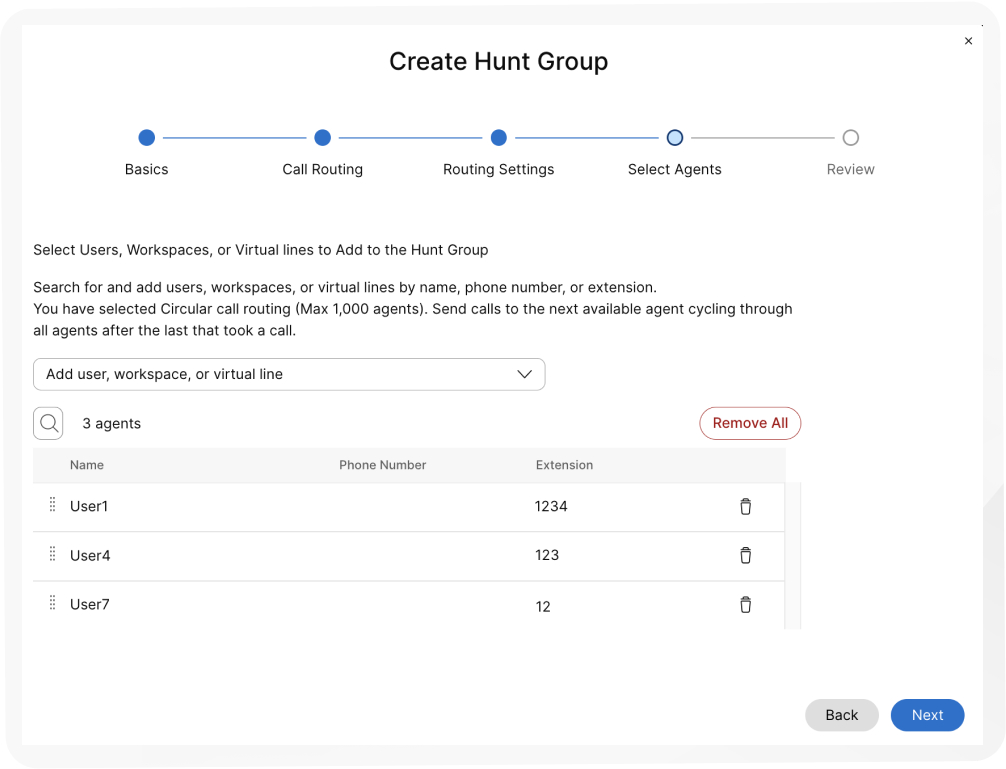
Nella pagina Seleziona agenti, cerca e aggiungi utenti, aree di lavoro o linee virtuali all'elenco chiamate e fai clic su Avanti. A seconda dell'opzione Instradamento chiamate scelta, aggiungi informazioni come l'assegnazione di una ponderazione percentuale a utenti, aree di lavoro o linee virtuali. Per l'instradamento circolare delle chiamate, trascina e rilascia utenti, aree di lavoro o linee virtuali nell'ordine della loro posizione in coda.
Se a un agente viene assegnato solo un interno, assicurarsi che la sua sede disponga di un numero principale. In assenza di un numero principale, le chiamate al gruppo di assistenza non vengono instradate all'operatore con accesso limitato all'interno. |
| 8 |
Nella pagina Revisione, controlla le impostazioni del tuo gruppo di caccia per assicurarti di aver inserito i dettagli corretti. |
| 9 |
Fai clic su Crea per creare il gruppo di caccia. |
Guarda questa dimostrazione video su come creare un nuovo gruppo di caccia nell'Hub di controllo.
Disabilita una gruppo di risposta
Con questa procedura, è possibile disabilitare una cartella creata gruppo di risposta.
| 1 | |
| 2 |
Vai a . |
| 3 |
Vai alla scheda Gruppo di caccia e fai clic su Gestisci. |
| 4 |
Seleziona un gruppo di caccia da disabilitare dall'elenco. |
| 5 |
Disattiva l'interruttore Abilita gruppo di caccia per disabilitare il gruppo di caccia. |
| 6 |
Fai clic su Salva. |
Modifica gruppo di risposta impostazioni generali
Modificare la lingua e le ID chiamante per ciascuna gruppo di risposta.
| 1 | |
| 2 |
Vai a . |
| 3 |
Vai alla scheda Gruppo di caccia e fai clic su . |
| 4 |
Seleziona il gruppo di caccia che desideri modificare. |
| 5 |
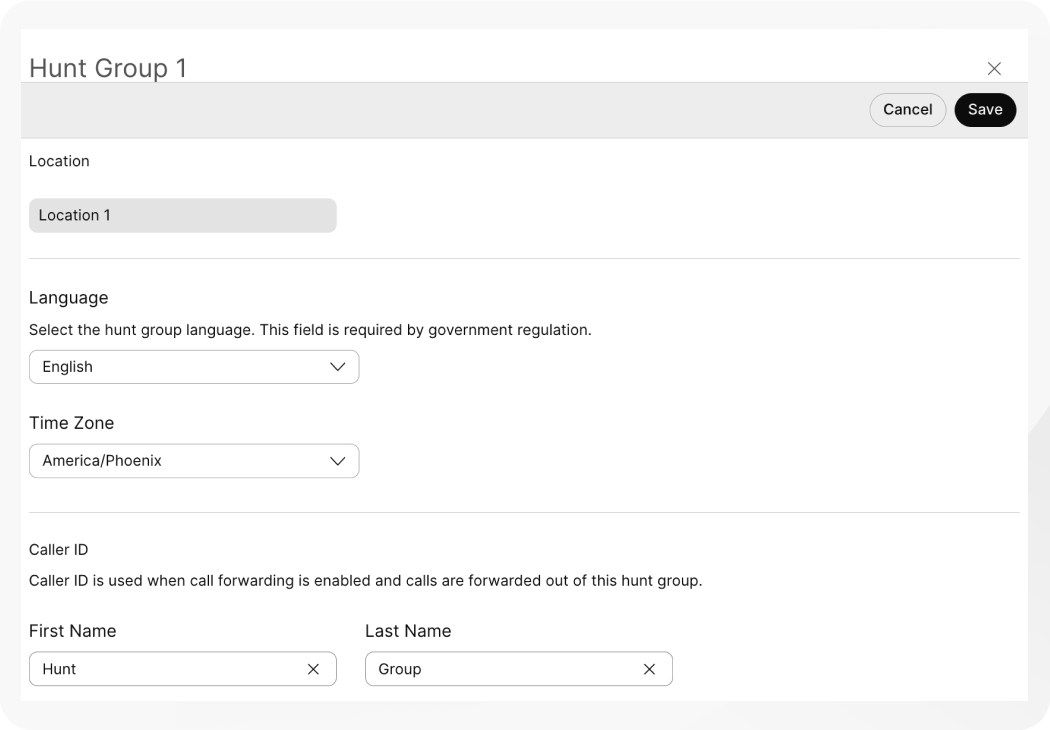
Fai clic su Impostazioni generali. |
| 6 |
Visualizza o modifica la Lingua dal menu a tendina Lingua. |
| 7 |
Visualizzare o modificare la fuso orario dal fuso orario elenco a discesa. |
| 8 |
Visualizzare o modificare il ID chiamante . ID chiamante chiamata viene utilizzata quando è abilitata l'inoltro delle chiamate e le chiamate vengono inoltrate da questo gruppo di risposta. |
| 9 |
Fare clic su Salva.
|
Modifica gruppo di risposta di telefono
Modifica i numeri di telefono, i numeri alternativi e assegna sequenze di suoneria distintive ai gruppi di ricerca.
| 1 | |
| 2 |
Vai a . |
| 3 |
Vai alla scheda Gruppo di caccia e fai clic su Gestisci. |
| 4 |
Seleziona un gruppo di caccia da modificare. |
| 5 |
Fare clic su Numero di telefono. |
| 6 |
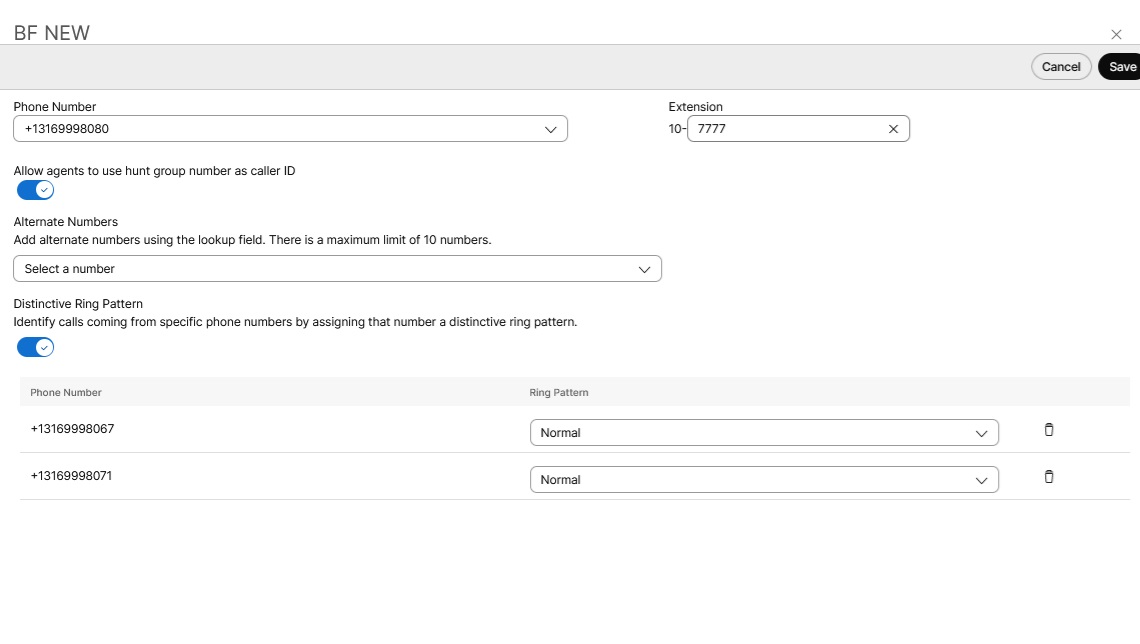
Modifica il numero di telefono e l'interno. Se hai lasciato vuoto il campo dell'interno durante la creazione del gruppo di ricerca, il sistema assegna automaticamente le ultime quattro cifre del numero di telefono come interno per tale gruppo. |
| 7 |
Attiva l'interruttore Consenti agli agenti di utilizzare il numero del gruppo di ricerca come ID chiamante per consentire agli agenti di utilizzare il numero del gruppo di ricerca come ID chiamante. Esiste una restrizione secondo cui sia la posizione del gruppo di caccia che quella dell'agente devono avere lo stesso provider PSTN, lo stesso paese e la stessa zona (questo vale solo per le località in India). Se è diverso, l'ID chiamante del gruppo di ricerca non viene visualizzato all'agente. Questa restrizione contribuisce a prevenire interruzioni delle chiamate, potenziali problemi di fatturazione e garantisce il rispetto delle normative nazionali in materia di telecomunicazioni. Esempi di utilizzo non valido di numeri di telefono tra località diverse:
|
| 8 |
Dal menu a tendina Numeri alternativi, cerca e aggiungi i numeri alternativi. È possibile aggiungere fino a 10 numeri alternativi. |
| 9 |
Attiva o disattiva Schema di suoneria distintivo. |
| 10 |
Fai clic su Salva.
|
Configura le impostazioni dell'agente per l'utente
Operazioni preliminari
-
L'amministratore di Control Hub abilita il numero di telefono da utilizzare come numero di telefono in uscita per gli agenti nella chiamata queue/hunt gruppo.
-
Dopo aver abilitato il numero di telefono, l'amministratore può impostare il numero di telefono in uscita degli agenti con lo specifico queue/hunt Gruppo CLID come da configurazione persistente.
- Gli agenti possono anche impostare una configurazione CLID temporanea utilizzando il codice FAC #80 per utilizzare la chiamata queue/hunt numero di telefono di gruppo come CLID visualizzato per la chiamata in uscita o #81 per l'ID chiamante predefinito in uscita come numero di telefono visualizzato come CLID.
| 1 | |
| 2 |
Vai a . |
| 3 |
Seleziona l'utente per il quale desideri configurare le impostazioni dell'agente. |
| 4 |
Fai clic su Chiamata e vai alla sezione Impostazioni agente. |
| 5 |
Fai clic su ID chiamante agente. È possibile impostare l'ID chiamante dell'agente sul proprio ID chiamante oppure su una coda di chiamate o un gruppo di ricerca specifici. |
| 6 |
Configura l'ID della coda di chiamate dell'agente o del gruppo di ricerca scegliendo tra le seguenti opzioni:
|
Configurare l'inoltro delle chiamate per una gruppo di risposta
| 1 | |
| 2 |
Vai a . |
| 3 |
Vai alla scheda Gruppo di caccia e fai clic su Gestisci. |
| 4 |
Seleziona un gruppo di caccia da modificare. |
| 5 |
Fare clic su Inoltro di chiamata. |
| 6 |
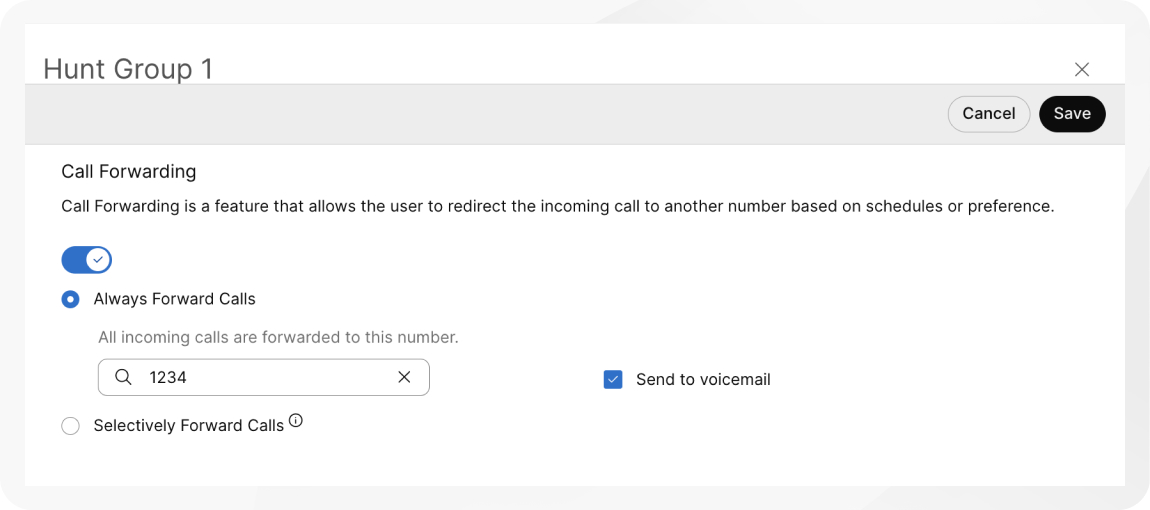
Attiva l'interruttore Inoltro di chiamata. |
| 7 |
Selezionare una delle seguenti opzioni:
|
| 8 |
Per Inoltra sempre le chiamate e Inoltra le chiamate in modo selettivo, assegna il numero al quale desideri inoltrare le chiamate.
Quando si sceglie Inoltra sempre o Inoltra selettivamente, è possibile anche selezionare Invia alla segreteria telefonica per inoltrare tutte le chiamate a una segreteria telefonica interna. La casella di controllo Invia alla segreteria telefonica è disabilitata quando viene inserito un numero esterno. |
| 9 |
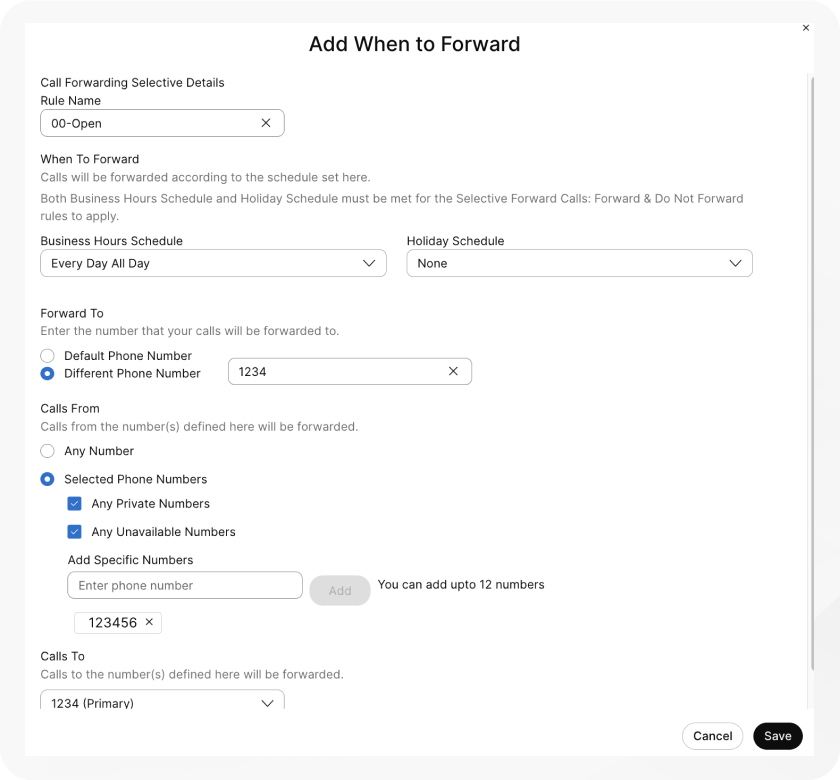
Per inoltrare le chiamate inmodo selettivo, creare una regola facendo clic su Aggiungi quando inoltrare o Aggiungi quando non lo è da inoltrare.
|
| 10 |
Creare un Nome regola. |
| 11 |
Per Quando inoltrare, selezionare un orario lavorativo e un orario festivo dal menu a tendina. È obbligatorio creare una nuova regola specifica per le festività. |
| 12 |
Per Inoltra a, selezionare almeno un'opzione da Numero di telefono predefinito o aggiungere un altro numero di telefono. |
| 13 |
Per Chiamate da, selezionare Qualsiasi numero o Numeri selezionati con almeno un'opzione tra le seguenti:
|
| 14 |
Per Chiamate a, seleziona un numero dal menu a tendina per inoltrare le chiamate ricevute su quel numero. |
| 15 |
Fai clic su Salva. |

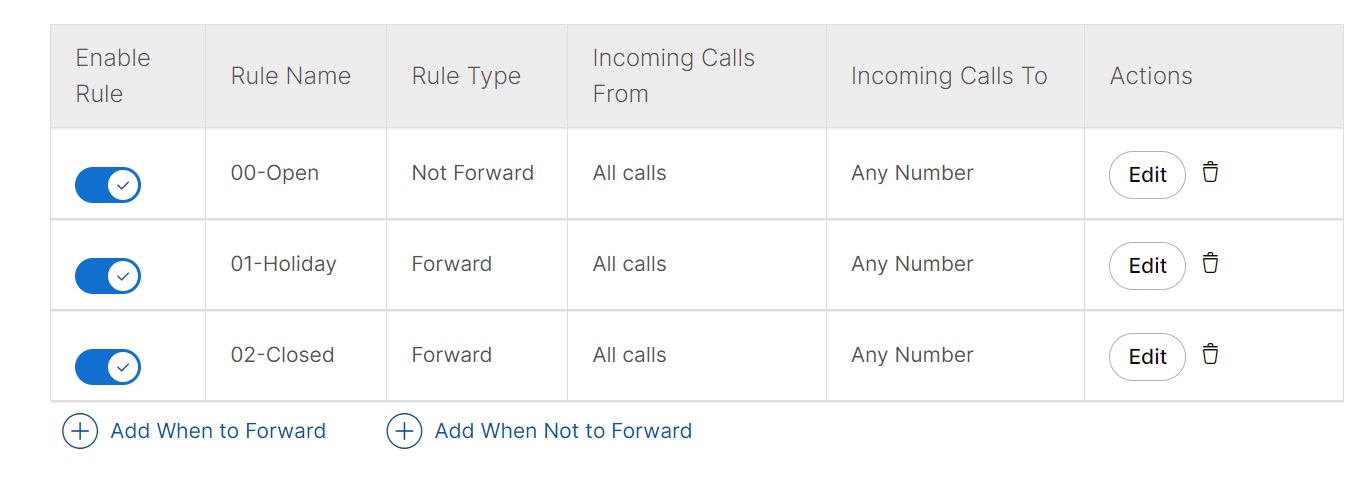
Le regole create per l'inoltro selettivo delle chiamate vengono elaborate in base ai seguenti criteri:
-
Nella tabella, le regole sono ordinate in base al carattere che compone il nome della regola. Esempio: 00_rule, 01_rule, e così via.
-
La regola "Non inoltrare" ha sempre la precedenza sulla regola "Inoltra".
-
Le regole vengono elaborate in base all'ordine in cui sono elencate nella tabella.
-
È possibile creare più regole. Tuttavia, se una regola viene soddisfatta, il sistema non verifica più la regola successiva. Se desideri che la regola specifica venga verificata per prima, ti suggeriamo di aggiornare il nome della regola aggiungendo dei numeri. Ad esempio: Se si desidera che la regola relativa ai giorni festivi venga verificata prima della regola relativa agli orari di chiusura dell'attività, allora assegnare alla regola il nome 01-Festività e 02-Chiuso.
Per ulteriori informazioni sulle funzionalità di base e sugli esempi di inoltro selettivo delle chiamate, consultare Configurare l'inoltro selettivo delle chiamate per le chiamate Webex.
Operazioni successive
Una volta creata una regola, è possibile abilitare o disabilitare una regola utilizzando l'interruttore accanto alla regola nella tabella. È inoltre possibile modificare o eliminare una regola in qualsiasi momento facendo clic su Modifica o  per eliminarla.
Aggiungere o eliminare utenti, aree di lavoro e linee virtuali in un gruppo di ricerca esistente
| 1 | |
| 2 |
Vai a . |
| 3 |
Vai alla scheda Gruppo di caccia e fai clic su Gestisci. |
| 4 |
Seleziona un gruppo di caccia da modificare. |
| 5 |
Fai clic su Agenti. |
| 6 |
Dal menu a discesa Aggiungi utente, spazio di lavoro o linea virtuale, seleziona gli utenti, gli spazi di lavoro o le linee virtuali che desideri aggiungere. Per eliminare i membri del gruppo di caccia, fai clic su |
| 7 |
Fai clic su Salva. |
Modifica del gruppo di risposta di inoltro chiamata
Modificare il modello del modello di gruppo di risposta tra le opzioni disponibili.
| 1 | |
| 2 |
Vai a . |
| 3 |
Vai alla scheda Gruppo di caccia e fai clic su Gestisci. |
| 4 |
Seleziona un gruppo di caccia da modificare. |
| 5 |
Fare clic su Schema di instradamento delle chiamate. |
| 6 |
Modificare le seguenti opzioni: Se si modifica lo schema di instradamento delle chiamate da uno schema che supporta 1.000 membri del gruppo di caccia a uno che ne supporta solo 100 o 50, verranno mantenuti solo i primi 100 o 50 membri. Viene richiesto di confermare questa modifica quando viene apportata la modifica.
|
| 7 |
Fai clic su Aggiungi utente, spazio di lavoro o linea virtuale per modificare l'elenco degli agenti. |
| 8 |
Fai clic su Salva. |
Modifica delle gruppo di risposta di inoltro chiamata
| 1 | |
| 2 |
Vai a . |
| 3 |
Vai alla scheda Gruppo di caccia e fai clic su Gestisci. |
| 4 |
Seleziona un gruppo di caccia da modificare. |
| 5 |
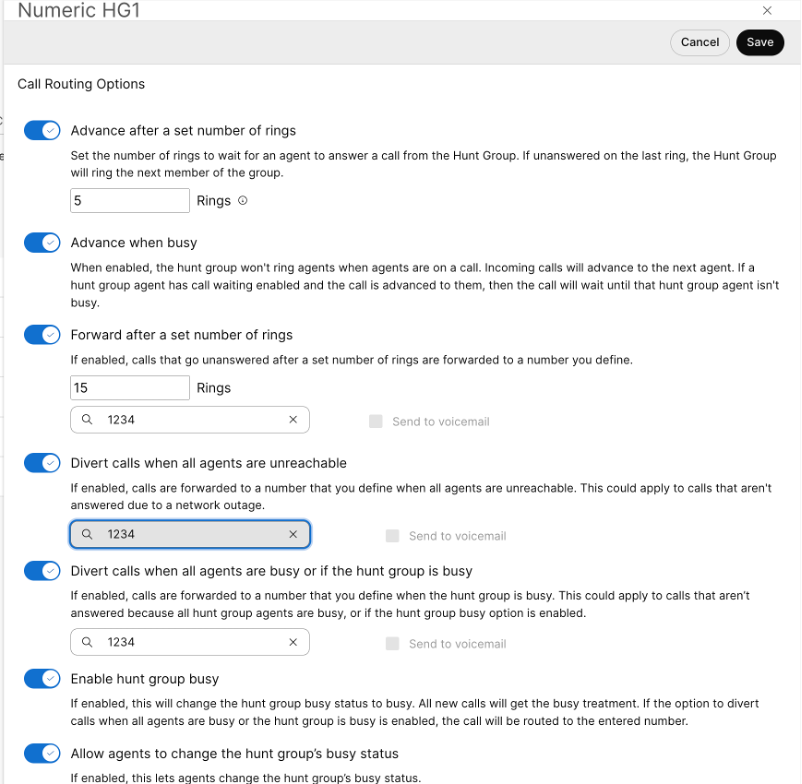
Fare clic su Opzioni di instradamento delle chiamate. |
| 6 |
Utilizzare i interruttori per attivare o disattivare ciascuna di queste funzioni.
|
Gestione in blocco dei gruppi di caccia
È possibile aggiungere e gestire i gruppi di risposta in massa utilizzando un gruppo di risposta CSV.
Limitazioni note e requisiti
-
Prima di caricare il file CSV gruppo di risposta, accertarsi di leggere L'opzione Provisioning di massa e gli Webex Calling tramite CSV per comprendere le convenzioni CSV.
-
È possibile esportare i gruppi di caccia correnti per aggiungere, eliminare o modificare il set di dati esistente, oppure esportare un set di esempio di gruppi di caccia. Una volta apportate le modifiche, è possibile caricare il file tramite la funzione di caricamento in blocco.
-
Esportazione di un file CSV in formato ZIP: Quando si esportano dati in un file CSV, il numero di record può essere superiore a 1000. In questi casi, viene scaricato il file ZIP, che contiene l'intero set di record in un singolo file CSV. Una cartella separata contenente tutti i dati è suddivisa in più file CSV con meno di 1000 record ciascuno. Questi file vengono generati per fare in modo che gli amministratori importino rapidamente qualsiasi aggiornamento e caricamento.
-
Esporta un nuovo file CSV per acquisire le informazioni più recenti relative ai campi ed evitare errori durante l'importazione delle modifiche.
-
-
È importante conoscere le colonne obbligatorie e facoltative, nonché le informazioni da fornire durante la compilazione del modello CSV. Nella tabella seguente è possibile trovare i campi specifici per il file CSV del gruppo di caccia.
-
Il numero massimo di gruppi di caccia per ciascuna località è di 1.000.
-
Il numero massimo di righe è 1.000 (intestazione esclusa).
-
Gli agenti possono essere utenti o spazi di lavoro. Per gli utenti, inserisci l'indirizzo e-mail dell'utente. Per gli spazi di lavoro, inserisci il nome dello spazio di lavoro.
-
Ogni riga può contenere un massimo di 50 agenti. Per ulteriori informazioni, vedi Aggiunta o modifica di più di 50 agenti alla volta.
Preparare il file CSV
Utilizza questa tabella per visualizzare i campi obbligatori e facoltativi e determinare quali sono necessari quando aggiungi o modifichi gruppi di caccia in blocco.
Le colonne sono campi obbligatori o facoltativi. Questo varia a seconda che si utilizzi il file CSV per aggiungere un nuovo gruppo di caccia o per modificare un gruppo di caccia esistente.
|
Colonna |
Obbligatorio o opzionale (Aggiungere una gruppo di risposta) |
Obbligatorio o opzionale (Modificare una gruppo di risposta) |
Descrizione |
Valori supportati |
|---|---|---|---|---|
|
Nome |
Obbligatorio |
Obbligatorio |
Inserisci il nome del gruppo di caccia. I nomi dei gruppi di caccia all'interno della stessa area devono essere univocamente identificabili. Se i gruppi di caccia si trovano in luoghi diversi, possono avere lo stesso nome. |
Esempio: Gruppo di risposta San Jose Lunghezza caratteri: 1–30 |
|
Numero di telefono |
Campo obbligatorio (se il campo interno è vuoto) |
Opzionale |
Immettere il numero gruppo di risposta un altro numero di telefono. È necessario disporre di un numero di telefono o di un'estensione. |
Il sistema consente solo numeri E.164 per l'importazione in formato CSV. Esempio: +12815550100 Il numero di telefono deve essere presente nella scheda Numeri in Control Hub. |
|
Estensione |
Campo obbligatorio (se il numero di telefono è vuoto) |
Opzionale |
Inserire l'gruppo di risposta interno. È necessario disporre di un numero di telefono o di un'estensione. |
Interno da due a dieci cifre. 00-999999 |
|
Posizione |
Obbligatorio |
Obbligatorio |
Inserire la posizione in cui assegnare questa chiamata gruppo di risposta. |
Esempio: San Jose La posizione deve essere riportata nella scheda Posizioni di Control Hub. |
|
Opzione ID chiamante diretto |
Opzionale. |
Opzionale. |
Seleziona se desideri utilizzare il nome visualizzato o un nome personalizzato come ID chiamante. |
_NOME DA VISUALIZZARE NOME PERSONALIZZATO_ Per impostazione predefinita è selezionato DISPLAY_NOME. |
|
NOME PERSONALIZZATO |
Opzionale. |
Opzionale. |
Inserisci un nome personalizzato per l'identificativo del chiamante. I caratteri Unicode sono supportati. |
Stringa |
|
Chiamare per nome |
Opzionale. |
Opzionale. |
Inserisci il nome con cui puoi chiamare questo gruppo di Hunt. Sono supportati i caratteri ASCII. |
Stringa |
|
Lingua |
Opzionale. |
Opzionale. |
Inserire la lingua dell'annuncio per il gruppo di risposta. |
Esempio: en_us |
|
Fuso orario |
Opzionale. |
Opzionale. |
Immettere la gruppo di risposta del fuso orario. Questo fuso orario si applica alle pianificazioni applicate a questo gruppo di risposta. |
Esempio: America o Chicago Lunghezza in caratteri: 1–127 |
|
Sequenza di inoltro chiamata |
Obbligatorio |
Opzionale |
Immettere il percorso gruppo di risposta di indirizzamento del gruppo. Seleziona una delle politiche supportate. |
CIRCOLARE, REGOLARE, SIMULTANEA, UNIFORME, SPESSO |
|
Avanza dopo l'abilitazione del numero di squilli |
Opzionale. |
Opzionale. |
Abilitare o disabilitare le chiamate in modo che avanzino dopo un numero impostato di squilli. Se questa opzione è abilitata, inserire il numero di squilli nella colonna successiva. |
TRUE, FALSE |
|
Avanza dopo la serie di squilli |
Opzionale. |
Opzionale. |
Inserisci il numero di squilli da attendere affinché l'agente attualmente assegnato risponda prima di assegnare la risposta al successivo agente disponibile. |
Intervallo: 1–20 |
|
Avanza se occupato abilita |
Opzionale. |
Opzionale. |
Il gruppo di caccia non chiama i membri già impegnati in un'altra chiamata e inoltra la chiamata al membro successivo disponibile. Se si disattiva questa impostazione e la chiamata viene inoltrata a un membro occupato con la funzione di avviso di chiamata abilitata, il sistema riproduce un tono di avviso di chiamata finché il membro non rifiuta la chiamata o non diventa inattivo. |
TRUE, FALSE |
|
Inoltro dopo attivazione squilli |
Opzionale. |
Opzionale. |
Abilitare o disabilitare le chiamate senza risposta da inoltrare a un numero di telefono designato dopo una serie di squilli. |
TRUE, FALSE |
|
Inoltra dopo squilli |
Opzionale. |
Opzionale. |
Inserire il numero di squilli da attendere prima di inoltrare al numero progettato. |
Gamma: 1–99 |
|
Inoltra numero |
Opzionale. |
Opzionale. |
Inserire il numero di telefono a cui vengono inoltrate le chiamate non risposta. |
Il sistema consente solo numeri E.164 per l'importazione in formato CSV. Esempio: +12815550100 Il numero di telefono deve essere presente nella scheda Numeri in Control Hub. |
|
Inoltro dopo squillo segreteria telefonica abilita |
Opzionale. |
Opzionale. |
Abilitare o disabilitare le chiamate senza risposta inoltrate a una casella vocale dopo un numero impostato di squilli. |
TRUE, FALSE |
|
Gruppo di caccia occupato abilitato |
Opzionale. |
Opzionale. |
Utilizzare questa colonna per abilitare o disabilitare il gruppo di caccia occupato. |
TRUE, FALSE |
|
Consenti agli agenti di modificare lo stato di occupazione del gruppo di caccia |
Opzionale. |
Opzionale. |
Attiva o disattiva l'interruttore per consentire agli agenti di modificare lo stato di occupazione del gruppo di ricerca. |
TRUE, FALSE |
|
Devia quando occupato Abilita |
Opzionale. |
Opzionale. |
Attiva o disattiva l'inoltro delle chiamate in arrivo a un numero di telefono predefinito. |
TRUE, FALSE |
|
Deviare la chiamata quando il numero è occupato |
Opzionale. |
Opzionale. |
Inserisci il numero di telefono al quale inoltrare le chiamate quando le linee sono occupate. |
Esempio: +12815550100 |
|
Inoltra la chiamata in caso di occupato alla segreteria telefonica. |
Opzionale. |
Opzionale. |
Attiva o disattiva il trasferimento delle chiamate in arrivo a una segreteria telefonica predefinita. |
TRUE, FALSE |
|
Deviare quando irraggiungibile abilitare |
Opzionale. |
Opzionale. |
Attiva o disattiva l'inoltro delle chiamate non raggiungibili a un numero di telefono predefinito. |
TRUE, FALSE |
|
Deviare quando numero irraggiungibile |
Opzionale. |
Opzionale. |
Inserisci il numero di telefono al quale inoltrare le chiamate in caso di irreperibilità. |
Esempio: +12815550100 |
|
Deviare quando è abilitata la segreteria telefonica irraggiungibile |
Opzionale. |
Opzionale. |
Attiva o disattiva l'inoltro delle chiamate non raggiungibili a una segreteria telefonica predefinita. |
TRUE, FALSE |
|
Abilitazione gruppo di risposta |
Opzionale. |
Opzionale. |
Utilizzare questa colonna per attivare o disattivare il gruppo di risposta. |
ABILITATO, DISABILITATO, abilitato, disabilitato |
|
Suoneria differenziata numero alternativo - Abilita |
Opzionale. |
Opzionale. |
Abilita o disabilita la suoneria differenziata per i numeri alternativi. Se questa opzione è abilitata, inserisci lo squillo nella colonna Modello di suoneria numeri alternativi. |
TRUE, FALSE |
|
Azione numeri alternativi |
Opzionale. |
Opzionale. |
Inserisci ADD per aggiungere i numeri alternativi elencati in questa riga. Inserisci REMOVE per rimuovere i numeri alternativi elencati nella riga. Se inserisci SOSTITUISCI, rimuoverai tutti i numeri alternativi inseriti in precedenza e li sostituirai con i numeri alternativi che stai aggiungendo solo in questa riga. |
AGGIUNGI, RIMUOVI, SOSTITUISCI |
|
Azione agente |
Opzionale. |
Opzionale. |
Inserisci ADD per aggiungere gli agenti elencati in questa riga. Inserisci RIMUOVI per rimuovere l'agente elencato nella riga. Se inserisci SOSTITUISCI, rimuoverai tutti gli agenti precedentemente inseriti e li sostituirai con gli agenti che stai aggiungendo solo in questa riga. |
AGGIUNGI, RIMUOVI, SOSTITUISCI |
|
Consenti agli agenti di utilizzare il numero del gruppo di ricerca come ID chiamante |
Opzionale. | Opzionale. |
Attiva l'interruttore per consentire agli agenti di utilizzare il numero del gruppo di ricerca come ID chiamante |
TRUE, FALSE |
|
Alternativa numero 1, Alternativa numero 2… Numero alternativo 10 |
Opzionale. |
Opzionale. |
Inserisci i numeri alternativi da assegnare al gruppo di caccia. |
Esempio: 1112223333 Il numero di telefono deve essere riportato nella scheda Numeri di Control Hub. Lunghezza in caratteri: 1–23 |
|
Schema alternativo dell'anello numero 1, Schema ad anello alternativo numero 2… Schema alternativo dell'anello numero 10 |
Opzionale. |
Opzionale. |
Se la suoneria differenziata è abilitata per i numeri alternativi, scegli il modello di suoneria differenziata. Scegli una delle opzioni supportate. |
NORMAL, LONG_LONG, SHORT_SHORT_LONG, SHORT_LONG_SHORT |
|
Agent1 ID, Agent2 ID… Agent50 ID |
Opzionale. |
Opzionale. |
Inserire gli agenti che si desidera assegnare al gruppo di risposta. Gli agenti possono essere utenti o spazi di lavoro. Per gli utenti, inserisci l'indirizzo e-mail dell'utente. Per gli spazi di lavoro, inserisci il nome dello spazio di lavoro. |
Esempio: test@example.com Lunghezza in caratteri: 1–161 |
|
Agent1 Weight, Agent2 Weight... Agent50 Weight |
Opzionale. |
Opzionale. |
Se il criterio di inoltro chiamata per il gruppo di risposta viene in base al peso, inserire la percentuale di peso dell'agente. |
Intervallo: 0-100 |
Aggiungi o modifica più di 50 agenti alla volta
Ciascuna riga può contenere un massimo di 50 agenti e il peso percentuale di indirizzamento chiamata associato (se applicabile). A gruppo di risposta un massimo di 1.000 agenti assegnati. Per aggiungere o modificare più di 50 agenti utilizzando il file CSV, segui questi passaggi.
| 1 |
Inserire i 50 agenti e la percentuale di peso instradamento chiamata associata (se applicabile), che si desidera aggiungere o modificare nella prima riga per la gruppo di risposta si sta aggiungendo o modificando. |
| 2 |
Nella riga successiva, devi solo inserire le informazioni nelle seguenti colonne per aggiungere o modificare altri agenti:
Puoi lasciare vuote tutte le altre colonne. |
| 3 |
Continua a fare questo finché non avrai aggiunto tutti gli agenti che devi aggiungere o modificare. Un gruppo di risposta può avere un massimo di 1.000 agenti. |
Aggiungi in massa gruppi di risposta
Per aggiungere gruppi di caccia in blocco, scarica e compila un modello CSV vuoto.
Non è possibile modificare in blocco le impostazioni di inoltro delle chiamate per un gruppo di ricerca. Per modificare l'inoltro di chiamata per un gruppo di ricerca, vedere Configurare l'inoltro di chiamata per un gruppo di ricerca.
| 1 | |
| 2 |
Vai a . |
| 3 |
Vai alla scheda Gruppo di caccia. Nel messaggio Preferisci creare il gruppo di caccia in blocco, fai clic su Apri l'editor in blocco. |
| 4 |
Viene visualizzata la finestra Gestisci gruppo di caccia. Selezionare una posizione per il risposta per assente di risorse che si desidera aggiungere. |
| 5 |
Fai clic su Scarica dati o Scarica modello .csvper verificare che il file CSV sia formattato correttamente, assicurandoti di compilare le informazioni richieste. |
| 6 |
Carica il file CSV trascinandone la selezione o facendo clic su Scegli un file. |
| 7 |
Fai clic su Visualizza importazione history/Tasks per visualizzare lo stato dell'importazione CSV e verificare se si sono verificati errori. Una volta caricati correttamente, è possibile fare clic sulla pagina Visualizza attività per dettagli per visualizzare lo stato delle modifiche. |
Modifica in massa gruppi di risposta
Per modificare in blocco i gruppi di caccia, scarica i dati CSV correnti e apporta le modifiche necessarie al foglio di calcolo.
Non è possibile modificare in blocco le impostazioni di inoltro delle chiamate per un gruppo di ricerca. Per modificare l'inoltro di chiamata per un gruppo di ricerca, vedere Configurare l'inoltro di chiamata per un gruppo di ricerca.
| 1 | |
| 2 |
Vai a . |
| 3 |
Vai alla scheda Gruppo di caccia e nel messaggio Preferisci creare il gruppo di caccia in blocco, fai clic su Apri l'editor in blocco. |
| 4 |
Selezionare una posizione per gruppo di risposta si desidera modificare. |
| 5 |
Fai clic su Scarica dati o Scarica modello .csvper verificare che il file CSV sia formattato correttamente, assicurandoti di compilare le informazioni richieste. Se i dati relativi al gruppo di caccia selezionato superano il limite massimo (più di 10.000 righe per ciascun file CSV), riceverai un file compresso contenente più file CSV. |
| 6 |
Apporta le modifiche necessarie al foglio di calcolo. |
| 7 |
Carica il file CSV modificato trascinandone la selezione o facendo clic su Scegli un file. |
| 8 |
Fai clic su Visualizza importazione history/Tasks per visualizzare lo stato dell'importazione CSV e verificare se si sono verificati errori. Una volta completato il caricamento, puoi fare clic su Vedi pagina Attività per dettagli per visualizzare lo stato delle modifiche. |


