- Home
- /
- Article

Thanks for your feedback.

Integrating Cisco Wireless Phone 840 and 860
 In this article
 Feedback?
The Cisco Wireless Phone 840 and 860 provide a mobile collaboration platform that allows users to manage tasks and communicate easily. The Cisco Wireless Phone 840 and 860 offer the power and performance of a secure, enterprise-grade smartphone, while delivering an easy-to-manage device through Cisco’s collaboration solution.
Overview of Cisco Wireless Phone 840 and 860
Like other devices powered by Android, your phone is app-driven, not menu-driven. You tap icons to open applications. Your phone includes several different Cisco apps that allow you to:
-
Place and receive phone calls.
-
Put calls on hold.
-
Transfer calls.
-
Have conference calls.
-
Forward your calls.
-
Monitor your phone battery life.
-
Customize your phone buttons.
-
If configured, provide emergency safety features such as alarms and motion monitoring.
-
If configured, send group broadcasts.
Like other network devices, system administrators configure and manage these phones. Based on the needs of your organization, administrators may limit certain features that may be available on consumer-grade Android devices.
Contact your system administrator for information about the configured capabilities of your phone within your organization.
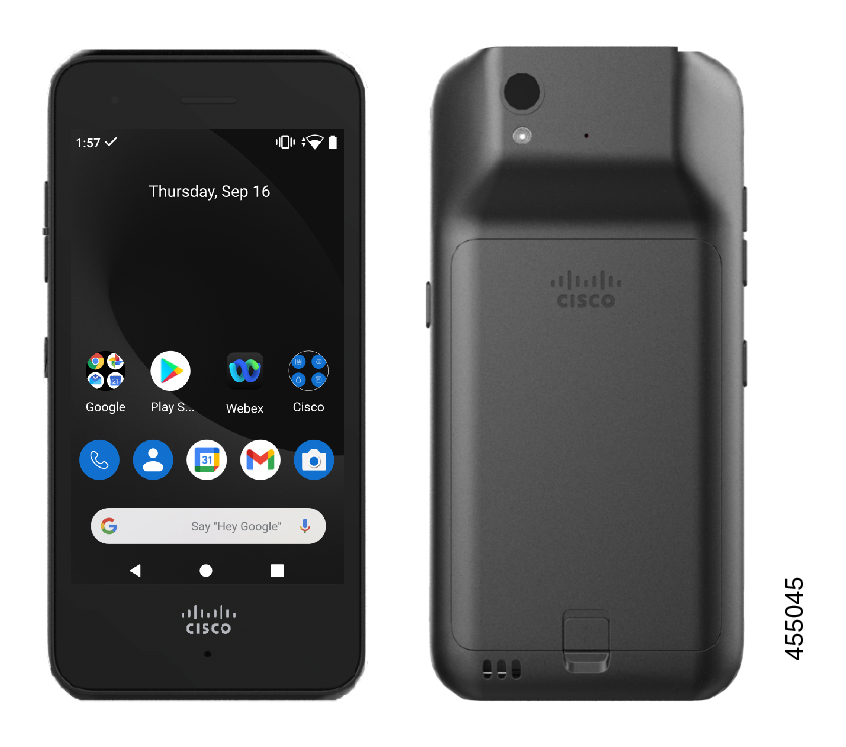
The following figure shows the Cisco Wireless Phone 840 on the left and the Cisco Wireless Phone 840S on the right. The Cisco Wireless Phone 840S includes a barcode scanner.
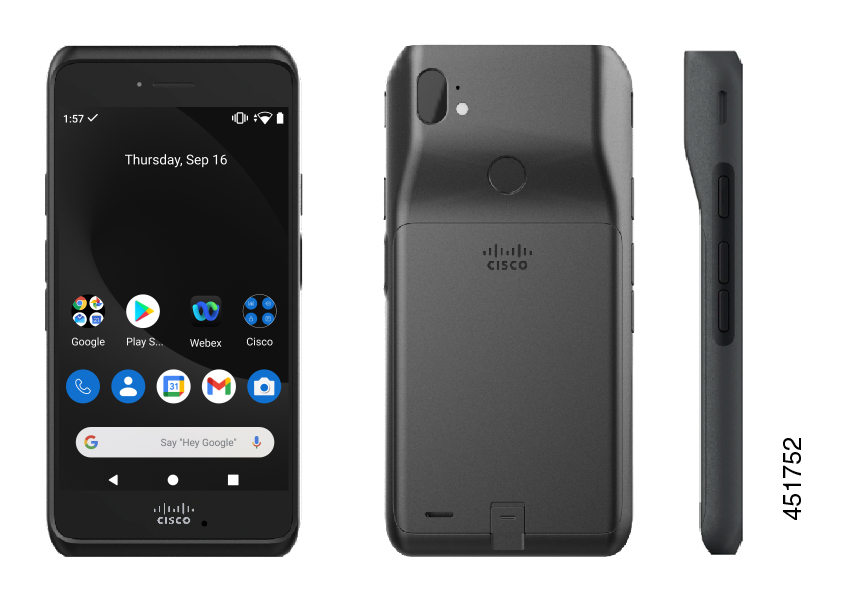
The following figure shows the Cisco Wireless Phone 860 on the left and the Cisco Wireless Phone 860S on the right. The Cisco Wireless Phone 860S includes a barcode scanner.
Some physical characteristics of the Cisco Wireless Phone 840 and 860 include:
-
4.0 in. (10.2 cm) touchscreen for the 840 phones
-
5.2 in. (13.2 cm) touchscreen for the 860 phones
-
8 MP rear and 5 MP front camera for the 840 phones
-
13 megapixels (MP) rear and 8 MP front camera for the 860 phones
-
Damage resistant Gorilla™ glass
-
Recessed display for screen protection
-
Tolerance of antibacterial and alcohol-based wipes
-
Latex- and lead-free
-
Shockproof and vibration-proof
-
USB-C interface
-
USB On-the-Go (OTG) 2.0 interface for use with a desktop charger or multicharger
-
Cisco Wireless Phone 840 has Ingress Protection 65 (IP65) with resistance to dust and water spray from a nozzle.
-
Cisco Wireless Phone 860 has Ingress Protection 68 (IP68) with resistance to dust, drops, and liquids.
-
Chargeable with a USB, desktop charger, or multicharger
For more details about the phones, see the Product data sheet.
Administrators must ensure that the wireless LAN is configured per the Cisco Wireless Phone 840 and 860 Wireless LAN Deployment Guide.
To know the features and functionalities of the phone, see the Cisco Wireless Phone 860 and 860S quick reference guide and Cisco Wireless Phone 840 and 860 user guide.
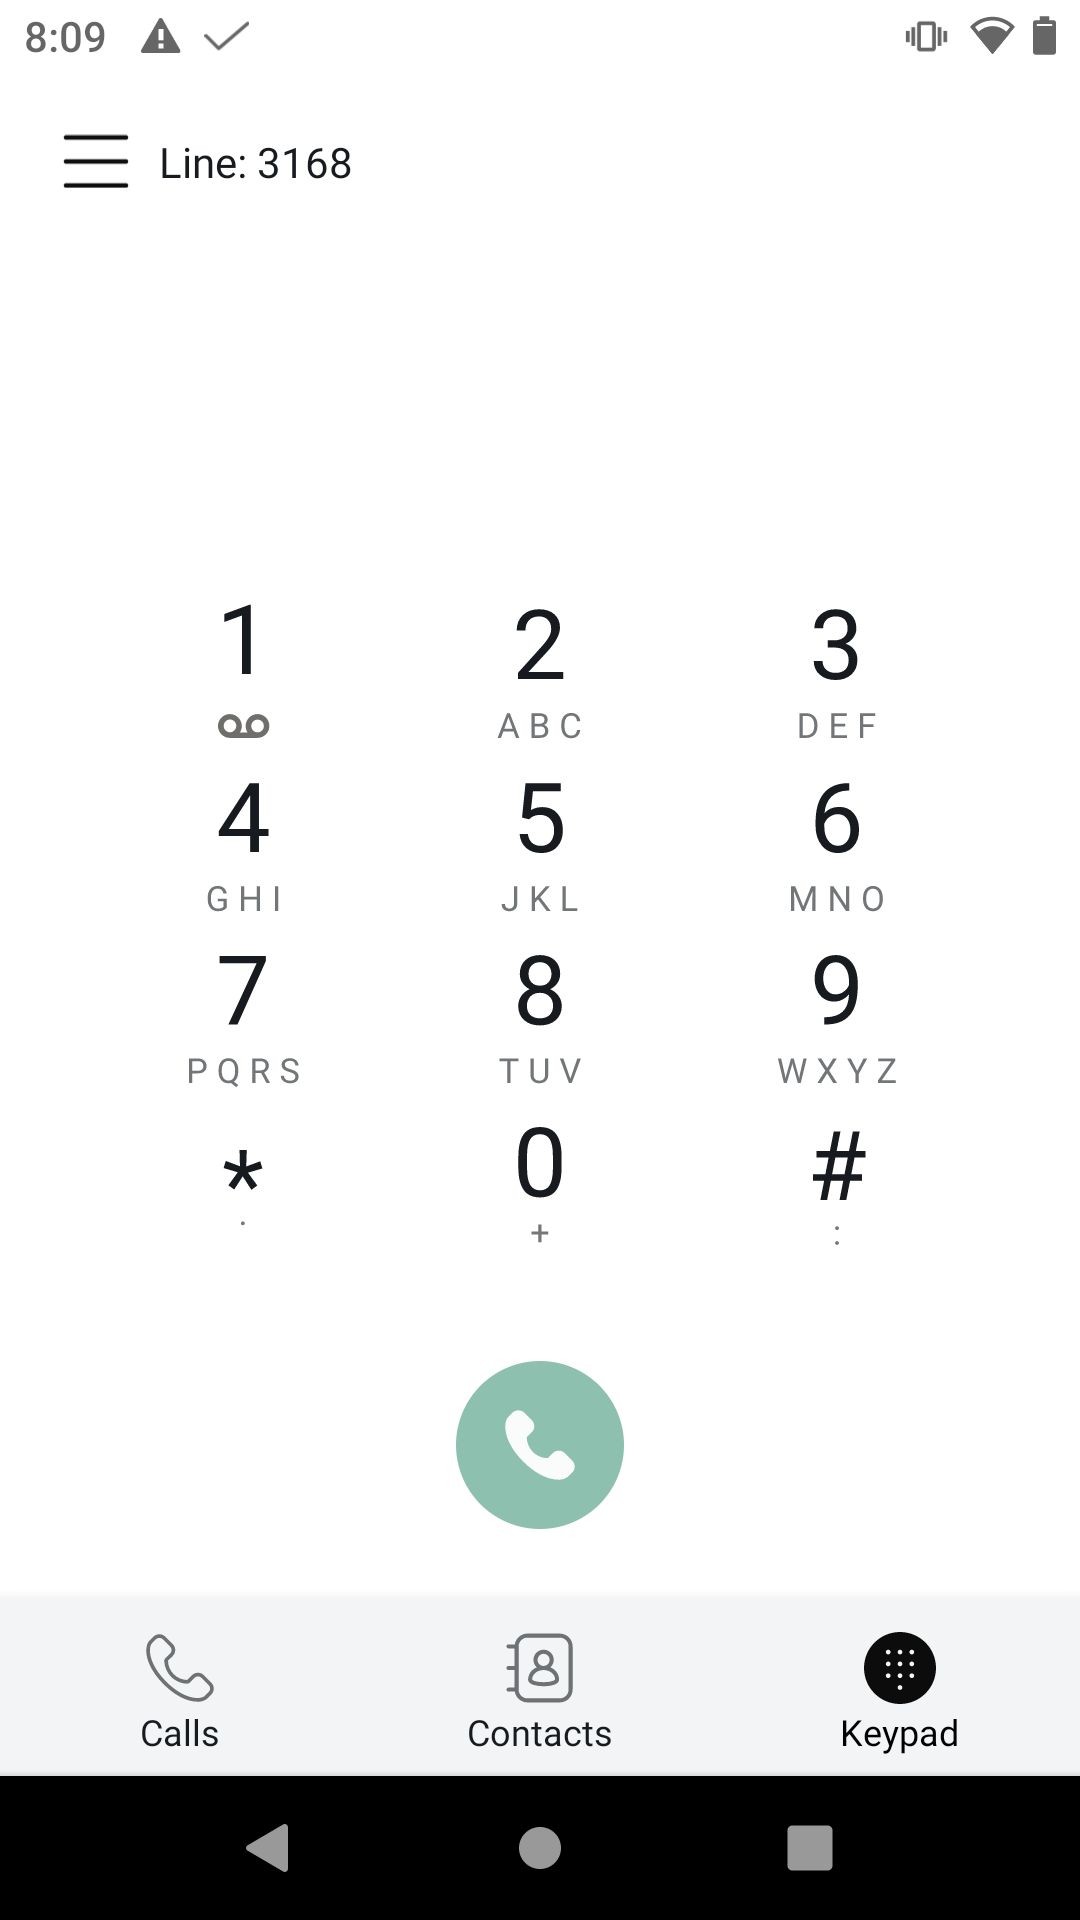
Cisco Phone app overview
The Cisco Phone app ![]() provides phone call functionality.
provides phone call functionality.
Your phone may not function if there is a power failure, since the phone relies on the Wi-Fi network to transmit calls. If the wireless system is down, the Wi-Fi icon on your phone grays out. There may be a time delay between the system failure and the appearance of the registration failure icon. Check with your administrator to see if the wireless system has any protection from power outages.
Access the Cisco Phone app
You can quickly access the Cisco Phone
![]() app from the home launcher screen.
app from the home launcher screen.
If the Cisco Phone app is the only app on your smart launcher, then it automatically opens when you turn on the phone.
|
From the home launcher screen, tap the Cisco Phone
|
Cisco Phone app tabs
When you open the Cisco Phone
![]() app, the Keypad
app, the Keypad
![]() tab opens by default.
tab opens by default.
|
Tab |
Description |
|---|---|
Calls |
Use to view recent and missed calls. |
Contacts |
Use to access and add contacts. |
Keypad |
Use to make calls. |
Voicemail |
Use to access your voicemail messages. This tab appears only if the administrator enables visual voicemail. If the administrator enables and then disables visual voicemail, the Voicemail tab remains on the Cisco Phone app; however, it will not function. |
Add and assign phones to a user
With Control Hub, you can assign devices to users for personal usage and then register those devices to the cloud.
The devices listed here support Webex Calling. You can register Cisco Wireless Phone 840 and 860 using a MAC address.
Ensure that the minimum firmware version for 840 or 860 devices on Webex Calling is 1.6. Also, upgrade the phones that are on earlier firmware versions to 1.6 or later.
The firmware upgrade tool updates the firmware and doesn’t provide a Webex Calling configuration file. Provision the phone in Control Hub using the MAC address and manually add the phone to Webex Calling.
| 1 |
From the customer view in https://admin.webex.com, go to and then click Add Device. You can also add a phone to a user in the user's profile. See how in Manage a device for a user section. |
| 2 |
Choose Existing User, enter the phone's owner, either part of the username or the user's real name, choose the user from the results, and then click Next. |
| 3 |
Choose the device from the drop-down list, and then click Next. |
| 4 |
Choose By MAC Address—This option lets you enter the MAC address of the device. A phone's MAC address must be a unique entry. If you enter a MAC address for a phone that's already registered or you make a mistake when you enter the number, an error message appears. Then click Save. Limitations may apply when using third-party devices. |
What to do next
Onboard devices to Webex Calling
Upgrade the Cisco 840 and 860 devices that you receive in the factory to the latest firmware to support Webex Calling. You can generate a QR code which contains the Wi-Fi credentials and server address for the firmware. The phone scans the QR code to start the firmware upgrade process.
Use this procedure to provision the phone to download the required firmware.
Before you begin
The Cisco Wireless phone upgrade tool upgrades the phone to the minimum supported 1.6.0 version for Webex Calling. If the phone is on 1.6.0 or later version, then you can factory reset the phone and follow the steps on the phone to add the wireless connection. Follow these steps on the phone to onboard and register to Webex Calling.
| 1 |
Access the https://webexphoneupgrade.cisco.com/qr portal. |
| 2 |
Provision the sites Wi-Fi SSID and password. |
| 3 |
Leave the default values for Load Server, unless using a local server to host the firmware. 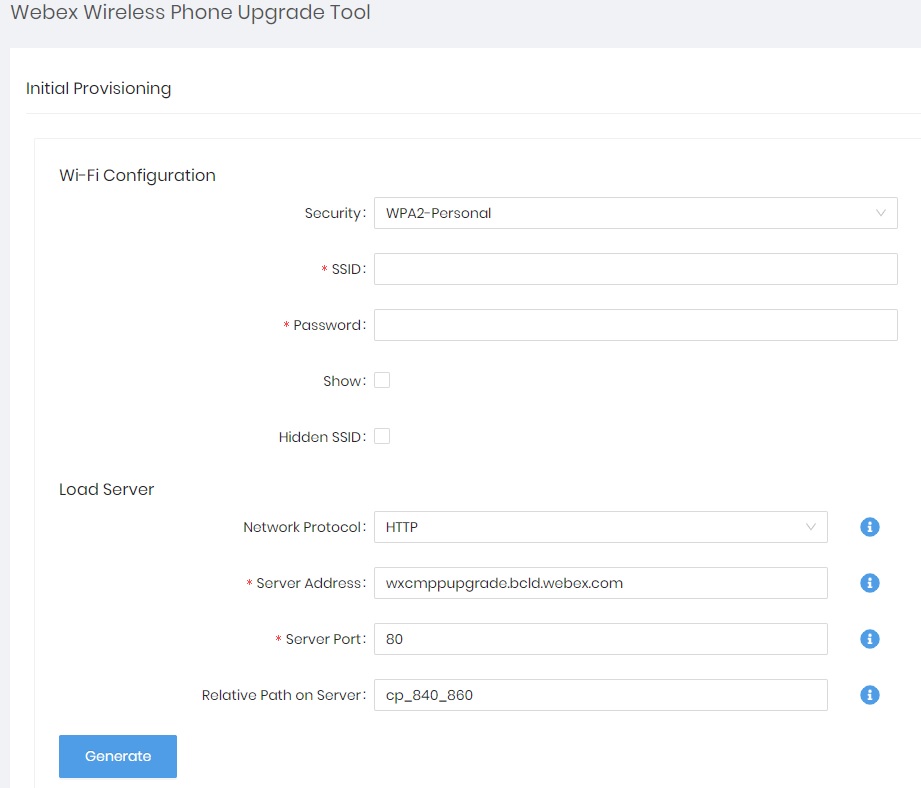
|
| 4 |
Click the Generate button to generate the QR code. 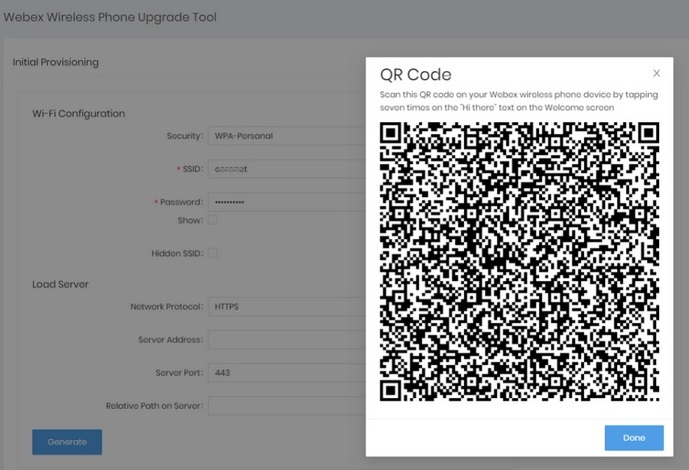
|
| 5 |
On the phone's Welcome screen, tap the screen seven times on the “Hi there” text to get access to the camera and scan a QR code. |
| 6 |
Allow the firmware download to complete. It takes around 20 minutes to complete the download. |
| 7 |
The phone factory resets after the firmware download completes. |
| 8 |
From the Welcome screen, follow the instructions to set up the phone. |
Manage a device for a user
You can add, remove, reboot, or check activation for the devices that are assigned to users within your organization. This can be helpful to view and manage devices in the users screen, when needed.
| 1 |
From the customer view in https://admin.webex.com, go to Users. |
| 2 |
Select the user to modify and click Devices. |
| 3 |
To add a device to this user, click Add Device. If the user is already assigned a device, and you want to add another device, click the |
| 4 |
To modify an existing device, select the device name. Here you can view and edit device settings, delete the device, reboot the device, or create a new activation code for the device, if applicable. For more information about configuring phone settings, see Configure and Update Phone Settings. |
| 5 |
Click Actions to manage the device. Actions help to apply configuration changes or update firmware for the MPP devices. The Actions tab has these options:
|
 icon next to
 General troubleshooting
General troubleshooting
The following table provides general troubleshooting information.
|
Problem |
Solution |
|---|---|
|
You’re not in a call and the phone goes black and displays the message: Close proximity detected. |
Your phone has a proximity sensor at the top right. When this sensor is blocked, the phone screen is black. The sensor is normally blocked by the face when the earpiece is used to listen to a caller. If you’re not in a call and you see the message: Close proximity detected. The sensor may be covered with a finger or paper or something else that blocks light. If there’s no apparent blockage, clean the area of the sensor. |
|
While using a standard headset, you experience a scratchy or intermittent signal. |
The headset connector may be dirty. If available, blow canned air into the connector to clear debris. Always point canned air orientation at glancing angles away from your face and eyes and always wear safety goggles or glasses when performing this procedure. Do not use air compressors on the connectors, since they apply too much force. |
|
Third Party Application Conflicts |
Third party application interference can be eliminated by factory reset and reregistration of a problematic phone. For more details about the factory reset, see Restoring Factory Defaults in the Cisco Wireless Phone 840 and 860 Deployment Guide. |
Capture a screenshot on the phone
When troubleshooting, it may be helpful to have a screenshot of the phone.
An alternate way to capture a screenshot on the phone is to press the Power and Volume down buttons at the same time.
| 1 |
Press and hold the Power button. |
| 2 |
Tap Screenshot. A notification briefly pops to the foreground and then appears in the notification drawer.
|
| 3 |
Tap the notification to Share, Edit, or Delete the screenshot. Unless you delete a screenshot, you can also locate it in the Files
|
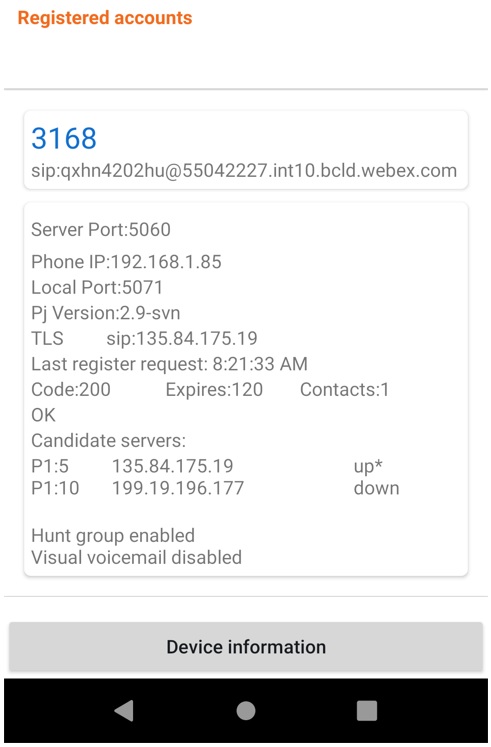
Create a problem report from the phone
If you experience a problem with your phone, you can create a bundle of log reports that can help the system administrator troubleshoot the issue. It may take several minutes to generate the problem report and log files. When the phone vibrates twice, you know that the report is complete.
If your phone's web browser is enabled, you can download the log bundle files to give to the system administrator.
| 1 |
Access the Cisco Phone
|
| 2 |
Tap the Drawer menu. |
| 3 |
Tap Cisco Phone Status, and collect the Phone IP address and tap the Left Arrow. |
| 4 |
Tap the Drawer menu. |
| 5 |
Tap Report problem. This step takes several minutes to generate the file (a triangle with an exclamation point indicates that generation is in progress).
|
| 6 |
Tap the Drawer menu. While the PRT report generation is in progress, the phone flashes a red light. |
| 7 |
Access the phone's web browser http://<Phone IP Address> after the log generation completes.
|
| 8 |
From the phone's web browser, access the Device Logs tab. |
| 9 |
Click on the top-most log file in the list, to download the log file on your computer. |
| 10 |
Share the log file with your administrator. |
| 11 |
After the phone vibrates twice, contact your system administrator to provide a description of the issue and approximate time. |