- Головна
- /
- Стаття

Підготовка Webex Go
 У цій статті
 Надіслати відгук?
Webex Go перетворює власний мобільний пристрій користувача на пристрій Webex Calling. Увімкніть Webex Go, додавши та призначивши номер телефону користувачеві.
Ви налаштовуєте Webex Go, додаючи номер телефону до розташування як тип номера мобільного телефону, а потім призначаючи номер користувачеві для активації послуги.
Перш ніж налаштовувати Webex Go, переконайтеся, що ви виконуєте всі попередні вимоги. Докладніше див. Необхідні умови для Webex Go.
Користувачі повинні придбати номер телефону з підтримкою Webex Calling та підписку на мобільний зв’язок у сертифікованого оператора мобільного зв’язку. Сертифікованих постачальників перелічено на сторінці Тип підключення у Центрі керування.
Щоб увімкнути Webex Go для користувача в Центрі керування, виконайте такі дії:
- Визначте постачальників Webex Go, яких підтримує ваша організація.
- Додайте номер мобільного телефону від підтримуваного постачальника до відповідного місця.
- Призначте користувачеві номер мобільного телефону.
Щоб отримати додаткові відомості про Webex Go, див. Що таке Webex Go.
Визначте постачальника
Ви можете знайти підтримуваних постачальників Webex Go за адресою: https://admin.webex.com/calling/pstn/providers.
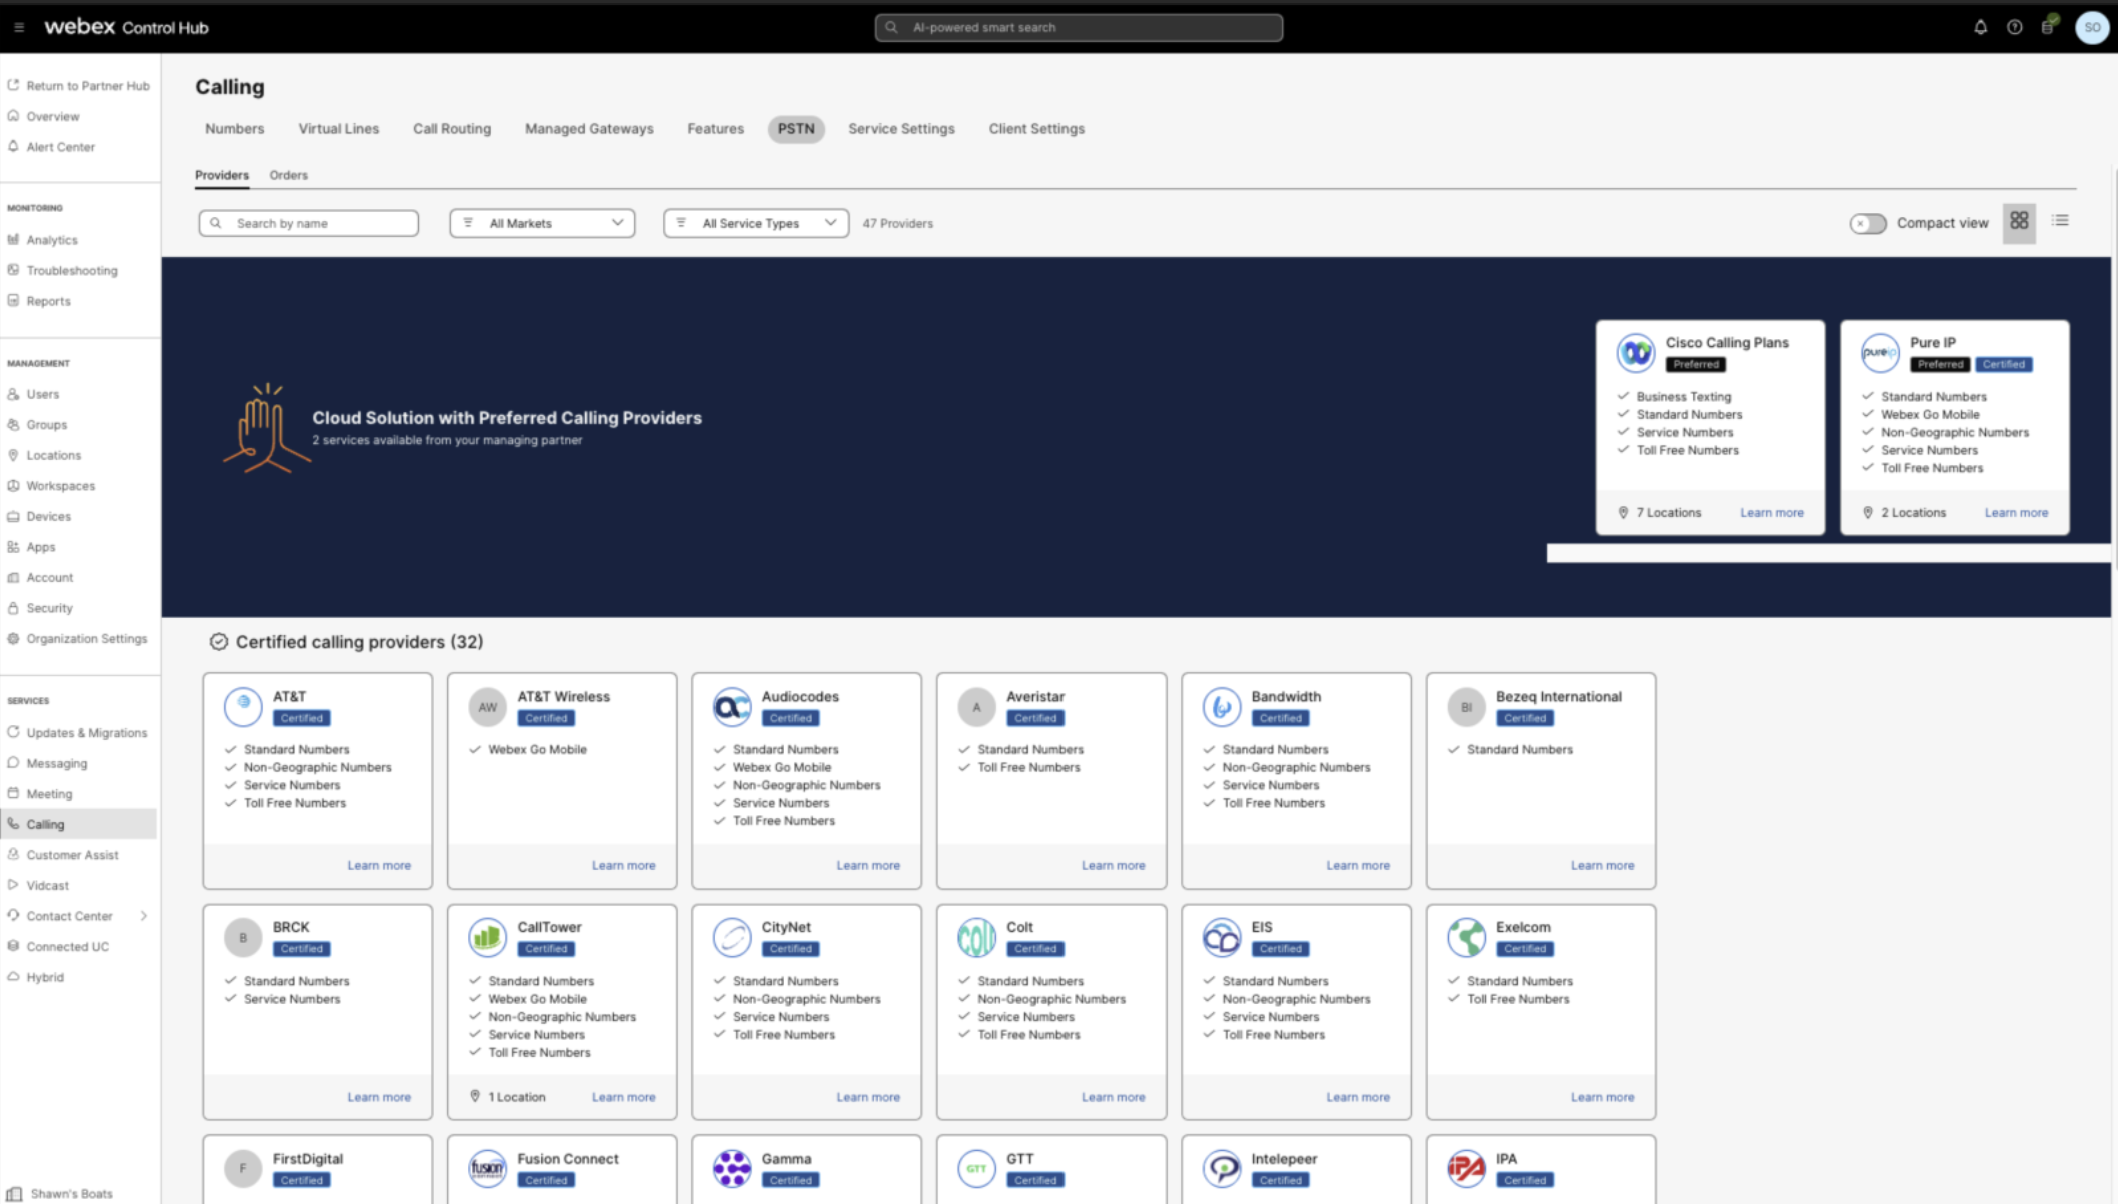
На екрані постачальників відображаються різні картки постачальників із підтримуваними типами послуг. Розділ Постачальники містить :
- Бажані постачальники послуг дзвінків
- Сертифіковані постачальники послуг дзвінків
- Постачальники послуг викликів
У режимі перегляду картки відображається список постачальників PSTN, доступних клієнтам Webex Calling, перед налаштуванням розташування PSTN. У режимі перегляду PSTN відображаються як постачальники, так і замовлення.
Ви можете застосувати фільтр пошуку, щоб звузити вміст за типом послуги та ринком. Використовуйте опцію перемикання, щоб переключитися з режиму перегляду «Компактний» на режим «Табличний ». У режимі Компактний розмір картки змінюється, щоб відображати відомості про постачальника без інформації про послугу.
Натисніть Дізнатися більше на картці, щоб переглянути інформацію про постачальника. Скористайтеся полем пошуку, щоб вибрати постачальника послуг PSTN на основі уподобань Cisco щодо ділових відносин, таких як Сертифікований постачальник та Постачальник послуг виклику.
Відомості про постачальника включають наступне:
- Короткий опис постачальника
- Список локацій, налаштованих для цього постачальника
- Список ринків, де постачальник доступний для підтримуваних послуг
Якщо у клієнта є місця розташування PSTN, де не налаштовано послуги викликів, відображається панель дій Вибрати цього постачальника. Виберіть цей параметр, щоб налаштувати послуги для розташування PSTN.
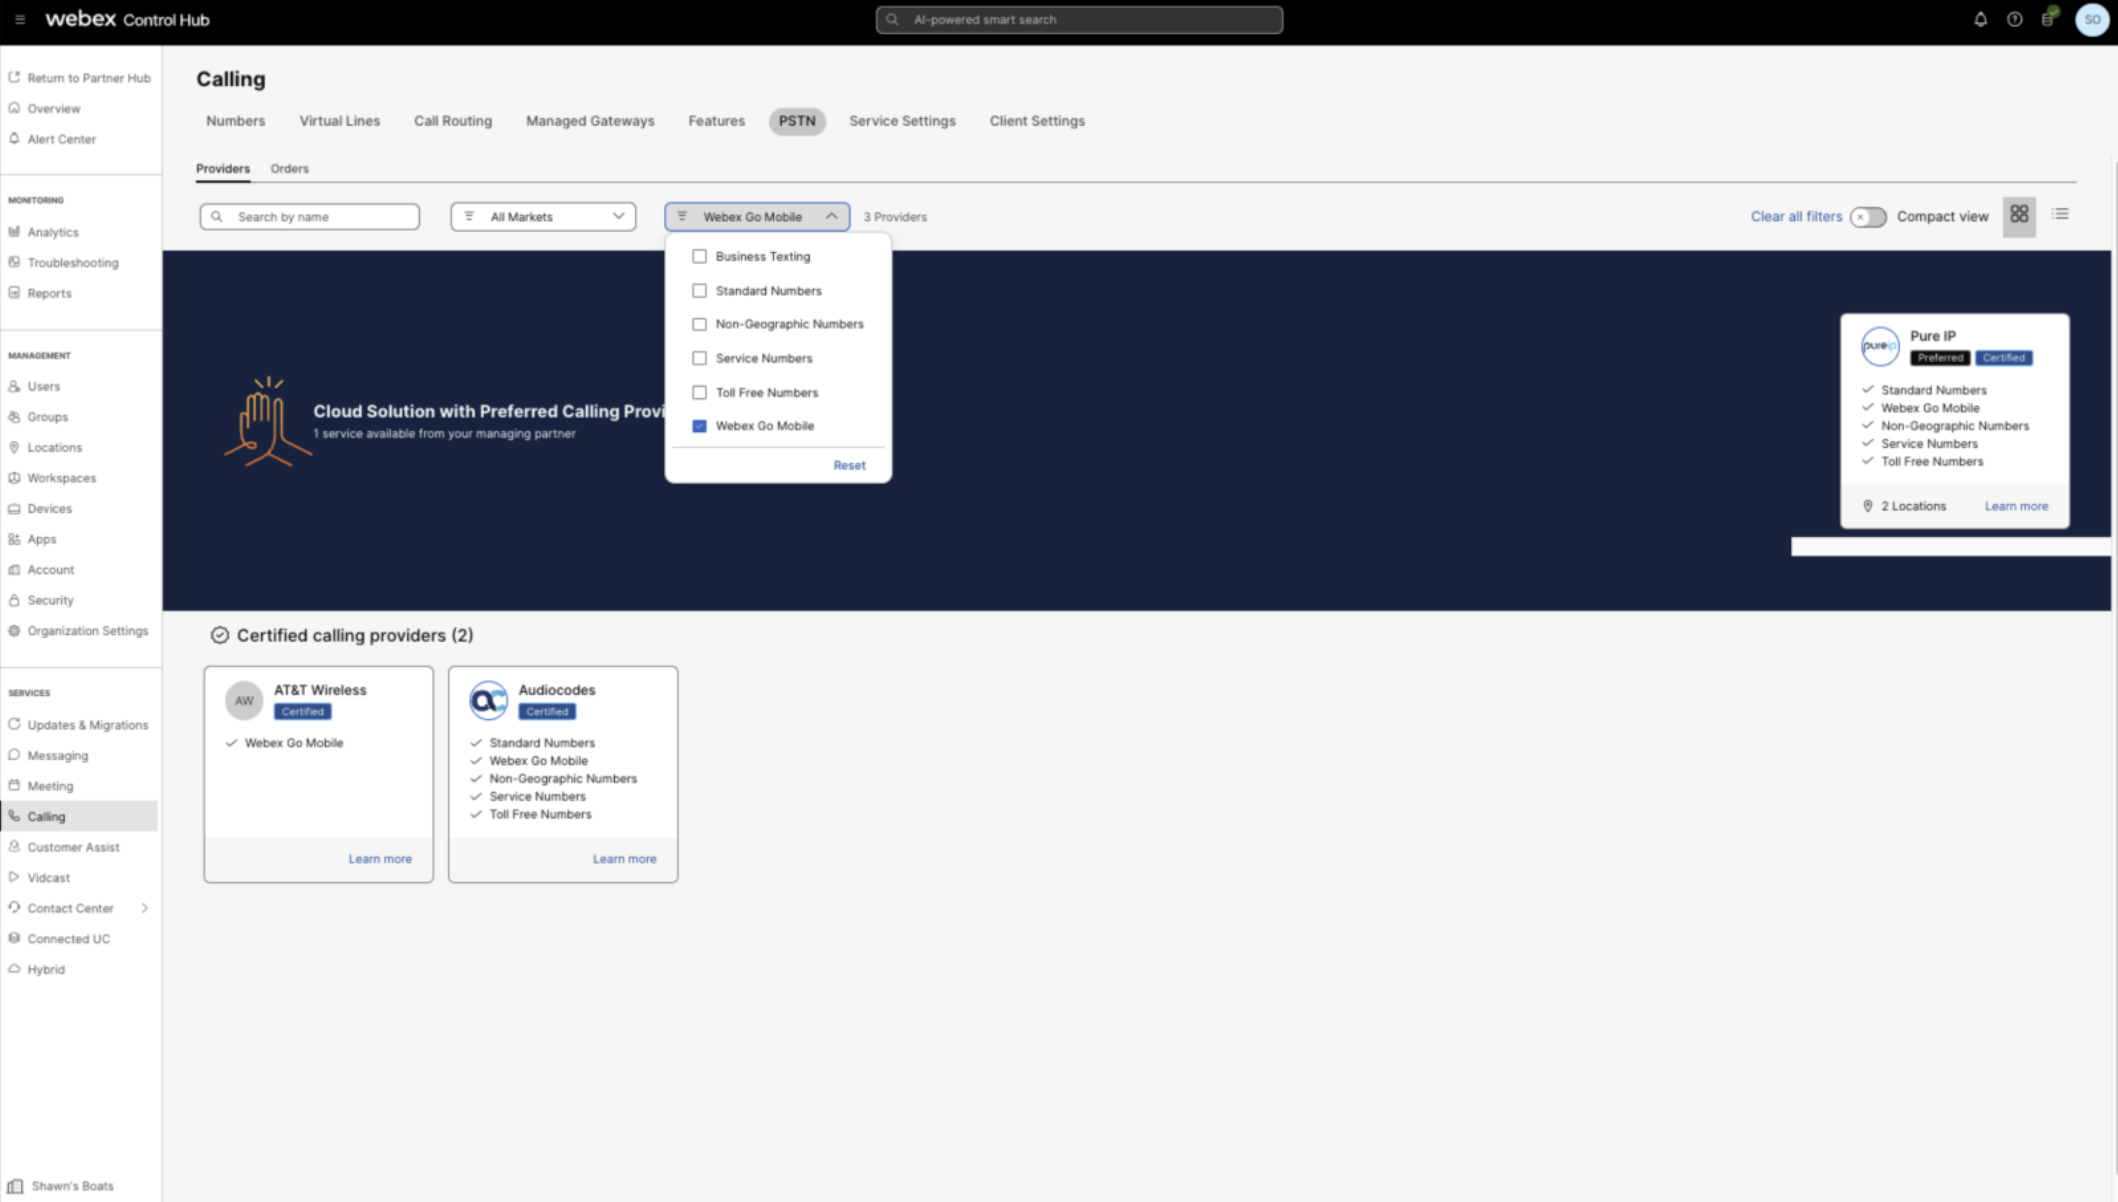
Щоб переглянути постачальників, відфільтруйте список за типом послуги, як показано нижче:
Відфільтруйте список за типом служби Webex Go, щоб переглянути постачальників Webex Go, як показано нижче:
Додати номери мобільних телефонів
Кроки для додавання номерів мобільних операторів Webex Go в Центрі керування.
| 1 |
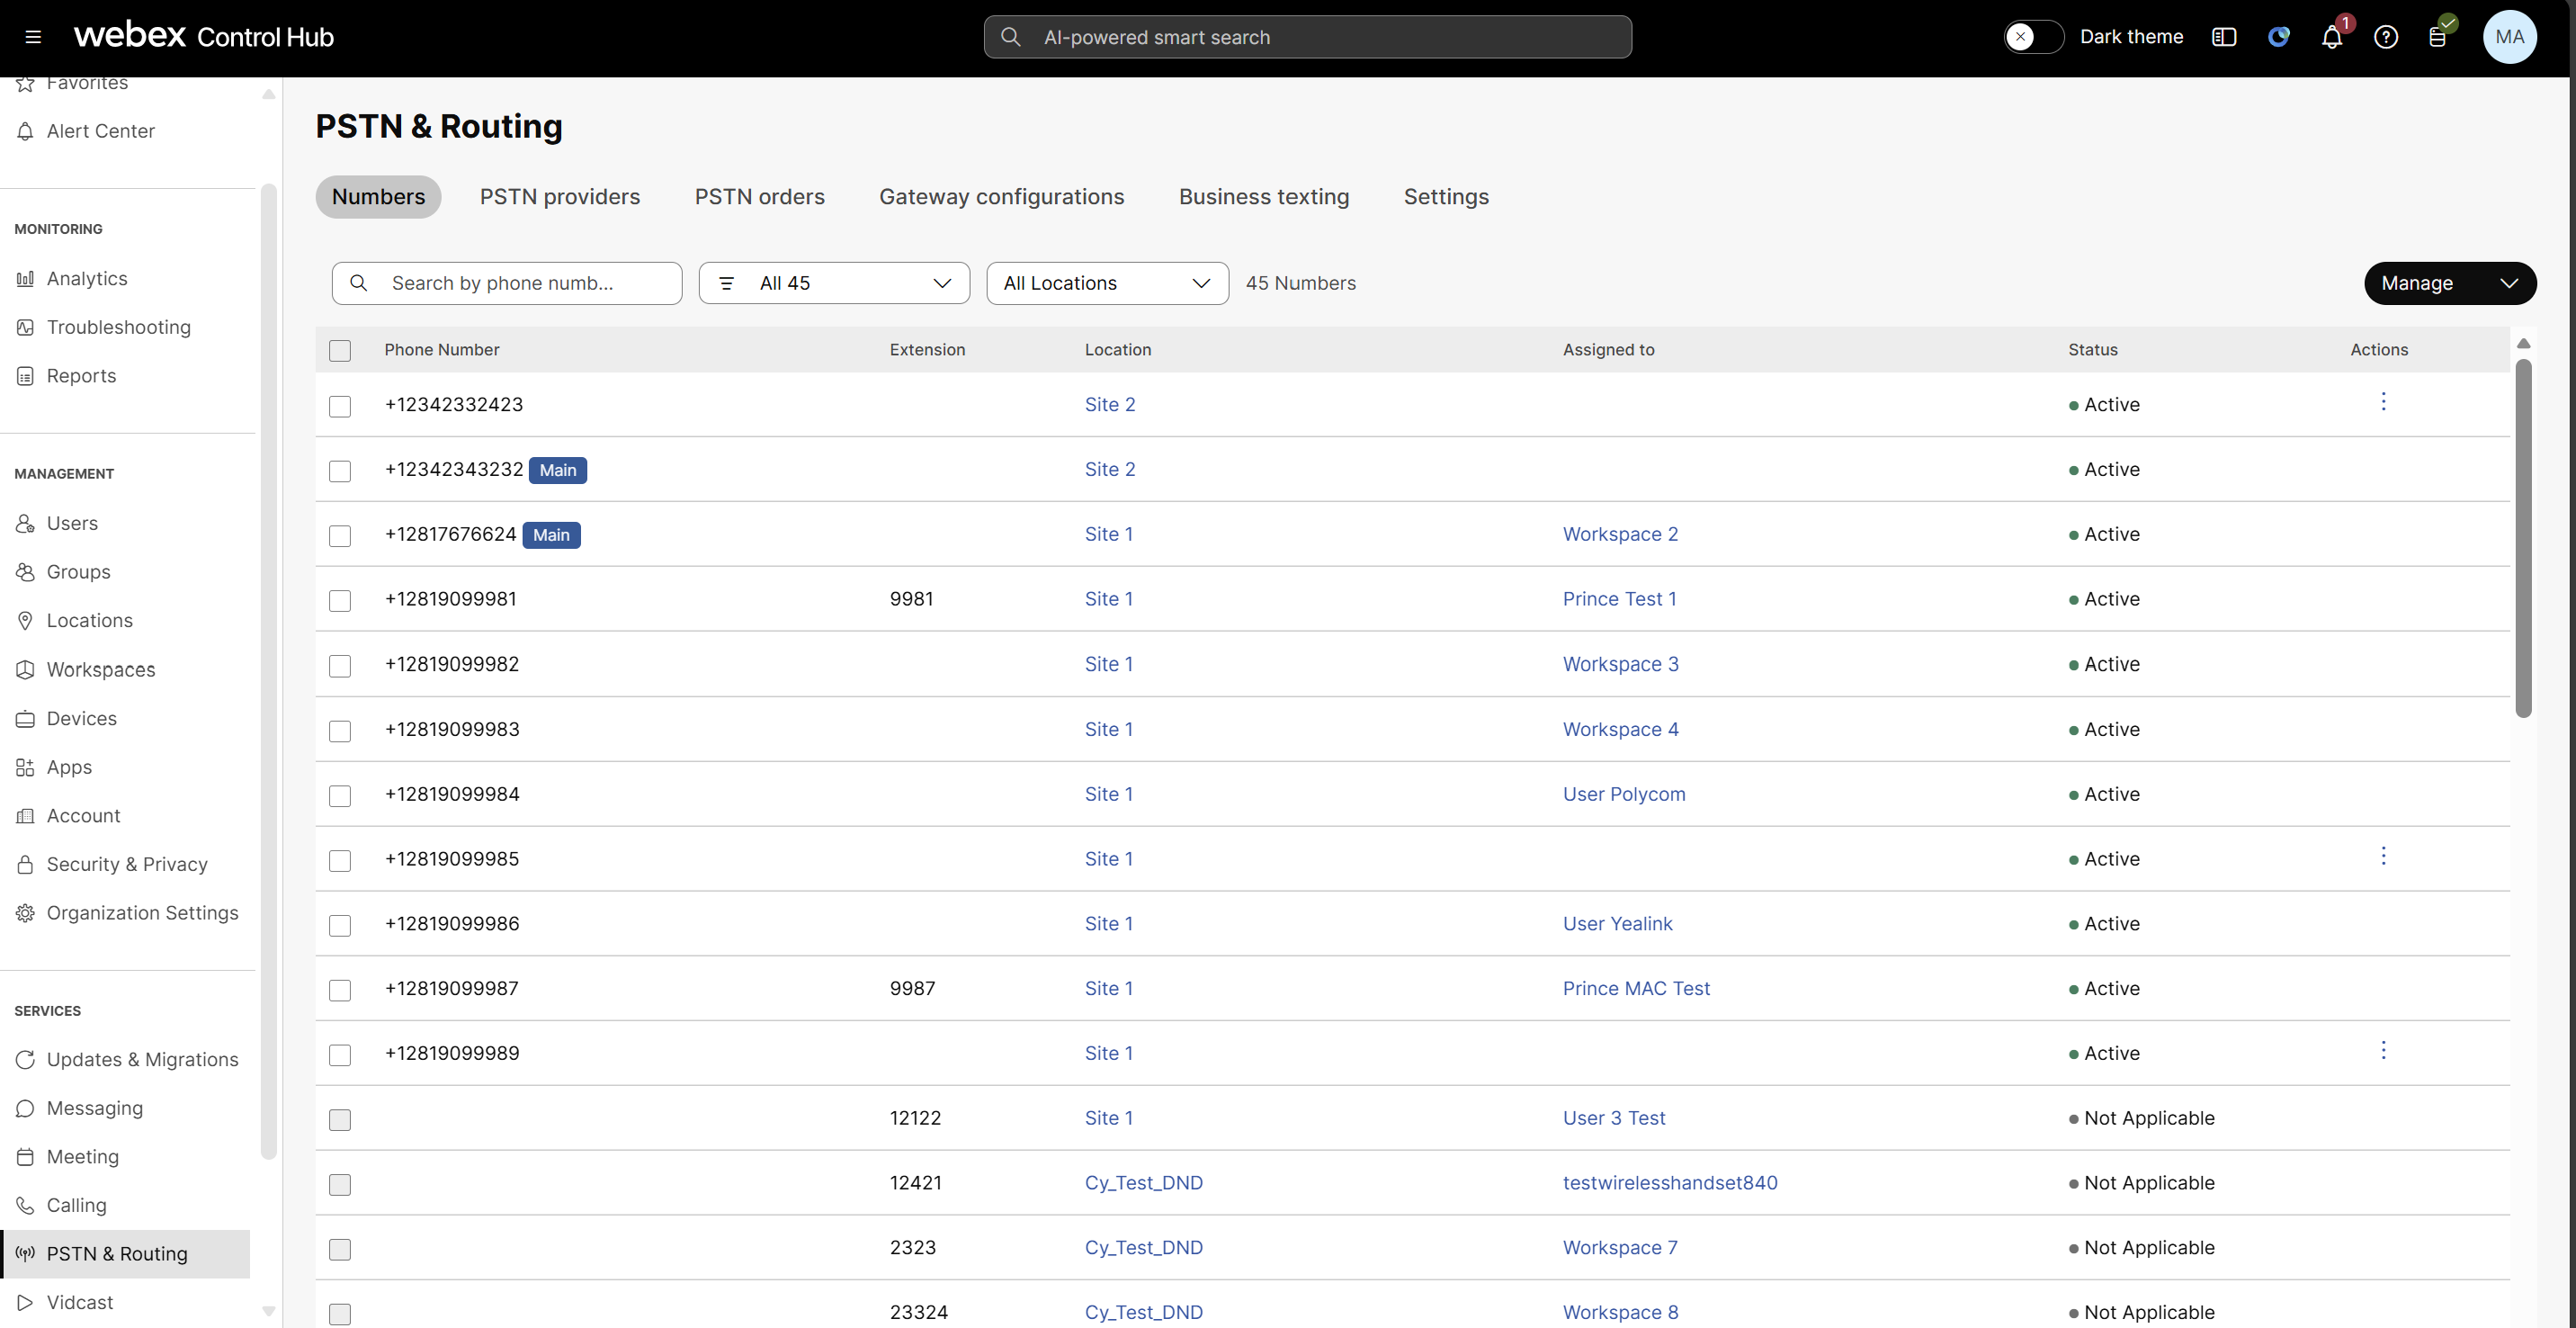
Увійдіть у Центр керування, перейдіть до . |
| 2 |
Натисніть .
|
| 3 |
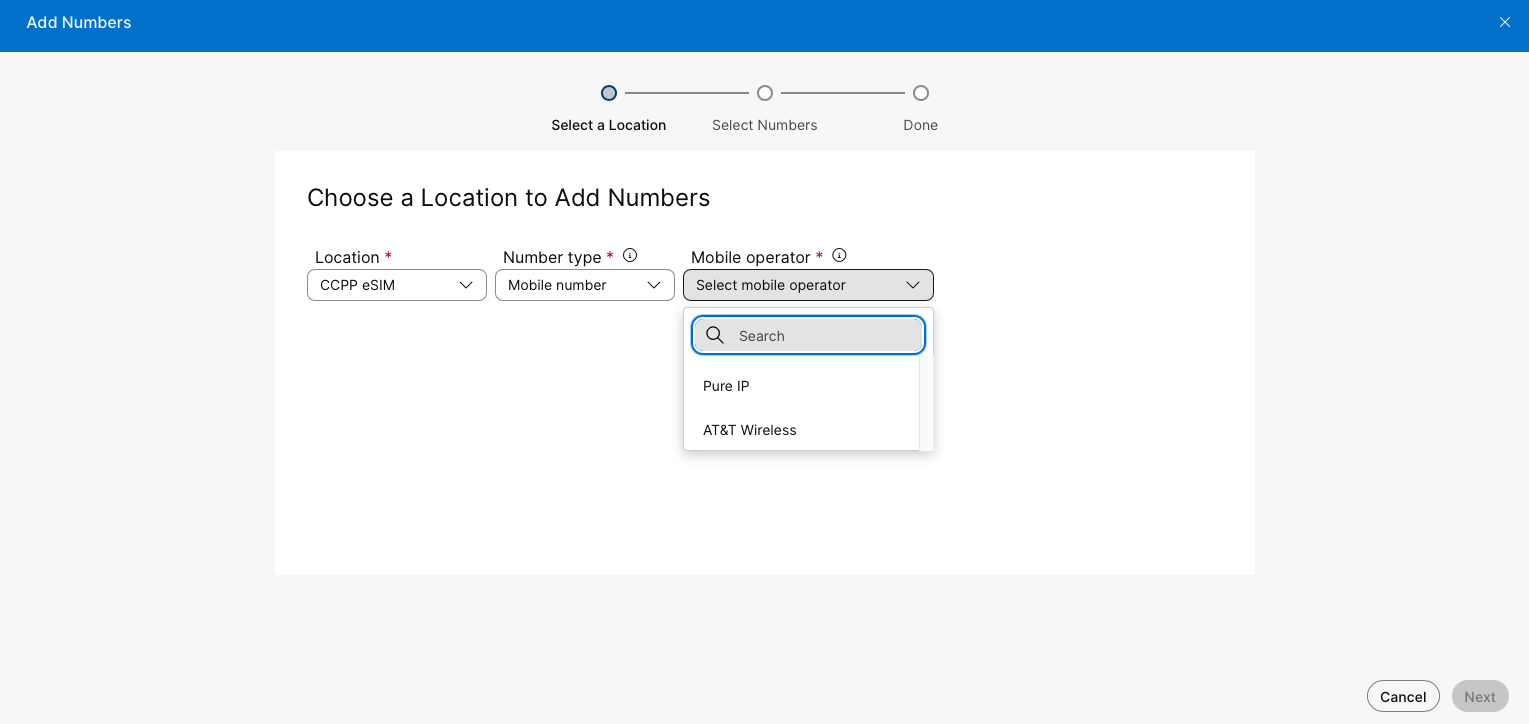
Виберіть місцезнаходження зі спадного меню Місцезнаходження.
Номер мобільного телефону потрібно додати до правильного розташування цільового абонента Webex Calling, щоб його було призначено правильно. |
| 4 |
У розділі Тип номеравиберіть Номер мобільного телефону. Додаткову інформацію див. в статті Керування номерами телефону в Control Hub.
|
| 5 |
Виберіть оператора мобільного зв’язку з випадаючого меню Оператор мобільного зв’язку.
Якщо ви оберете AT & T, див. Webex Go з AT & Т. |
| 6 |
Клацніть Далі. |
| 7 |
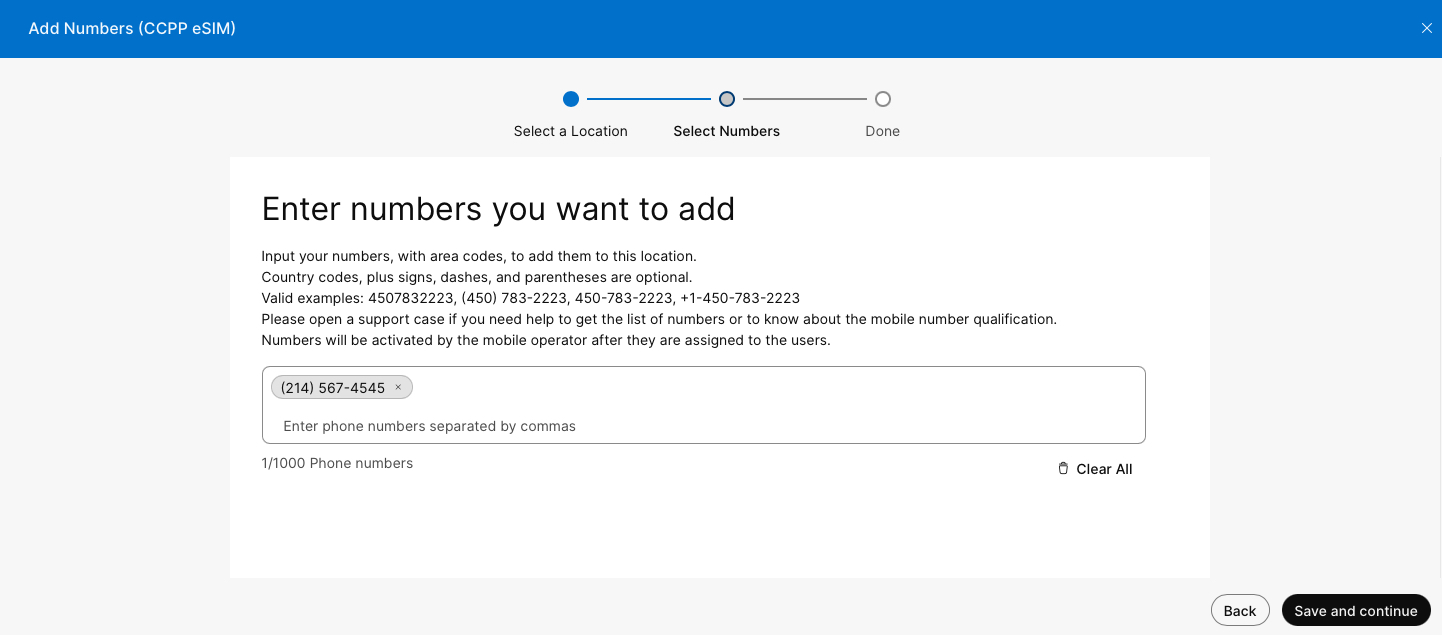
Введіть номер мобільного телефону, який ви хочете додати, розділяючи його комами.
|
| 8 |
Натисніть Зберегти та продовжити. Після успішного налаштування номерів ви побачите, що номери мобільних телефонів відображатимуться у списку номерів. Ви також побачите поруч із кожним номером значок, який вказує на те, що це номер мобільного телефону Webex.
Мобільні номери, які відображаються в неактивному стані, автоматично активуються після того, як ви призначите їх користувачеві. |
Призначити користувачеві номер мобільного телефону
Після додавання номерів мобільних операторів Webex Go до інвентарю керування номерами в Control Hub, призначте їх користувачам.
Кроки для призначення мобільного номера Webex Go користувачеві
| 1 |
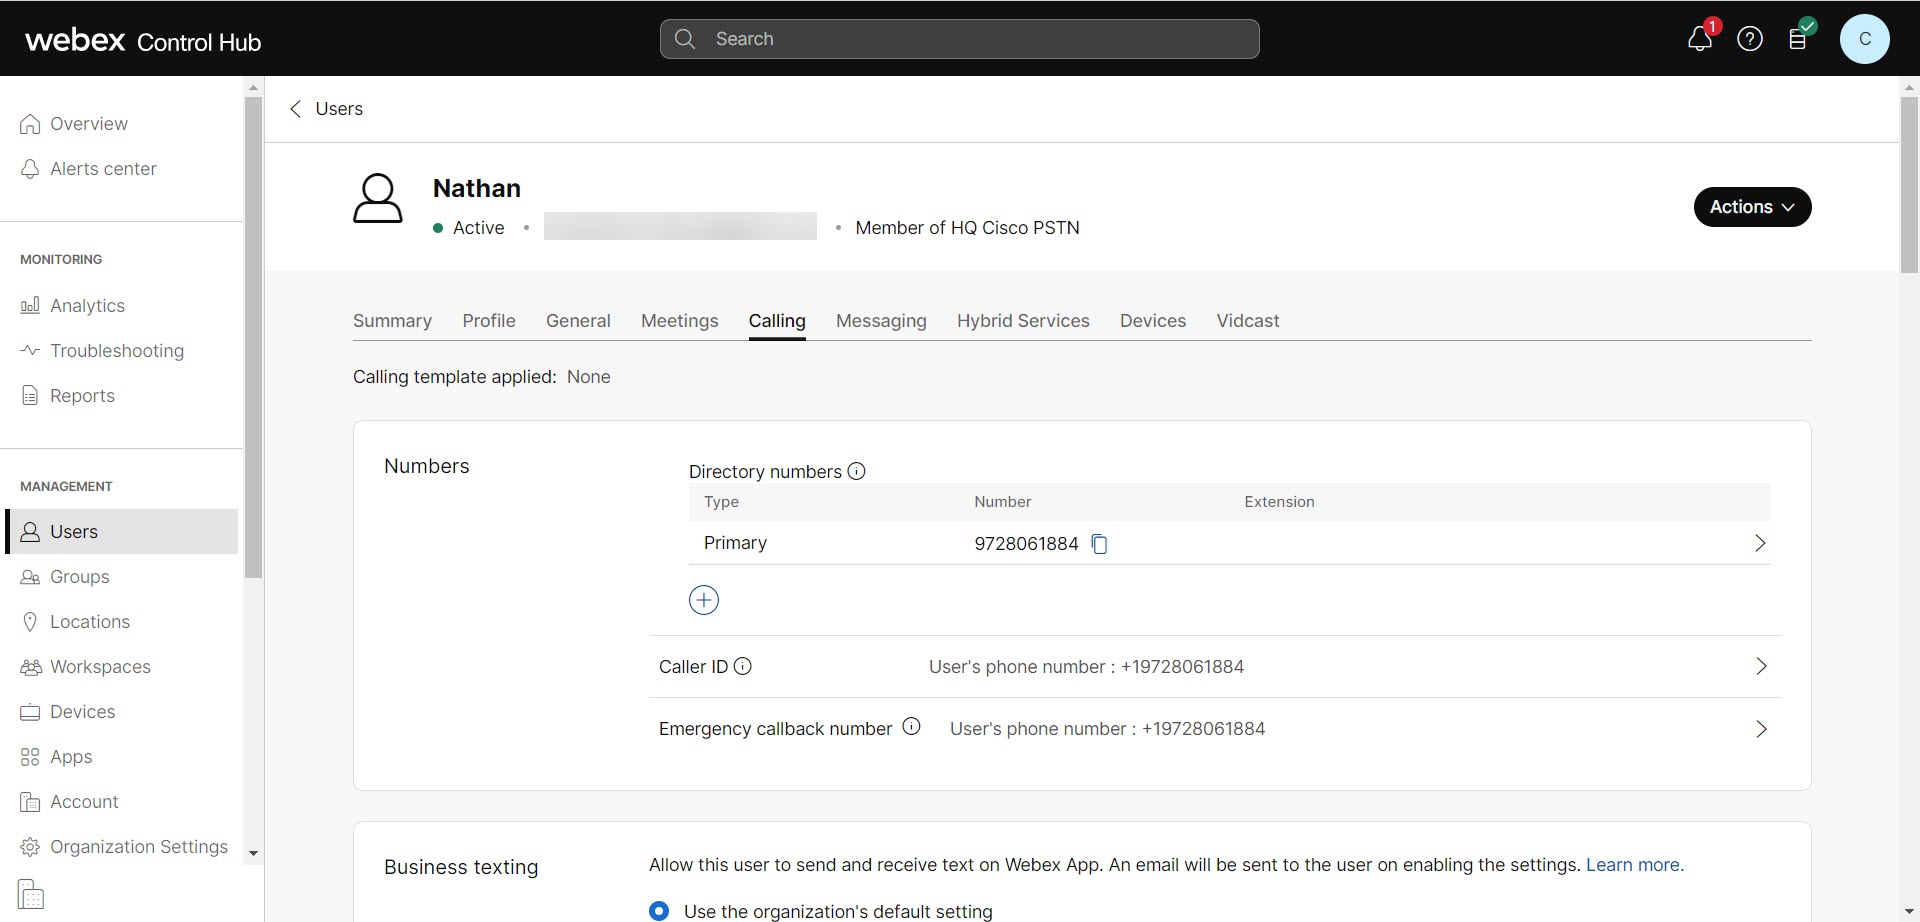
Увійдіть у Центр керування, а потім перейдіть до розділу Користувачі. |
| 2 |
Виберіть користувача, якому ви хочете призначити номер мобільного телефону. |
| 3 |
Виберіть Виклик. |
| 4 |
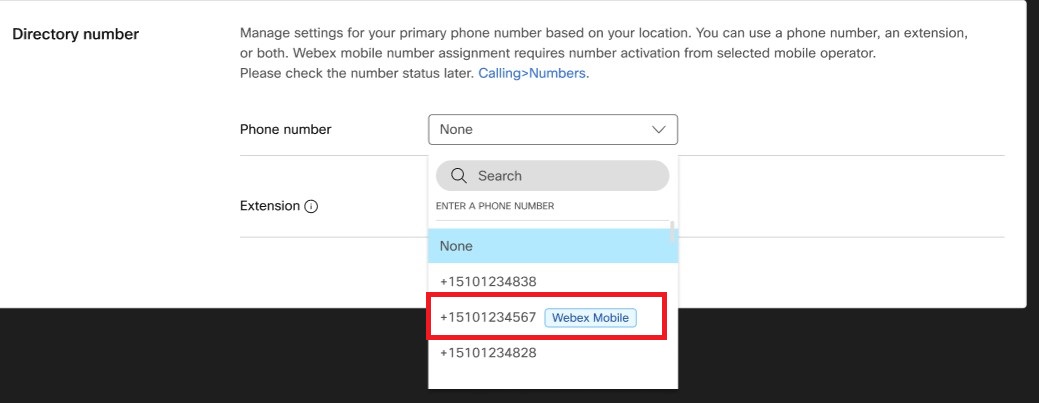
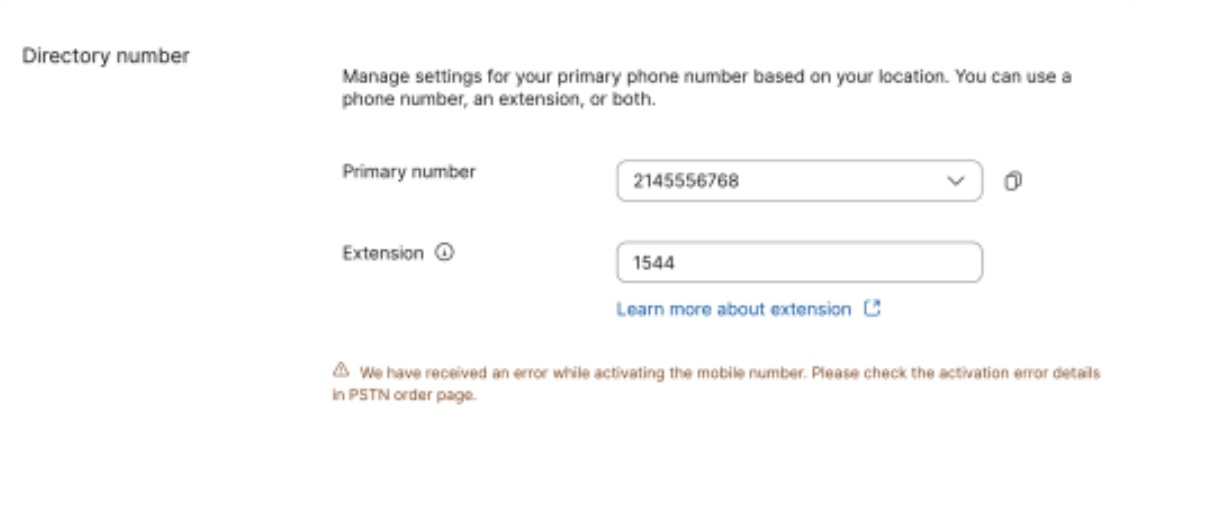
У розділі Номери телефонних книгнатисніть Додати номер. Якщо основний номер уже призначено, натисніть Основний, щоб замінити його номером мобільного телефону Webex.
|
| 5 |
Зі спадного списку Номер телефону виберіть номер мобільного телефону, який потрібно призначити. У розкривному списку містяться всі доступні номери. Використовуйте мобільний тег Webex, щоб фільтрувати та переглядати номери мобільних телефонів, доступні для призначення користувачам.
|
| 6 |
Клацніть Зберегти. Мобільний пристрій Webex Go автоматично призначається користувачеві та доступний на вкладці користувача Пристрої.
|
Надання альтернативної ідентифікаційної інформації Webex Go
У деяких випадках номер мобільного телефону, призначений пристрою, може не збігатися з бажаним ідентифікатором Webex Calling користувача. Наприклад, користувач може бажати зберегти опублікований бізнес-номер, але не може або не хоче переносити його до постачальника, сертифікованого Webex. Для підтримки цього сценарію призначте альтернативну ідентифікаційну особу користувачеві Webex Go.
Користувачі Webex Calling можуть мати кілька номерів. Адміністратори можуть призначити існуючий опублікований номер компанії (з наведеного вище прикладу) як додатковий номер. Коли хтось телефонує на цей номер, дзвонять усі пристрої користувача, включаючи пристрій Webex Godevice. Webex Calling підтримує цей одночасний дзвінок на призначених пристроях. Інструкції щодо призначення номерів користувачам див. у статті Призначення номера телефону користувачеві та робочій області.
Ви можете використовувати політику Ідентифікація зовнішньої лінії виклику, щоб відображати будь-який номер користувача як CLID для дзвінків. У наведеному вище прикладі опублікований номер компанії, призначений як додатковий номер, можна налаштувати в політиці.
Використовуйте політику ідентифікації зовнішньої лінії виклику Webex Calling, щоб відображати будь-який номер користувача як CLID для вихідних викликів. Наприклад, ви можете налаштувати опублікований номер компанії, який призначається як додатковий номер, як номер, що використовується в політиці Зовнішній CLID. Інструкції див. у статті Визначення параметрів ідентифікації абонента для користувачів і робочих просторів.
Постачальник PSTN, що відповідає за місцезнаходження користувача, направляє виклик до місця призначення. Як оператор мобільного зв'язку, так і постачальник послуг PSTN можуть фіксувати використання або застосовувати облік.

