- Home
- /
- Article

Thanks for your feedback.

 In this article
 Feedback?
Administrators can use settings templates to apply collections of settings to groups of users, including all users in a particular location.
Settings template overview
A settings template is a collection of custom settings for a service (meeting, messaging, calling, or vidcast) or a location. Settings templates help to simplify the onboarding and management of users in your organization.
You can create a template by following the Create template workflow (see Create a general template or Create a template for a service), or you can copy an existing template and edit it. You can also delete unnecessary templates by selecting a template, then choosing Delete from the Actions drop-down menu.
AI Assistant settings across services, including Calling, Messaging, and Meetings, are configured in the general template.
Types of settings templates
Settings templates are of the following types:
- General template that uses settings applied across services, such as Messaging and Meetings.
- Messaging
- Meeting
- Calling
- Vidcast
You can create up to 50 templates of the same type for an organization.
The setting templates are available under .
Assign a settings template to groups or locations
A settings template can be assigned to multiple groups or locations. When a settings template is assigned to groups or locations, all users of each group or location inherit the value that is specified in the settings template (unless there is a user override, as discussed in the 'User override' section). A group or location can have only one settings template of any given type. For more information, see Apply a settings template to a group of users or a location.
User override
You can override the specific settings at the user level. That particular setting follows the setting value at the user level, whereas the rest of the settings in that service continue to follow the template. For example, if the administrator enables in-meeting chat at the user level, then while in-meeting chat honors the user-level value, the rest of the settings in the meeting template continue to honor the values inherited from the group’s meeting settings template.
In general, the following is the hierarchy around setting assignments:
Conflict resolution
You can add a user to multiple groups. When you add a user to two or more groups with templates assigned, Control Hub utilizes a template ranking to identify which template’s setting values is applied to the user. Templates with smaller number are ranked higher and get higher priority. For example, rank 1 is higher than rank 2, and so on. Typically, you place the most restrictive template at higher rank so that it is applied in case of a conflict.
You can only rank templates when there are 50 or fewer.
Apply a settings template to a group of users or a location
Here are some key behavioral attributes of preferences when you apply a settings template to a group or location:
-
The settings template applies to the users based on the following hierarchy:.
-
If a user belongs to two groups, then the user receives the template that has the higher rank. Template ranking is evaluated for each settings template type: meeting, messaging, and calling. See each feature template topic for more information on ranking.
You can only rank templates when there are 50 or fewer.
-
A user or workspace can only be assigned to one location.
-
If a user is removed from a group, the user loses the settings template of the group from which they were removed. If they were added to a group, they acquire the template from the new group to which they were added.
-
In general, any changes that are made to the user’s settings at the organization level, using settings templates or user overrides, can take up to 8 hours to apply to the user.
See Create a general template or Create a template for a service for instructions on how to apply a new template to a group or location. You can also select an existing template and apply it to a group or location as follows:
- Sign in to Control Hub.
- Under Management, select Organization settings.
- Click the Templates tab.
- Select a template, then select Apply template from the Actions drop-down menu.
Create a template for your organization
| 1 |
Sign in to Control Hub |
| 2 |
Under Management, select Organization Settings. |
| 3 |
Click the Templates tab. |
| 4 |
Click Create template and add a name and description, or if you're editing an existing template, select it in the list. |
| 5 |
Choose Calling AI features that are available. Calling AI features allow users to interact with AI Assistant during calls and generate insights, such as summaries and transcripts, which can also serve as search sources for AI responses. This applies to all current and future Calling AI features. Calling AI features are not available for users in India locations. These settings are visible in templates and can be enabled, but they don’t apply to users who are in India locations. At the user level, these settings are hidden for users in India. You can also manage Calling AI settings for individual users from the AI tab in the user details page in Control Hub.
|
| 6 |
In the Messaging AI Features section, turn AI Assistant options on or off:
|
| 7 |
In the Meetings section, turn AI Assistant and AI features on or off. For internal or external meetings:
For internal meetings only:
|
| 8 |
In the General AI Settings section, turn on the AI settings
Enjoy complimentary use of external search sources for a limited time—pricing and terms are subject to change. |
| 9 | |
| 10 |
Personal insights—Users can learn more about their collaboration habits and set goals that help them build stronger connections, make the most of their time, and create a more inclusive workplace. For more information, see Webex App | Personal insights. |
| 11 |
Virtual background—You can enforce virtual backgrounds for internal and external meetings. |
| 12 |
Digital whiteboard—Turn on Allow whiteboarding to enable whiteboards for users in Webex App.
|
| 13 |
Discover Webex devices—Webex devices emit ultrasound signals that Webex App can hear through the device's microphone. When listening for ultrasound, devices can either automatically or manually connect. Cisco doesn't keep audio data from ultrasound detection. For more information, see Manage discovery of nearby Webex devices. |
| 14 |
Click Create template and next |
| 15 |
Assign the template to groups or locations by typing the group or location name to which you want to apply the template. Matches are shown in a drop-down list. Select the group or location you want. The template is automatically applied to this group or location. |
| 16 |
Click Done. |
What to do next
You can modify this template at any time by selecting it in the list of templates.
You can also apply the template to groups or locations, duplicate the template, or delete it by selecting the Actions drop-down menu.
Meeting settings templates
You can use meeting settings templates to assign meeting settings to a group of users, including users in a particular location. Settings templates are similar in usage to a session type, and are the future alternative to session types. Meeting templates are a fast and easy alternative to using session types or CSV files for bulk user management.
You can create up to 50 templates of the same type for an organization.
If you apply a meeting template to a group, each user in the group inherits the template values.
Meeting settings templates have the following special properties, apart from the common behaviors of the settings template:
- Meeting templates apply to users of both Control Hub-managed and Site admin-managed sites. Settings templates require user accounts to be linked to Control Hub and Webex Identity.
- Settings that are part of the settings template apply to all sites in the organization.
- Settings template values apply to both the meeting host and attendees.
- You can use settings templates to apply settings to internal or external meetings. External meetings are hosted on sites outside of your organization.
The Override participant settings when hosting setting in meeting templates applies only to internal meetings.
The following is the hierarchy to process meeting settings:
Group-based meeting template < User override or site restrictions
Site and session type restrictions are still honored, although a settings template is applied to a group. In case the site has a certain feature set to FALSE, users can't use that feature even if they had a settings template with the feature set to TRUE.
-
For example, a user is part of Group A with in-meeting chat ENABLED. If the user is in sites A and B and site A has in-meeting chat ENABLED while site B has in-meeting chat DISABLED, when the user hosts the meeting on site A, the user will have the chat option. When the user hosts a meeting on site B, the user won’t have the chat option.
If you apply a session type, settings that are common between the settings template and the session type observe the previously described hierarchy. The most restrictive of the options take precedence. However, the session type determines the value for settings that exist only in the session type. Similarly, any setting that only exists in the settings template acquires its value from the settings template (with any overrides on the user level, if applied).
The following is the hierarchy of settings application, including session type restrictions to facilitate the migration of customers out of session types:
-
Group-based meeting template < User override or site restrictions or session type restrictions
Site restriction, session type restrictions, and user override are at the same level, and the most restrictive rule is applied. If any of the restrictions are false, the client is restricted from joining a meeting.
Internal meeting policy and restrictions
Internal meeting policy allows the admin to decide whether users of their organization can have external users attend meetings conducted on their site. An admin can decide whether external meetings are completely blocked, or if they are open to users in specific external domains. In addition, the meeting settings described in the following sections apply when the users of the organization host or attend meetings on their internal sites.
External meeting policy
Collaboration restrictions or external meeting policies allow you to decide whether users of your organization can attend meetings in sites external to their organization. In addition, you can also specify what features the users can use using the external settings listed in the template. To learn more, see Collaboration restrictions for Webex Meetings in Control Hub.
Create a meeting template
The following pre-meeting policies are supported:
- Require authenticated sign-in when joining a meeting
- Allow Bring
your own device (BYOD) in Control Hub
- If a guest is using a company device with their Organization ID installed on it, they can start or join a meeting from that device.
- Internal and external meeting join policies for allowed email domains
Allowing or blocking in-meeting features with templates is only available with Enterprise subscriptions for Webex Meetings.
| 1 |
Sign in to Control Hub | ||||||||||||||||||||||||||||||
| 2 |
Go to . | ||||||||||||||||||||||||||||||
| 3 |
Click Create template. If Education is your business vertical, you can apply predefined
templates with custom settings for students or teachers.
| ||||||||||||||||||||||||||||||
| 4 |
In the General section, enter the template name and description. | ||||||||||||||||||||||||||||||
| 5 |
In the Persistent space meetings section, turn on Allow persistent meetings for spaces | ||||||||||||||||||||||||||||||
| 6 |
In the Automatically share meeting content section, choose if users can set up automatic sharing of their meeting content in user hub. When settings are off, users won't see the settings in user hub.
| ||||||||||||||||||||||||||||||
| 7 |
For the Meetings section, choose the settings for Internal and External meetings. In the Internal section, select one of the following settings:
| ||||||||||||||||||||||||||||||
| 8 |
In the Breakout sessions section, enable or disable this setting for internal and external meetings.
| ||||||||||||||||||||||||||||||
| 9 |
In the Collaboration tools section, enable or disable the following settings for internal and external meetings.
| ||||||||||||||||||||||||||||||
| 10 |
In the In meeting section, enable or disable the following settings for internal and external meetings.
| ||||||||||||||||||||||||||||||
| 11 |
In the Recording section, enable or disable the following settings for internal and external meetings.
| ||||||||||||||||||||||||||||||
| 12 |
In the Remote Control section, enable or disable the following settings for internal and external meetings. If Turn on remote control is toggled off, all types of sharing are disabled. If Turn on remote control is toggled on, check or uncheck the box next to each type of remote control.
| ||||||||||||||||||||||||||||||
| 13 |
In the Sharing section, enable or disable the following settings for internal and external meetings. If Sharing is turned off, all types of sharing are disabled. If Sharing is turned on, check or uncheck the box next to each type of sharing.
| ||||||||||||||||||||||||||||||
| 14 |
In the Telephony section, you can enable or disable the following settings for internal meetings only. With the exception of VoIP, these settings are not applicable to external meetings.
| ||||||||||||||||||||||||||||||
| 15 |
In the Video section, you can enable or disable the following settings for internal or external meetings. If Enable video is turned on, you can check the boxes next to the types of video you want to be available to meeting attendees:
| ||||||||||||||||||||||||||||||
| 16 |
In the Recording downloads section, you can enable or disable users from downloading recordings. Toggle Prevent recordings download on to stop users from downloading recordings. This is the default setting. Hosts can override this default setting and enable downloading of recordings if required. This feature is only applicable to MP4 recordings. | ||||||||||||||||||||||||||||||
| 17 |
In the Recording links section, you can enable or disable public sharing of recording links. Toggle Allow public recording link on to share recording links with anyone. If toggled off, recording links are private. This means only people within your organization can view recordings. This is the default setting. Hosts can override this default setting and allow public sharing of recording links if required. This feature is only applicable to MP4 recordings. | ||||||||||||||||||||||||||||||
| 18 |
In the Recording link expiration section, you can set and customize the expiration time for public recording links. Toggle Customize recording link expiration time on to allow setting and customizing the expiration time for recording links. Your retention policy sets a default expiration period for recording links. But, the custom expiration time does not have to match with the duration specified in the retention policy. This means you can adjust the default setting and customize the expiration time of recording links to suit specific needs. Compliance officers and administrators can access recordings even if the links are set to expire after a certain period. This feature doesn’t apply to recordings shared with users from the same site, uploaded recordings, recordings in Webex App, Webex Events, Webex Training, Webex Support, old recordings in Webex Meetings for mobile platforms, and old recording formats (such as ARF). Contact Cisco support for assistance if you would like to use this feature. | ||||||||||||||||||||||||||||||
| 19 |
In the Attendee consent requirement section, turn on Explicit consent for org users to prompt all meeting attendees to give explicit consent before recording their meetings, saving transcripts, or accessing the AI Assistant. For more information, see Require explicit consent before meeting attendees are recorded. | ||||||||||||||||||||||||||||||
| 20 |
In the Settings override section, turn on Override participant settings when hosting if you want all participants to have the same settings as the host. This applies only to internal meetings. | ||||||||||||||||||||||||||||||
| 21 |
Click Create template and next. | ||||||||||||||||||||||||||||||
| 22 |
Search for and select groups or locations for this template. | ||||||||||||||||||||||||||||||
| 23 |
Click Done. | ||||||||||||||||||||||||||||||
| 24 |
To reorder the rank of your meeting template, click Rank in the Templates tab. A user can inherit different templates from multiple groups. You can rank the
templates in order of priority. Templates with smaller number are ranked higher and get
higher priority.
| ||||||||||||||||||||||||||||||
| 25 |
In the Rank templates page, you can reorder the available templates by dragging and dropping them, then clicking Save. |
What to do next
To delete your template, click the template and select Delete from the Actions drop-down menu. In the Delete template page, check the box informing you that deleting a template is permanent, then click Delete.
To modify the template, select it, make your modifications, then click Save.
Create a messaging template
| 1 |
Sign in to Control Hub |
| 2 |
Under Services, select Messaging, then click Templates. |
| 3 |
Click Create template.
|
| 4 |
In the General section, enter a Template name and description. |
| 5 |
In the Collaboration Restrictions section, configure the following settings to enable or disable file interactions:
|
| 6 |
Click Create template and next. |
| 7 |
Search for and select a group to whom you want to apply this template. |
| 8 |
Click Done. |
| 9 |
To reorder the rank of your messaging template, click Rank in the Templates tab. A user can inherit different templates from multiple groups. You can rank the templates in order of priority. Templates with smaller number are ranked higher and get higher priority.
|
| 10 |
In the Rank templates page, you can reorder the available templates by dragging and dropping and then clicking Save.
|
Create a calling template
You can create the following types of Calling templates as follow:
-
User—This template includes settings related to users' voicemail, announcement language, caller ID, and music on hold.
-
Webex App—This template includes settings related to In-call features such as give or take remote control, screen sharing, call recording, video, Microsoft Teams integration, and calling behavior.
You can also modify the existing settings of the template, assign ranks to the templates, or delete a template.
| 1 |
Sign in to Control Hub. |
| 2 |
Under Services, select . The list of User templates and Webex App templates are displayed under the
respective tabs.
|
| 3 |
To edit an existing calling template, click on User or Webex App tab. |
| 4 |
To reorder the rank of your calling template, click Rank in the Templates tab. A user can inherit different templates from multiple groups. You can rank the
templates in order of priority. Templates with a smaller number are ranked higher and get
higher priority.
|
| 5 |
In the Rank templates page, you can reorder the available templates by dragging and dropping and then clicking Save. |
| 6 |
To delete your template, click the template and select Delete from the Actions drop-down list. In the Delete templatepage, check the box to confirm you understand that deleting a template is permanent, then click Delete. |
| 7 |
To modify the template, click on it and modify the toggles. Click Save. |
Create calling template of Application type
| 1 |
Sign in to Control Hub. |
| 2 |
Under Services, select . The list of User templates and Webex App templates are displayed under
respective tabs.
|
| 3 |
Click . |
| 4 |
In the In-call feature access section, turn on or off the following features:
The subcontrols are hidden if Display calling dock is turned OFF. |
| 5 |
In Microsoft Teams integration, turn on the Optimize Webex app for Microsoft Teams experience field to get simplified call settings, ability to mute Webex calls and set to MS teams as default app for calling dock. |
| 6 |
In the Calling Behavior section, set the following calling behavior options for Unified CM Users:
|
| 7 |
An emergency call disclaimer is shown in Webex App, advising users about importance of accurate location details in directing emergency calls and limitations of Webex App in providing such details. As an administrator, you can customize the disclaimer settings for your customers. |
| 8 |
Click Create template and next. |
| 9 |
Search and select a group or location for this template in the search box. |
| 10 |
Click Done. |
Create a Calling template of user type
| 1 |
Sign in to Control Hub. |
| 2 |
Under Services, select . You can view the list of User templates and Application templates under the
respective tabs.
|
| 3 |
To create a user template, click . |
| 4 |
In the General section, enter a Template name and Description. |
| 5 |
In Caller ID section, choose which External Caller ID Phone Number needs to display for this user to select when they make an outgoing call. You can select a Direct line (user's phone number), Location number, or custom number
to display as external caller ID. For more details, see Specify caller ID options for users and workspaces.
|
| 6 |
Turn on the Voicemail toggle. |
| 7 |
Go to Send calls to voicemail section and choose from any of the following options:
Once you've uploaded the file or recorded the greetings, you can update it by selecting Replace File or recording another message. Recording a new message or uploading a new file overrides the previous greetings. The audio (WAV) file must be 8Khz, 8-bit mono, CCITT µ-law, 2MB max, .wav file format. If you select Send all calls to voicemail, you can’t select the other two options. You can choose to direct to voicemail with both Send calls to voicemail during a busy line and Send calls to voicemail when unaswered options are selected together. |
| 8 |
In Additional settings, |
| 9 |
Turn on Receive notification of any new voice messages toggle to send notifications to users for new voicemails. |
| 10 |
Turn on Receive fax messages toggle to enable users to receive fax messages. |
| 11 |
In Music on Hold section, turn on Play music when a call is places on hold toggle. |
| 12 |
Choose a language from the Announcement Language drop-down list. |
| 13 |
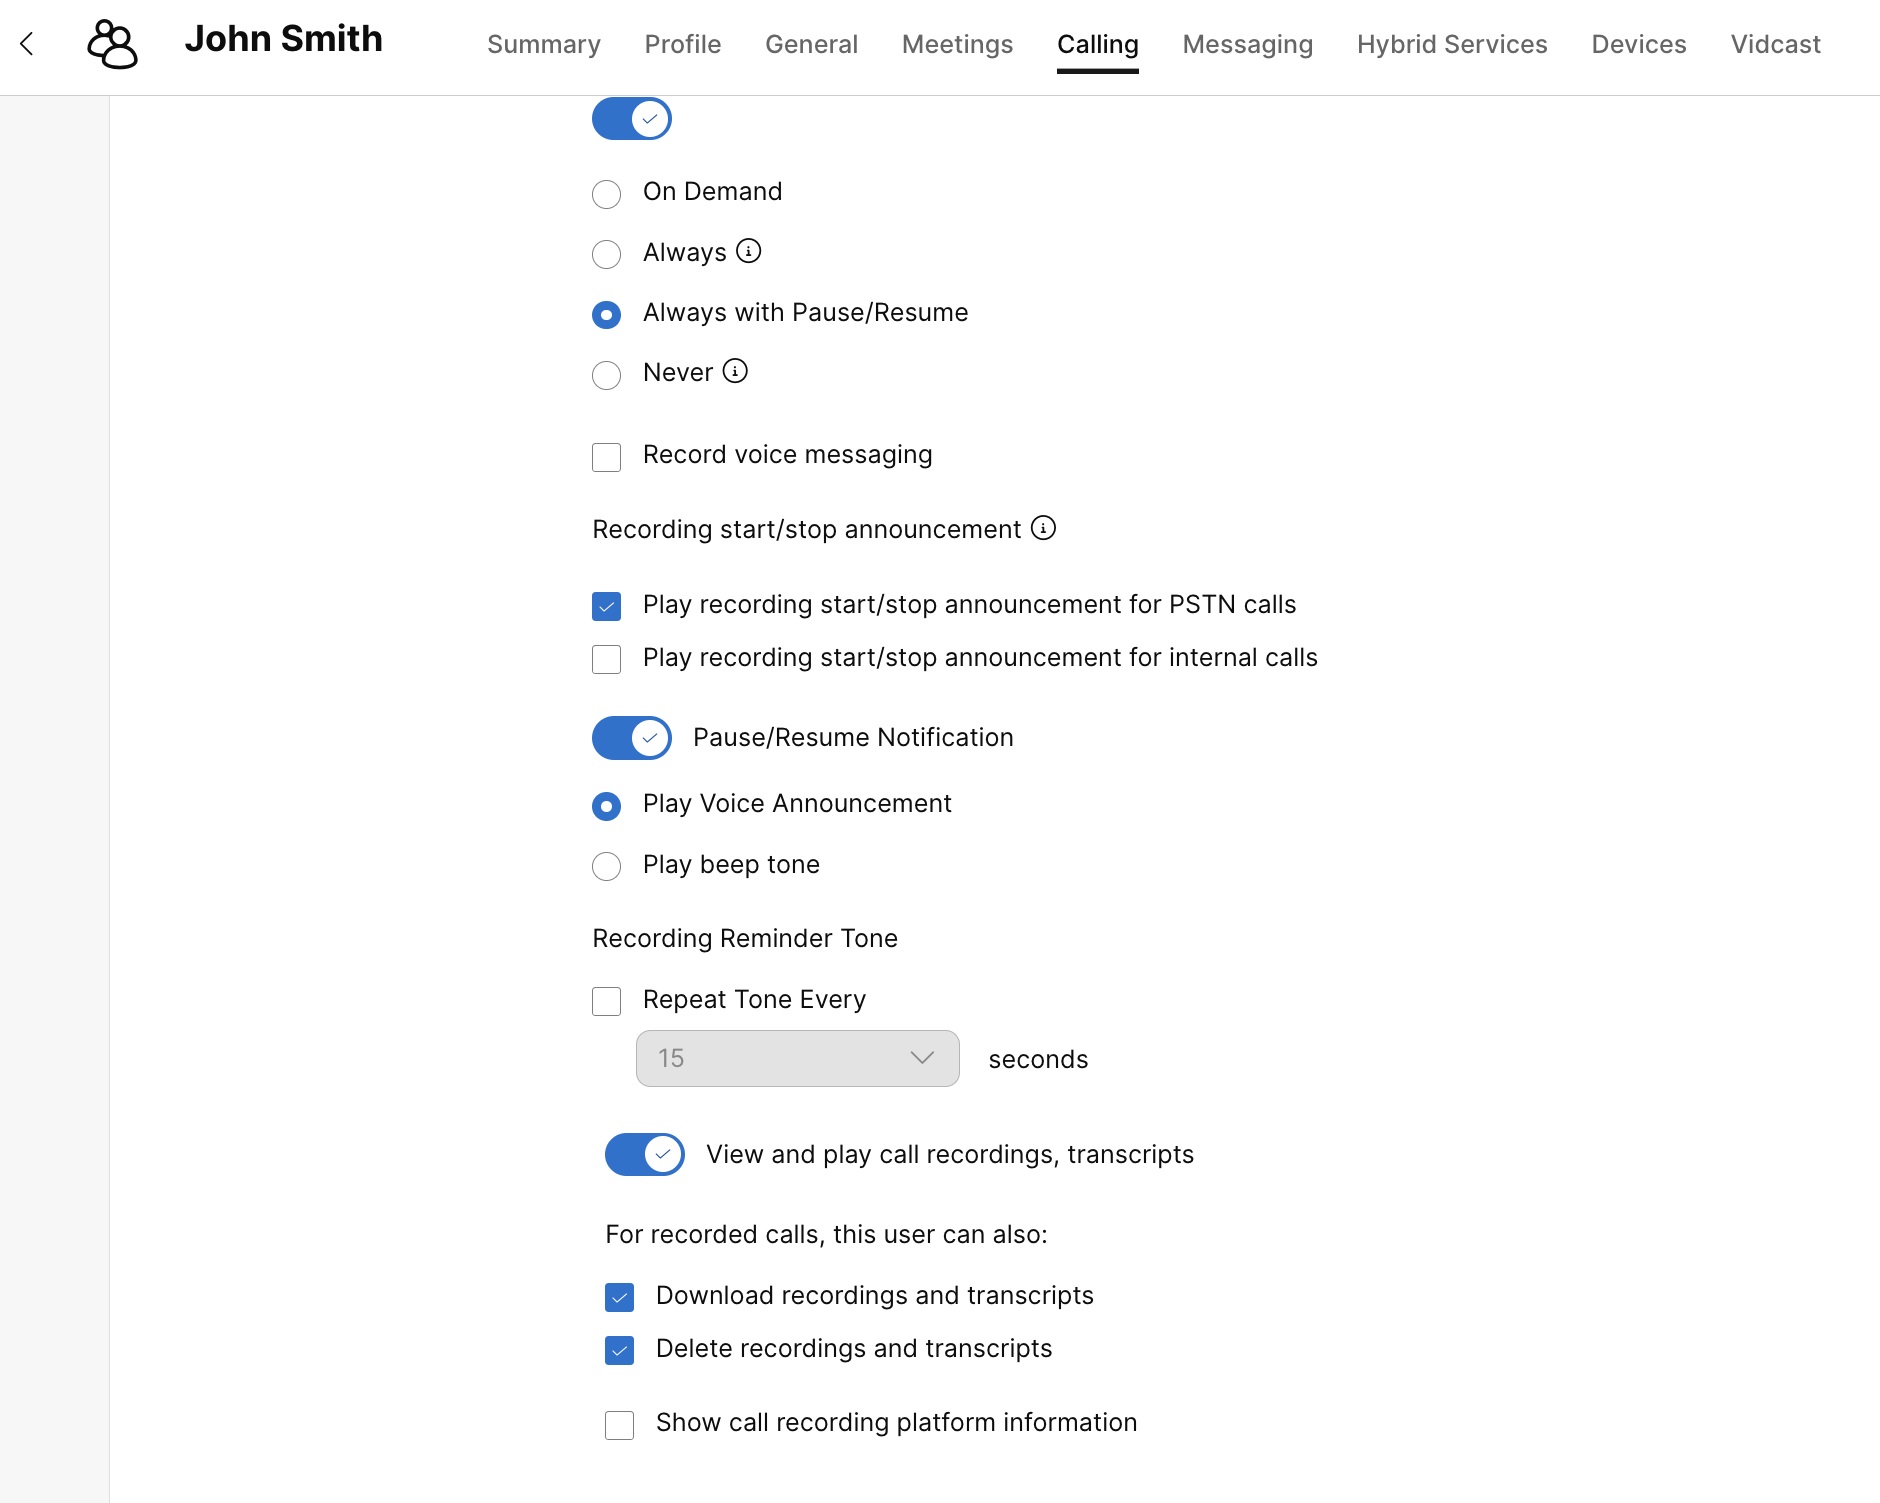
In Call Recording section, turn on Record incoming and outgoing calls and voicemail, or set recording announcements and notifications toggle. Call Recording must be enabled at the Organization level and at the location to which the users are assigned. In the absence of this setting, call recording won't apply. See Manage call recording for Webex Calling article for more information on call recording settings. |
| 14 |
Configure one of the following settings:
|
| 15 |
In Hide Calling Settings section, you can customize the settings that end users have access to in their devices, Webex App, and User Hub. Toggle on the settings that you want to allow access to. 
If a Calling Feature Template is assigned to a user, they can't go back to the organization's default settings. To know how to update user level settings, see Hide calling settings in a user. The selected settings override the system default settings of the group of
users.
|
| 16 |
Click Create template and next. |
| 17 |
In the Search box, enter and select the name of a Group or a Location to which you want to apply this template. |
| 18 |
Click Done. The template is configured and applied to the selected groups and
locations.
|
Create a Vidcast template
| 1 |
Sign in to Control Hub |
| 2 |
Under Services, select Vidcast, then click If Education is your business vertical, you can apply predefined
templates to allow custom settings for students or teachers.
|
| 3 |
In the General section, enter a Template name and description. |
| 4 |
In the Access section, all options are enabled by default. You can disable the settings you don't want users to have in a vidcast. |
| 5 |
In the Webex integration section, turn on or off the Enable Vidcast recording in Webex Messaging |
| 6 |
Click Create template and next. |
| 7 |
Search and select a group or location for this template in the search box. |
| 8 |
Click Done. |
Frequently asked questions: settings templates and meeting templates
What's the difference between internal meetings and external meetings?
- Internal meeting: OrgID is same between the meeting site and the user who's joining (such as Cisco user joins Cisco ORG meeting)
- External meeting: OrgID is different between the meeting site and the user who's joining (such as Apple user joins Cisco ORG meeting)
Can you apply settings templates to any group?
There are different types of groups in Control Hub, and different ways to create groups. There are two different types of groups in Active Directory:
- Security groups—used to assign permissions to shared resources.
- Distribution groups—used to create email distribution lists.
You can synchronize security groups and distribution groups to Control Hub, but you can apply settings templates to security groups only. Distribution groups are intended for use when sending mass communications.
You can also create groups in Control Hub using the API, and apply settings templates to these groups too.
How do I assign a user to a group?
You can assign a user to a group in either of the following ways:
How do I create a template with closed captioning off for an internal site, then apply it to a group?
- Sign in to Control Hub.
- Create a meeting template by selecting , and in the In meeting section, toggle Closed captioning off in the Internal meeting column.
- Click Create template and next.
- Start typing the group name to which you want to apply the template. Matches are shown in a drop-down list. Select the group you want.
The template is automatically applied to this group.
- Click Done.
How many templates can I create?
You can create up to 50 templates of the same type for an organization.
What are some best practices when I start to assign settings templates?
- Identify the different user profiles in your organization and determine how you want the groups to be structured. If you have users of the types all access and restricted access, you must create two groups that carry two different templates for each.
- Create settings templates for each service you want to have group-based access control.
- Apply the settings templates to the relevant groups and ensure they have the appropriate rankings.
I have adopted the previous group-based settings for collaboration restrictions. Are those automatically migrated?
If you have previously used the group-based settings for messaging, those are not automatically migrated. Here are the steps to follow once settings templates are made available to you:
Create messaging templates to reflect the different restrictions you have in your organization.
Apply the templates to the relevant groups. See How do I apply a template to a group? above.
Once you apply the template, make sure to click revert users to ensure that users are now following the permissions that are included in the template.
What are the best practices for utilizing settings templates when we already have session types?
You can control meetings settings using templates. If you are managing your meeting site in Control Hub, the templates do the same job as session types did in Site Administration.
You can consider transitioning completely to the settings template model, instead of using session types and settings templates concurrently.
Can I apply settings templates to sites that are not managed by Control Hub?
Yes, you can apply templates to the sites that are not managed by Control Hub.
I am unable to synchronize groups using the directory connector. Are there other methods by which I can create groups?
In addition to directory connector-based groups, you can manually create groups in Control Hub or use the group API.
I just updated my settings template; why can't I see the changes for a user?
In general, changes made to user settings at the organization level, using settings templates or using user overrides, can take up to 8 hours to apply to the user.
Which client version should I use to apply the new settings template?
We recommend upgrading your Meetings client to the latest version (WBS 42.7 or above) or at least to the latest lockdown version (WBS 42.6), in order to get the best user experience of settings template policy-enforcement related features. If you're using a version of the Meetings client older than WBS 42.3, some features may not be available, or you may not have the best user experience.
Known issues
-
When a template is already applied to a particular group, it should show the group in the group’s drop-down list as one that already has the template applied.
-
The User Details page for the Site Administrator role has ineffective user experiences and error states. Only the full admin can update the settings applied via the settings template on the user level.


