Thanks for your feedback.
Provision Wholesale RTM customer organization through Partner Hub
 Feedback?
Provision a customer organization through Partner Hub
Complete the following tasks to provision a new customer organization manually using Partner Hub.
You can also use APIs to provision customer organizations. See Provision Customer Organization Task Flow (via API).
| 1 |
Before you provision a customer, you must set up an onboarding template. You can use an existing template or create a new template. |
| 2 |
Create a new customer organization manually in Partner Hub. |
| 3 |
Add users and locations to set up the newly created customer. |
| 4 |
Edit licenses for a new or existing users. |
Create an onboarding template
You must have an onboarding template before you can provision any customer organizations or users. Use this procedure to create an onboarding template with common settings that you want to apply to the customer organizations that use the template. The following conditions apply:
-
You can apply a single onboarding template to multiple customers.
-
You can create multiple onboarding templates with settings that are targeted to different sets of customers.
| 1 |
Sign in to Partner Hub and click Customers. |
| 2 |
Click the Onboarding templates to view the existing templates. |
| 3 |
Click Create Template. |
| 4 |
Select Webex for Wholesale and click Next. |
| 5 |
Set up your Primary settings such as Template name, Service provider admin, Country or region, Default email language, and Wholesale subscription. |
| 6 |
Under Wholesale calling, select a Cloud Connected PSTN vendor if desired, and click Next. We don't recommend using this optional template setting due to the limitations with this approach. For more details, see Customer PSTN setup. |
| 7 |
Choose one of the following Authentication methods and click Next.
|
| 8 |
Configure Email settings and Call settings and click Next.
|
| 9 |
Review the settings summary and click Edit to change any settings that you want. When the settings look correct, click Submit. Your newly created template gets added to the onboarding template
view.
|
| 10 |
Open the template that you created and copy the Provisioning ID value. You need this value when you provision a customer organization. |
Create a customer
Use this procedure to create a new customer organization manually in Partner Hub.
| 1 |
Sign in to Partner Hub. |
| 2 |
Click Customers to view the list of existing customers. You can select any customer to view information about that organization. |
| 3 |
From Actions drop-down, click Create Wholesale customer to create a new customer organization. |
| 4 |
In the Organization verification screen, enter the email of Customer admin, and click Create a new customer. |
| 5 |
In the Customer Information screen, enter the Legal company name, Administrator email, and External customer ID, and choose the Country. |
| 6 |
If the customer headquarters is in a Webex supported location, select I verify that this customer is in a Cisco Webex supported location and click Next. |
| 7 |
In the Packages and add-ons screen, select the package that you want to assign to this customer, and click Next. You can select Activate package quantity selection to specify quantities for applicable packages and add-ons. Quantity assignment isn't available for non-user or workspace assignable packages and add-ons, such as Cisco Calling Plan.
Package quantity assignment limitations
|
| 8 |
In the Headquarters location screen, enter the location details about the customer's headquarters and click Next. |
| 9 |
Review the customer summary and click Create a customer. |
What to do next
You can now add users to the customer organization.
Webex partners in one region can create customer organizations in any region that we offer the services. For details, see Data residency in Webex.
Set up a customer
Use this procedure to set up a newly created customer organization by adding users, locations, and license based packages.
| 1 |
Sign in to Partner Hub. |
| 2 |
Click Customers and select the appropriate customer. |
| 3 |
Click Setup Customer and Add users. This opens the Control Hub users page.
|
| 4 |
Click Manage users and select Manually add users or CSV add or edit. When you select Manually add users:
|
| 5 |
Click Close. If you're providing Control Hub access to customer organizations, you can also assign roles to the customer administrators. For more details, see Assign organization account roles in Control Hub. You need to provision administrators with the same package level as the one used to create the customer organization. Downgrading the package for the customer administrator (full administrator) isn’t supported. |
 to add the basic information and click
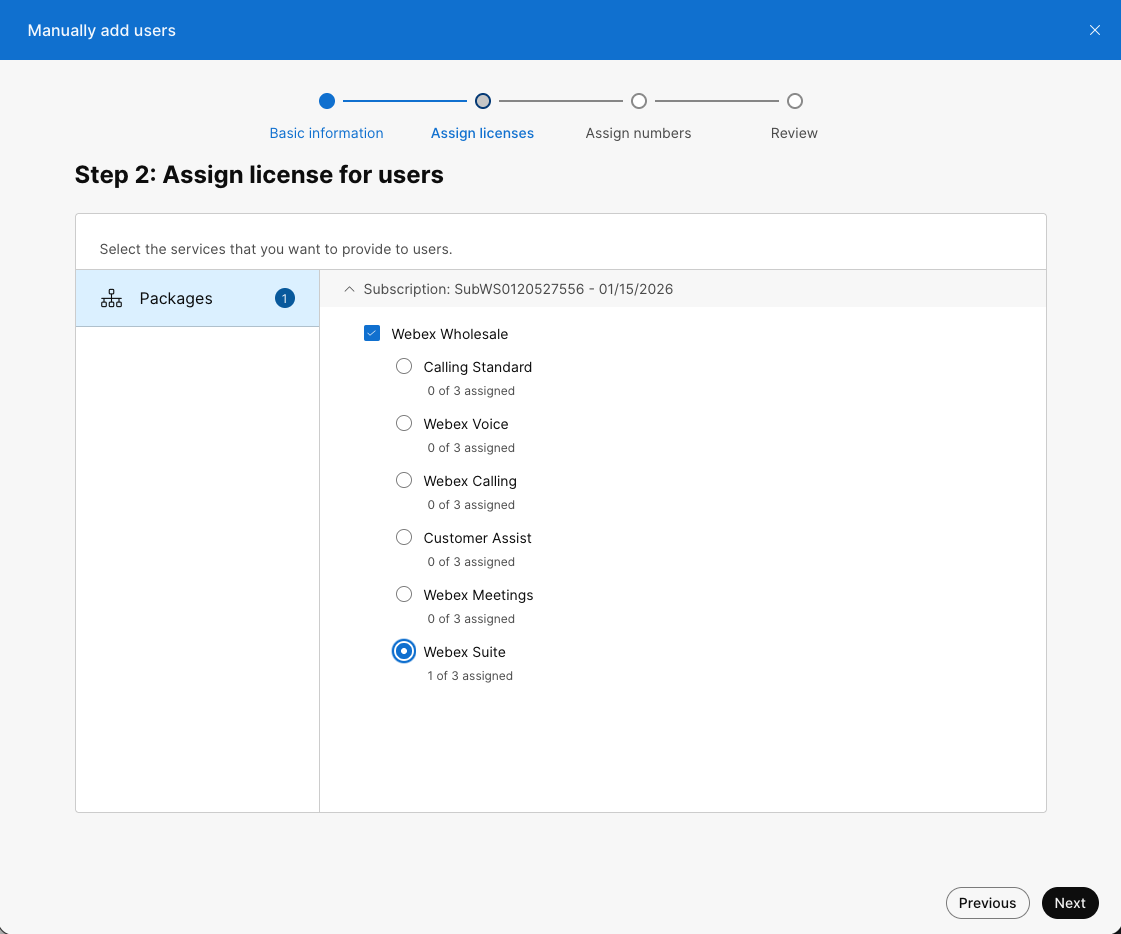
What to do next
Optional. If you’re using the Wholesale Setup Assist service, Submit Wholesale Setup Assist Request Form.
Edit licenses for users
Use this procedure to assign or change Wholesale packages to new or existing users through the standard license assignment UI.
| 1 |
Sign in to Partner Hub. |
| 2 |
Click Customers and select the appropriate customer. |
| 3 |
Click Setup Customer and click Add users. This opens the Control Hub users page.
|
| 4 |
Click Users and select a user to edit for license. |
| 5 |
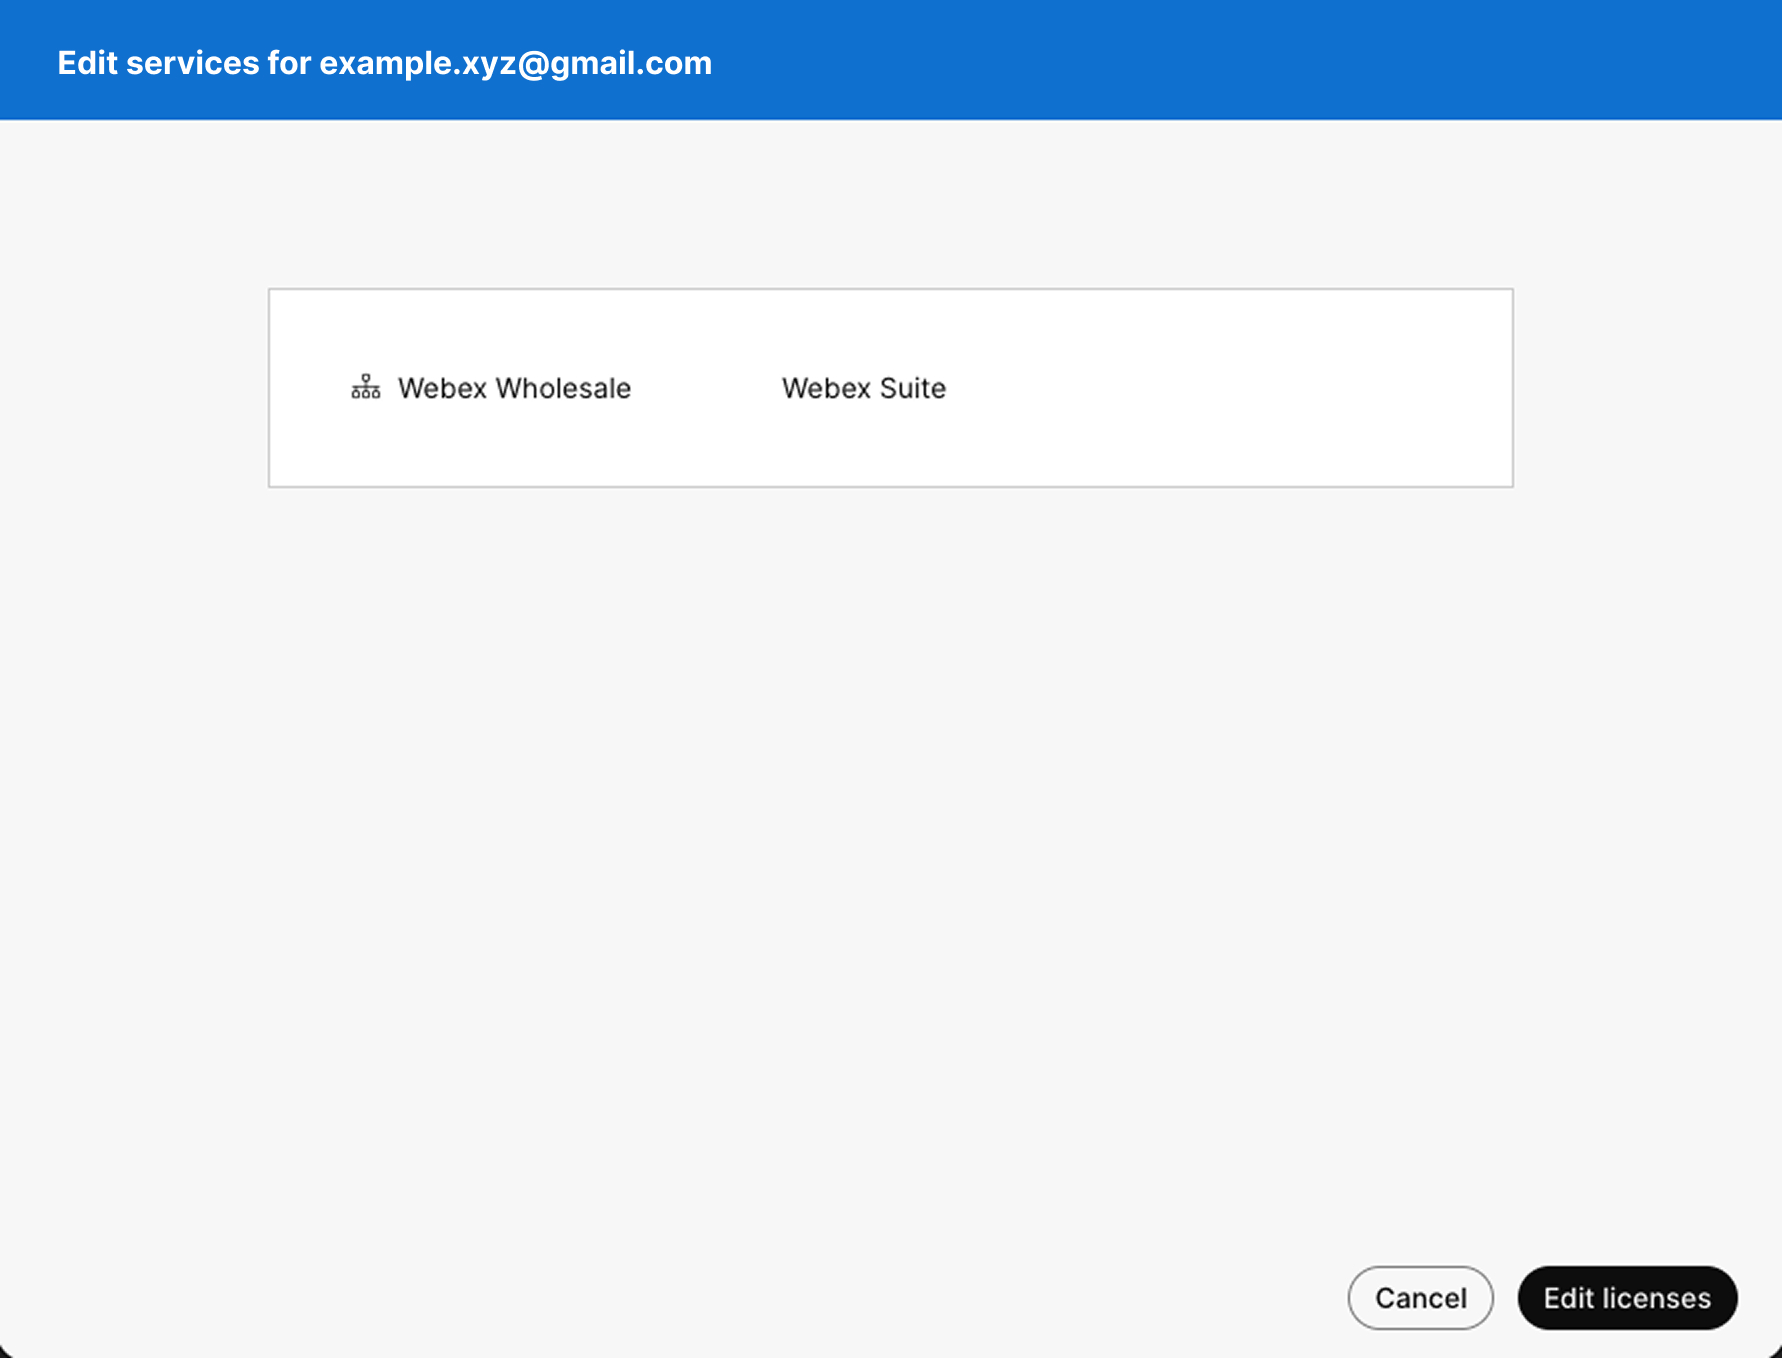
In the Summary tab, scroll to Licenses, and click on Edit licenses. |
| 6 |
It displays Webex Wholesale and list of packages, click on Edit licenses. |
| 7 |
Click Packages and select the desired Wholesale package for example Webex Suite, Webex Calling and so on. Optional: Assign add-ons such as the Attendant Console if supported by the selected package. |
| 8 |
Click Save and Close. For organizations with only Wholesale subscriptions, the package includes basic services such as basic Messaging and Meetings associated with spaces. If a partner moves a user from a Webex for BroadWorks package to a Wholesale package, the partner may need to manually clean up certain phone attributes, such as mobile numbers. |