- Home
- /
- Article

Thanks for your feedback.

Set up digital channels in Webex Contact Center
 In this article
 Feedback?
This article serves as a reference for anyone implementing and managing the different digital channels available in Webex Contact Center. It provides insights for optimizing digital communication within the Webex ecosystem.
About digital channels
Webex Contact Center supports different types of digital channels, namely Facebook Messenger, Livechat, Email, SMS, Apple Messages for Business and WhatsApp—with enhanced capabilities. Digital channels enhance the reach of any business. With changing demographics and individual habits, consumers expect to reach out to a business through any channels of their choice. Businesses must be available through all the popular channels of communication.
Set up digital channels
This article provides an end-to-end process to set up digital channels in Webex Contact Center. The setup process starts with onboarding and provisioning your organization in Control Hub and spans across multiple applications such as Webex Connect and Webex Engage.
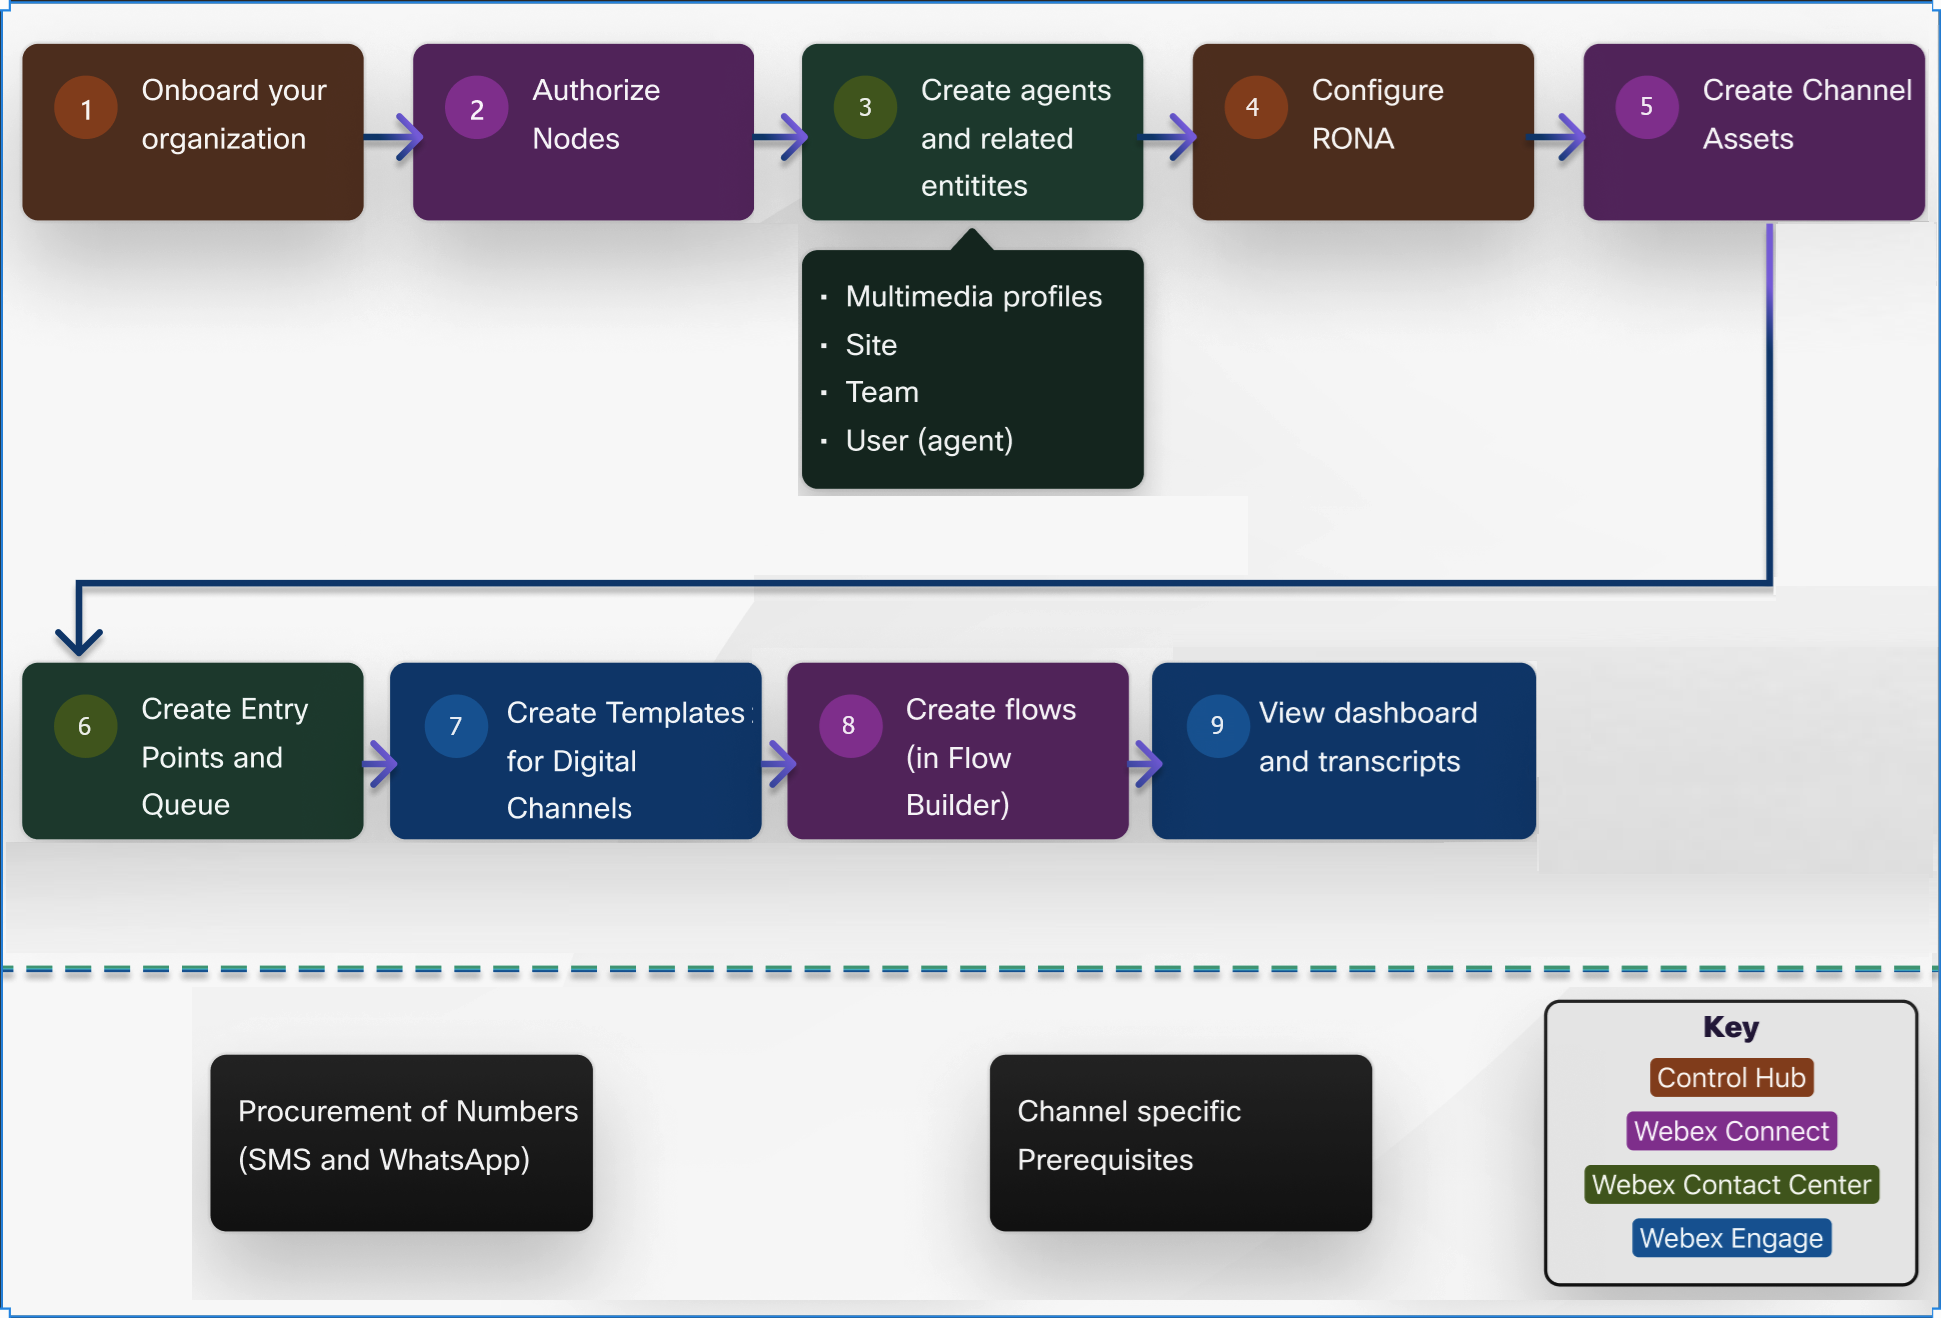
The following diagram depicts the sequence of tasks that you must perform to set up digital channels:
Provision digital channels
Webex Contact Center automatically provisions digital services like Webex Engage and Webex Connect. Contact Center and Webex Connect automatically synchronize the user management for the administrators. All partners and customer administrators can start using Webex Connect right away and set up the services.
- If you’re adding a customer administrator, then the customer administrator must create the user account through the Cisco email first.
- Once you add the administrators, they must create their user account and go to Webex Connect within 7 days. Otherwise, they'll need to return and recreate the user account so that they can access Webex Connect.
Completing these steps is crucial, as it successfully creates the administrator's account. The following tables show the mapping of roles between Control Hub and Webex Connect:
| Users' privileges for External Administrator for Partners | Access levels in Webex Connect |
|---|---|
| External Administrator: Full Administrator | Connect Full Access |
| External Administrator: Provisioning Admin | Connect Limited Access |
| External Administrator: Read-only | Connect Read-only |
| Users' privileges in Control Hub | Role allocated in Webex Connect |
|---|---|
| Customer Administrator: Full Administrator | Connect Tenant Owner |
| Customer Contact Center Administrator | Connect Tenant Owner |
| Customer Administrator: Read-only | Connect Read-only |
| Users' privileges in Webex Connect | Role allocated in Control Hub |
|---|---|
| Connect Read-only | Customer Administrator: Read-only |
| Connect Limited | Customer Administrator: Read-only |
| Connect Full Access | Customer Administrator: Full Administrator |
| Connect Tenant Owner | Customer Administrator: Full Administrator |
| Connect Restricted Access | Customer Administrator: Read-only |
Partner administrators don't have access to Webex Engage.
Before you begin
-
You must have the administrator role and access credentials for the following applications:
-
Control Hub
-
Webex Contact Center
-
Webex Connect
-
Webex Engage
-
-
You must meet all channel-specific prerequisites. For more information, see Channel-specific prerequisites.
| 1 |
Once your Contact Center is provisioned, go to Control Hub > Tenant Settings > Digital to view and launch Webex Engage and Connect. These are also available as quick link from the Control Hub. |
| 2 |
Complete node authorization in Webex Connect. Set the Webex CC Task and Webex CC Engage nodes to Authorized state before setting up digital channels. Node authorization enables the Webex Connect nodes to communicate with other applications such as Webex Contact Center and Webex Engage. For more information, see Node authorization for Webex Contact Center Engage nodes. |
| 3 |
Create agents and other related entities in Webex Contact Center Management Portal in the following sequence:
|
| 4 |
Configure RONA timeout in Control Hub. Redirection on No Answer (RONA) time out is the duration within which if an agent doesn’t answer a contact request, the contact request returns to the queue and the agent state changes to RONA. For more information, see Manage RONA Timeout. |
| 5 |
Create separate channel assets for digital channels in Webex Connect such as SMS, Email, Livechat, Facebook Messenger, and WhatsApp. Register these assets in Webex Contact Center. For more information, see Channel asset configuration. |
| 6 |
Create Entry Points and Queues in Webex Contact Center Management Portal to configure the initial landing place for a customer contact. Create an entry point with the Channel Type as Social Channel, Social Channel Type as the desired digital channel. In the Asset Name dropdown list, map the channel asset that you created in Step 5 for the chosen digital channel. Create a queue with the channel type as Social Channel. For more information, see support for Entry Points and Queues. |
| 7 |
Create templates for digital channels in Webex Engage. Use these templates to design how each channel appears in Agent Desktop. You can also configure the attachment types allowed for each channel. For more information, see the Templates section of Webex Engage Admin and Setup Guide. |
| 8 |
Create flows in Webex Connect. After you create your digital channel assets in Webex Connect and register those assets with Webex Contact Center, you can create relevant flows for the lifecycle of a digital contact for these assets in Flow Builder. Flow Builder in the Webex Connect application contains various nodes that enable you to configure flow paths and error paths for successful customer interactions in the available digital channel platforms. For more information, see Webex Connect Flow Builder. You can also import and upload pre-configured flows in Webex Connect. Webex Contact Center provides a set of predefined flow templates that are available in the Cisco Devnet portal. You can import these flow templates and configure flows to set up and execute your digital channel customer journey. Import all pre-configured media-specific flows from GitHub and upload these flows in Webex Connect. Optionally, you can also import channel agnostic flows, and event handling specific workflows from GitHub for this purpose. For more information on the latest flow templates and sample flows for various use cases, refer to README.TXT in CiscoDevNet GitHub or contact your Customer Success Manager. |
What to do next
-
View Dashboard and access transcripts in Webex Engage. For more information, see the Webex Engage Customer Console section of Webex Engage Admin and Setup Guide.
Channel-specific prerequisites
SMS
A Short Message Service (SMS) channel enables customers to reach out to agents via SMS from anywhere. There’s no need for data connectivity. Customers can send SMS to a Longcode, Shortcode, or toll-free number. Work with your account manager to procure your SMS number.
An Email channel enables agents and contacts to exchange email messages with tables, embedded links, and attachments. Sign up to an Email service provider to get a valid email ID and credentials.
Livechat
A Livechat channel facilitates businesses to engage and support their website visitors and customers. Customers need to add the Livechat widget script to a web page. The widget icon appears on the bottom-right corner of the web page. The customer clicks the icon to open the widget. The customer can then initiate a conversation with an agent.
Additionally, you can customize Livechat Widget in Webex Engage. For more information, see the Configure Livechat Widget section of Webex Engage Admin and Setup Guide.
Facebook Messenger
The Facebook Messenger channel enables customers to communicate with agents through the Facebook Messenger on the Facebook page. A business can create and manage a Facebook page from their Facebook account. For more information about Facebook page creation and management, see Facebook article.
Work with your account manager to verify your business and set up your WhatsApp Business account (WABA) number. After you obtain the WABA number, use it to configure the WhatsApp contact handling.
Webex Contact Center integrates WhatsApp as a channel for improved customer interaction. With this integration, the WhatsApp channel facilitates businesses to engage with customers quickly through the WhatsApp application.
Currently, this feature is available on Webex Contact Center with the following limitations:
-
The system doesn't support multiple text formatting while creating a message in both the agent and the customer ends.
-
All multimedia files, such as stickers, pictures, and GIFs, sent from customers appear as attachments in the Agent Desktop.
-
If a customer deletes a message using the Delete for Everyone feature, the message won’t be deleted on the Agent Desktop.
-
The system doesn't support voice messages for the WhatsApp channel.
-
The system doesn't support real time read receipts on the customer end. When an agent reads a customer message, the customer doesn't see the blue tick marks (read receipt) beside that message.
-
If a customer blocks an agent during a conversation, the customer can’t receive messages from the agent.
-
During a conversation, when a customer replies to a message using the reply option, the message appears as a standalone message on the Agent Desktop. Hence, the agent doesn't know which message the customer replied to.
-
Customer can’t add phone numbers that are registered to a WhatsApp business account, to a group.
-
When a customer shares a live location or contact, it doesn't render on the Agent Desktop.
-
Customers can’t make WhatsApp payments to the agent.
-
While configuring services, the system allows one-to-one mapping between a service and an asset. That means one service can have only one asset.
-
WhatsApp templates are currently not supported even if the template option is visible in the WhatsApp compose box.
Apple Messages for Business (AMB)
Apple Business Chat, also known as Apple Messages for Business (AMB), allows businesses to communicate with their customers through Apple's Messages app. Customers using Apple devices can reach out for support, schedule appointments, make purchases, and more, using the iMessage interface. AMB empowers businesses to connect directly with customers through the familiar and convenient Messages app on iPhones, iPads, and Macs.
This channel offers a unique opportunity to enhance customer service, provide real-time support, and drive engagement. To use AMB with Webex Contact Center, you must ensure that your Webex Contact Center environment supports this integration.
Register on the Apple Business Register to create a Messages for Business account and select Webex Connect as your messaging service provider (MSP). This creates a Messages for Business application. For more information, see Apple Messages for Business.
The rich message types that are supported between agents and customers on the Apple platform include the following:
- List Picker: Enables customers to choose from a set of options presented in a list format.
- Time Picker: Allows customers to select a specific time, streamlining the scheduling process.
- Forms: Facilitates the collection of customer information through structured input fields.
- Rich Links: Supports the sharing of videos and images, enhancing the visual component of customer interactions.
For detailed specifications on these features, including the requirements for both Bot/Flow and live agent integrations, please refer to Apple Required Features.
Configure flows for digital channels
After you create your digital channel assets in Webex Connect and register those assets with Webex Contact Center, you can create relevant flows for the lifecycle of a digital contact for these assets in Flow Builder. Flow Builder in the Webex Connect application contains various nodes that enable you to configure flow paths and error paths for successful customer interactions in the available digital channel platforms.
Webex Contact Center provides a set of predefined flow templates that are available in the Cisco Devnet portal. You can import these flow templates and configure flows to set up and execute your digital channel customer journey. For more information on the nodes and components, see Webex Connect Flow Builder.
If you’re an existing customer, you can import and upgrade your existing flows to the latest flow templates with minimum impact on the flow execution. For more information on the latest flows and migration with sample use cases, contact your account manager or refer to README.TXT in this github location.
Only users who have the Webex Connect login credentials for the registered organizations can perform the migration. Users include organization administrators or any other user of the organization to whom the organization administrator has given access to the Webex Connect application such as flow developers.
Supported attachment file types for digital channels
The supported attachment file types for digital channels in Cisco Webex Contact Center varies depending on the specific channel. See Supported attachment types for digital channels in Webex Contact Center article for the list of supported file types across various digital channels.
As a security enhancement, the system automatically runs a malware check for all inbound and outbound attachments for all digital channels. If any malware is detected, the infected attachment is dropped in both directions. The Agent Desktop displays the infected attachment as an Unknown file and doesn't provide an option to download.
Variables support for digital channels
Webex Contact Center supports the use of global variables and custom flow variables while you build flows for the digital channels by using Flow Builder in Webex Connect.
Global variables are defined in the Management Portal. You can use these variables within the flows to set and pass values in the context of interactions that are handled in Webex Contact Center. If you mark these variables as agent-viewable and agent-editable, agents can view and update values for these variables in the Agent Desktop during customer interaction.
Additionally, you can mark global variables as reportable, whereby values are available in the Analyzer for custom reporting.
You can create custom flow variables in Webex Connect and mark those variables as Agent-viewable and Agent-editable.
For more information on how to set global and custom flow variables in Webex Connect, see Set Variable in Webex Connect.
Variables that are set in the main flow are also available in the shared flows (routed, modified, and close) in embedded JSON format.
Implement skills-based routing and contact priority for digital channels
The skills-based routing matches the needs of contacts with agents who have the skills to best meet those needs. When the contact arrives, they are classified into subsets that can be routed only to agents who possess a required set of skills, such as language fluency or product expertise.
Skill requirements are assigned to the QueueTask node in Webex Connect. The calls are sent to a queue for distribution to agents who have a matching set of skills. If an agent doesn’t become available within a time interval specified in the QueueTask node, the skill requirements can be removed or reduced by specifying skill relaxations in the QueueTask node.
Contact Priority is assigned to the QueueTask node in Webex Connect. The calls are routed to agents based on the value of the Contact Priority field. For more information on this, refer to Queue Task section.
| 1 |
Define skills. For more information, see Skill definitions. You can define the following types of skills:
|
| 2 |
Define skill profiles. A skill profile is a set of skills that can be collectively assigned to a team or agent. Each skill in the profile is assigned a specific value. For example, a skill of English might be assigned a high level of proficiency in one skill profile and a lower level in another profile. For more information, see Skill Profiles. Currently, Webex Contact Center does not support skill profile assigned to a team. |
| 3 |
Assign skill profiles to agents. An individual agent is assigned a skill profile. For more information, see View details of a user. |
| 4 |
From the Management Portal navigation bar, choose . |
| 5 |
Create a queue with channel type as Social Channel, Email, or Chat. |
| 6 |
In the Contact Routing Settings section, choose Skills Basedfrom the Queue Routing Type drop-down list. |
| 7 |
Create a flow with QueueTask node in Webex Connect that defines how to treat the contact. |
| 8 |
Add the skill requirements and skill relaxations in the QueueTask node. For more information on how to select Skill Requirements and specify Skill Relaxations, see the QueueTask node in the Webex Connect online help documentation. In the Webex Connect application, navigate to Help > Documentation > Platform Documentation > QueueTask.
|
Digital Channel Consoles
The digital channel administration portal is split into the following areas:
-
Admin console–Administrators can manage tenant-wide configurations for digital channel offerings such as policies and channel asset configurations. In the Management Portal navigation bar, click New Digital Channels to launch the default console.
-
Customer Care console–Primarily used to access past conversation transcripts and agent monitoring capabilities.
For more information, see the Admin Console and Customer Care console sections of Webex Engage Admin and Setup Guide.


