- Home
- /
- Article

Thanks for your feedback.

 In this article
 Feedback?
Transfer action allows you to breakdown complex business tasks into modular, multi-agent work flows, where individual agents handle specific responsibilities. Use these agents to seamlessly transfer calls.
The custom transfer action feature enables you to transfer calls from one AI agent to another AI agent, to a human agent, or to any another desired destination (voicemail box, hunt group, or any number) to ensure seamless customer experience. By using a transfer action, you exit out of the escalated path of the Virtual Agent V2 Activity in Flow Builder with metadata that allows you to orchestrate the next path in the conversation. See the following sections for more details.
Some business scenarios require the AI agent to announce the transfer so the customer knows what is happening. In other scenarios, using transfer-related language can be confusing or undesirable.
Based on your need, you can configure the transfers as:
- Announced transfer: AI agent clearly informs the customer about an upcoming transfer (for example “Let me transfer you to a billing specialist”).
- Silent transfer: AI Agent performs the transfer silently without mentioning it to the customer. In these scenarios, the AI agent uses neutral language (for example "Let me take care of that", "Please hold on a moment while I process your request").
See the following sections for details.
Announced transfers
Before you begin
Ensure to create multiple agents for a complex task.
| 1 |
Create an action: |
| 2 |
Route the interaction using a flow: Once the flow regains control, route the interaction to a human or another AI agent.
Use the metadata from the Virtual Agent V2 activity to identify the specific transfer
trigger. You can use |
| 3 |
Configure Voice: Because the caller is aware of the transition, it is
recommended to set a distinct voice using the |
| 4 |
Data Sharing: Conversation history is shared automatically. You may optionally pass additional information using the custom data field. |
Silent transfers
Before you begin
Ensure to create multiple agents for a complex task.
| 1 |
Create an action: |
| 2 |
Route the interaction using a flow: When the flow regains control, route the interaction to a human or another AI agent.
Use the metadata from the Virttual Agent V2 activity to identify the transfer trigger.
You can also use the |
| 3 |
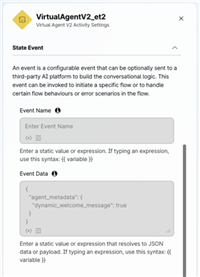
Configure the Welcome Message: Perform the following configuration in the State Event setting
of the Virtual Agent V2 activity. Ensure dynamic_welcome_message is set to True for
the receiving agent to skip the static welcome prompt.
|
| 4 |
Configure Voice: To maintain a seamless experience, it is recommended to use the same voice for the
receiving agent using the |
| 5 |
Data Sharing: Conversation history is shared automatically. You may optionally pass additional information using the custom data field. |
Best practices when creating transfer actions
See the following best practices when creating transfer actions:
- Modularity: Use actions to keep your logic clean by separating specialized tasks into dedicated agents.
- Metadata: Always leverage VAV2 activity metadata to define the routing logic.
- Consistency: When performing silent transfers, maintaining the same voice profile helps ensure the caller perceives the interaction as a continuous experience.
- Define agent roles in transfer condition: Treat the transfer condition as an action description. When configuring your multi-agent setup, focus on the specific function of the receiving agent rather than the act of transferring. For example, describe the agent by its capability, such as a 'Booking Agent' that handles tasks like booking, canceling, or rescheduling appointments. This provides clearer context for the LLM.


