- Home
- /
- Article

Troubleshoot your Cisco Desk Phone 9800 Series
 In this article
 Feedback?
Here's what you need to know about troubleshooting your Cisco Desk Phone 9800 Series.
Find information about your phone
Your administrator may ask for information about your phone. This information uniquely identifies the phone for troubleshooting purposes.
Before you begin
| 1 |
Press Settings |
| 2 |
If prompted, enter the password to access the Settings menu. You can get the password from your administrator. |
| 3 |
Select About this device. You can view the following information:
|
| 4 |
Select Back to exit the About this device screen. |
Check phone issues and diagnostics
If you are experiencing any issues with your phone (for example, network connection, phone registration, or phone upgrade), then you see an error message displayed under Issues.
Use the information and functions listed under the Issues and diagnostics section to collect data and troubleshoot any problems on your phone. Typically, this section contains the following functions:
|
Diagnostics |
Function |
|---|---|
|
Issues | Select this item to view the detected issues. When issues are found, it shows the number of issues. If no issues are detected. it shows None. |
|
Diagnostics |
Select this item if you want to see the statistics information about the network, service, and calls. The specific statistics vary with the calling system that your phone is deployed to. |
|
Report problem |
Select this item if you want to collect and send your device logs to your administrator. |
| 1 |
Press Settings |
| 2 |
If prompted, enter the password to access the Settings menu. You can get the password from your administrator. |
| 3 |
Select and go to Issues or Diagnostics as you need. |
| 4 |
Select the field as you need to see the relevant statistics. |
| 5 |
Select Back to return to the upper-level menu. |
Report problem from your phone
When you seek for help on phone issues from your administrator, send your device logs to the administrator for troubleshooting.
| 1 |
Press Settings |
| 2 |
If prompted, enter the password to access the Settings menu. You can get the password from your administrator. |
| 3 |
Select . |
| 4 |
Enter the date and time when the issue occurred. By default, the current date and time are populated, you can further change them.
|
| 5 |
Choose a description from the Problem description list. |
| 6 |
Select Submit. After the report is sent, you can see the report file name and the submission time. If your phone can't sent out the problem report, the report file is generated locally, and you can download the file from a given IP address. |
Check network status
Check the network connection details when you are troubleshooting a network issue. The Network status screen in the phone menu gives you the details about the Ethernet or Wi-Fi settings.
Cisco Desk Phone 9811, 9841, and 9851 don't support Wi-Fi network. The network status doesn't show wireless network related information.
| 1 |
Press Settings |
| 2 |
If prompted, enter the password to access the Settings menu. You can get the password from your administrator. |
| 3 |
Do one of the following actions based on your phone model:
|
Check VPN statistics
You can check the VPN statistics on the phone screen. The VPN connection statistics contains the detailed information of current and past connections, and possible reasons of the failed connections (if existing).
This VPN connection is only available for the phones registered to Cisco Unified CM.
- Press Settings
 .
. - If prompted, enter the password to access the Settings menu. You can get the password from your administrator.
- Select .
- Select a VPN connection statistics (current, past, or failed) from the list. See the VPN connection statistics table for detailed information.
| VPN connection statistics | Description |
|---|---|
| Current connection |
|
| Past connections |
Select a time stamp from the list, and view the following information:
|
| Failed connections |
Select a time stamp from the list, and view the following information:
|
Check device security status on the phone
Your phone checks the device security status automatically. If it detects potential security threats on the phone, the Issues and diagnostics menu can show the details of the issues. Based on the reported issues, your administrator can take operations to secure and harden your phone.
The device security status is available before the phone is registered to the call control system (Webex Calling or BroadWorks).
To view details of security issues on the phone screen, do the following:
| 1 |
Press Settings |
| 2 |
Select . Currently, the device security report contains the following issues:
|
| 3 |
Contact your administrator for support to resolve the security issues. |
Restart your phone
You may need to restart your phone to resolve some issues or for some changes to take effect. A phone restart doesn't erase the phone settings. You can restart your phone either from the touch user interface.
| 1 |
Press Settings
|
| 2 |
If prompted, enter the password to access the Settings menu. You can get the password from your administrator. |
| 3 |
Do one of the following actions based on your phone model:
|
| 4 |
Select Restart in the prompt window. |
Reset security settings (Cisco Unified CM)
The security certificate reset option isn't available on phones that are registered to Cisco BroadWorks or Webex Calling.
If you want to change the phone registration from a Cisco Unified Communications Manager (Unified CM) server to another Cisco Unified CM server , we recommend that you delete the security settings on your phone. Security settings reset removes the Certificate Trust List (CTL) file. The phone gets the new CTL file from the new Unified CM cluster so that the phone can register successfully.
| 1 |
Press Settings
|
| 2 |
If prompted, enter the password to access the Settings menu. You can get the password from your administrator. |
| 3 |
Do one of the following actions based on your phone model:
|
| 4 |
Select Reset in the prompt window. |
Reset your phone to the factory settings
A factory reset clears all settings from your phone. You lose your current registration and all the configuration after a factory reset. You must register and set up your phone as you do for a new phone before you can use it again.
You can use the phone menu to factory reset your phone. If you can't access to the menu from the phone screen, you can use the phone keypad to reset your phone.
| 1 |
Press Settings |
| 2 |
If prompted, enter the password to access the Settings menu. You can get the password from your administrator. |
| 3 |
Do one of the following actions based on your phone model:
|
| 4 |
Select Reset in the prompt window to start the reset. Your phone reboots when the reset completes.
|
Use these steps to reset the phone to the factory default settings using the keypad.
| 1 |
Unplug the phone:
|
| 2 |
Wait 5 seconds. |
| 3 |
Press and hold # and plug the phone back in. The Headset button, the Speaker button, and the Mute button light up.
|
| 4 |
As soon as the Mute button goes off, release # and press 123456789*0# in sequence. When you press 1, the Headset button goes off. You have less than 15 seconds to finish pressing the keys. The phone goes into a normal startup if you don't finish the input before it times out or you press the keys out of sequence. After you finish pressing these keys, the Mute button lights up, indicating the factory reset process has started. Don’t power down the phone until it completes the factory reset process and the Welcome screen appears. |
You can remote restore your phone to its default settings from the phone web page only when your phone is registered to Cisco BroadWorks or Webex Calling.
|
Reset your phone from the phone web page with one of the methods:
|
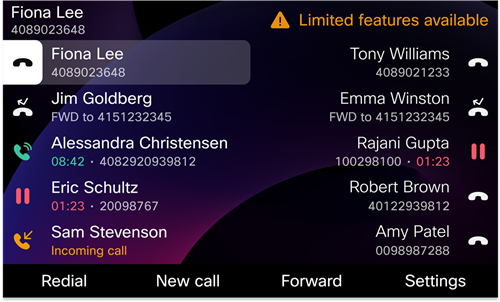
Limited features available notification
When the connection to Webex cloud is unreachable or breaks, you will see the Limited features available notification at the header of the phone home screen. For example:

On Cisco Desk Phone 9871 and Cisco Video Phone 8875, only the warning icon  displays on the home screen. You can tap the icon to show more information.
During this situation, phone gets connected to the Site Survivability Gateway (SGW) so that you can use at least basic calling features. SGW services are deployed within your local network, hence, the phone supports only basic calling features.
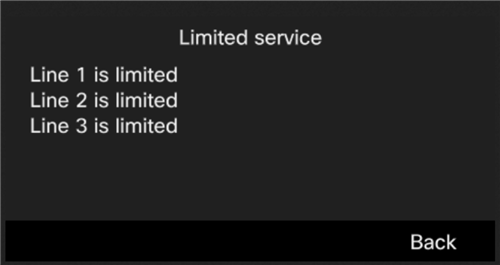
You can find out which lines are impacted by the issue under the . For example:

When you experience this issue, your administrator can help troubleshoot.

 Select
  In the
  .
. 
