- Home
- /
- Article

Thanks for your feedback.

Collaborate with Webex in Salesforce
 In this article
 Feedback?
Get everything you need from Webex without leaving Salesforce. Consolidate the customer interactions that matter into one place. Access Webex features with context provided by the Salesforce record or Home Page. See messages, make calls, and manage your Salesforce records anytime. Webex makes it easy to link inbound and outbound calls with Salesforce objects.
Sign in to Webex from Salesforce
| 1 |
From the Salesforce Home page, click Sign in on the Webex widget. |
| 2 |
Enter your email address and click Next. |
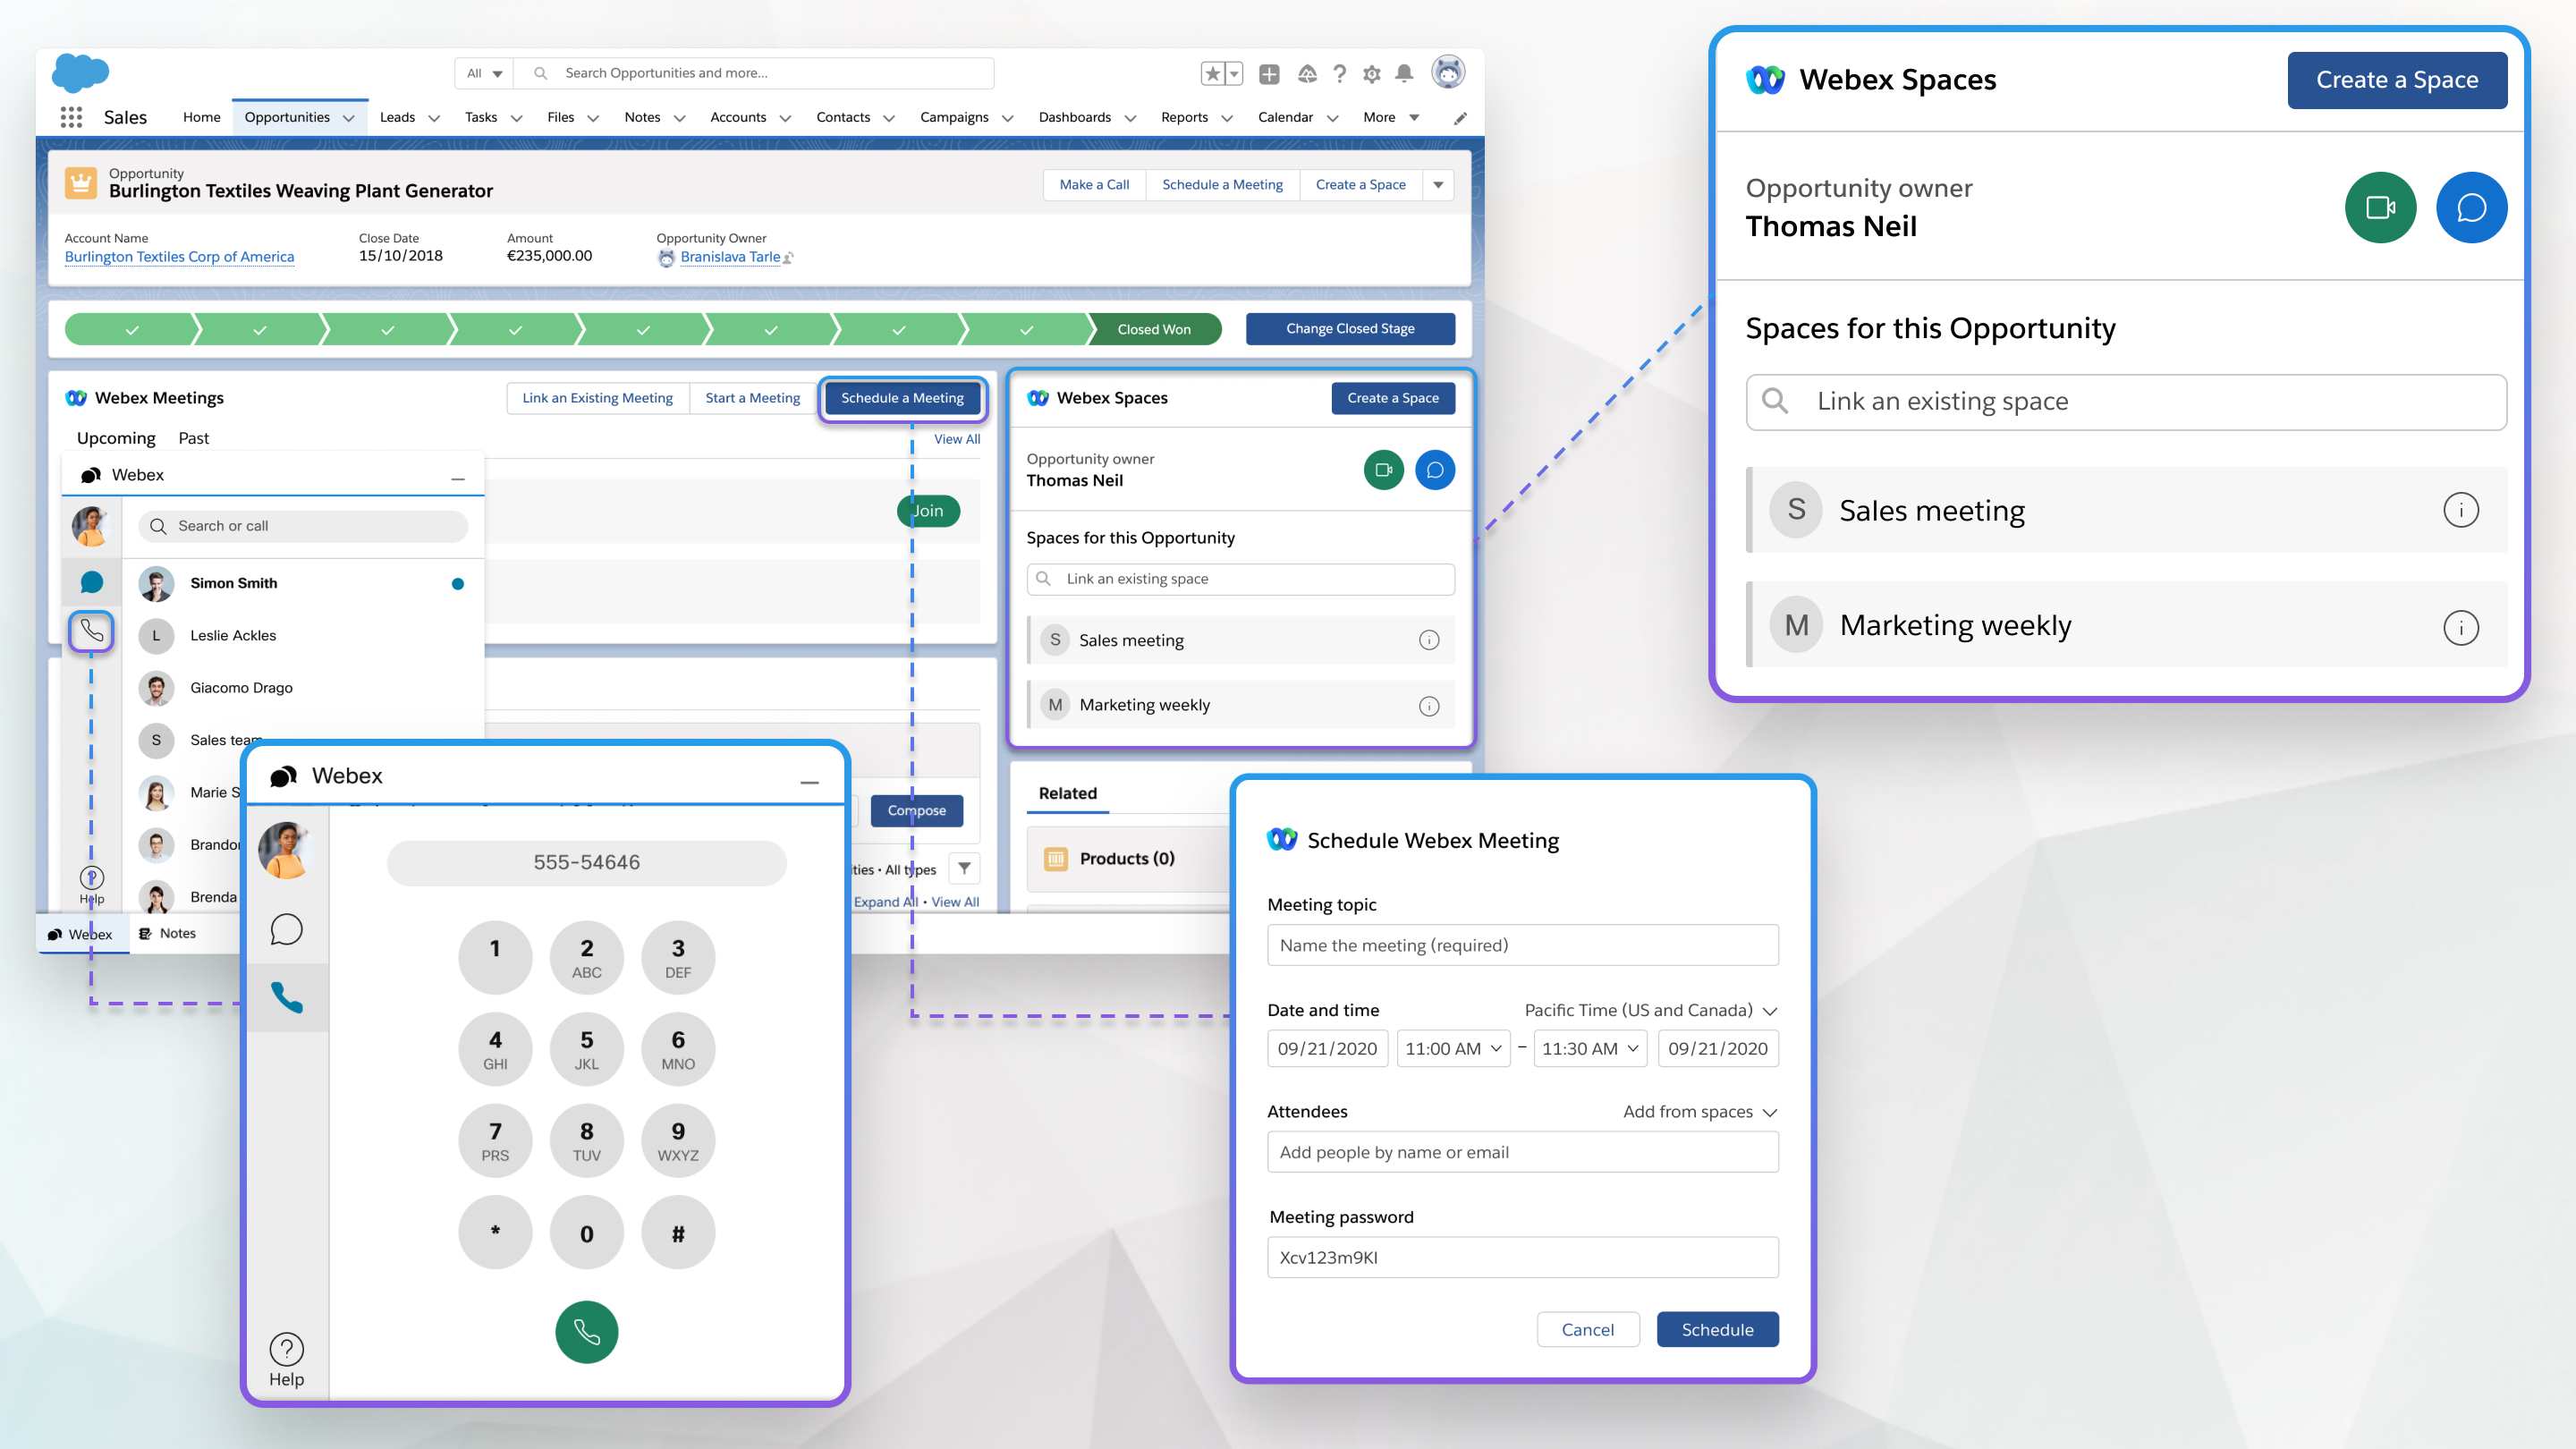
You can create Webex App spaces in Salesforce that are based on objects. Objects are database tables that allow Salesforce to store data specific to the organization in Salesforce.
You can see any space that you're a member of in Salesforce. When you create a space that's based on a Salesforce object, the owner of that object is automatically added to the space you create.
| 1 |
From the Salesforce Home page, create an object such as an opportunity or case, or select one that you’ve already created. |
| 2 |
Select Create a Space. |
| 3 |
Select Autofill with details to automatically name the space and to add all team members from teams associated with this object. |
| 4 |
Select Include notifications bot to receive bot notifications in the space when changes are made to the object. Your administrator configures how and when the notifications bot sends messages to the space. |
| 5 |
Enter a Space name, add people to the space, and click Create. |
You can link existing Webex App spaces to a Salesforce object, such as an opportunity or case, so everyone is aware of what is being discussed.
| 1 |
From the Salesforce Home page, select an object. |
| 2 |
Search for the name of the space that you want to link in the Link an existing space field. |
| 3 |
Select Link next to the space you want to link. You can link multiple spaces to the same object. |
You can start a space meeting with other space members, unlink a space from an object, change the space name, or add and remove people from the space all from Salesforce.
| 1 |
From the Salesforce Home page, select the object with the space linked to it that you want to manage. |
| 2 |
Select the information i. |
| 3 |
Choose:
The Video call and Chat icons also appear beside the object owner, and you can use them to contact the owner directly. |
| 4 |
Select Save. |
You can schedule a Webex meeting that is related to an object.
| 1 |
From the Salesforce Home page, select the object that you want to schedule a meeting for. |
| 2 |
Select Schedule a Meeting. |
| 3 |
Enter a Meeting topic. |
| 4 |
Choose a Date and time for the meeting. |
| 5 |
Add Attendees to the meeting. Choose Add from space or team to add all the people from one of the spaces or teams that you linked to this object. |
| 6 |
Use the calendar to check the availability of the attendees you add. You won't be able to view the availability of attendees outside of your organization. |
| 7 |
Select Schedule. The meeting information appears. |
|
From the Salesforce Home page choose one of the following:
|
You can link existing Webex meeting from your calendar to a Salesforce object, such as an opportunity or case, if you need to discuss anything related to the object.
| 1 |
From the Salesforce Home page, select an object. |
| 2 |
Select Link an existing meeting. |
| 3 |
Use the From and To fields to show all of your Webex meetings that occur during that timeframe. |
| 4 |
Select Link next to the meeting you want to link. You can link multiple Webex meetings to the same object. |
| 1 |
From the Salesforce Home page, select the object that you recorded a meeting for. |
| 2 |
Choose Past and select the recording transcript. |
| 1 |
From any page in Salesforce, select Webex. |
| 2 |
Click Calling, enter the phone number, and select Audio Call. When you start to enter a phone number, Salesforce contacts with a matching number appear. |
| 3 |
Confirm that you want to make the call in Webex App. |
You can call any contact that is associated with any Salesforce object.
| 1 |
From the Salesforce Home page, select the object with the associated contact you want to call. |
| 2 |
Select Make a Call and select Audio Call for the contact you want to call. |
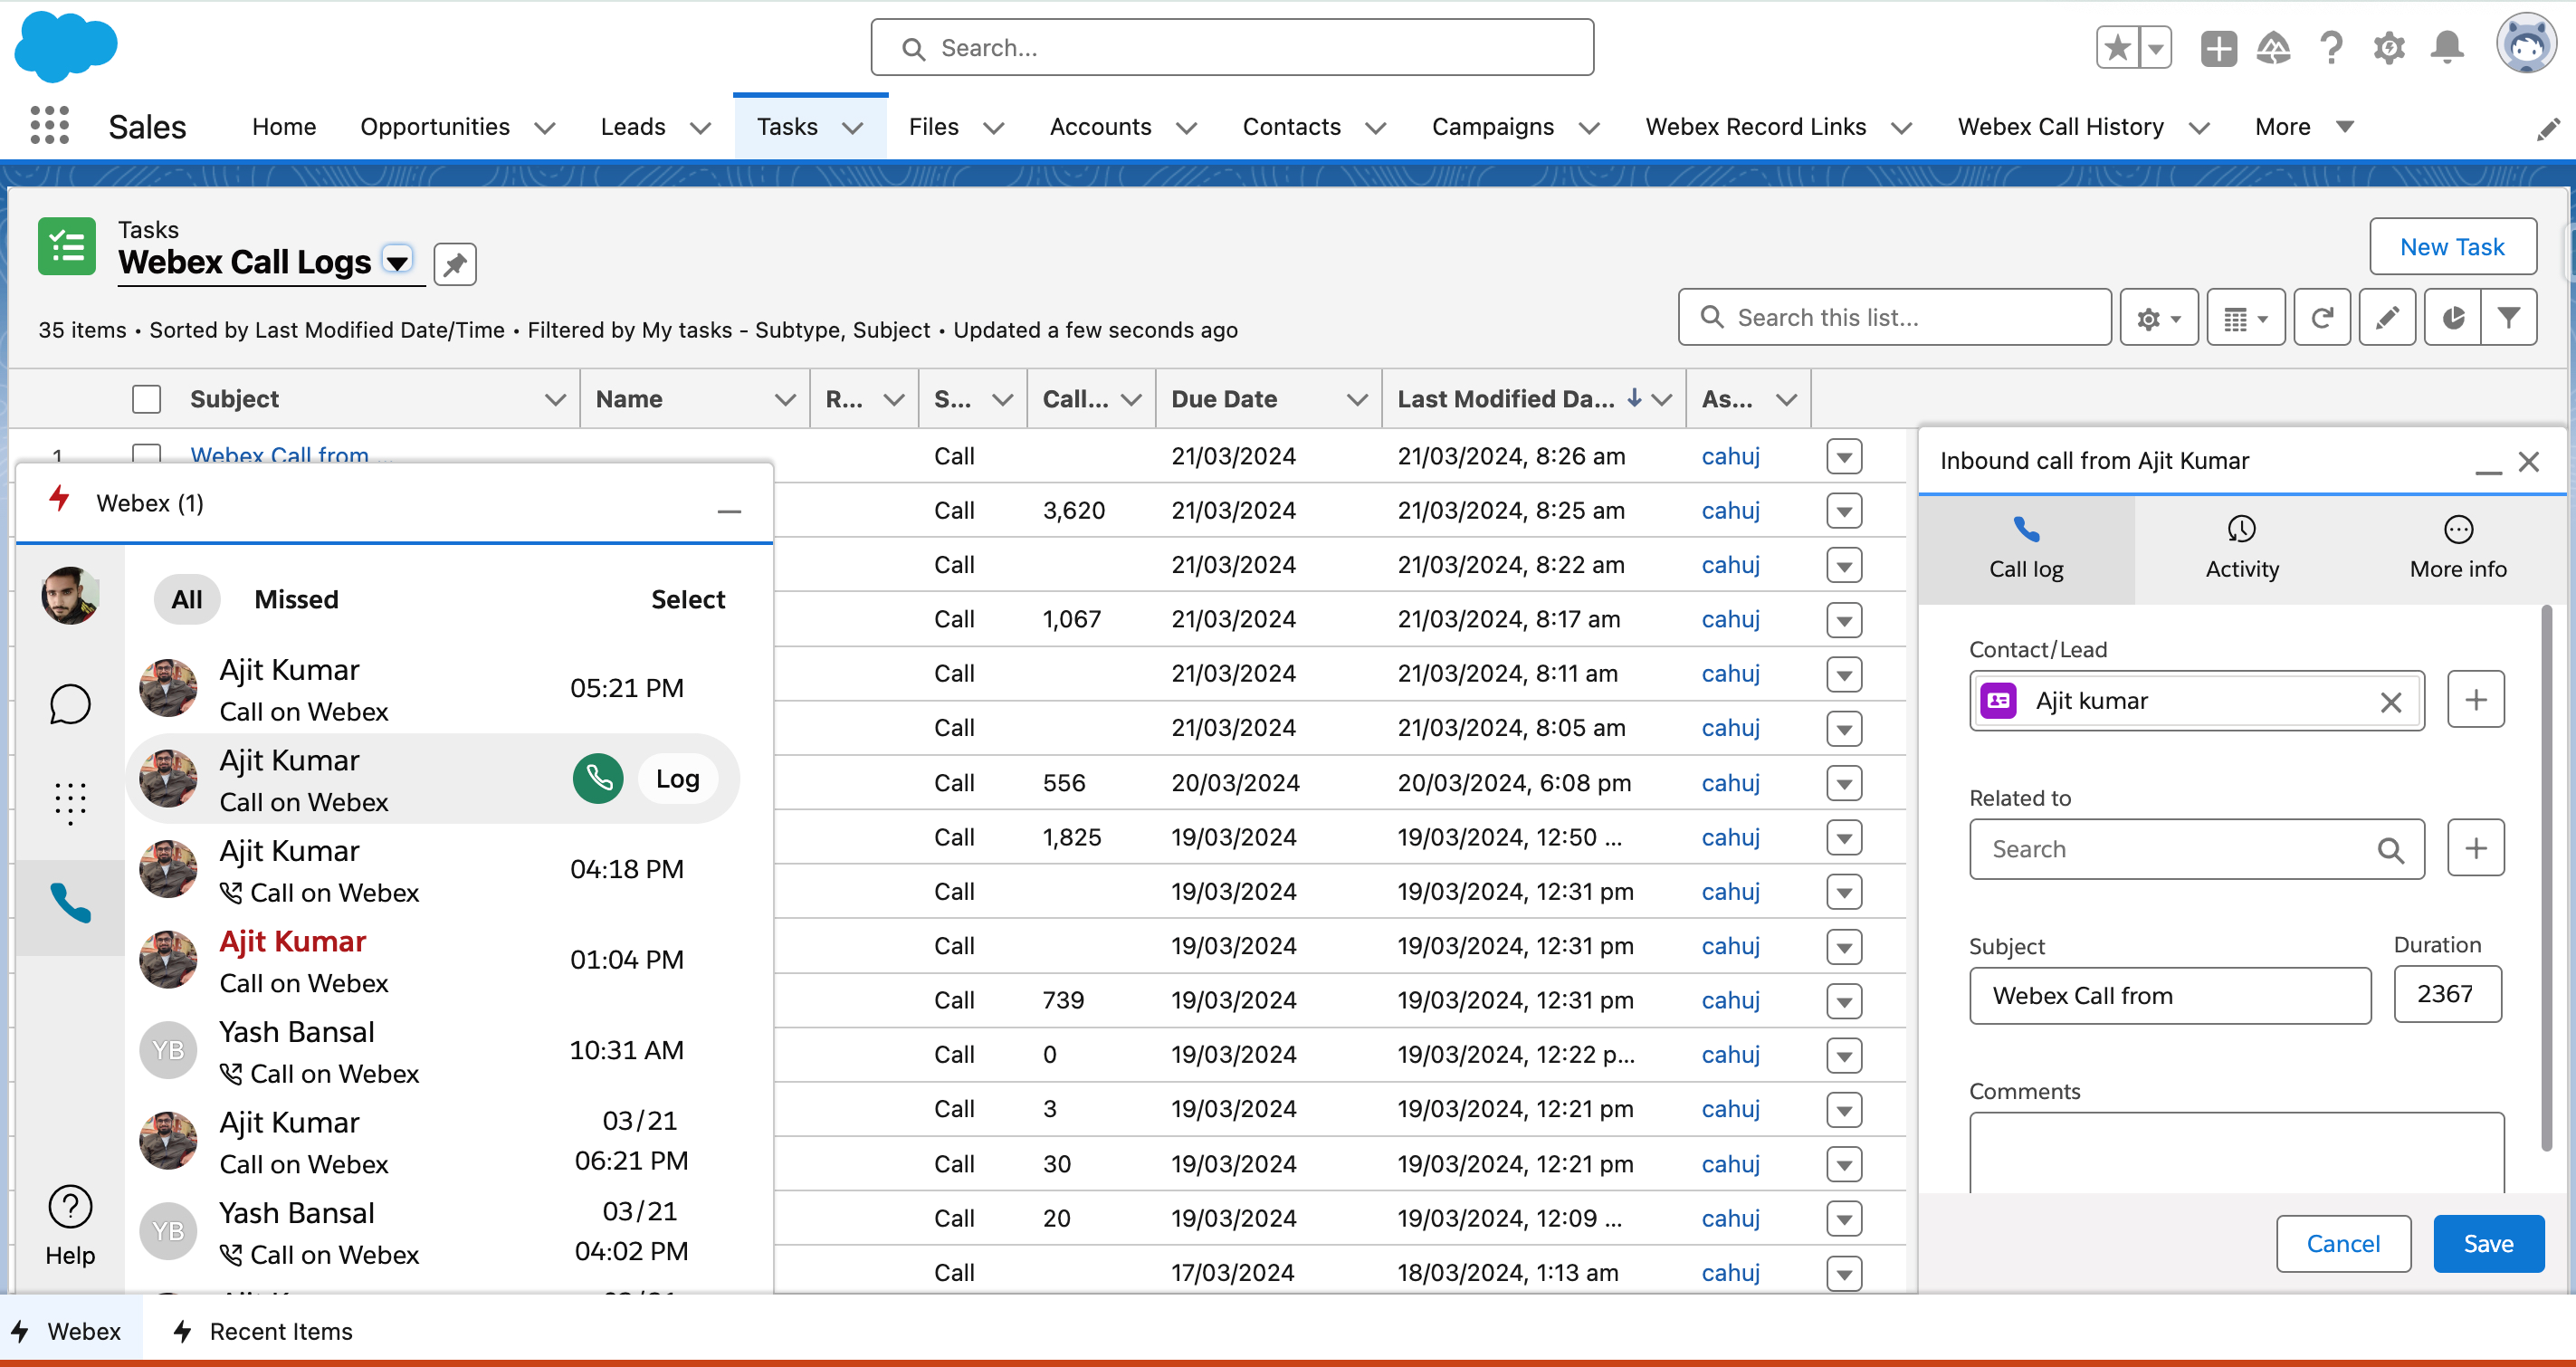
While you are on an inbound or outbound call, you can manage your Salesforce records. If you are talking with someone who is a new contact or lead, you can add them to your database and create related objects for them at the same time.
| 1 |
If no Salesforce record exists for the person on the call, select New Contact or New Lead.
The name of the contact or lead automatically appears if a record already exists for them.
|
| 2 |
Search for and select the record in the Contact/Lead field to link them to the Salesforce record. |
| 3 |
If you want to create a new object related to this case, such as a case or opportunity, select New <object>. |
| 4 |
Search for and select the object in the Related to field to link it to the contact or lead. |
| 5 |
You can also add a Subject and Comments related to the call. |
| 6 |
Use the Activity tab to review the call history for this contact or lead.
You can select the contact's name to open their account page. If they don't have an account, their contact page is shown instead.
|
| 7 |
Use the More info tab to view all of the objects related to this contact or lead.
You can select an object to open the page related to it. Your administrator controls what you see on the More info tab.
|
Using the Webex for Salesforce integration's Call History feature, you can see a complete log of recent as well as missed calls, log a single call or multiple calls at once, and return calls directly from call history entries.
Review recent and missed calls
To review your recent and missed calls:
- Select the Webex utility component at the bottom of any page view and select the telephone handset icon to display your call history.
- You can scroll through All calls or select the Missed calls tab to view
calls you've missed.Missed calls are also displayed in the All calls tab in a red bold font.
- Select a call entry to see further details including a list of incoming/outgoing calls to the contact.
Log a call
To log an individual call:
- Select the Webex utility component at the bottom of any page view and select the telephone handset icon to display your call history.
- Hover over the call log entry you're interested in, and select Log adjacent the
entry.Call entries that have already been logged are denoted by a small folder icon adjacent the entry in the Call Log view.
- Enter any details you like in the Call log entry and select Save.The caller is automatically matched with a Salesforce Contact or Lead if one exists.
- You can view your logged calls by searching for Tasks in the Search apps and
items search box or select the Task tab from your Sales App Navigation
bar if you've added it there, and choose Webex Call Logs from the task type
list.
Log multiple calls
To log multiple calls:
- Select the Webex utility component at the bottom of any page view and select the telephone handset icon to display your call history.
- Select Select, toggle the check boxes adjacent the calls you'd like to log, and select Log multiple calls.
- The calls are logged and automatically matched to an existing Salesforce Contact or Lead if one exists.
- You can view your logged calls by searching for Tasks in the Search apps and
items search box or select the Task tab from your Sales App Navigation
bar if you've added it there, and choose Webex Call Logs from the task type
list.You'll also receive a Salesforce notification that you can select to view the log entries.
Return a call from history
To return a call from your call history:
- Select the Webex utility component at the bottom of any page view and select the telephone handset icon to display your call history.
- Hover over the contact you'd like to call and select the green telephone icon to place a call.
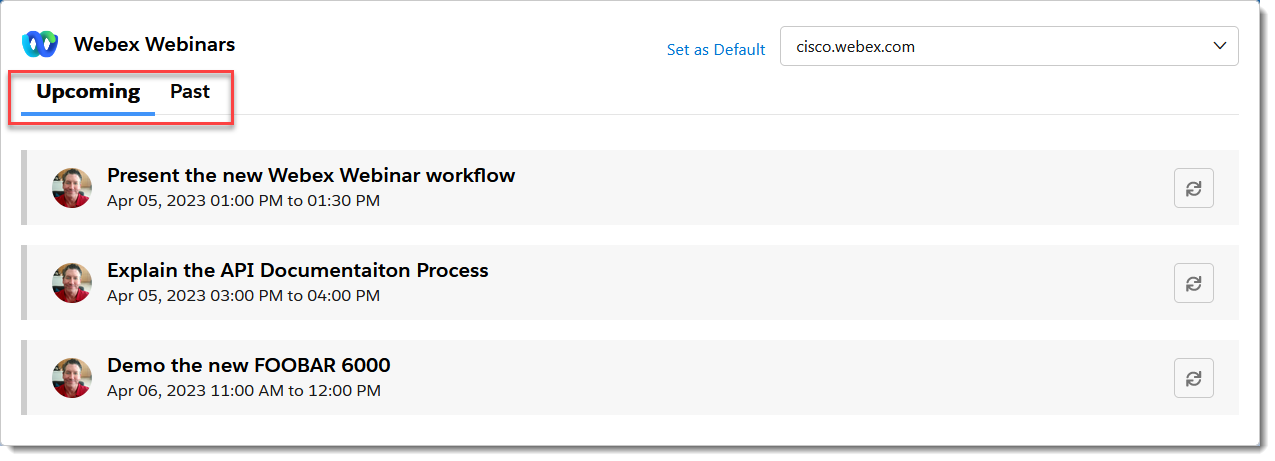
You can import attendee data from your scheduled and completed Webex Webinars and attach them to a Salesforce campaign as well.
To import attendee data from your Webex webinar:
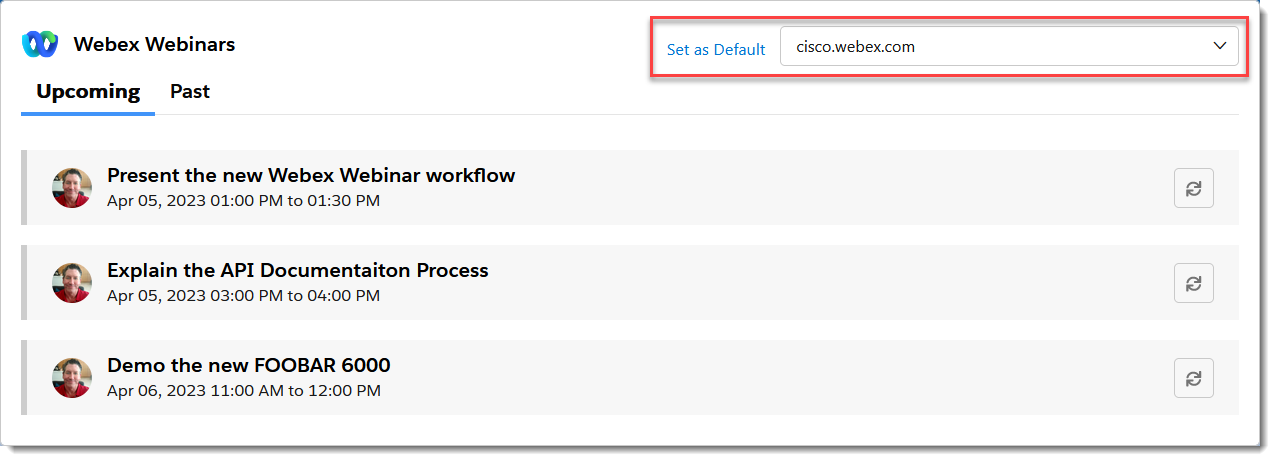
- Find the Webex webinar component on your home page, and choose the Webex domain in which
you created your webinars:
- Choose from either Upcoming or Past webinars:
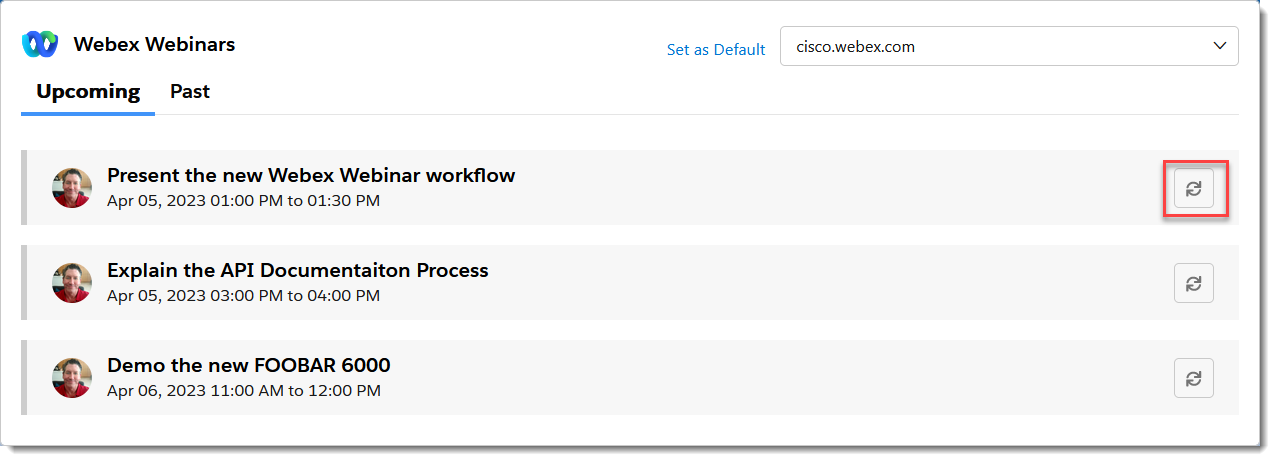
- Click the import button adjacent the webinar whose data you’d like to import:
- In the Import dialog, if required, search for an existing campaign or click
+ to create a new campaign into which you want to import the webinar data:
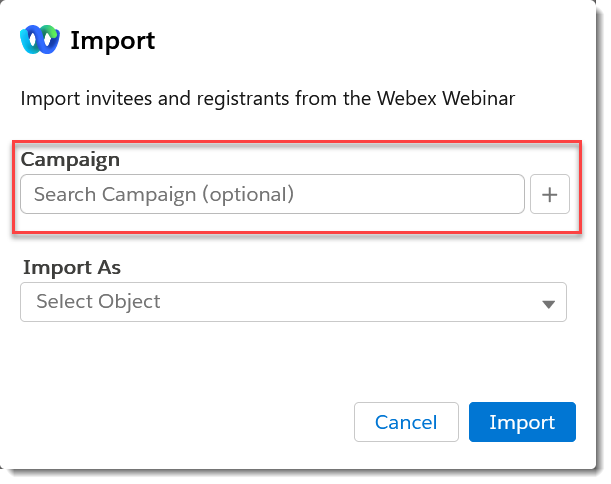
NOTE: You’ll need the appropriate Salesforce permissions to create new campaigns.
- If you’re importing data from an Upcoming webinar, choose the type of Salesforce object
from Import As and then click Import.
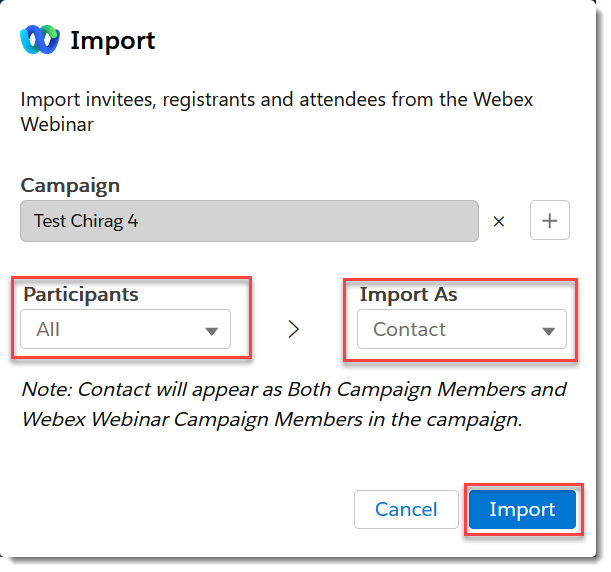 The note below Import As indicates where the imported information will appear in the campaigns depending upon the import settings mapped by your administrator.
 - If you’re importing data from a Past webinar, you can choose the status of the webinar
Participants records you’d like to import (All, Attended, or
No show), and then select the type of Salesforce object from Import
As. Click Import: The note below Import As indicates where the imported information will appear in the campaigns depending upon the import settings mapped by your administrator.
- If you’re importing data from an Upcoming webinar, choose the type of Salesforce object
from Import As and then click Import.
- You’ll see a banner indicating that the data is being imported and receive a
notification once the import has completed:

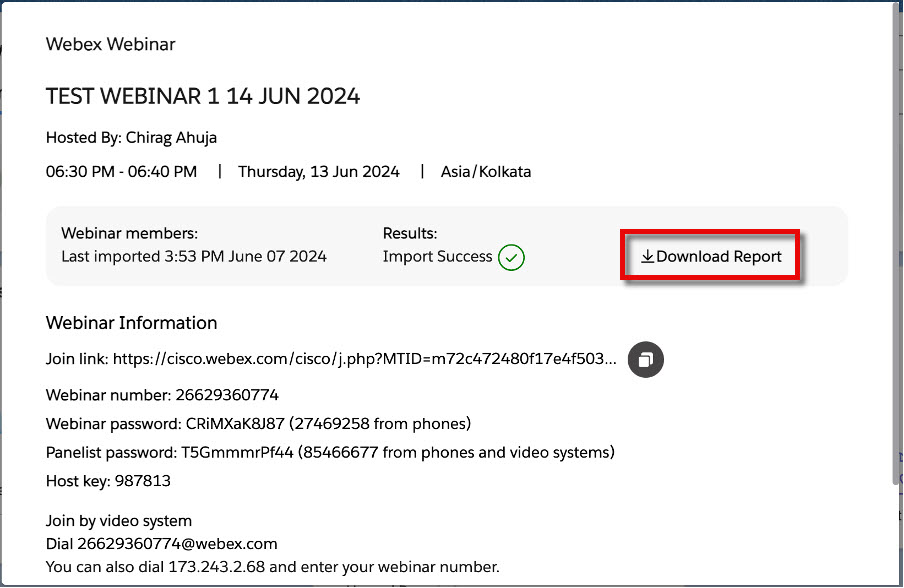
- The import process generates a comma separated values (CSV) report file for all imports,
including successful, partially failed, and failed ones. The report details each failure
or success and includes links to the mapped Salesforce records for each successfully
imported row. Select Download Report to download and review the CSV
report:
-
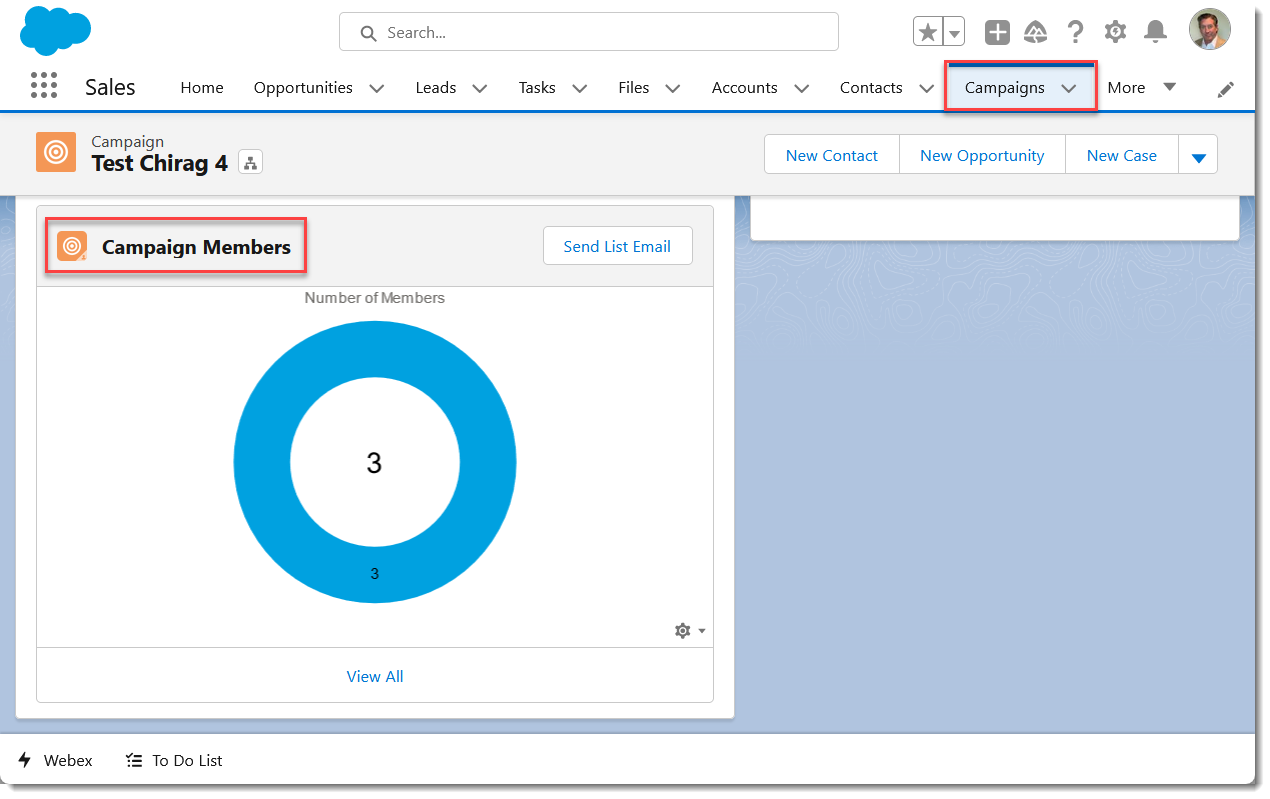
The Webinar data is imported as the selected Salesforce object type, and is available in the Webex Webinar Campaign Member or Campaign Members panel in the Salesforce Campaign tab, if a campaign was selected while importing, and depending upon how the Webinar data import was configured by your administrator.
From the example above, the Webinar data is imported as Salesforce Contact objects and is available, as explained in the note, in both the Campaign Members, as well as the Webex Webinar Campaign Members panels (only the Campaign Members panel is shown below):