- Home
- /
- Article

Thanks for your feedback.

How to Activate Enhanced Survivability
 In this article
 Feedback?
Here we discuss on the ordering process of licenses, the call scenarios based on which the ESN supports, Enabling the node for the specific region continued with the activation steps, and the troubleshooting steps. After the activation, the ESN takes over call routing responsibilities during these events and processes intra-site, PSTN, and emergency calls for the affected users. It provides a reliable backup solution to maintain communication capabilities during unexpected disruptions.
Overview
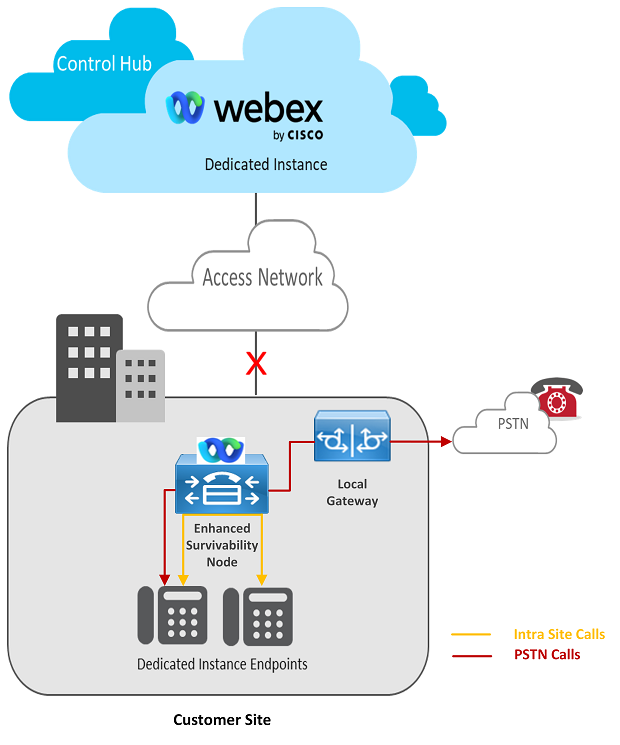
In an unlikely event of a customer’s network outage, or a cloud outage, preventing users at that site from connecting to Webex Calling Dedicated Instance, the Enhanced Survivability Node actively takes over the call routing responsibility. Throughout the outage, the Enhanced Survivability Node will process all Intra-site, PSTN and Emergency calls for the users in that site.
The Enhanced Survivability Node is used during any of the following events:
-
Customer Network outage – for e.g. WAN or ISP outage.
-
Dedicated Instance Calling service is unavilable.
Solution Overview
A Unified CM node deployed in Customer’s data center connects to the Dedicated Instance Unified CM Cluster as an Enhanced Survivability Node.
During a survivability event, all the devices and third-party integrations that support Enhanced Survivability Node will failover.
The following are the key specifications for an Enhanced Survivability Node:
-
A maximum of only 8 Enhanced Survivability Nodes can be deployed in a single Unified CM cluster.
-
The round-trip time (RTT) between the Unified CM cluster in Dedicated Instance and the enhanced survivability node should be equal or less than 200 milliseconds.
-
A maximum of 7500 devices can be registered on the Enhanced Survivability Node during an event of Survivability.
-
The feature is supported only on Edge or Partner Connect, cloud connectivity options.
The following are the key specifications for an Enhanced Survivability Node:The following table lists the feature comparison between SRST and Enhanced Survivability Node:
| Call Scenarios |
SRST |
Enhanced Survivability Node |
|
Basic and Supplementary Calls (Inbound, Outbound, Hold/Resume) |
Yes |
Yes |
|
PSTN Calls |
Yes |
Yes |
|
Nomadic E911 Support |
Yes |
Yes |
|
EPIC CRM Integration |
No |
Yes |
|
SIP integrations |
Yes |
Yes |
|
No |
Yes |
|
|
Paging Support (with CTI) |
No |
Yes |
How to order
| 1 |
Navigate to the CCW Ordering site, and then click Login to sign on to the site: https://apps.cisco.com/Commerce/guest. |
| 2 |
Click Create Estimate and add A-FLEX-3 SKU. |
| 3 |
Click Select Options and add the respective SKUs for Webex Calling. |
| 4 |
Select “Webex Calling Dedicated Instance” and “Enhanced Survivability for Webex Calling Dedicated Instance” and provide the region quantity. The region quantity can equal or less than the Webex Calling Dedicated Instance region quantity. Below are SKU names for the feature: A-FLEX-DI-ESV (applies to both Suite an EA) A-FLEX-DI-NU-ESV (applies to NU) A-FLEX-DI-ESV-E (applies to EDU in FLEX 3) A-FLEX-DI-NU-ESV-E (applies to EDU in FLEX 3) Upon successfully placing the order for Enhanced Survivability for Webex Calling Dedicated Instance, an email will be sent to the “E-delivery email address” provided in CCW, with the details for downloading the Unified CM bootable ISO. This would be required for you to install the Enhanced Survivability Node at your premise. We provide the bootable ISO only for the main Unified CM releases and in a scenario where your target version is different from the main release version, you would need to first install the main release using the bootable ISO provided and post that upgrade to the same version as the Dedicated Instance Unified CM publisher's version (upgrade ISOs are available to all to download). For any support related to E-Delivery, email to " edelivery-customer-support@cisco.com". |
Enable Enhanced Survivability
Once the Enhanced Survivability feature has been added to the subscription, in Control Hub you need to enable the feature for a particular region, where the Enhanced Survivability Node will be deployed.
| 1 |
Sign-in to Control Hub https://admin.webex.com/login, navigate to 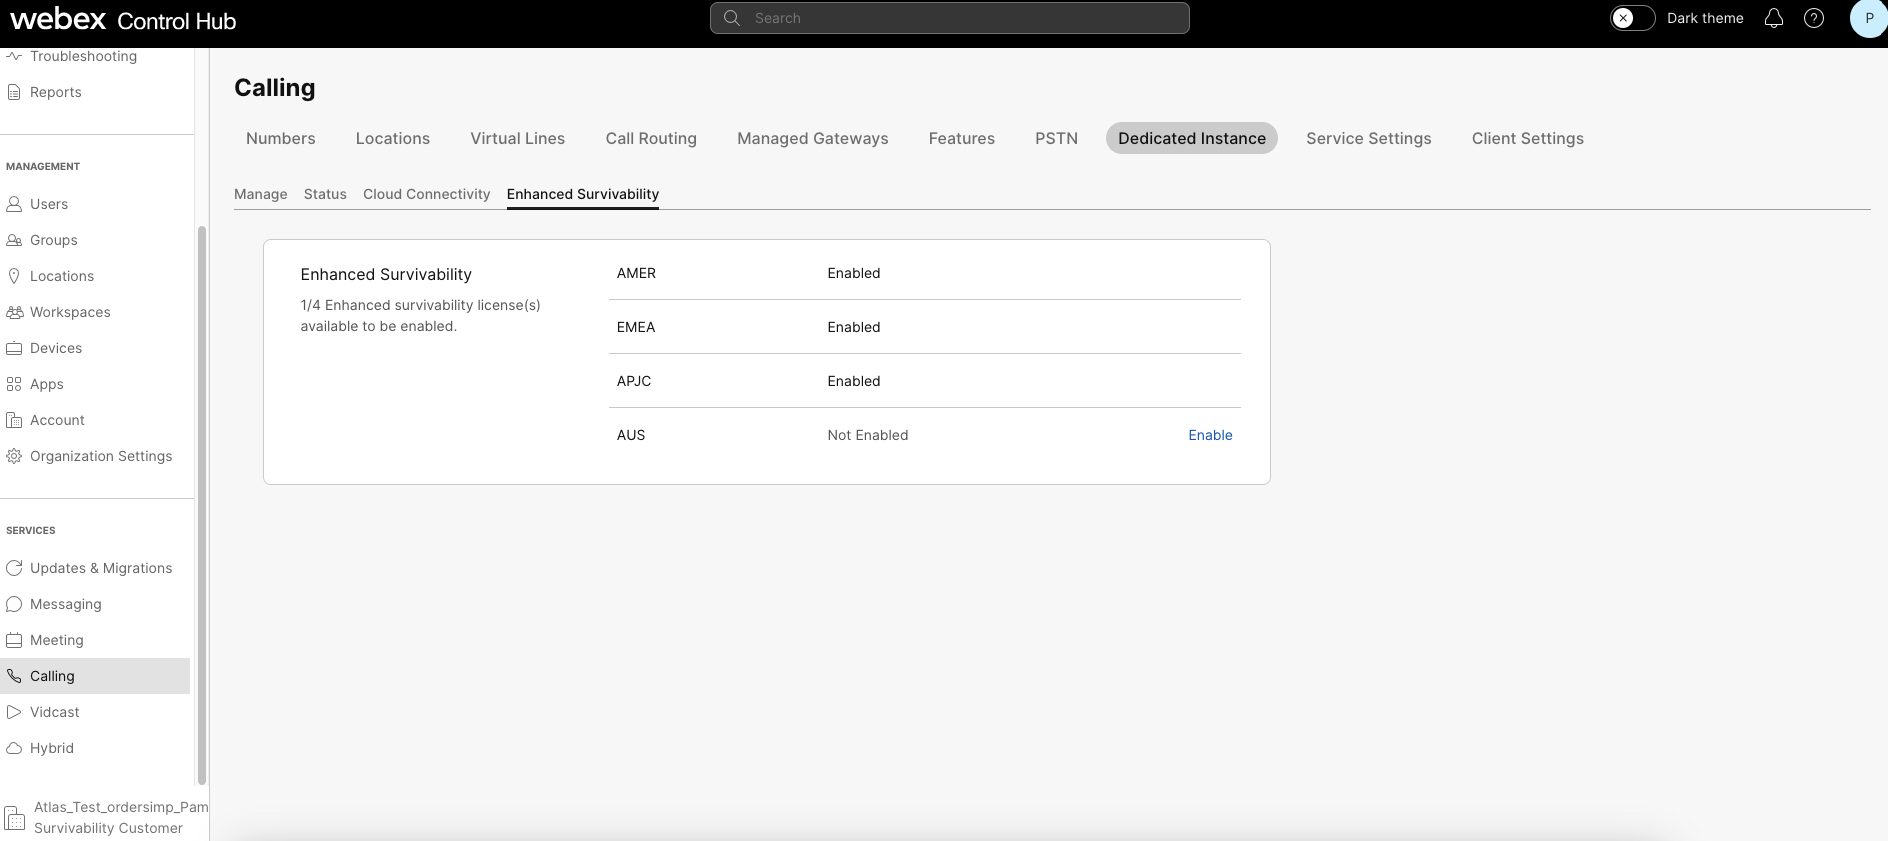
The feature can be enabled only in the region(s) where the Dedicated Instance service has been activated. |
| 2 |
Click Enable for the region to initiate the Enhanced Survivability activation. Once a particular region is enabled, the action is irreversible. |
| 3 |
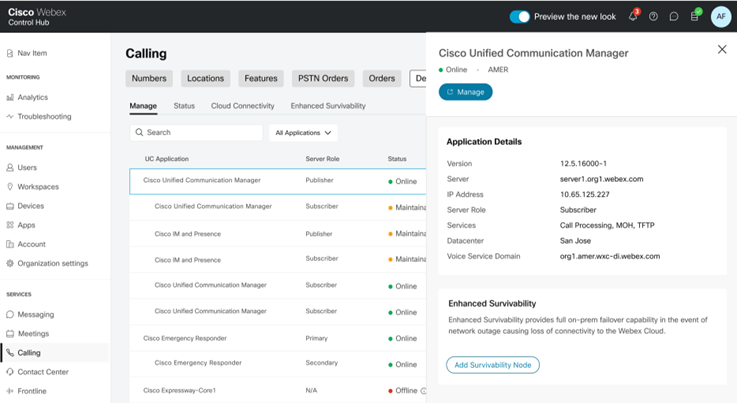
When successfully enabled, the Enhanced Survivability tile is visible in the Unified CM publisher's right panel in the respective region. 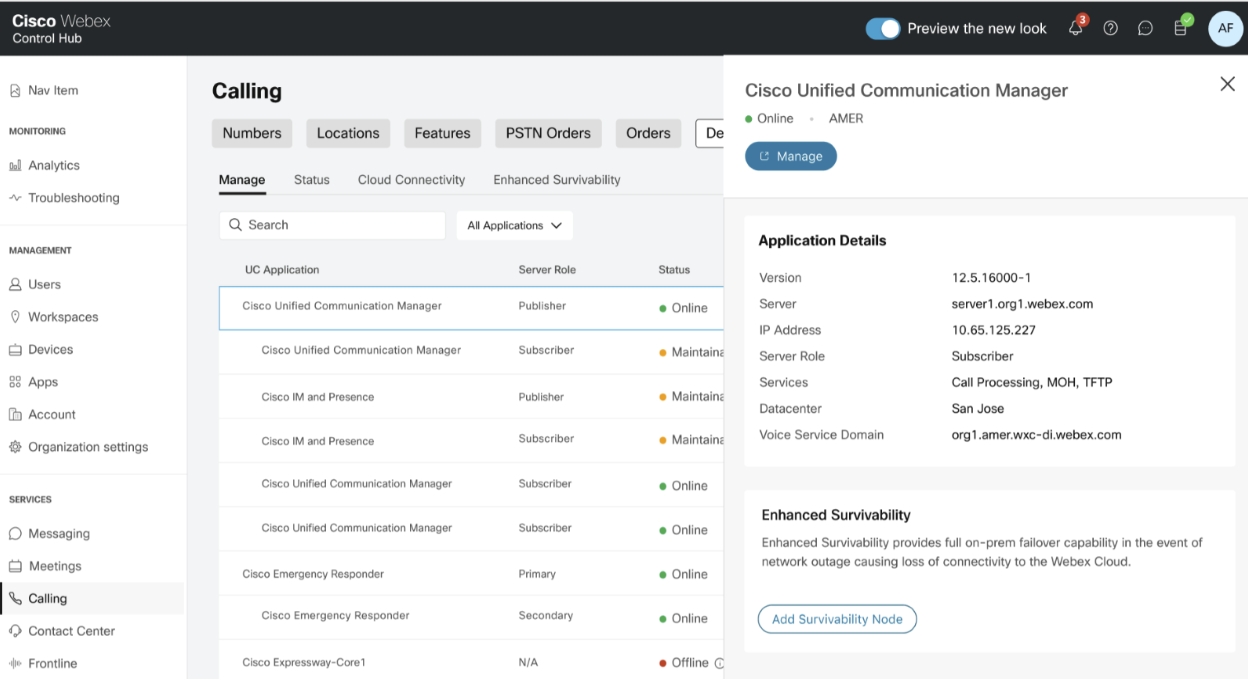
If a Dedicated Instance region has multiple Unified CM clusters, the Enhanced Survivability tile is available in all the cluster’s publisher nodes. |
Add Enhanced Survivability Node
| 1 |
Navigate to Calling > Dedicated Instance > Manage tab and choose a region. Under the region, select the Unified CM publisher for which the Enhanced Survivability Node must be added. |
| 2 |
In the Enhanced Survivability tile, click Add Survivability Node. |
| 3 |
Provide the IP address for the list of nodes and click Confirm. We provide the Enhanced Survivability Node’s Hostname. While installing the Enhanced survivability node, you should use the same Hostname and IP address. 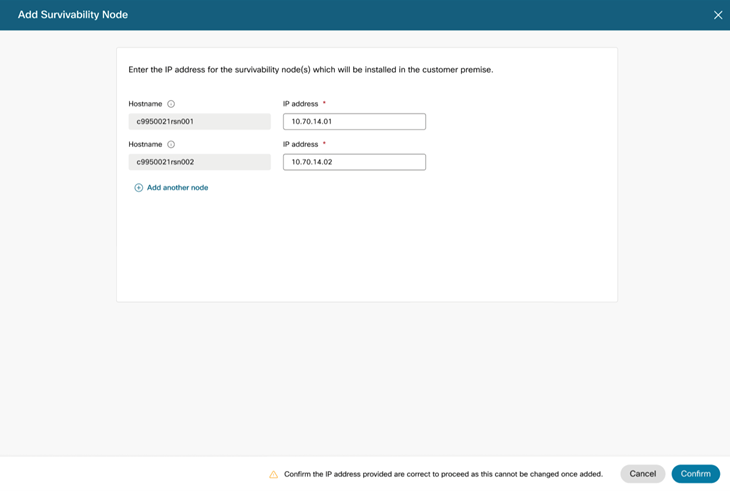
Maximum of only 8 Enhanced Survivability Nodes can be added and activated per Unified CM cluster. The IP address provided in the above form cannot be modified, once added. |
| 4 |
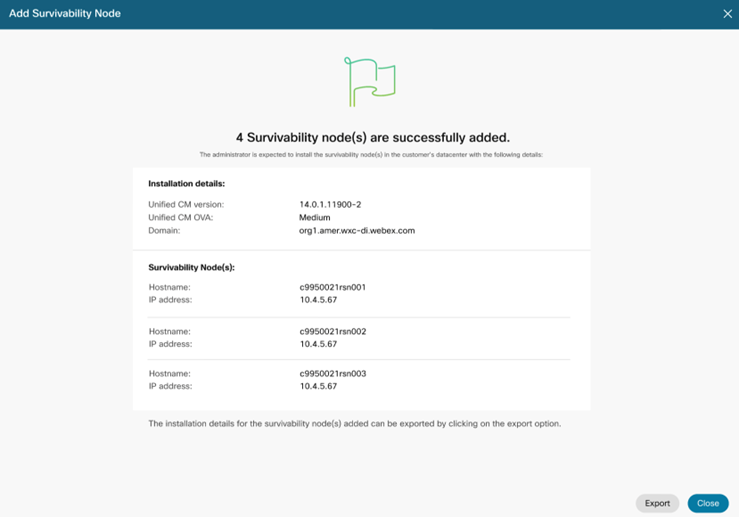
Click Confirm and the summary page appears. |
| 5 |
The summary page will provide all the details that requires for you to install the Enhanced Survivability Node. Click Export to download the detailed document. The downloadable export file has all the required details to install the Enhanced Survivability Node in your on-premises, such as:
|
Install Enhanced Survivability Node
Before starting the activation for Enhanced Survivability Node in Control Hub, the customer administrator is expected to install the enhanced survivability node. The enhanced survivability node is a Cisco Unified CM publisher installed as a stand-alone node in their site, preferably the branch site location. The Enhanced Survivability Node details are provided in the downloadable export file in Control Hub. Please refer to step (5) in Add survivability node to a Unified CM cluster. The bootable ISO required to install the Unified CM will be provided through email to the email address provided in "E-delivery email address" in CCW order. Using the link, the administrator can download the bootable ISO and proceed with the installation of Unified CM publisher (as stand-alone node) at their site.
For more information regarding pre-requisites to be validated before starting the installation of the node:
- For virtualisation requirements information, see Virtualisation requirements.
- For ports to be allowed on customer's firewall, see Port reference.
- For local DNS server configurations at customer's site, see DNS requirements.
- For Proxy settings at customer's site, refer Proxy settings.
The Enhanced Survivability Node is supported in Unified CM version V14 SU3 and above. We only provide the bootable ISO for the main release of Unified CM (e.g., v14 SU3 base version). Therefore, if the Dedicated Instance Unified CM cluster version is different from the downloadable bootable version, the administrator should install the base version and then upgrade to the same version as the Dedicated Instance cluster. The Unified CM upgrade ISOs are available for everyone to download.
Fresh Installation values for the ESN
- Select Product or Product Suite – Cisco Unified Communications Manager.
- Timezone – customer’s choice and it will be changed to Dedicated Instance publisher’s timezone once the activation is completed in Control Hub.
- Network Configuration –
- Hostname – As provided by Cisco in Control Hub
- IP Address - As provided by Cisco in Control Hub.
- IP mask – customer to fill their IP mask configured.
- GW address – customer to fill their default GW address on-premises.
- DNS-
- Primary DNS & Secondary DNS – customer’s internal DNS server IP (for more information, refer DNS Requirements.
- Domain – As provided by Cisco in Control Hub.
- Administrator Login Configuration –
- . Platform Administration (OS Admin) username – to be always “opsadmin”. The same needs to be provided in the Control Hub ESN activation wizard for Cisco (refer Activate Enhanced Survivability Node).
The username is required to be same for Cisco to monitor the ESN.
- Platform Administration (OS Admin) password – customer’s choice. The same needs to be provided in the Control Hub ESN activation wizard for Cisco (refer Activate Enhanced Survivability Node).
Password will be changed during the activation process.
- . Platform Administration (OS Admin) username – to be always “opsadmin”. The same needs to be provided in the Control Hub ESN activation wizard for Cisco (refer Activate Enhanced Survivability Node).
- Certificate Information – customer’s choice.
- First Node Configuration – Yes
- NTP server – customer’s NTP server IPs. Will be changed to Cisco’s NTP IPs during the activation process of ESN from Control Hub.
- Security Configuration – passwords to be provided by customer and the same needs to be entered in the Control Hub ESN activation wizard for Cisco ( for more information, see Activate Enhanced Survivability Node).
Passwords will be changed during the activation process.
- SMTP Host Configuration – No.
- Smart Call Home Enable Page – Disable all call home on system start.
- Application User Configuration – The username and password can be provided as per customer’s choice.
The username and password will be changed and provided back by Cisco once the activation of ESN is completed in Control Hub.
Activate Enhanced Survivability Node
| 1 |
In Control Hub, navigate to |
| 2 |
Select the desired Unified CM Publisher node> Enhanced Survivability and Click Activate for the Enhanced Survivability Node that needs to be added to the cluster as survivable node. |
| 3 |
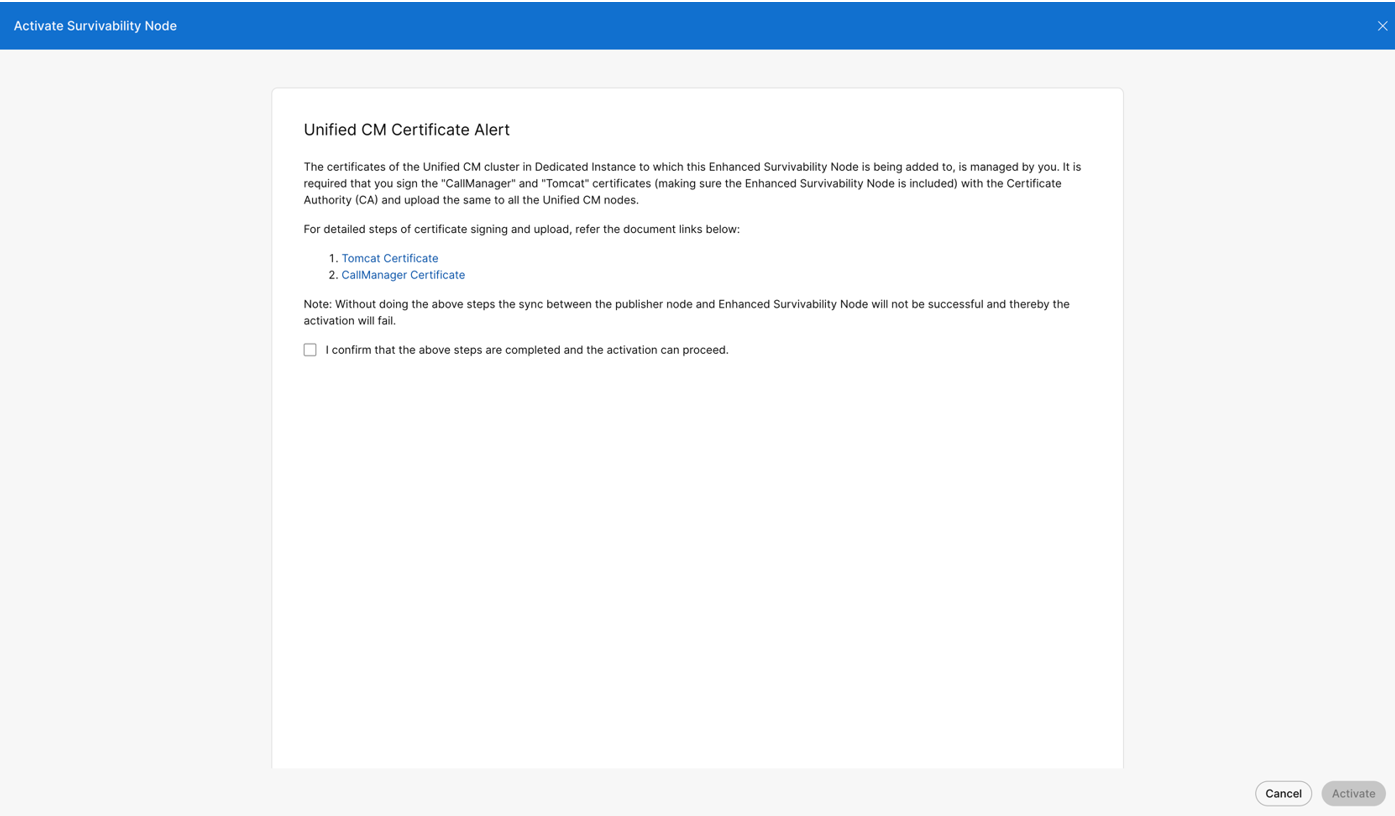
In the activation form, the admin would need to confirm that the Enhanced Survivability Node has been installed in the customer’s datacenter with the mentioned hostname and IP address. Only one enhanced survivability node can be activated at a time within a Unified CM cluster. |
| 4 |
The following details of the Enhanced Survivability Node installed needs to be provided to Cisco and this information is used for the conversion of Unified CM publisher node to Enhanced Survivability Node in the customer premise. OS admin username and password is of the RSN installed by the customer in their premise. 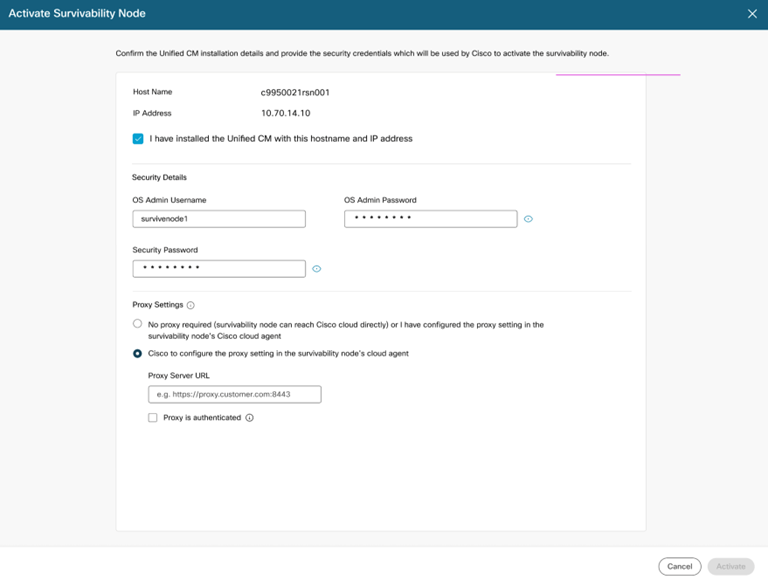
The proxy settings are optional and can be done by customer or Cisco will configure the same during activation. In case the proxy setting is required to be configured by Cisco, the “Proxy server URL” and authentication credentials needs to be provided in the form. |
| 5 |
Click Activate and then Confirm to start the Activation of Enhanced Survivability Node. |
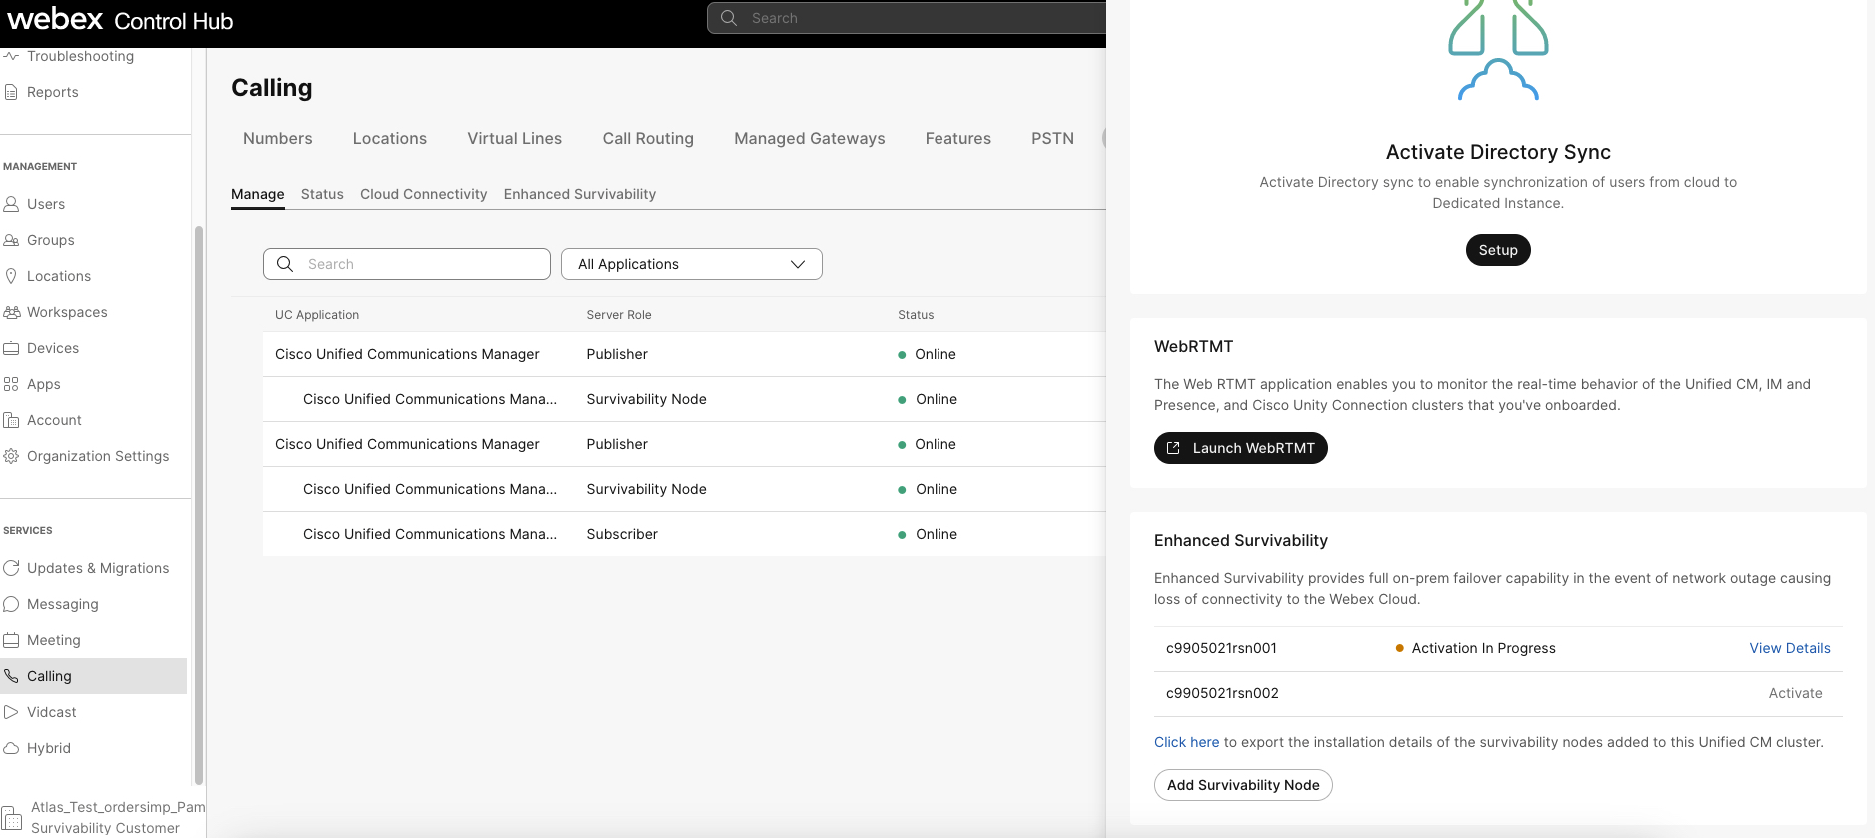
| 6 |
The status of the activation can be viewed under,
|
Troubleshooting
Pre-Check error Messages in Control Hub
The different pre-check errors displayed in Control Hub during the activation of the Enhanced Survivability Node is discussed below.
| Error title | Error description |
|---|---|
| Unable to connect to the on-premises Unified CM Publisher. | Make sure to allow the necessary firewall in your organization, so that we can connect to the on-premises Unified CM node from the Dedicated Instance cloud. Cisco also uses the OS Administrator credentials and security password provided in Control Hub during the activation for signing in to the on-premises United CM node, so confirm that the entered values are correct. |
| Mismatch in node type and version for Unified CM node on-premises. | The on-premises Unified CM node isn’t a standalone publisher, or the version doesn’t align with the Unified CM version deployed in the Dedicated Instance cloud. When installing the node, ensure that the version matches the Dedicated Instance cluster, and it’s a stand-alone publisher. |
| Enhanced survivability Node can’t connect to the Control Hub |
Connect the ESN to the Control Hub over the internet for completing the on-boarding process. Option 1: The node's network has a direct internet access, allowing the agent running on the enhanced survivability node to register with the Control Hub. If so, no action is required; simply select Continue to proceed with node activation. Option 2: In the enhanced survivability node, configure a proxy that allows the node to connect to the Control Hub. In this scenario, select "Update proxy" and enter the information to proceed with node activation. |
| Firewall ports aren’t allowed to complete activation. | Make sure that the neccessary firewall ports are allowed in the customer's site firewall. This is necessary to activate and operate the enhanced survivability node from the Dedicated Instance cloud. |
| NTP isn’t configured correctly or synced in the on-premises standalone Unified CM node. |
To convert the on-premises standalone publisher Unified CM node to an ESN, the NTP server IP address (of the customer's on-premises) must be configured during installation, and the sync must be successful before the ESN is activated. Make sure this is completed before proceeding with the activation.
After the node is converted to ESN, the NTP server IP address will be changed to a Dedicated Instance NTP address and synchronized. So the Dedicated Instance cluster and ESN NTP remains the same. |
| The OS administrator doesn’t have the required level of access | The "ops admin" username doesn’t have level 4 access, which is necessary for activating the enhanced survivability node. During installation of the on-prem publisher Unified CM node, make sure the "ops admin" username is used for the OS administrator sign-in information in the installation wizard. |
| VMWare requirements aren’t met for the installed on-premises Unified CM node | It’s necessary to follow the Medium OVA specifications stated in "Virtualization for Cisco Unified Communications Manager" for the installed version. For more information, click here. |
| The Primary and Secondary DNS server configurations in the Enhanced Survivability Node is incorrect. |
The Primary and Secondary DNS servers configured in the Enhanced Survivability Node should be the local DNS server on the customer's premises. You need to make sure that: 1. The Enhanced Survivability node can resolve the FQDN of all nodes in the Dedicated Instance cluster using the local DNS servers. The local DNS servers need to be configured with conditional forwarders to the Dedicated Instance DNS server. 2. The automation also validates the resolution of the SRV record "_cisco-uds._tcp.{domain_name}" in the primary and secondary DNS servers configured in the Enhanced Survivability Node. |


