- Головна
- /
- Стаття


Створення розкладів у Центрі керування
 У цій статті
 Надіслати відгук?
Створюйте різні розклади та застосовуйте їх до автосекретарів і налаштувань викликів користувачів , щоб ефективно маршрутизувати виклики на основі робочих годин, свят або доступності користувачів .
Керування розкладами розташування
Ви можете створювати графіки робочих годин або святкових днів для локацій в організації та застосовувати їх до таких функцій, як автосекретар. Автосекретар працює відповідно до визначеного дня та часу в графіку робочих годин.
Ви також можете застосувати розклади, створені в певному місці, до налаштувань викликів користувача, таких як послідовний дзвінок, одночасний дзвінок або пріоритетне сповіщення, в межах цього місця.
Створіть графік розташування
| 1 |
Увійдіть у Центркерування. |
| 2 |
Перейти до . |
| 3 |
Виберіть місцезнаходження та натисніть вкладку Виклик. |
| 4 |
Перейдіть до розділу Налаштування функцій викликів та виберіть Розклади. |
| 5 |
Натисніть Додати розклад. |
| 6 |
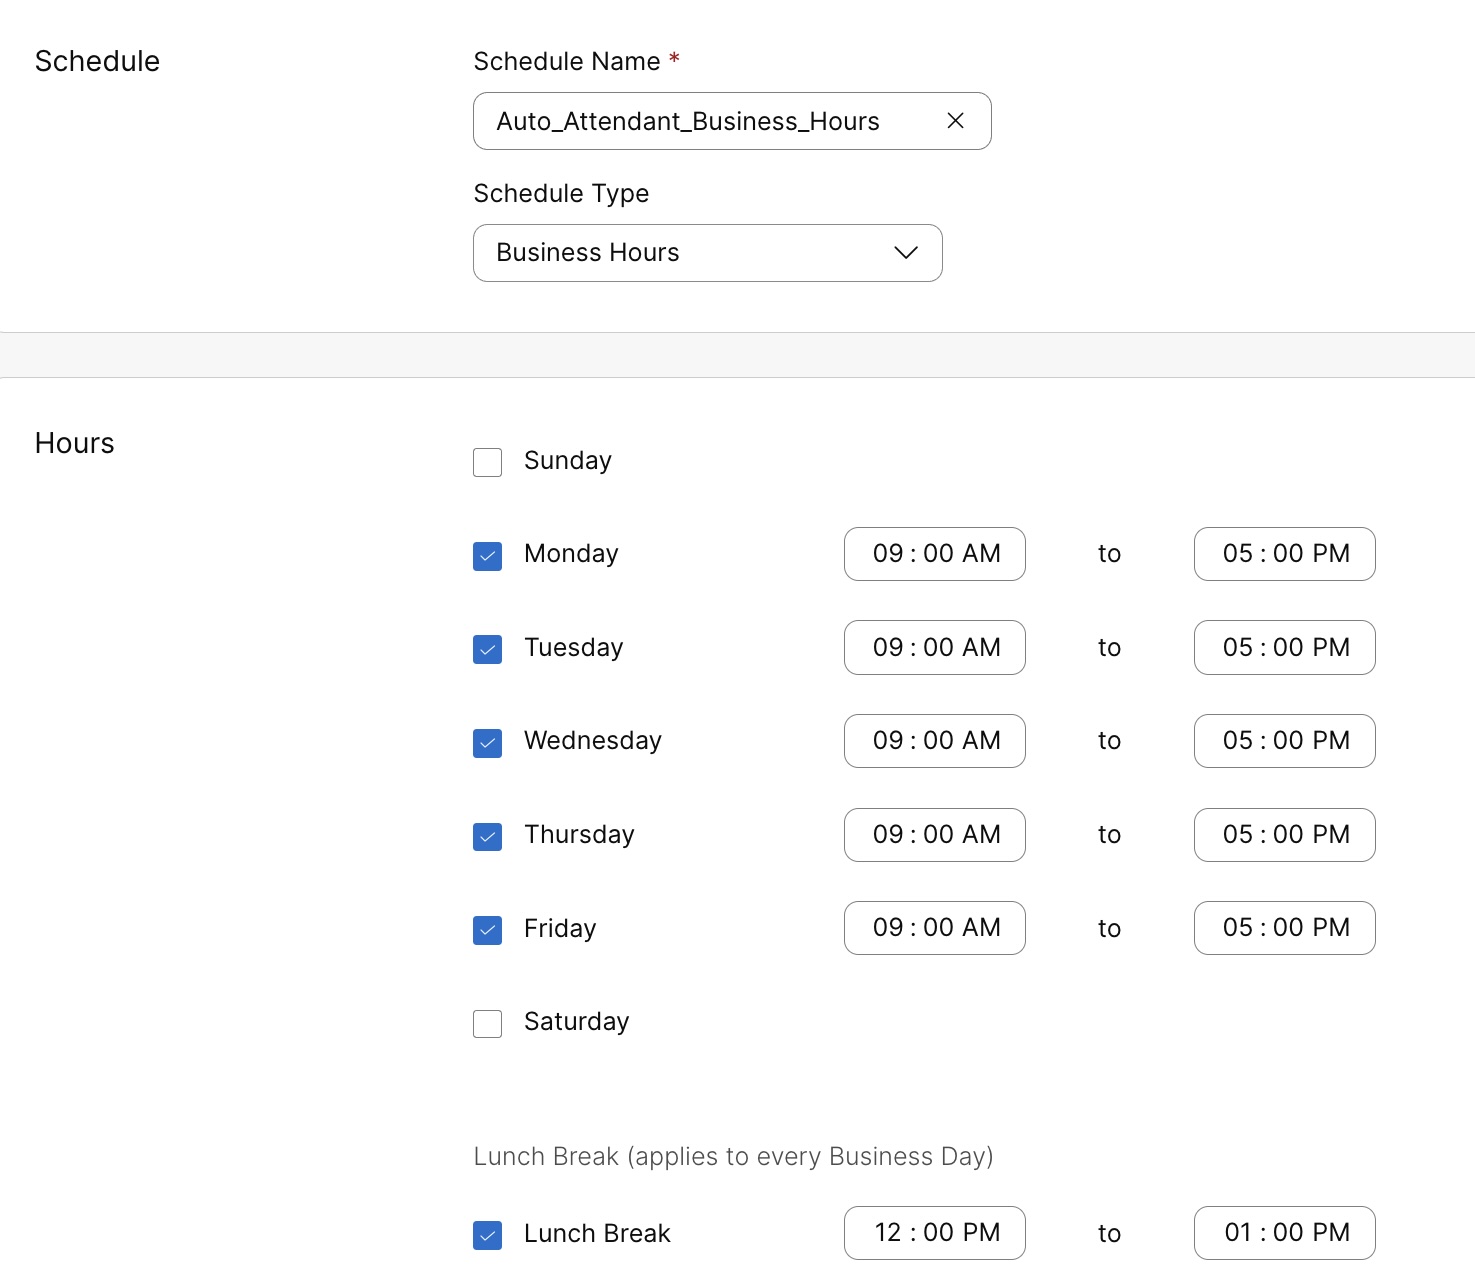
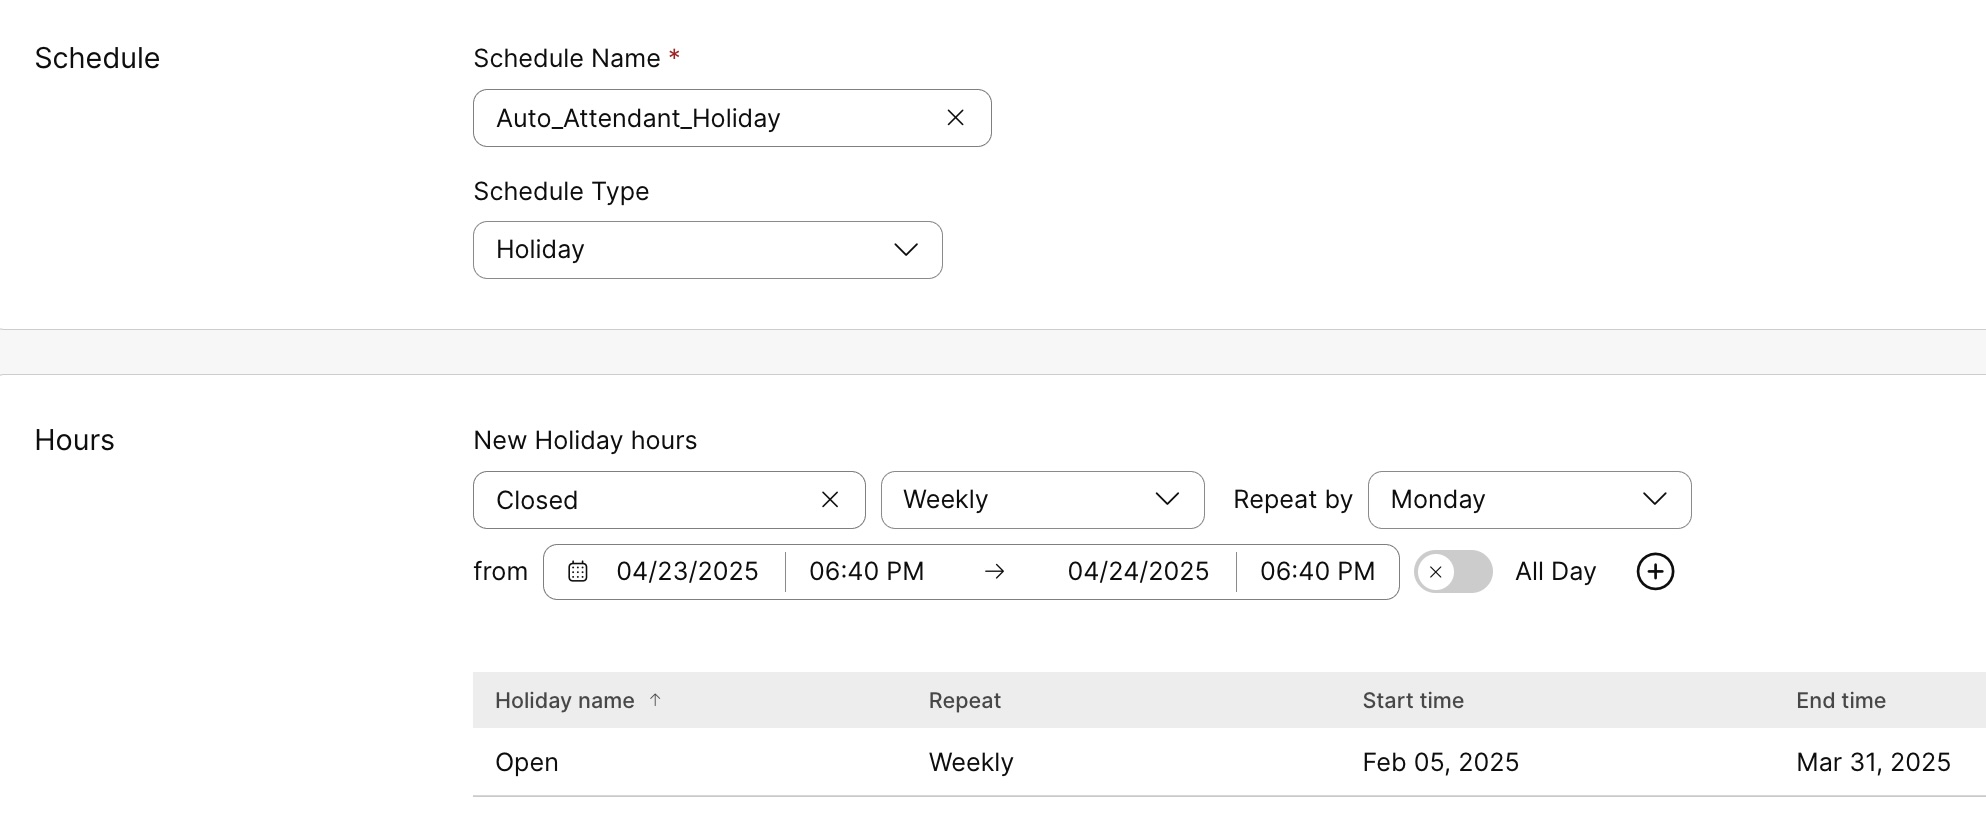
Введіть Назву розкладу та виберіть Тип розкладу як Робочі години або Свято. Назви розкладів і подій повинні бути унікальними. |
| 7 |
Якщо ви оберете Робочий час, виконайте такі дії, щоб визначити графік робочих годин протягом дня. Після створення графіка робочих годин ви можете редагувати окремі події, якщо хочете оновити їх повторюваність як Немає (одноразова подія, яка може тривати кілька днів), Щотижня (повторюється у вибрані дні), Щорічно (повторюється у певний день або день щороку) або Цілий день (триває цілий день).
|
| 8 |
Якщо ви оберете Свято, виконайте такі дії, щоб створити розклад на певні дні року, коли ваша організація не працює.
|
| 9 |
Клацніть Зберегти. |
Редагування або видалення розкладу розташування
Ви можете змінити або видалити розклад розташування в будь-який час. Ви також можете експортувати всі події розкладу.
Перш ніж почати
Щоб видалити розклад розташування, спочатку потрібно видалити його з усіх функцій, які його використовують.
| 1 |
Увійдіть у Центркерування. |
| 2 |
Перейти до . |
| 3 |
Виберіть місцезнаходження та натисніть вкладку Виклик. |
| 4 |
Перейдіть до розділу Налаштування функцій викликів та виберіть Розклади. |
| 5 |
У списку розкладів наведіть курсор на розклад і натисніть |
| 6 |
Щоб експортувати події розкладу як файл
|
Додавання або редагування розкладів для кількох локацій
Використання масового виробництва import/export CSV-файл із розкладами та подіями дозволяє додавати, редагувати або видаляти розклади одночасно в кількох місцях.
Перш ніж почати
-
Перш ніж завантажувати свій Schedule/Events CSV, обов’язково прочитайте Масове налаштування елементів виклику Webex за допомогою CSV, щоб зрозуміти правила використання CSV.
-
Ви можете експортувати свій поточний Schedule/Events, що дозволяє додавати, видаляти або змінювати існуючий набір даних, або ж експортувати зразок набору Schedule/Events. Після внесення змін файл можна передати за допомогою функцій для масової передачі.
Експорт CSV-файлу у формат ZIP-файлу: Під час експорту даних у файл CSV кількість записів може перевищувати 1000. У таких випадках завантажується ZIP-файл, який містить повний набір записів в одному CSV-файлі. Окрема папка, що містить усі дані, розбивається на кілька CSV-файлів, кожен з яких містить менше 1000 записів. Ці файли створюються для того, щоб адміністратори могли швидко імпортувати всі оновлення і передати файл.
-
Важливо знати обов’язкові та додаткові колонки, а також інформацію, яку потрібно надати під час заповнення шаблону CVS. Конкретні поля для Schedule/Events CSV-файли можна знайти в наступній таблиці.
-
Максимальна кількість рядків — 1000 (без урахування заголовка).
-
Кожен рядок може містити максимум 10 подій.
-
Для одного місця можна створити максимум 1000 розкладів.
-
До одного розкладу можна додати максимум 150 подій.
| 1 |
Увійдіть у Центркерування. |
| 2 |
Перейти до . |
| 3 |
Виберіть місцезнаходження та натисніть вкладку Виклик. |
| 4 |
Перейдіть до розділу Налаштування функцій викликів та виберіть Розклади. |
| 5 |
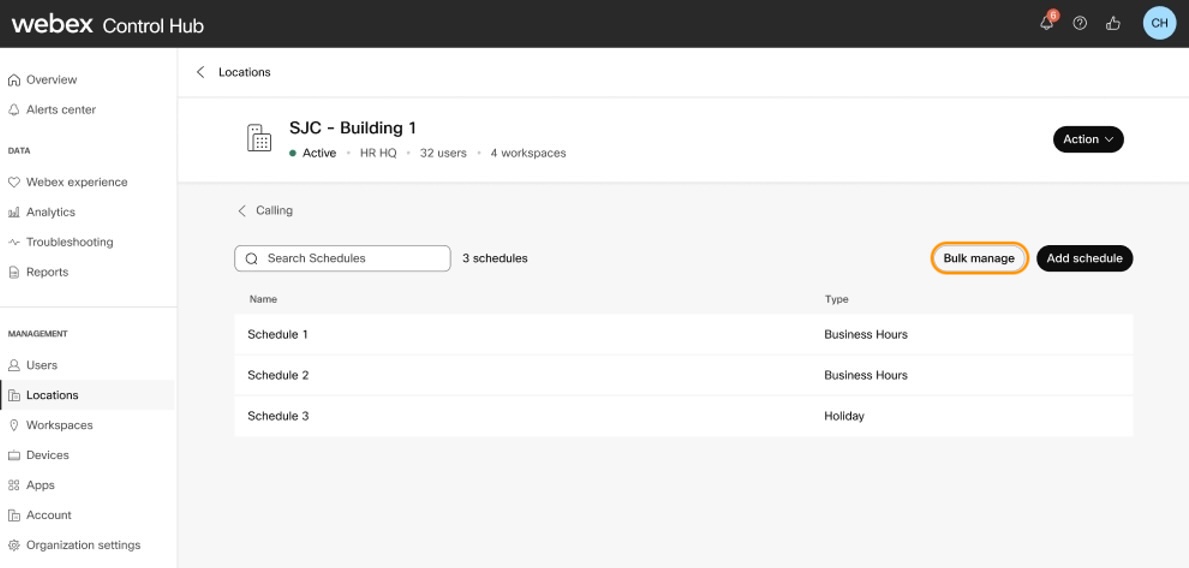
Натисніть Масове керування. |
| 6 |
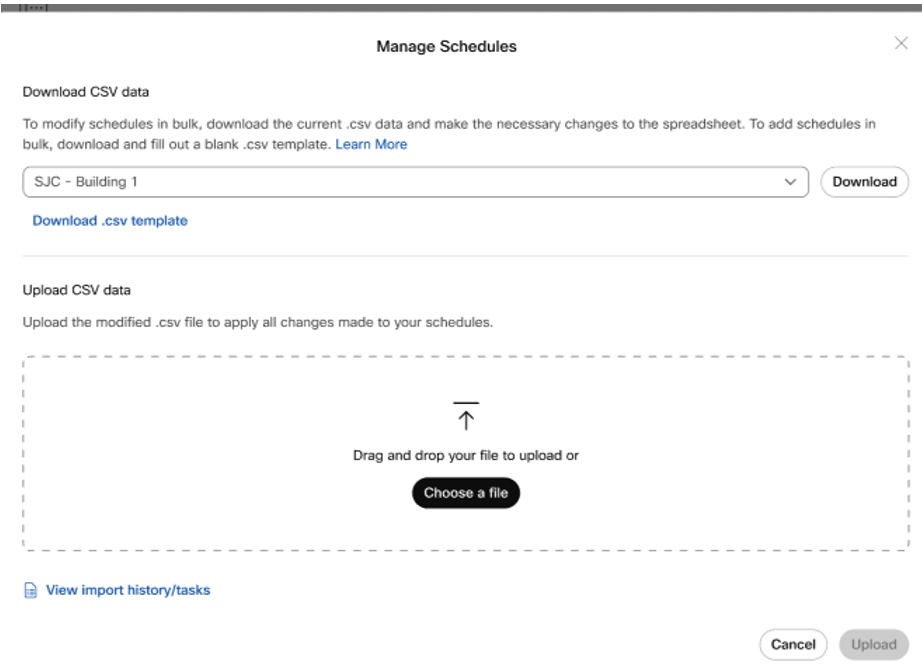
У спливаючому вікні «Керування розкладами» виберіть розташування та натисніть «Завантажити шаблон .csv». Шаблон .CSV орієнтований на розклад, до якого додається кілька подій.
|
| 7 |
Заповніть електронну таблицю. |
| 8 |
Перетягніть файл CSV, щоб завантажити його, або натисніть Вибрати файл. |
| 9 |
Клацніть Передати. |
Довідка про формат CSV-файлу
Скористайтеся цією таблицею, щоб побачити, які поля є обов’язковими, а які – необов’язковими, а також що потрібно визначити під час масового додавання або редагування розкладів і подій.
| Стовпець | Mandatory/Optional | Опис | Підтримуване значення (приклад) |
|---|---|---|---|
|
Ім’я |
Обов’язкове |
Введіть назву для ідентифікації розкладу. |
Лocation_А |
|
Розташування |
Обов’язкове |
Введіть місцезнаходження організації. Щоб дублювати розклад в кількох місцях, скопіюйте запис розкладу в новий рядок і пов’яжіть його з новим місцем розташування. Щоб внести паралельні зміни до розкладу в кількох місцях, виконайте search/replace в експортованому CSV-файлі та повторно імпортуйте.
Для одного місця можна створити максимум 1000 розкладів. |
Місцезнаходження А |
|
Запланувати дію |
Обов’язкове |
Введіть значення стовпця «Запланувати дію», щоб додати, змінити або видалити. Щоб додати розклад, введіть ADD. Щоб змінити розклад, введіть стовпець, який потрібно оновити новим значенням. Щоб видалити розклад, введіть ВИДАЛИТИ. |
ДОДАТИ ВИДАЛИТИ |
|
Тип розкладу |
Обов’язкове |
Введіть тип розкладу (Time/Holiday) які ви хочете додати. Введіть TIME, щоб додати графік робочого часу, та HOLIDAY, щоб додати графік святкових днів. |
ЧАС ВІДПУСТКА |
|
Дія події |
Додатково |
В одному рядку можна додати до 10 подій для одного місця. Щоб додати більше подій, додайте новий рядок. Введіть ADD, щоб додати подію. Введіть REPLACE, щоб замінити раніше призначені деталі події новими. Введіть ВИДАЛИТИ, щоб видалити подію. |
ДОДАТИ ЗАМІНИТИ ВИДАЛИТИ |
|
Ім’я події |
Додатково |
Введіть назву події. |
День Cisco |
|
Дата початку події |
Додатково |
Введіть дату початку події. |
2025-06-18 |
|
Дата завершення події |
Додатково |
Введіть дату завершення події. |
2025-06-18 |
|
Час початку події |
Додатково |
Введіть час початку події. |
12:00 |
|
Час завершення події |
Додатково |
Введіть час завершення події. |
14:00 |
|
Тип повторення події |
Додатково |
Введіть повторення як None/Weekly/Yearly від day/Yearly за датою. |
Немає |
|
День повторення події за тижнем |
Додатково |
Виберіть повторення на основі події – день повторення за тижнем, день щорічного повторення за днем, тиждень щорічного повторення за днем, місяць щорічного повторення за днем, дата щорічного повторення за датою, місяць щорічного повторення за датою. До одного розкладу можна додати максимум 150 подій. |
- |
|
День події щорічної повторюваності за днями |
Додатково |
ПОНЕДІЛОК |
|
|
Тиждень подій щорічної повторюваності по днях |
Додатково |
ПЕРШИЙ |
|
|
Місяць події щорічної повторюваності по днях |
Додатково |
СІЧЕНЬ |
|
|
Дата події щорічного повторення за датою |
Додатково |
- | |
|
Місяць події щорічної повторюваності за датою |
Додатково |
- |
Керування розкладами користувачів
Ви можете створити розклад для користувача та застосувати його лише до налаштувань викликів цього користувача, таких як послідовний дзвінок, одночасний дзвінок або пріоритетне сповіщення. Ці налаштування викликів виконують визначені дії на основі часового проміжку в розкладі, що спрощує керування викликами для користувачів.
Створіть розклад користувача
| 1 |
Увійдіть у Центркерування. |
| 2 |
Перейти до . |
| 3 |
Виберіть користувача й перейдіть на вкладку Виклики. |
| 4 |
Перейдіть до розділу Обробка викликів та виберіть Розклади. |
| 5 |
Натисніть New Schedule (Новий розклад). |
| 6 |
Введіть назву розкладу. 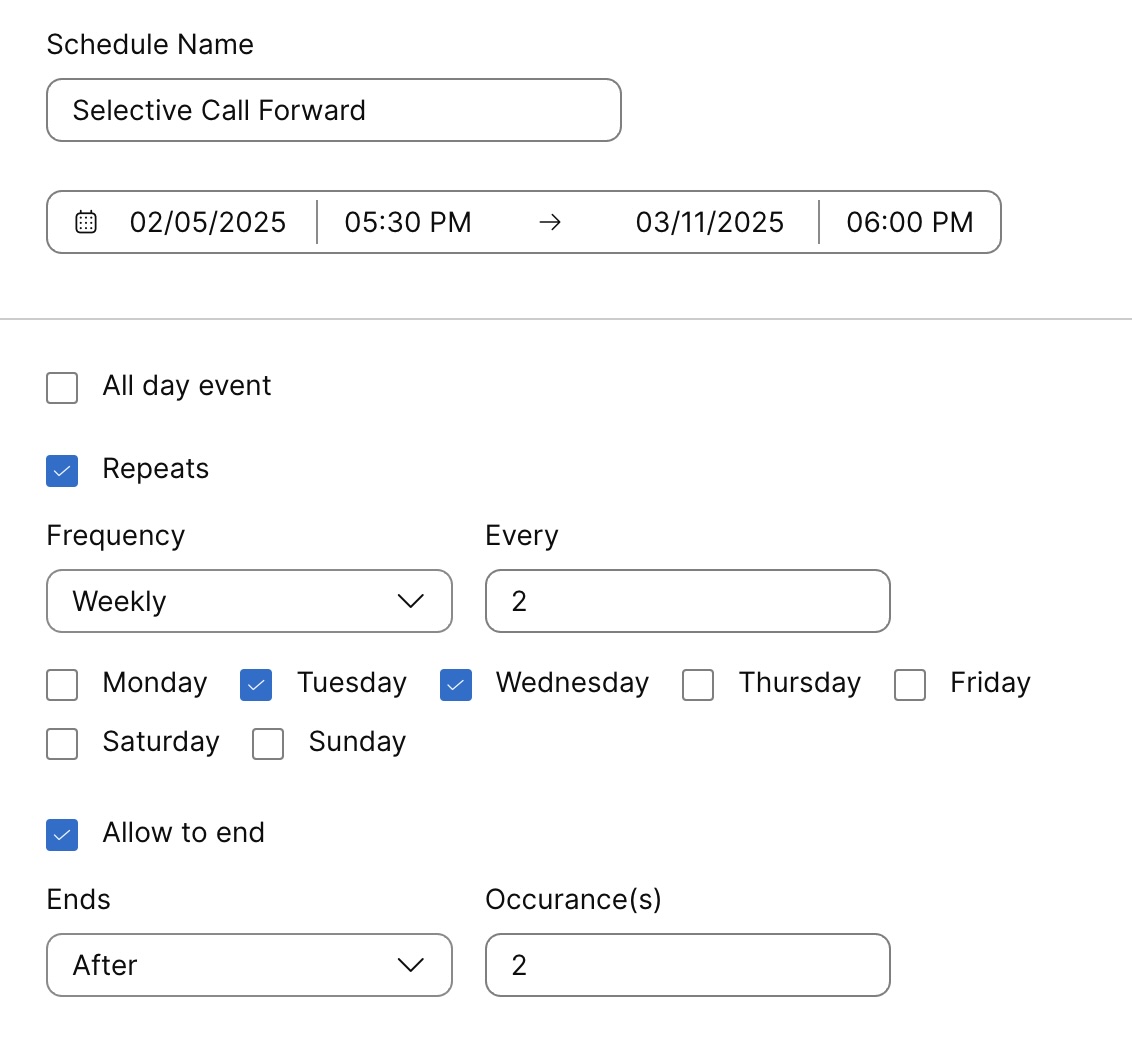 |
| 7 |
Встановіть дату й час початку та завершення розкладу. |
| 8 |
Виберіть Подія на весь день, якщо розклад триває цілий день. |
| 9 |
Виберіть Повторюється, якщо потрібно, щоб розклад повторювався повторно. Виберіть одну з наступних частот:
Виберіть Дозволити завершити, якщо потрібно визначити, коли має припинитися повторюваний розклад. Після вибору з’являється розкривний список Закінчується з двома варіантами:
|
| 10 |
Клацніть Зберегти. Користувач також може самостійно створювати розклади в Центрі користувача. Докладніше див. у розділі Створення розкладів для налаштувань викликів. Будь-які зміни, внесені користувачем до цих налаштувань, будуть відображені як у Центрі користувача, так і в Центрі керування. |
Редагування або видалення розкладу користувача
Перш ніж почати
Щоб видалити розклад користувача, спочатку потрібно видалити його з усіх налаштувань викликів, які його використовують.
| 1 |
Увійдіть у Центркерування. |
| 2 |
Перейти до . |
| 3 |
Виберіть користувача й перейдіть на вкладку Виклики. |
| 4 |
Перейдіть до розділу Обробка викликів та виберіть Розклади. З’явиться список створених розкладів та подій.
|
| 5 |
Щоб додати більше подій до розкладу, розгорніть розклад і натисніть Додати подію. |
| 6 |
Щоб видалити розклад, натисніть
|


 , щоб внести зміни, або
  , щоб видалити.
 .
.
 та виберіть

