- Domů
- /
- Článek


Vytváření plánů v Control Hubu
 V tomto článku
 Zpětná vazba?
Vytvořte různé plány a použijte je na automatické telefonáty a nastavení hovorů uživatelů pro efektivní směrování hovorů na základě pracovní doby, svátků nebo dostupnosti uživatelů .
Správa rozvrhů míst
Můžete si vytvořit pracovní dobu nebo rozvrhy svátků pro dané lokality v organizaci a použít je pro funkce, jako je automatický telefonní hovor. Automatický operátor pracuje na základě definovaného dne a času v rozvrhu pracovní doby.
Plány vytvořené na daném místě můžete také použít na nastavení hovorů uživatele v rámci daného místa, jako je sekvenční vyzvánění, současné vyzvánění nebo prioritní upozornění.
Vytvořte rozvrh umístění
| 1 |
Přihlaste se k Centru řízení. |
| 2 |
Přejít na . |
| 3 |
Vyberte místo a klikněte na kartu Volání. |
| 4 |
Přejděte do sekce Nastavení funkcí volání a vyberte Plány. |
| 5 |
Klikněte na Přidat plán. |
| 6 |
Zadejte Název plánu a vyberte Typ plánu jako Pracovní doba nebo Svátek. Názvy plánů a názvy událostí musí být jedinečné. |
| 7 |
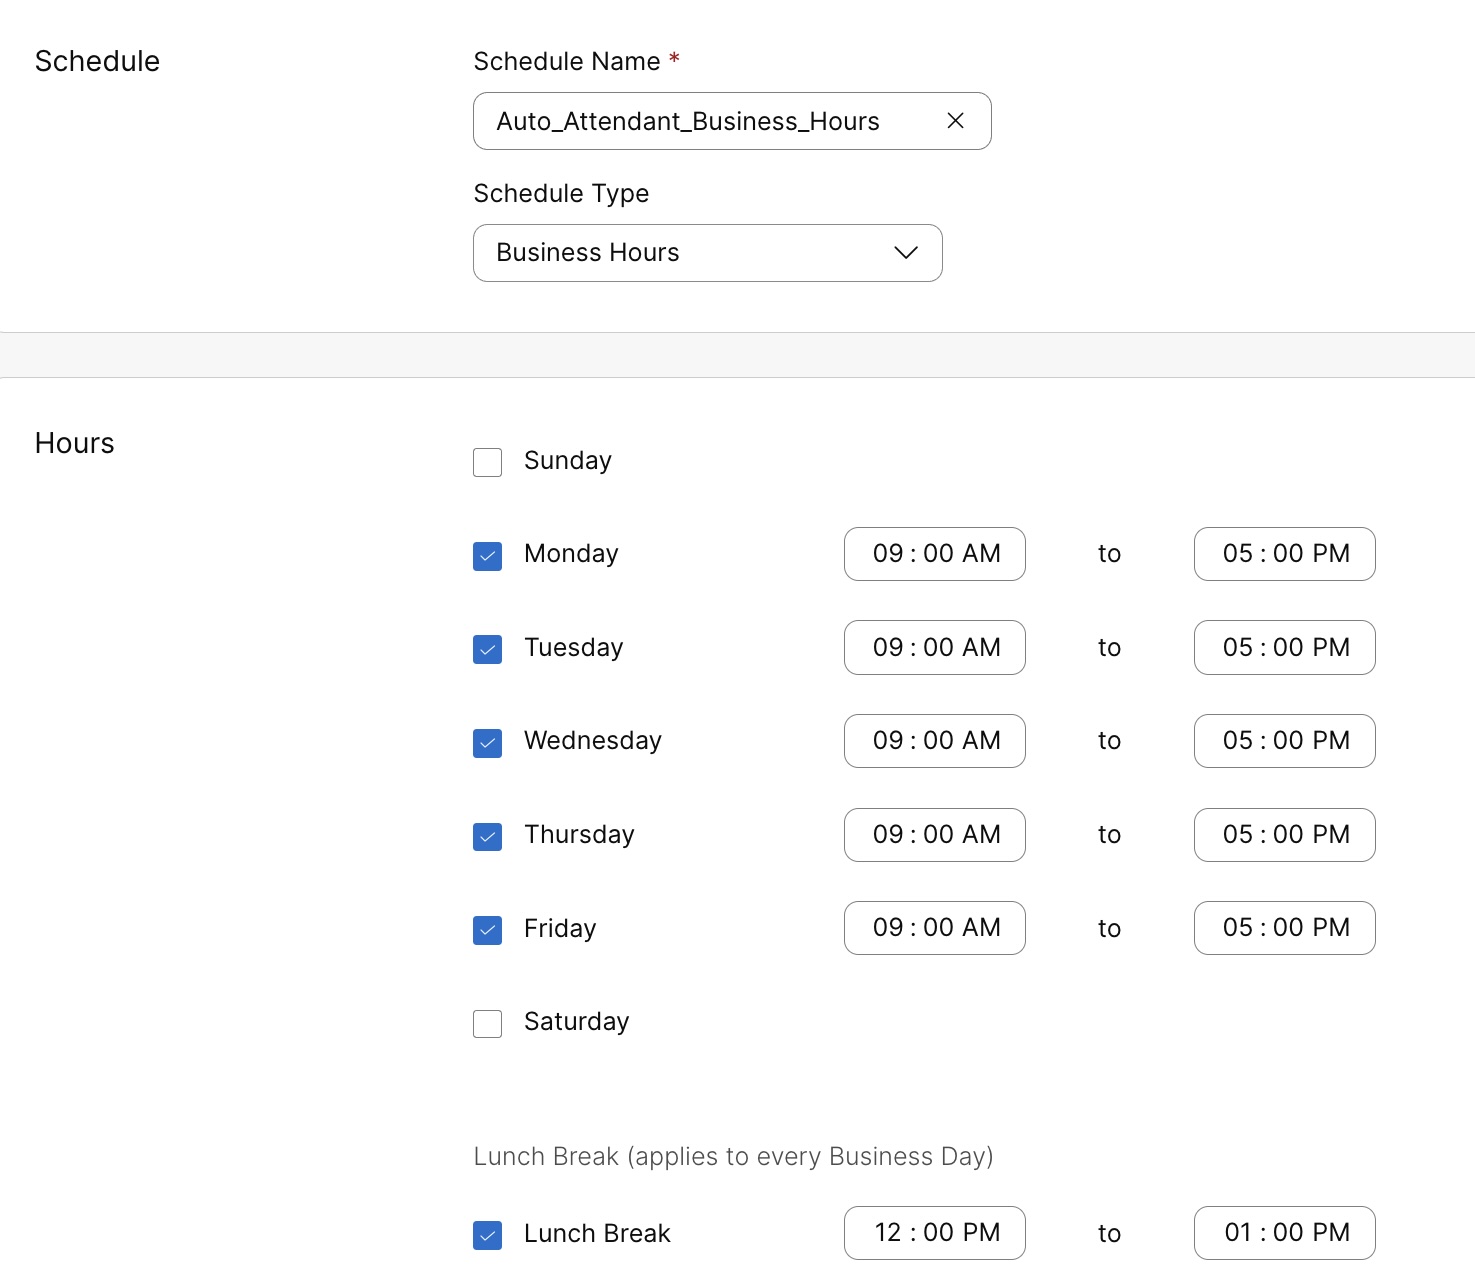
Pokud zvolíte Pracovní doba, postupujte podle následujících pokynů k určení rozvrhu vaší pracovní doby během dne. Jakmile vytvoříte rozvrh pracovní doby, můžete jednotlivé události upravit, pokud chcete aktualizovat jejich opakování na Žádná (jednorázová událost, která může trvat několik dní), Týdně (opakuje se ve vybrané dny), Ročně (opakuje se v konkrétní datum nebo den každého roku) nebo Celý den (trvá celý den).
|
| 8 |
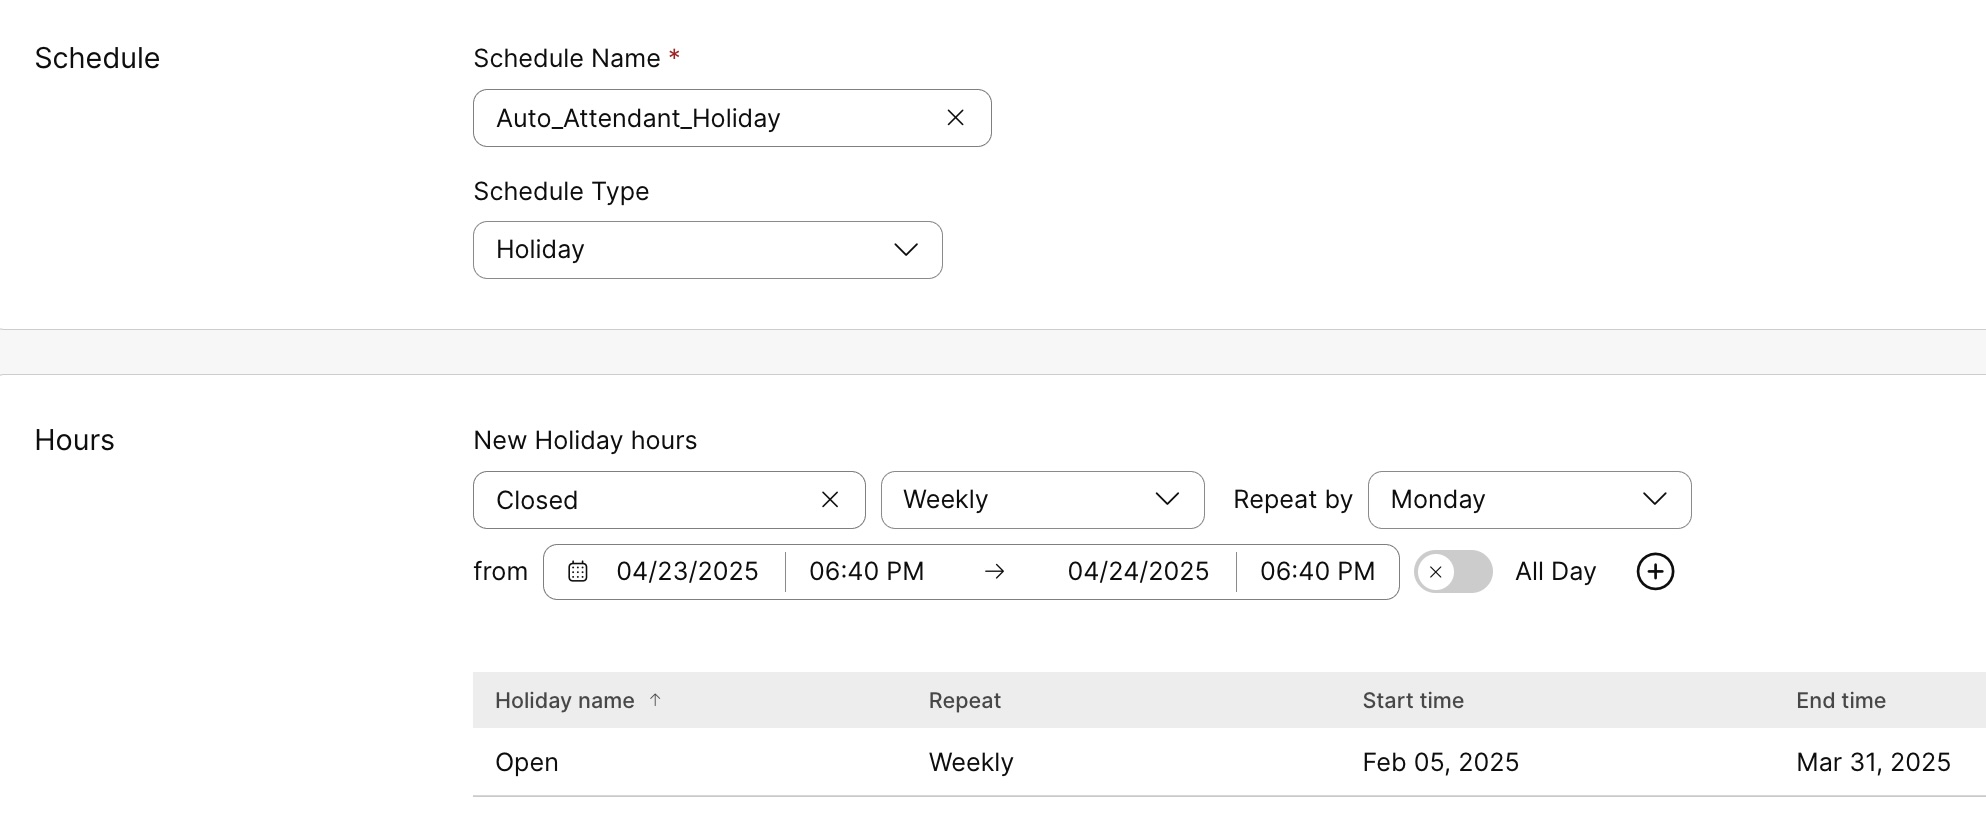
Pokud zvolíte Svátek, postupujte takto pro vytvoření rozvrhu pro konkrétní dny v roce, kdy vaše organizace není otevřená.
|
| 9 |
Klikněte na položku Uložit. |
Úprava nebo smazání rozvrhu umístění
Plán lokality můžete kdykoli změnit nebo smazat. Můžete také exportovat všechny události z plánu.
Než začnete
Chcete-li smazat plán umístění, musíte jej nejprve odebrat ze všech funkcí, které jej používají.
| 1 |
Přihlaste se k Centru řízení. |
| 2 |
Přejít na . |
| 3 |
Vyberte místo a klikněte na kartu Volání. |
| 4 |
Přejděte do sekce Nastavení funkcí volání a vyberte Plány. |
| 5 |
V seznamu plánů najeďte myší na plán a kliknutím na |
| 6 |
Chcete-li exportovat události plánu jako soubor
|
Přidání nebo úprava rozvrhů pro více míst
Použití hromadného import/export V souboru CSV s rozvrhy a událostmi můžete rozvrhy hromadně přidávat, upravovat nebo mazat napříč lokalitami současně.
Než začnete
-
Před nahráním Schedule/Events CSV, nezapomeňte si přečíst Hromadné zřizování prvků volání Webexu pomocí CSV, abyste porozuměli konvencím CSV.
-
Můžete buď exportovat své aktuální Schedule/Events, což vám umožňuje přidávat, mazat nebo upravovat stávající datovou sadu, nebo si můžete exportovat vzorovou sadu Schedule/Events. Po úpravě lze soubor nahrát prostřednictvím hromadných funkcí.
Export souboru CSV do formátu ZIP: Při exportu dat do souboru CSV může počet záznamů překročit 1 000. V takových případech se stáhne soubor ZIP, který obsahuje celou sadu záznamů v jednom souboru CSV. Samostatná složka obsahující všechna data je rozdělena do několika souborů CSV, každý s méně než 1000 záznamy. Tyto soubory jsou generovány pro správce, aby mohli rychle importovat všechny aktualizace a nahrát je.
-
Je důležité znát povinné a volitelné sloupce a informace, které je třeba poskytnout při vyplňování šablony CVS. Konkrétní pole pro Schedule/Events CSV naleznete v následující tabulce.
-
Maximální počet řádků je 1 000 (bez záhlaví).
-
Každý řádek může pojmout maximálně 10 událostí.
-
Pro jednu lokalitu lze vytvořit maximálně 1000 rozvrhů.
-
Do každého plánu lze přidat maximálně 150 událostí.
| 1 |
Přihlaste se k Centru řízení. |
| 2 |
Přejít na . |
| 3 |
Vyberte místo a klikněte na kartu Volání. |
| 4 |
Přejděte do sekce Nastavení funkcí volání a vyberte Plány. |
| 5 |
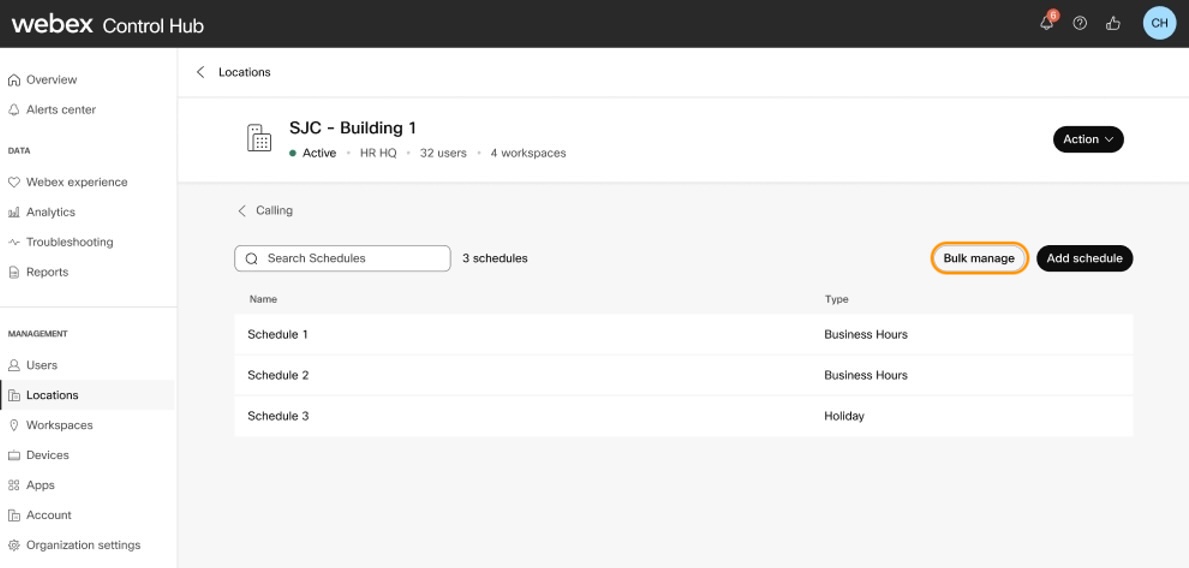
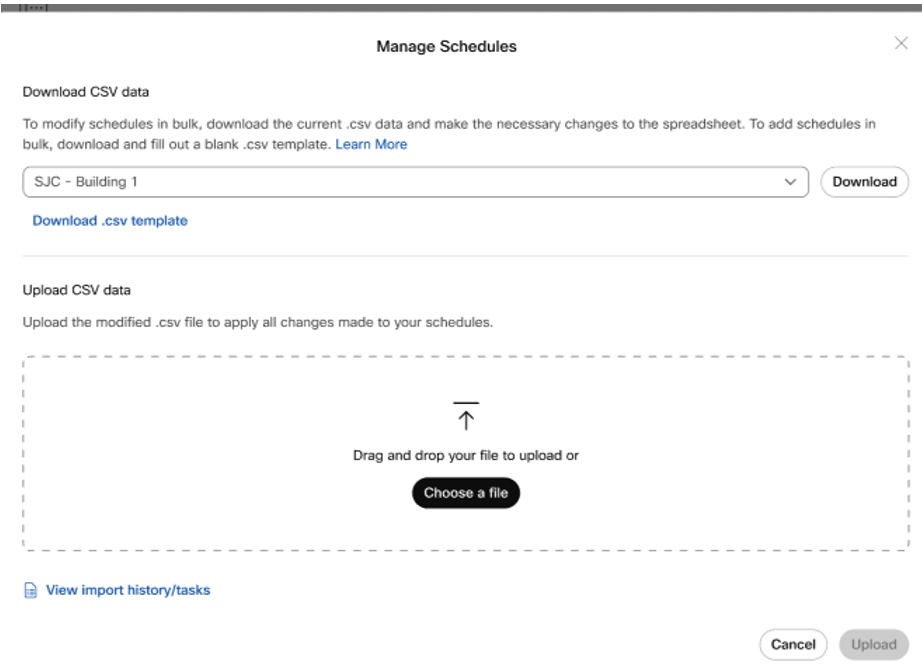
Klikněte na Hromadná správa. |
| 6 |
V rozbalovacím okně Spravovat plány vyberte umístění a klikněte na Stáhnout šablonu .csv. Šablona.CSV je orientovaná na plánování s více událostmi připojenými k plánování.
|
| 7 |
Vyplňte tabulku. |
| 8 |
Přetažením nahrajte soubor CSV nebo klikněte na Vybrat soubor. |
| 9 |
Klikněte na tlačítko Nahrát. |
Referenční informace o formátu souboru CSV
V této tabulce zjistíte, která pole jsou povinná nebo volitelná a co je třeba zjistit při hromadném přidávání nebo úpravě plánů a událostí.
| Sloupec | Mandatory/Optional | Popis | Podporovaná hodnota (příklad) |
|---|---|---|---|
|
Název |
Povinné |
Chcete-li identifikovat plán, zadejte název. |
Location_A |
|
Pobočka |
Povinná |
Zadejte sídlo organizace. Chcete-li duplikovat rozvrh napříč více místy, zkopírujte záznam rozvrhu do nového řádku a přiřaďte jej k novému místu. Chcete-li provést paralelní změny v rozvrhu napříč více lokalitami, proveďte search/replace v exportovaném souboru CSV a znovu jej importovat.
Pro jednu lokalitu lze vytvořit maximálně 1000 rozvrhů. |
Místo A |
|
Naplánovat akci |
Povinné |
Zadejte hodnotu sloupce Naplánovat akci, kterou chcete přidat, upravit nebo odebrat. Chcete-li přidat plán, zadejte PŘIDAT. Chcete-li upravit plán, zadejte sloupec, který chcete aktualizovat novou hodnotou. Chcete-li odebrat plán, zadejte ODSTRANIT. |
PŘIDAT ODEBRAT |
|
Typ rozvrhu |
Povinné |
Zadejte typ rozvrhu (Time/Holiday) které chcete přidat. Zadejte ČAS pro přidání rozvrhu pracovní doby a SVÁTEK pro přidání rozvrhu svátků. |
ČAS DOVOLENÁ |
|
Akce události |
Volitelné |
Do jednoho řádku můžete přidat až 10 událostí pro stejnou lokalitu. Chcete-li přidat další události, pokračujte přidáním nového řádku. Zadejte PŘIDAT pro přidání události. Zadejte NAHRADIT, chcete-li nahradit dříve přiřazené podrobnosti události novými. Zadejte ODSTRANIT pro odstranění události. |
PŘIDAT NAHRADIT ODEBRAT |
|
Název události |
Volitelné |
Zadejte název události. |
Den společnosti Cisco |
|
Datum zahájení události |
Volitelné |
Zadejte datum zahájení události ve formátu RRRR-MM-DD. |
2025-06-18 |
|
Datum ukončení události |
Volitelné |
Zadejte datum ukončení události ve formátu RRRR-MM-DD. |
2025-06-18 |
|
Čas zahájení události |
Volitelné |
Zadejte čas zahájení události. |
12:00 |
|
Čas ukončení události |
Volitelné |
Zadejte čas ukončení události. |
14:00 |
|
Typ opakování události |
Volitelné |
Zadejte opakování jako None/Weekly/Yearly podle day/Yearly podle data. |
Žádné |
|
Den opakování události podle týdne |
Volitelné |
Vyberte opakování na základě události – den opakování podle týdne, den ročního opakování podle dne, týden ročního opakování podle dne, měsíc ročního opakování podle dne, datum ročního opakování podle data, měsíc ročního opakování podle data. Do každého plánu lze přidat maximálně 150 událostí. |
- |
|
Den události s ročním opakováním po dnech |
Volitelné |
PONDĚLÍ |
|
|
Událost týdne s ročním opakováním po dnech |
Volitelné |
PRVNÍ |
|
|
Měsíc události s ročním opakováním po dnech |
Volitelné |
LEDEN |
|
|
Datum události s ročním opakováním podle data |
Volitelné |
- | |
|
Měsíc události s ročním opakováním podle data |
Volitelné |
- |
Správa uživatelských plánů
Můžete vytvořit plán pro uživatele a použít ho pouze pro nastavení hovorů daného uživatele, jako je sekvenční vyzvánění, současné vyzvánění nebo prioritní upozornění. Tato nastavení hovorů provádějí definované akce na základě časového rámce v plánu, což uživatelům usnadňuje správu hovorů.
Vytvořte uživatelský rozvrh
| 1 |
Přihlaste se k Centru řízení. |
| 2 |
Přejít na . |
| 3 |
Vyberte uživatele a klikněte na kartu Volání. |
| 4 |
Přejděte do sekce Vyřizování hovorů a vyberte Plány. |
| 5 |
Klikněte na Nový plán. |
| 6 |
Zadejte název plánu. 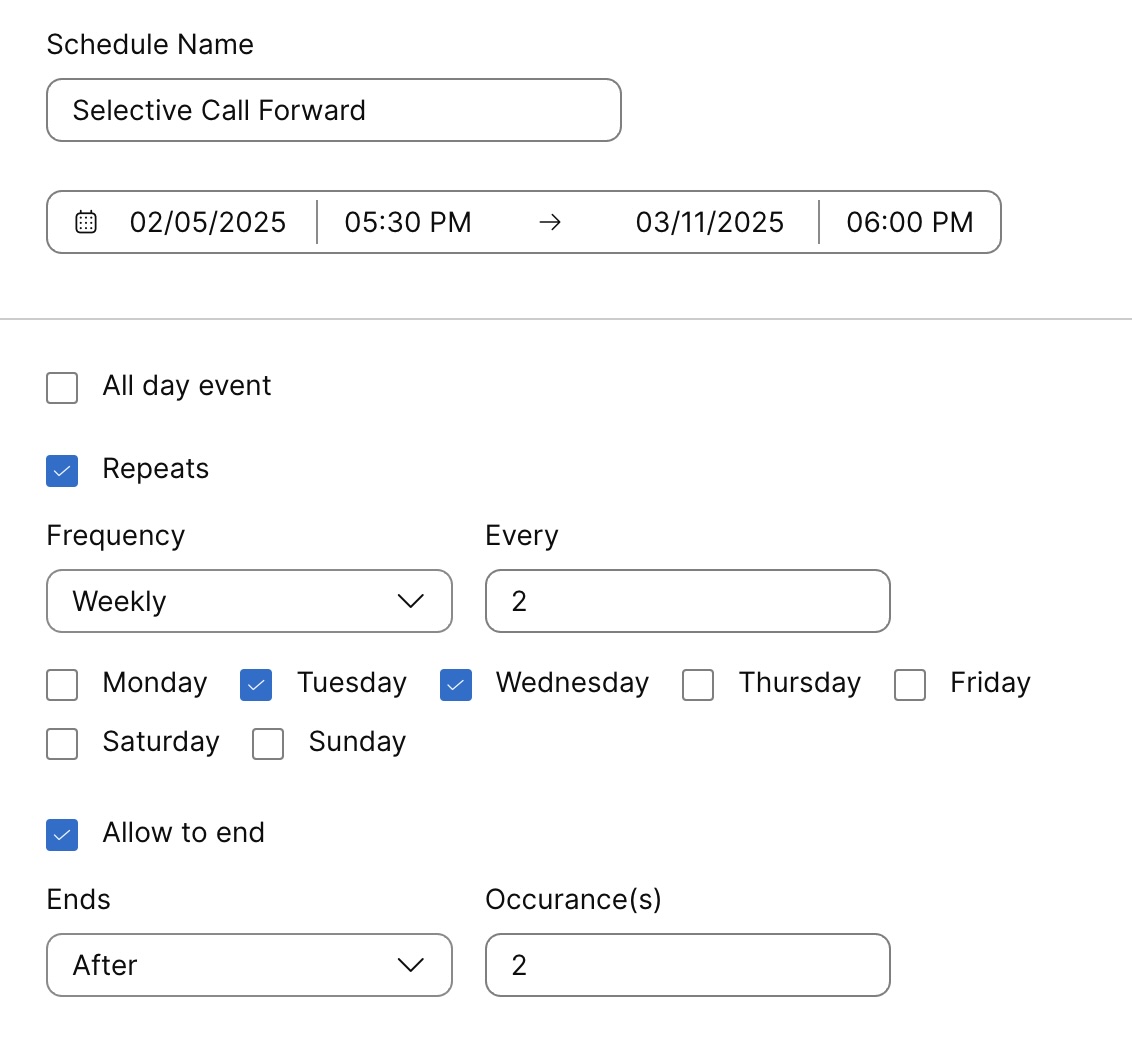 |
| 7 |
Nastavte datum a čas zahájení a ukončení plánu. |
| 8 |
Pokud program trvá celý den, vyberte Celodenní událost. |
| 9 |
Pokud chcete, aby se plán opakoval, vyberte možnost Opakuje se. Vyberte si jednu z následujících frekvencí:
Vyberte Povolit ukončení, pokud chcete definovat, kdy se má opakující se plán zastavit. Po výběru se zobrazí rozbalovací nabídka Končí se dvěma možnostmi:
|
| 10 |
Klikněte na možnost Uložit. Uživatel si také může v Centru pro uživatele vytvářet vlastní plány. Více informací naleznete v části Vytvoření plánů pro nastavení hovorů. Veškeré změny provedené uživatelem v těchto nastaveních se projeví v uživatelském centru i v ovládacím centru. |
Úprava nebo smazání uživatelského rozvrhu
Než začnete
Chcete-li odstranit uživatelský plán, musíte jej nejprve odebrat ze všech nastavení hovorů, která jej používají.
| 1 |
Přihlaste se k Centru řízení. |
| 2 |
Přejít na . |
| 3 |
Vyberte uživatele a klikněte na kartu Volání. |
| 4 |
Přejděte do sekce Vyřizování hovorů a vyberte Plány. Zobrazí se seznam vytvořených plánů a událostí.
|
| 5 |
Chcete-li do plánu přidat další události, rozbalte plán a klikněte na Přidat událost. |
| 6 |
Chcete-li smazat plán, klikněte na
|


 proveďte změny nebo na
  jej smažte.
 .
.
 a zvolte

