- Home
- /
- Article

Thanks for your feedback.

Users list in Control Hub
 In this article
 Feedback?
Manage your users by modifying service licenses, taking relevant actions based on their statuses, and filtering the list by specific administrator roles, account types, or Webex sites.
Filter users
You can filter the list to focus on the types of users that you want to manage, such as by administrators or by users that are in a Webex Meetings site.
| 1 |
Sign in to Control Hub, then go to . |
| 2 |
Click Filter. |
| 3 |
Select the filters that you want to apply to the list. You can filter by:
|

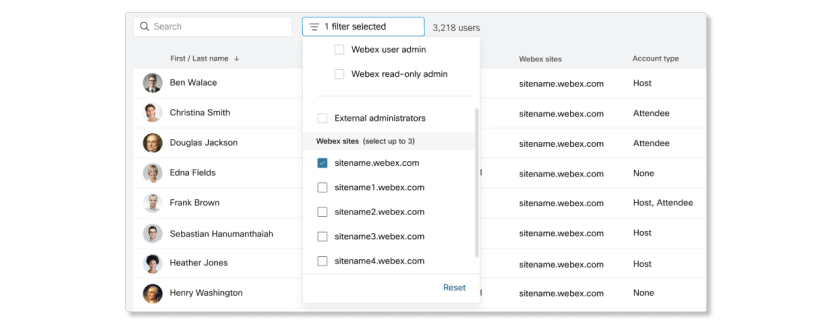
The list automatically updates based on the filters that you select. Click Reset to remove all of the filters at once.
User status details
The Status column tells you if there are users in your organization who are inactive or haven't been verified. Use this information to decide what action to take on a specific user account, such as resending the verification email or removing a user from your organization.
Service licenses are assigned to users, regardless of their status. For example, an inactive user still uses a license. You can remove licenses from a user if they don't need the services anymore.
User statuses can be one of the following:
-
Active—This is the ideal state for users to be in during normal use. The user is part of the organization (either linked from Site Administration or created by a Webex admin in Control Hub) and is using or ready to use their collaboration services. No further administrative action is required.
-
Verified—The user's email address is verified, and the account status changes to Active after they set the password.
-
Not Verified—The user hasn't verified their email address. You can resend another verification email to the user.
- Pending—The user hasn't accepted a cross-org license that's been assigned to them. Their status changes to Active when they accept the invitation and sign in to the Webex site.
-
Inactive—The user has been deactivated and can no longer access Webex services.
Filter column headers
You can add or remove columns that show on the Users page and the Deleted users page. For example, you may want to sort users by when they were added to your organization, or alphabetically by department. Your changes are saved automatically and are shown when you log back in.
-
You must be a full administrator in this organization to make these changes. External administrators and read-only administrators do not see this feature.
-
You can't currently filter and sort users by Sync source.
| 1 |
Sign in to Control Hub. |
| 2 |
Go to and in the list of users, click |
| 3 |
Select the attributes you want to appear on the page. The Display name attribute is always visible. |
| 4 |
(Optional) Drag and drop the column headers to rearrange the order in which they appear. |
 .
.Download a list of users
You can export your list of users to a CSV file and download it to your desktop. The exported CSV file reflects any filters, search parameters, or customized attribute columns you've applied to the user list on your screen.
Depending on the size of your organization, it may take some time for Control Hub to compile and export the user list into a CSV file. The pop up window displays any exports currently in progress. You can click Start a new download in the window to initiate a fresh file that reflects any changes you may have made since the last export was initiated.
| 1 |
Sign in to Control Hub, then go to . |
| 2 |
Click The most recently exported CSV file is available to download up to seven days after it's initiated. |
| 3 |
Click Download from task manager when the exported CSV is compiled. |

Actions column details
You can make changes to a user's status in the Actions column.
If you use Cisco Directory Connector for user synchronization, you can resend invitations to users in Control Hub, but you can't reactivate, deactivate, or delete users. You must perform those actions in Active Directory and then resync the changes to Control Hub.
Depending on the status, the actions that you can take are:
-
Resend Invitation—Resends the verification email to users.
-
Reactivate User—Reactivates users to their previous status.
-
Deactivate User—Deactivates users and changes their status to Inactive.
-
Delete User—Deletes users from your organization.
Manage user status
| 1 |
Sign in to Control Hub, then go to . |
| 2 |
Click |
| 3 |
Select the action you want to perform. If your organization uses directory synchronization (e.g. DirSync, Okta, Entra ID), you need to manage users in your directory and sync those changes to Webex. |
 next to a user.
Manage inactive users
Control Hub normally deletes inactive users 30 days after they were deactivated. You can change this to make Control Hub wait up to 90 days before deleting inactive users.
Webex retains user data for inactive users. If you reactivate an inactive user, they can find their old data (Spaces and Meetings), but only if that data is still within your retention period.
This setting does not apply to Active Directory users that are synchronized with Webex. When you sync Active Directory with Webex:
-
Any users that were deactivated in the directory become Inactive. Webex holds these users in the Inactive state indefinitely.
-
Any users that were deleted from the directory become Inactive in Webex. Webex holds these users in the Inactive state for 7 days and then deletes them. You can choose to delete them sooner to free up their user license. This 7-day window still applies to Inactive users even if Directory Connector is disabled in that time.
-
If users originally synchronized from Active Directory are marked as Inactive after synchronization is disabled, they will be retained for the normal 30 to 90-day window.
| 1 |
Sign into Control Hub, then go to . |
| 2 |
Scroll down to Manage inactive user. |
| 3 |
Enter a number between 30 and 90 in the Delete inactive user field. Your changes save automatically.
|


