- Home
- /
- Article

Thanks for your feedback.

Use CScan to test Webex Calling network quality
 In this article
 Feedback?
CScan is the network readiness tool designed for Webex Calling. Anyone can use it to test their network connection to Webex Calling.
Introduction
Prequalifying service availability for a customer involves the important step of confirming that their network is ready for the Webex Calling Services.
CScan is a network readiness tool designed to pre-qualify a customer’s network. Cisco customers can run this tool to test their network connection to ensure they get high-quality experience for their Webex Calling service.
Before you begin
A correctly configured firewall is essential for a successful Webex Calling deployment. Outbound ports are required to be open for signaling, media and network connectivity and local gateway because Webex Calling is a global service. Consult the Port Reference Information for Cisco Webex Calling Service to ensure that all required firewall rules are in place when running CScan tool.
Run your CScan test from the same network that you will use your Webex Calling services to get optimal results.
It is not possible to test every requirement from a web-based tool. Here are some areas which CScan cannot test or detect.
-
Whether user is using a wired or wireless network
-
Availability of a DHCP and DNS server
-
SRV support
-
NTP port for date/time synchronization
-
Proxies
-
QoS (TOS/DSCP)
-
VPN
Launching and running a CScan test
| 1 |
Sign in to Control Hub. |
| 2 |
Navigate to Quick Links and select Test the network for Webex Calling. Or, access the CScan tool and perform the following instructions: |
| 3 |
Select a location, pick your home region, and choose a language. Choose the location that’s closest to you. This is the data center that Webex Calling connects to. If you’re unsure, leave it to the default selection. |
| 4 |
Choose the type of test that you'd like to run.
Detailed information about each of these test types is available in the CScan Report Information section. If you choose Advanced Diagnostic Test, you must allow CScan to access your microphone and camera. |
| 5 |
Select the option box (by checking or unchecking) if you want to share your information with Cisco and then click the Start Test button to continue. Cisco only collects your IP address and the test results to help troubleshoot your connection. Cisco never sends your information to 3rd parties. |
| 6 |
Click Continue to advanced test button to initiate the test. Allow Camera and Microphone access. You can re pick your test by clicking the Close button. |
| 7 |
Click Continue to advanced test. |
CScan report information
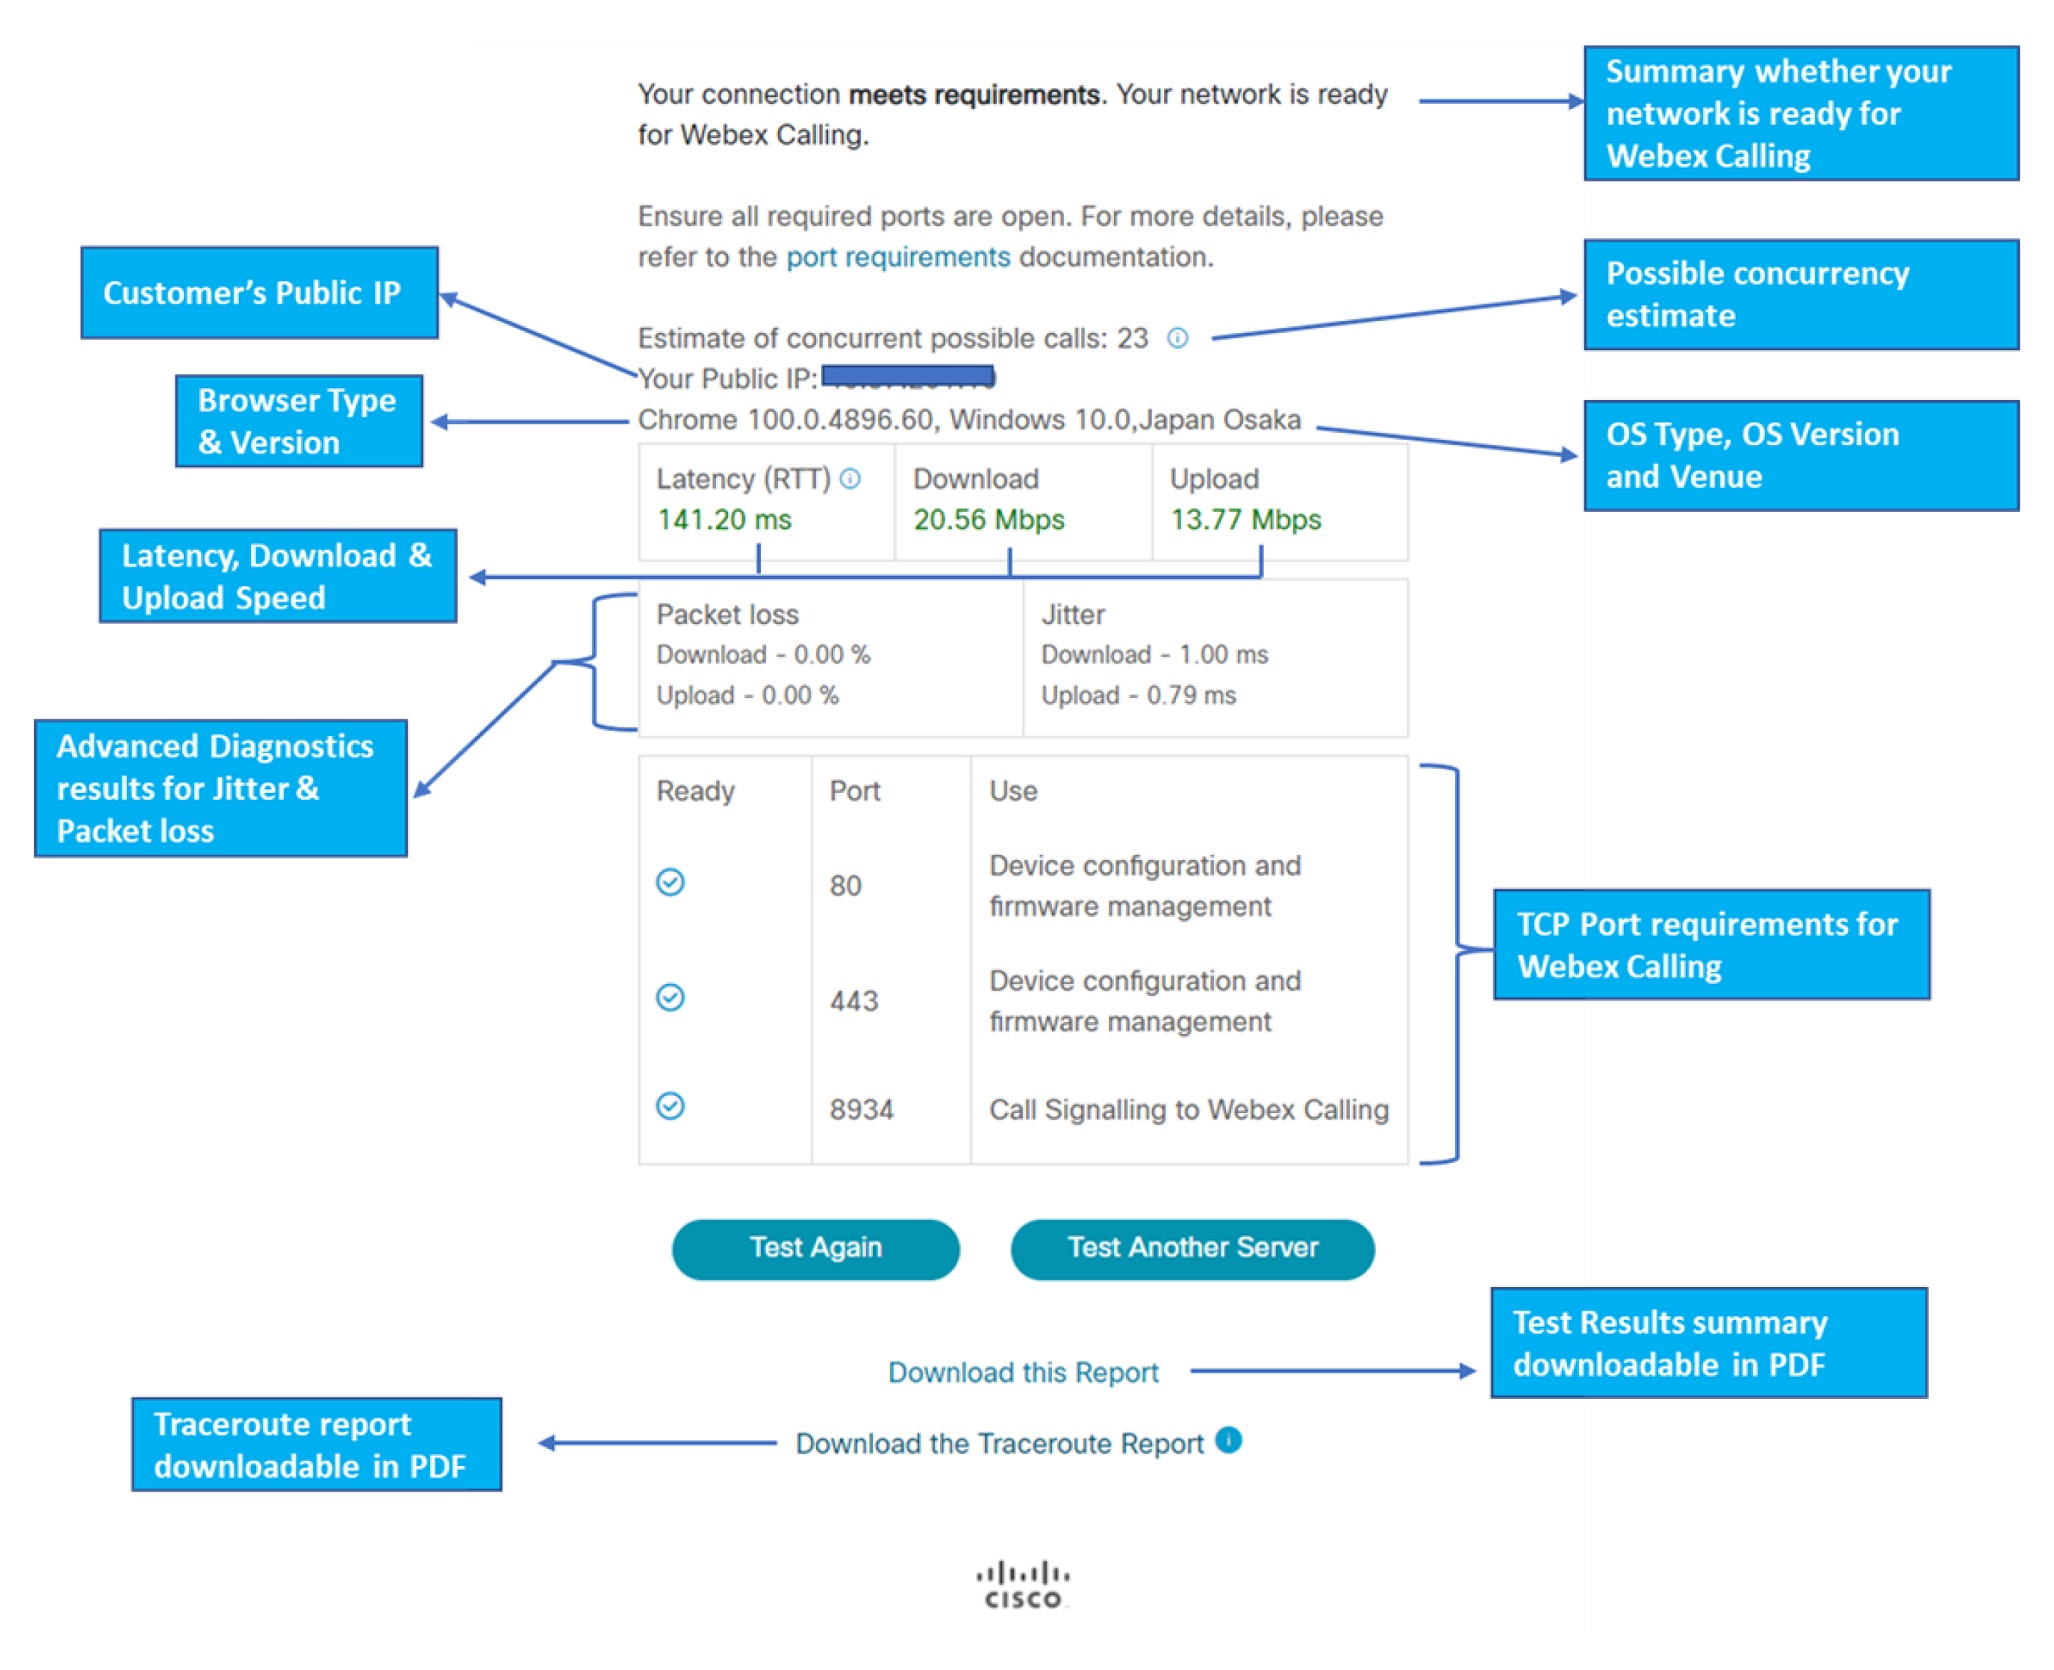
CScan runs a series of basic and advanced tests on port and bandwidth requirements to ensure a customer’s network is ready to deploy Webex Calling services.
Basic test
The Basic Test analyzes the following between your computer and the Calling services data center:
-
Concurrent calls estimate
-
Download and upload bandwidth
-
Latency (RTT)
-
Traceroute reports
-
TCP ports*
* The TCP ports that are tested are a subset of the ports required for Webex Calling. It isn’t possible to test all the ports for a web-based application. Follow the port requirements guide to ensure that your firewall is set up correctly.
Advanced diagnostic test
The Advanced Diagnostic test collects the same information as the Basic test and on top of that adds the following:
-
Packet loss (download and upload)
-
Jitter (download and upload)
To carry out the Advanced Diagnostic test, CScan must open a WebRTC connection to your computer, this requires access to your computer’s camera and microphone. CScan doesn’t save any audio or video packets. This permission is used for measuring packet loss and jitter. CScan will never access your camera or microphone outside of running a test. The permission is saved by your browser and can be revoked at any time.
CScan doesn’t test a wider UDP port range using WebRTC because of browser limitations, it can only validate two UDP ports for a test and it picks a random port range 19560–65535 and then runs the test.
Traceroute report
A traceroute report is provided every time you run a CScan test. To generate this, CScan initiates a reverse traceroute from a Webex Calling data center to the public IP address of your computer. This can give insight into where issues might be occurring along the path between your computer and the Webex Calling data center.
The reason for using the reverse traceroute option is that we can’t initiate a ‘normal’ traceroute from the client browser to the Webex Calling service DC. Reverse traceroute reports can take a while to generate, and the link is grayed out until the report finishes generating.
Interpret test results
CScan tool estimates potential concurrent calls that could traverse your network. This is a conservative estimate based on the bandwidth that is required for audio calls. Since the CScan test is taken at a single point in time, this is an estimate and not a guarantee of performance during peak traffic times.
Call concurrency calculation is a conservative estimate. Assuming all audio calls require two legs of 100kbps and 50 packets/sec for each leg.
If CScan indicates that ports are blocked, check your firewall configuration and the port requirements document. If ports are blocked, you may have issues registering devices or making calls. It's not possible to test all ports listed in the Port Requirements document, so if all ports on CScan are listed as open, there may still be other ports not tested that are causing issues.
If latency or bandwidth figures are low, you may have a lower quality Webex Calling experience. Ensure you have enough bandwidth from your ISP, and that your device has a strong connection to the internet. If you’re using Wi-Fi, ensure that your signal is strong.
CScan test results can be viewed as Downloadable in PDF formats. Once the test execution is complete click on the Download this report
and Download traceroute report
links.
Troubleshooting examples
Example 1
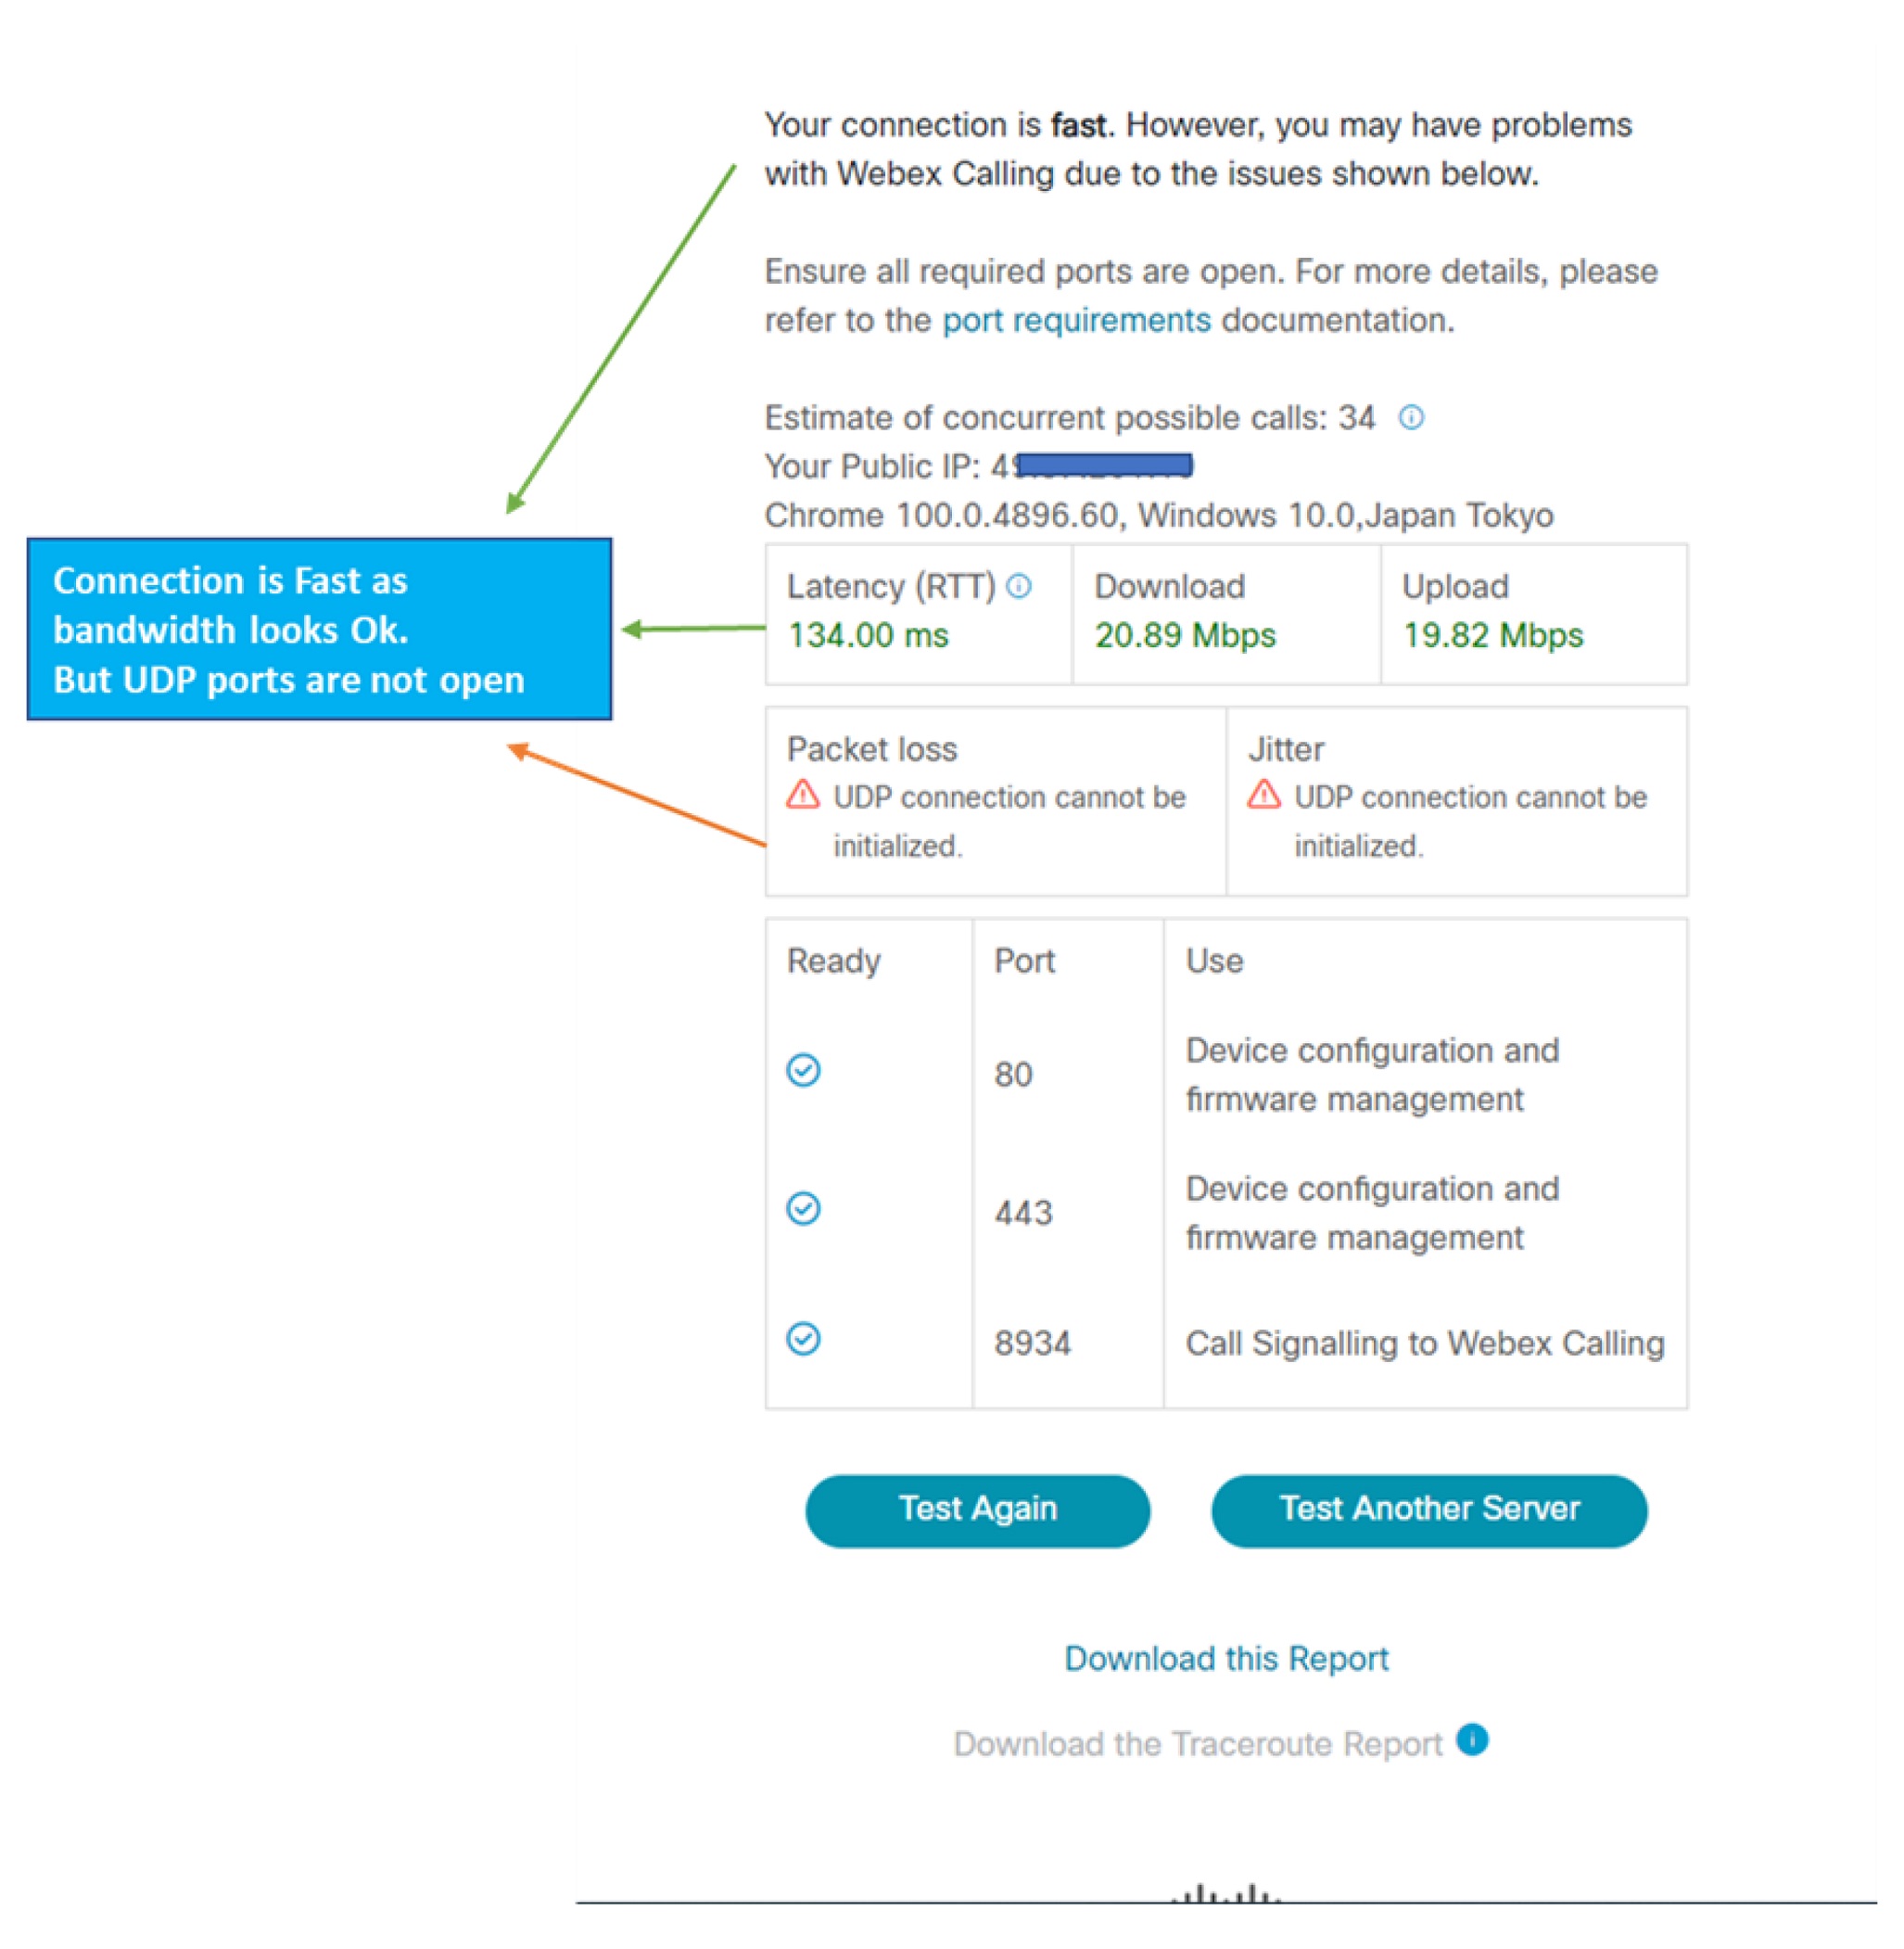
The following figure indicates that the CScan tool was unable to establish a UDP connection from the customer location to the Webex Calling service. This may be due to a NAT/firewall blocking the UDP traffic.
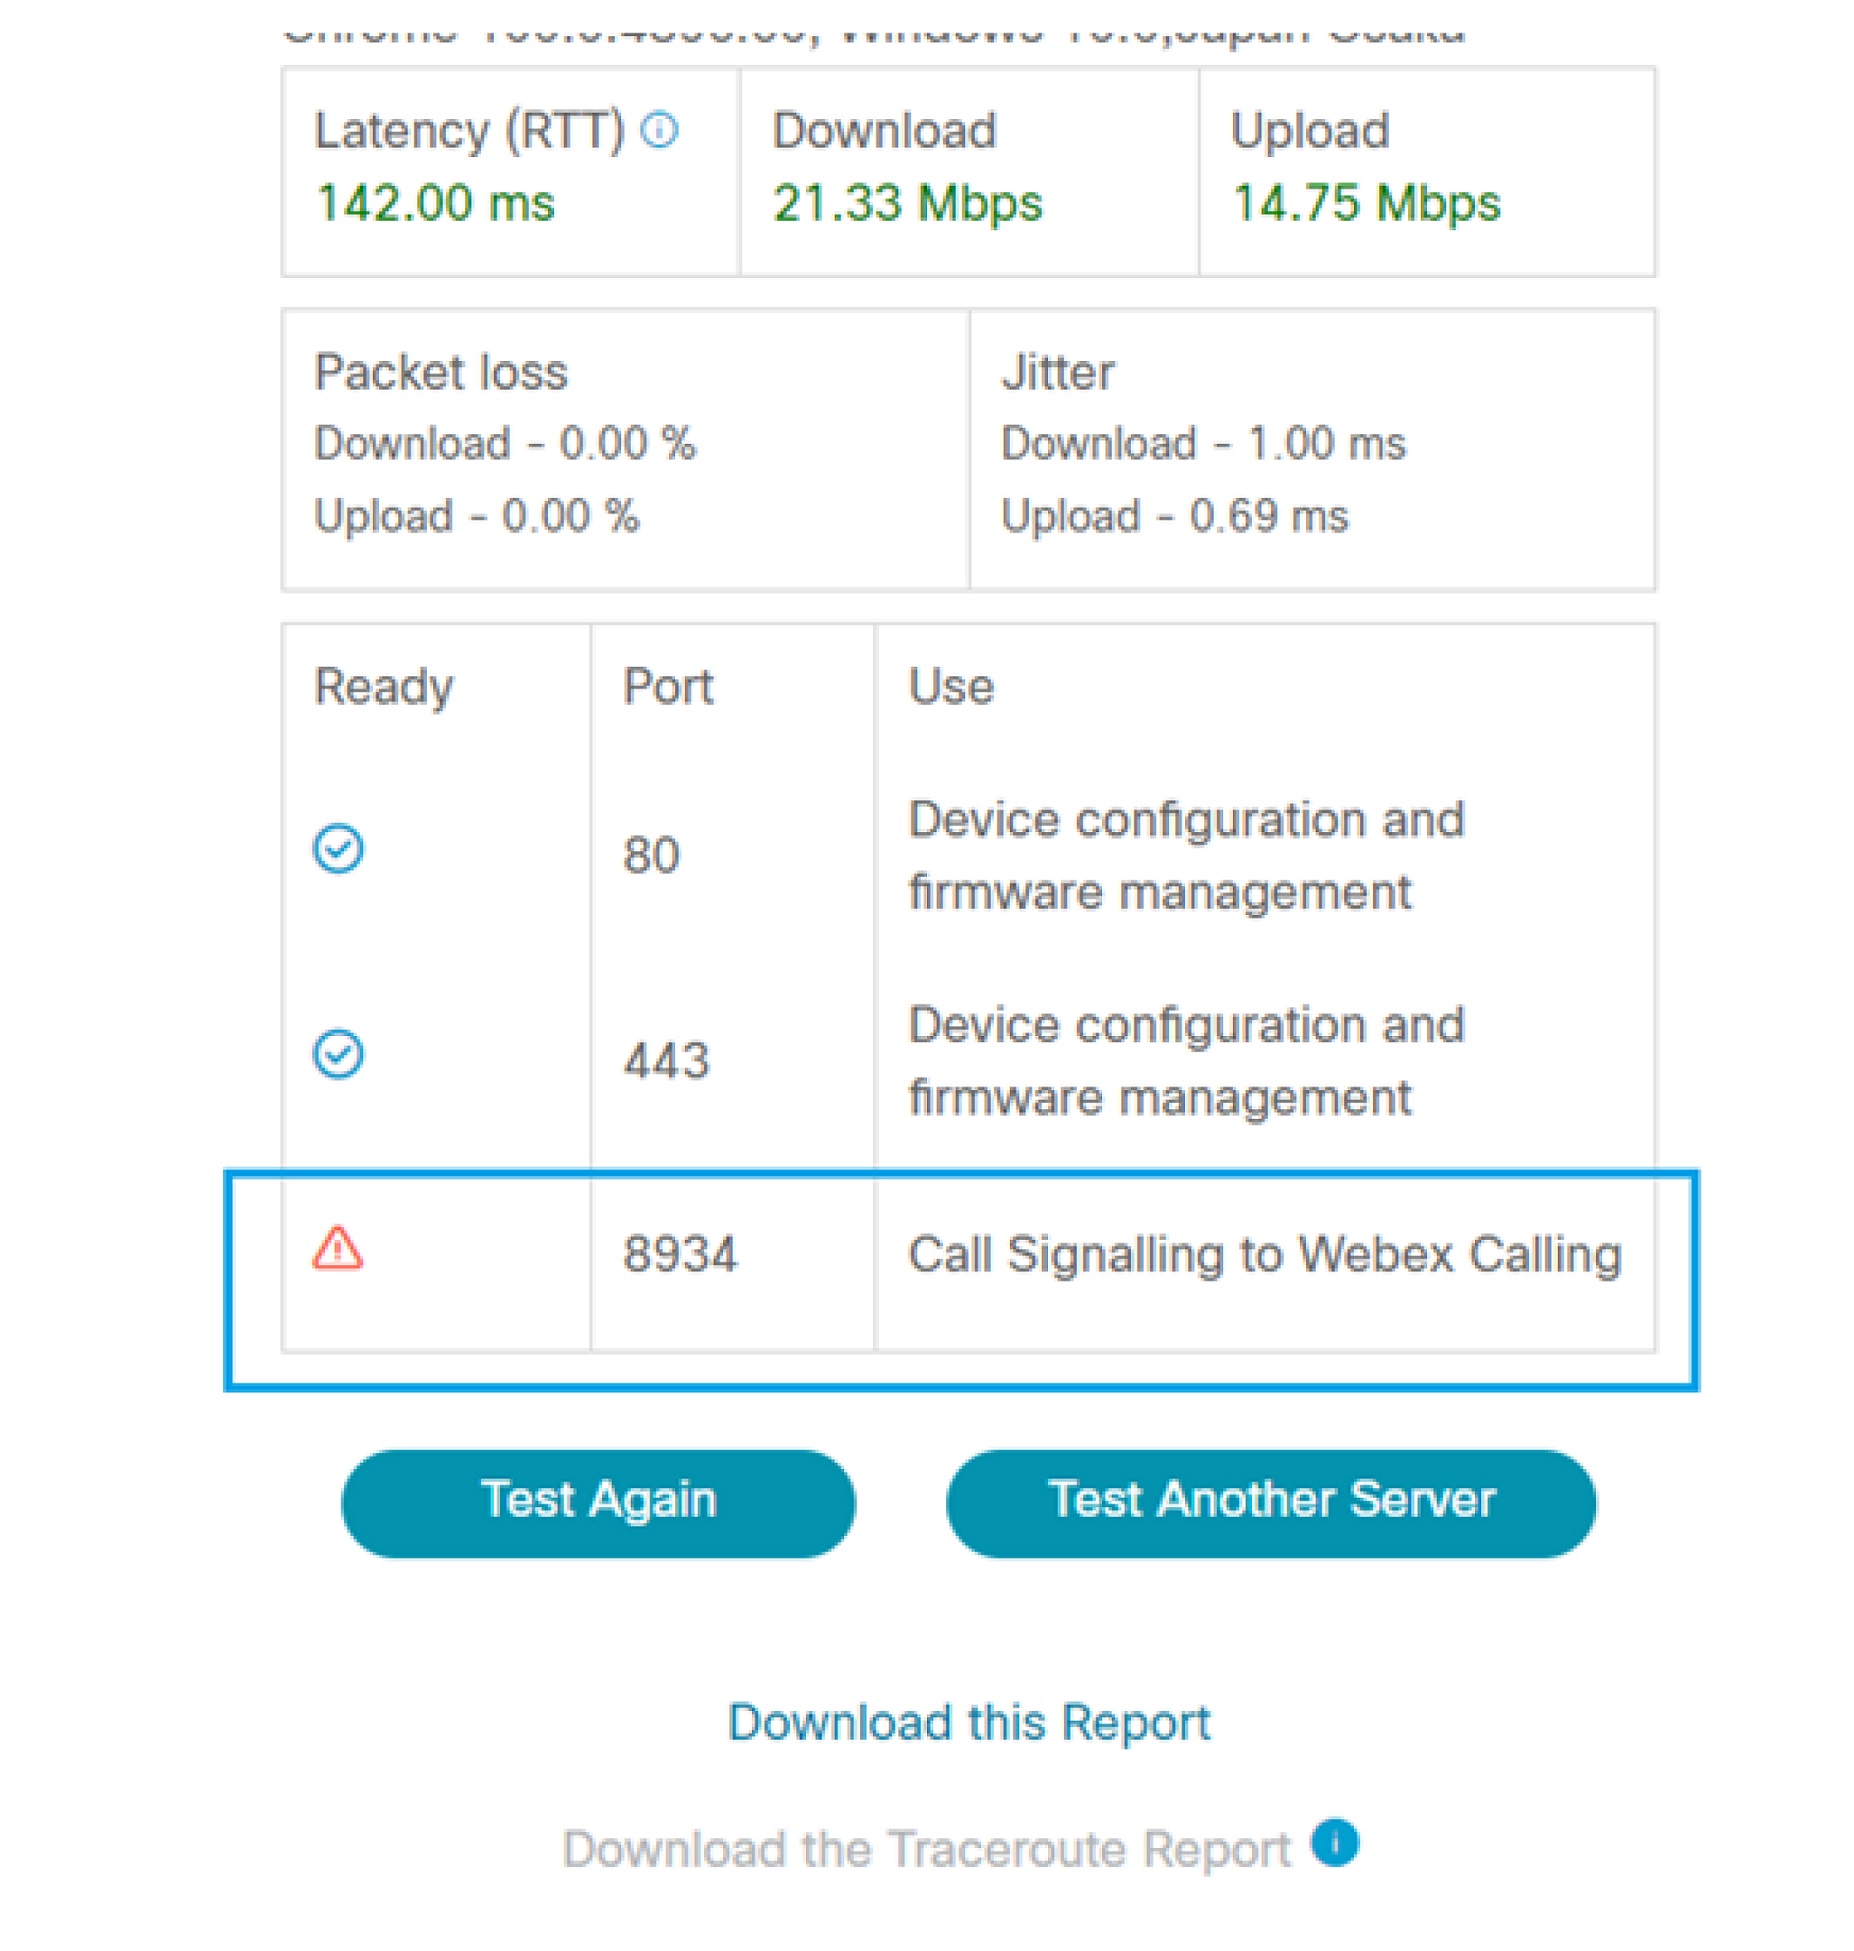
Example 2
The following figure indicates that the CScan test failed to establish SIP over TCP connectivity through port 8934 to the Webex Calling service. This may cause phone registration failures.
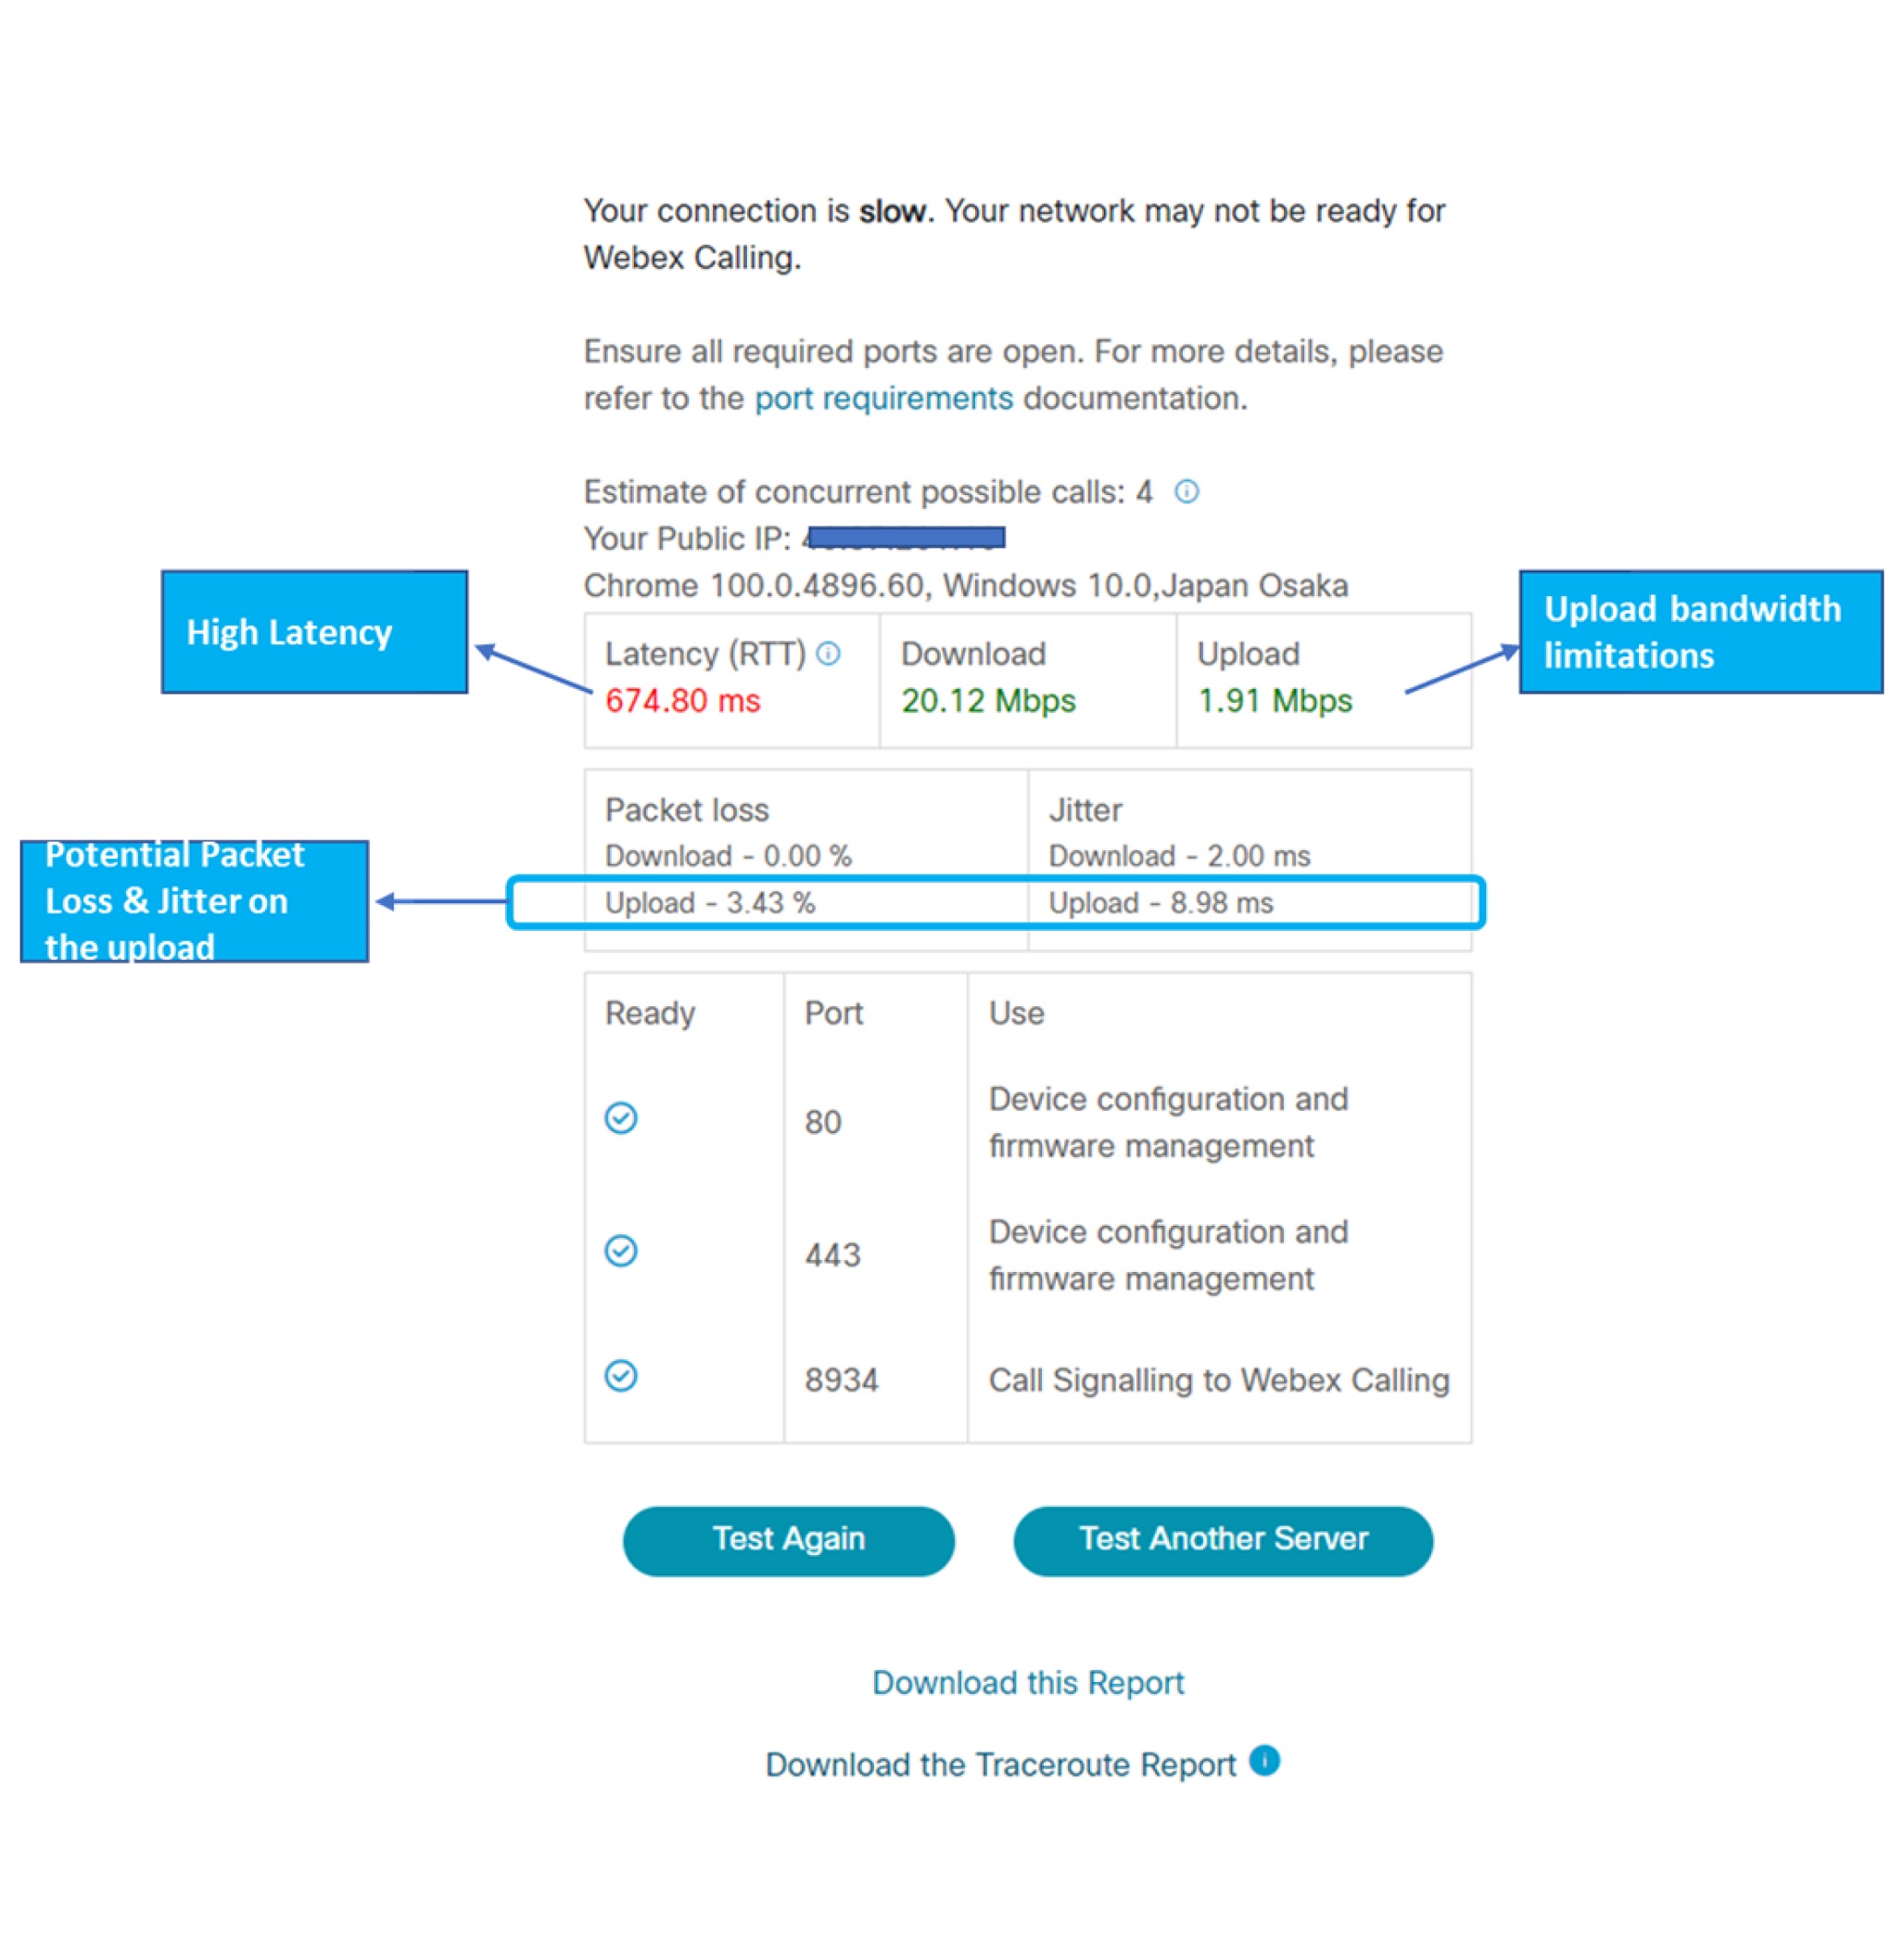
Example 3
The following figure indicates that the CScan test identified high latency and outbound packet loss. This may be due to possible traffic congestion on the WAN side or Bandwidth limitations at the customer location.