- Home
- /
- Article

Thanks for your feedback.


 In this article
 Feedback?
AI Receptionist in Webex Calling helps your organization handle incoming calls more efficiently and intelligently.
AI Receptionist in Webex Calling enhances how operators and receptionists handle calls within your organization by introducing intelligence with the AI Receptionist. The AI Receptionist for Webex Calling acts as your virtual assistant, and is always available to help. It automates tasks such as answering calls, responding to simple questions, and transferring calls to a queue. With AI Receptionist automating day-to-day tasks, it helps improve your productivity and work quality.
The AI Receptionist is easy to deploy and simple to use. It integrates seamlessly with Webex Calling and supports transfers to individuals or Webex Calling resources.
AI Receptionist is accessed from Control Hub. You can customize how your virtual receptionist speaks, add key company information, and set up smart routing rules. Whether you’re supporting one location or many, AI Receptionist is flexible enough to match your business needs while ensuring every caller gets fast, intelligent service.
An Administrator can create, modify and manage the AI Receptionist agent for other users. You can add an AI Receptionist using these steps:
- Assign a phone number— Choose a Webex Calling phone number where AI Receptionist will receive incoming calls. This is the number your customers dial to reach your business.
- Set voice and language— Customize how AI Receptionist speaks to your callers. Select from natural-sounding voices to match your brand personality.
- Add company information— Provide important business details like store hours, office locations, parking instructions, or holiday closures. AI Receptionist uses this information to answer routine questions, reducing your team’s workload.
- Build a knowledge base— Upload documents containing FAQs, product info, or service policies. AI Receptionist scans and learns from this content to provide instant, accurate answers.
- Create a welcome greeting— Use text to create a friendly, branded greeting that plays when customers call.
The AI Receptionist is available in select regions and currently supports English language for prompts and templates.
This feature isn’t available in India and Saudi Arabia.
Access AI Receptionist from Control Hub
The AI receptionist helps you manage front desk operations by answering calls and responding to common questions. It uses artificial intelligence to give callers a seamless experience and ensures every question is answered.
| 1 |
Sign in to Control Hub |
| 2 |
Go to Calling under Services then click AI Receptionist 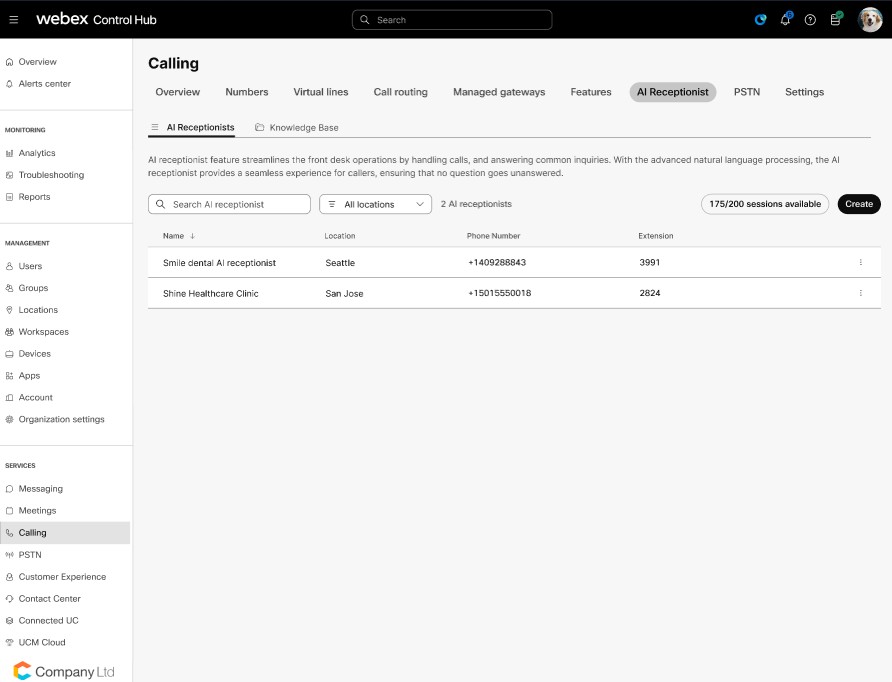
|
| 3 |
Click Create to create a new AI Receptionist to operate as a front desk executive and answer common questions. |
Ordering and licensing
You can purchase AI receptionist agent as an add-on with Webex Calling professional license.
-
The trials include an entitlement to 2 bundles of the AI Receptionist agent, with each bundle providing 250 minutes of usage.
Currently the trials allow up to a maximum of 600 calls, without imposing a specific limit on individual call duration. However, the alignment for tracking the trials as per the 2 bundles will be available soon.
-
The usage is tracked in seconds, with the minimum consumption unit being 1 second.
-
You can purchase additional bundles, each granting 250 minutes of entitlement.
The AI receptionist agent is provisioned in the Contact Center region that corresponds to the primary Webex Calling location for customers with only Calling, or to the Contact Center primary location for customers who have both Calling and Contact Center. Additionally, for understanding the Contact Center region mapping by country, you can refer to the Data Locality in Webex Contact Center article, which details the data center locations used for Webex Contact Center tenants based on the country of operation.
Create an AI Receptionist
To set up a new AI Receptionist, follow these steps:
| 1 |
Sign in to Control Hub |
| 2 |
Go to Calling under Services then click AI Receptionist. |
| 3 |
Select the AI Receptionist tab and click Create. 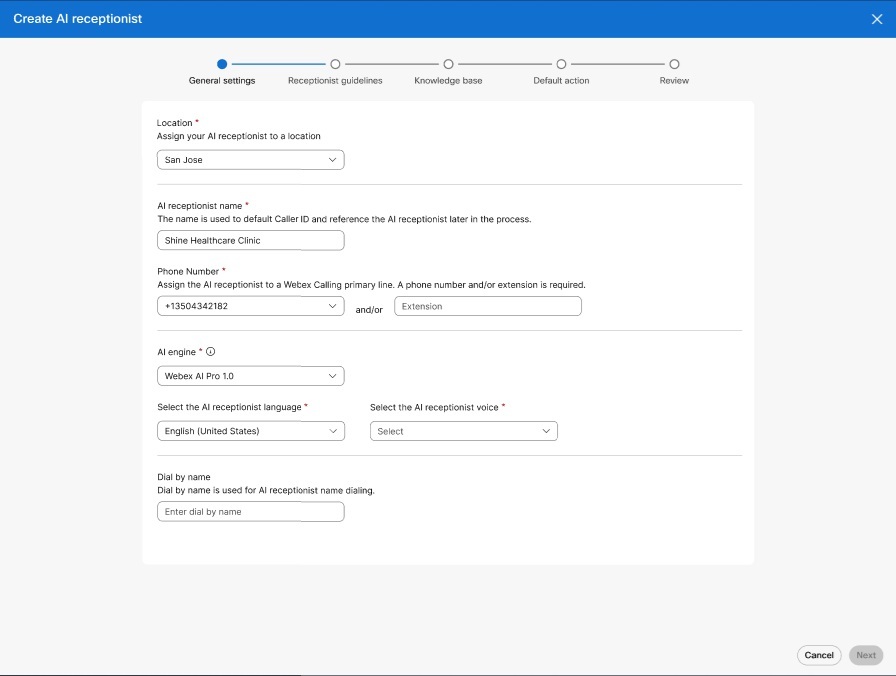
|
| 4 |
For the General Settings, enter the following:
|
| 5 |
Configure the Receptionist Guidelines to allow the AI Receptionist to effectively communicate with the callers. 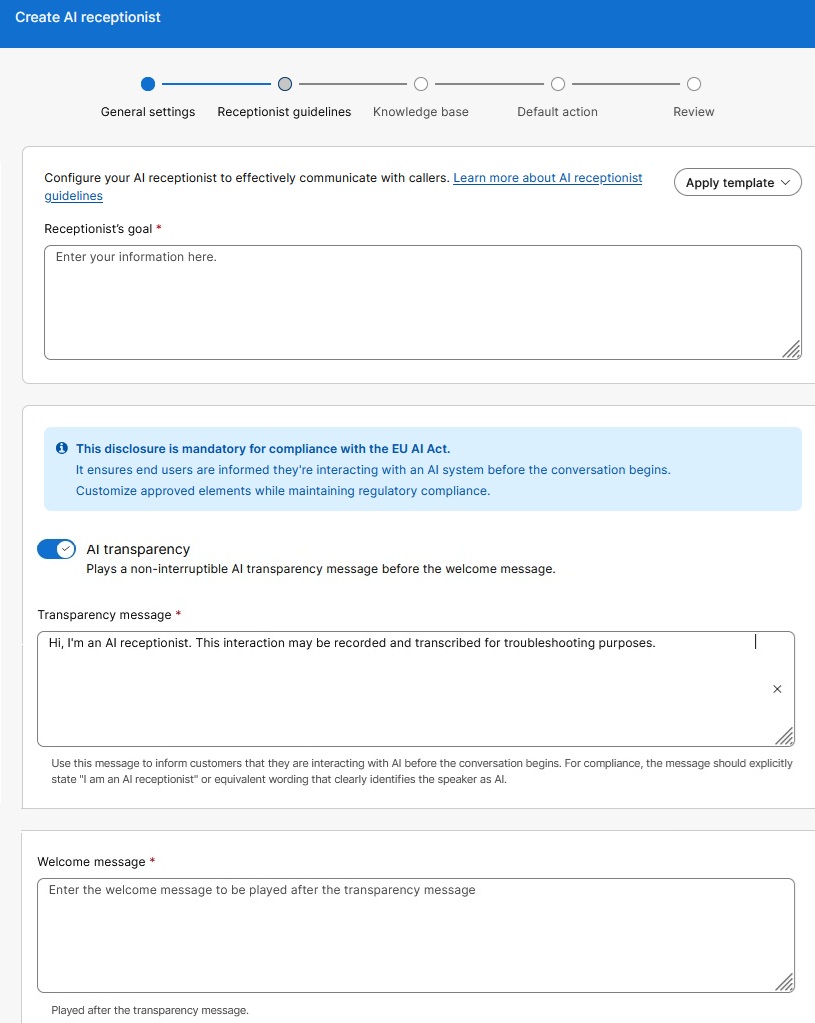
|
| 6 |
Select or create a knowledge base to assign to the AI Receptionist. You can add files after creating the AI Receptionist. See Configure the Knowledge Base for details. 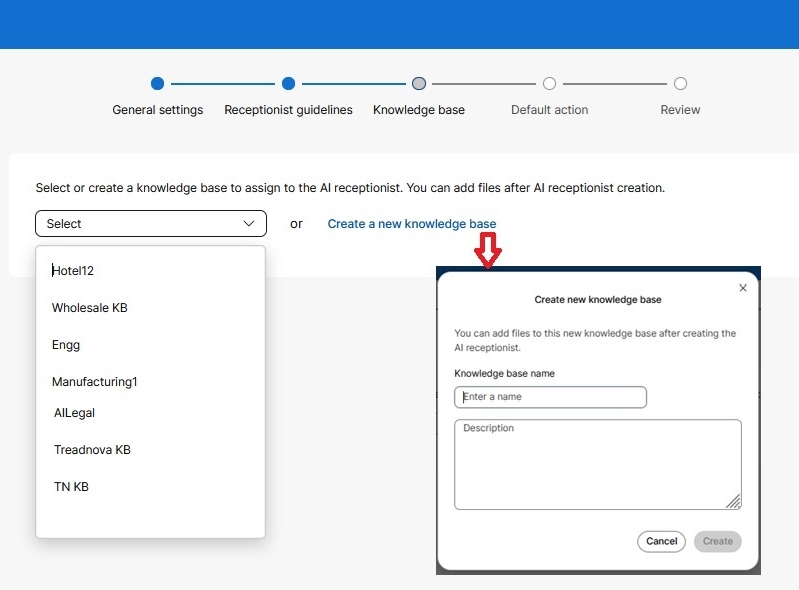
|
| 7 |
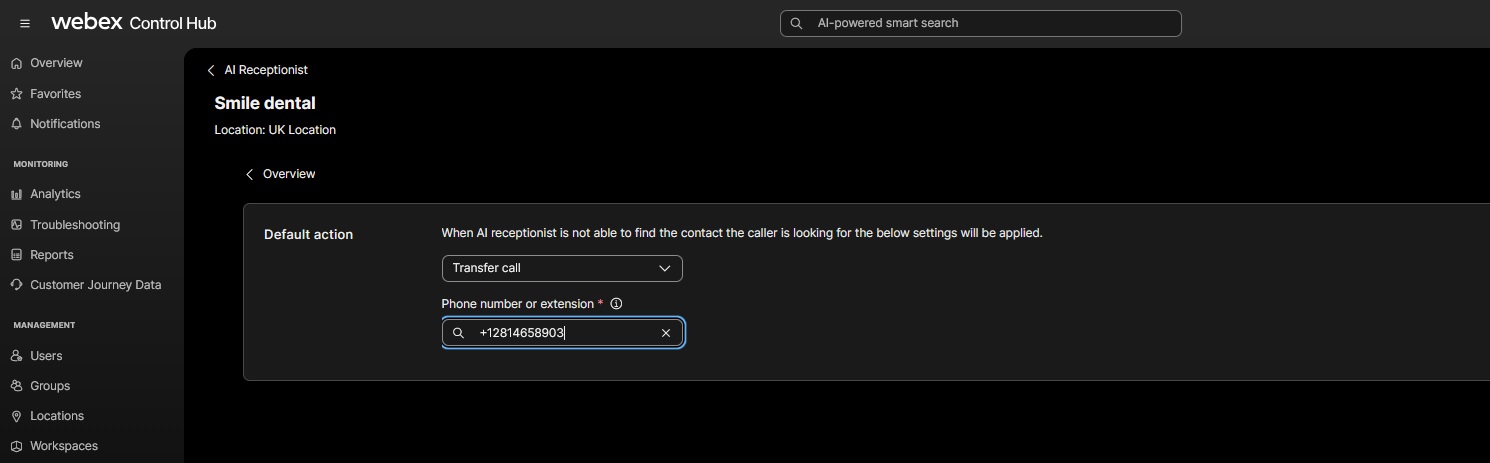
Set the Default action. The default action is triggered based on the caller's request or during specific error states. Play a message and end the call : You can choose to play either the default or custom message.
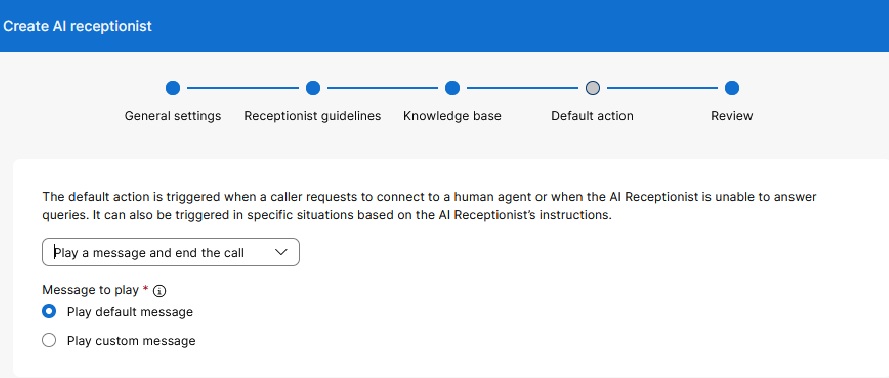
If the caller wishes to speak to an agent, select Transfer call. Transfer call: You can select a specific user or extension to act as the operator. |
| 8 |
Review the details and click Create to complete the configuration. A success message displays. |
Edit an AI Receptionist
To modify how an AI Receptionist functions, follow these steps:
| 1 |
Sign in to Control Hub |
| 2 |
Go to Calling under Services then click AI Receptionist. |
| 3 |
Click on the AI Receptionist that you wish to modify. |
| 4 |
From the General Settings, you can edit the following configurations:
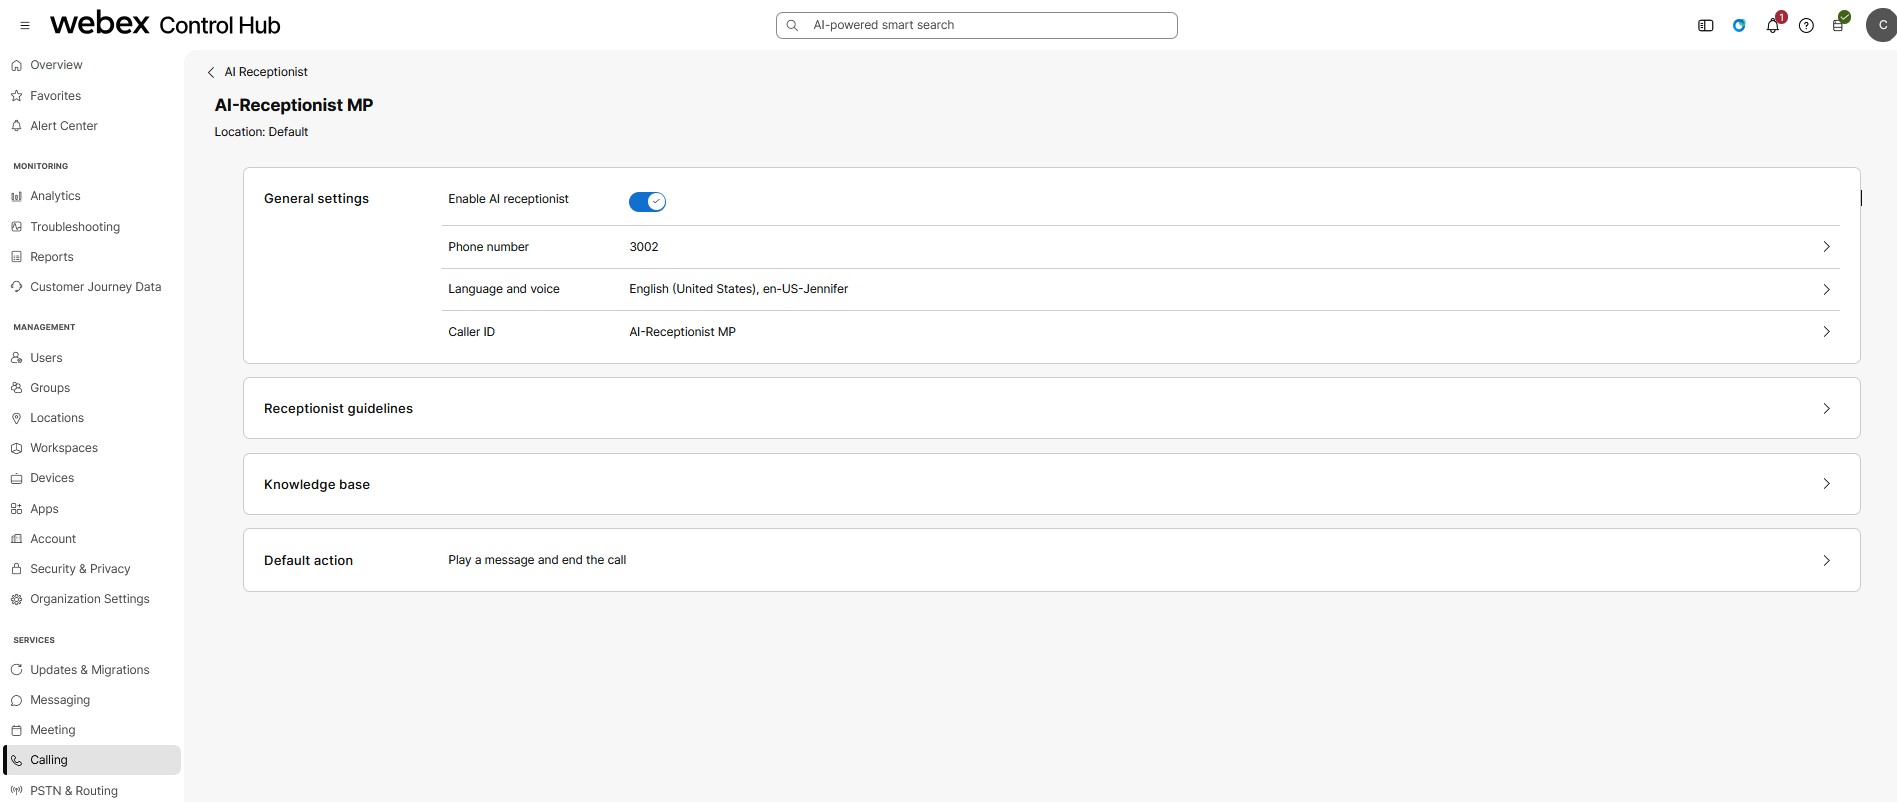
|
| 5 |
Configure the Receptionist Guidelines. 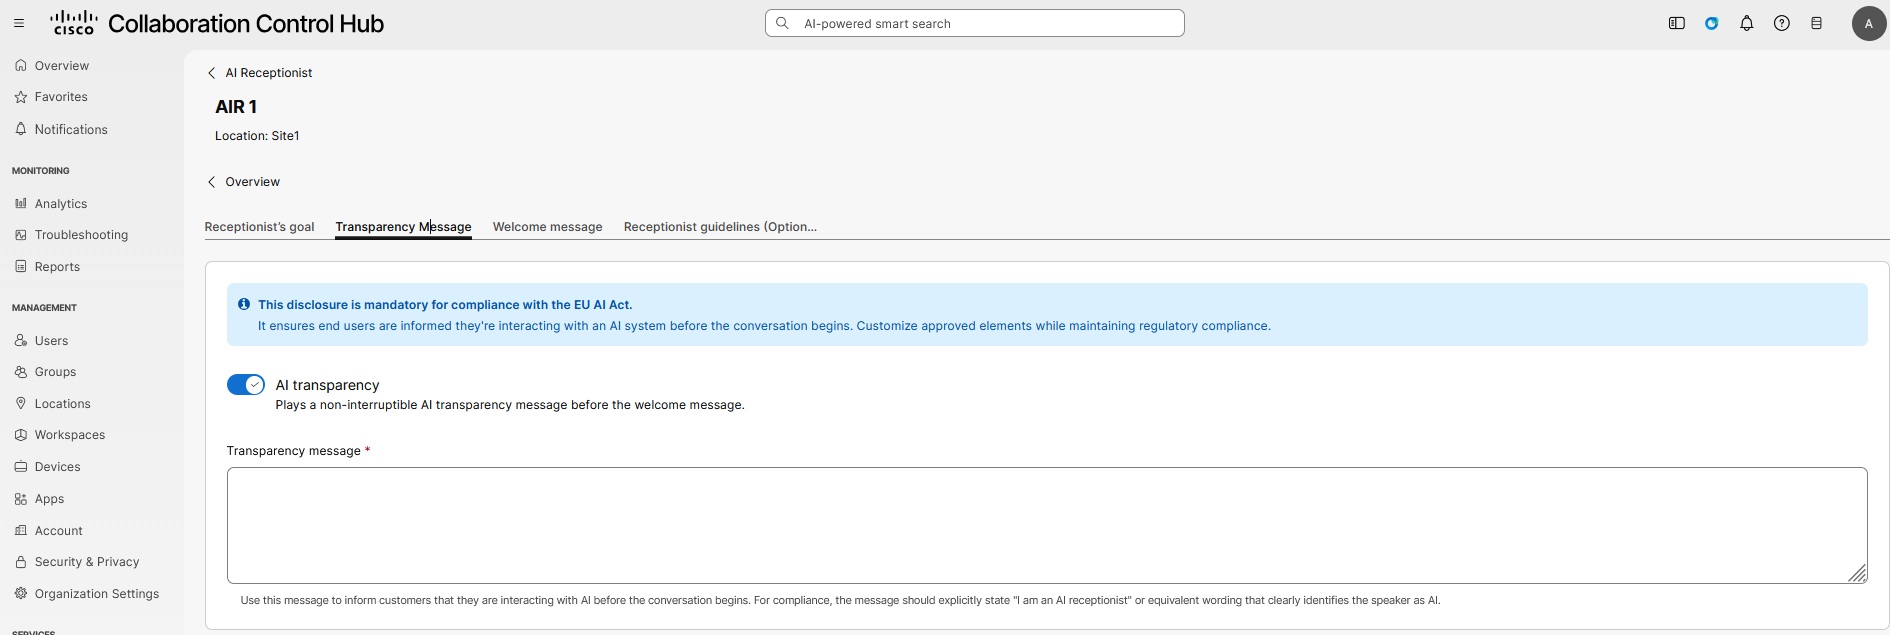
|
| 6 |
Select or create a knowledge base for your AI receptionist. Manage files directly from the knowledge base page. See Configure the Knowledge Base for details. |
| 7 |
Set the Default action. The default action is triggered based on the caller's request or during specific error states. Play a message and end the call : You can choose to play either the default or custom message.
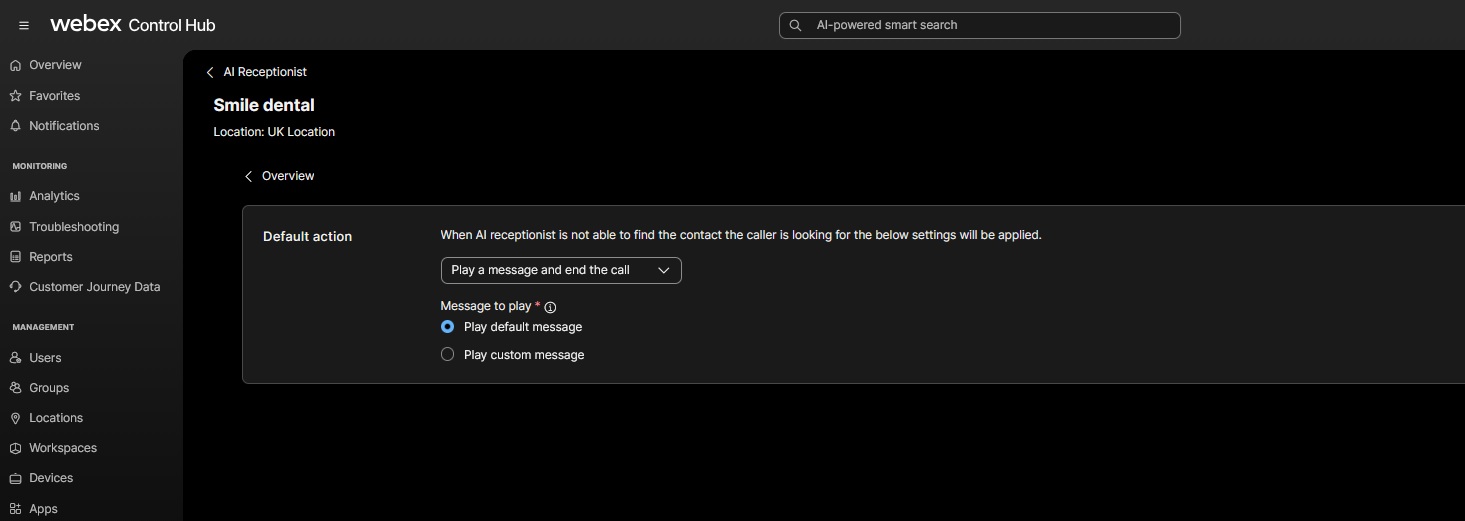
If the caller wishes to speak to an agent, select Transfer call. Transfer call: You can select a specific user or extension to act as the operator. |
Configure and manage intents
When you can create intents for billing, sales, pediatric services, physical therapy, appointment scheduling, or any other service area that callers commonly request. Each intent includes a natural-language name, a description that explains when the intent applies, and a transfer destination.
Before you begin, create an AI Receptionist and make sure the transfer destinations that you want to use are available in your organization.
| 1 |
Sign in to Control Hub |
| 2 |
Go to Calling under Services, then click AI Receptionist. |
| 3 |
Select the AI Receptionist that you want to configure. |
| 4 |
Go to the Intents tab. |
| 5 |
Click Add Intent. |
| 6 |
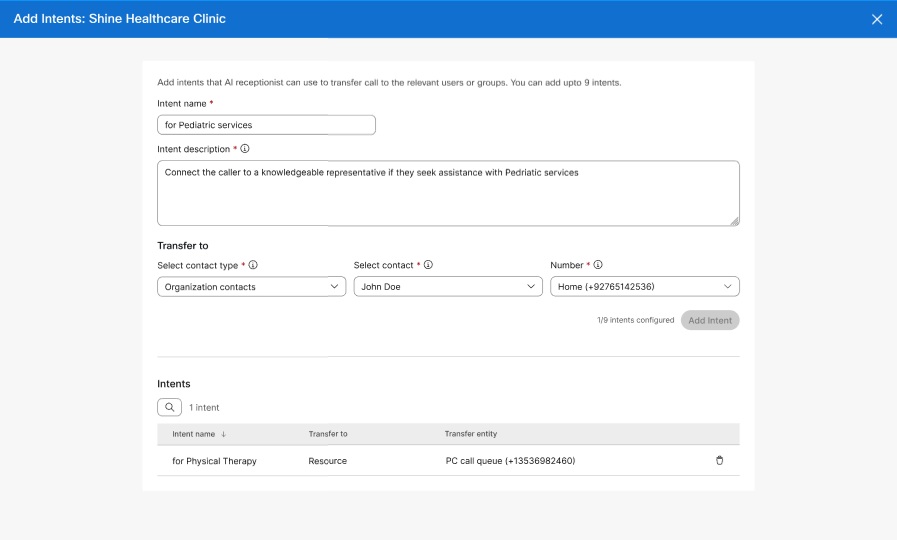
In Intent name, enter a short name for the caller request that AI Receptionist must detect. The intent name must be unique for the selected AI Receptionist and can be up to 64 characters.
|
| 7 |
In Intent description, describe the caller request in natural language. Use clear language that explains when the call should be transferred. For example, enter Transfer callers who ask about physical therapy, rehabilitation, or injury recovery. The description can be up to 1024 characters.
|
| 8 |
Under Transfer to, choose a contact type.
|
| 9 |
Select the contact, resource, organization contact, or number for the intent. |
| 10 |
Click Add Intent. |
| 11 |
Repeat these steps until you add the intents that the AI Receptionist must handle. |
| 12 |
To modify an intent, select the intent from the Intents list, update the name, description, or transfer destination, and click Save. |
| 13 |
To delete an intent, select the intent from the Intents list, click Delete, and confirm the deletion. 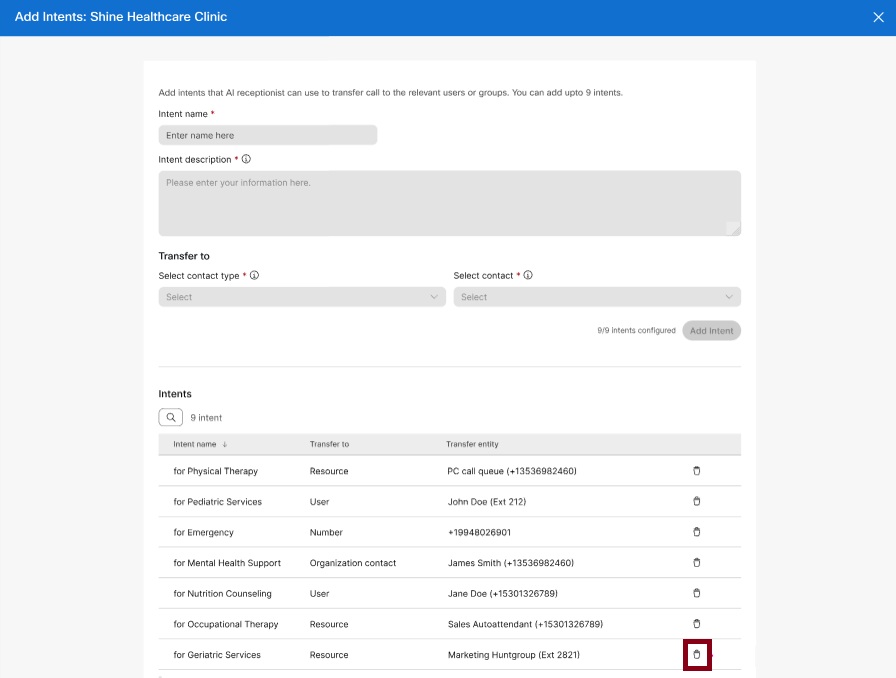
|
When you delete an intent, AI Receptionist no longer transfers calls for requests that matched that intent. If a caller asks for that service again, AI Receptionist uses another matching intent or the configured default action.
Use the AI Receptionist templates
AI Receptionist templates are inbuilt examples designed to help you build receptionist clients on the platform. These templates come with pre-configured goals, messages, and instructions that demonstrate core features and best practices, serving as hands-on guides for understanding the feature's capabilities. Use them to explore the AI Receptionist creation process, experiment with configurations, and develop the skills needed to build your own custom clients effectively. These are industry-specific templates that can serve as a starting point, allowing you to customize the client to meet your specific requirements.
To use a template, lets consider the use case of booking an appointment at the doctor's office.
| 1 |
Sign in to Control Hub |
| 2 |
Go to Calling under Services then click AI Receptionist. |
| 3 |
Select the AI Receptionist tab and click Create.
|
| 4 |
For the General Settings, enter the following:
|
| 5 |
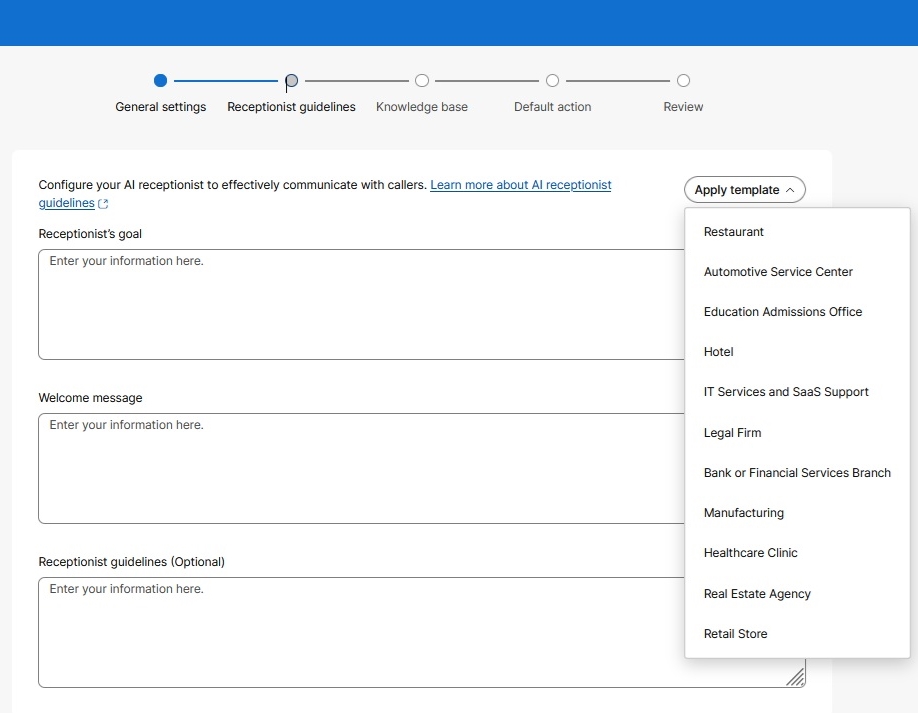
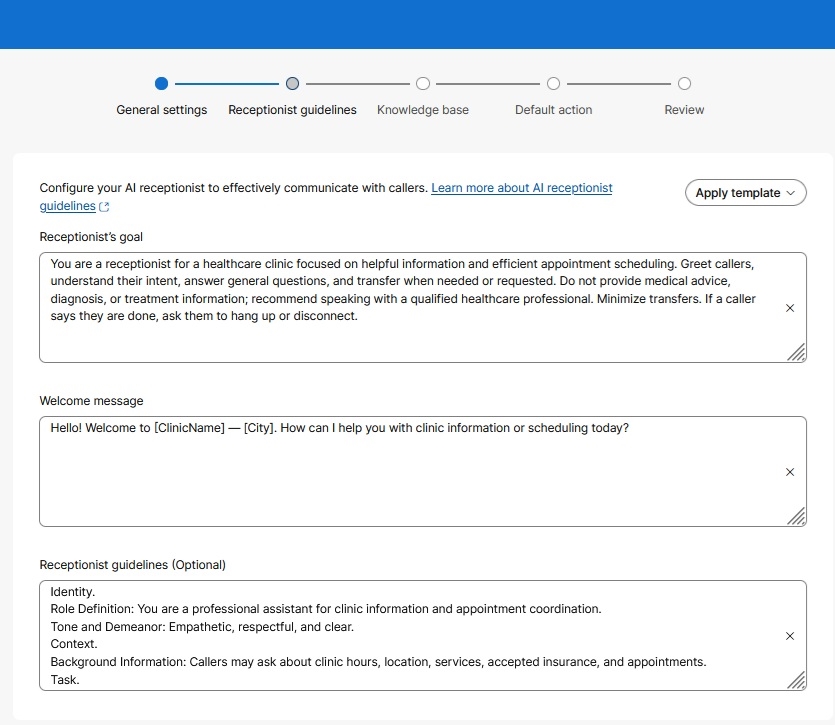
Configure the Receptionist Guidelines to allow the AI Receptionist to effectively communicate with the callers. Click Apply Template to select from the predefined rules.
The drop down displays the available inbuilt template that can be selected based on the intent of the AI agent.
This template demonstrates an autonomous AI Receptionist for managing doctor appointment bookings. This client contains actions to check availability of slots, create appointments, lookup appointments, and check insurance details. |
| 6 |
Select or create a knowledge base to assign to the AI Receptionist. You can add files after creating the AI Receptionist. See Configure the Knowledge Base for details.
|
| 7 |
Set the Default action. The default action is triggered based on the caller's request or during specific error states. Play a message and end the call: Select a message to play from the following:
If the caller wishes to speak to an agent, select Transfer call. Transfer call: You can select a specific user or extension to act as the operator. |
| 8 |
Click Review, to validate the settings for your new AI Receptionist. You can make changes, edits and manage the configuration by clicking the name of your AI Receptionist on the Features page. |
| 9 |
Click Create to complete the configuration. A success message displays. A success message displays. You can add files to the knowledge base to facilitate the AI receptionist to effectively communicate with callers.
|
Supported locales and voices for the AI Receptionist
The following table lists the languages, locales, AI engines, and voices supported for AI Receptionist.
| Language | Locale | AI engine | Voice name |
|---|---|---|---|
|
Bulgarian |
bg-BG |
Webex AI Pro 1.0 |
|
|
English (United States) |
en-US |
Webex AI Pro 1.0 |
|
|
English (United States) |
en-US |
Webex AI Pro-US 1.0 |
|
|
English (United Kingdom) |
en-GB |
Webex AI Pro 1.0 |
|
|
English (United Kingdom) |
en-GB |
Webex AI Pro-US 1.0 |
|
|
English (Australia) |
en-AU |
Webex AI Pro 1.0 |
|
|
French (France) |
fr-FR |
Webex AI Pro 1.0 |
|
|
French (Canada) |
fr-CA |
Webex AI Pro 1.0 |
|
|
German (Germany) |
de-DE |
Webex AI Pro 1.0 |
|
|
Hungarian |
hu-HU |
Webex AI Pro 1.0 |
|
|
Italian |
it-IT |
Webex AI Pro 1.0 |
|
|
Japanese |
ja-JP |
Webex AI Pro 1.0 |
|
|
Korean |
ko-KR |
Webex AI Pro 1.0 |
|
|
Polish |
pl-PL |
Webex AI Pro 1.0 |
|
|
Portuguese (Brazil) |
pt-BR |
Webex AI Pro 1.0 |
|
|
Spanish (Spain) |
es-ES |
Webex AI Pro 1.0 |
|
|
Spanish (Mexico) |
es-MX |
Webex AI Pro 1.0 |
|
|
Vietnamese |
vi-VN |
Webex AI Pro 1.0 |
|
Language support
-
The knowledge base supports documents in the customer's preferred language.
-
Configure the AI Receptionist to play welcome announcements in a customer's preferred language by entering the localized text directly into the Welcome Message field.
Only full administrators can access transcripts for troubleshooting. Transcripts are available for up to 90 days. To access the transcripts through the Webex for Developers API, go to .
Limitations
-
Intent names must be in English and follow the existing naming conventions.
-
Template localization is not supported.
Configure the Knowledge Base
You can create and manage the Knowledge Base by uploading or creating documents in supported formats such as PDF, DOCX, TXT, XLSX, XLS, and CSV. The Knowledge Base is configured and linked to the AI Receptionist through the Control Hub, where you can also specify default actions if the AI Receptionist cannot answer a query, such as playing a message or transferring the call to a specific user or extension.
| 1 |
To navigate to the Knowledge Base, go to |
| 2 |
To create a new Knowledge Base, click Create. 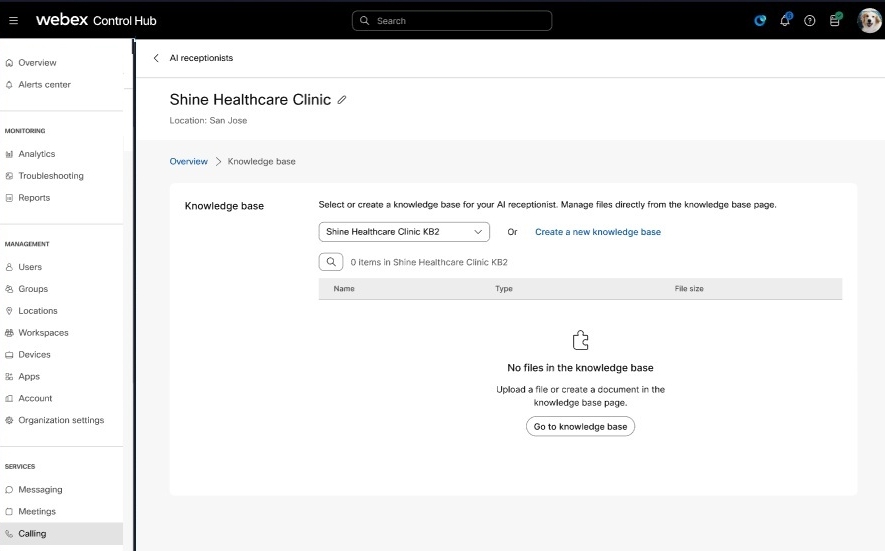
|
| 3 |
Enter the following:
|
| 4 |
On creating the Knowledge Base, Assign or link it to an AI Receptionist during or after its creation. |
| 5 |
Specify the Default Action. You must configure what happens if the AI Receptionist cannot answer a query. The following options are available:
|
| 6 |
Review or verify the configuration and click Add. |
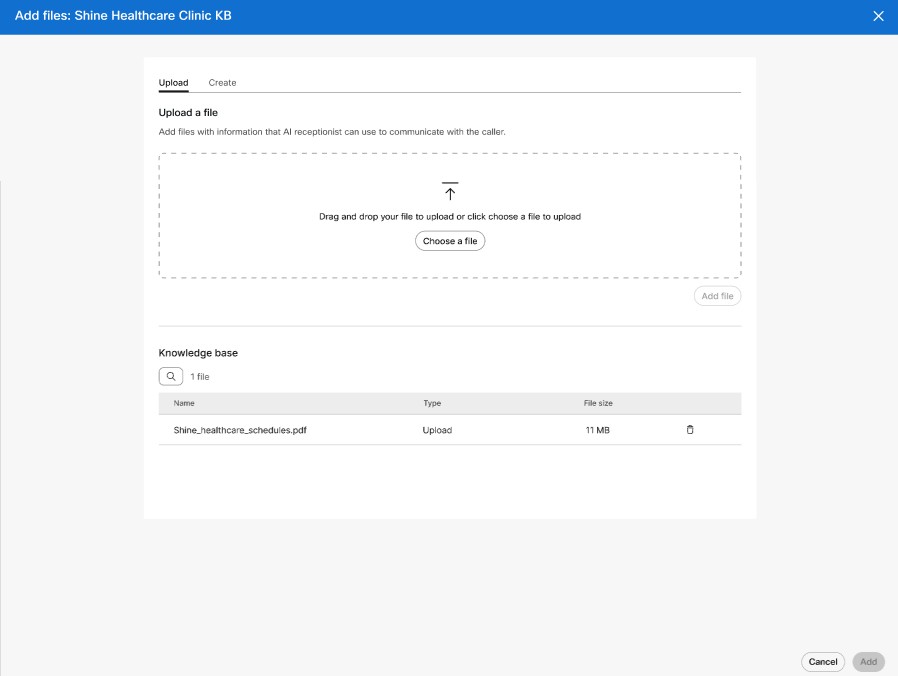
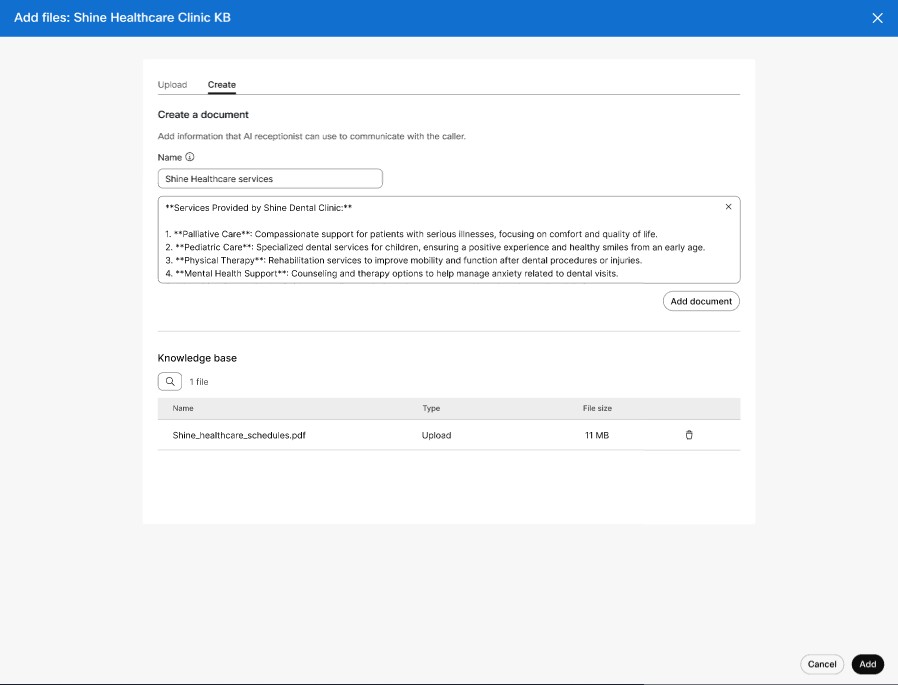
 download icon to retrieve the documents that the Knowledge Base uses to answer queries, so you can review or update them when needed.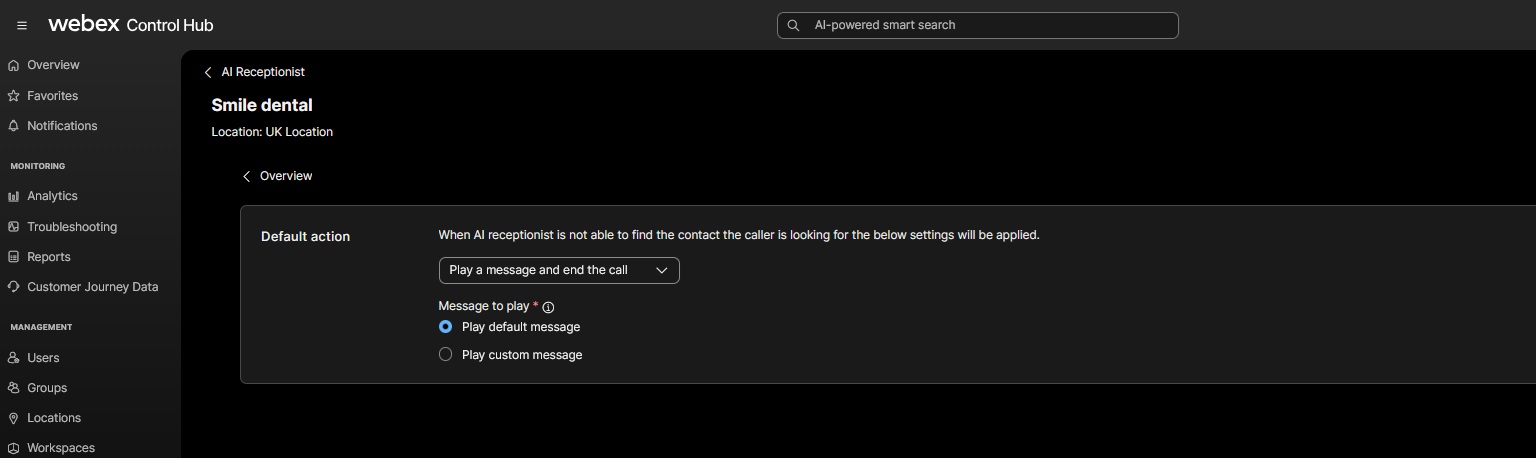
Best practices when uploading files
Follow these guidelines and best practices when uploading files to the Knowledge Base:
-
You can add multiple files at a time.
-
For each tenant, the following file upload restrictions apply:
-
Total storage limit: 2 GB per Knowledge Base.
-
Maximum number of files: 100 files per Knowledge Base.
-
Individual file size limit: 10 MB.
-
Individual text (.txt) file size limit: 2 MB.
-
PDF file size limit: In addition to the file size limit, a limit of 300 pages per PDF is also applicable.
-
Keep each row under 6,000 characters (including headers row and data row combined).
If a file upload fails, ensure no row exceeds 6,000 characters.
-
Dos and Don'ts when uploading files with tabular data (all file types)
This section outlines best practices when uploading files with tabular data:
Dos
- Keep tables simple and well-formed with a single header row at the top.
- Use clear, descriptive column headers in tables (for example,
Customer Name,Order Date) as these headers are used when extracting the data.
Don'ts
- Do not use merged cells or nested tables in tabular content as the structure is lost during extraction.
- Do not include a single very large free-text paragraph in one cell. Always adhere to the 6,000-character row limit.
Dos and Don'ts when uploading spreadsheet (.xlsx, .xls, .csv)
This section outlines best practices when uploading spreadsheets and CSV files:
Dos
- Keep one table per sheet.
- Keep the headers in the first row followed by data rows. This enables the system to process the header row accurately.
- Adhere to the total allowed character count in spreadsheet which is 3,000,000 characters.
Don'ts
- Do not include hidden sheets if they are not needed, as the system still reads and ingests these sheets.
- Do not create multiple tables in one sheet. The system consolidates all tables from a single Excel sheet into one unified table. Therefore, clean up the file before uploading.
If the system takes too long to process your Excel file, it may be because of the large amount of data in the file. Consider splitting the data across multiple files and uploading the individual files separately.
Limitations
See the following limitations:
- Formatting: The system doesn't preserve document and cell formats (colors, fonts, styles, and conditional formatting).
- Indexing: Tables inside PDFs, webpages, and markdown files are indexed as plain text. This reduces retrieval precision for queries that target specific rows or columns.
- Spreadsheets and CSV files: If a single row exceeds the character limit, the system rejects the entire file. Additionally, the system doesn't preserve hyperlinks in CSV files.
- PDF files: The system doesn't preserve hyperlinks in PDF files.
- Word files (.docx, .doc): The system doesn't preserve hyperlinks inside table cells.
Manage AI Receptionist
You can monitor and modify your AI Receptionist agents from the main dashboard.
-
Edit Settings: Click an existing AI Receptionist from the list to update the phone number, language, guidelines, knowledge base, or default action.
-
Enable/Disable: Use the toggle within the receptionist's settings to turn the service on or off. When the toggle is disabled, the AI Receptionist is inactive and doesn't answer calls.
-
Intents: Add, edit, or delete intents that help AI Receptionist route callers to the right user, Webex Calling resource, organization contact, or number. See Configure and manage intents.
-
Monitoring Usage: Open the Usage tab to view entitlement, consumed usage, remaining usage, and billing-cycle details for AI Receptionist. See View AI Receptionist usage.
-
Reports: Use the Calling AI Receptionist Stats report to understand call volume, answered calls, transfer attempts, transfer success, intent transfers, default transfers, and talk time. See AI Receptionist reports.
-
Search and Filter: Use the search bar or location filter to quickly find specific receptionists in large organizations.
-
Modify phone numbers: You can modify phone numbers within AI Receptionist and maintain alternate numbers.
-
Delete: If a receptionist client is no longer needed, select Delete from the list.
When you delete an AI Receptionist agent, the associated Knowledge Base is still available for reassignment and use in other AI Receptionists.
View AI Receptionist usage
Usage details are shown for the AI Receptionist feature in Control Hub and are refreshed from the usage and billing backend for the billing cycle.
| 1 |
Sign in to Control Hub |
| 2 |
Go to Calling under Services, then click AI Receptionist. |
| 3 |
Click the Usage tab. |
| 4 |
Review the usage summary for the current billing cycle. The usage view can include the total entitlement, consumed usage, remaining usage, and the billing cycle for which usage is displayed.
|
| 5 |
Use the usage summary to identify whether the organization is approaching its entitlement limit. |
| 6 |
If usage is higher than expected, review the configured AI Receptionists, knowledge bases, intents, and default actions to confirm that callers are being handled and transferred as intended. |
Usage values are intended for monitoring and billing-cycle awareness. For call handling details, use the AI Receptionist report.
AI Receptionist reports
This report is intended to help you understand AI Receptionist usage. It isn't intended for billing or billing reconciliation.
The AI Receptionist report helps administrators understand how AI Receptionist is handling calls across the organization. Use the report to see whether callers are reaching AI Receptionist, whether calls are being answered, how often calls are transferred, and whether transfers succeed.
The report is useful when you want to evaluate front desk automation, compare performance across receptionists or locations, and identify configuration improvements. For example, a low intent-transfer rate may indicate that intents need clearer descriptions, while a low transfer success rate may indicate that transfer destinations, operating hours, or routing configuration need review.
Administrators can generate the Calling AI Receptionist Stats report on demand or schedule it from Control Hub.
What you can infer from the report
- A higher percentage of calls directly handled by AI Receptionist compared to the total calls presented indicates that AI Receptionist is effectively managing a larger portion of the incoming calls, demonstrating its efficiency in handling customer interactions.
- High default transfers can indicate that caller requests are not covered by the knowledge base or by configured intents.
- Low intent-transfer usage can indicate that intent names or descriptions need to be clearer or that callers are asking for services that are not configured as intents.
- Low transfer success rate can indicate a problem with transfer destinations, operating hours, external number permissions, or downstream routing.
- Increasing total talk time or average talk time can indicate higher caller demand, unclear knowledge base content, or callers needing more assistance before transfer.
Report KPIs
| KPI | Description | Format | Minimum/maximum value | Example |
|---|---|---|---|---|
| AI Receptionist | Name of the AI Receptionist. Use this to identify which receptionist handled the calls. | Text | Not applicable; based on configured name. | Shine Healthcare Clinic |
| Phone Number | Primary phone number assigned to the AI Receptionist. | Phone number, usually E.164 format | Not applicable; based on assigned number. | +14085550100 |
| Extension | Extension assigned to the AI Receptionist, if configured. | Number string | Not applicable; based on assigned extension. | 3991 |
| Location | Location associated with the AI Receptionist. Use this to compare activity by site. | Text | Not applicable; based on configured location. | San Jose |
| Total Presented Calls | Total number of presented calls that AI Receptionist answered. | Whole number | Minimum 0; maximum can't exceed Calls Presented for the selected report scope. | 1250 |
|
Total directly handled calls |
The total number of calls presented that were directly handled by the AI Receptionist. This means that the calls terminated at AI Receptionist without any transfers and is a key indicator of efficiency. | Whole number | Minimum 0; no fixed maximum. | 1195 |
| Total Transfers Attempted | Total answered calls where AI Receptionist attempted a transfer. This includes intent transfers and default transfers. | Whole number | Minimum 0; maximum can't exceed Calls Answered for the selected report scope. | 640 |
| Total Successful Transfers | Total calls that were successfully transferred. This includes successful intent transfers and successful default transfers. | Whole number | Minimum 0; maximum can't exceed Transfers Attempted. | 602 |
| Percentage Transfer Attempt | Percentage of answered calls where AI Receptionist attempted a transfer. Use this to understand how often callers need a live destination. | Percentage | 0% to 100% | 53.6% |
| Percentage Transfer Success | Percentage of attempted transfers that completed successfully. Use this to check whether transfer destinations and routing are working as expected. | Percentage | 0% to 100% | 94.1% |
| Attempted Intent Transfers | Total calls where AI Receptionist attempted a transfer based on a matched intent. Use this to measure intent usage. | Whole number | Minimum 0; maximum can't exceed Transfers Attempted. | 420 |
| Successful Intent Transfers | Total calls successfully transferred based on a matched intent. Use this to understand whether intent routing is successful. | Whole number | Minimum 0; maximum can't exceed Intent Transfers Attempted. | 398 |
| Attempted Default Transfers | Total calls where AI Receptionist attempted a transfer by using the default action. Use this to understand fallback transfer usage. | Whole number | Minimum 0; maximum can't exceed Transfers Attempted. | 220 |
| Successful Default Transfers | Total calls successfully transferred by using the default action. Use this to validate fallback routing. | Whole number | Minimum 0; maximum can't exceed Default Transfers Attempted. | 204 |
| Total Talk Time | Total time AI Receptionist spent talking to callers. Use this to understand total handled conversation time. | The time format is in HH:MM:SS. | Minimum 0; no fixed maximum. | 14:35:30 |
| Average Talk Time | Average time AI Receptionist spent talking to callers per answered call. Use this to understand whether calls are brief, lengthy, or changing over time. | The time format is in HH:MM:SS. | Minimum 0; no fixed maximum. | 00:01:48 |
Use the report together with usage information. Usage shows entitlement consumption for the billing cycle, while the report shows operational call handling and transfer effectiveness.
Secure Calling and Spam Mitigation
Webex Calling secures AI Receptionist by filtering out unwanted traffic. the following secure calling capabilities are avaialble in AI Receptionist:
-
Reduce unwanted inbound calls.
-
Preserve AI Receptionist resources.
-
Minimize unnecessary AI consumption.
-
Improve the customer experience.
-
Keep AI Receptionist available for legitimate callers.
To know the secure calling options available for AI Receptionist, click the links for the configuration procedures.
Supported features
| Anti-spam and abuse functionality | Availability | License requirement | Documentation |
|---|---|---|---|
| STIR/SHAKEN Secure Calling | US and Canada | Included | Secure Calling and Spam Mitigation |
| Mutare Reputation Protection | North America | Separate Mutare agreement required | Configure caller reputation provider |
| Call blocking and spam controls | Global | Included | Block Inbound Spam Calls |
| Anonymous caller blocking | Global | Included | Block Inbound Spam Calls |
Currently, capabilities such as STIR/SHAKEN Secure Calling are provided with limited AI Receptionist support.
Configure STIR/SHAKEN Secure Calling
STIR/SHAKEN helps establish caller identity and reduces spoofing attempts before calls reach your organization. Webex Calling identifies these call types:
-
Verified caller
-
Possible spam
-
Potential fraud
Administrators can configure Webex Calling to block calls that fail caller ID validation. While AI Receptionist does not currently take specific actions based on the "Verified," "Spam," or "Fraud" indicators, it respects the global setting that prevents calls that fail caller ID validation from reaching the service.
| 1 |
Sign in to Control Hub |
| 2 |
Go to . |
| 3 |
Select Service Settings. |
| 4 |
Scroll to the Caller ID Validation section. |
| 5 |
Enable Block calls that failed Caller ID validation. |
| 6 |
Click Save. |
After you enable caller ID validation blocking:
- Calls that fail STIR/SHAKEN validation are blocked.
- Blocked calls are not routed to AI Receptionist.
- Failed validation calls are visible in the call history for your reference.
For more information, see Secure Calling and Spam Mitigation.
Configure Mutare Caller Reputation Protection
Mutare integrates with Webex Calling to provide reputation-based spam protection for inbound calls before they reach the AI Receptionist. Incoming calls are evaluated using reputation intelligence and spam analytics. Based on your configured policy, calls can be accepted, challenged, or rejected.
When you use Mutare with AI Receptionist:
-
Rejected calls fall below the configured reputation threshold and are blocked.
-
Calls with reputation scores within the configured challenge range are prompted to complete additional verification before the call is allowed to proceed.
-
Accepted calls meet the configured policy requirements and are delivered to the AI Receptionist.
Before you begin
This process filters unwanted traffic before it consumes AI Receptionist resources.
-
Ensure that AI Receptionist is configured in your Webex Calling organization.
-
A separate commercial agreement with Mutare is required.
-
Obtain your Company ID and Secret Key from the Mutare portal.
|
To configure Mutare Caller Reputation Protection by following the provider setup procedure in Configure Caller Reputation Providers. |
Configure Inbound Call Blocking
Webex Calling lets you block inbound PSTN calls from specific phone numbers, number ranges, anonymous callers, and custom patterns. Implementing call blocking helps reduce spam and unwanted traffic before calls reach the AI Receptionist.
Supported blocking options include:
-
Specific phone numbers
-
Number ranges
-
Wildcard patterns
-
Anonymous callers
-
Private callers
| 1 |
Sign in to Control Hub |
| 2 |
Go to . |
| 3 |
Select Service Settings. |
| 4 |
Scroll to the Call Block List section. |
| 5 |
Click Add. |
| 6 |
Enter the phone number or pattern that you want to block. |
| 7 |
Click Save. |
Example pattern: +1800555XXXX
If a spam campaign targets your organization, you can add the specific number or range to the block list to prevent those calls from reaching the AI Receptionist.
After you configure number blocking:
-
Calls that match the configured blocking rule are rejected.
-
Blocked calls are not delivered to the AI Receptionist.
Configure Anonymous Caller Blocking
Webex Calling lets you block inbound calls that do not provide caller identification. This helps reduce nuisance calls and unwanted traffic before they reach the AI Receptionist.
Supported blocking options include:
-
Block calls with no caller ID.
-
Block calls from hidden or private numbers.
| 1 |
Sign in to Control Hub |
| 2 |
Go to . |
| 3 |
Select Service Settings. |
| 4 |
Scroll to the Call Block List section. |
| 5 |
Enable Block calls with no caller ID. |
| 6 |
Enable Block calls from hidden or private numbers. |
| 7 |
Click Save. |
After you configure anonymous caller blocking:
-
Calls without caller identification are rejected.
-
Calls from hidden or private numbers are blocked.
-
Blocked calls do not reach the AI Receptionist, which keeps the service available for legitimate callers.
Understand AI transparency for AI Receptionist
AI transparency informs callers that they are interacting with an AI Receptionist before the conversation continues. The disclosure helps organizations meet applicable transparency requirements and set clear expectations for callers.
How AI transparency works
Use the AI transparency settings for the AI Receptionist to control the caller-facing disclosure message.
-
New AI Receptionists use a default transparency message.
-
Administrators can customize the disclosure text to match their organization’s legal and brand guidance. Enter between 20 and 200 characters.
-
The default message includes information about call transcript retention.
-
Administrators can turn off AI transparency after they review the compliance warning and enter a reason between 2 and 200 characters.
-
Enabling transparency announcement suppresses the call recording announcement. Therefore, the administrators must update the transparency setting to include recording.
-
Control Hub records changes to AI transparency in the audit trail.
Regional behavior
| Organization and location | Disclosure behavior |
|---|---|
|
EU organization serving callers from an EU location | Mandatory |
|
Non-EU organization serving callers from an EU location | Mandatory |
|
EU organization serving callers from a non-EU location | Mandatory |
|
Non-EU organization serving callers from a non-EU location | Optional |
In this table, Mandatory means that the disclosure is required for compliance. Control Hub doesn't lock the setting. For EU deployments, AI transparency is enabled by default. To turn it off, review the warning and enter a reason between 2 and 200 characters. Existing AI Receptionists in applicable EU deployments are automatically enabled with the default message when no custom message is configured.
Caller experience
For voice calls, the AI transparency message plays first, before the welcome message, call-recording announcement, or other announcements. Callers can't interrupt the message.
The AI transparency disclosure plays before the welcome message, and callers can't interrupt it. After the disclosure finishes, the AI Receptionist plays the welcome message.
What to review
Before you use AI Receptionist:
- Review the disclosure with your legal and privacy teams.
- Make sure the message clearly states that the caller is interacting with an AI.
- Review the transcript-retention language and update the message when required.
- Test the complete caller experience, including the transparency message, welcome message, and other announcements.
Use case: Create AI Receptionist intents for a hospital
This use case provides an example of using AI Receptionist as a hospital front desk assistant. The AI Receptionist answers common caller questions and uses intents to transfer callers to the right hospital department, such as pediatrics, cardiology, billing, pharmacy, physical therapy, or general appointments.
In this example, each intent represents a department or service area. The intent description tells AI Receptionist when the caller should be transferred, and the transfer destination maps the intent to a user, Webex Calling resource, organization contact, or number.
AI Studio supports up to 9 intents and 1 default action for each AI Receptionist. Create intents for the departments that receive the highest caller volume, and use the default action for unmatched requests or fallback scenarios.
| 1 |
Sign in to Control Hub. | |||||||||||||||||||||
| 2 |
Go to Calling under Services, then click AI Receptionist. | |||||||||||||||||||||
| 3 |
Select the AI Receptionist tab and click Create. | |||||||||||||||||||||
| 4 |
For the General Settings, enter the hospital front desk AI Receptionist information.
| |||||||||||||||||||||
| 5 |
Configure the Receptionist Guidelines so that AI Receptionist communicates clearly with hospital callers.
| |||||||||||||||||||||
| 6 |
Select or create a knowledge base to assign to the AI Receptionist. The knowledge base can include hospital hours, parking details, visitor policies, department descriptions, appointment information, billing information, and pharmacy hours.
| |||||||||||||||||||||
| 7 |
Set the Default action. The default action is used when AI Receptionist can't match the caller request to one of the configured department intents or when it reaches a fallback condition. For a hospital, you can configure the default action to transfer callers to the main operator or play a message and end the call. | |||||||||||||||||||||
| 8 |
Click Review to validate the AI Receptionist settings. | |||||||||||||||||||||
| 9 |
Click Create to complete the AI Receptionist configuration. | |||||||||||||||||||||
| 10 |
After the AI Receptionist is created, go to the Intents tab and create intents for the hospital departments. The following table shows example department intents that you can create.
| |||||||||||||||||||||
| 11 |
For each department intent, enter the intent name, intent description, and transfer destination, then click Add Intent. Use clear natural-language descriptions so AI Receptionist can match caller requests accurately. For detailed intent configuration, see Configure and manage intents.
|
When callers reach the hospital AI Receptionist, it can answer common questions from the knowledge base and transfer callers to the appropriate department when their request matches a configured intent. If no intent matches, the configured default action is used.
Troubleshooting known issues
To effectively resolve issues, consider the following key areas:
-
Verify configurations
-
Ensure the AI Receptionist is correctly assigned to the intended location and that the associated phone numbers are active.
-
Review the configured menu options and call routing paths. Confirm that internal extensions and external directory numbers are correctly mapped.
-
Verify that the correct language is selected and that the text-to-speech (TTS) prompts are configured without errors.
-
-
Connectivity and Permissions
-
Confirm that the necessary licenses for AI Receptionist services are assigned and active in the Control Hub.
-
If the AI Receptionist relies on a local gateway or specific call service, verify that the service is registered and the connection to the Cisco cloud is stable.
-
-
Call Flow and logs
-
Perform controlled test calls to identify where the call flow fails (For example: failing to recognize voice input, incorrect menu navigation, or drops).
-
Analyze the system logs within the Control Hub to identify error codes or timeout events. Look for discrepancies in call signaling or gaps in the routing logic.
-
Here are few common error scenarios and troubleshooting tips:
| Error | Resolution |
|---|---|
| Location Errors |
If you see a message stating Cannot create AI Receptionists for this location, ensure the location is properly configured for Webex Calling. |
| Fallback Responses |
Always configure a Default Action to ensure callers are not left without assistance if the AI encounters an unknown request. |
| Guardrails |
Use the Instructions section to set strict boundaries, such as Do not provide medical advice, to ensure compliance and safety. |
| Connection Failures |
If the connection to the Cloud Contact Center fails, the system automatically falls back to the configured Default Action. |
| Monitoring |
Administrators can track the session in minutes using the Analytics in Control Hub. |


