- Home
- /
- Article

Thanks for your feedback.

 In this article
 Feedback?
On the Team Performance Details page, you can view real-time information about your agents and manage their status. Use this page to monitor agent availability, send one-on-one messages using the Webex App, change agent states, update skill profiles, or sign out agents.
-
For optimal performance, we recommend a maximum of 500 agents across all managed teams in the supervisor view of the Team Performance Details page. This ensures you can access all the information that you need without delay or performance issues.
-
Desktop profile has an option to explicitly specify buddy teams. We recommend that when you explicitly specify buddy teams, ensure that the number of agents available in those buddy teams doesn't exceed the maximum limit of 1000.
-
Explicitly configure wrap-up codes and idle codes for Desktop profiles. We recommend that the maximum values don't exceed 50.
-
We recommend that you explicitly specify the managed queues and managed teams in the profile. Ensure that the maximum values for managed queues and managed teams don't exceed 250 and 100 respectively.
Supervisors get a comprehensive and intuitive interface to monitor and manage agents across multiple communication channels through the Team Performance widget. They can view agent states, manage availability, and observe RONA (Ring No Answer) behavior with channel-specific granularity. Team performance widget allows supervisors to select which channels to monitor; agent states and timers are visible, mirroring the agent desktop experience, providing supervisors with synchronized visibility into agent activity.
Managing Agent Availability
- Supervisors can set an agent’s state to lunch (idle) across all channels simultaneously, with timers updating accordingly.
- They can also adjust availability on individual channels, enabling granular control similar to the agent desktop.
- This flexibility allows supervisors to tailor agent availability based on operational needs or agent capacity.
Call handling and state transitions
- When a call is connecting on the telephony channel, the agent’s state changes to reserved. Once it offers or gets connected, stated changes to engaged.
- During telephony engagement, the agent remains engaged other on the remaining channels, indicating availability for interactions on those channels.
- After the call ends, the agent moves into a wrap-up state on telephony while maintaining engagement on other channels.
- Supervisors can track these state changes in real time, ensuring accurate monitoring of agent workload and status.
Pending Idle States and Wrap-Up
- Supervisors can set agents to pending lunch (idle) while the agent is still in wrap-up, signaling the intention to go idle after completing current tasks.
- The system reflects this pending status on the telephony channel while showing the agent as at lunch on other channels.
- Once wrap-up is complete, the agent fully transitions to lunch across all channels.
- This behavior aligns with the agent desktop experience, providing consistency in state management visibility. This state is not possible in non-voice as the agent is able to set themselves to idle directly.
RONA behavior
- If an agent does not answer a call on a particular channel (for example, telephony), only that channel’s state changes to RONA (idle), while other channels remain available.
- This selective RONA handling minimizes disruption to the agent’s availability on other channels and maintains operational efficiency.
- Supervisors have the same visibility into this behavior as agents, enabling effective oversight and intervention if needed.
The team performance dashboard provides a grid view of all agents and their availability across multiple channels (Voice, Chat, Email, Social) simultaneously. You need not click into individual profiles or separate menus to understand an agent's current activity.
By hovering over a status icon (as shown for agent Eli Cho), a detailed popover appears providing:
- Specific Channel Status: It explicitly labels the state, such as "Chat: Engaged."
- Real-Time Duration: It shows exactly how long the agent has been in that state (e.g., 00:16:36), allowing supervisors to identify if a chat is taking longer than usual.
- Workload Breakdown: It reveals the "Active interactions" count, distinguishing between Automatically assigned (example, 2 out of a capacity of 5) and Self-assigned (2/2) tasks.
- Quick Action: It includes a "View" link within the hover state, allowing the supervisor to jump directly into the details of those specific interactions if intervention is needed.
The supervisors now get more useful information without leaving the dashboard. Earlier, they only saw a static list. Now, when they hover over an agent, they see a quick summary of productivity and capacity, helping them make faster decisions about balancing workloads and supporting agents. They can also view the automatic count and self-assigned count.
View team performance
View the details of the agents with their current state, time in a specific state, call state, time in a call state, channel capacity, and actions that can be performed for an agent.
Before you begin
-
You must be assigned to a team.
-
The Team Performance Details only contains the list of agents who are signed in on your assigned teams.
| 1 |
Navigate to Monitor > Team performance. You can view the following tabs:
|
| 2 |
Go to the intended tab and use the search field to filter the interaction list by using the search criteria such as agent name, agent state, queue, channel, and so on. Your search results are retained, even if you switch to another page and return to the Team Performance Details page. |
Team performance details
The Team Performance Details page supports Voice and digital channels.
| Column name | Description |
|---|---|
|
Agent Name |
Displays the name and profile picture (Webex image) of the agent. |
|
Agent State |
The work status while using Supervisor Desktop. The agent availability state includes Available, Idle codes, or RONA. |
|
Agent State Duration |
The time that the agent has been in the current state. The state timer format is hh:mm:ss (for example, 01:10:25). |
|
Voice/Chat/Email/Social |
Indicates the status of the respective channels for the agent. You can see the status on hover. |
|
Phone Number |
Dial number or extension of the agent signed in. |
|
Site |
Name of the site with which the agent is associated. |
|
Team |
Name of the team with which the agent is associated. |
|
Skill Profile |
This displays the skill profile assigned to each individual agent, where the details of their skills can be viewed. |
|
Dynamic Skill |
Displays the number of dynamic skills assigned to the agent. Select the count to view the dynamic skill names and current values. |
|
Channels |
The mode of communication through which an agent can communicate. For example, voice call. |
|
Contact Queue |
Name of the queue that the agent routes the request to. |
|
Contact Status |
The status of the agent in an active call. For example, Connected, Consulting, Conference, or Wrap up. |
|
Time in Contact Status |
The time spent by an agent in an active call. For example, the time an agent is in a conference call. |
|
Interaction Duration |
The total duration of the interaction between the agent and the contact from when the call is connected, including all states such as On Hold, Consult, and Conference, but excluding Wrap-up. This metric helps you determine if the agent is spending more time than necessary with the contact and may need assistance in handling the customer. |
|
Total Contact Duration |
Total duration of the contact from when it was first connected (including any other state like Consult or Conference in the same contact). The time elapsed since the agent accepted the request. The connected timer format is hh:mm:ss (for example, 01:10:25). |
|
Sign In Time |
The time an agent has signed in to the Supervisor Desktop. The date and time format is dynamic and displays according to location. By default, the table rows sort according to the sign-in time. The most recent sign-in time appears at the top of the list. |
|
Action |
Based on your user profile privileges, set by your administrator, you can perform the following actions from the Actions column:
|
 )—Silently monitor and review agent calls.
 )—Send a one-on-one message to an agent.
 )—
)—  )—Sign an agent out when they are not actively interacting with a customer.
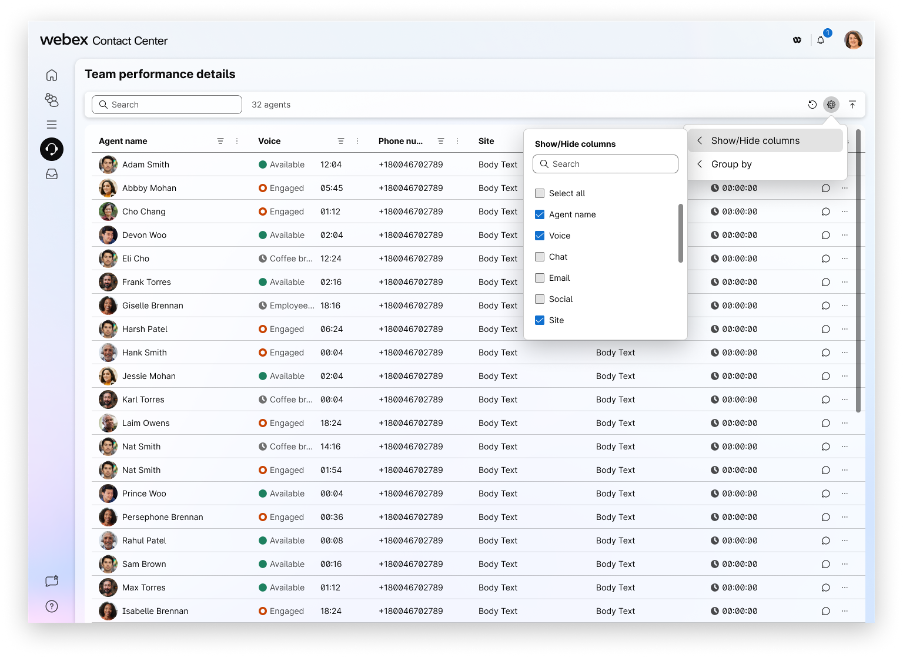
Show or hide column—Use the Show/Hide Columns option to customize the data displayed in the Team performance details table. This dialog box includes the following elements:
| Element | Description |
|---|---|
| Search field | Enter a column name to quickly locate a specific attribute in the list. |
| Select all | Select or clear this check box to display or hide all available columns in the table. |
| Columns | Select or clear this check box next to the column name to display or hide that column in the table. Available options include
|
Change agent state
You can manually adjust the agent availability from the dashboard. Perform the following steps:
- Under the Actions column, click the ellipses (…) icon.
- Select .
Starting April 30, 2026, for a period of six months (Oct 29, 2026), an administrative toggle will be available within Control Hub that allows tenant administrators to enable or disable the Granular Agents state control feature at the tenant level. This admin toggle will remain available for a period of six months after which the Granular state control will go for general availability (GA), meaning available to all agents. To continue using Webex WFO, keep the admin toggle off in Control Hub.
- Choose an appropriate option from the list. For more information, see Agent Availability States.
- Click Apply.
If you change an agent's state, an information icon (i) appears next to the status timer. Hover over this icon to see the name of the person who updated the status (example, "Set by James Jones").
Filter by agent state
You can filter the list of agents based on their current availability or activity. This provides a real-time view of each agent's status across different channels. To filter by agent state, click ellipses (…) next to the column name.
Additional controls available in the filter include:
- Search Bar: Located at the top, this allows you to quickly find a specific state if the list is long.
- Checkboxes: You can select multiple states at once (example, to filter everyone who is either "Available" or "Engaged").
- Reset: This button clears all selected filters to show the full list of agents again.
Send a message to an agent
On the Team Performance Details page, you can send messages to one agent at a time. If you'd like to send a message to multiple agents at once using Webex App in Supervisor Desktop, see Send broadcast messages to your agents.
Before you begin
-
You and the agent must have access to Webex App.
-
The Webex App is disabled by default. For information about configuring the Webex App in the desktop, see the section webexConfigured in the Webex Contact Center Setup and Administration Guide.
| 1 |
Navigate to Monitor > Team performance. |
| 2 |
Go to the Live tab to view ongoing interactions. |
| 3 |
Click |
| 4 |
Enter your message in the compose box. Your message can't exceed the 1000 character limit. The compose box displays the current character count in the bottom-right corner. For example, 150/1000. |
| 5 |
Click Send. |
 under the
 What to do next
If the agent replies to your message, a notification appears at the top-right corner. Click the notification to view the message in Webex App.
Change skill profile
On the Team Performance Details page, you can change an agent's skill profile.
| 1 |
Navigate to Monitor > Team performance. |
| 2 |
Go to the Live tab to view the ongoing interactions. |
| 3 |
Click Change Agent Skill in the Actions column. The Manage Skill pop-up appears.
This option appears in the Actions column only if the administrator selects the Manage skill profile assignments checkbox in the User Profiles section of Control Hub. For more information, see Desktop Experience. For the current skill profile, the available skills are listed. |
| 4 |
From the Skill profile drop-down list, choose a new skill profile for the agent. From the Dynamic skills drop-down list, check the required dynamic skills that you want to assign to the agent. Enter or choose appropriate values for proficiency, text, boolean, or enum. The system enables the Review changes button and displays a message at the bottom after the skill listing. This has three scenarios:
|
| 5 |
Click Review changes. The system highlights the summary of changes at the top:
|
| 6 |
Click Confirm changes. A notification displays the successful skill profile change with the new agent name.
When you click the Cancel button or close the pop-up window after changing the skill profile, the system prompts you to either reconsider your action and proceed or discard the changes. |
Other scenarios
Some other scenarios that you may encounter when you're changing the agent skill profile include:
- Search for the skill profile—Type three characters in the search box, and the system populates the options for selection. If no skill profiles match, no data populates.
- Assign none as a skill profile—During a skill change, if you select
Noneand confirm the changes, the system displays a warning message stating that the agent isn't routed using queue-assigned skills but is still routed using flow-assigned skills. - Assign a new skill profile when none exists currently—If you select a different skill profile from
None, the system displays the respective number of queues added and removed. - Only one agent with the skill profile—If you attempt to change the skill profile of an agent who is the sole owner of that profile, the system displays a warning. It alerts you to proceed with caution, as removing the skill profile could leave critical tasks unassigned. It highlights the affected queue with a warning icon.
- No change in skill profile on queue assignment changes—If a skill profile change doesn’t include any related queue assignment changes, the system keeps the agent's queue assignments unchanged.
- Error messages—The system displays an error message when the skill profile update fails due to network issues or an invalid selection.
Sign out an agent
On the Team Performance Details page, you can sign out an agent who isn’t actively interacting with a customer. You can’t sign out the agents who have left for the day while in a wrap-up state, are still marked as available (causing calls to be routed to them), or have accepted an asynchronous interaction, such as an email.
When the agent is involved in an active interaction, you can sign out the agent only after the active interaction ends.
When a sign out request is being processed, and the agent receives a call or interaction, a "Confirm Force Sign Out" pop-up appears. Signing out may end or redirect these interactions.
| 1 |
Navigate to Monitor > Team performance. |
| 2 |
Go to the Live or History tab to view the agent interactions. |
| 3 |
Click |
| 4 |
Click Sign Out Agent. The Confirm Sign Out pop-up appears.
|
| 5 |
Click Sign Out to proceed. If the system fails to sign out an agent, an error icon appears on |


