
Thanks for your feedback.
Integrate Webex Contact Center with Salesforce (Version 1—Legacy)
 Feedback?
Prerequisites
The minimum supported size for the softphone interface is 500px. Any value lower than 500px may result in display or functionality issues.
Before you integrate Webex Contact Center with the Salesforce CRM console, ensure that your profile has the following access privileges:
-
Access to Webex Contact Center.
-
Administrator access to the Control Hub at https://admin.webex.com and the Webex Contact Center Management Portal. The URLs for the Management Portal are specific to your region.
-
Agent access to the Desktop. The URL for the Desktop is specific to your region.
-
Agent access to the following domains that are added in the Content Security Policy Allowed List:
-
*.force.com
-
*.salesforce.com
-
*.lightning.force.com
-
*.lightning.salesforce.com
For more information on how to define the allowed list, see the article Security Settings for Webex Contact Center.
-
-
A Salesforce developer or sandbox account (minimum requirement). To create an account, go to the Salesforce developer portal at https://developer.salesforce.com/ and click Sign Up.
-
Access to the Desktop Layout (JSON) for Salesforce at https://github.com/CiscoDevNet/webex-contact-center-crm-integrations/tree/main/Salesforce.
Digital channels such as chat and email are not supported with CRM connectors. This applies to all CRM integrations using these connectors. Please plan your deployment and customer engagement workflows accordingly.
To integrate Webex Contact Center with the Salesforce CRM console, complete the following tasks:
Before you begin
If you have an older version of Webex Contact Center for Salesforce, then uninstall the old version before you install the latest version. For more information, see Uninstall Webex Contact Center for Salesforce.
| 1 |
Go to the Salesforce AppExchange at https://appexchange.salesforce.com/. |
| 2 |
On the Salesforce AppExchange page, search for Webex Contact Center for Salesforce. |
| 3 |
Click Get It Now. |
| 4 |
Enter your username and password for the Salesforce organization in which you want to install the package, and click Log In. |
| 5 |
Choose one of the following options:
|
| 6 |
After the installation is complete, click Done. Webex Contact Center for Salesforce is available in App Launcher.
|
Download the latest call center definition file:
-
Visit the Github repository to download the latest call center definition file https://github.com/CiscoDevNet/webex-contact-center-crm-integrations/tree/main/Salesforce.
-
The latest call center definition file is in the format https://github.com/CiscoDevNet/webex-contact-center-crm-integrations/blob/main/Salesforce/sfdc-callcenter-definition-file.xml
Update the call center definition file
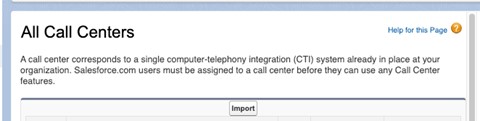
Go to .
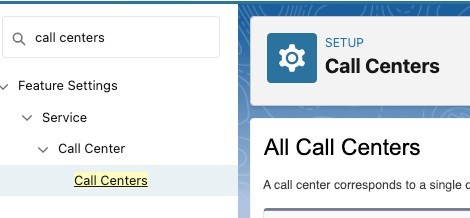
Click Import to import a file.
Assign the file to the users who use Webex Contact Center. Do this using Manage Call Center Users.

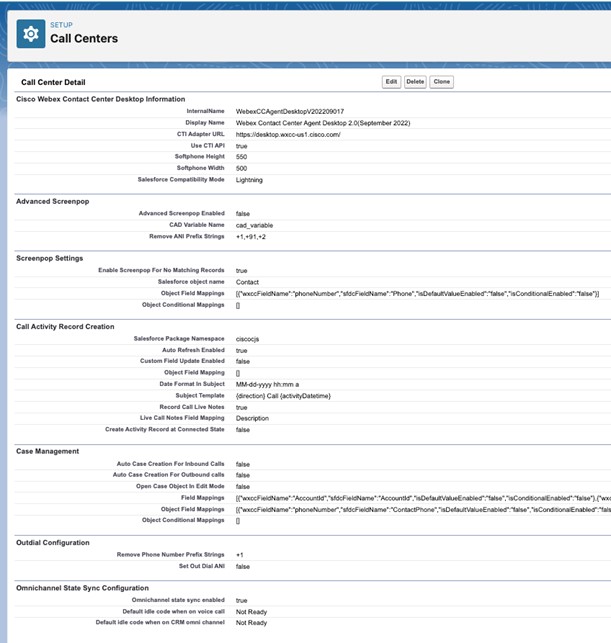
Once imported, the Call Center definition file displays as follows:
| 1 |
In Salesforce, click the gear icon in the upper-right corner and select Setup. |
| 2 |
Enter |
| 3 |
Click the Edit link corresponding to the user to whom you want to provide access permission. |
| 4 |
Search for the Call Center parameter, and in the search lookup, select Webex Contact Center. |
| 5 |
Click Save. |
| 1 |
In Salesforce, click the gear icon in the upper-right corner and select Setup. |
| 2 |
Enter |
| 3 |
Click New. |
| 4 |
In the Name field, enter the name for the layout and check the Is Default Layout check box. |
| 5 |
From the Select Call Type drop-down list, select the call type to indicate when to start the softphone layout:
|
| 6 |
Set up the Screen Pop Settings according to your requirement. |
| 7 |
Click Save. |
| 1 |
In Salesforce, click the gear icon in the upper-right corner and select Setup. |
| 2 |
Enter |
| 3 |
Select . |
| 4 |
Select a profile from the list in the Profiles column. |
| 5 |
From the Page Layout To Use drop-down list, select Webex Contact Center Task Layout. |
| 6 |
Click Save. |
You can download the Desktop Layout JSON file for Salesforce from https://github.com/CiscoDevNet/webex-contact-center-crm-integrations/tree/main/Salesforce.
For more information about the Webex Contact Center Management Portal Desktop Layout, see the Provisioning chapter of the Cisco Webex Contact Center Setup and Administration Guide.
| 1 |
Go to the Webex Contact Center Management Portal. |
| 2 |
From the Management Portal navigation bar, choose |
| 3 |
Click New Layout and enter the details for the desktop layout. |
| 4 |
Upload the Salesforce Desktop Layout JSON file. |
| 5 |
Click Save to save the configuration. You can now start the Webex Contact Center Desktop within the Salesforce CRM console. |
| 1 |
In Salesforce, click the gear icon in the upper-right corner and select Setup. |
| 2 |
Enter |
| 3 |
Select . |
| 4 |
Select the profiles that are associated with the Webex Contact Center Task Layout. |
| 5 |
From the Page Layout To Use drop-down list, select any other page layout. Ensure that no profiles are associated with the Webex Contact Center Task Layout. |
| 6 |
Click Save. |
| 7 |
Navigate to Setup. |
| 8 |
Enter |
| 9 |
Click Uninstall for the Webex Contact Center for Salesforce package name. |
| 10 |
On the Uninstalling a Package page, select "Yes, I want to uninstall this package and permanently delete all associated components." |
| 11 |
Click Uninstall. |
Set up the computer telephony integration (CTI) system to enable Webex Contact Center.
| 1 |
Log in to Salesforce. |
| 2 |
Click the gear icon in the upper-right corner and select Setup. |
| 3 |
Enter |
| 4 |
Click the Edit link that corresponds to the Webex Contact Center. |
| 5 |
In General Information area, update the following fields:
|
| 6 |
Click Save. |
- When you log into the desktop, it takes a few seconds for the CRM application to complete successful initialization. Typically, this process may take 5 to 15 seconds depending on the response received from the CRM application. Only after the initialization is complete, you become available to handle calls.
- We support signing into Agent Desktop using WebRTC for Salesforce (SFDC) and Microsoft Dynamics (MS Dynamics) Connectors only.
- Currently, this feature is applicable to agents only.
- Currently, the CRM connector app does not support opening multiple tabs. Opening a case in a new tab may result in Multi Sign-in alerts on the WxCC Agent Desktop or cause unpredictable behavior for agents.
Before you make outdial calls
Before you make outdial calls, ensure that you do the following:
-
Create the outdial entry point and setup an outdial entry point strategy.
-
Enable outdial ANI for the Agent Profile.
-
Set the outdial ANI to a Dial Number-to-Entry Point mapping.
For more information, see the Provisioning chapter of the Cisco Webex Contact Center Setup and Administration Guide.
For information on how to use Desktop, see the Cisco Webex Contact Center Agent Desktop User Guide.
-
If the record is found and the screen pop is configured, a pop-up screen displays the customer details.
-
If the record is not found, then a New Contact profile screen pop appears where you can enter the details.
To set up the screen pop, see Create a Default Softphone Layout in the Integrate section of this article.
| 1 |
In Salesforce, click the App Launcher menu and select Webex Contact Center. | ||||||||||||||||||||||||||||||||||||||
| 2 |
Click the Phone button and sign in to the application. | ||||||||||||||||||||||||||||||||||||||
| 3 |
Change the status to Available to receive calls. | ||||||||||||||||||||||||||||||||||||||
| 4 |
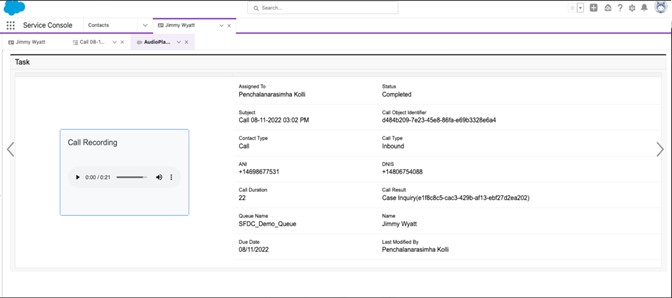
After you disconnect a call, select a wrap-up reason from the drop-down list. An activity is logged against the respective Salesforce contact. To see the activity log, click any entry in the activity list. The following details appear:
|
| 1 |
In Salesforce, click the App Launcher menu and select Webex Contact Center. |
| 2 |
Enter the contact name in the Search Salesforce text box and click the contact name, and click the phone number to dial. Or, click Phone > Dialer and then enter the phone number and click the Phone icon to dial. |
| 3 |
(Optional) From the Select Outdial ANI drop-down list, select an outdial ANI to use as your caller ID. The drop-down list appears in alphabetical order. Your administrator adds the outdial ANI list to your profile. To remove the selected outdial ANI, choose the label Select Outdial ANI from the drop-down list. |
Salesforce Actions widget provides UI controls to directly communicate with Salesforce CRM from Webex Contact Center agent desktop application.
|
Use case |
SFDC call center definition configuration |
|---|---|
|
New Salesforce actions widget appears on-screen when an agent receives a call |
No configuration is required on Salesforce Dot Com (SFDC).
|
|
Open activity record in edit mode |
This feature is enabled by default. No specific configuration is required from the SFDC side. |
|
Associate CRM object to phone call activity |
This feature is enabled by default. No specific configuration is required from the SFDC side. |
|
Create case object and open in edit mode |
This feature is enabled by default. No specific configuration is required from the SFDC side. |
|
Live Call Notes:
|
There is a specific configuration in the call center definition file to enable or disable this feature. The SFDC administrator must specify the SFDC field in the task object to update the captured call notes. Edit the fields in the Call Activity Record Creation section of the call center definition file to enable and update activity record in the Salesforce application.
|
| 1 |
In Salesforce, click the App Launcher menu and select Webex Contact Center. |
| 2 |
From the Navigation Apps drop-down list, select Reports. If Reports is not in the list, click and add Reports. |
| 3 |
To see the existing reports, click All Reports. There is a default call activity report that installs with Webex Contact Center for Salesforce. You can modify the dates, and add or remove fields and filters. |
| 4 |
To create a new report, click . |
| 5 |
In the Report Builder tab, select the required report type and click Save & Run. |
| 6 |
Enter the Webex Contact Center for Salesforce generates this report using the data from Salesforce. 
|
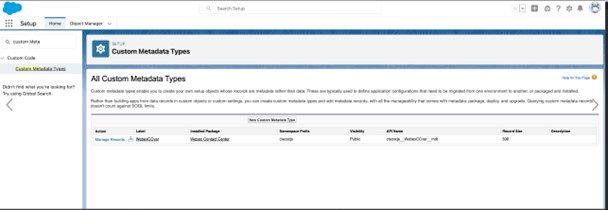
The following section describes the customization of each section of the call center definition file and its possible values, description and comments.
This helps an administrator customize behavior based on the required use case.
|
Field |
Possible Values |
Description |
|---|---|---|
|
Internal Name |
WebexCCAgentDesktopV202209019 |
No change in this value. |
|
Display Name |
Webex Contact Center Agent Desktop 2.0 (September 2022) |
No change in this value. |
|
CTI Adapter URL |
Default value is US data center. You can change the value based on your data center location. North America: https://desktop.wxcc-us1.cisco.com UK: https://desktop.wxcc-eu1.cisco.com | |
|
Use CTI API |
true |
No change in this value. |
|
Softphone Height |
550 |
No change in this value. |
|
Salesforce Compatibility Mode |
Lightning |
No change in this value. |
|
Field |
Possible Values |
Description |
|---|---|---|
|
Advanced Screen Pop Enabled |
true or false |
The feature flag to enable screen pop search based on CAD variable. |
|
CAD Variable Name |
Name of the CAD variable |
Name of the CAD variable that holds the screen pop search parameter. |
|
Remove ANI Prefix Strings |
Country codes |
Specify the country codes in comma-separated and it will be removed from the incoming call ANI prefix. |
|
Field |
Possible Values |
Description |
|---|---|---|
|
Enable Screen Pop For No Matching Records |
true or false |
This is the feature flag to enable the no record match screen pop scenario. Ensure to disable record match scenario in softphone layout configuration. |
|
Salesforce Object Name |
Any standard or custom Salesforce object |
Any standard or custom Salesforce object that is opened in edit mode. |
|
Object Field Mappings |
This is mapping between Salesforce object and WebexCC CAD variables |
This setting maps the WebexCC CAD variables to the Salesforce field values that are prepopulated in the Salesforce form when opened in edit mode. For example, the mapping should be done in following JSON format and it is an array of JSON object. The JSON object has following properties:
Examples: If you want to overwrite the fields with constants, you can use the isDefaulValueEnabled set to true. This sets the value of the variable on Salesforce. Example: Configuration: |
|
Object Conditional Mappings |
This is conditional rule for the object mappings |
The conditional mapping helps bind one-to-many field values between the WebexCC CAD Variables and SFDC Fields. The condition helps to bind the SFDC Field values based on different WebexCC CAD variable Values. For example: WebexCC CAD variable The conditional mapping has mainly three properties - WxCCFieldName which is the CAD variable, wxccFieldValue, and sfdcFieldValue. Examples: If you have a variable queueName on WebexCC and want to conditionally map those to Salesforce field called Customer Type. You can set the queueNames to other values based on the Object Conditional Mappings as below. Configuration for Object Field Mappings wxccFieldName: queueName Salesforce: CustomerType isDefaultValueEnabled: false isConditionalEnabled: true Configuration for Object Coniditional Mappings
|
|
Field |
Possible Values |
Description |
|---|---|---|
|
Salesforce Package Namespace |
ciscocjs |
Default value. Don't change the value. |
|
Auto Refresh Enabled |
true or false |
This is the feature flag variable. This feature enables the auto refresh of the Salesforce screen immediately after the activity record creation. |
|
Create Activity Record at Connected State |
true or false |
By default, this value is false. Set the value to true if the activity ownership change feature is enabled. This ensures that the activity record gets created at the beginning of a call and ownership of the activity record can be changed when the agent transfers a call to another agent. |
|
Open Activity Record On Connected State |
true or false |
By default, this feature is disabled. Enable the Create Activity Record at Connected State feature flag to use this feature. This feature allows to open the activity record in edit mode automatically when an agent's status moves to Connected state. |
|
Open Activity Record On Wrap-Up State |
true or false |
By default, this feature is disabled. Enable this feature to open the activity record in edit mode when an agent's status moves to Wrap-Up state. |
|
Activity record ownership to be changed for transferred calls |
true or false |
By default, this value is false. This is the feature flag variable that needs to be enabled. This feature enables the change in the ownership of the activity record when an agent transfers a call to another agent. This ensures to create only one activity record for an interaction. |
|
Name of the cad variable that holds activity id |
Name of the CAD variable |
Name of the CAD variable that holds the activity ID and is used to change the ownership of the activity record for transferred calls. |
|
Record Call Live Notes |
true or false |
This field is a feature flag to enable the call notes feature from Actions widget. By default, this feature is disabled. |
|
Live Call Notes Field Mapping |
SFDC field used for call notes mapping. |
SFDC field that is updated with call notes. By default it updates the Description field of the activity record at Salesforce. |
|
Add Subject to Call Notes |
SFDC field used for adding subject to call notes |
This provides the ability for agents to add a subject to call notes directly from the call notes section in the SFDC Actions widget. The feature is controlled via a feature flag and requires customers to enable it through their desktop layout properties. By default, the feature is disabled. |
|
Date Format In Subject |
This is to set the date and time in activity subject |
The default format is MM-dd-yyyy hh:mm a. |
|
Subject Template |
Sets the subject field of the activity record which helps update the dynamically set subject of the activity record. |
This field can be a combination of both variables and static strings. For example: {direction} Call {activityDatetime}. In the example, phrase |
|
Custom Field Update Enabled |
true or false |
By default, this feature is disabled. If you want to update the call activity record with more data that is captured in the IVR or Flow, then enable this feature. |
|
Object Field Mapping |
An array of JSON properties. By default it's [] |
This field maps the WebexCC CAD variables and SFDC fields. Enable custom field update feature to use this mapping. The JSON has mainly four properties: CadFieldName: WebexCC CAD variable name SalesforceFieldName: SFDC field name isDefaultValueEnabled: Flag to check whether to use the static value to bind with the SFDC field defaultFieldValue: Default field value Example: In the first JSON code, the CAD variable name Whereas in the second JSON Statusbinds with the default value Completed. |
|
Field |
Possible Values |
Description |
|---|---|---|
|
Auto Case Creation For Inbound Calls |
true or false |
The feature flag to enable the auto case creation for all inbound calls. By default, this feature is disabled. |
|
Auto Case Creation For Outbound calls |
true or false |
The feature flag to enable the auto case creation for all outbound calls. By default, this feature is disabled. |
|
Open Case Object In Edit Mode |
true or false |
The feature flag to decide whether to open the case object in edit mode. By default, this feature is disabled. |
|
Open Case Object Always View Mode |
true or false |
The feature flag to open the case object always in view mode, when:
|
|
Object Field Mappings |
An array of JSON properties |
Maps the WebexCC CAD variables and SFDC case object fields. JSON has mainly four properties: CadFieldName: WebexCC CAD Variable Name SalesforceFieldName: SFDC case object Field Name isDefaultValueEnabled: Flag to check whether to use the static value to bind the SFDC case object field. defaultFieldValue: Default field value |
|
Object Conditional Mappings |
Conditional rule for the object mappings |
The conditional mapping helps bind one-to-many field value mappings between the WebexCC CAD variables and SFDC fields. The conditional mapping helps to bind the SFDC Field values based on different WebexCC CAD variable values. |
|
Field |
Possible Values |
Description |
|---|---|---|
|
Omnichannel state sync enabled |
true or false |
The feature flag is enabled only on the Salesforce instance with omnichannel already enabled. |
|
Default idle code when on voice call |
Omnichannel not ready reason code |
Name of the SFDC omnichannel not ready reason code to make agent not ready in SFDC omnichannel. |
|
Default idle code when on CRM omnichannel |
Webex Contact Center idle reason code |
Name of the Webex Contact Center idle reason code to make agent not ready in Webex Contact Center. |
Create the below apex class and give execution permission to all agent profiles in SFDC instance to use omnichannel state sync feature.
To create the Apex Class:
-
Go to
-
Navigate to
-
Paste the following content and save it as sfdcOmniChannel
public class sfdcOmniChannel {
    public static String fetchOmniPresenceStatusCodes(){
       ServicePresenceStatus[] omniStatus;
         omniStatus = [SELECT Id, MasterLabel FROM ServicePresenceStatus] ;
         String OmniPresenceStatusCodes = JSON.serialize(omniStatus);
         System.debug(OmniPresenceStatusCodes);
      return OmniPresenceStatusCodes;
    }
}Considerations
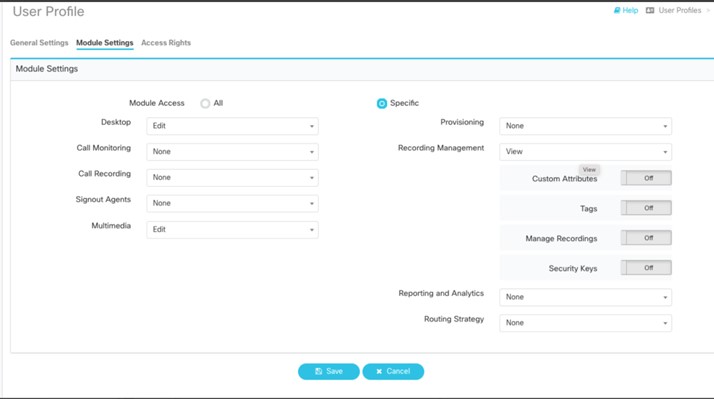
Requires a specific User Profile and License to access and play recordings.
-
User Profile — Custom Supervisor Profile
-
License — Premium License
To configure the playback recordings, you need access to Recording Management module in the User Profile level.

Mandatory settings in the user profile
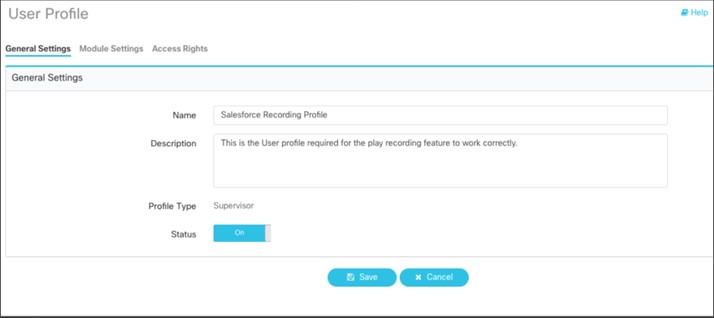
The view access in the Recording Management module allows you to view the Call Recordings from Webex Contact Center. This is a default security setting for all administrator and supervisor profiles.
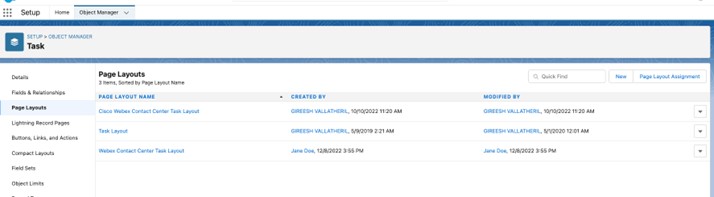
Salesforce Lightning setup
Layout selection-
Go to .
-
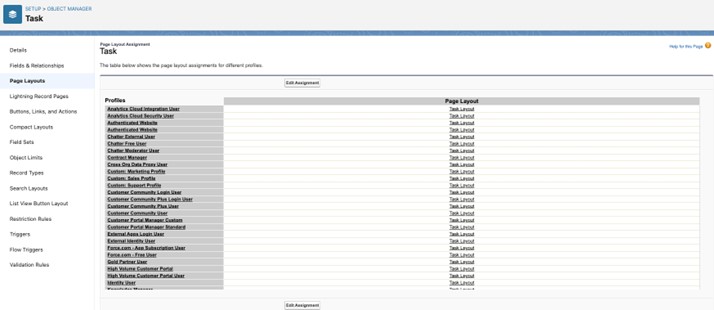
Click Page Layout Assignment on the top-right side corner of the page.
-
Edit the Page Layout Assignment
-
Choose Webex Contact Center Task Layout from the drop-down list.
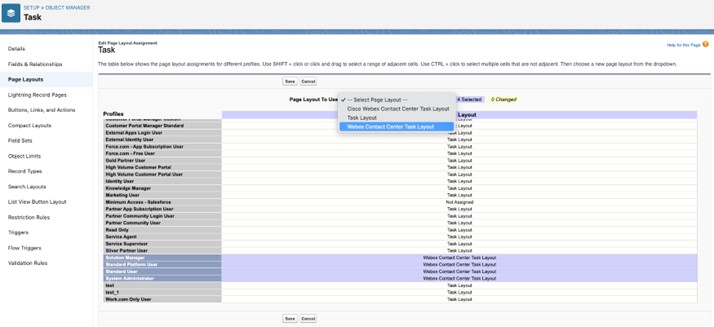
Cisco Webex Contact Center Task Layout is an old layout.
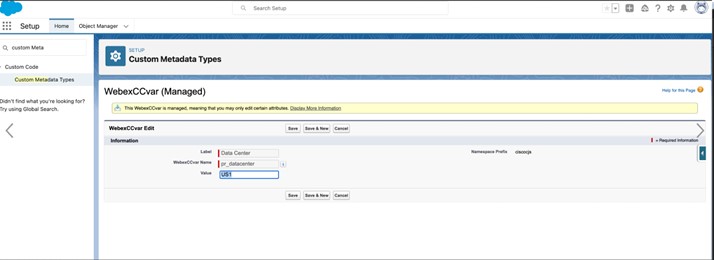
To select the required data center:
-
Go to .
-
Click .
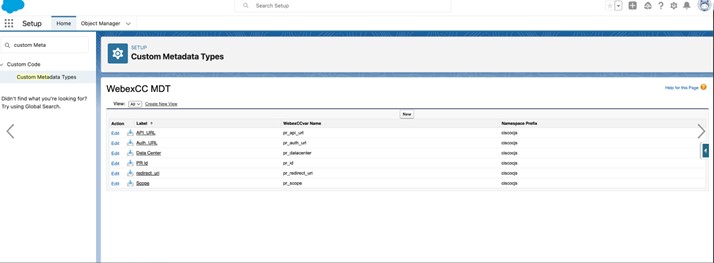
-
Change the Value from US1 to the required Webex Contact Center data center.
Example: Change the value from US1 to EU1 to select EU1 data center.
To select the required API URL:
-
Go to .
-
Click .
-
Change the Value to the required Webex Contact Center API URL ( https://audioconnector.produs1.ciscoccservice.com/audio?taskid=).
-
Go to .
-
Click .
-
Change the Value to the required Webex Contact Center redirect URL ( https://audioconnector.produs1.ciscoccservice.com/auth).
Feature demo
The demo is hosted in the internal Salesforce application center.

-
Click Play Recording 2.0 to open the Call Recording in Salesforce application.
-
If you are not signed in to the Webex Contact Center desktop widget, the application prompts to enter credentials.
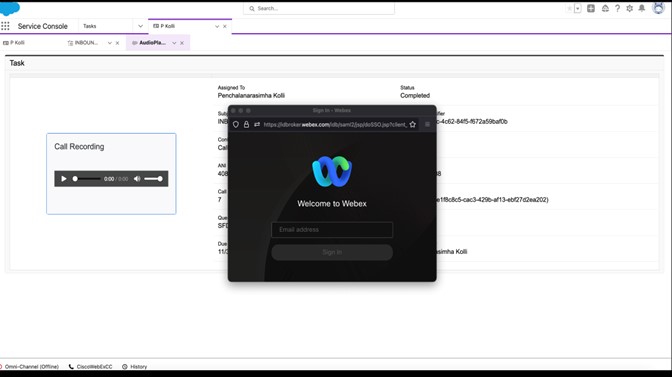
-
If you have permission and are signed in to the Webex Contact Center desktop widget for Salesforce, the sign-in pop-up disappears.
-
If you are signed in as an agent or any other user profile that does not have access to the Call Recording Management module, then an unauthorized message displays. Administrator can modify the user profile settings to view recordings.
The CRM connector operates based on the version of the widget specified in the desktop layout JSON. It is extremely important to ensure the widget version within the Desktop Layout is kept updated.
Administrators are expected to ensure all desktop layouts for this CRM connector use this widget version. If the layout is not updated to use the latest version, functionality will no longer be supported and may cease to work correctly.
- Last Salesforce update—salesforce_desktop_0.1.0_v1.1.9.json. As of November 2024, package version is 1.2.3
- Last XML update—sfdc-callcenter-definition-file.xml, June 2024


