- Home
- /
- Article

Thanks for your feedback.

Get started with Control Hub
 In this article
 Feedback?
Welcome to Control Hub, a single dashboard to manage users, permissions, calling, meetings, messaging, and devices.
We recommend adding users by entering their email addresses, so that they can join Webex Meetings and use Webex App. We encourage them to use the services and to provide feedback. You can add more users at any time.
Webex uses "starts with" search and "complete match" search on each word of your search query. We recommend that you use spaces between words in your names to make searching easier.
Control Hub fully supports Mozilla Firefox 66 and later, Google Chrome 89 and later, Microsoft Edge 89 and later, and Apple Safari 15.1 and later.
-
Control Hub doesn't support Internet Explorer.
-
Control Hub isn’t designed for mobile devices.
Get started
- Sign in to Control Hub.
- Once you sign in, a setup wizard automatically starts if you're using a trial version.
- After accepting the terms and services agreement, you can create your organization.
- Once your organization has been created, you'll receive an email with instructions on how to set up your Webex services (Meetings, Messaging, and Calling).
- Whether you're starting a trial or a paid subscription, click Get Started to set up your admin account and to have access to Control Hub. The email address used for activation is also used to sign in, where you'll be prompted to set the administrator password.
Check how Webex adoption is going, and make your environment more secure
After you set up your environment, you can check to see how the adoption of Webex is going. Control Hub can also guide you through making your environment more secure. See set up an organization in Control Hub.
Overview
The Control Hub settings are on the Overview page. You can view licenses across all your services, administer licenses to users, and see notifications to stay updated with new functions.
Favorite pages
You can create a personalized list of links that provides direct access to pages up to three levels deep within Control Hub. Instead of clicking through multiple layers of navigation, such as selecting , you can favorite the Admin Activities page and return to it with a single click.
You can favorite up to 20 pages.
To favorite a page:
-
Sign in to Control Hub.
-
Select Favorites.
-
Click
 > Add Favorites.
 -
Click
next to the page you want to favorite. -
Select Save.
Your favorites are shown the next time you select Favorites. You can update your list of favorites by clicking Edit Favorites.
Switch between light or dark mode
Control Hub supports light and dark themes, allowing you to choose the appearance that best fits your environment and preferences. Dark mode can help reduce eye strain in low-light settings.
Match Browser is the default selection.
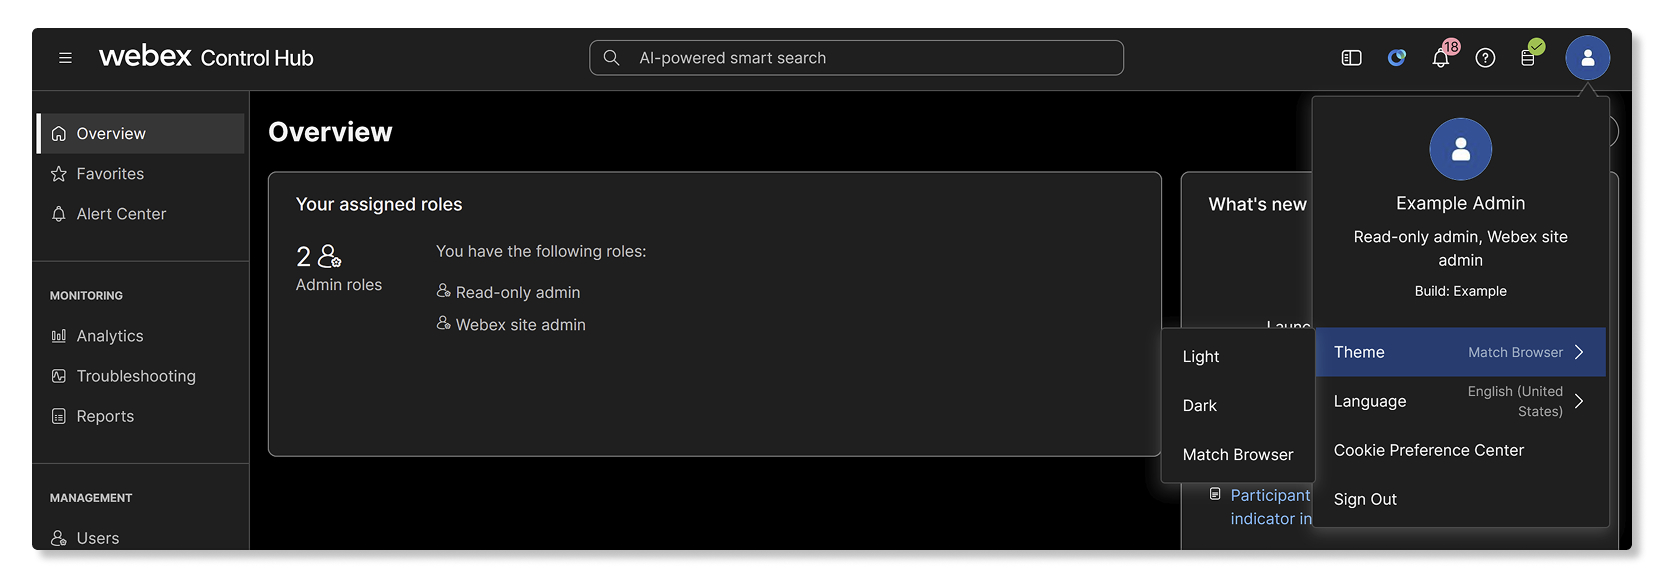
To change the theme in Control Hub:
- Sign in to Control Hub.
- Click your profile icon.
- Select Theme.
- Choose from one of the following:
- Light—Standard light appearance.
- Dark—Dark background with light text.
- Match Browser—Matches your current browser settings.
Your selected theme is applied instantly. You can change this setting at any time, and it only affects your personal view in Control Hub.
Configure your network
Configure your network so that the Webex can access all the necessary traffic. This ensures Webex services are optimized for your users, and makes it easier for you to troubleshoot the network issues.
Configure Webex services
If Messaging, Meetings, or Webex Calling is provisioned for your organization, you can configure the settings for each service.
- Sign in to Control Hub.
- Go to Services, then select a service.
- Select Settings, then configure the service.
To configure Webex Calling, see the following guides:
-
Webex Calling—This service provides cloud-based calling. See Webex Calling Configuration Workflow for more information.
-
Calling in Webex App (Unified CM)—This service is a client-based integration between your Unified CM environment and the cloud. See Deployment guide for Calling in Webex App (Unified CM).
-
See Supported calling options in Webex App for supported calling features for all Webex-based call services.
To configure a specific Webex Meetings site:
- Go to .
- Select the site to configure, then click Settings and choose the area you want to configure.
Manage domains
Manage your domains in Control Hub to help add security and credibility to your organization. Domains also help with user management.
Claim users to your organization
You can claim users into your organization who have signed up for Webex using your company's email domain. This ensures the users in your company are in one organization, so that you can manage and provide them with the needed Webex services and support.
Add users to your organization
Now that you've set up your services, you can add people from your company directory.
| 1 |
Sign in to Control Hub. |
| 2 |
Go to , then click Manage Users. |
| 3 |
Choose one of the available methods to add users, depending on the number of users you want to add.
|
Assign roles to your users
You can assign different administrator roles to users in your organization. Users can become full administrators, or a combination of support administrators, user and device administrators, location administrators, device administrators, read-only administrators, or compliance officers. You can also see a list of all or specific administrators in Control Hub, including device administrators and compliance officers.
Assign services to users
While you can edit the services for an individual user, it can be more efficient to edit multiple users' services at once using the bulk CSV template.
| 1 |
Sign in to Control Hub. |
| 2 |
Go to , then click Manage Users. |
| 3 |
Select Export and import users with a CSV file, then click Export. |
| 4 |
In the downloaded file, add True for the services you want to assign to each of your users. |
Set up Single Sign-on (SSO) for users
Webex App uses basic authentication. You can set up SSO so that users only need to authenticate once.
For more information, see Single Sign-On Integration in Control Hub.
| 1 |
Sign in to Control Hub. |
| 2 |
Go to . |
| 3 |
In the Identity provider tab and click Activate SSO. |
| 4 |
Select an identity provider, then click Next. |
| 5 |
Select a certificate, then click Download metadata. |
| 6 |
Click Next. |
| 7 |
Select how to connect your identity provider (IdP) to the Webex cloud by clicking either Upload your IdP's metadata or Fill out the configuration form. |
| 8 |
Click Next. |
| 9 |
Click Save. |
Add and manage devices
You can add devices to your organization, and assign them to either individual users or shared workspaces. To make it easier to organize and search for devices later, you can group devices with tags.
After adding a device, Control Hub generates an activation code that you must enter into your device to link it to Control Hub.
If you have many devices within your organization, you can also search for devices.
Adjust settings
Add your logo
- Sign in to Control Hub.
- Go to .
- Scroll to Branding, then select Use your own logo.
- Select your logo and click Upload.
You can also configure advanced branding customizations.
Help and support information
Follow the steps below to provide support information for your users. This is displayed on your Webex site, their Webex App, and Cisco Technical Assistance Center (TAC) case open tools.
- Sign in to Control Hub
- Go to , then scroll to Help and support information.
- To provide direct support to your users through your organization's support team, toggle on Redirect user support.
- When turned on, your users are redirected to the Contact support and Help Site URLs you specify, and see the description you configure. Users cannot open support cases with Cisco TAC through Support Case Manager, the Webex Chat Assistant, or by making a phone call. This setting does not apply to Webex organization administrators, as defined in Assign organization account roles in Control Hub.
- When turned off, users' support requests are not redirected; they can open cases with Cisco TAC.
You can still configure the Contact support and Help Site URLs. These are displayed in Webex App under the Help menu, and on your Webex site under Support.
- In the Contact support section, enter the following, which is shown under the Support option on your Webex site:
- Support URL—URL where your organization's users open support cases.
- Description—Specify details to be presented to a user about your Webex organization's support, such as hours of operation, phone number for urgent support, etc.
- In the Help Site section, enter the URL to your company's knowledge base, where users can access self-help resources.
If Contact support and/or Help Site are configured with a URL that is internal to your organization, users must be connected to your organization's network or connected through a VPN.
- Click Save.
For more settings, see Set up your organization in Control Hub.
Manage sites
| 1 |
Sign in to Control Hub. |
| 2 |
Go to . |
| 3 |
Select the site you want to manage. For more information, see Add and manage your Webex sites. |
Track site and service usage
Use Analytics and Reports in Control Hub to see how your users use your Webex site and services.
- Sign in to Control Hub.
- Under Monitoring, select an option:
- Analytics—Interactive data visualizations that show important information, such as usage and adoption trends. Explore data as it automatically adapts to parameters that you specify in real-time. For more information, see Analytics for Your Cloud Collaboration Portfolio.
- Reports—Generate a variety of reports, view or set up scheduled jobs, and use classic reports to view comprehensive statistics for all of a Webex site's services. For more information, see Reports for Your Cloud Collaboration Portfolio.
Monitoring and Troubleshooting
You can collect baseline data on your organization’s network when using Webex services with the Webex Monitoring Service. The data can help you troubleshoot issues that your users run into, such as identifying if a low-quality meeting is caused by a network problem.
If issues come up with a Webex service, or to check the status of your services, do the following:
- Sign in to Control Hub.
- Go to .


