- Home
- /
- Article

Thanks for your feedback.

 In this article
 Feedback?
You can use Agent Desktop to receive, respond, and make customer calls, depending on the permissions assigned to you by your administrator.
Access popover to answer a call
If the Task List pane is collapsed, you can see the popover at the bottom-right of the Desktop. The popover is the pop-up dialog box that is displayed when a call, chat, email, or social messaging conversation request is routed to you.
The Desktop displays the following popovers:
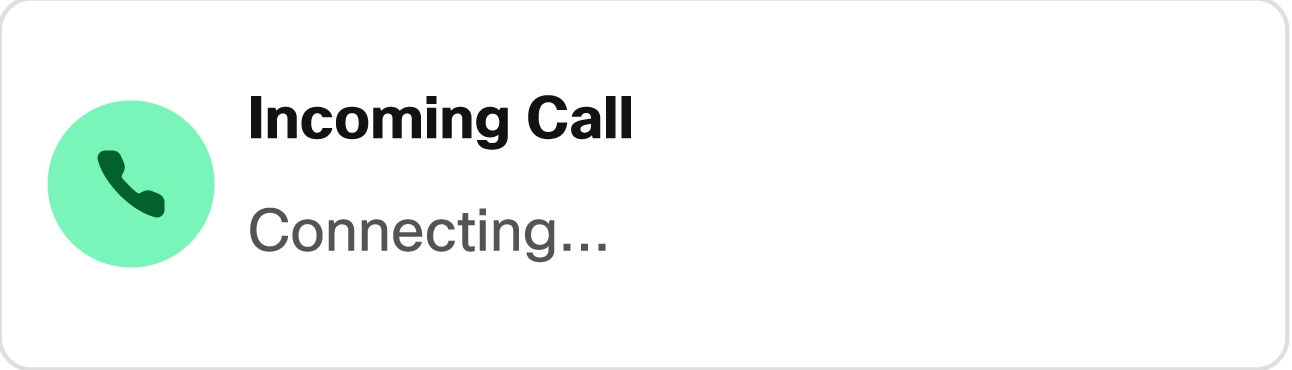
- Connecting popover: The connecting popover informs you that a new contact request is in the process of being assigned.
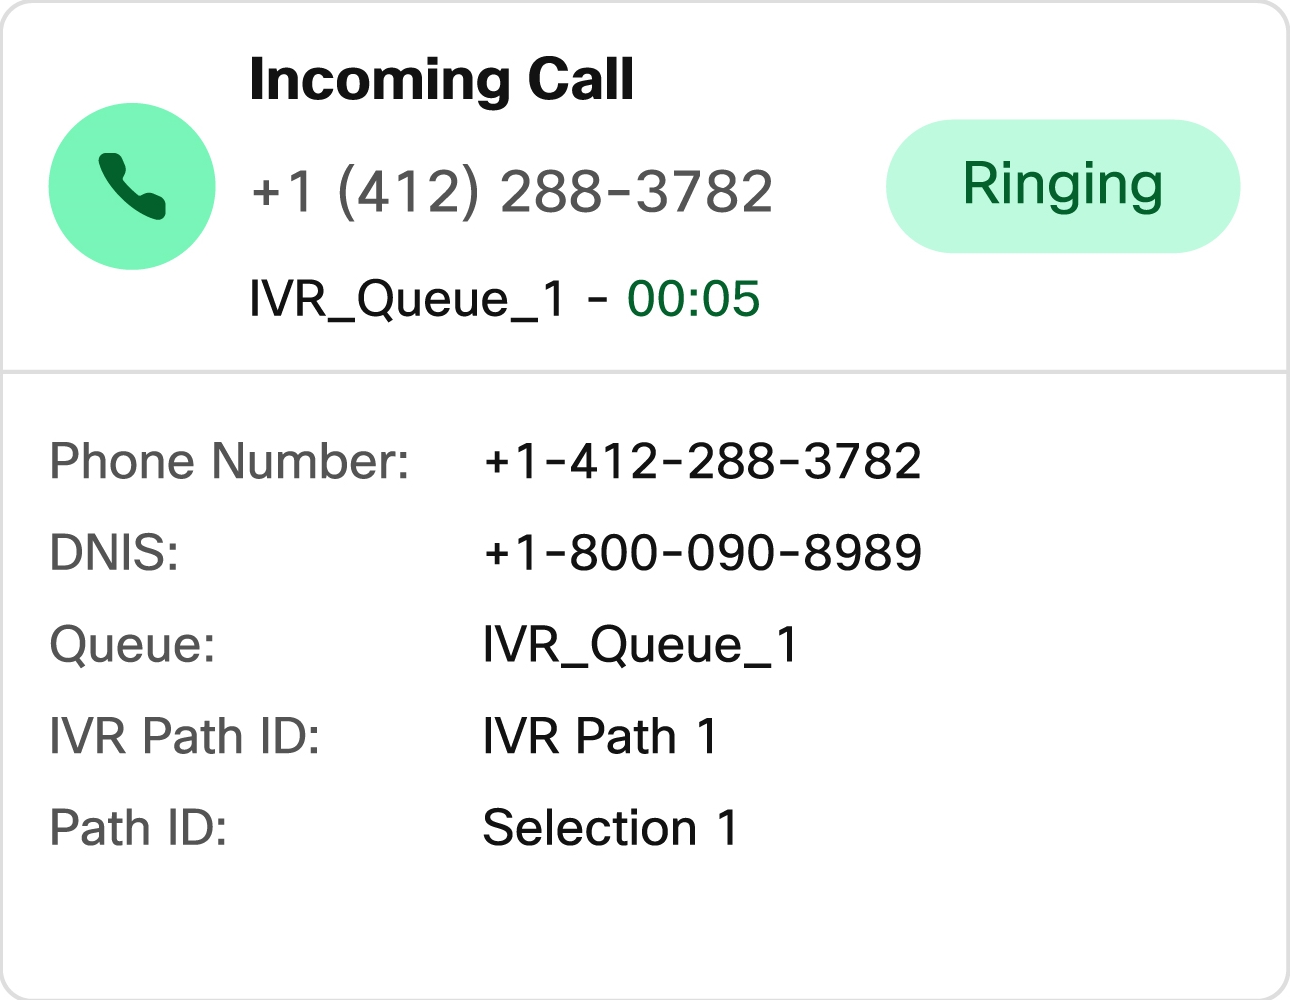
- Contact request popover: The contact request popover appears after the connecting popover. You must take action on the contact request popover before your state changes to Idle. The popover displays variables, action buttons, or links based on the configuration that is defined for each channel.
You can’t sign out when a connecting popover or contact request popover appears on the Desktop.
When you have multiple requests, the popovers are stacked. If you have more than five requests at any point in time, the requests are displayed as 1-5 of <total number>. You can accept the email, chat, or social messaging conversation by clicking the Accept button in each popover. To accept all requests together, click Accept <number> requests. The earliest request is displayed at the top. The order is emails, social messaging conversations, chats, and calls from top to bottom.
In addition to the popover, all incoming and active interactions (calls, chats, emails, and social messages) are consistently listed in the Task List pane, typically located on the left side of your Agent Desktop. This pane provides a persistent view of your current workload. If you miss an incoming call popover, or if you are managing multiple concurrent interactions, you can always find and manage them from the Task List pane. Incoming calls will display a 'Ringing' status and an associated icon in this list until accepted or declined.
The popover displays the variables, the action buttons, or the links based on the configuration that is defined for each channel. The following table lists the variables that are displayed on the popover for the voice channel:
| Voice Channel-Call Type | Variables Displayed on Popover |
|---|---|
|
Incoming Voice Call |
In Flow Designer, your administrator configures the variables, labels of the variables, and the order in which they must appear on the Agent Desktop. A minimum of three and a maximum of six variables are displayed on the popover. An incoming popover doesn't display variables marked as secure by your administrator. The consult call request displays a maximum of nine variables on the popover. That is, the three default variables (Agent Name, Agent DN, Agent Team) and a maximum of six variables configured by your administrator. The three default variables refer to the agent who initiated the consult call. If your administrator has enabled the senstitive data protection for your desktop, you will only see the last four digits of the incoming call number; the rest remains hidden. |
|
Callback |
|
|
Outbound Preview Campaign Call |
Variables that are based on the configuration that is defined by your administrator. |
|
Outdial Call |
In Flow Designer, your administrator configures the variables, labels of the variables, and the order in which they must appear on the Agent Desktop. A minimum of three and a maximum of six variables are displayed on the popover. An outdial popover doesn't display variables marked as secure by your administrator. The consult call request displays a maximum of nine variables on the popover. That is, the three default variables (Agent Name, Agent DN, Agent Team) and a maximum of six variables configured by your administrator. The three default variables refer to the agent who initiated the consult call. |
Background Noise Removal (BNR) for Desktop Mode
Background Noise Removal (BNR) helps reduce unwanted background sounds during customer calls, such as office noise, nearby conversations, keyboard sounds, or equipment noise. By reducing these sounds, BNR can make speech easier to hear and improve overall call clarity.
BNR support depends on the telephony endpoint being used:
- If you have signed in to the Agent Desktop using a dialed number or extension, your
telephone provides BNR support:
- The Webex App supports BNR capabilities.
- BNR support for Cisco desk phones depends on the phone model, firmware version, calling platform, and administrator configuration.
- If you are using the Agent desktop as your telephone (you've signed in using desktop mode), background noise removal is applied to your calls by the agent desktop.
Desktop mode uses WebRTC to terminate calls and media directly in the Agent Desktop. In this mode, Cisco BNR technology is built directly into the browser experience and can reduce background noise from the agent’s surroundings during the call.
Configure Background Noise Removal
If you are using Agent Desktop as your telephony endpoint, you can enable or disable BNR from the User Settings panel.
| 1 |
Click the user profile icon in the upper-right corner of the Agent Desktop. |
| 2 |
In the User Settings panel, use the Apply background noise reduction toggle. |
| 3 |
Turn the toggle on or off as needed. |
During a call
The current BNR status is shown as an icon in the interaction control pane, next to the customer’s name or phone number. Click the icon to turn BNR on or off for the current call. When BNR is off, the icon appears with a strike-through.
You can choose to turn BNR off temporarily when you want to hear non-speech audio clearly, such as music on hold or other non-human sounds.
Important considerations for availability and usage
- Consultation calls: BNR controls are unavailable during an active consultation call. You can change the BNR setting after the consultation has ended.
- Conference calls: BNR is managed at the individual user level. During a conference call, each participant can control their own BNR setting independently.
Answer a call
When you receive an inbound call from a customer, the contact request popover follows the connecting popover. The status of the incoming call displays as Ringing.
If you don’t answer the call within the maximum available time, the call returns to the queue, and the system automatically places you into Idle state. This is triggered by a Re-route On No Answer (RONA) event. A popover then appears, offering options to change your state to either Available or Idle. For more information on RONA occurrence, see Understand agent states for Webex Contact Center.
Before you begin
You must be in the Available state to answer customer calls.
| 1 |
When you receive a call request in Agent Desktop, use your physical phone to answer it. The timer starts and your interaction control pane appears.
|
| 2 |
(Optional) Perform the following tasks in the interaction control pane, while you're handling a call:
|
Hold and resume a call
You can put the customer on hold to consult with another agent or look up additional customer information.
Before you begin
You must have accepted the call request.
To interact with another agent, you need to initiate a hold and resume on the Agent Desktop rather than using a phone device (hardphone or softphone).
| 1 |
Click Hold. The Call on Hold state displays next to the
timer. The End button is disabled.
|
| 2 |
Click Resume to take a call off hold. When you are consulting with another agent, your call with the customer is automatically put on hold. When you take the customer off hold, the consulting agent is automatically put on hold. Both calls can’t be on hold simultaneously. |
Initiate a consult
You can initiate a consultation with an agent, queue, dial number, Entry Point (EP), and organization.
Consult calls to an Entry Point (EP) or Dial Number (DN) that are configured to route to a capacity-based team are not supported. If an EP-DN is routed to a capacity-based team, consult attempts will fail and may result in an 'Unsupported destination' error. This limitation applies to both direct consults and consults initiated during an outbound call where the EP-DN destination is a capacity-based team.
Before you begin
You must be on an active call.
| 1 |
Click Consult. The Consult Request dialog box appears.
|
| 2 |
Choose one of the following options to consult with the agent, queue, organization, entry point or dial number:
|
| 3 |
(Optional) Click |
| 4 |
Click Consult. The Consult Requested state is displayed next to the timer. The consult call request displays a maximum of nine variables on the popover. That is, the three default variables (Agent Name, Agent DN, Agent Team) and a maximum of six variables configured by your administrator. The three default variables refer to the agent who initiated the consult call. When the consult call request is accepted by an agent, two Interaction Control panes are displayed on your desktop along with the variables.
The consulted agent can exit the call by clicking Exit Consult, and the call continues between you and the customer. If a consult call is initiated through the dial number mapped to an entry point (EP-DN), consider the following points:
|
| 5 |
(Optional) You can perform the following while on a consult call with another agent.
|
| 6 |
When finished, click End Consult. The Wrap Up Reasons dialog box appears. For steps on how to apply a wrap-up reason, see Apply a wrap-up reason.
.
The system enables the "Transfer" and "Conference" buttons as soon as the consultation call reaches the consulted agent's Extension/Direct Number (EP/DN). This allows the primary agent to:
This benefits both agents and callers by enhancing efficiency and reducing hold times. |
 to retrieve the most recent list of agents, queues, entry points, and dial numbers.
Actions each consult call participant can perform
Each call participant involved in a consult call can perform different actions. Use this table to understand how each participant can interact.
-
The primary agent refers to the agent who initiates a consult call.
-
The consulted agents refer to the agents who accept the consult call.
|
Participant |
Actions |
|---|---|
|
Customer |
|
|
Primary agent |
|
|
Consulted agent |
|
|
Non-agent participants (Dial Number) |
Non-agent participants don’t have call controls, such as consult, add participants, or end conferences, unlike agents with Contact Center capabilities enabled. |
Initiate a conference
You can start a conference call between agents and subject matter experts. You can add a maximum of eight participants, including the customer and yourself.
Group communication is further enhanced by allowing three or more individuals to communicate simultaneously. This feature efficiently manages calls with multiple participants, by keeping the conversations active without any interruption.Before you begin
You must have already initiated a consult call. For more information, see Initiate a consult.
| 1 |
Click Conference. To interact with another agent, you need to initiate a conference on the Agent Desktop rather than using a phone device (hardphone or softphone). The customer is taken off hold and you, the customer and the consulting agent can communicate with each other. |
| 2 |
(Optional) Click Exit Conference to exit the call. The call continues between the customer and other participants. The call continues between you and the customer. The Transfer button has been replaced with the Exit Conference button. To transfer control of the call, you will now need to exit the conference. Upon your exit, the participant who has been in the call the longest will automatically assume control.
|
| 3 |
Click End to end the call. The Wrap Up Reasons dialog box appears. For steps on how to apply a wrap-up reason, see Apply a wrap-up reason.
|
Actions each conference call participant can perform
Each call participant involved in a conference call can perform different actions. Use this table to gain an understanding of how each participant can interact.
-
Primary agent refers to the agent who starts a conference call.
-
Conferenced agents refer to the consulted agents who are part of the conference call.
|
Participant |
Actions |
|---|---|
|
Customer |
|
|
Primary agent |
|
|
Conferenced agents |
|
|
Non-agent participants (Dial Number) |
Non-agent participants do not have call controls, such as consult, add participants or end conferences, unlike agents with Contact Center capabilities enabled. |
Group communication is further enhanced by allowing three or more individuals to communicate simultaneously. This feature efficiently manages calls with multiple participants, by keeping the conversations active without any interruption.
|
Participant action |
Description |
|---|---|
|
Customer leaves the call |
The customer's connection ends. However, if a consult or conference is active, the conversation between the remaining agents (primary and consulted/conferenced) does not end immediately. They can continue their discussion. The call ends only when there's one participant left. This ensures that all discussions are completed and the call's "handle time" (the total time taken to handle the call) is accurately tracked. |
|
Agent leaves the call | The call does not end when the agent exits the call. It continues between the remaining participants. |
|
Both customer and agent leave the call | The call ends when both customer and agent leave the call. |
| Post Call | If the customer exits the call, the call enters the
Post Call state. Existing participants
can continue the conversation, but no new participants can be
added. Post Call is a separate metric that can be tracked via Analyzer. |
| Supervisor monitoring |
|
| Admin control | There are no admin controls. |
Drop a participant from a conference call
During a conference call, participants who are no longer needed are expected to drop themselves. But if an unintended participant joins the call or an IVR enters an endless loop, the call owner or the primary agent may need to remove that participant to prevent a poor customer experience.
As a primary agent, you can remove the customer or another participant from an active voice conference call when their participation is no longer required. Other agents in the conference can't remove participants.
This feature doesn't apply to digital conferences.
Before you begin
| 1 |
In an active conference call, open the participant list. |
| 2 |
In the participant list, find the participant or customer that you want to remove, and click Drop next to their name. |
| 3 |
A confirmation dialog appears when dropping a customer. Click Drop. A notification pops-up after the customer is dropped. |
The selected participant is removed from the conference call and the call continues with the remaining participants.
- If you drop an internal participant and the customer remains on the call, the call continues with the remaining parties.
- If only two participants remain after a participant is dropped, the conference state ends and the remaining parties continue the call as applicable.
- If a supervisor barges-in, the participant list is updated with the supervisor name.
- If the primary agent drops from the call, the agent who has been in the conference for the longest time can drop participants.
Transfer a call
You can transfer the active voice call (inbound and outbound) to another flow associated with an entry point. If you can't resolve a customer question and want to escalate the call, you can transfer the call to another agent or supervisor.
Before you begin
You must have accepted the call request from a customer.
| 1 |
Click Transfer. To interact with another agent, you need to initiate a transfer on the Agent Desktop rather than using a phone device (hardphone or softphone). The Transfer Request dialog box appears.
|
| 2 |
Choose one of the following options to transfer an active call to a queue, an agent, an entry point, or a dial number:
|
| 3 |
(Optional) Click |
| 4 |
Click Transfer. If you want to transfer the call immediately (blind transfer), select either Agent or Dial Number and click Transfer. The call is answered by any available agent. The transfer request is initiated, and the Wrap Up Reasons dialog box appears. For steps on how to apply a wrap-up reason, see Apply a wrap-up reason.
The system enables the "Transfer" and "Conference" buttons as soon as the consultation call reaches the transferred agent's Extension/Direct Number (EP/DN). This allows the primary agent to:
This benefits both agents and callers by enhancing efficiency and reducing hold times. |
Record a call
Your call with the customer is automatically recorded if your administrator has enabled call recordings. If enabled, you can pause a call recording while obtaining sensitive information, such as a customer’s credit card information. Your administrator specifies the pause duration. After the specified pause time has elapsed, the recording automatically resumes. To pause or resume the call recording, follow these steps.
Pause Recording and Resume Recording features don't work during conference and consult calls.
Before you begin
You must have accepted the call request.
| 1 |
Click Pause Recording to pause the recording of an active call. The Record icon ( |
| 2 |
(Optional) Click Resume Recording to manually resume paused recording. |
 ) indicates that the recording is in progress.
Edit call-associated data variables
Call-Associated Data (CAD) variables allow the administrator to collect call data such as a case number or any customer's action code. During a call, you can edit the CAD variables if your administrator configures the CAD variables as editable. If you require additional CAD variables, contact your Supervisor or Webex Contact Center administrator to request they be added to the call control script.
Your administrator can mark variables containing sensitive information, such as personally identifiable information (PII) and your organization's data, as secure. If the variable is marked as secure, the Secure Variable icon appears beside the field name in the interaction control pane.
When consulting or transferring a call, if multiple agents edit the same CAD variable value at the same time, the changes that are saved first display, and the other agent is notified with a message. For example, consider that two agents (Agent A and Agent B) edit the same CAD variable at the same time and Agent A saves the value. Then, the value entered by Agent B is overwritten, and Agent B is notified with a message.
Before you begin
You must have accepted the call request.
| 1 |
Click within the text box of an editable field and enter an appropriate value. For example, enter a case number or an action code. You can enter or paste a maximum of 256 characters for the CAD variable value. |
| 2 |
You can do the following:
|
| 3 |
(Optional) If the secure variable values are displayed with an asterisk (*) symbol, click the Click to retry link to view their values. |
| 4 |
After you edit the CAD variable values as required, click Save. The system may delay displaying the updated CAD variable values, based on the routing configuration or events in Flow Designer. Saving the CAD variable values is subject to network availability and other operational considerations. |
| 5 |
(Optional) To retrieve the previously saved values, click Revert. |
 .
. or click on the field. When editing a CAD variable corresponding to
date and time, follow the supported international standard to save the
variable value.
or click on the field. When editing a CAD variable corresponding to
date and time, follow the supported international standard to save the
variable value. End a call
After you’ve helped your customer with their questions or requests, we recommend asking the customer to end the call. If necessary, you can also end the call.
You cannot end the call when the call is on hold.
Type at least 3 characters to search for the wrap-up code you need.
Before you begin
You must have accepted the call request.
| 1 |
Click End. The Wrap Up Reasons dialog box appears. The Wrap Up Reasons dialog box appears only for the primary agent. The consulted or conferenced agents can help the primary agent with wrap-up assist.
|
| 2 |
Select the wrap-up reason from the drop-down list or use the search field to filter the list. For steps, see Apply a wrap-up reason. |
| 3 |
Click Submit Wrap Up. |
| 4 |
(Optional) If you're using a handset or headset, you must disconnect the physical phone before you can receive the next call. |
Callback
Customers can opt to receive a callback using an IVR (Interactive Voice Response) by calling, visiting the website, or using a chatbot (Virtual Agent).
The following are the different callback types:
-
Courtesy Callback: A customer can opt to receive a courtesy callback instead of waiting in the queue for an agent to answer the call.
-
Web Callback (Callback): A customer can opt to receive a callback by submitting a callback request. The request includes a name and callback number when visiting the contact center website or interacting with a chatbot (Virtual Agent).
-
Scheduled Callback: A customer can opt to receive a callback at a later, mutually convenient date and time. During a live call, the agents can register the callback request from a customer for a specific date and time in the future.
The callback requests are sent to the Webex Contact Center system. When an agent is available, the system initiates a callback to the customer. The customer can be offered the callback option during peak hours or nonworking hours of the contact center.
Callback requests are routed to you as an incoming call request. The callback contact
request popover (incoming popover) displays the Callback label, the Callback
icon ( ), the phone number of the customer, DNIS (Dialed Number Identification Service), the
queue that routed the call to you, and a timer indicating the time elapsed since you
received the call. The status of the incoming call is displayed as Ringing. You
can also see the incoming call and the call back reason in the task panel card.
), the phone number of the customer, DNIS (Dialed Number Identification Service), the
queue that routed the call to you, and a timer indicating the time elapsed since you
received the call. The status of the incoming call is displayed as Ringing. You
can also see the incoming call and the call back reason in the task panel card.
If the End Call feature for Web Callback is enabled by your administrator, the Ringing status is replaced with the Cancel button in the contact card request.
The 'callback reason' entered when scheduling a callback is typically stored as a Call-Associated Data (CAD) variable. While not displayed by default on the callback popover, your administrator can configure this variable to appear on the popover or within the Interaction Control Pane using Flow Designer. If you require the callback reason to be displayed, please contact your administrator. For more information on configuring variables, refer to the Start Flow section in the Flow Designer Guide.
If the customer accepts the call, you are connected to the customer and the Interaction Control pane displays.
To cancel the Web Callback before the customer answers the call, click Cancel. When the callback is canceled, the Wrap Up Reasons dialog box appears.
If the customer doesn’t answer the call, the call is returned to the queue.
If the contact center has reached the maximum limit for concurrent calls that is set for the data center or tenant, you can't make more calls, and the corresponding reason codes are displayed on Agent Desktop.
Schedule a callback
Agents can register a callback request from a customer for a specific date and time in the future. Agents can do this directly through their desktop interface or by using APIs. Instead of calling the customer immediately, the agent sets up a request for the system to call the customer back at the chosen time.
This helps to—
- Manage customer interactions more efficiently and ensures that customers receive calls at times that are convenient for them.
- Reduce the number of abandoned or repeated calls.
- Manage agent workload more effectively.
- Reduce the need for customers to call back again, as their concerns will be addressed during the scheduled callback.
Callbacks can be scheduled from all contact types including campaign calls. This includes all inbound and outbound calls, as well as digital contacts such as chats or emails.
Prerequisite
To enable and manage scheduled callbacks, the following Control Hub configurations are mandatory:
- The administrator must configure an outdial entry point to serve as the callback entry point.
- This entry point is used to process all scheduled callback calls within the organization.
- Only entry points that are currently active appear in the selection drop-down list.
For more information, see Setup a callback entry point.
An agent can create or manage callback schedules for a customer—
- When connected to the customer on the Agent Desktop—follow the following steps.
- When not connected to the customer—directly by clicking the + icon from the task panel.
To create a customer callback schedule when connected to the customer:
- During an ongoing call, click ellipsis (…) and then Schedule and manage callbacks.
- On the Schedule and manage callbacks pop-up, you can create a callback request for a customer:
By default, Schedule a callback tab is open.
- (Required) Enter the customer's phone number.
- The field accepts 7 to 15 characters.
- You may include the country code.
- Special characters such as spaces, hyphens (-), commas (,), and periods (.) are allowed.
- (Required) Enter the customer's name.
- All valid Unicode characters are allowed.
- The name must be between 3 and 250 characters in length.
- In the Select date and time section:
- (Required) Date—Choose a date for the callback.
- (Required) Call between—Choose a start time and end time for the callback.
- The scheduled time must be at least 30 minutes after the schedule creation time.
- The scheduled time can't exceed 31 days from the schedule creation time.
- (Required) Customer time zone—Choose a valid IANA time zone.
- Assign to: Choose the agent assignment preference from the following:
- Any available agent: The system assigns the callback to the next available agent.
- Myself: Assigns the callback directly to you.
- A specific agent: Allows you to select a particular agent. The queue list will update based on your selection.
- (Required) Queue name—Choose an active telephony queue (inbound or outbound) within the organization that the agent has access to.
- Enter a callback reason.
- The maximum length of this field is 250 characters.
- All valid Unicode characters are allowed.
- Click Schedule.
You can view all scheduled callbacks for a specific customer in the Manage Callbacks tab.
To manage a customer callback schedule:
- During an ongoing call, click ellipsis (…) and then Schedule and manage callbacks.
- Click Manage Callbacks tab.
- Click Edit to update the scheduled callback.
- Click Delete to delete the scheduled callback.
You can't update or delete a callback schedule after its start time has passed.
Schedule a personal callback
Personal Callbacks make it simple for the original agent to schedule a follow-up call with the customer — assigning it to themselves or another member of their buddy team. This ensures that customers can connect with the same agent for continuity or receive specialized assistance.
You can create or manage personal callback schedules:
- When not connected to the customer, click the + icon from the Task List pane
- When connected to the customer on the Agent Desktop, perform the following steps.
You can also initiate personal callbacks from digital channel conversations (for example, chat, email). Use the same process used for voice interactions to schedule a personal callback during a digital conversation. The system correlates the personal callback with the original digital conversation for flow context.
Before you begin
Administrators must have configured an outdial entry point to serve as the callback entry point for personal scheduled callbacks.
| 1 |
During an ongoing call, click ellipsis (…) and then click Schedule and manage callbacks. |
| 2 |
On the Schedule and manage callbacks pop-up, create a personal callback request for a customer by performing the following steps. |
| 3 |
(Required) Enter the customer's phone number.
|
| 4 |
(Required) Enter the customer's name.
|
| 5 |
In the Select date and time section:
|
| 6 |
(Required) Customer time zone—Choose the customer's time zone (must be a valid IANA time zone). |
| 7 |
In the Assign to section, choose one of the following options:
|
| 8 |
(Required) Queue name—Choose an active telephony queue (inbound or outbound) within the organization (user profile organization) that you or the assigned agent has access to. |
| 9 |
Enter a callback reason.
|
| 10 |
Click Schedule. |
What to do next
You can view all personal callbacks assigned to you by accessing the Manage Callbacks tab in your Agent Desktop. The system assigns default priority to scheduled or scheduled personal callbacks, unless the flow configures a different priority using Set Contact Priority.
To manage a personal scheduled callback:
- During an ongoing call, click ellipsis (...) and then Schedule and manage callbacks.
- Click Manage Callbacks tab.
- Click Edit to update the scheduled callback.
- Click Delete to delete the scheduled callback.
Schedule a campaign callback
You can schedule a callback during an eligible outbound campaign call if the customer wants to continue the conversation later. The callback stays tied to the campaign so that the Campaign Manager can apply campaign timing, retry, and compliance rules.
Campaign callbacks are similar to standard scheduled callbacks, with the following differences:
- You can schedule the callback only while handling the original campaign call or during wrap-up for that call.
- You must use the campaign queue to schedule a callback. You can't choose another queue for a campaign callback.
- For a personal campaign callback, you must assign only yourself as the preferred agent.
Agent Desktop shows only dates and times when the campaign can accept callbacks.
- If the campaign call is transferred to another agent or an agent joins through a conference, any callback scheduled after that point is handled as a standard callback.
- If an Interactive Voice Response (IVR) campaign call reaches an agent, a callback scheduled from that interaction is handled as a standard callback.
To schedule a callback for a customer from an eligible campaign call on Agent Desktop:
Before you begin
- Callback scheduling must be enabled in your Desktop Profile.
- You must be the original agent on an eligible Preview, Progressive, or Predictive campaign call.
- The campaign must provide valid callback dates and times.
| 1 |
During an ongoing campaign call, click ellipsis (…) and then Schedule and manage callbacks. |
| 2 |
On the Schedule and manage callbacks pop-up, you can create a callback request for the customers. |
| 3 |
(Required) Enter the customer's phone number.
|
| 4 |
(Required) Enter the customer's name.
|
| 5 |
In the Select date and time section select valid campaign dates and times. Agent Desktop shows only valid campaign dates and times.
|
| 6 |
(Required) Customer time zone—Choose a valid IANA time zone. |
| 7 |
Assign to: Choose the agent assignment preference from the following:
|
| 8 |
(Required) Queue name—Choose the campaign queue for the callback. You can't choose another queue. |
| 9 |
Enter a callback reason.
|
| 10 |
Enter or update the callback number and callback reason, if these fields are available. |
| 11 |
Submit the callback. |
Agent Desktop schedules the callback and shows it as read-only. You can view the callback, but you can't reschedule, modify, or cancel it.


