Thanks for your feedback.
Webex Instant Connect
 Feedback?
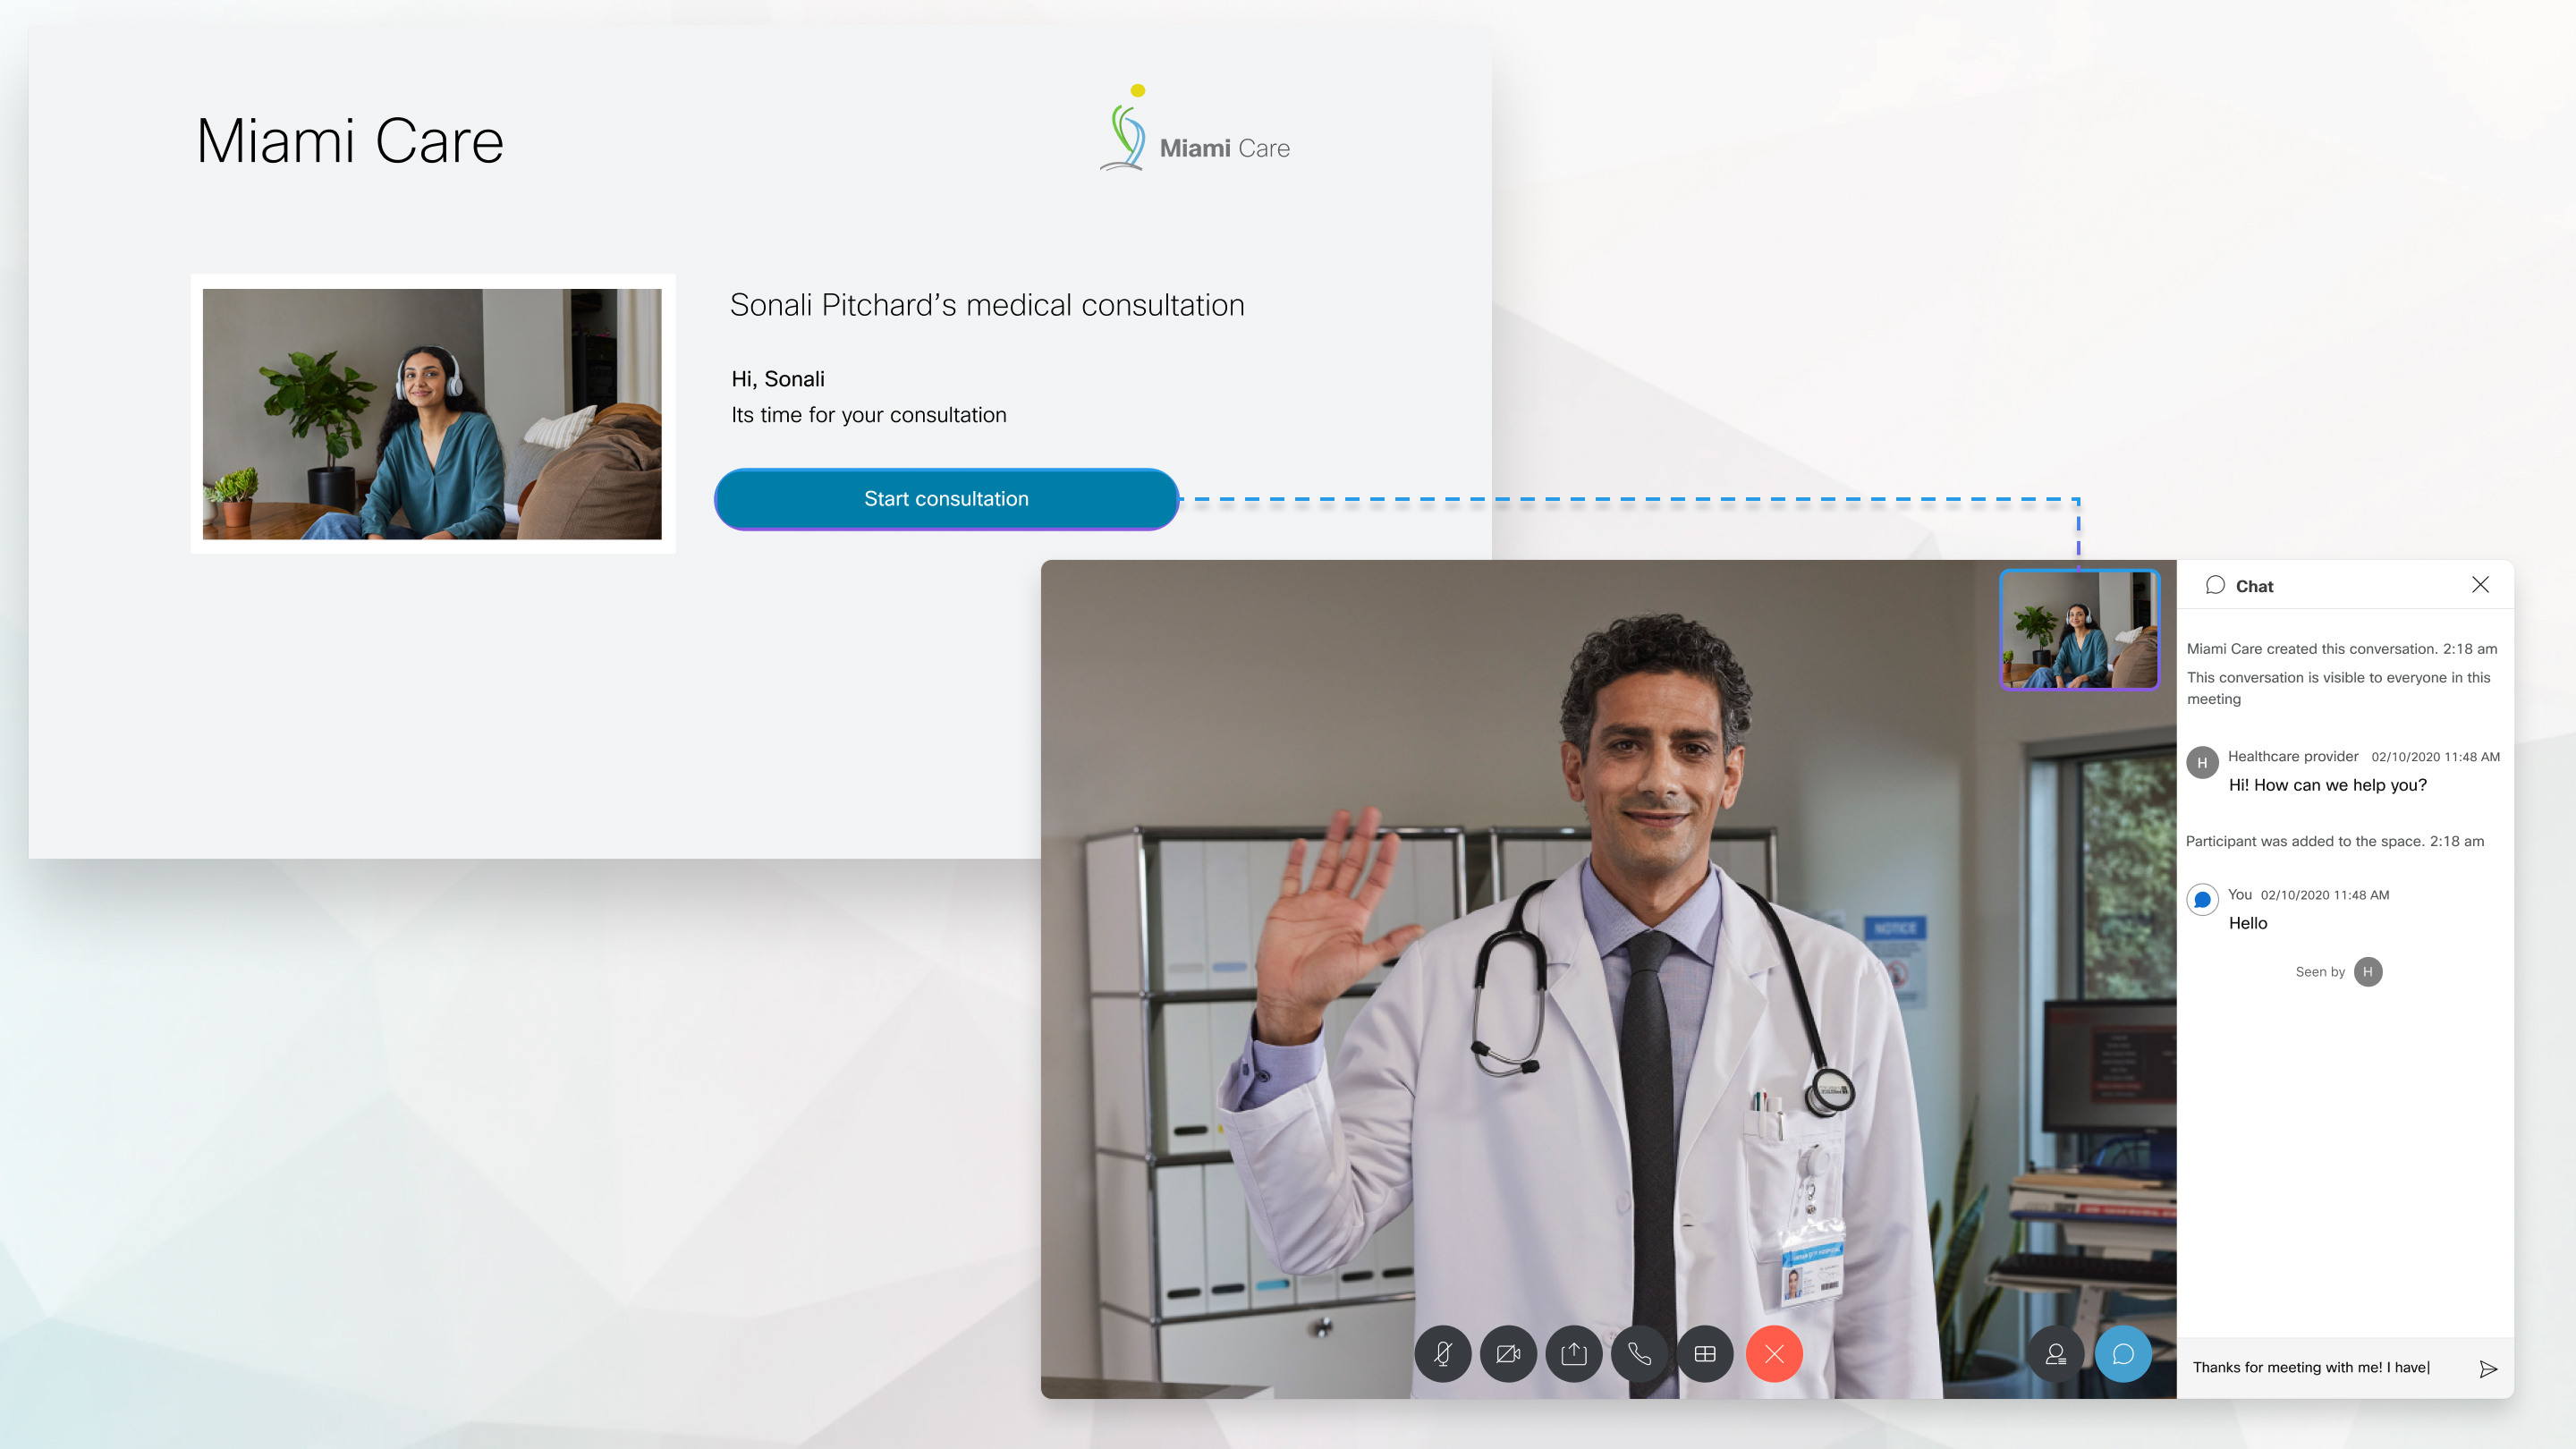
Patients are able to view their upcoming appointments in their EMR portal and click on a link that starts their browser-based telehealth visit. While they’re waiting for the healthcare professional to join, patients can test their video, audio and speaker hardware. The healthcare professional also just needs to click the link provided, and they are instantly connected with the patient.
Visit instant.webex.com to get started with Webex Instant Connect today!
The Webex Virtual Rounding solution builds on the flexibility of Webex Instant Connect to drive hourly rounding and in-patient virtual consultation use cases. Hourly rounding patients can be scheduled directly in the Electronic Medical Records (EMR) portal, and the provider just needs to go to the EMR portal’s patient context to launch the visit. The Cisco device facing the patient will join the call directly and the providers will be able to control the device’s camera, thus, simulating a physical visit.
Advantages
- Providers can join from anywhere using their laptop/mobile.
- Through Far End Camera Control (FECC), the providers can maneuver the patient’s device camera so that they can focus on the right area for diagnosis, essentially simulating a physical visit.
- Reduces Provider burden and increases overall efficiency resulting in millions of dollars of operational cost savings.
Things to Note
- We currently provide native integration with Epic EMR for this capability, but any EMR or healthcare system can integrate with Webex Virtual Rounding to unlock this workflow.
- The patient-to-device mapping must be maintained by the EMR or healthcare system.
- We currently support a no-knock scenario where the patient is notified on device that they will join the call in 15 seconds.
- Devices can be configured for this workflow by following the steps mentioned here.
- FECC and the supported devices list can be found here.
High-Level Workflow for Virtual Rounding – Epic Integration
The following diagram shows a high-level example integration between Instant Connect Virtual Rounding and a typical Epic EMR installation.

Webex Instant Connect supports the following browsers:
-
Mac OS
-
Chrome version 75 and later
-
Firefox version 60 and later
-
Safari version 10 and later
-
-
Windows OS
-
Chrome version 75 and later
-
Firefox version 60 and later
-
Microsoft Edge
-
-
iOS version 13 and later
-
Safari version 10 and later
Chrome, Firefox, and Microsoft Edge are not supported on iOS.Webex Instant Connect is not supported with iOS 15.1 or Safari 15.1. -
-
Android
-
Chrome version 75 and later
- Firefox version 60 and later
- Microsoft Edge
-
To ensure you're ready for your consultation, test the following functions before joining:
-
OS compatibility
-
Internet speed
-
Microphone
-
Speaker
-
Camera
| 1 |
Go to https://instant.webex.com/mediatest and then click Start test. Webex Instant Connect starts testing each function.
|
| 2 |
Test your microphone by speaking, and then click Yes or No depending on the result. Click Skip if you don't want to test your microphone. |
| 3 |
Click Test to test your speaker, and then click Yes or No depending on the result. Click Skip if you don't want to test your speaker. |
| 4 |
During the video test, click Yes or No to indicate if your video preview appeared correctly or not. |
What to do next
Once you open your meeting link, the consultation lobby opens in your browser. Before you connect with your patient, you can sign in, open the consultation in Webex App, test your video, audio and speaker to ensure everything is working.
You can meet with more than just one patient. Webex Instant Connect supports up to 100 participants for each consultation.
| 1 |
To sign in and use the capabilities of Webex App during your consultation, click Log In with Webex and sign in using your credentials. If you're happy to use your web browser and you don't need to sign in, click
Join as Guest.
|
| 2 |
Click Continue in browser to host the consultation in your web browser, or click Launch in Webex App to open the consultation in Webex App. |
| 3 |
When you're ready to start the consultation with the patient, click Start Consultation. The consultation starts and your patient is added to the meeting.
|
| 4 |
To invite more participants to the consultation using email, click |
| 5 |
Use the following meeting controls during your consultation to ensure the patient has the best possible experience during their virtual visit. Most of these controls are also available to the patient, unless indicated otherwise.
|
| 6 |
The provider can submit feedback on the audio and video quality after the consultation ends. Select a star rating and click Submit Feedback. Click Skip if you don't want to provide feedback. |

 – Enable or disable picture-in-picture mode.
 - Access a Far End Camera Control (FECC) enabled device.
See the following sections to get started integrating Instant Connect with your own system. If you encounter any issues, please contact your Cisco AM.
Integrate with Epic for Telehealth
To integrate Instant Connect with Epic for Telehealth:
- Go to https://instant.webex.com and select the Epic Integration Page.
- Select Begin Integration with Epic and then login as Webex administrator for your organization.
- Select Generate Secret Key, and save the Secret Key, URL, and Parameters entries to a temporary location.
- Login to your Epic environment and paste the secret key into the CryptKey field, the URL into the CryptURL field, and the parameters into the PatientOpenURL field in the Epic configuration page within your FDI records for each Epic application you intend to use.
- Create a Device Integration for each Epic application you intend to use.
- Create an Appointment Type within Epic.
- Make sure access to the domain,
instant.webex.com,is enabled in your Epic configuration.
Integrate with Epic for Virtual Rounding (device integration)
To integrate Instant Connect with Epic for Virtual Rounding (device integration):
- Go to https://instant.webex.com and select the Epic Integration Page.
- Select Begin Integration with Epic and then login as Webex administrator for your organization.
- Select Generate Secret Key, and save the Secret Key, URL,
entries to a temporary location.
The Provider Parameters entry for this integration is:
visitID=%CSN%&userType=1&userID=%EPICUSERID;;; ; ;;NONE;%&flow={"id":"sip-no-knock","data":[{"uri":%EXTENSION;101336%}]}where%EXTENSION;101336%is the parameter which contains SIP address of the Webex Device that is in front of the patient. - Login to your Epic environment and paste the secret key into the CryptKey field, the URL into the CryptURL field, and the parameters into the PatientOpenURL field in the Epic configuration page within your FDI records for each Epic application you intend to use. You’ll only need to configure the Provider Record in this case.
- Create a Device Integration for each Epic application you intend to use.
- Create an Appointment Type within Epic.
- Make sure access to the domain,
instant.webex.com,is enabled in your Epic configuration. - A Webex administrator from your customer organization needs to set up Webex Devices in Control Hub to work with this flow. See Configure Virtual Rounding.
- Most new Webex devices also support Far End Camera Control with this workflow. Based on your devices and your Room OS version, some configurations might need to be updated in Control Hub. See Control remote cameras with Instant Connect.
Integrate other systems with Instant Connect
To integrate Instant Connect with other systems:
- Go to https://instant.webex.com.
- Select Begin Integration and then login as Webex administrator for your organization.
- Select Activate Instant Connect.
- Go to this Webex Developer Portal link and follow the steps to integrate Webex Instant Connect
with your EHR or any other clinical healthcare system. You’ll need to add
verticalType=”gen”(for generic) in the API for non-healthcare workflows. The default vertical ishc(healthcare). - Once complete, your customers can leverage Webex Instant Connect links constructed by the endpoint in any way they desire.
- Make sure access to the domain,
instant.webex.com,is enabled to avoid firewall issues.
Integrate other systems with the Instant Connect device integration workflow
To integrate other systems with the Instant Connect device integration workflow:
- Go to https://instant.webex.com.
- Select Begin Integration and then login as Webex administrator for your organization.
- Select Activate Instant Connect.
- Go to this Webex Developer Portal link and follow the steps to integrate Webex Instant Connect with your EHR or any other clinical healthcare system.
- Follow the section Complete Sample JSON Request Payload Including Device
Support to understand parameters required for integrating Webex Device
with your workflow.
NOTE: You’ll need to add
verticalType=”gen”(for generic) in the API for non-healthcare workflows. The default vertical ishc(healthcare). - A Webex administrator from your customer organization needs to set up Webex Devices in Control Hub to work with this flow. See Configure Virtual Rounding.
- Most new Webex devices also support Far End Camera Control with this workflow. Based on your devices and your Room OS version, some configurations might need to be updated in Control Hub. See Control remote cameras with Instant Connect.
- Once complete, your customers can leverage Webex Instant Connect links constructed by the endpoint in any way they desire.
- Make sure access to the domain,
instant.webex.com,is enabled to avoid firewall issues.
Webex Instant Connect now allows administrators to add and edit contacts in the phone book. The contacts are then displayed in the Instant Connect phone book for Instant Connect users.
To add customized contacts to your Instant Connect phonebook:
- Login to your administrator account on https://instant.webex.com.
- Choose Feature customization in the left pane and, make sure Dialout
is enabled, and then enable Phonebook. Use Add Contact to add a new contact
and the pencil and trash icons to modify or remove existing contacts:
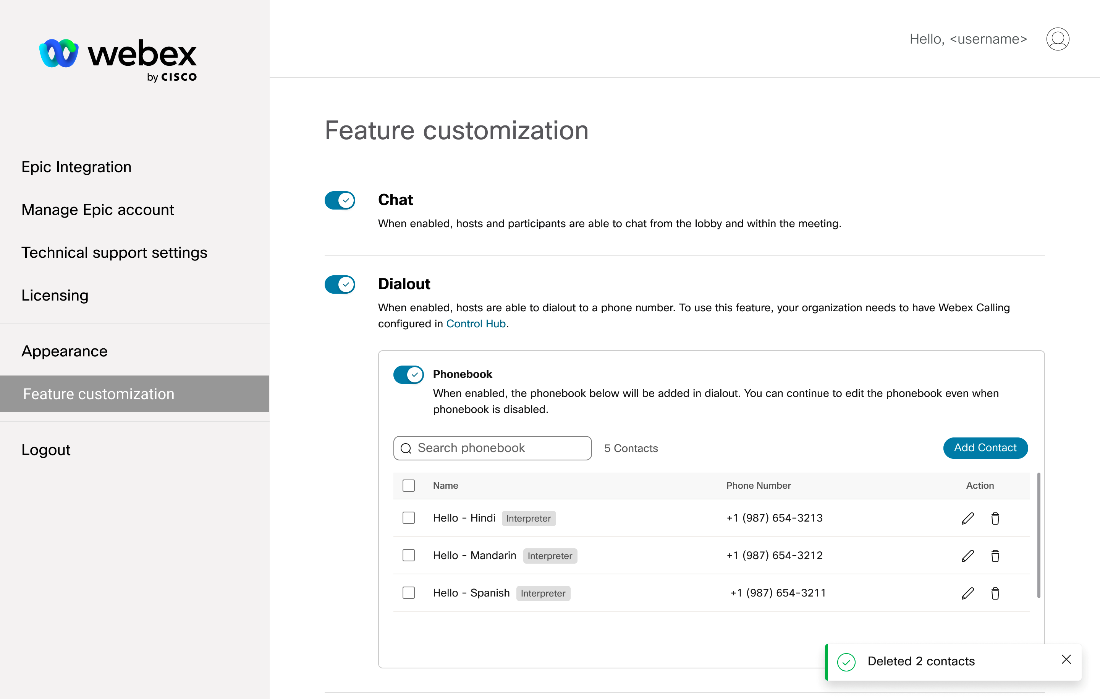
- The list of contacts will be displayed to users in the Instant Connect dialer:

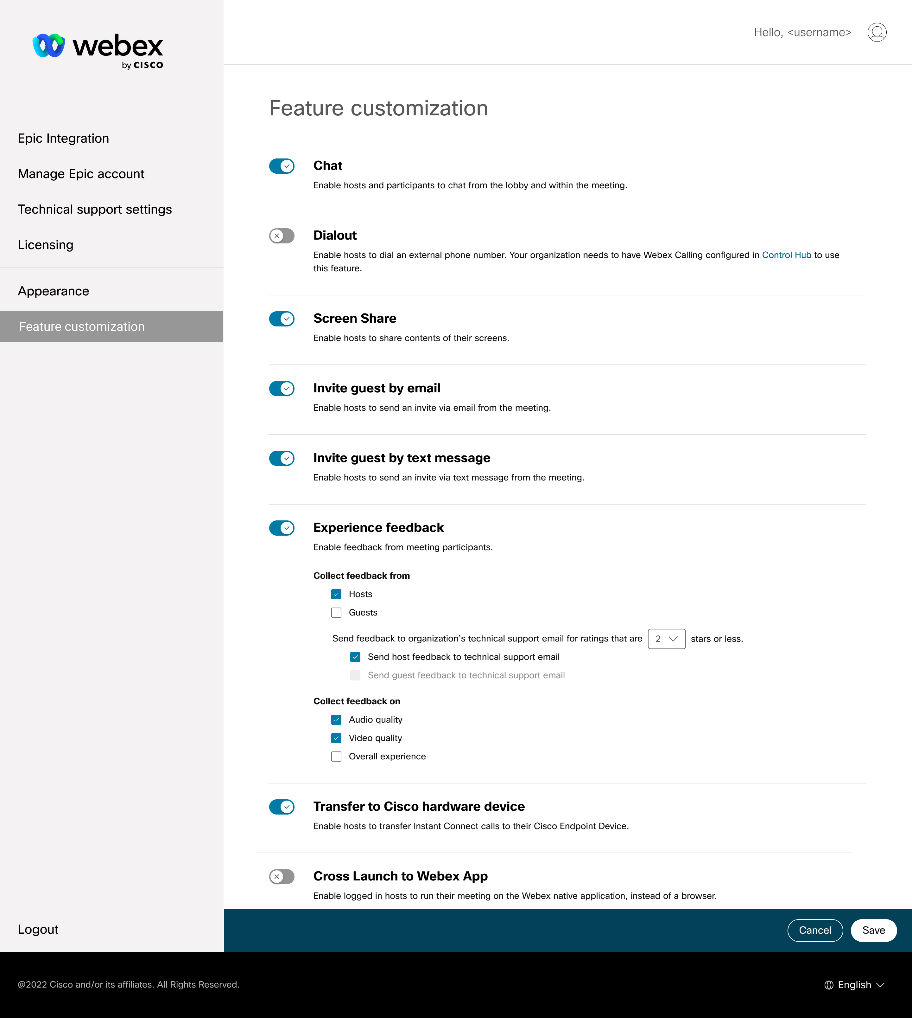
To improve the customer experience, Instant Connect offers an option to disable screen sharing.
To disable screen sharing:
- Login to your administrator account on https://instant.webex.com.
- Choose Feature customization in the left pane and enable or disable Screen
Share as you require: