- Home
- /
- Article

Thanks for your feedback.

Configure Hot Desking for phones on Control Hub
 In this article
 Feedback?
This Help article is for Cisco phones that register to Webex Calling as a workspace device. The supported models include Cisco Video Phone 8875, Cisco Desk Phone 9800 Series, and Cisco IP Phone 8800 Series with Multiplatform Firmware.
Hot Desking overview
Hot Desking allows your organization to make the best use of office space. People using shared workspaces can sign in and book a shared phone for their workday.
As an administrator, you must configure the Hot Desking feature for both devices and users to enable access from the phone. Before setting it up in Control Hub, we recommend reading the following information to understand how it works for users.
Phones with the Hot Desking feature enabled show a QR code and sign-in options on the screen. If a workspace phone is set up as a hot-desk-only device, it displays the workspace name without a directory number, allowing only emergency calls before sign-in. If the phone displays the workspace name with a directory number, users can make and receive calls without signing in but can't view their directory, calendar, or call history.
Depending on configurations, users can choose one of the following ways to sign in to a shared phone and access its full features.
-
Signing in with Webex account
The user scans the QR code on the phone screen with their mobile device and follows the prompts to sign in via either Webex App or a web browser on the mobile device.
-
Signing in with voice portal (Only supported on 9800 Series and 8875)
The user will be prompted to enter their voice mailbox ID and passcode for authentication. Depending on the user's and the device's locations, these mailbox numbers can be used for Hot Desking sign-in:
- If the user's home location is the same as the device's location, the user can
sign in using their
- Extension number
- Enterprise Significant Number (ESN)
- E.164 format telephone number (without the + prefix)
- National format telephone number
- If the user and the device belong to different locations, the user can sign in
using their
- Enterprise Significant Number (ESN)
- E.164 format telephone number (without the + prefix)
- Extension number — works only if the "Allow extension dialing between locations" policy for the organization is enabled and the extension is unique across all locations.
- National format telephone number — works if both locations use the same country code.
Depending on the phone model, the user can begin the sign-in process in the following ways:
 Press the Sign in softkey or dial
*30on the phone. Tap Sign in via voice portal or dial
*30. - If the user's home location is the same as the device's location, the user can
sign in using their
After the user signs in and books the device, the phone is reprovisioned with their own directory number. If configured, the user's Webex calendar and call history also load onto the phone.
When the booking duration ends, the user is automatically signed out and the phone is provisioned back to the workspace device for others to book. However, the user can also end the booking earlier by manually signing out via the phone or through the mobile or desktop version of Webex App. After sign-out, all user information will be removed from the phone.
If there's an active call on the phone when the booking duration expires, the auto sign-out won't happen until the call ends. Remind your users to end all calls before they leave. They can't sign out via Webex App when the phone is on a call.
Enable Hot Desking for a workspace phone
If your phone is added as a hot-desk-only device, the Hot Desking feature is enabled by default. You can't disable it unless the workspace's calling service is changed from hot desk only.
Follow these steps to enable the Hot Desking feature on a workspace phone:
Before you begin
Your phone has registered to Webex Calling as a shared device in a workspace. See Add a phone to a new workspace for the instructions.
| 1 |
From the customer view in Control Hub, go to . |
| 2 |
Locate your phone and click it to open its settings. |
| 3 |
On the Scheduling tab, choose Hot desking as the scheduling option. |
| 4 |
Click Save. |
Enable Hot Desking sign-in via voice portal
To enable sign-in to Hot Desking devices using the voice portal, this feature must be enabled for both the device’s location and the user. The location setting ensures that phones in that location support sign-in via voice portal, while the user setting allows administrators to restrict access for specific users. By default, the feature is enabled in both the location-level and user-level configurations.
Keep the following notes in mind while configuring the Hot Desking feature:
- The voice portal in the device's location must have a phone number or extension configured.
- If the organization has a default voicemail passcode set, voice portal sign-in will be blocked.
- Hot Desking voice portal sign-in supports logging in with a Hot Desk user's voice mailbox. Logging in using mailboxes for groups, workspaces, or virtual lines isn't supported.
- Before signing in to the phone using the voice portal, users must change their voicemail PIN from the default.
- If a user enters the wrong PIN three times when signing in to the voice portal, the mailbox will be locked. To unlock it, reset the voicemail PIN.
| 1 |
Follow these steps to enable the voice portal sign-in option:
|
| 2 |
Click Save. |
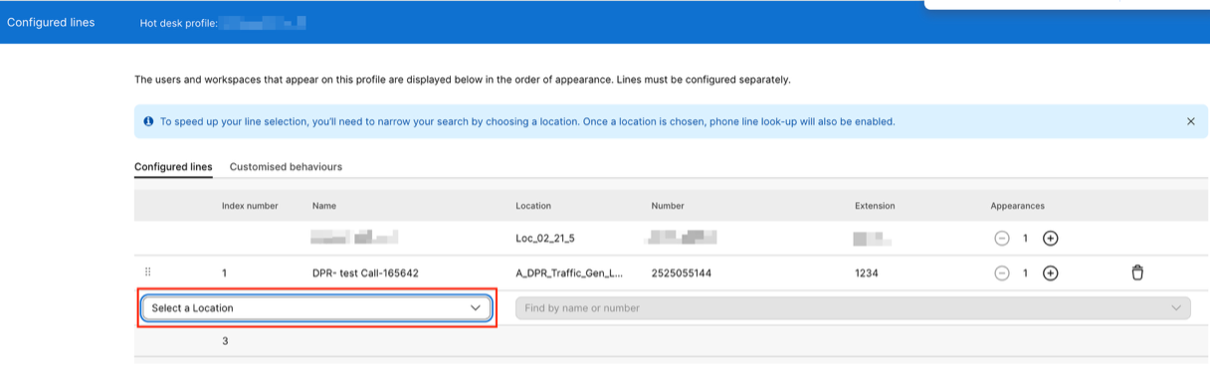
Configure phone lines for a Hot Desking user
By default, the user's primary line is used for Hot Desking. You can add more lines for the user to use on a shared phone.
| 1 |
From the customer view in Control Hub, go to , and then select the user. |
| 2 |
In the Between-user permissions section on the Calling tab, select Hot Desking. |
| 3 |
Click Configure lines. |
| 4 |
Click By default, the user's primary line takes Line 1. If you need to set both Line 1 and Line 2 as primary lines, click
 on Line 1. on Line 1. |
| 5 |
Repeat Step 4 to add more lines. |
| 6 |
Click Save. For large organizations, the administrator must select a location before configuring additional calling lines. Click For a regular organization, the location filter is not available, and the administrator can select a line. |
Manage user bookings
If a workspace phone has been booked, you can change or end the booking in Control Hub.
| 1 |
From the customer view in Control Hub, go to , and then select your workspace. |
| 2 |
In the Real-Time Utilization Metrics section, edit the booking range or end the session as needed.
|
 next to the booking time and click


