
Thanks for your feedback.
Integrate Webex Contact Center with Microsoft Dynamics 365 (Version 1—Legacy)
 Feedback?
Prerequisites
The minimum supported size for the softphone interface is 500px. Any value lower than 500px may result in display or functionality issues.
Before you integrate Webex Contact Center with the Microsoft Dynamics 365 CRM console, ensure that you have the following:
-
Access to Webex Contact Center.
-
Administrator access to the Control Hub at https://admin.webex.com and the Webex Contact Center Management Portal. The URL for the Management Portal is specific to your region.
-
An agent with access to the Desktop. The URL for the Desktop is specific to your region.
-
North America: https://desktop.wxcc-us1.cisco.com
-
Singapore: https://desktop.wxcc-sg1.cisco.com
-
-
Agent access to the following domain that is added in the Content Security Policy Allowed List:
-
*.dynamics.com
For more information on how to define the allowed list, see the Security Settings for Webex Contact Center article.
-
-
Webex Contact Center for Microsoft Dynamics uses the Microsoft Channel Integration framework to integrate with Agent desktop. The system requirements for Dynamics 365 Channel Integration Framework are:
-
Dynamics 365 (online) 9.1 and later
We don't support integrations with Microsoft Dynamics on-premise versions.
-
-
A Microsoft Dynamics 365 sales instance. For more information, see Start a Dynamics 356 Sales Trial.
-
Access to the Desktop Layout (JSON) for Microsoft Dynamics at https://github.com/CiscoDevNet/webex-contact-center-crm-integrations/tree/main/MS%20Dynamics.
Digital channels such as chat and email are not supported with CRM connectors. This applies to all CRM integrations using these connectors. Please plan your deployment and customer engagement workflows accordingly.
To integrate Webex Contact Center with the Microsoft Dynamics 365 console, complete the following tasks:
| 1 |
Go to the Dynamics 365 Sales page at: https://dynamics.microsoft.com/en-us/dynamics-365-free-trial/. |
| 2 |
Click Try for free. |
| 3 |
Follow the on-screen guidance to enter your email and contact information. |
| 4 |
Set up your account and click the email to start your free trial. |
| 5 |
Log in to the Power Platform admin center with your trial instance at: https://admin.powerplatform.microsoft.com/environments/ |
| 6 |
In the site map, select Environments. |
| 7 |
Select the new environment that you created and make a note of the URL in the Environment URL field. You use this URL when you configure the Dynamics 365 Desktop layout on Webex Contact Center. |
| 1 |
Sign in to Dynamics 365. |
| 2 |
Click the gear icon at the upper right of the window, and select Advanced Settings. |
| 3 |
On the Settings page, click Microsoft AppSource. |
| 4 |
In the Search field, search for and select Dynamics 365 Channel Integration Framework. |
| 5 |
Click Get it now. |
| 6 |
Sign in to Microsoft AppSource with your *.onmicrosoft.com account. |
| 7 |
From the Select an environment field, choose Sales Trial. |
| 8 |
Accept the Legal Terms and Privacy Statements. |
| 9 |
Click Agree. |
Before you begin
| 1 |
Sign in to Dynamics 365. |
| 2 |
Click the gear icon at the upper right of the window, and select Advanced Settings. |
| 3 |
On the Settings page, click Microsoft AppSource. |
| 4 |
In the Search field, search for and select Cisco Webex Contact Center for Microsoft Dynamics. |
| 5 |
Click Get it now. |
| 6 |
Sign in to Microsoft AppSource with your *.onmicrosoft.com account. |
| 7 |
Accept the Legal Terms and Privacy Statement. |
| 8 |
Click Agree. The installation takes some time to complete.
|
| 9 |
To check the status of the installation, log in to the Power Platform admin center at: https://admin.powerplatform.microsoft.com/environments/ |
| 10 |
Select . |
| 11 |
On the Sales Trial page, go to the Resources pane and click Dynamics 365 Apps. |
| 12 |
Ensure that the status of the following applications is Installed:
|
| 1 |
On the Dynamics 365 home page, from the Dynamics 365 drop-down list, select Channel Integration Framework. The Active Channel Providers page lists the preconfigured Webex Contact Center channel, if any.
|
| 2 |
Click the instance of the Webex Contact Center channel, if any. |
| 3 |
On the Channel Provider Webex Contact Center page, click Delete and confirm the deletion. |
| 4 |
On the Active Channel Providers page, click New and enter the following information: Use the values shown in the list. If the list does not specify a value, leave the field blank. Leave the Custom Parameters field blank.
|
| 5 |
From the Select Unified Interface Apps for the Channel drop-down list, select Customer Service Hub. The connector application only supports the Unified Interface Apps. |
| 6 |
From the Select the Roles for the Channel drop-down list, select the applicable role. |
| 7 |
Click Save. The Webex Contact Center page appears.
|
| 8 |
Click the URL in the Channel URL field to validate the configuration. |
You can download the Desktop Layout JSON file for Microsoft Dynamics 365 from https://github.com/CiscoDevNet/webex-contact-center-crm-integrations/tree/main/MS%20Dynamics.
For more information about the Webex Contact Center Management Portal Desktop Layout, see the Provisioning chapter of the Cisco Webex Contact Center Setup and Administration Guide.
| 1 |
Open the Microsoft Dynamics Desktop Layout JSON file and enter an Agent DN in the agentDN field. |
| 2 |
In the hostName field, enter the Dynamics 365 Environment URL. |
| 3 |
Save your changes. |
| 4 |
Go to the Webex Contact Center Management Portal. |
| 5 |
From the Management Portal navigation bar, choose |
| 6 |
Click New Layout and enter the details for the desktop layout. |
| 7 |
Upload the Microsoft Dynamics Desktop Layout JSON file. |
| 8 |
Click Save to save the configuration. You can now start the Webex Contact Center Desktop within the Dynamics 365 CRM console. |
- We support signing into Agent Desktop using WebRTC for Salesforce (SFDC) and Microsoft Dynamics (MS Dynamics) Connectors only.
- Currently, this feature is applicable to agents only.
- Currently, the CRM connector app does not support opening multiple tabs. Opening a case in a new tab may result in Multi Sign-in alerts on the WxCC Agent Desktop or cause unpredictable behavior for agents.
Before You Make Outdial Calls
Before you make outdial calls, ensure that you do the following:
-
Create the outdial entry point and set up an outdial entry point strategy.
-
Enable outdial ANI for the Agent Profile.
-
Set the outdial ANI to a Dial Number-to-Entry Point mapping.
For more information, see the Provisioning chapter of the Cisco Webex Contact Center Setup and Administration Guide.
For information on how to use Desktop, see the Cisco Webex Contact Center Agent Desktop User Guide.
| 1 |
Sign in to Dynamics 365. |
| 2 |
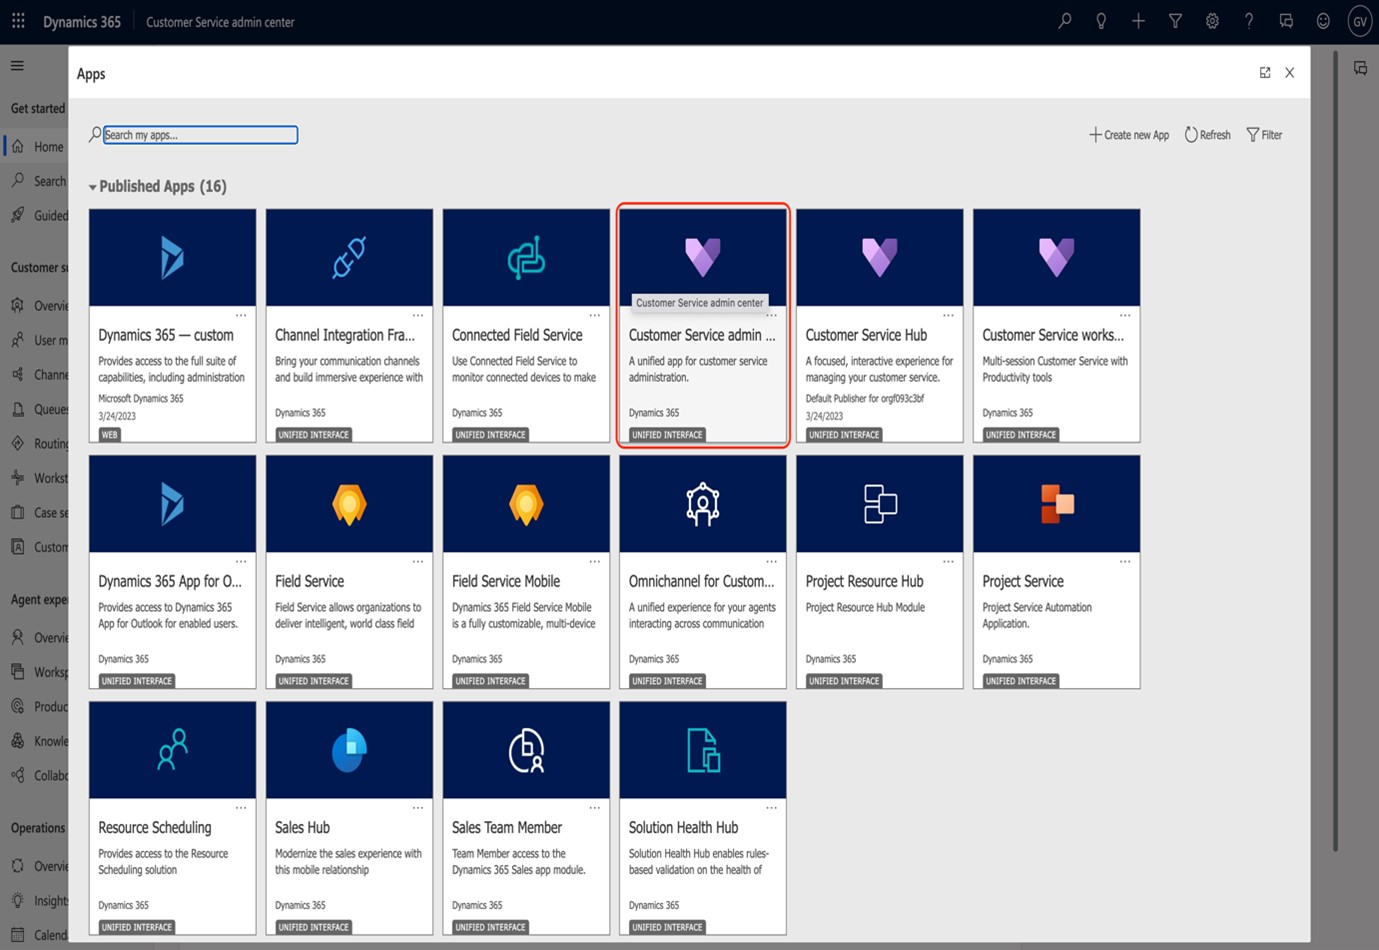
On the Dynamics 365 page, select the App selection link at the upper left of the page. |
| 3 |
In the Published Apps area, select Customer Service Hub. |
| 4 |
On the Webex Contact Center widget, click Sign In. The integrated Webex Contact Center
Desktop opens on the right side of the Microsoft Dynamics 365 console.
|
| 1 |
On the Dynamics 365 page, from the Dynamics 365 drop-down list, select the Customer Service Hub application. |
| 2 |
Sign in to the Webex Contact Center Desktop application. |
| 3 |
On the Agent Desktop page, change the status to Available to receive calls. |
| 1 |
On the Dynamics 365 page, from the Dynamics 365 drop-down list, select the Customer Service Hub application. |
| 2 |
Sign in to the Webex Contact Center Desktop application. |
| 3 |
On the left navigation pane, click Contacts to display the list of contacts. |
| 4 |
Select the contact that you want to call. |
| 5 |
Click the Dialer icon in the Mobile Phone or the Business Phone field.
Desktop places the call to the customer and changes the agent status to Idle.
|
This article describes the configuration and customization of Webex Contact Center MS Dynamics Agent Desktop application. This article helps customize and automate different workflows for the agents while they handle both inbound and outbound calls through Webex Contact Center Agent Desktop application.
The Webex Contact Center MS Dynamics Agent Desktop application supports both versions of Channel Integration Framework (CIF v1 and CIF v2). You must install the Channel Integration Framework on the MS Dynamics instance.
You must download and install the latest version of the Webex Contact Center MS Dynamics connector application from Microsoft Marketplace to support the CIF v1 and v2 versions.
Webex Contact Center MS Dynamics Agent Desktop connector application works only with Dynamics 365 (online) 9.1 and later. CIF v2 version works only with multisession apps. For multisession capabilities, the MS Dynamics instance must use a multisession app such as the Customer Service workspace.
The channel integration framework configuration page is used for embedding the Webex Contact Center Agent Desktop Application inside the MS Dynamics. The following section details the configuration of both channel integration framework version 1 and version 2.
The channel integration framework configuration has 3 sections:
-
Channel Provider Configuration
-
Select Unified Interface Apps for the Channel
-
Select the Roles for the Channel
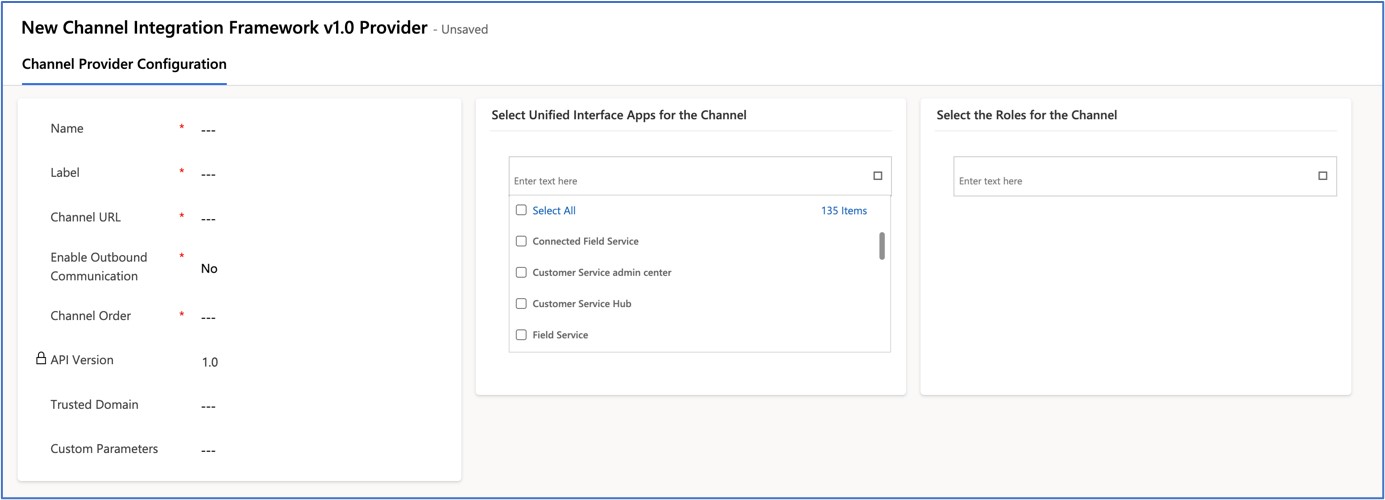
This section captures the general information about channel. In this case, it is Webex Contact Center Agent Desktop.
|
Field name |
Description |
|---|---|
|
Name |
Enter a unique name to identify the channel. For example, |
|
Label |
A widget name. For example, |
|
Channel URL |
Set a Webex Contact Center Agent Desktop URL based on the data center accessing the desktop. Refer the data center and desktop URL mappings table. |
|
Enable Outbound Communication |
Yes or No |
|
Channel Order |
Enter 1 to enable the channel |
|
API Version |
Enter 1 for CIF v1 |
|
Trusted Domain |
No value |
|
Custom Parameters |
No value |
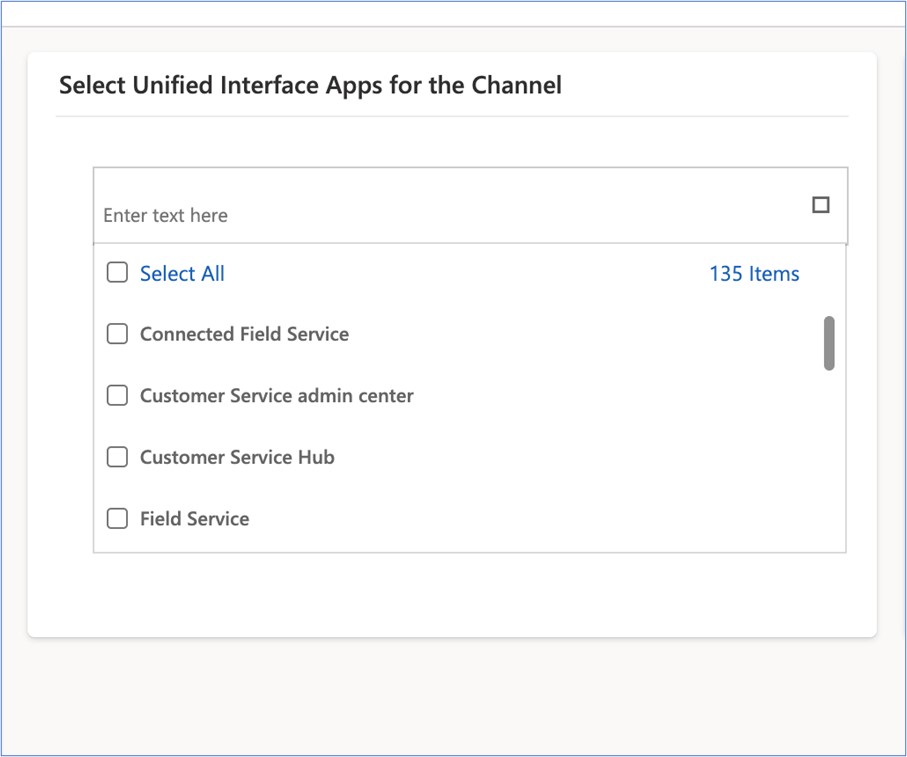
Select few apps or all from the list of items. When the unified interface app initializes, the Webex Contact Center Agent Desktop application loads into the unified interface app as widget.
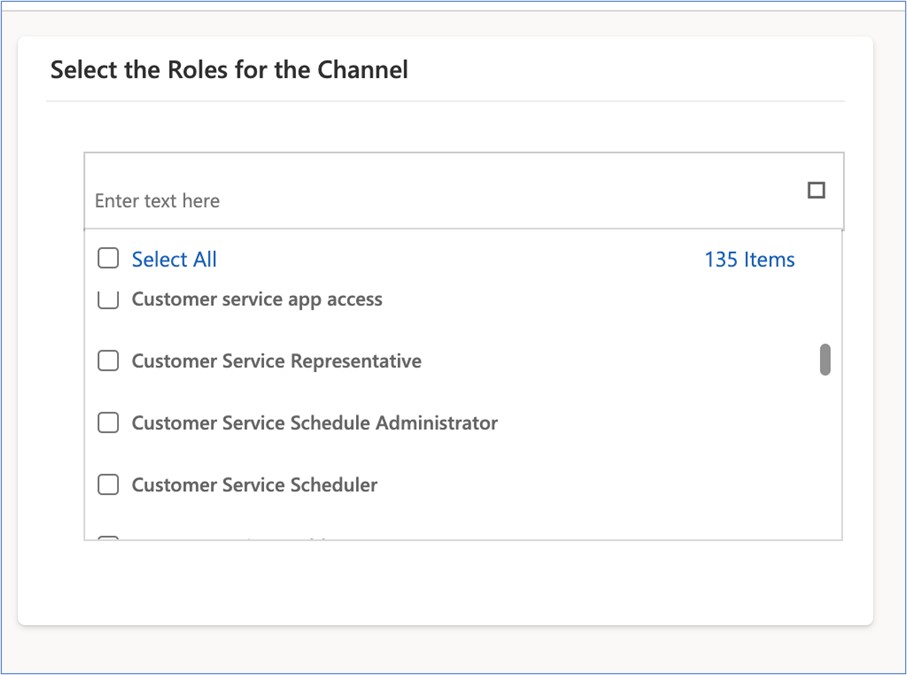
Associate the agent role who has access to the Unified Interface app. This configuration sets the user-level access to the Webex Contact Center Agent Desktop Application inside MS Dynamics.
The CIF v2 configuration is a two-step process. In the first step, Microsoft Dynamics Admin must create a custom channel through the Customer Service Admin Center App. In second step, the MS Dynamics Admin must associate the newly created channel to the custom channel section of the agent profile.
Configure the general information about the channel in Channel Integration Framework v2 Provider page. The CIF v2 works only with multisession apps such as Customer Service workspace.
Create channel configuration in customer service admin center-
Open the Customer Service admin center app from MS Dynamics apps listing page.
-
Navigate to .
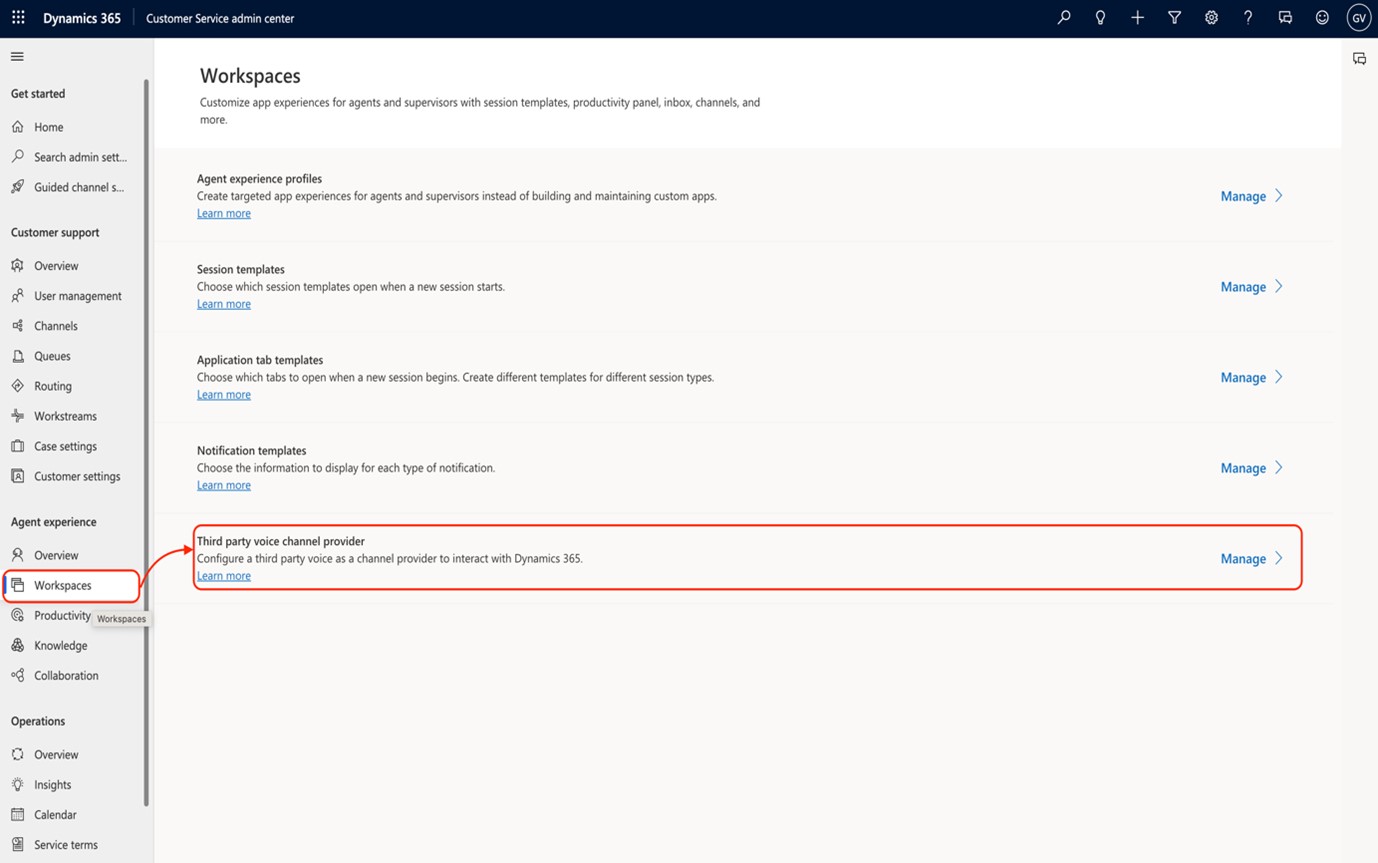
-
Click New to open the channel configuration page.
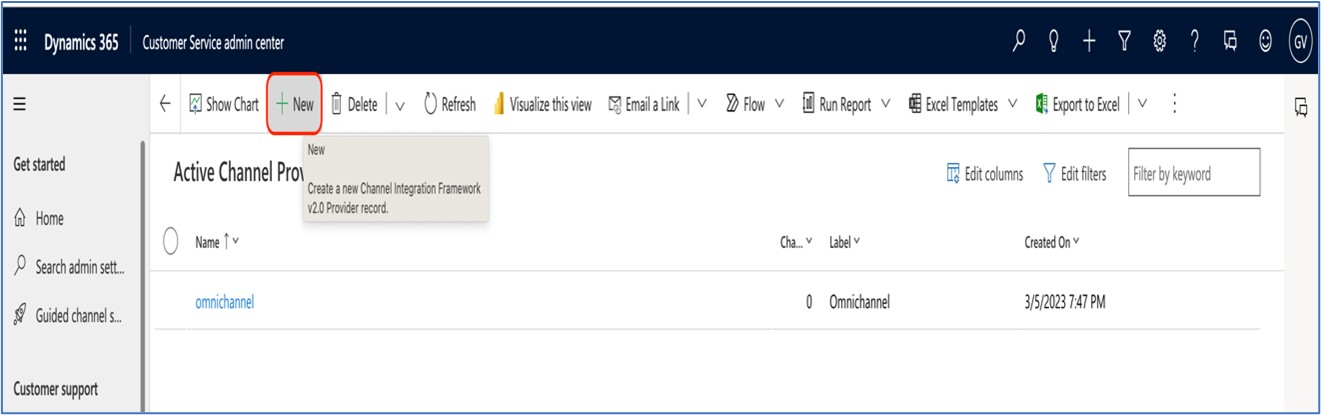
-
Enter the General information about the channel provider.
General tab details
The following table gives the general information about custom voice channel provider for CIF v2.
|
Field name |
Description |
|---|---|
|
Name |
Name of the channel. For example, wxccdesktop |
|
Unique Name | Unique name of the channel. For example, msdync_wxccdesktop |
|
Label |
A widget name. For example, WebexCC Desktop |
|
Channel URL |
This is the channel URL. https://<hostname of dynamic crm> /WebResources/cjp_WebexccDesktopV1 |
|
Enable Outbound Communication |
Value is Yes or No |
|
Channel Order |
Enter 1 to enable the channel |
|
API Version |
Enter 2 for CIF v2 |
|
Trusted Domain |
No value |
|
Custom Parameters |
WxCCDesktopUrl: "https://desktop.wxcc-us1.cisco.com/", "SessionTemplateName":"<session template name>"}
|
|
Enable Analytics |
Value is Yes or No |
Webex Contact Center Agent Desktop URLs
|
Desktop URL |
Data Center |
|---|---|
|
North America | |
|
United Kingdom | |
|
Europe | |
|
APJC |
The custom desktop layout configuration defines the properties to manage feature flags, customize the screen pop search, configure click to dial, and manage phone call activity record. You can download the latest custom desktop layout for Webex Contact Center MS Dynamics Agent Desktop Application from the following link https://github.com/CiscoDevNet/webex-contact-center-crm-integrations/tree/main/MS%20Dynamics.
General informationThe Contact Center Administrator needs to update the two properties that capture the general information of the Webex Contact Center MS Dynamics Agent Desktop application.
|
Property name |
Description |
|---|---|
|
hostName |
This is the host name of the customer’s MS Dynamics instance. Set the property value properly to initialize the Webex Contact Center MS Dynamics Agent Desktop application. |
|
desktopWidth |
To set the width of the desktop widget inside the MS Dynamics CRM. Default value is 500. |
The default search parameter for the screen pop search is ANI or phone number of the caller. At times, even when the service provider sends the phone number in E.164 format (with the country code), the customer phone number is stored without the country code in the CRM. Therefore, it leads to screen pop search failure.
The following properties help to remove the country code from the ANI or phone number of the inbound call and are used for the screen pop search.
|
Property name |
Description |
|---|---|
|
inboundANIPrefixToBeRemoved |
Feature flag to remove ANI or phone number prefix. Value is true or false. |
|
inboundANIPrefix |
To remove the country code. For example, +1 |
You can perform screen pop search based on ANI or phone number of the caller in Webex Contact Center MS Dynamics Agent Desktop application. The default search parameter for the screen pop search is ANI or phone number of the caller.
You can customize the screen pop search parameter based on business requirements. There is a feature flag in the custom desktop layout to enable this feature. There are additional properties to define the screen pop search parameter, crm entity name and crm entity field name.
|
Property name |
Description |
|---|---|
|
isAdvancedScreenpopEnabled |
Feature flag to enable the advanced screen pop search. Set the value to true to enable this feature. By default, this feature is disabled. |
|
cadVariableName |
The name of the CAD variable that holds the screen pop search value. For example, if the screen pop search is done based on customer’s name, the CAD variable holds the customer’s name and is set to Webex Contact Center IVR flow. |
|
crmEntityFieldName |
The name of the CRM entity field on which the screen pop search is performed. For example, if the screen pop search is performed on the customer’s name field of the contact record, it is customer name. |
|
crmEntityName |
The name of the CRM entity that is used as screen pop search record. For example, if the screen pop search is performed on the CRM contact entity record, the crmEntityName is the contact. |
Configure phone call activity record creation
Create a phone call activity record in MS Dynamics CRM automatically for both inbound and outbound calls. The administrator can control the phone call activity record creation using the desktop layout feature property.
|
Property name |
Description |
|---|---|
|
phoneCallActivityRecordConfig |
Property value is JSON object and it has mainly three properties that allow the administrator to control the phone call activity record creation. Following is the JSON object. |
Create phone call activity record for JSON object
{"createActivityRecordForInboundCall":true,"createActivityRecordForOutboundCall":true,"openActivityRecordAutomatically":false}
-
“createActivityRecordForInboundCall” allows the administrator to control the phone call activity record creation for inbound calls. The possible value for this property is true or false. If the administrator sets the value as false, the system doesn't create the phone call activity record for the inbound call.
-
“createActivityRecordForOutboundCall” allows the administrator to control the phone call activity record creation for outbound calls. The possible value for this property is true or false. If the administrator sets the value as false, the system doesn't create the phone call activity record for the outbound call.
-
“openActivityRecordAutomatically” allows the administrator to control whether the phone call activity record opens automatically after the creation of record. If this property is enabled, the phone call activity opens for outbound calls at the beginning of the call and for inbound calls when the agent goes to wrap up state.
Configure click to dial
The click to dial feature of the Webex Contact Center MS Dynamics Agent Desktop Application allows the agent to initiate outdial calls directly from the MS Dynamics CRM application. You can customize the outdial ANI for outdial calls initiated from the MS Dynamics CRM.
|
Property name |
Description |
|---|---|
|
outDialAni |
The administrator can set outdial ANI for the click-to-dial calls initiated from the MS Dynamics CRM. If the outdial ANI value isn’t set, then the application uses the first outdial ANI from the list that is configured for the agent in Webex Contact Center Management Portal. |
|
outDialEp |
The store object property to fetch outdial entry point. It is a static property and requires no change. |
Use the channelIntegrationFrameWorkVersion2Enabled property for enabling the Channel Integration Framework version v2.
|
Property name |
Description |
|---|---|
|
channelIntegrationFrameWorkVersion2Enabled |
This feature is disabled by default. To enable the feature CIF v2, set the property value to true. |
Use the isWidgetDisplayEnabled property to enable the Actions widget. You must not modify this property's value in the custom desktop layout's headless section. The property is always set to false in the custom desktop layout's headless section. You should update the property's value only in the panel section of the custom desktop layout.
Manage Activity RecordIn Microsoft Dynamics CRM, a phone call activity record is automatically generated for both inbound and outbound calls. The custom desktop layout includes a configuration section that helps to map the associated call data to the corresponding fields of the phone call activity record in Microsoft Dynamics.
|
Property name |
Description |
|---|---|
|
createActivityRecordConfig |
Property value is JSON object and it has mainly four values that help to map the call associated data to the Microsoft Dynamics phone call activity record fields. Following are the property values: |
-
“CadFieldName” is the CAD variable that holds the call information to be posted into Microsoft Dynamics.
-
“msDynamicsFieldName” is the field where you can update the data and the value will be updated in the CadFieldName.
-
“isDefaultValueEnabled” is the property that is used to decide whether to use the default value or any other constant to update the msDynamicsFieldName property. If this property is set to true, the value in the defaultFieldValue property is used to update the msDynamicsFieldName property.
-
“defaultFieldValue” holds the default value that will be used to update the msDynamicsFieldName if the isDefaultValueEnabled property is set to true.
For example:
[{"CadFieldName":"callNotes","msDynamicsFieldName":"description","isDefaultValueEnabled":false,"defaultFieldValue":""},
{"CadFieldName":"directioncodeValue","msDynamicsFieldName":"directioncode","isDefaultValueEnabled":false,"defaultFieldValue":""}]
Where the callNotes is the associated call data of the Webex Contact Center field and the description is the Microsoft Dynamics phone call activity record field.
Create CasesYou can create a case on demand during the call. The create or view case button in the Microsoft Dynamics Actions widget helps you to open the case object in edit mode anytime during the interaction.
The Actions widget configuration has the following properties:
{"actionsWidgetConfig": {"isLiveNotesEnabled": true, "isCreateCaseEnabled": true}
The isCreateCaseEnabled property is used to enable or disable the create case object.
In addition, the createCaseRecordConfig property is used to bind the CAD variable to the Microsoft Dynamics field. The mapping is an array of JSON objects and each JSON has four properties.
{"CadFieldName": "contactId", "msDynamicsFieldName": "customerid", "isDefaultValueEnabled": false, "defaultFieldValue": ""}
-
“CadFieldName” is the CAD variable that holds the call information to be posted into Microsoft Dynamics.
-
“msDynamicsFieldName” is the field where you can update the data and the value will be updated in the CadFieldName.
-
“isDefaultValueEnabled” is the property that is used to decide whether to use the default value or any other constant to update the msDynamicsFieldName property. If this property is set to true, the value in the defaultFieldValue property is used to update the msDynamicsFieldName property.
-
“defaultFieldValue” holds the default value that will be used to update the msDynamicsFieldName if the isDefaultValueEnabled property is set to true.
For example:
[{"CadFieldName":"contactId","msDynamicsFieldName":"customerid","isDefaultValueEnabled":false,"defaultFieldValue":""},
{"CadFieldName":"ivrDescription","msDynamicsFieldName":"title","isDefaultValueEnabled":true,"defaultFieldValue":"case created by webexcc"}]
Where the contactId is the selected contact for the call and the customerid is the Microsoft Dynamics case record field.
Configure Actions WidgetThe actions widget is enabled by default, however, you can enable or disable the create case and live notes features from the custom desktop layout.
|
Property name |
Description |
|---|---|
|
actionsWidgetConfig |
Helps to disable or enable the create case and live notes features from the custom desktop layout. {"isLiveNotesEnabled":true,"isCreateCaseEnabled":true} Where the isCreateCaseEnabled property is used to enable or disable the create case object and the isLiveNotesEnabled property is used to enable or disable the live notes feature. |
If the customer information is not available in the screen pop search, a new contact form appears, pre-filled with the caller's details such as their phone number and other data associated with the call. These details are captured from the customer through IVR. From the custom desktop layout, you can map this Webex Contact Center call-associated data to the corresponding fields on the Microsoft Dynamics form.
|
Property name |
Description |
|---|---|
|
openContactFormWithPrefilledDataConfig |
To configure the mapping of the call-associated data and Microsoft Dynamics contact form. This mapping helps to pass the call-associated data into the Microsoft Dynamics contact form. |
-
“CadFieldName” is the CAD variable that holds the call information to be posted into Microsoft Dynamics.
-
“msDynamicsFieldName” is the field where you can update the data and the value will be updated in the CadFieldName.
-
“isDefaultValueEnabled” is the property that is used to decide whether to use the default value or any other constant to update the msDynamicsFieldName property. If this property is set to true, the value in the defaultFieldValue property is used to update the msDynamicsFieldName property.
-
“defaultFieldValue” holds the default value that will be used to update the msDynamicsFieldName if the isDefaultValueEnabled property is set to true.
For example:
[{"CadFieldName":"phoneNumber","msDynamicsFieldName":"telephone1","isDefaultValueEnabled":false,"defaultFieldValue":""}] Where the phoneNumber is the associated call data of the Webex Contact Center field and the telephone1 is the Microsoft Dynamics contact record field.
The CRM connector operates based on the version of the widget specified in the desktop layout JSON. It is extremely important to ensure the widget version within the Desktop Layout is kept updated.
Administrators are expected to ensure all desktop layouts for this CRM connector use this widget version. If the layout is not updated to use the latest version, functionality will no longer be supported and may cease to work correctly.
- Last MSDynamics update—MSDynamics_Desktop_0.1.0_v1.5.3.json. As of November 2024, package version is 1.0.0.7


