- Home
- /
- Article

Thanks for your feedback.

E911 Emergency Calling in Webex for BroadWorks
 In this article
 Feedback?
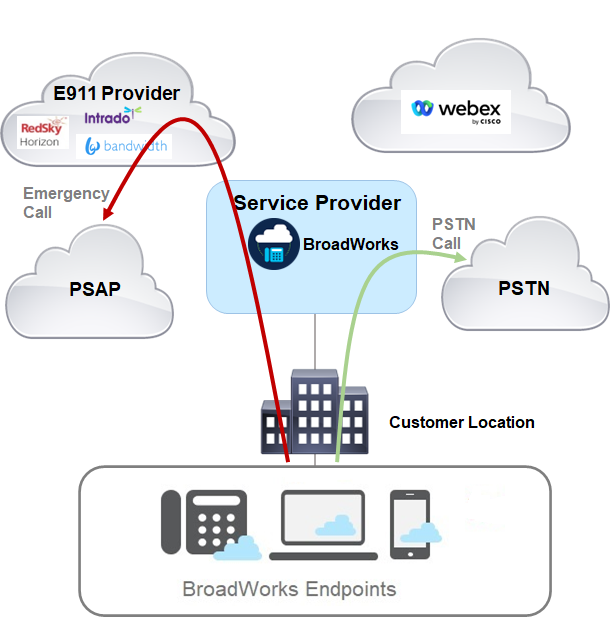
This integration provides E911 emergency services for Webex for Cisco BroadWorks users. When a user places an E911 emergency call, the E911 provider finds the user location and routes the call to the appropriate Public Safety Answering Point (PSAP). A dispatcher can send emergency services to the user location to provide aid, if it is needed.
E911 Emergency Calling in Webex for BroadWorks
This integration provides compliance to Ray Baum Act Phase II. Full compliance for all devices, including mobile devices such as tablets, is provided by January 2022.
E911 Providers
This article can be used to configure E911 emergency calling using the following E911 providers:
-
9Line/Bandwidth
-
Intrado
-
RedSky
How it Works
E911 calling services provide \ user location services and a network that routes emergency calls to Public Safety Answering Points (PSAPs) around the US, its territories, and Canada. E911 services can be enabled on a per-location basis. After a location is enabled, emergency calls (911 for emergency calls and 933 for test calls) placed from phones and clients assigned to that location use the E911 calling service, which does the following:
-
FIND—The E911 calling service finds the user location. Both the Webex App and desk phones send MAC or network information to the E911 calling service, which uses a company wiremap to determine the location. For Webex App users, if their location can't be determined, the user is prompted to enter location information, which is then submitted to the E911 calling service.
-
ROUTE—For 911 and 933 calls, the location information is added to the SIP header, which also identifies the user as an E911 calling user. The E911 service routes the call to the appropriate PSAP for the location.
-
NOTIFY—The E911 service sends notifications to the appropriate personnel (e.g., security or emergency services).
The E911 service handles the following tasks:
-
The E911 provider maintains the partner/customer provisioned database that maps an emergency call to a dispatchable location.
-
Based on the calling device's dispatchable location, the E911 provider directs emergency calls to the correct PSAP. The call includes location information so that the PSAP knows where to dispatch emergency personnel as well as the call-back number.
-
The E911 provider generates optional notifications to enterprise personnel.
-
For subscriptions with enhanced licenses, the E911 provider bridges enterprise personnel into emergency calls placed by enterprise users and provides pop notifications.
Location Detection
E911 calling services support two main types of location detection: HELD and non-HELD.
Dynamic location detection for non-fixed devices. These are devices that move within the premises (HELD-supported desk phones).
-
For HELD-capable desk phones, location detection is based on network discovery. Desk phone devices use a protocol called HTTP Enabled Location Delivery (HELD) to report their network environment information (LLDP enabled upstream switch, wireless access points (WAP) BSSID, IP address, or their MAC addresses) to the E911 HELD service.
-
For HELD+ capable Webex App on desktop, location detection is based on network discovery to report their network environment information (upstream LLDP enabled switch, wireless access points (WAP) BSSID, IP address, or upstream gateway default MAC address) to the E911 HELD+ service (Cisco Discovery Protocol (CDP) isn’t supported). If devices are connected through a phone pass-through port, LLDP information can't be accessed because LLDP packets from the switch stop at the phone.
Dynamic location detection for E911 service. These are HELD+ devices that go off-premises.
-
For HELD+ capable Webex App on desktop and mobile platforms (tablets) that don’t have a cellular connection, location detection is based on network discovery which includes the wireless access points (WAP) BSSID, IP address, upstream gateway default MAC address. When the Webex App determines the device is in a known location, the user's location is updated automatically. The Webex App sends any of the available network identifiers listed above to the E911 provider. If the E911 provider determines the device is in a known location, the user's location is updated automatically. On sign-in, if the Webex App detects that the device has moved to an unrecognized location, the user is prompted to update a new address. However, if the user is already signed in when an unrecognized location is detected, the user isn’t prompted and the red X is shown in the Webex App footer. The user can click the red X to update their location (assuming
%EMERGENCY_REDSKY_USER_LOCATION_PROMPTING_WXT%configuration tag is set to default). The E911 provider validates and stores the new location in its database.
All VPN and virtual network interfaces on Webex desktop (Windows and MacOS) should be ignored. For Windows, the Webex App uses MSFT_NetAdapter - the "boolean Virtual" parameter is used to filter out VPN and Virtual interfaces.
Fixed device location detection. These are non-HELD devices that don't move.
-
Telephone Number Based Location Detection: For non-HELD capable devices, which includes mobile devices without cellular access, softphone clients, Cisco ATAs, Cisco DECT systems, and any non-Cisco customer premises equipment (CPE), location determination is based on the Caller ID asserted in the test or emergency call.
PSTN and E911 Locations-Enabled Routing
BroadWorks routes emergency calls to the E911 service, so that the call can be sent to the appropriate PSAP, instead of the PSTN. This route gets used for all endpoints that place emergency calls from the E911-enabled location. This includes hard phones and portable endpoints (such as mobile phones, tablets, and laptops).
One exception to this rule is for cellular-based phone clients. These clients send emergency calls directly to the Public Land Mobile Network (PLMN, the mobile equivalent of the PSTN) using the built-in dialer on the phone.
Requirements for E911 Integration
|
Component |
Requirement |
|---|---|
|
E911 Calling Provider |
The partner must enter an agreement with an E911 calling provider to route emergency calls using Cisco-provided implementation for Webex App desktop and tablet clientsand MPP phones (HELD). E911 Provider Configuration The partner must configure the E911 provider portal to provide location services for the following types of devices:
Support Documents
Intrado Support Documents
9Line/Bandwith Support Documents
|
|
BroadWorks |
To use this feature, you must have installed the following BroadWorks patches. Install only the patches that apply to your BroadWorks release:
|
|
Phones |
MPP phones use downloaded configuration parameters to access the E911 Location Information Server (LIS). They receive a token that gets passed forward over the peering connection to E911 when a E911-enabled user dials 911 or 933. |
|
Devices |
HELD capable devices: Once a location is enabled for E911 services, Cisco BroadWorks device management systems generate updated device configurations to enable HELD functionality. Each HELD device must be re-synced or reinitialized to pick up the new configuration before the device can use HELD for location services. |
|
Webex App |
Webex desktop and tablet apps use downloaded configuration parameters to access the E911 provider's Location Information Server (LIS). Users must enter their location information once per location. The E911 provider maintains a record of each location. When the user logs in from a new location, they are prompted to enter their location information, which gets added to the database. When the user places a 911 or 933 call, the geolocation information gets passed in the SIP Header. 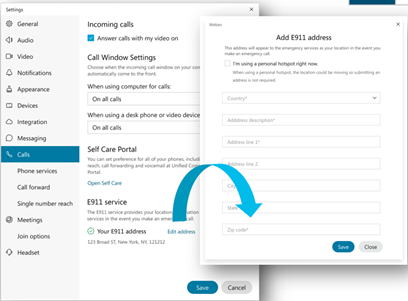 By default, the Webex App prompts users to update their location when logging in at an unknown location. However, the %EMERGENCY_REDSKY_USER_LOCATION_PROMPTING_WXT% configuration tag lets administrators reconfigure the frequency to include any network change to an unknown location. See Webex Client Configuration Tags for Emergency Calling for configuration options. |
E911 Emergency Calling Configuration Task Flow
| 1 |
Use the CLI to activate feature 101792. |
| 2 |
Configure Third-Party Calling URLs Use the CLI to configure settings such as URLs used by RedSkythe E911 provider. |
| 3 |
Verify the dial strings that BroadWorks uses for Emergency Calling. |
| 4 |
Configure SIP Header Proxy Rule On the Application Server, configure a SIP Header proxy rule. |
| 5 |
Configure Third-Party Emergency Calling (Enterprise/Service Provider Service) On CommPilot, configure the Enterprise service for Third-Party Emergency Calling. |
| 6 |
Configure Third-Party Emergency Calling (Group Service) On CommPilot, configure the Group service for Third-Party Emergency Calling. |
Activate Feature
|
On the Application Server, run the following CLI command to activate feature 101792.
|
Configure Third-Party Calling URLs
Use the CLI to configure the AS with Third-Party Emergency Calling parameters such as E911 provider URLs.
| 1 |
Run the following CLI command to view current parameter settings: | ||||||||||||
| 2 |
Run the following CLI command to set the parameters. Refer to the subsequent table for information on the fields: See the following table for help with the parameters:
|
Check Emergency Dial Strings
| 1 |
On the AS, run the following CLI command to verify the dial strings that are being used for emergency callings. Note that 933 should be included in addition to 911. The 933 prefix is used for test calls. |
| 2 |
If you need to add dial strings, use the following command: For detailed information on these CLI commands, see Cisco BroadWorks Application Server Command Line Interface Administration Guide. |
Configure SIP Header Proxy Rule
| 1 |
Run the following CLI commands to set the
|
| 2 |
Run the following CLI commands to add the SIP headers to that rule:
|
Configure Third-Party Emergency Calling (Enterprise/Service Provider Service)
Configure Third-Party Emergency Calling settings at the Enterprise level.
Before you begin
Make sure that you understand which provisioning model you are using as the Customer ID and Secret Key configurations depend on the model:
-
Enterprise provisioning model—The customer organization is an enterprise. Different groups, such as different sites, fall within the enterprise.
-
Service Provider provisioning model—The goup is a customer organization. Different groups under the Service Provider are unrelated to one another.
| 1 |
On Comm Pilot Services window, select Third-Party Emergency Calling. | ||||||||
| 2 |
Check the Allow Activation check box. | ||||||||
| 3 |
Enter values for the Customer ID and Secret Key fields, depending on which provisioning model you run:
| ||||||||
| 4 |
Click OK. You can also configure these settings automatically by a back-office system using this command: ServiceProviderThirdPartyEmergencyCallingModify.If you are configuring emergency calling for a Service Provider's own organization (rather than customer organizations that the Service Provider manages), use the Enterprise provisioning model and add a unique Customer ID and Secret Key for the Service Provider's own organization.
|
Configure Third-Party Emergency Calling (Group Service)
If you are using the Service Provider provisioning model, configure Third-Party Emergency Calling that appears under Group Services.
Before you begin
Make sure that you understand which provisioning model you are using as the Customer ID and Secret Key configurations depend on the model:
-
Enterprise provisioning model—The customer organization is an enterprise. Different groups, such as different sites, fall within the enterprise.
-
Service Provider provisioning model—The goup is a customer organization. Different groups under the Service Provider are unrelated to one another.
For the Group Profile settings, the Country must be USA or CAN (for Canada).
| 1 |
On the Comm Pilot Group Services window, select Third-Party Emergency Calling. | ||||||||||
| 2 |
Check both of the following check boxes:
| ||||||||||
| 3 |
Enter the appropriate Customer ID and Secret Key values for this group according to your provisioning model:
| ||||||||||
| 4 |
Click OK. See the following table for help with the fields.
|
Webex Client Configuration Tags for Emergency Calling
Dynamic Tags
The following table summarizes the dynamic Webex DMS tags that appear in the Webex client configuration file (config.wxt-xml) and how they get derived dynamically from the BroadWorks configuration.
These are “built-in dynamic” tags, not custom tags that are directly created and populated by administrator.
|
Tag |
Data Source |
|---|---|
|
%BWE911-PRIMARY-HELDURL% |
AS_CLI/Service/ThirdPartyEmergencyCalling> primaryHELDServerURL |
|
%BWE911-SECONDARY-HELDURL% |
AS_CLI/Service/ThirdPartyEmergencyCalling> secondaryHELDServerURL |
|
%BWE911-EMERGENCY-NUMBER-LIST% |
AS_CLI/System/CallP/CallTypes> Digit Map values marked as “Emergency” To use this tag, the %RESERVEDBWE911-EMERGENCY-NUMBER-LIST% reserved custom tag must be added to a tag set used by the device type. The reserved tag must contain the emergency numbers defined under Note that the Webex App does not support wildcards in emergency numbers. Only exact emergency numbers should be added to the reserved custom tag. The following example shows how the reserved tag functionality is meant to be used:
|
|
%BWE911-CUSTOMERID% |
Configured Group Customer ID if not empty, otherwise SP/Enterprise configured ID |
|
%BWE911-SECRETKEY% |
Configured Group Secret Key if not empty, otherwise SP/Enterprise Secret Key |
Custom Tags
Following is a list of Webex App desktop and tablet custom tags for emergency calling. Please refer to the Webex for Cisco BroadWorks Configuration Guide for additional details:
%ENABLE_EMERGENCY_DIALING_WXT%
-
Description: Enables Emergency Calls detections
-
Values: [true|false]
-
Default value: false
%EMERGENCY_DIALING_ENABLE_REDSKY_WXT%
-
Description: Enable Redsky Emergency Location Platform
-
Values: [true|false]
-
Default value: false
%EMERGENCY_REDSKY_USER_LOCATION_PROMPTING_WXT%
-
Description: Defines the E911 location prompting behavior. The "aggressive" value shows the dialog to the user on each network change to an unknown location. The "once_per_login" value shows the dialog only while logging in at an unknown location, preventing further popups and distractions for the user.
-
Values: [aggressive|once_per_login]
-
Default value: once_per_login
%EMERGENCY_REDSKY_USER_MANDATORY_LOCATION_WXT%
-
Description: The times that the user is allowed to close the location dialog before location becomes mandatory. A value of -1 allows the user to close the dialog indefinitely.
-
Values: [-1 - 100]
-
Default value: -1
%EMERGENCY_REDSKY_USER_REMINDER_TIMEOUT_WXT%
-
Description: The timeout in minutes that will be used to reminder the user to update the emergency location if the current one is not entered or is invalid. If 0 is set, there will be no reminders.
-
Values: [0 - 43200]
-
Default value: 0
Change History
|
Change |
Details |
|---|---|
|
January 20, 2025 |
Editorial Changes! |
|
October 25, 2023 |
Updated Location Detection section. |
|
May 09, 2023 |
Updated E911 Emergency Calling in Webex for BroadWorks section. |
|
December 13, 2022 |
Added notes under Location Detection section. |
|
August 24, 2022 |
Updated PSTN and E911 Locations-Enabled Routing. |
|
April 25, 2022 |
Added Country requirement to Group Service configuration. |
|
March 23, 2022 |
Added wildcard restriction to |
|
March 21, 2022 |
Added Note with info on requirements for the %BWE911-EMERGENCY-NUMBER-LIST% native tag. |
|
March 14, 2022 |
Added new config tag, %EMERGENCY_REDSKY_USER_LOCATION_PROMPTING_WXT%, which lets administrators edit the location update frequency. |


