
Thanks for your feedback.
Integrate Webex Contact Center with Zendesk
 Feedback?
Prerequisites
The CRM connector operates based on the version of the widget specified in the desktop layout JSON. It is extremely important to ensure the widget version within the Desktop Layout is kept updated. As of November 2025, the latest widget version is 1.2.2. Administrators are expected to ensure all desktop layouts for this CRM connector use this widget version. If the layout is not updated to use the latest version, functionality will no longer be supported and may cease to work correctly.
The minimum supported size for the softphone interface is 500px. Any value lower than 500px may result in display or functionality issues.
Before you integrate Webex Contact Center with the Zendesk CRM console, ensure that you have the following:
-
Access to Webex Contact Center.
-
Administrator access to the Control Hub at https://admin.webex.com and the Webex Contact Center Management Portal. The URLs for the Management Portal are specific to your region.
-
An agent with access to the Desktop. The URL for the Desktop is specific to your region.
-
Agent access to the following domain that is added in the Content Security Policy Allowed List:
-
*.zendesk.com
For more information on how to define the allowed list, see the article Security Settings for Webex Contact Center.
-
-
A Zendesk developer portal account. To create an account, go to https://www.zendesk.com/ and click Free trial. By default, you get a 14-day trial account.
-
Access to the Desktop Layout (JSON) for Zendesk at https://github.com/CiscoDevNet/webex-contact-center-crm-integrations/tree/main/Zendesk.
To integrate Webex Contact Center with Zendesk, complete the following tasks:
Before you begin
This package installation is applicable for the new Webex Contact Center platform. This is not applicable for the Webex Contact Center 1.0 platform.
| 1 |
Sign in to your Zendesk account. |
| 2 |
Follow the quick start wizard. |
| 3 |
(Optional) To add your team to Zendesk, click Add your team. |
| 4 |
Navigate to . |
| 5 |
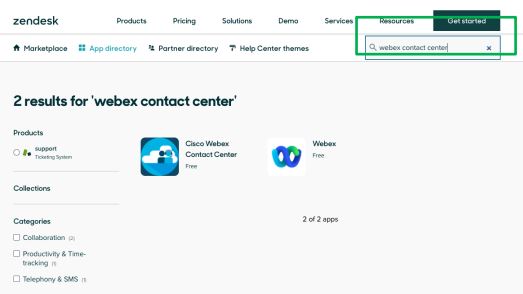
On the Marketplace page, search for Webex Contact Center. |
| 6 |
Select the Webex Contact Center application.
|
| 7 |
From the Select account to install this app drop-down list, select the appropriate account. |
| 8 |
Click Install and follow the install wizard to install the application. |
| 9 |
On the Webex Contact Center Installation page, ensure that the Desktop URL is the Desktop URL for your region: |
| 10 |
Click Save. |
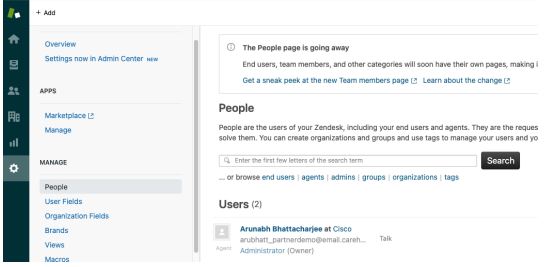
| 1 |
On your Zendesk console, navigate to .
|
| 2 |
Click Edit for the newly activated agent. |
| 3 |
In the Role area of the agent's profile, click Manage in Admin Center. |
| 4 |
From the agent's Roles and access settings, select Admin from the Role drop-down list. |
| 5 |
Click Save. |
You can download the Desktop Layout JSON file for Zendesk from https://github.com/CiscoDevNet/webex-contact-center-crm-integrations/tree/main/Zendesk.
For more information about the Webex Contact Center Management Portal Desktop Layout, see the Provisioning chapter of the Cisco Webex Contact Center Setup and Administration Guide.
| 1 |
Go to the Webex Contact Center Management Portal. |
| 2 |
From the Management Portal navigation bar, choose |
| 3 |
Click New Layout and enter the details for the desktop layout. |
| 4 |
Upload the Zendesk Desktop Layout JSON file. |
| 5 |
Click Save to save the configuration. You can now start the Webex Contact Center Desktop within the Zendesk CRM console. |
If you have an older version of the Webex Contact Center for Zendesk App, uninstall the old version before you install the latest version.
| 1 |
Sign in to your Zendesk account. |
| 2 |
Navigate to . |
| 3 |
Select Webex Contact Center. |
| 4 |
From the options menu, click Uninstall. |
| 5 |
Click Uninstall to confirm. |
- We support signing into Agent Desktop using WebRTC for Salesforce (SFDC) and Microsoft Dynamics (MS Dynamics) Connectors only.
- Currently, this feature is applicable to agents only.
Before you make outdial calls
Before you make outdial calls, ensure that you do the following:
-
Create the outdial entry point and set up an outdial entry point strategy.
-
Enable outdial ANI for the Agent Profile.
-
Set the outdial ANI to a Dial Number-to-Entry Point mapping.
For more information, see the Provisioning chapter of the Cisco Webex Contact Center Setup and Administration Guide.
For information on how to use Desktop, see the Cisco Webex Contact Center Agent Desktop User Guide.
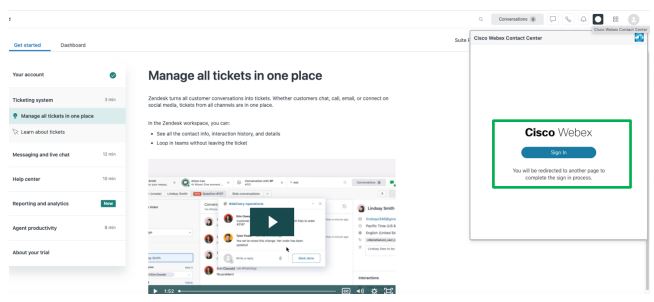
| 1 |
Sign in to the Zendesk agent console at |
| 2 |
From the toolbar at the upper right of the Zendesk console, click the Webex Contact Center icon.
|
| 3 |
Sign in with your Webex Contact Center Desktop credentials. The integrated Webex Contact Center
Desktop opens on the right side of the Zendesk console.
|
| 4 |
Enter the Dial Number (DN) and Team information.
|
| 1 |
Sign in to the Zendesk agent console at |
| 2 |
From the toolbar at the upper right of the Zendesk console, click the Webex Contact Center icon. |
| 3 |
Sign in with your Webex Contact Center Desktop credentials. |
- Create Zendesk tickets directly from the agent desktop during active customer calls.
-
- If
isCaseCreationForAllInboundCallsEnabledis set to true in the desktop layout, a new ticket is created for every incoming call, regardless of whether the caller already has an open ticket. - If
isCaseCreationForAllInboundCallsEnabledis set to false in the desktop layout, then it does not create any new ticket and does the following:- If there is one open ticket, it opens that ticket and links it to the caller automatically.
- If there are multiple open tickets, all are listed, and the agent must choose which ticket to work on.
- The agent can also create a new ticket and link it to the caller using the connector widget.
- If
- Create new customer records seamlessly within the agent desktop application (only when no matching customer profile is found).
- Automatically populate ticket fields with relevant CAD variable data based on desktop layout configurations.
- Link tickets to various contacts, leveraging existing screen pop search functionality (single match, no match, and multiple match scenarios). Linking of the ticket is based on the navigation events. For example, if the connector opens ticket XYZ when the call arrives, but the agent navigates to ticket ABC, then after the call ends, ticket ABC will be updated.
| Sl. no. | Scenario | Solution |
|---|---|---|
| 1 | Ticket creation from Zendesk Connector for single match record scenario | If a single matching user record exists, agents can create and link a new or existing ticket.
|
| 2 | Ticket creation from Zendesk Connector for multiple match record scenario | If multiple matching user records exists, agents can select a relevant profile and add an existing ticket or create a new one. |
| 3 | Ticket creation from Zendesk Connector in case of invalid ANI (no match record scenario) | In case no matching records are found for invalid ANI,
|
| 4 | Ticket creation from Zendesk Connector in case of anonymous ANI (no match record scenario) | In case no matching records are found for anonymous ANI,
|
| 1 |
Sign in to the Zendesk agent console at |
| 2 |
From the toolbar at the upper right of the Zendesk console, click the Webex Contact Center icon. |
| 3 |
Sign in with your Webex Contact Center Desktop credentials. |
| 4 |
Go to Home and select a customer record. |
| 5 |
From the list of tickets, click a ticket to open. |
| 6 |
On the right side vertical panel, click the Apps icon. |
| 7 |
Click Call under Webex Contact Center app. The system dials the number that is associated with the ticket.
|
Desktop layout property customizations
The following section describes the customization of each property of the custom desktop layout file.
The administrator can customize the behavior of Zendesk connector as per the required business use case.
|
Desktop layout property |
Description |
Possible values |
|---|---|---|
|
outDialAni |
This feature is disabled by default. You can set the outdial ANI for click-2-dial calls. This value overrides the value that is set in the Management Portal. |
<OutDialAniValue> for example, +11234567890 |
|
isCaseCreationForAllInboundCallsEnabled |
This feature is enabled by default. Setting it to true creates a new ticket for all inbound calls. Setting it to false enables creation of tickets only when there are no open or pending tickets that are associated with that caller. |
true, false |
|
adavanceSearchCadVariableName |
This feature is disabled by default. Use this feature with adavanceSearchCrmObjectName to enable Screen Pop based on advanced search. Specify the CAD variable name to search for the value in Zendesk CRM. |
<cad_variable> For example, NPI |
|
adavanceSearchCrmObjectName |
This feature is disabled by default. Use this feature with adavanceSearchCadVariableName to enable Screen Pop based on advanced search. Specify the CRM object & object field name to search for the CAD variable value. |
<crm_object> <crm_object_field>: For example, user npi: |
|
ticketDynamicField |
This feature is disabled by default. Use this feature with ticketDynamicFieldValue to associate the ticket object with other fields such as forms. Specify the ticket field name. |
< ticketDynamicField> For example, ticket_form_id |
|
ticketDynamicFieldValue |
This feature is disabled by default. Use this feature with ticketDynamicField to associate the ticket object with other dynamic fields like forms. Specify the Ticket field value. |
<ticketDynamicFieldValue> For example, 12152079860369 |
|
ticketDynamicSubject |
This feature is enabled by default. Use this feature to customize your own subject lines for the tickets generated by Webex Contact Center. You can use CAD variables. Make sure to enclose CAD variables in between curly braces {}. |
Default value: Call {activityDateTime} For example, Call 01.23.2023 09:34 p.m. |
|
dateTimeFormat |
This feature is enabled by default. Use this feature to change the date-time format. |
Default value: MM.dd.yyyy hh:mm a |
|
customFieldsToBeUpdatedForExistingTickets |
This feature is disabled by default. Use this feature with ticketCustomFieldsMapping to enable or disable the custom fields' update feature for existing tickets. |
true, false |
|
ticketCustomFieldsMapping |
This feature is disabled by default. Use this feature to map the WebexCC CAD variables and Zendesk CRM Custom field IDs to auto populate CAD variable values in the ticket object’s Custom fields. The mapping JSON has 3 keys: wxccFieldName: WebexCC CAD variable name. This can be configured with one or more WebexCC fields. Following WebexCC fields are available by default.
zendeskTicketFileldID: Zendesk ticket’s custom field ID isDefaultValueEnabled: Boolean flag to check whether to use the default value or CAD variable’s dynamic value to bind with the Custom field ID. |
Example #1 – In this example, isDefaultValueEnabled is false and the application looks for CAD variable in wxccFieldName value. The CAD variable is activityDateTime. Its value is retrieved and populated in the Custom field whose ID is 12093897017233. Example #2 –
In this example, the isDefaultValueEnabled is true, so the application looks for default or static value that is specified in wxccFieldName value. WxCC is the default value and the same is populated in the Custom field whose ID is 12093897017233. |


