- Home
- /
- Article

Thanks for your feedback.

 In this article
 Feedback?
You can enhance teamwork and collaboration by creating a call pickup group. Users that are added to a call pickup group can answer calls when another member of the call pickup group is busy.
Call pickup group enables a user to answer any ringing line within their pickup group. A call pickup group is an administrator-defined set of users within a location, to which the call pickup feature applies.
Once you create a call pickup group, you can add, modify, remove, and assign specific users to that group. Also, you can notify incoming calls to the users in the group.
Create a call pickup group
Call pickups must meet the following conditions:
-
An admin can assign a user to only one call pickup group
-
A call pickup group can only have users from the same location.
-
A location may have multiple call pickup groups.
-
Call pickup group names must be unique.
| 1 |
From the customer view in https://admin.webex.com, go to . |
| 2 |
Go to the Call Pickup card and click on Add New. You may be asked to select a location in a pop-up window. |
| 3 |
Select the Location from the drop-down menu. If you have previously selected a location, ensure the correct one is selected. |
| 4 |
Enter a name for the call pickup. |
| 5 |
Search for and add available users, workspaces or virtual lines by name, phone number, or extension to the call pickup. |
| 6 |
Click Create. |
Edit a call pickup group
| 1 |
From the customer view in https://admin.webex.com, go to . |
| 2 |
Go to the Call Pickup card and click on Manage . The Call Pickup window displays. Select a location and the call pickup group that you want to edit. |
| 3 |
Make any changes to the call pickup group, and then click Save. |
Notify incoming calls to your call pickup group
You can opt to set up automatic notifications for incoming calls. It ensures to notify all members within your call pickup group. Also, you can configure a custom notification delay timer for your call pickup group. Both Webex App and MPP devices support automatic notifications for incoming calls. You can choose the notification type that best fits your preferences.
The Webex Calling for Chrome extension and mobile clients don’t support automatic notifications.
| 1 |
Sign in to https://admin.webex.com, go to . |
| 2 |
Go to the Call Pickup card and click on Manage. The Call Pickup window displays. Select the location and select the call pickup group that you want to edit. |
| 3 |
From Notification type, select the format to display the incoming call notification to users in the group. 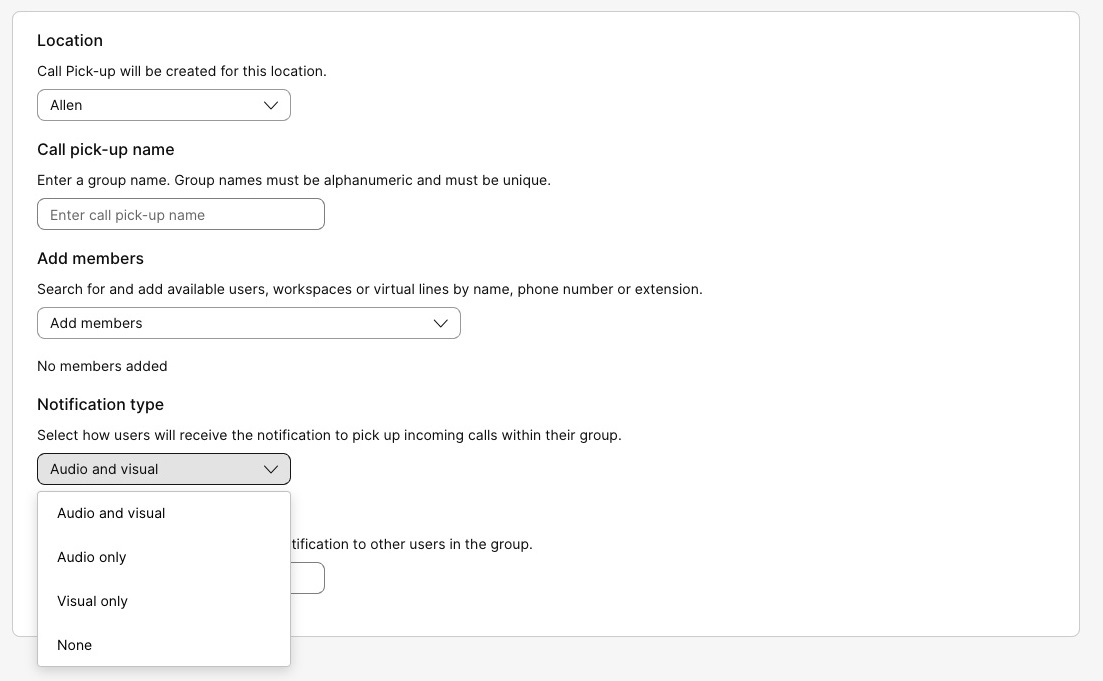
The default option is None for users with existing Pickup groups and Visual +audio for a new Pickup group. |
| 4 |
From Notification delay timer, enter the time of delay before notifying about the incoming call to users in the group. 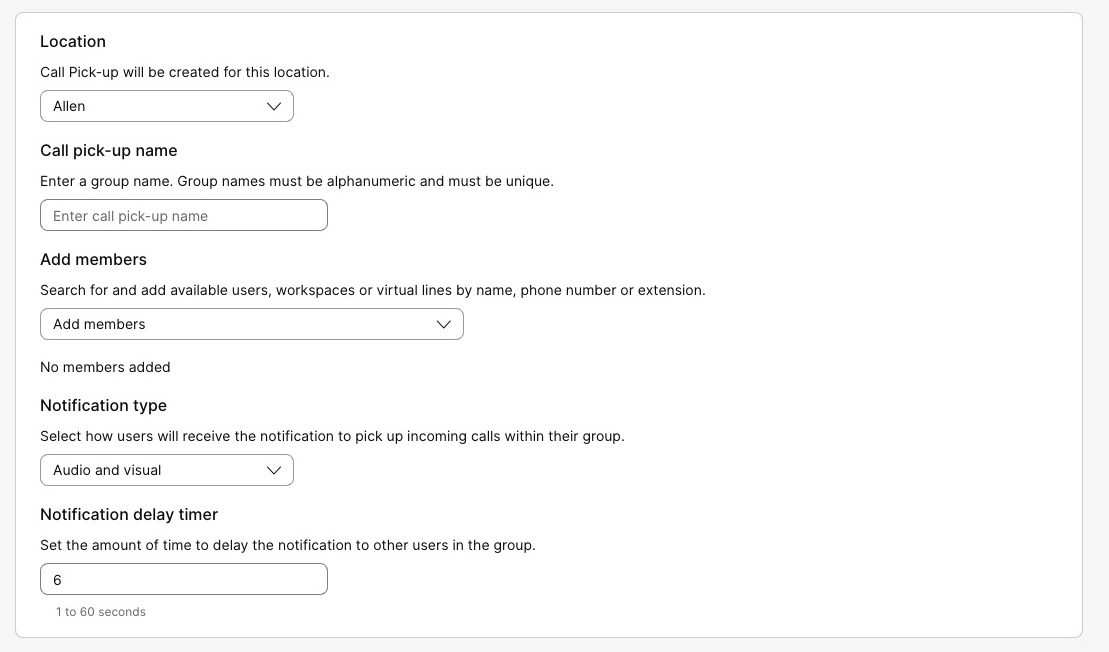
The range is 1–60 seconds. |
| 5 |
Click Save. |
Bulk manage your call pickup group
You can add and manage call pickup groups in bulk using a call pickup CSV.
Here’s a list of specific fields and values needed for the CSV upload of Webex Calling call pickup groups.
Known limitations and requirements
-
Before uploading your call pickup CSV, make sure to read Bulk provisioning Webex Calling elements using CSV to understand the CSV conventions.
-
You can either export your current call pickup groups, which allows you to add, delete, or modify your existing data set, or you can export a sample set of call pickup groups. Once modified, you can upload the file through the bulk features.
-
It’s important to know the mandatory and optional columns, and information that you need to provide when filling out the CSV template. The specific fields for the call pickup CSV are found in the following table.
-
The maximum amount of rows is 1,000 (not including the header).
Exporting more than 1000 records will export the data in a zip file format. The zip file contains a single CSV with all the data and multiple files less than 1000 records. The files less than 1000 records are generated for the administrators to quickly import any updates, as importing is limited to CSV of less than 1000 records.
-
A call pickup group can have users and/or workspaces. These are referred to as agents. If you're adding or editing a user, enter the user’s email address. For workspaces, enter the workspace name.
A user or workspace can only be assigned to one call pickup. A call pickup can only have users from the same location.
-
Each row can hold a maximum of 50 agents. For more information, see Add or edit more than 50 agents at a time.
Prepare your CSV
Use this table to see what fields are mandatory or optional, and what you need to determine when adding or editing the call pickup in bulk.
|
Column |
Mandatory or optional |
Description |
Supported values |
|---|---|---|---|
|
Name |
Mandatory |
Enter the name of the call pickup group. Call pickup group names within the same location need to be uniquely identifiable. If call pickup groups are in a different location, they can have the same name. |
Example: San Jose Call Pickup Character length: 1—30 |
|
Location |
Mandatory |
Enter the location to assign this call pickup group. |
Example: San Jose Location must be on the Locations tab in Control Hub. |
|
Agent Action |
Optional* *If you specify any agents, this field is mandatory. |
Enter ADD to add the agents you list in this row. Enter REMOVE to remove the agents you list in the row. Enter REPLACEto remove all previously entered agents and replace it with the agents you’re adding in this row only. |
ADD, REMOVE, REPLACE |
|
Agent1 ID, Agent2 ID… Agent50 ID |
Optional |
Enter the agents that you’d like to assign to the call pickup group. Agents can be users or workspaces. For users, enter their email address. For workspaces, enter the workspace name. |
Example: test@example.com Character length: 1-161 |
|
Notification Type |
Optional |
For an incoming call on your call pickup group:
|
NONE, AUDIO_ONLY, VISUAL_ONLY, AUDIO_AND_VISUAL Default: NONE. |
|
Notification Delay Timer In Seconds |
Optional |
Specify the delay for an incoming call to be notified in your call pickup group. Enter an integer value in seconds. |
Example: 30 Range: 1—60. Default: 6. |
Add or edit more than 50 agents at a time
Each row can hold a maximum of 50 agents. To add or edit more than 50 agents, using the CSV file, follow these steps.
| 1 |
Enter the 50 agents that you’d like to add or edit on the first row for the call pickup you’re adding or editing. |
| 2 |
On the next row, you only have to enter information in the following columns to add or edit additional agents:
You can leave all other columns blank. |
| 3 |
Continue to do this until you have added all of the agents you need to add or edit. |
Bulk add call pickup groups
To add call pickup groups in bulk, you’ll simply download and fill out a blank CSV template.
| 1 |
From the customer view in https://admin.webex.com, go to Services, and choose . |
| 2 |
Go to the Call Pickup card. |
| 3 |
Click on the Call Pick up card. On the Prefer to create Call Pick up in bulk message, click Open the bulk editor. |
| 4 |
The Manage Call Pickup window displays. Select a location for the call pickup group you'd like to add. |
| 5 |
Click Download Data or Download .csv templateto verify that your CSV file is properly formatted, making sure to fill in the required information. |
| 6 |
Upload the CSV file by dragging and dropping or clicking Choose a file. |
| 7 |
Click View Import history/Tasks to view the status of your CSV import and see whether you've encountered any errors. When successfully uploaded, you can click See Tasks Page for details to view the status of the changes. |
Bulk edit call pickup groups
To modify call pickup groups in bulk, you’ll simply download the current CSV data and make the necessary changes to the spreadsheet.
| 1 |
From the customer view in https://admin.webex.com, go to Services, and choose . |
| 2 |
Go to the Call Pickup card and click Manage. From the Call Pickup window, click on Manage and select Bulk Manage from the drop-down list |
| 3 |
The Manage Call Pickup window displays. Select a location for the call pickup group you’d like to modify. |
| 4 |
Click Download data. If the data for the call pickup group you’ve selected exceeds the maximum (more than 10,000 rows for each CSV), you will receive a zipped file with multiple CSV files included. |
| 5 |
Make the necessary changes to the spreadsheet. |
| 6 |
Upload the modified CSV file by dragging and dropping or clicking Choose a file. |
| 7 |
Click Upload. When successfully uploaded, you can click See Tasks Page for details to view the status of the changes. |
Use the Webex App to pick up calls in a group
A call pickup group allows Webex App users to pick up phone calls for someone else. When a call comes in for a user who isn’t available to answer, one of the pickup group members can answer the call. Use the Webex App on Desktop or on multicall windows to get a notification and answer the incoming call. This functionality enhances collaboration. Also, call pickup functionality ensures that you handle calls promptly, reducing the chances of potential delays or missed calls.
The following are some key points regarding incoming call notifications for the Webex App:
-
The Webex App supports visual and audio notifications.
-
The support for incoming call notification is available from Webex App version 44.2.
-
Apart from the FAC-based (dial *98) group call pickup, you can now pick up calls from the notification toast in the Webex App.
- WebexApp supports call pickup notifications for multiline.
For more details, see Webex App | Pick up someone else's phone call.
Use desk phones to pick up calls in a group
Now answer the incoming call for a coworker using a desk phone. When a call comes in for one of the call pickup group members, the call is notified to other members in the group. Then, any one of the group members can answer the call. You can use softkeys or feature access code (dial *98) to pick up calls on your desk phones.
To alert all members of a call pickup group about an incoming call, you can enable notifications. The notification is always an audio chime and blinking handset LED.
The following are some key points regarding such incoming call notifications:
-
The support for incoming call notification is available from desk phone version 12.0.4.
-
All desk phones, except for the 6821, support audio chimes and visual notification through the handset LED. The 6821 only supports audio chimes.
-
As part of call pickup notification, desk phones always generate audio chimes and the handset LED blinks. Desk phones generate this notification as long as the notification type selected in the Control Hub isn’t None.
-
Desk phones support call pickup notifications only for primary lines.


