- Home
- /
- Article

Thanks for your feedback.

 In this article
 Feedback?
Open a service request to get the service assistance for Day-0 and Day-1 activities from the Control Hub to set up the Dedicated Instance.
Overview
You can raise a service request from Control Hub for the following service assistance types, to set up a Dedicated Instance:
- DNS entry
- Firewall Updates
- Firmware Upload
- Cloud Connectivity
- Audit Log Settings
- UC Application Management
- DI-MT Inter-op SIP trunks
- UC application lifecycle
- Infrastructure as a Service
You can create and track the service requests in the Control Hub by going to Calling → Dedicated Instance → Service Request. Once you create a service request, you can refer to view, track and manage service request communications for more details on managing it.
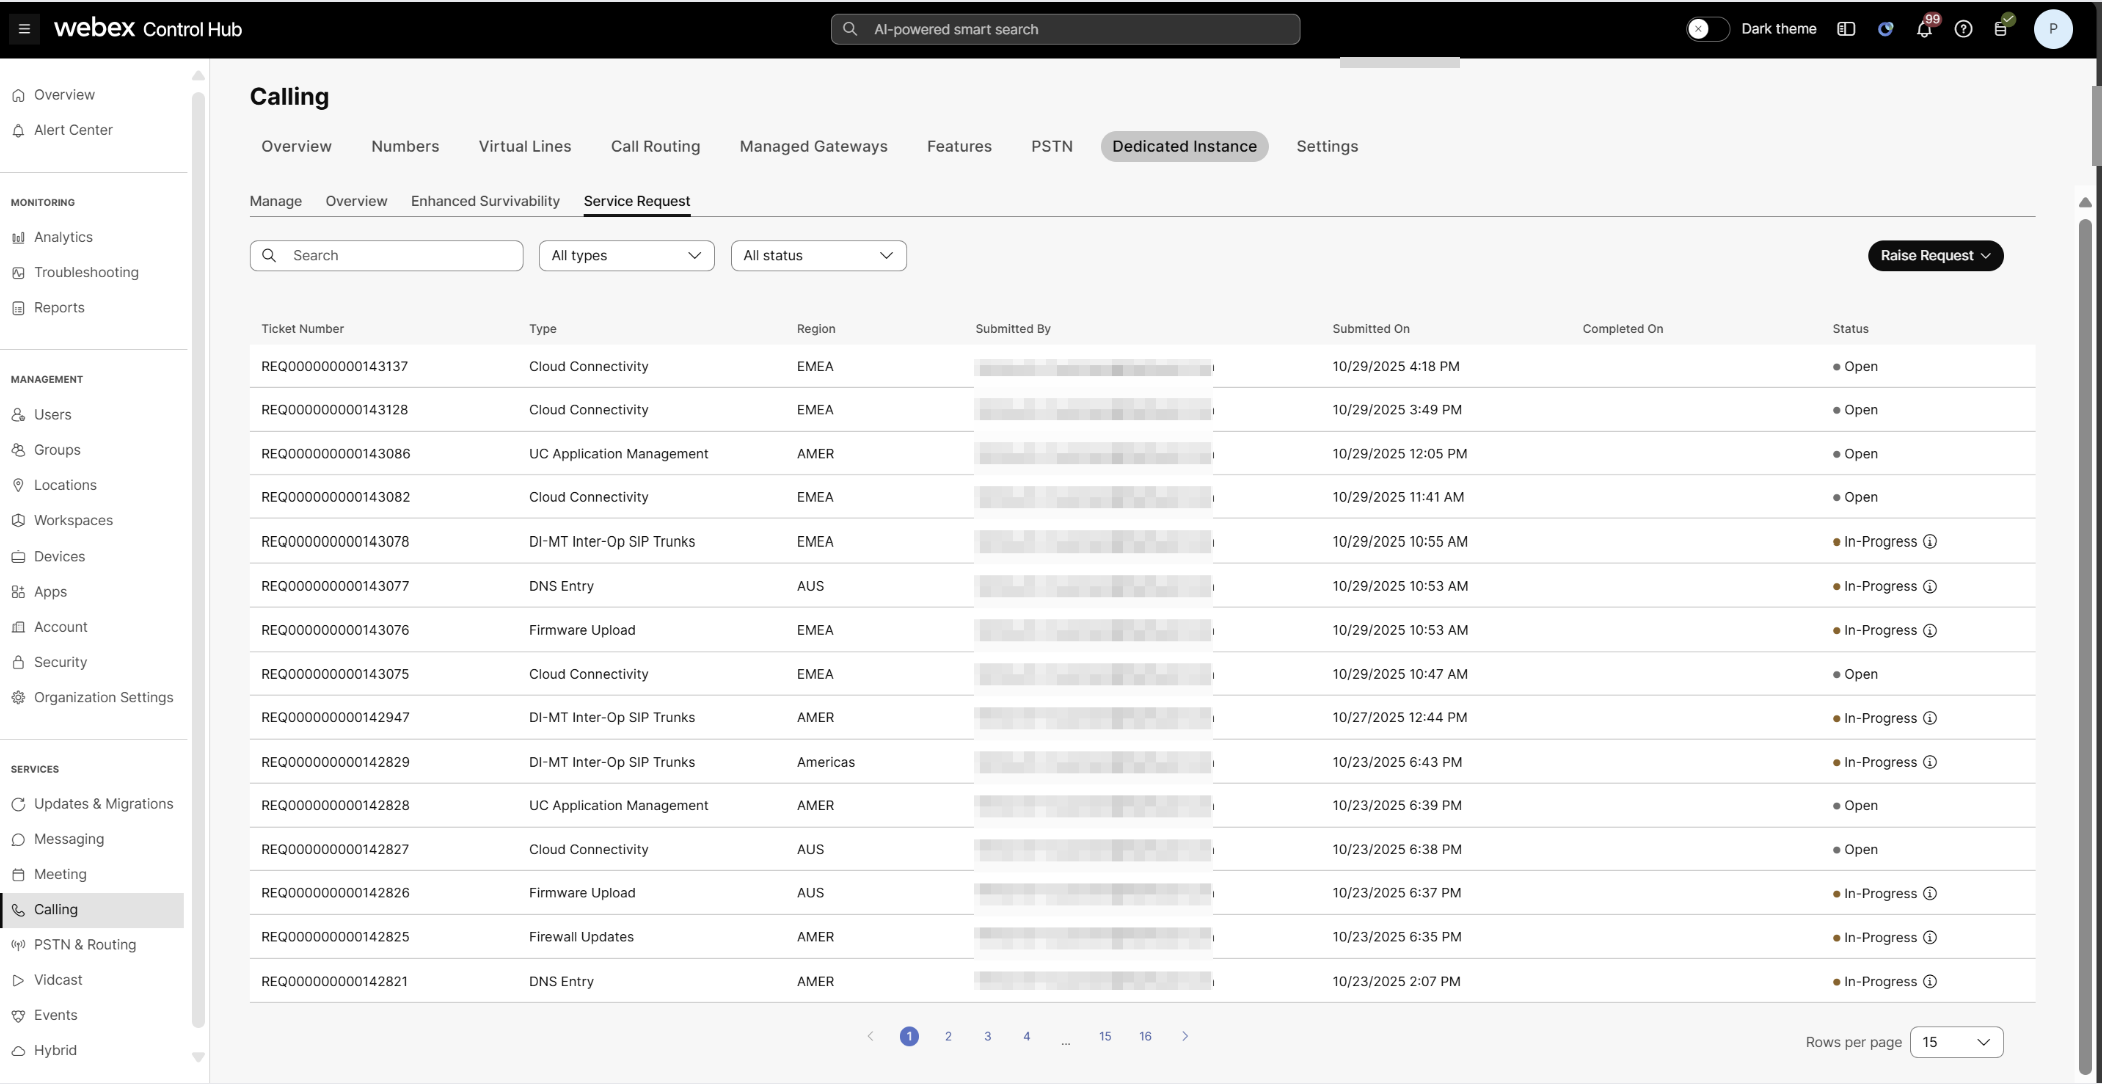
You can see the following fields in the service request page:
- Ticket Number: Unique identifier automatically assigned to each service request for tracking and reference purposes.
- Type: Service request type.
- Region: Dedicated Instance region for which the service request is submitted.
- Submitted By: Name of the service request submitter.
- Submitted On: Service request submitted date and time.
- Completed On: Service Request completed date and time. The field is empty when the status is in In-Progress.
-
Status: Status of the opened service request:
- Open: The raised service request is open and pending action.
- In progress: Work has started for the service request. Hover over the
 to view the estimated completion date and time
of that specific Service Request.
to view the estimated completion date and time
of that specific Service Request. - Completed: Work on the raised service request is complete.
To send messages to the Dedicated Instance Operations Team, click the Service Request and choose the Communications tab. For more information, refer to view service request details and communications.
It is highly recommended for the submitter to have a Webex App account created and use the same for messages. If there are any queries or additional information is required, we use the service request of the submitter's email ID to contact through the Webex App space or the Communications tab in the created service request.
The timezone on UC applications is fixed to UTC and cannot be altered.
DNS entry
| 1 |
Sign in to Control Hub. |
| 2 |
Go to Calling > Dedicated Instance > Service Request. |
| 3 |
Go to Raise Request and choose DNS Entry.
|
| 4 |
From the Region drop-down list, choose the region for which the DNS entries need to be configured. |
| 5 |
Enter the Fully Qualified Domain Name (FQDN) and IP address in the fully qualified domain name (FQDN) and IP address field. You can provide a single or multiple IP addresses for a given FQDN. The provided values are configured in the DNS servers in Dedicated Instance that uses the UC applications. An error message appears if you attempt to configure an FQDN that already exists. To modify an existing entry, refer modify DNS entry. |
| 6 |
Select the PTR Record checkbox, if you need a reverse lookup of the FQDN and IP address provided. |
| 7 |
Click Add another to add multiple DNS entries. |
| 8 |
Click Submit and review the DNS entry request details. Once you submit the service request, it cannot change. |

Modify DNS entry
| 1 |
Sign in to Control Hub. |
| 2 |
Go to Calling > Dedicated Instance > Overview. |
| 3 |
In the DNS Entries section, select one or more FQDNs as needed, and click Modify.
|
| 4 |
Add, edit, or delete IP addresses as needed, and check or uncheck the Mark to Delete check boxes to delete the FQDN based on your requirements. |
| 5 |
Click Submit and review the DNS entry service request details. |

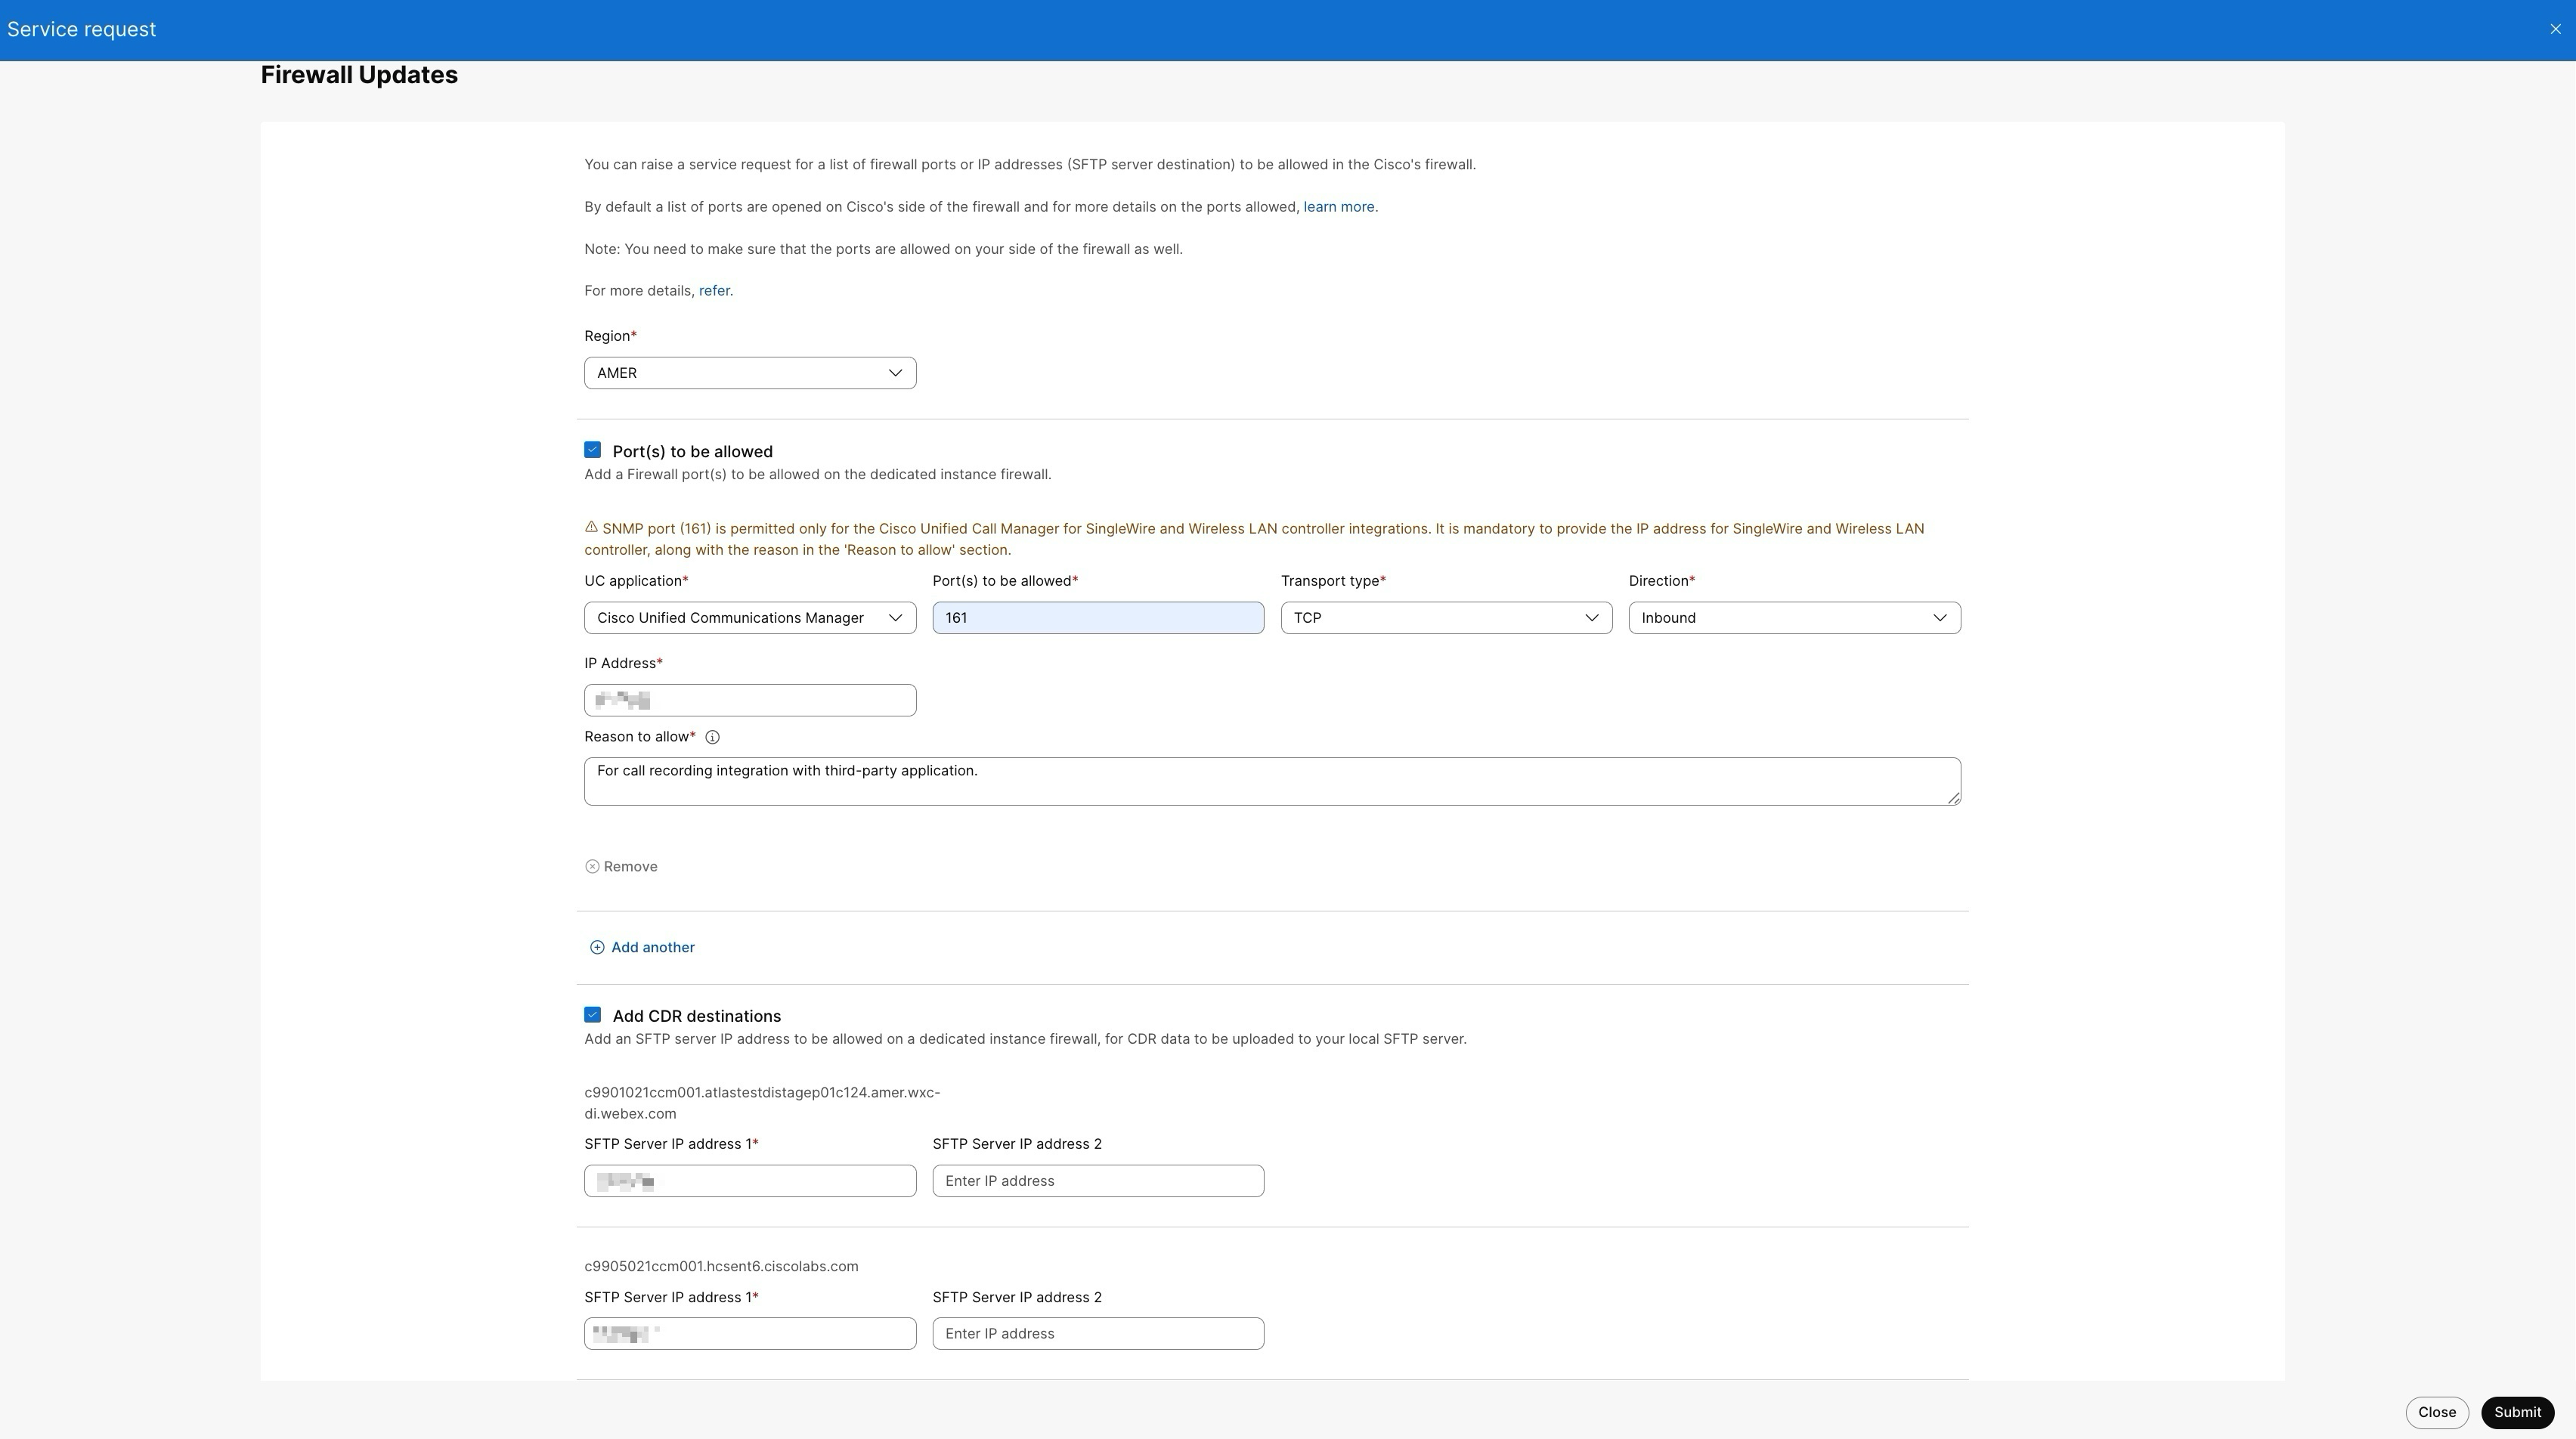
Firewall updates
| 1 |
Sign in to Control Hub. | |||||||||||||||||||||||||||||||||||||||||||||
| 2 |
Go to Calling > Dedicated Instance > Service Request. | |||||||||||||||||||||||||||||||||||||||||||||
| 3 |
Go to Raise Request and choose Firewall Updates.
Cisco allows some ports and restricts others for each Unified CM application. The table below details the specific reasons when providing an IP address is mandatory.
Cisco permits a standard set of ports by default. See Dedicated Instance – port numbers and protocols, for more information. | |||||||||||||||||||||||||||||||||||||||||||||
| 4 |
Choose the Region in Select a Region for which the Firewall updates needs to be done on the Cisco firewall. | |||||||||||||||||||||||||||||||||||||||||||||
| 5 |
Choose the required UC application from the UC application list. The port opens specifically for the UC application type selected from the list. If you require to open the same port for multiple UC applications, you need to add multiple rows with the UC application type and the same port number. | |||||||||||||||||||||||||||||||||||||||||||||
| 6 |
In the Destination Port, enter the port number to allow in the firewall for the selected UC application. The values for the Destination Port can be single or a range, for example, 5080 or 15000–17000. Make sure to allow the mentioned ports on your side of the firewall as well. | |||||||||||||||||||||||||||||||||||||||||||||
| 7 |
In the Transport Type and Direction, enter the type as TCP or UDP and choose Inbound or Outbound respectively. If you require a port to allow Inbound and Outbound, add separate entries (rows) with the same port number and different Direction type in the service request. | |||||||||||||||||||||||||||||||||||||||||||||
| 8 |
In the IP Address enter the of the external system that will be permitted to connect to your Unified CM application on that port. | |||||||||||||||||||||||||||||||||||||||||||||
| 9 |
In the Reason to allow mention the exact reason on why you need to allow the ports in the Dedicated Instance firewall. It’s important for us to review the request and decide whether to allow or reject. | |||||||||||||||||||||||||||||||||||||||||||||
| 10 |
Click Add another to add and configure multiple UC applications. | |||||||||||||||||||||||||||||||||||||||||||||
| 11 |
Select Add CDR Destinations (optional) and enter the IP Address of your SFTP server to be allowed in the Dedicated Instance firewall. This request won’t configure CDR settings in the Unified CM and it’s your responsibility to do the same. | |||||||||||||||||||||||||||||||||||||||||||||
| 12 |
Click Submit and Review the Firewall Update Request details. Once you submit the service request, it cannot change. |
Firmware upload
| 1 |
Sign in to Control Hub. |
| 2 |
Go to Calling > Dedicated Instance > Service Request. |
| 3 |
Go to Raise Request and choose Firmware Upload.
|
| 4 |
Choose the Region in Select a Region for which the firmware needs to be uploaded in the SFTP server. |
| 5 |
Enter the following fields for the firmware uploading request:
|
| 6 |
Click Submit and Review the Firmware Upload Request details. |
| 7 |
You can view the SFTP server details in the Control Hub, once the request is moved to Completed state. Navigate to Calling > Dedicated Instance > Service Request and click on the Firmware Upload request. You can view the below SFTP server details:
Using the information, you can install the COP files as per your convenience in the UC application. To view the reason for rejection, click the Service Request and view the Overview section. Security or bug-fix COPs will not be uploaded; installing these updates on the UC applications is Cisco’s responsibility. Cisco supports only publicly available builds and Engineering Special (ES) builds won’t be uploaded. Service Request raised for ES builds will be rejected by Cisco. |
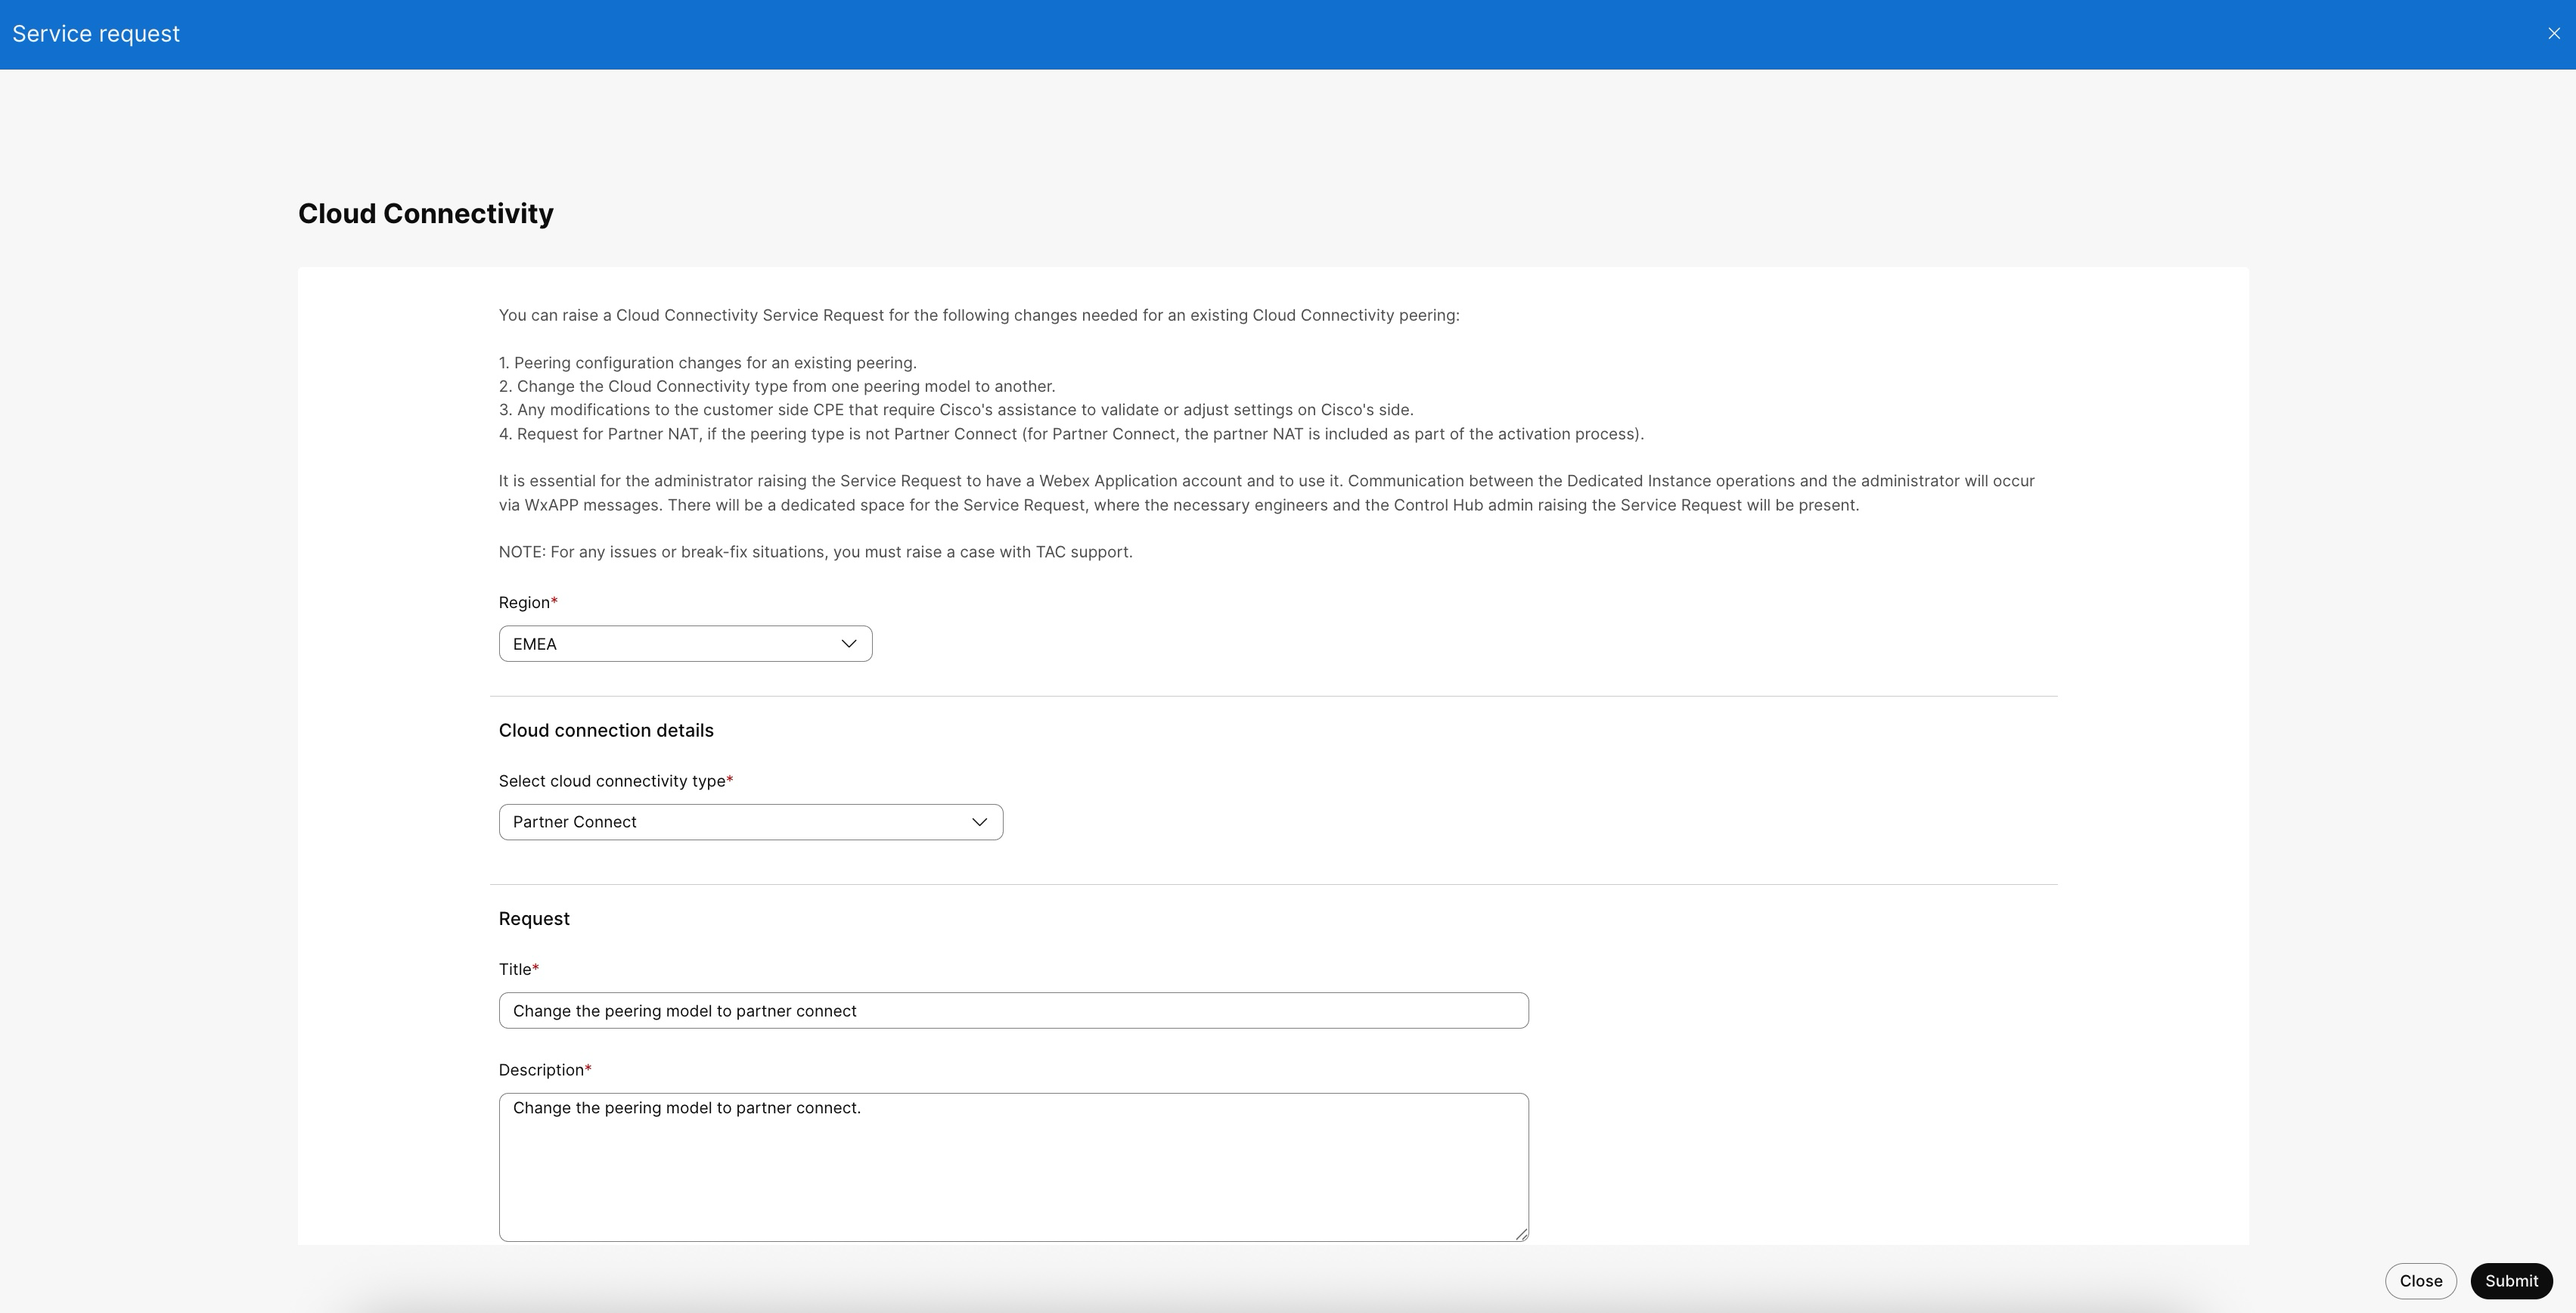
Cloud connectivity
Raise a Cloud Connectivity Service Request for any of the following changes needed to an existing Cloud Connectivity peering:
-
Peering configuration changes for an existing peering.
-
Change the Cloud Connectivity type from one peering model to another.
-
Any modifications to the customer side CPE that require Cisco's assistance to validate or modify the settings on Cisco's side.
Communication regarding the service request will occur through the Control Hub communications tab in the Service Request.
For any call issues or break-fix situations, raise a case with TAC Support. Cloud connectivity service request option cannot be used for new peering requests and for more information regarding activation of new peering requests, see here.
Before you begin
Ensure you have an active Webex App account. You must use this account to raise the service request.
| 1 |
Sign in to Control Hub. |
| 2 |
Go to Calling > Dedicated Instance > Service Request. |
| 3 |
Go to Raise Request and choose Cloud Connectivity.
|
| 4 |
Choose the region in Region for which the cloud connectivity updates needs to be done. |
| 5 |
Choose the type of your existing cloud connection from the Select Cloud Connectivity Type drop-down list. |
| 6 |
Enter the title and mention the details about the cloud connectivity peering changes required in the Title and Description text boxes respectively. |
| 7 |
Click Submit and review the cloud connectivity change details. |
What to do next
After you submit the request, you can use the Communications tab in Control Hub to interact with the Dedicated Instance Operations team. For more information, refer to view service request details and communications.
For any break-fix or support issues, do not use this procedure. Instead, raise a case directly with TAC support.
Audit log settings
-
Sign in to Control Hub.
-
Go to Calling > Dedicated Instance > Service Request.
- Go to Raise Request and choose Audit Log
Settings.
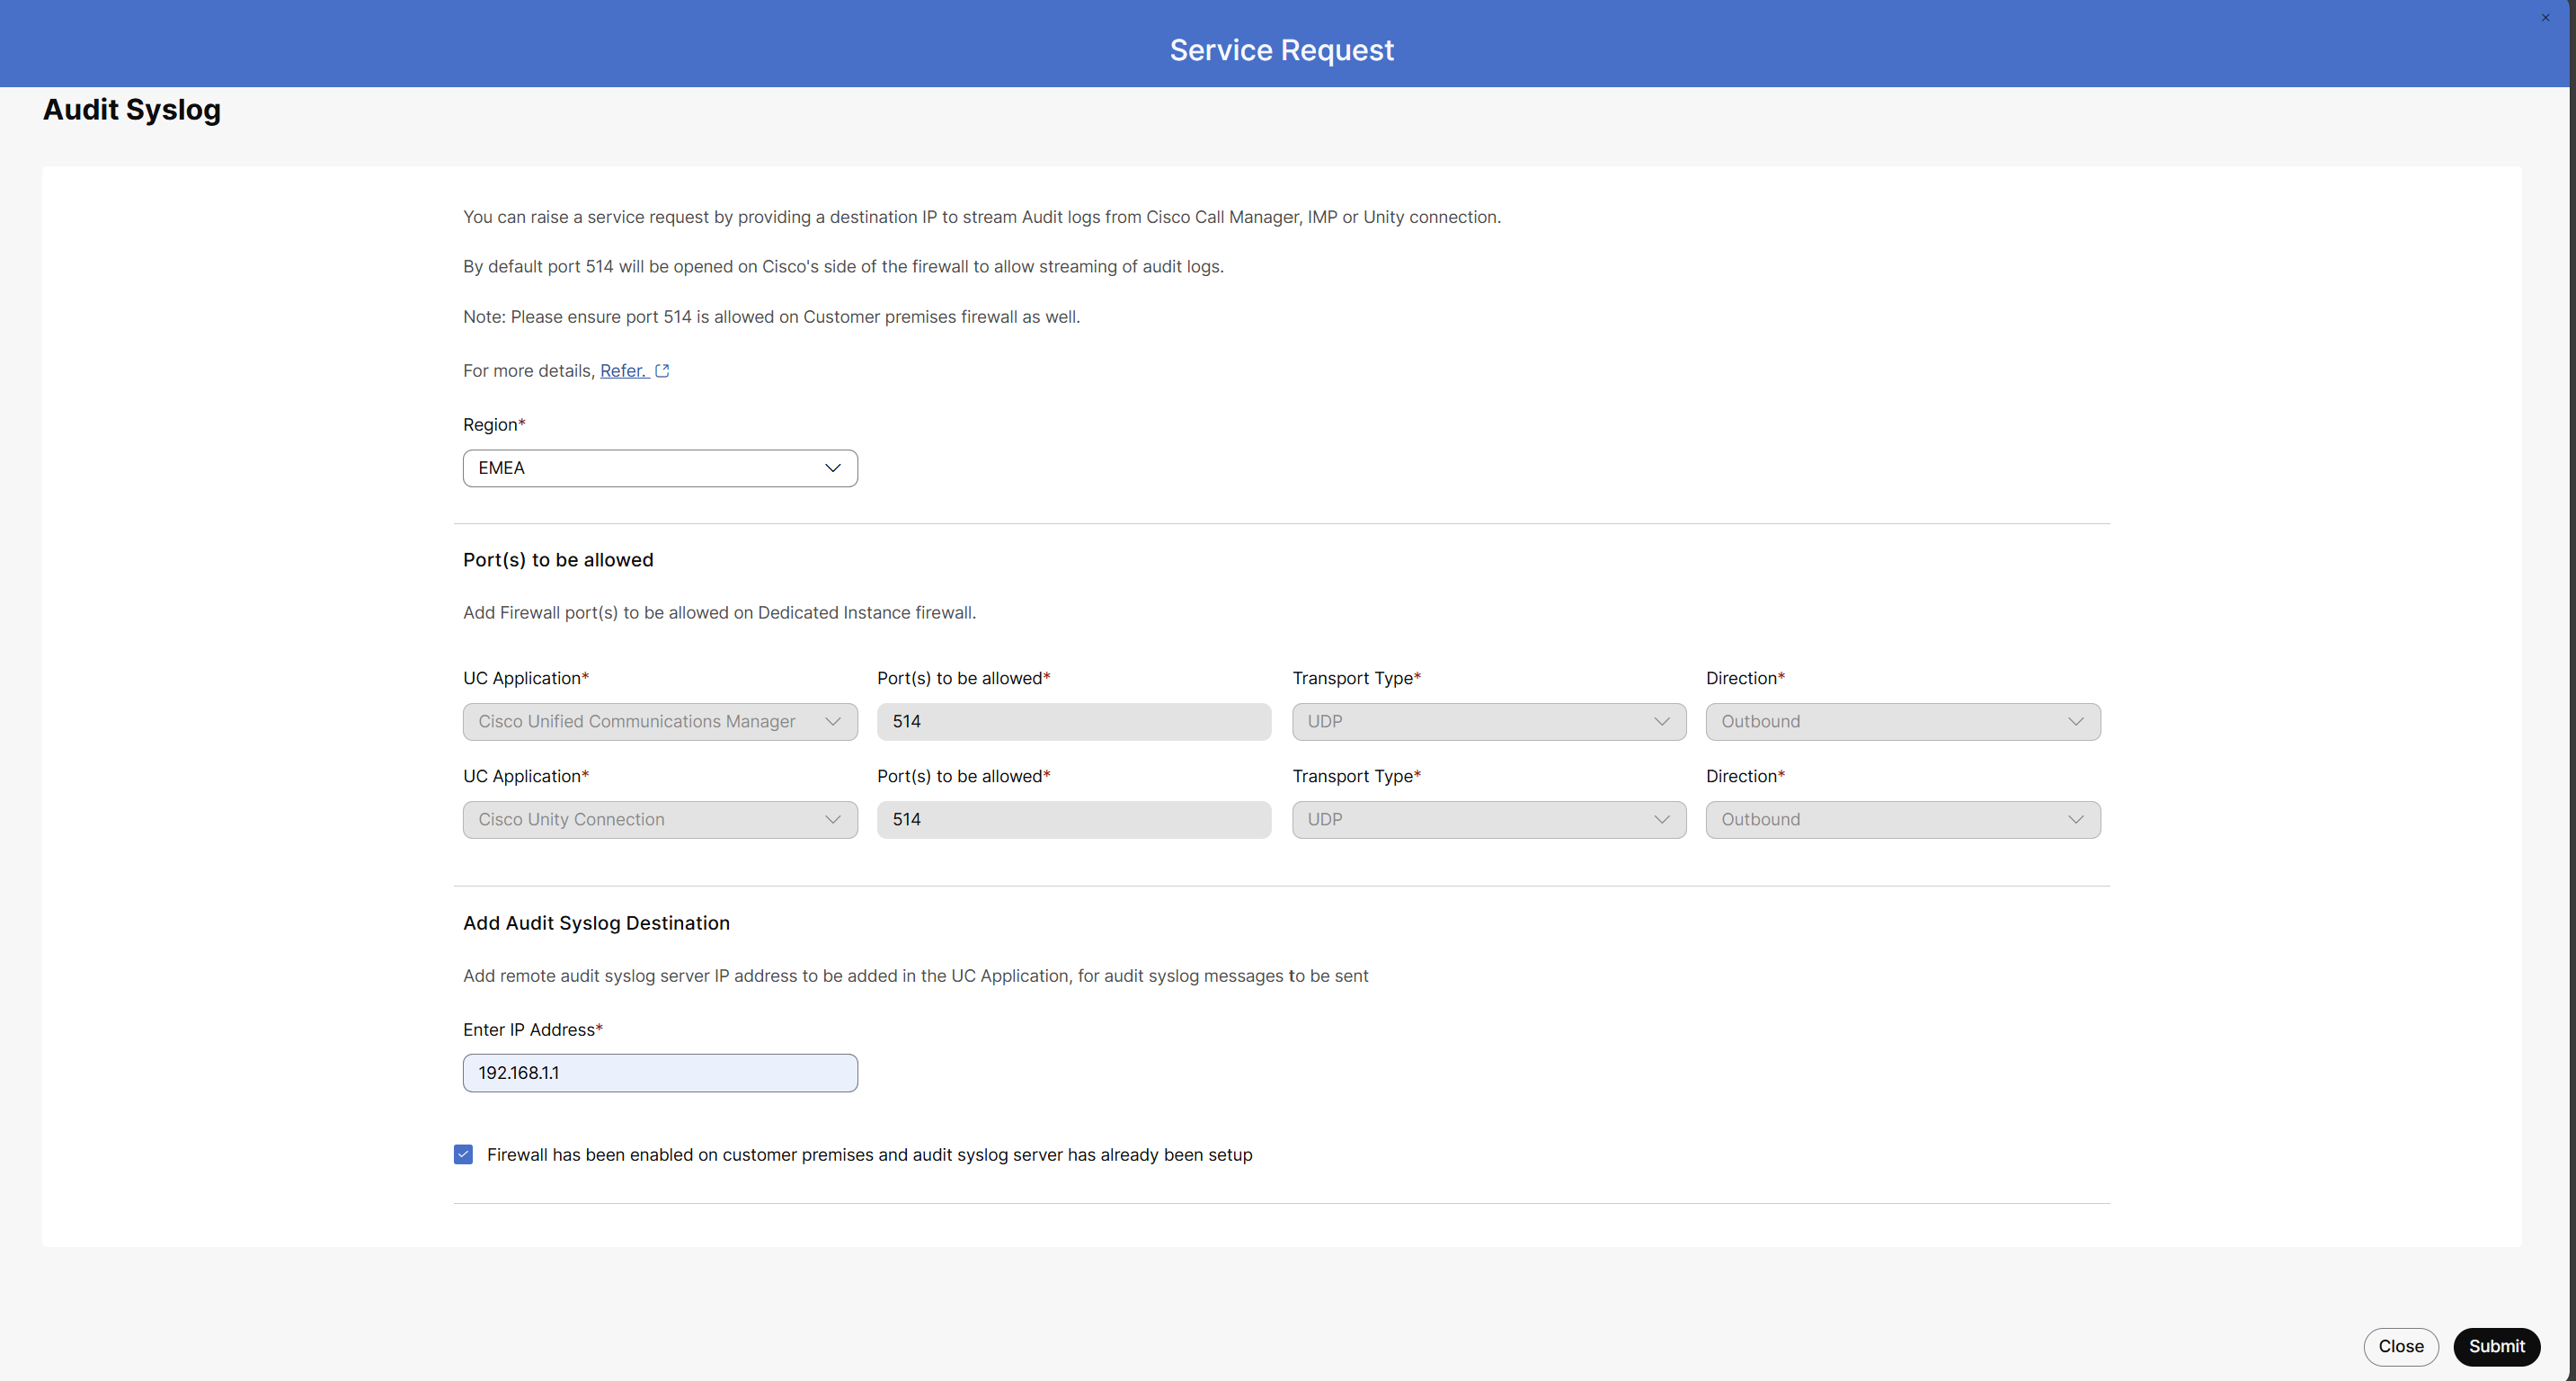
- From the Region drop-down list, choose the region for the audit log entry.
- In the Ports to be allowed section, review the following default
applications:
-
Cisco Unified Communications Manager
-
Cisco Unity Connection
-
Cisco IM&Presence
The Ports to Be Allowed, Transport Type, and Direction fields are prefilled and not editable.
-
- Under Add Audit Syslog Destination, enter the IP address of the remote audit syslog server.
- Check the Firewall has been enabled on customer premises and audit syslog server has already been set up check box, and click Submit.
- Click Submit and review the Audit Log Entry Request details.
Modify audit log server IP address
- Choose Calling → Dedicated Instance → Service Request
- Click Raise Request, then choose Audit Log Settings.
- From the Region drop-down list, choose the region for the audit log entry.
- In the Add Audit Syslog Destination section, you can do one of
the following:
-
Edit the prefilled IP address for the selected region.
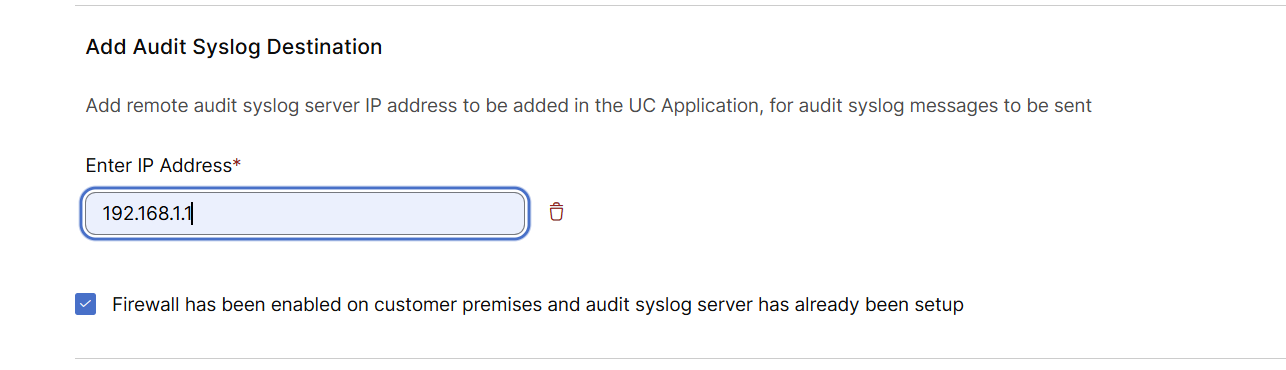
-
Delete the IP address by clicking the Delete icon.

-
- Check the Firewall has been enabled on customer premises and audit syslog server has already been set up check box, and click Submit.
UC application management
Raise a UC Application Management Service Request for any of the following changes to the UC application on your Dedicated Instance:
- Assistance with access-related changes that the partner administrator cannot perform.
- Requests for UC application actions that the partner administrator does not have permissions to complete.
Before you begin
Ensure that you have an active Webex App account. You must use this account to raise the service request.
| 1 |
Sign in to Control Hub. | |||||||||||||||||||||||||||
| 2 |
Go to Calling > Dedicated Instance > Service Request. | |||||||||||||||||||||||||||
| 3 |
Click Raise Request and choose UC Application Management.
| |||||||||||||||||||||||||||
| 4 |
From the Region drop-down list, choose the region where the UC application is deployed. | |||||||||||||||||||||||||||
| 5 |
In the Request details section, choose the Request type. From the Select request type drop-down list, choose an option based on the change you want to request. Some request types include additional sub-options that you can choose as needed.
| |||||||||||||||||||||||||||
| 6 |
In the Select UC Application Types section, check the boxes for one or more UC applications relevant to your request from the following options:
The Select UC Application Types section is not available for the Certificate Consolidation to Establish Trust request type. | |||||||||||||||||||||||||||
| 7 |
In the Select UC Applications section, search for and select one or more UC application instances associated with the application types you chose earlier. The list displays available instances based on your selected region and UC application types. | |||||||||||||||||||||||||||
| 8 |
In the Brief Description field, provide the details required to process your request. | |||||||||||||||||||||||||||
| 9 |
Click Submit and review the UC application request details. |

DI-MT Inter-op SIP trunks
Raise a DI-MT Inter-op SIP trunks service request to change the location in the selected region on Multi-Tenant for the default trunks that Cisco created for the Dedicated Instance.
| 1 |
Sign in to Control Hub. |
| 2 |
Go to Calling > Dedicated Instance > Service Request. |
| 3 |
Go to Raise Request and choose DI-MT Inter-op SIP trunks.
|
| 4 |
From the Region drop-down list, choose the region where your DI-MT Inter-op SIP trunk is deployed. After you select a region, the Current DI MT Inter-op SIP trunk location displays the corresponding country (for example, United States of America, Netherlands, or Australia). If no Inter-op SIP trunk location exists for the chosen region, the message "Selected region don't have MT Inter-op SIP trunk location." appears. |
| 5 |
In the Request Details section, choose the desired country from the Select the new location for the SIP trunks drop-down list by scrolling through the list or using the search bar. |
| 6 |
In the Address field, enter the address associated with the new SIP trunk deployment. |
| 7 |
In the Reason to change field, provide the reason for the SIP trunk location or address update, and include any additional details necessary to complete the request. |
| 8 |
Click Submit and review the SIP trunk change request details. |

UC application lifecycle
Raise an UC Application Lifecycle service request for any queries or changes required to the maintenance schedule related to UC application lifecycle management, which includes certificate management, software upgrades, or PSIRT fixes of the UC applications.
-
Sign in to Control Hub.
-
Go to Calling > Dedicated Instance > Service Request.
-
Click Raise Request and choose UC application lifecycle.
-
From the Region drop-down list, choose the region where the UC application is deployed.
-
In the Request details section, choose the Request type. From the Select request type drop-down list, choose an option based on the change you want to request.
Request type
Sub-request (if applicable)
Description
UC Application Certificates
Request to change the certificate renewal schedule
Use this option to modify certificate renewal that has already been scheduled. The system displays a list of active schedules for the selected organization and region, including the Change ID, Schedule Date, and Expiry Date. When you expand a schedule, the corresponding certificate node details are shown, such as the UC application, server, and the expiry date.
Request information regarding certificate renewal
Use this option to get information on the certificate renewal that has already been scheduled. The system displays a list of existing schedules for the selected organization and region, including the Change ID, Schedule Date, and Expiry Date. When you expand a schedule, the corresponding certificate node details are shown, such as the UC application, server, and the expiry date.
If your query does not relate to the change IDs listed above, you may still proceed by selecting the relevant UC applications and UC application nodes to submit a node-specific query or information.
Request for Private Key PKI from Expressway CLI
Use this option to request for PKI from Expressway CLI. This will list all the available Expressway nodes. Then, use the Select UC application types drop-down list to choose the specific Cisco Expressway application name.
This will be applicable only for Expressways deployed in customer domain. Domains with webex.com are disabled for selection.
UC Application Software Upgrade
Request to change the upgrade schedule
Use this option to modify an upgrade that has already been scheduled. The system displays a list of existing schedules for the selected organization and region, including the Change ID and Schedule Date. When you expand a schedule, the corresponding cluster details are shown, such as the UC application, server, and the current application version.
Select the check box for the relevant Change ID and provide the required details to submit the request for updating the upgrade schedule.
Request for an upgrade to the latest version
Use this option to select the application types and request Cisco to upgrade them to the latest supported version. The system displays a list of existing schedules for the selected organization and region, including the Change ID and Schedule Date. When you expand a schedule, the corresponding cluster details are shown, such as the UC application, server, and the current application version.
For more information on the supported versions, see Release management.
Request information regarding UC application upgrade
Use this option to request information regarding an UC application upgrade. The system displays a list of existing schedules for the selected organization, including the Change ID and Schedule Date. When you expand a schedule, the corresponding cluster details are shown, such as the UC application, server, and the current application version.
If your query does not relate to the change IDs listed above, you may still proceed by selecting the relevant UC applications and UC application nodes to submit a node-specific query or information.
PSIRT related queries
PSIRT issues are Cisco’s responsibility, and Cisco applies the required patches. Use this option if you need any additional information. For more information, see Cisco Options Package (COP) files
-
In the Select UC Application Types section, check the boxes for one or more UC applications relevant to your request from the following options:
- Cisco Unified Call Manager
- Cisco Unity Connection
- Cisco Emergency Responder
- Cisco IM&Presence
- Cisco Session Management Edition
This step is not applicable for Request for Private Key PKI from Expressway CLI service request.
-
In the Select UC Applications section, search for and select one or more UC application instances associated with the application types you chose earlier. The list displays available instances based on your selected region and UC application types.
-
In the Brief Description field, provide the details required to process your request.
-
Click Submit and review the UC application request details.
Infrastructure as a Service
Raise a request for assistance in IaaS activation or any application/virtual machine setup related support required from Dedicated Instance Operations team.
Troubleshooting or break-fix issues should be routed through TAC and will not be handled through this service request. To raise a TAC case, see Tier-1 support.
-
Sign in to Control Hub.
-
Go to Calling >Dedicated Instance > Service Request.
-
Click Raise Request and choose Infrastructure As a Service.
-
From the Region drop-down list, choose the region where the UC application is deployed and enter the Title for the request.
-
In the Description field, provide the details required to process your request.
-
Click Submit and review the UC application request details.
View service request details and communications
To access your service requests in Control Hub, navigate to Dedicated Instance → Service Request. Choose a request from the list to display its details in the following tabs:
-
Request Details: Displays information about the selected service request, such as request type, region, and current status.
-
Communication: Shows message exchanges between the admin and the Dedicated Instance Operations team.
For each new request, the Communication tab provides an interface for basic messaging between the admin and the Dedicated Instance Operations Team. Messages sent through this tab remain synchronized with timestamps and sender details. For more detailed conversations, the admin and a Dedicated Instance Operations engineer can communicate through the Webex App or email as needed.
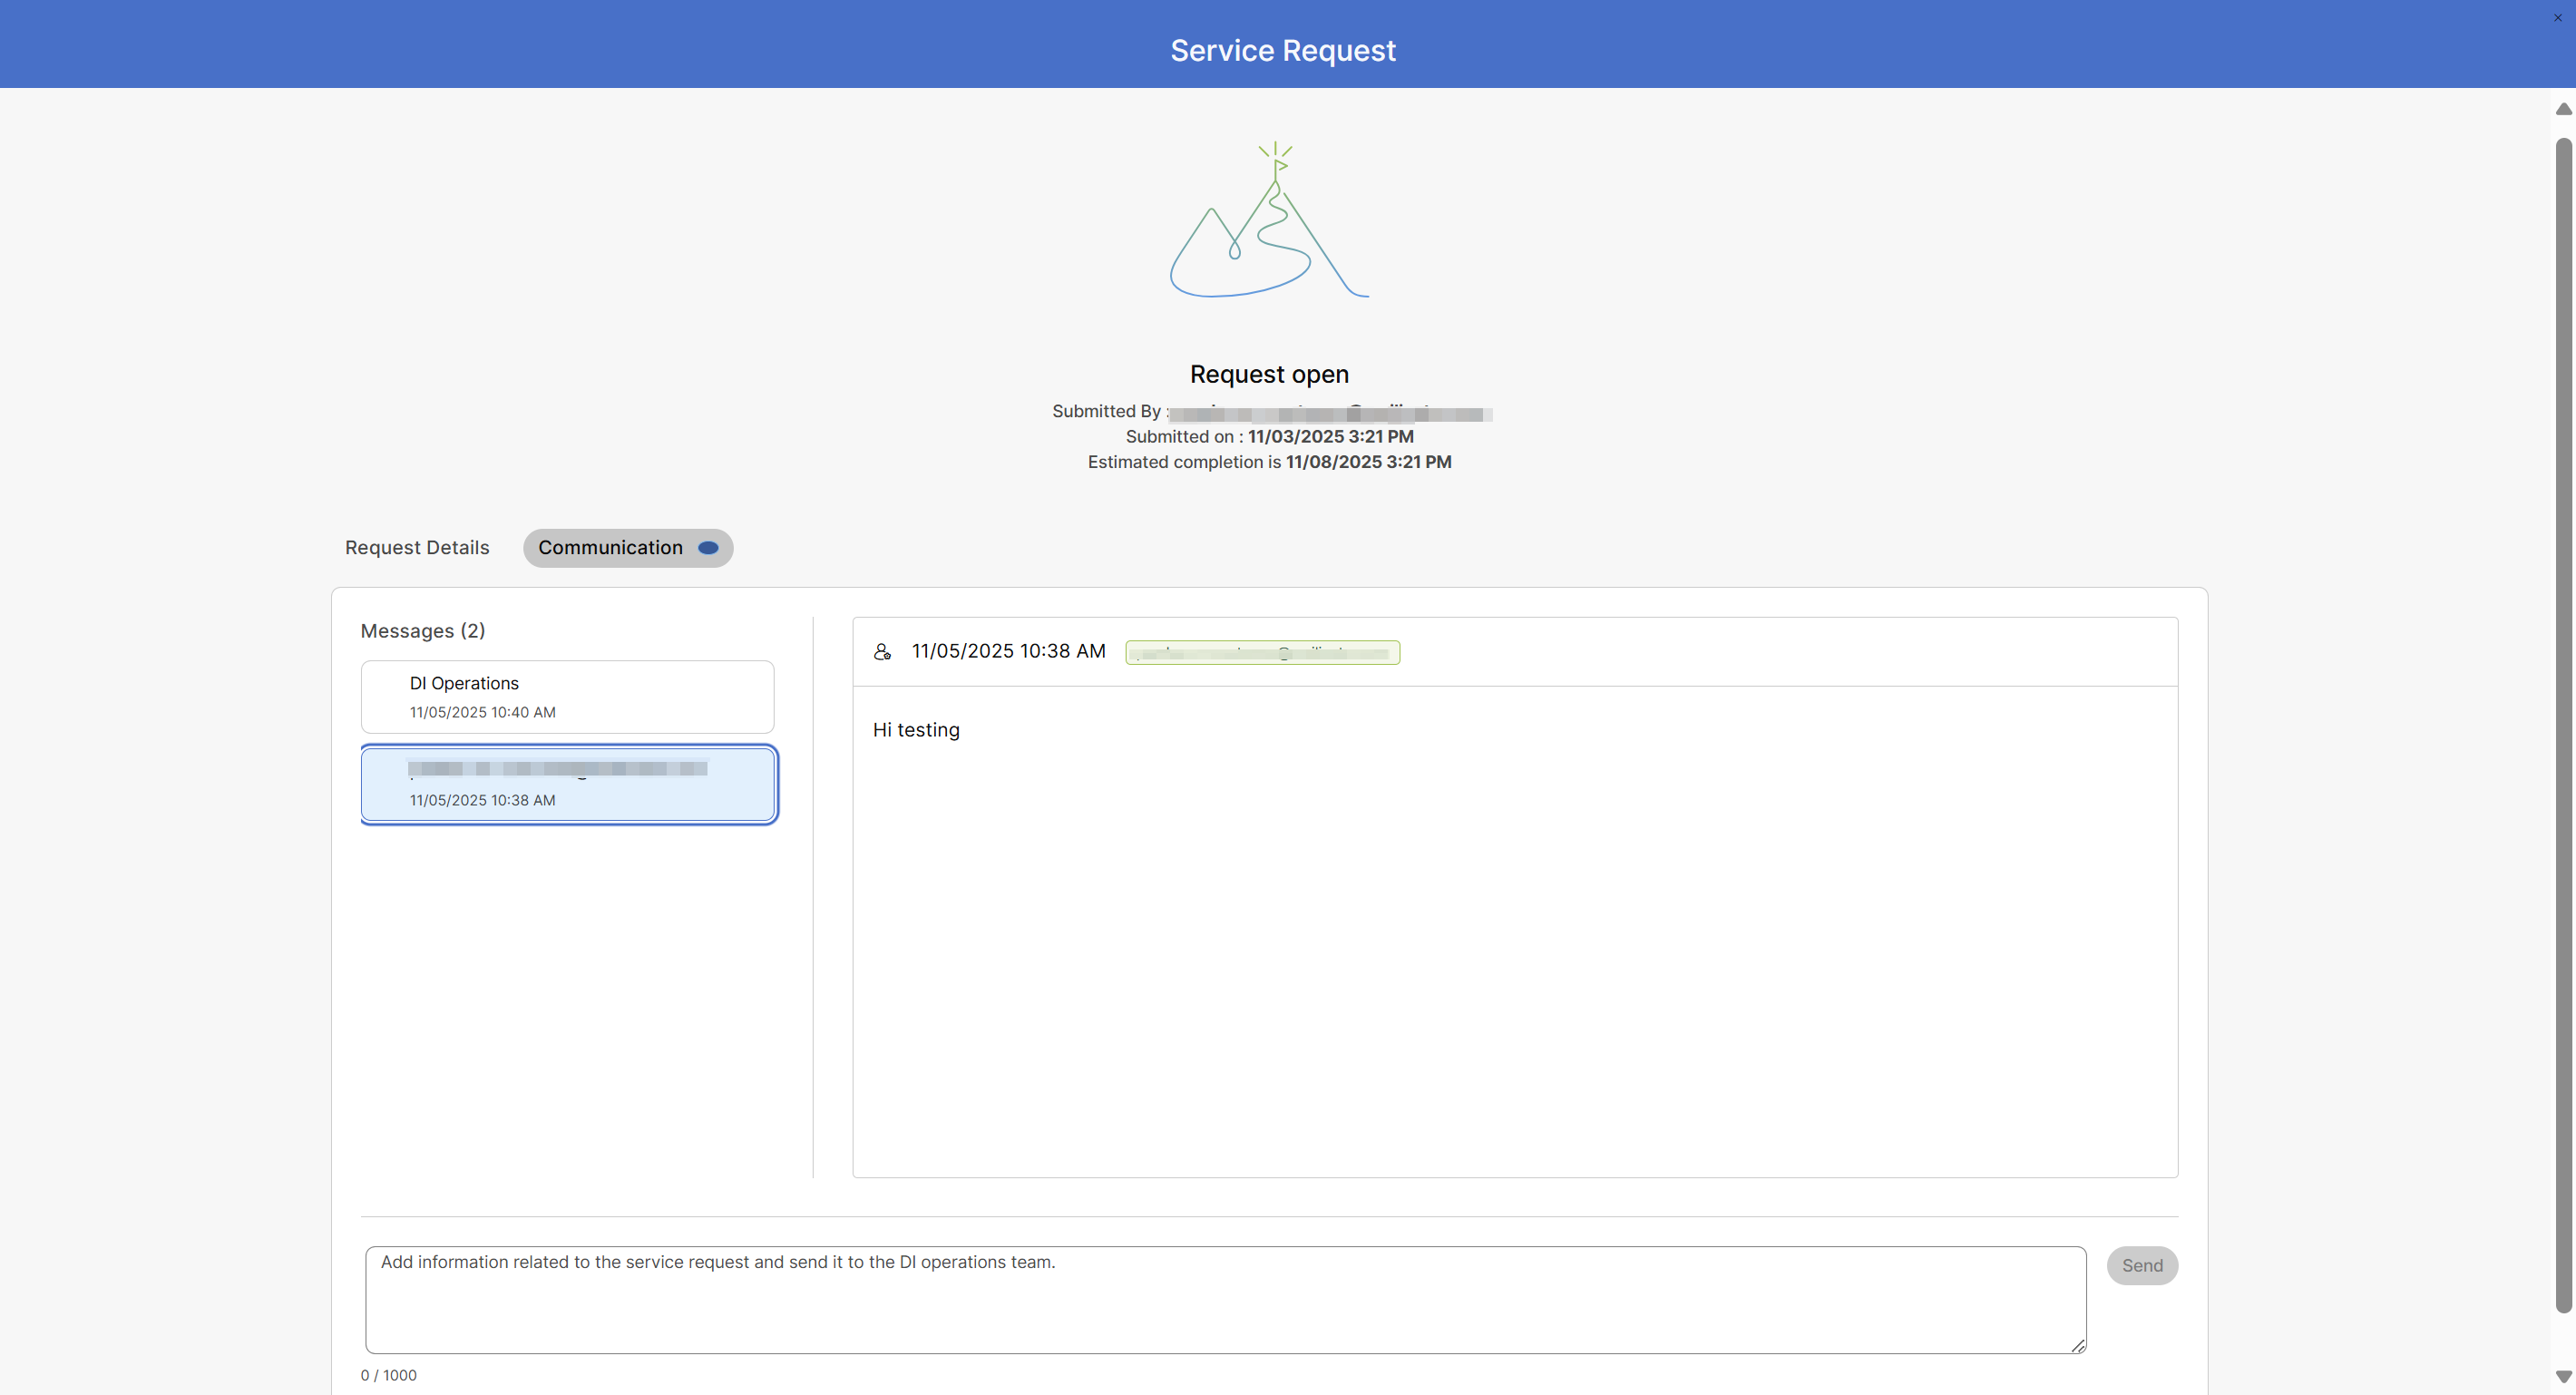
When a new message arrives, Control Hub displays a banner to indicate new communication. The Communication tab supports back-and-forth communication between the admin and the Dedicated Instance Operations team. Unread message indicators (blue dots) appear when there are new messages available. The indicator clears once the admin reads the message. Once the service request is closed, the customer cannot post any further messages.
Click the  icon in the top-right corner of the tab to return to the service
request list.
icon in the top-right corner of the tab to return to the service
request list.


