- Home
- /
- Article

Thanks for your feedback.

 In this article
 Feedback?
When you integrate Webex Contact Center with ServiceNow, you can launch Desktop from within ServiceNow.
Requirements
Before you integrate Webex Contact Center with the ServiceNow console, ensure that you have the following:
- System Administrator access to ServiceNow instance.
- A ServiceNow account to install from https://store.servicenow.com (for installing into Enterprise licensed instances).
- Access to the following files at https://github.com/webex/webex-contact-center-crm-connectors/blob/main/servicenow/updateSet.xml:
- Cisco Click-to-dial Update Set (XML)
- https://github.com/webex/webex-contact-center-crm-connectors/blob/main/servicenow/Global_WxCC_ClickToDial_UIMacro_UpdateSet_1.0.xml—This update set enhances the Click To Dial button experience in older ServiceNow UIs. This enhancement requires the button to reside in ServiceNow's global scope for universal visibility.
- The update sets are only for developer instances.
-
The legacy Agent Workspace is no longer supported starting with the ServiceNow Xanadu edition. The Webex Contact Center connector is designed for the modern Agent Workspace. Customers should migrate to the modern Agent Workspace to ensure integration continuity and access new features introduced in ServiceNow Yokohama and ServiceNow Xanadu or newer versions.
Integrate
Follow one of the two methods below:
For Developer licensed instance, we recommend you to follow the steps under the developer-licensed instance.
If you own an Enterprise licensed instance, follow the guidelines for enterprise-licensed instance.
Digital channels such as chat and email are not supported with CRM connectors. This applies to all CRM integrations using these connectors. Please plan your deployment and customer engagement workflows accordingly.
We do not recommend mixing the enterprise-licensed app with developer sandbox instances.
Install ServiceNow for developer instances
The following sections describe the steps to install the ServiceNow connector for developer instances.
Install the ServiceNow Openframe plugin
| 1 |
Sign into your ServiceNow instance as a System Administrator. |
| 2 |
Go to All > System Definition > Plugins. 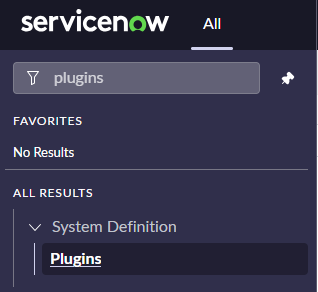
|
| 3 |
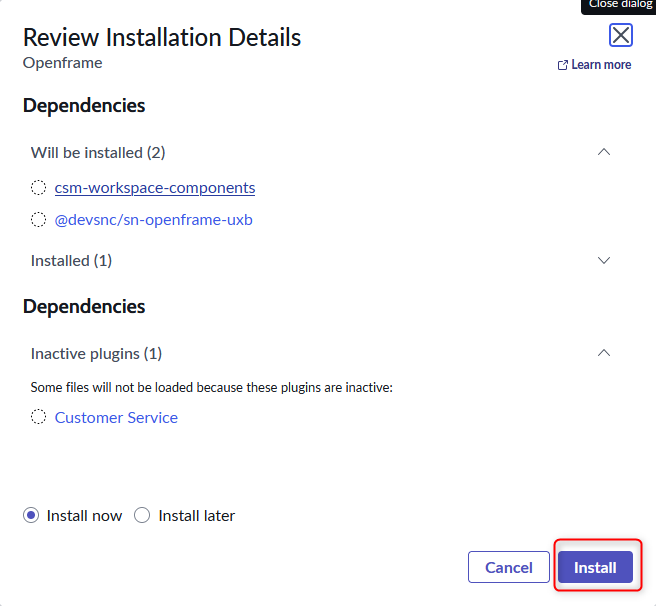
Search for Openframe and install the plugin. 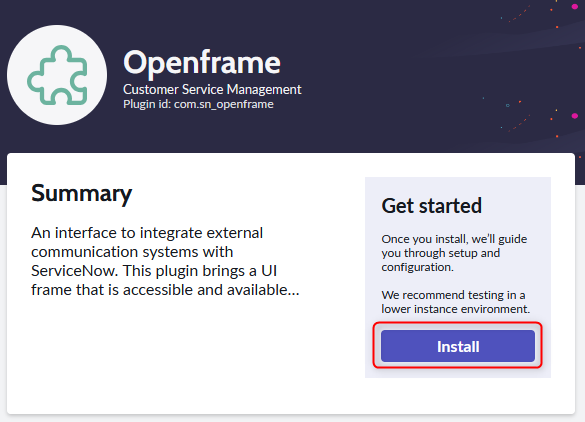
|
Commit the Update Set
| 1 |
Download the latest System Update Set XML file available on the github repo at this location: https://github.com/webex/webex-contact-center-crm-connectors/blob/main/servicenow/updateSet.xml. File Name: updateSet.xml |
| 2 |
Log into your ServiceNow instance as an Administrator. |
| 3 |
Go to All > Retrieved Update Sets. 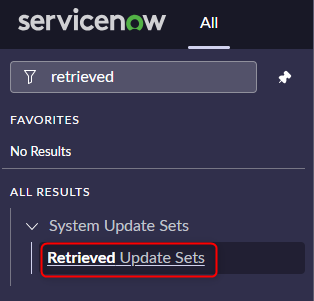
|
| 4 |
Click Import Update Set from XML and choose a file to load the .xml file. 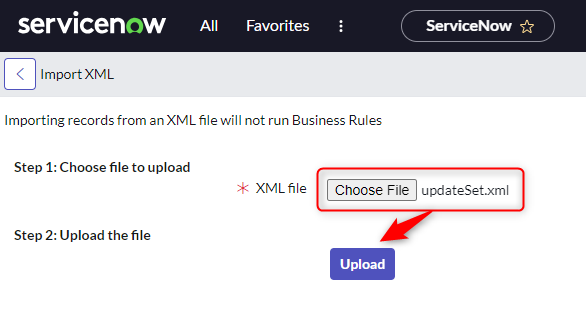
|
| 5 |
Click Upload. |
| 6 |
Click on the created update set name and click Preview Update Set. 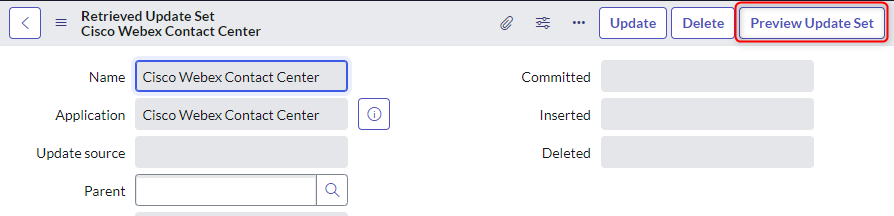
|
| 7 |
Finish by clicking Commit Update Set. 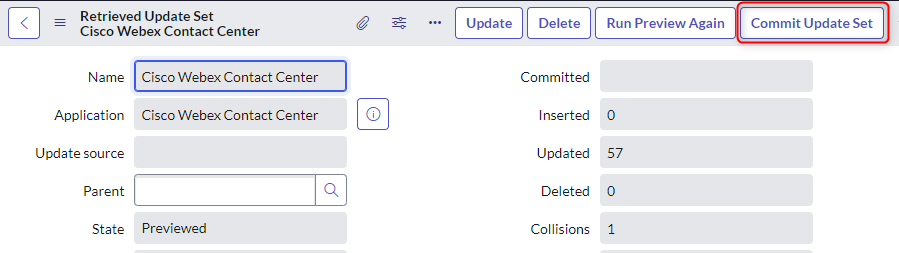
|
Assign Roles to agents
Two system roles and one custom role need to be assigned to the agents:
- sn_openframe_user (system role)
- interaction_agent (system role)
- CC Agent (custom role)
| 1 |
Go to All > System Security > Groups. 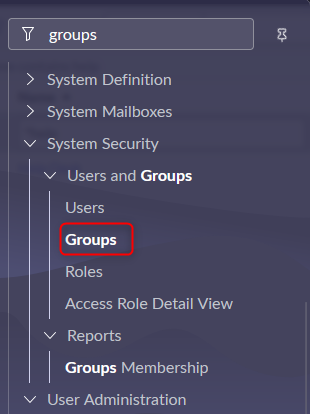
|
| 2 |
Search for the Group you want to edit and click the name. 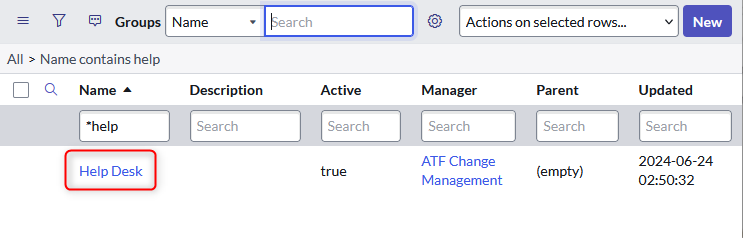
|
| 3 |
Click Edit to change the roles. 
|
| 4 |
Add the following roles: 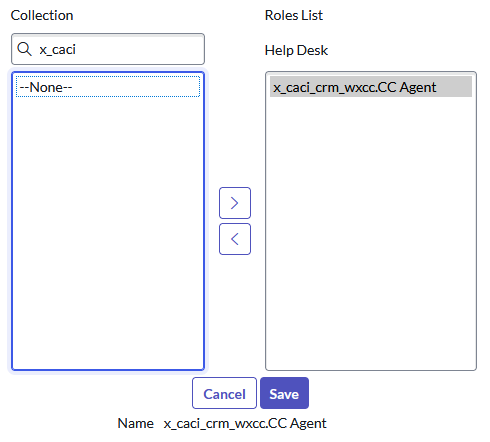
|
| 5 |
Click Save. |
| 6 |
Click the Group Members tab > Edit to add your users. 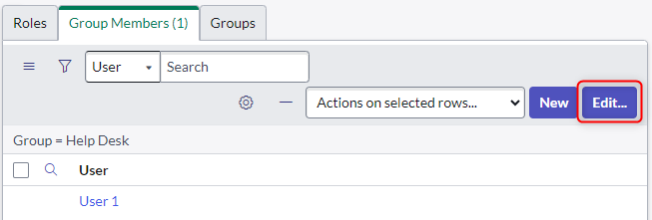
|
| 7 |
Add the users to the list and click Save when finished. 
|
Create the Openframe Configuration
| 1 |
Go to All > Openframe > Configurations. 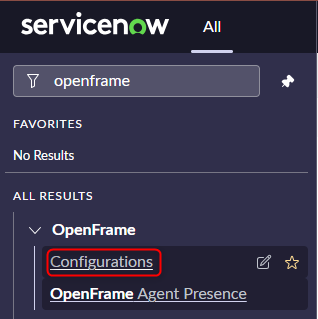
|
| 2 |
Click New. 
|
| 3 |
Enter the following minimum values: 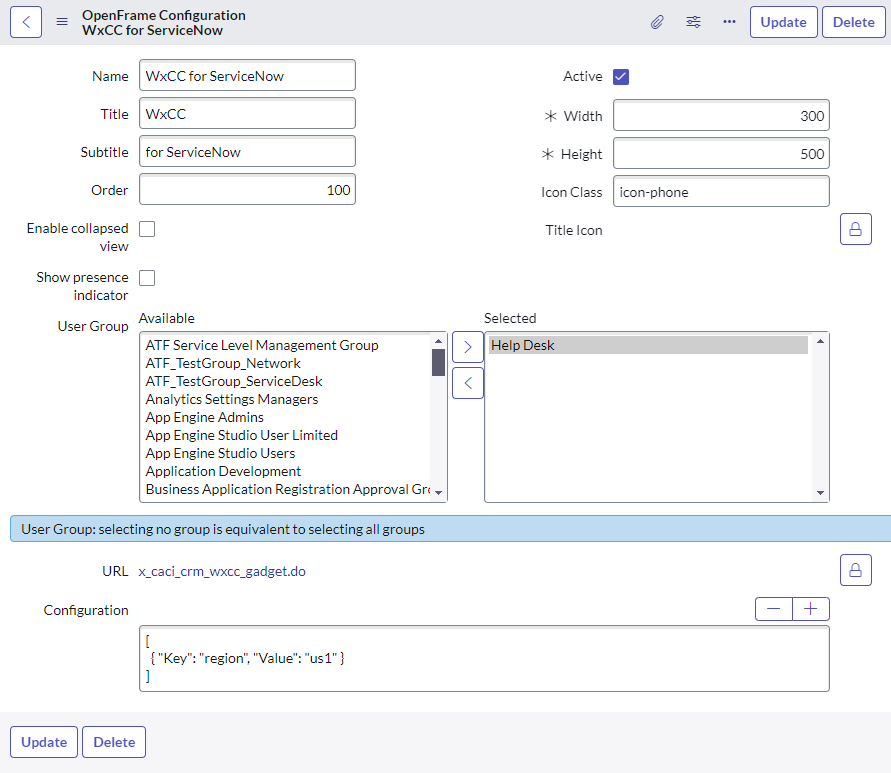
|
Install ServiceNow for Enterprise licensed instances
The following sections describe the steps to install the ServiceNow connector for production instances.
Install the ServiceNow Openframe plugin
| 1 |
Sign into your ServiceNow instance as a System Administrator. |
| 2 |
Go to All > System Definition > Plugins.
|
| 3 |
Search for Openframe and install the plugin.
|
Install the Webex Contact Center application
Instances that have enterprise licenses can install the Webex Contact Center application directly from the ServiceNow Store.
| 1 |
To download and install the Webex Contact Center package, visit the ServiceNow store: https://store.servicenow.com/. |
| 2 |
Type |
| 3 |
From the search results, select Cisco Webex Contact Center and click Get to install the package. To download the legacy version, click Webex Contact Center from the search results and click Get to install the package. |
Assign Roles to agents
Two system roles and one custom role need to be assigned to the agents:
- sn_openframe_user (system role)
- interaction_agent (system role)
- CC Agent (custom role)
| 1 |
Go to All > System Security > Groups.
|
| 2 |
Search for the Group you want to edit and click the name.
|
| 3 |
Click Edit to change the roles.
|
| 4 |
Add the following roles:
|
| 5 |
Click Save. |
| 6 |
Click the Group Members tab > Edit to add your users.
|
| 7 |
Add the users to the list and click Save when finished.
|
Create the Openframe Configuration
| 1 |
Go to All > Openframe > Configurations.
|
| 2 |
Click New.
|
| 3 |
Enter the following minimum values:
|
Customize
The following section explains how to configure and customize the Webex Contact Center ServiceNow Agent Desktop application. You can tailor and automate various workflows to assist agents in managing inbound and outbound calls within the Webex Contact Center Agent Desktop.
Openframe Configuration property customizations
The table below details how to customize the properties of the custom desktop layout file. Tailor the behavior of ServiceNow to fit your specific business needs.
|
Openframe Configuration key property |
Description |
Values |
|---|---|---|
|
region |
Wxcc Region used by agent |
|
|
shareRecordVariable |
CAD variable to save the Sys_Id of the interaction and is used to change the ownership of the record for transferred calls. |
[Default:sharedRecordId] Any CAD variable |
|
enableNotifications |
Enable browser-based pop-up notifications. |
[Default:false] true or false |
|
screenPopOnNoMatch |
Autoclick "New record link" when no match for new customer or new case when not found (depending on screenPopIncomingMode) |
[Default:false] true or false |
|
screenPopIncomingMode | What record type to search on incoming call. Aligns with customerTable or caseTable. | [Default:Customer] Customer, Case, Interaction, or Disabled |
|
customerTable |
The table to search for customers and to create new customer records with “New Record link”. User (ITSM) = sys_user Contact (CSM) = customer_contact | [Default:Users] Users or Contacts |
|
caseTable |
The table to search for cases and to create new case records with "New record link". Incident (ITSM) = incident Case (CSM) = sn_customerservice_case | [Default:Incidents] Cases or Incidents |
|
lookupFields |
Comma separated fields to query on Table. Example: phone | [Default:phone,mobile_phone] Any field on table defined in customerTable or caseTable |
|
lookupVariable |
Value to query tables for inbound call. Example: CADIncidentNumCollected | [Default:ANI] ANI or any CAD variable |
|
lookupResultFields |
Labels to display at top of connector for lookup results on active phone call. Example: name, location | [Default:name,title,department] Up to any three fields on the table defined in customerTable or caseTable. |
|
countryCodeRemoval |
Comma-separated prefixes to be removed from an ANI or CAD variable before performing lookup. Example: +1,+49,+41 | [Default:] Any country code |
|
customerRecordMapping |
Mapping to create a new customer record with "New record link" and populate CAD Variable data. Example: caller_id={ani};employee_number={CADVariable3} | |
|
caseRecordMapping |
Mapping to create new case record with "New record link" and populate data. Example: caller_id={ani};u_cisco_queue={QueueName} | |
|
activityRecordMapping | Mapping for interaction data population. Example: short_description={ani};u_call_disposition={CADCallResult} | |
|
omniReasonCrm[A(10] |
"Unavailable" AWA ServiceNow Presence State on CRM channel when receiving voice call. To get this value, go to Advanced Work Assignment > Settings > Presence States. Right-click the desired Presence State and click “Copy sys_id”. Example: 7f888794dbd28e10999d8c3b1396198b | Any AWA Presence State Sys_Id |
|
omniReasonVoice |
ID of the WxCC “Idle” Auxiliary code used when the agent receives inbound chat. Example: cff0ca82-c623-4cde-aaf1-4e17f268f7f7 | Any WxCC Idle Auxiliary Code |
|
webRtcDomain | WebRTC Domain. Select the domain according to the Region. |
|
|
enableAwaChannelSync |
Enable Agent State synchronization between Cisco WxCC states and ServiceNow AWA presence states. This synchronization is bidirectional and is based on the names of ServiceNow and Cisco presence states. |
|
Example Configuration
Here is a config sample that allows:
- Doing a lookup on the Incidents table (based on incident number collected on the IVR)
- Record Creation on No Match
- State change for OmniChannel
[
{ "Key": "region", "Value": "eu2" },
{ "Key": "screenPopIncomingMode", "Value": "Case" },
{ "Key": "customerTable", "Value": "Users" },
{ "Key": "customerRecordMapping", "Value": "phone={ani};mobile_phone={ani}" },
{ "Key": "caseTable", "Value": "Incidents" },
{ "Key": "caseRecordMapping", "Value": "product=8583ce8237732000158bbfc8bcbe5dd9;short_description={ani}" },
{ "Key": "lookupFields", "Value": " numbephoner"},
{ "Key": "lookupVariable", "Value": "IVR_Incident_Number" },
{ "Key": "lookupResultFields", "Value": "short_description,caller_id,priority" },
{ "Key":"enableNotifications", "Value": "true" },
{ "Key": "omniReasonCrm", "Value": "7f888794dbd28e10999d8c3b1396198b"},
{ "Key": "omniReasonVoice", "Value": "868643ae-c1ed-4849-a5be-a3deaa54f97b"},
{ "Key": "screenPopOnNoMatch", "Value": "true" }
]
List of variables
These variables can be used on the openframe config with the following parameters:
- lookupVariable
- customerRecordMapping
- caseRecordMapping
- activityRecordMapping
| Variable name | Variable description |
|---|---|
| ani | Calling number |
| dn | Called number |
| id | CRM identifier of the found record |
| wrapUpAuxCodeId | Id of the wrapup reason selected by the agent |
| wrapUpAuxCodeName | Name of the wrapup reason selected by the agent |
| virtualTeamName | Name of the team assigned to the call |
| shareRecordId | Id of the CRM activity |
| ronaTimeout | Value of the Ring On No Answer parameter |
| [[Custom Webex CC variables]] | Name of the variable defined on the Webex CC flow designer |
This example shows how to save ani, dn wrapupAuxCodeId, wrapupAuxCodeName into the short description field of the interaction:
{ "Key": "activityRecordMapping", "Value": "short_description= {ani} / {dn} / {wrapUpAuxCodeId} / {wrapUpAuxCodeName} "}
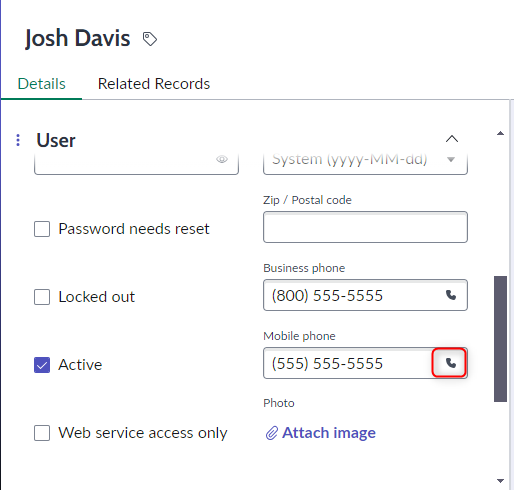
Click-to-dial UI Macro (Classic UI)
When using ServiceNow’s Configurable Workspaces, click to dial on phone records will automatically be enabled. When using the Classic UI view, an update set must be imported to get the same functionality on phone records. Download the Click to dial Update Set and follow these steps to add the click-to-dial functionality to Classic UI.
| 1 |
Go to All > System Update Sets > Retrieved Update Sets.
|
| 2 |
Click Import Update Set from XML 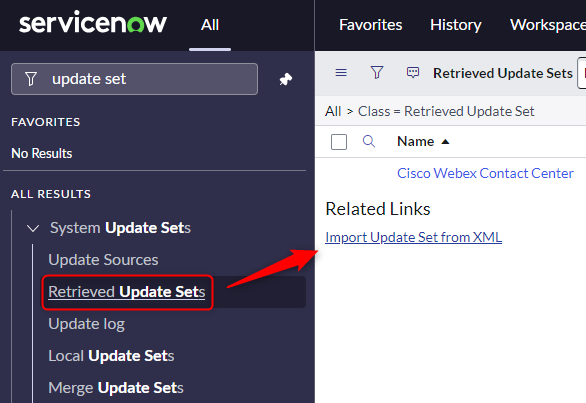
|
| 3 |
Click Choose File, select the downloaded Click-to-dial UI macro .xml file and click Upload. 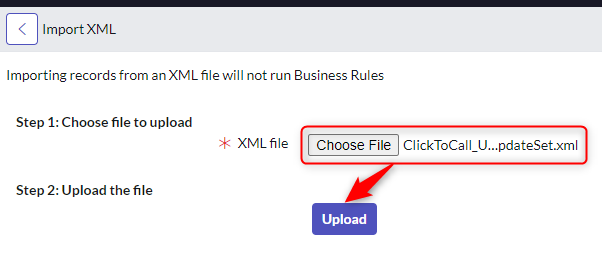
|
| 4 |
Click on the name once uploaded to open the Update Set. 
|
| 5 |
Click Preview Update Set and Close once finished. 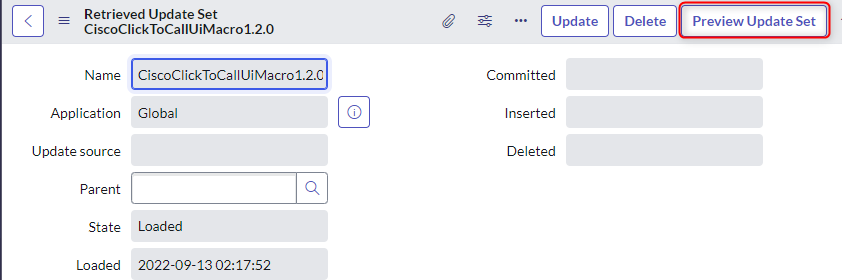
|
| 6 |
Click Commit Update Set and Close once finished. 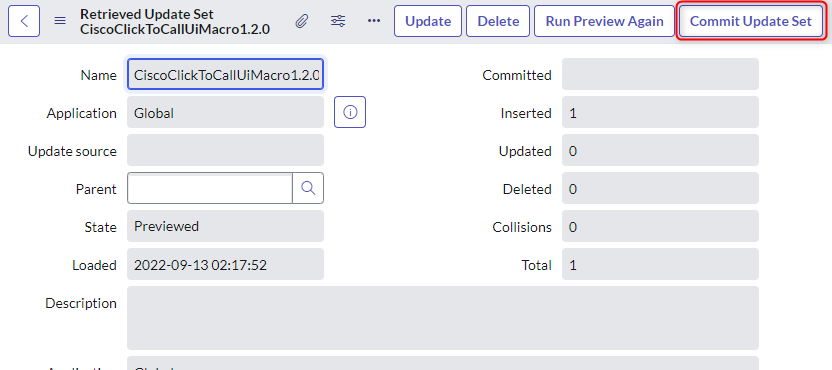
|
| 7 |
Open an existing record to configure click-to-dial. 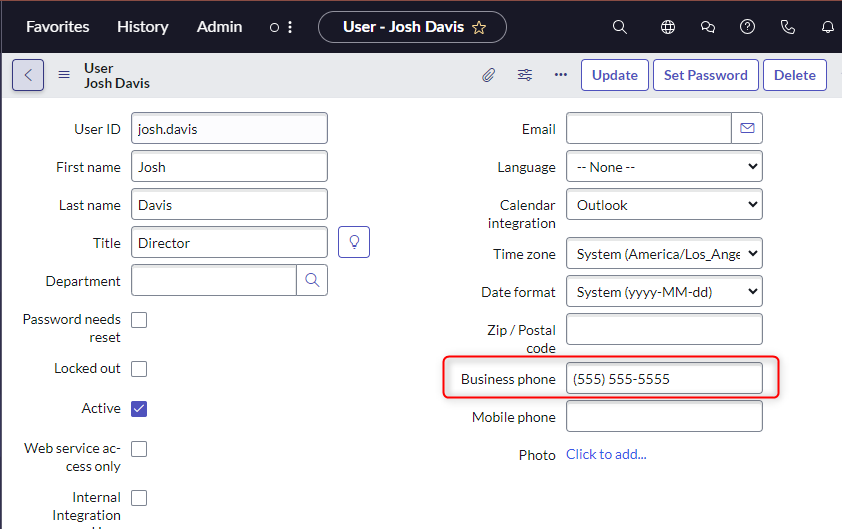
|
| 8 |
Right-click on the phone record name and click Configure Dictionary. 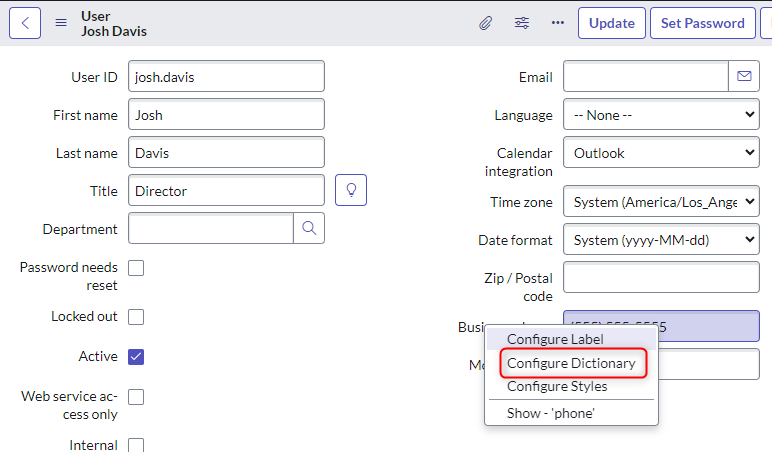
|
| 9 |
Click New on the Attribute tab under Related Links. 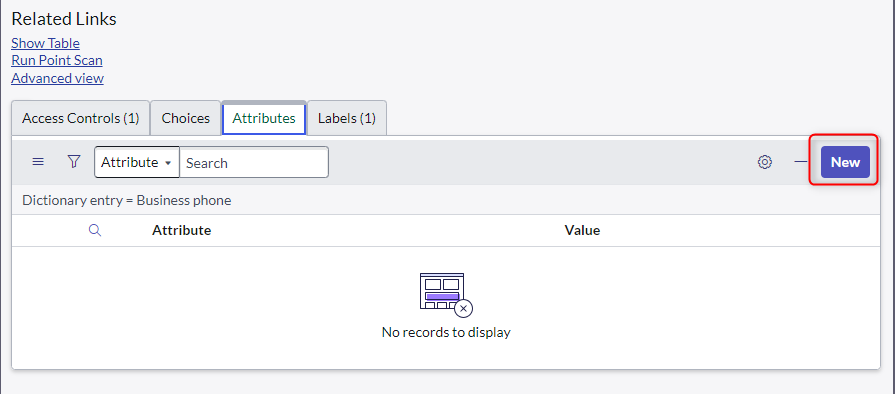
|
| 10 |
Select Field Decorations as the attribute, type 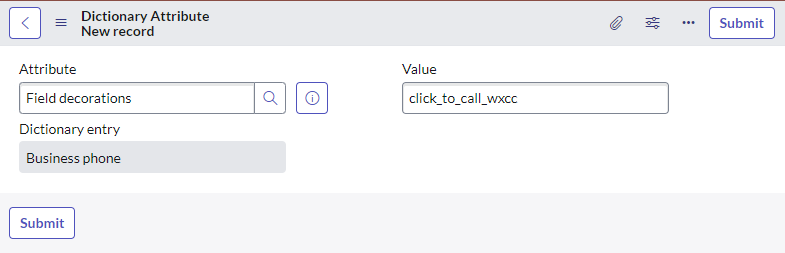
|
| 11 |
The Click-to-dial button should now be visible on the record page. 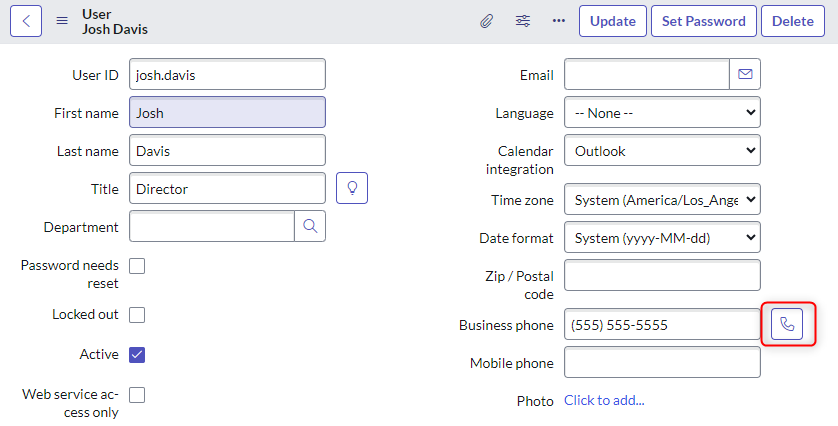
|
| 12 |
Repeat for any other phone fields. |
WebRTC
The ServiceNow connector supports WebRTC on the following browsers—
- Firefox
- Google Chrome
However, WebRTC is not supported on Microsoft Edge browser.
To enable WebRTC, enure that:
- Webex CC Desktop profile allows Desktop.
- You have the webRtcDomain config key in the openframe configuration set with the correct domain name.
- Browser refresh requires you to logout and login again.
- Device selection (micro/headset) is possible from the Options menu.
Update ServiceNow properties
- Login to your ServiceNow instance as an administrator.
- From the all menu, search for
sys_properties.list.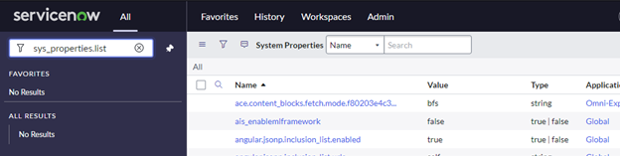
- Search for the property with the
sn_openframe.cross.origin.accessname.
- Edit the record and add the Value field with these parameters:
microphone *;autoplay;speaker-selection

Limitation
If an agent unplugs an active default device while on a call, they will need to select a new device manually through the "Speaker and Microphone" settings.
Speaker and Microphone selection is currently not possible in Firefox.
Desktop Timeout
To enable automatic agent logout after a specified inactivity threshold, the Desktop Profiles Desktop Timeout setting must be configured with a custom value
Limitation
The global Tenant Settings Desktop Inactivity Timeout does not affect the behavior of the CRM connector and will not automatically log out an agent once the inactive duration is reached.
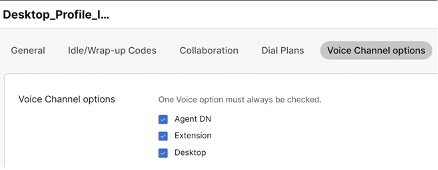
WxCC DN restrictions in gadget
In WxCC Control Hub, under Desktop Profiles > Voice Channel Options, you can configure how Agent DN (Directory Number) is validated. There are three available options:
-
Unrestricted (Allow any value)—Agents can enter any DN of their choice.
-
Provisioned DN (Restrict login DN to provisioned agent DN)—The DN is predefined and cannot be changed by the agent. The DN field in the gadget is pre-filled and disabled.
-
Validate using Dial Plans (Select from list)—Agents can select a DN from a list of predefined options configured by the administrator.
Limitation
Currently, the gadget does not enforce this option. Even if Validate using Dial Plans is selected in Control Hub, the gadget does not check or restrict the DN based on the dial plan list. This setting has no effect with the current gadget.
Synchronize Agent State with Webex App
To enable the Webex App agent state synchronization, the feature must be enabled in the Desktop tenant settings (Desktop) or in the desktop experience (desktop profile Collaboration settings).
Limitation
If agent state synchronization with Webex App is enabled during runtime, logged in agents have to refresh the browser window in order to apply the setting.
Wrap-up time extension
To enable or cancel the auto-wrapup timer, you must select Auto wrap-up extension in the Desktop Profile in Webex Control Hub.
Limitation
If the agent refreshes the browser after canceling the auto wrap-up timer, the outcome depends on whether the original timer has expired:
- If the original timer has expired, the system ends the wrap-up state and sets the agent to Available.
- If the original timer has not expired, the agent can cancel the auto wrap-up timer again.
If the Webex Contact Center Agent Desktop is used in parallel with the Webex Contact Center Integration for Microsoft Dynamics, the wrap-up must be extended on both; otherwise, the wrap-up time ends once the time expires.
Outbound Campaigns
The supported modes are Predictive and Progressive. Other modes are currently not supported.
Acqueon Campaigns Requirement
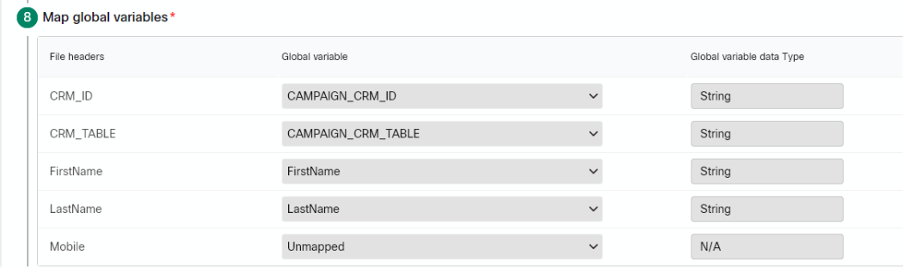
The Global Business Parameters Business Fields CAMPAIGN_CRM_ID and CAMPAIGN_CRM_TABLE must be created. These two fields serve as identifiers for the customer CRM record which should be displayed to the agent. The Business Fields LastName and FirstName are optional.
These business fields must be added to the campaign group, campaign business parameters and campaign Contact business data mapping.
On the Webex Contact Center Control Hub side these fields must be declared as global variables and marked as visible for the agents flows.
Cisco Campaigns Requirement
In The Webex Contact Center Control Hub the global variables CAMPAIGN_CRM_ID and CAMPAIGN_CRM_TABLE must be created and marked as visible for the agents flows. These two variables serve as identifiers for the customer CRM record which should be displayed to the agent. The variables FirstName and LastName are optional.
In the Voice campaign administration field mappings, the global variables must be mapped to the example files header which contains the data for the two global variables CAMPAIGN_CRM_ID and CAMPAIGN_CRM_TABLE.
Webex Directory Search
To enable Webex directory search functionality within the connector, the feature must first be enabled in Webex Control Hub at both the tenant settings level and within the desktop profile (Display User Details setting). Additionally, a Primary Work Number must be configured in the user settings.
Limitations
-
Only users with a Primary Work Number configured in Webex Control Hub are searchable.
-
The feature does not expose presence information.
Release updates
This update (relevant on May 05, 2026) addresses the following enhancements:
- No new package install required.
Features and Improvements
- Qualification for the Australia Release
Archives
May 2026
- Enable agents to decline incoming WebRTC calls
- Extend Search to Webex Directory
March 2026
Features and Improvements
- Webex Calling and Contact Center state synchronization.
- Salesforce auto activity configurability.
- Enhanced progressive and predictive campaign handling.
- Cancel Auto-Wrapup Timer flexibility.
December 2025
Features and Improvements
- Agents can now use a dialpad during to initiate a consulation or transfer call
- Agents are now automatically logged out if they are inactive
November 2025
Features and Improvements
- Enable Agents to start outgoing calls from the Home screen using a dialpad
- Edit call subject field from within the connector
- Send DTMF Tones via keypad when using WebRTC
October 2025
Features and Improvements
- Send DTMF Tones via keypad when using WebRTC.
September 2025
Features and Improvements
- Enabled direct transfers to entry points for more seamless call routing.
- Provided the ability to update Outdial ANI settings.
- Introduced WebRTC mute and unmute functionality for better call control.
August 2025
Features and Improvements
- Added the ability to mute and unmute the microphone during active WebRTC calls.
- Pre-filled the dial number field on the login screen with the default dial number for faster sign-in.
- Enabled changing Team, DN, and Telephony options on the fly for greater flexibility.
- Enhanced CRM lookups by including related records for improved information access.
July 2025
Features and Improvements
- Enabled selection of a phone number as the caller ID for outgoing calls.
- Added the ability to switch microphone and speaker devices when using WebRTC.
- Provided the option to reject incoming calls for more control.
June 2025
Features and Improvements
- Added scope for Spark WebRTC calling in default authentication URL.
- Switched event tracking for improved analytics and reporting.
- Enabled selection of audio input and output devices for calls.
May 2025
Features and Improvements
- Synchronized agent state with After Work Activities (AWA).
- Enabled WebRTC for ServiceNow OEM and added ringtone support.
- Displayed queued consultation calls for better visibility.
- Improved the accuracy of the Disconnect Reason field on voice call records.
- Removed system roles from the custom "CC Agent" role.
March 2025
Features and Improvements
- Created phone logs linked to interactions when calls end for improved tracking.
- Added new configuration options for screen pop behavior.
- Enabled initiating screen pops by a Webex Contact Center flow within ServiceNow.
- Enhanced voice channel login options based on Webex Contact Center configuration.
- Supported consult, conference, and warm transfer to entry points.
- Improved integration by updating to the latest List Contact Service Queues API.
- Enhanced user experience by automatically closing open drawers when an alert is shown.
January 2025
Features and Improvements
- Transitioned from using PhoneLogs to Interactions for call activity.
- Accepted table names as configuration input for case and customer tables.
- Improved variable interpretation in customer and case record mappings.
- Auto-created records on no match only in visible tabs.
- Enhanced data privacy by sanitizing actions for LogRocket.
- Allowed editing of call-associated data during calls.
- Updated API endpoints for Webex Contact Center requests.
- Updated menu options to a sidebar layout for easier navigation.


