- ホーム
- /
- 投稿記事


Control Hub でデジタル DECT ネットワークを構築および管理する
 この記事の内容
 フィードバックがある場合
Webex Calling は、Cisco IP DECT DBS-210 に マルチセルサポートを提供し、最大 254 の拠点に最大 1000 回線をプロビジョニングできます。
DECT ネットワークを使い始める
管理者は、サイト内で Cisco DECT ネットワーク設定を構築しCisco Webex Control Hub。Cisco IP DECT シリーズは、次の Cisco デバイスで構成されています。
-
Cisco IP DECT DBS 110 シングルセル ベース ステーション
-
Cisco IP DECT DBS 210 マルチセル ベース ステーション (最大 254 ベース)
-
Cisco DECT ハンドセット (6823 および 6825)
Webexの場合 Calling/Wholesale, 以下のオファーが適用されます:
-
DBS 110 は、リピーターを使用したシングル セル展開のみをサポートします。
-
DBS 210 は、リピーターを使用したシングル、デュアル、およびマルチセルの展開をサポートします。
DECT ネットワークを作成すると仮想コンテナが構築され、DECT ネットワークを構成するさまざまな要素が設定されます。DECT ネットワークを構築すると、管理者は新しい DECT ネットワークを展開し、既存のネットワークを管理できるようになります。既存の単一セルまたは複数セル ネットワークを新しい DECT ネットワーク ソリューションに移行できます。
DECT ネットワークを構築すると、同じ顧客のロケーションで共存できるシングルセルとマルチセル両方の DECT ネットワークを展開できます。
DECT ネットワークを作成する際に、展開要件 (例: 企業、倉庫環境、小売業):
-
ユーザーと場所をマルチセル ネットワークに割り当てます。
-
ハンドセットごとに複数の回線を設定します。
-
自給自足の拠点を構成します。
-
DECTベースステーションをDECTネットワークにグループ化する
DECT ネットワークを作成する主な 3 つの手順は以下のとおりです。
| 1 |
DECT ネットワーク自身を作成します (すべてのベースと受話器を置くコンテナ)。 |
| 2 |
ベース ステーションを追加します。 |
| 3 |
ユーザーをハンドセットに割り当てます。 |
新しい DECT ネットワークを作成する
始める前に
-
コントロール ハブの DECT ネットワーク タブ内で DECT ネットワークを構成します。ここでは、ベース ステーションを追加し、ユーザーにハンドセットを割り当てます。
-
DECT ネットワーク内で 110 ベースと 210 ベースを混在させたり一致させたりすることはできません。
-
ハンドセットには最大 2 つの回線があり、DECT ネットワークはすべてのハンドセットで合計 1000 回線をサポートします。
-
DECT ネットワークの構築は、すべてのベースとハンドセットを収容するコンテナを構築するようなものです。DECT ネットワークを作成し、後でユーザーまたは回線を割り当てることができます。
| 1 | |
| 2 |
。 |
| 3 |
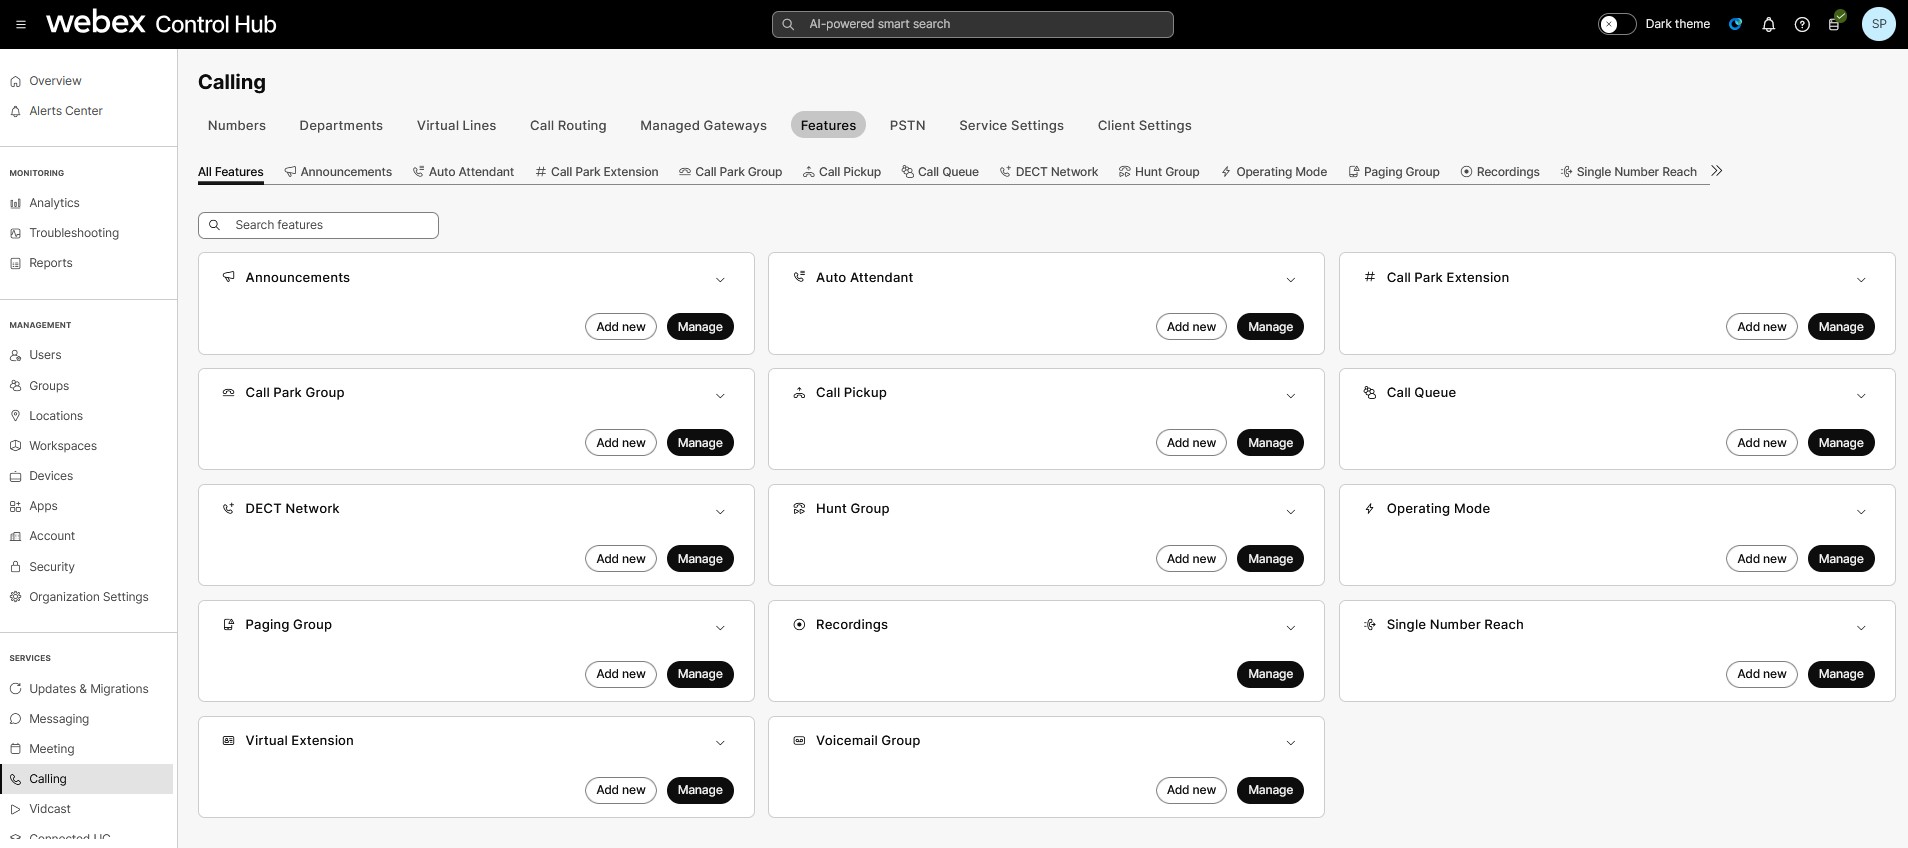
DECT ネットワークを作成するには、 [新規追加]をクリックします。 既存のシングルセルまたはマルチセル ネットワークがある場合は、移行ウィザードを使用して新しい DECT ネットワークに簡単に変換できます。 |
| 4 |
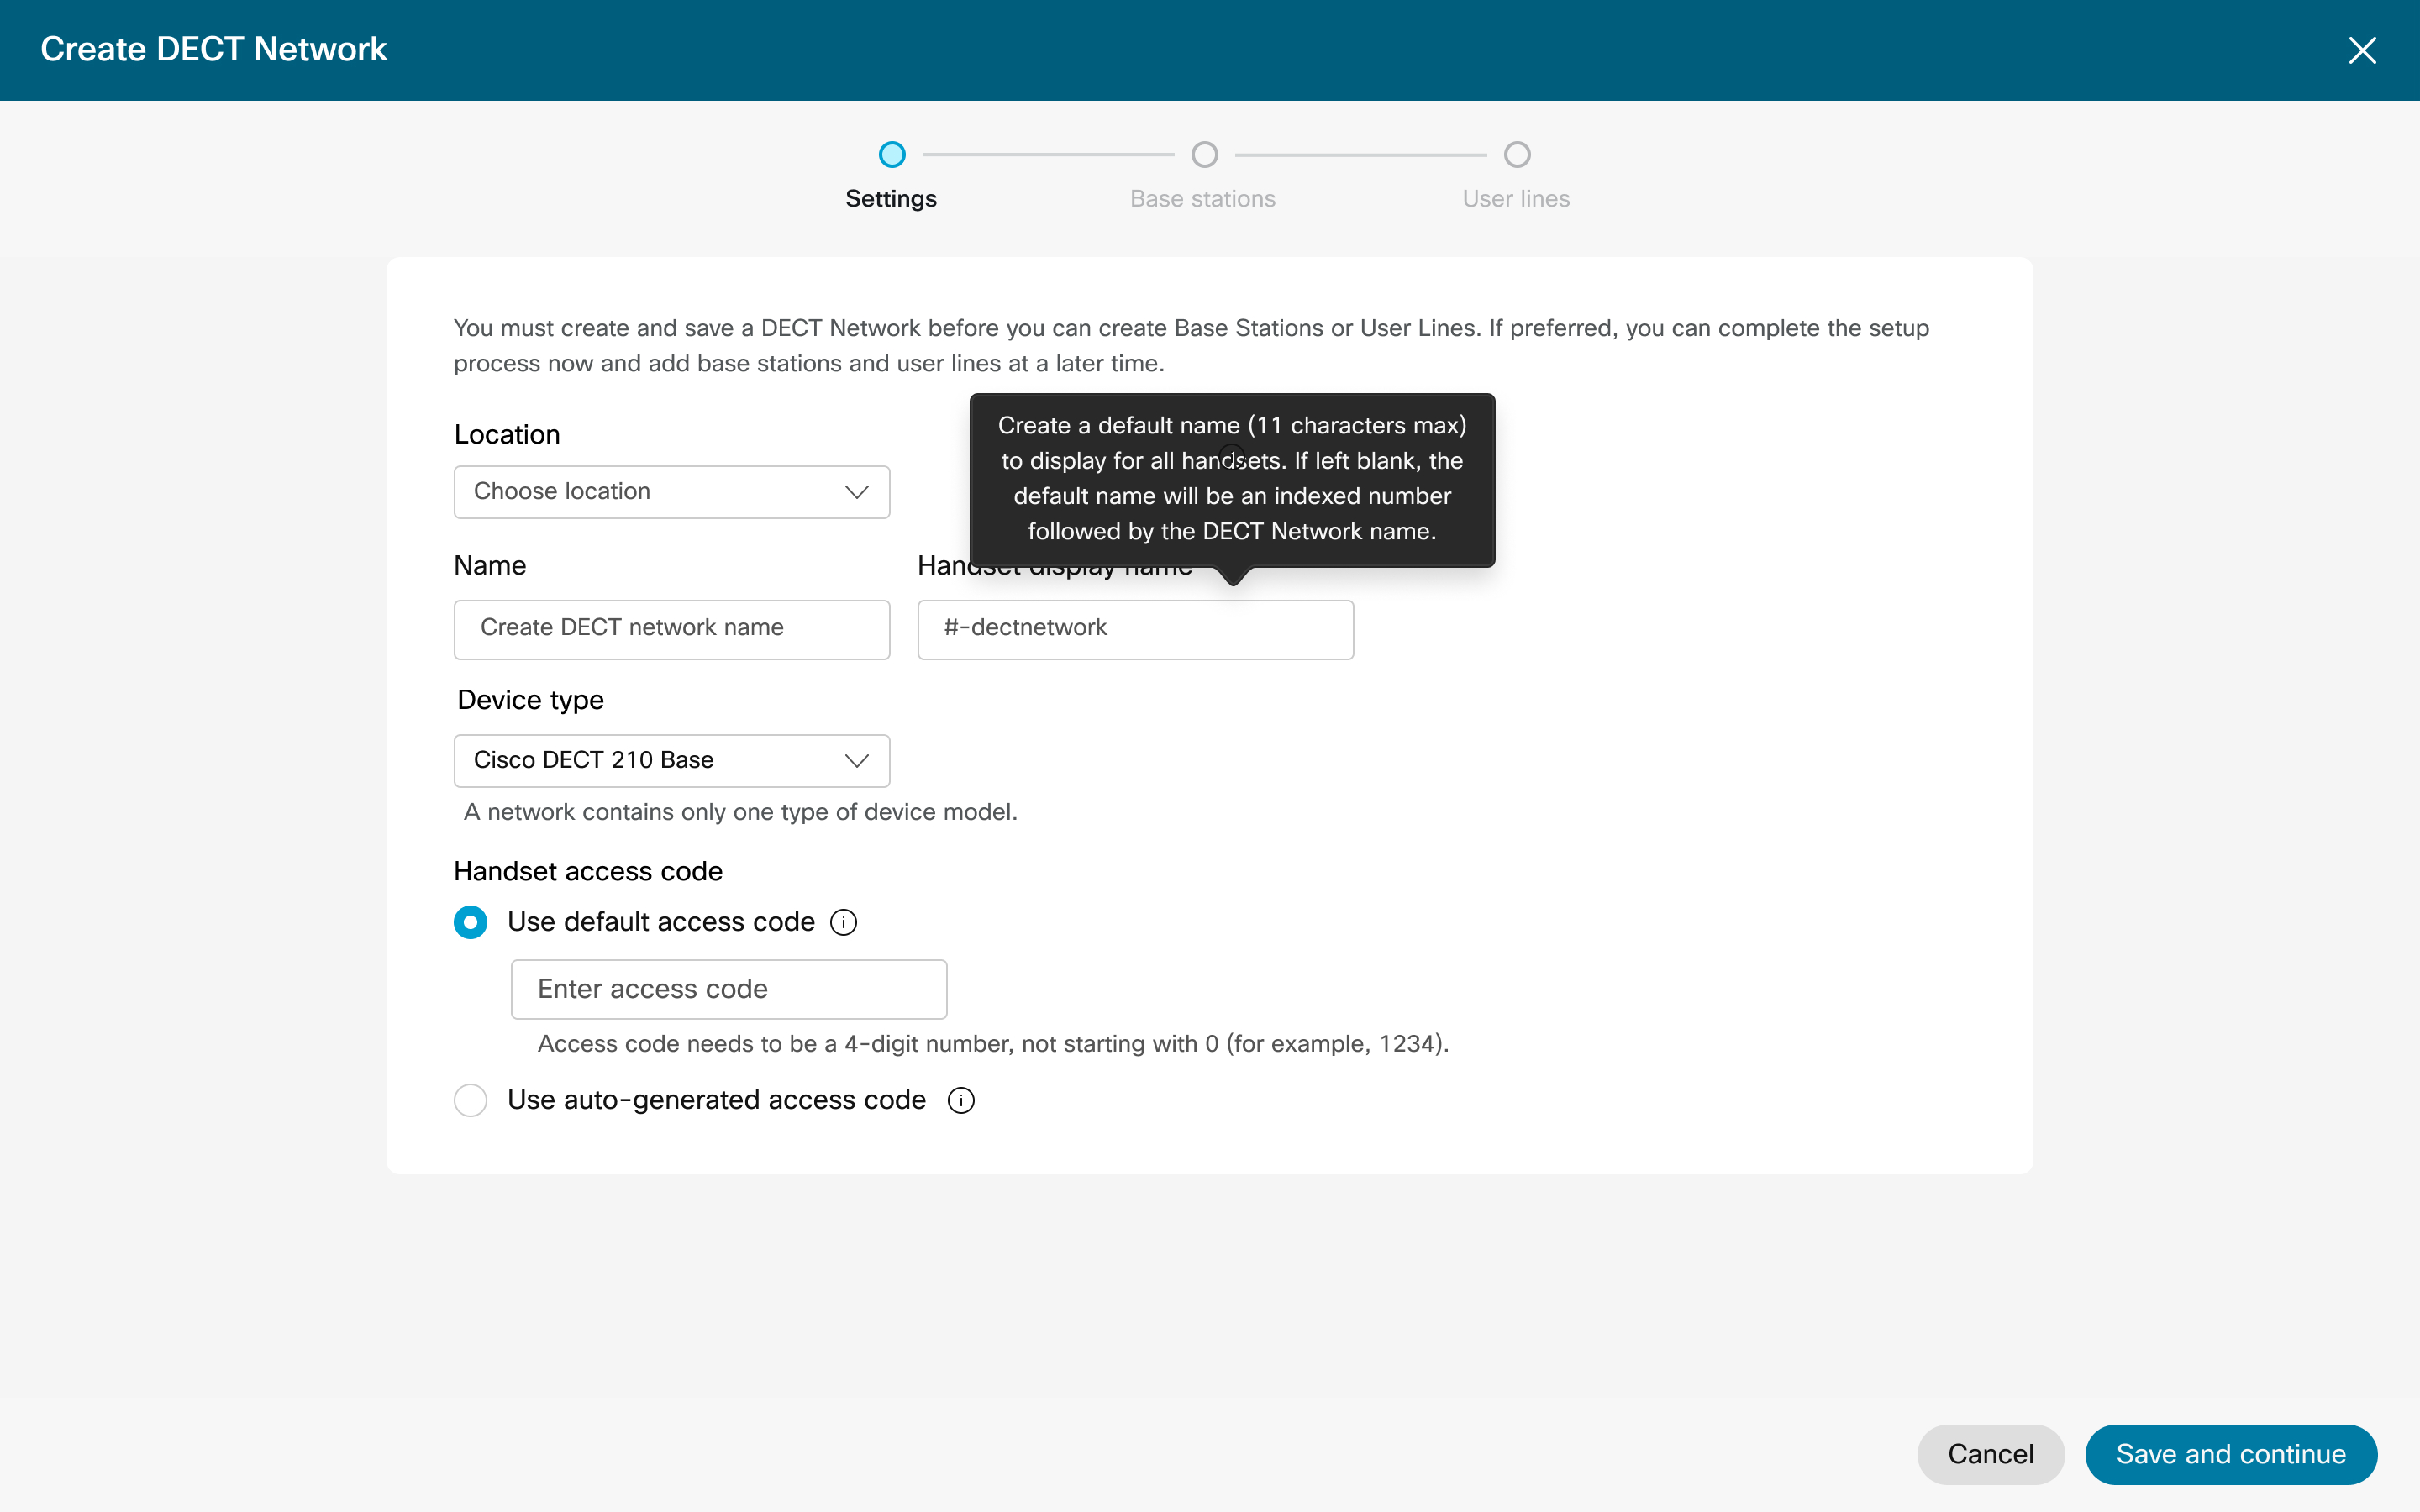
[設定] で、ドロップダウン メニューから [ロケーション] 選択します。 |
| 5 |
最大 20 文字の英数字を含む DECT ネットワーク 名を入力します。 |
| 6 |
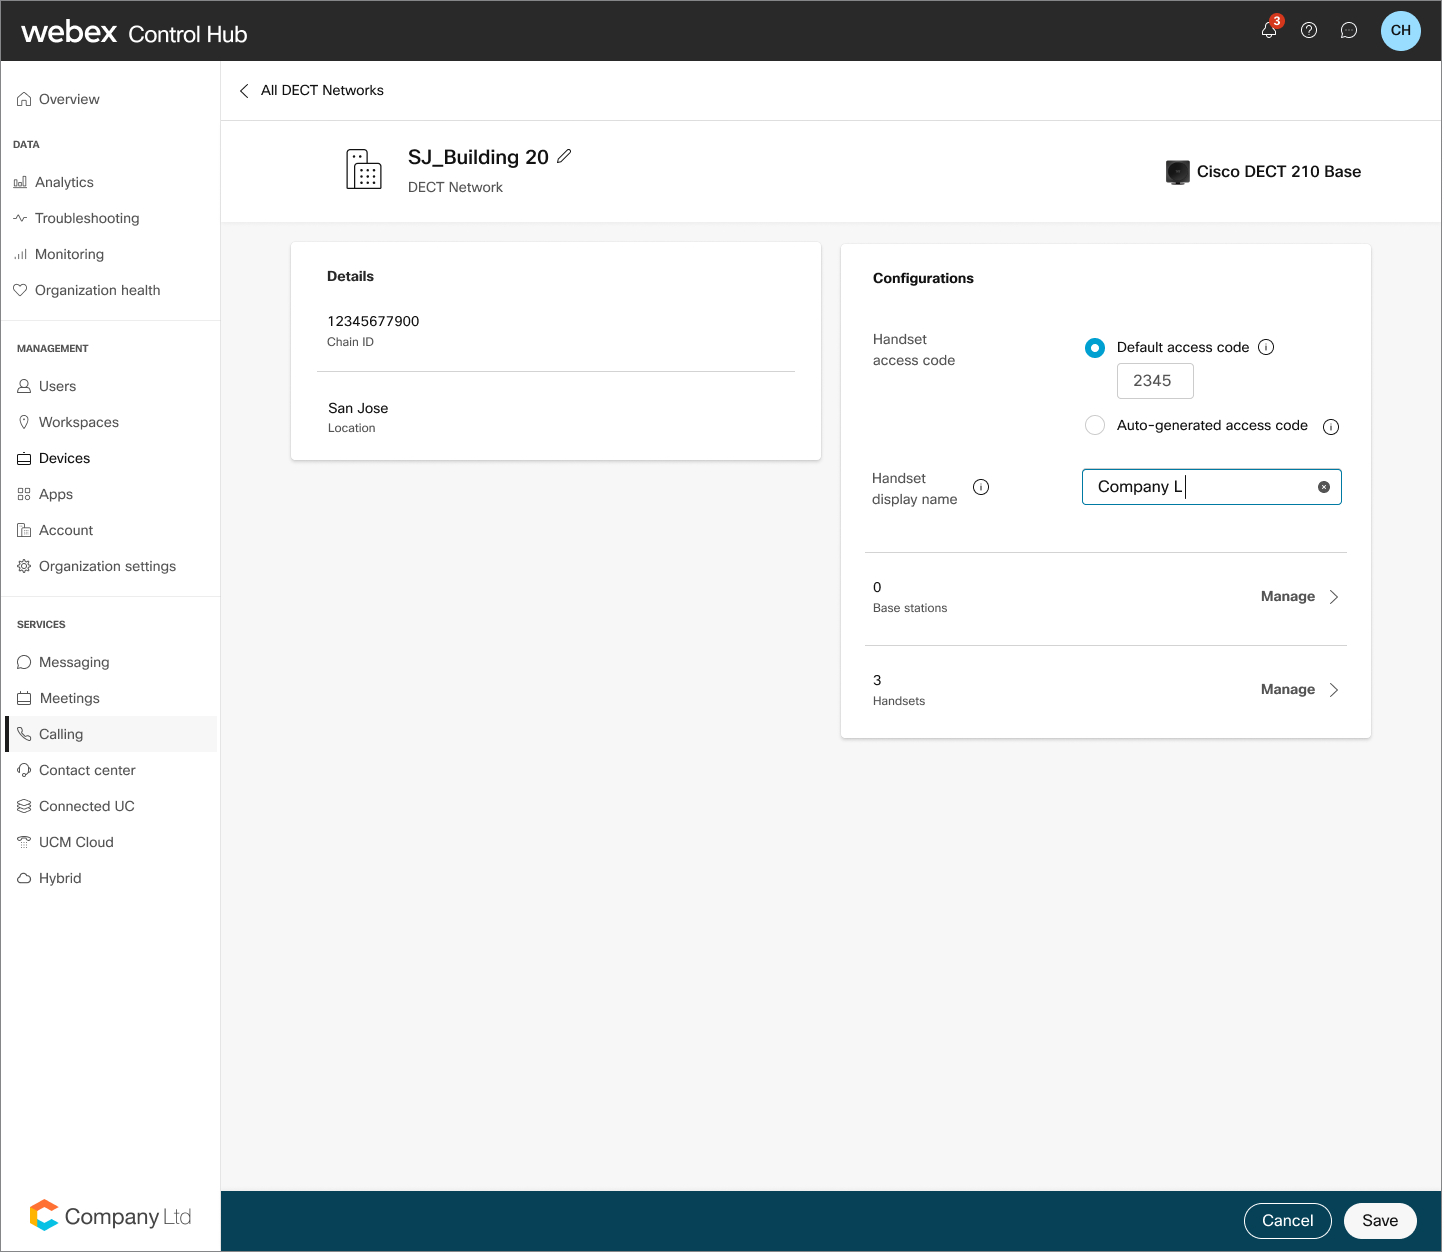
デフォルトのハンドセットアイドル画面名を入力します。 |
| 7 |
ドロップダウン メニューから デバイス タイプ を選択します。このオプションは、この DECT ネットワークに使用するベースのタイプを定義します。110 ベース ステーションと 210 ベース ステーションを混在させることはできません。 |
| 8 |
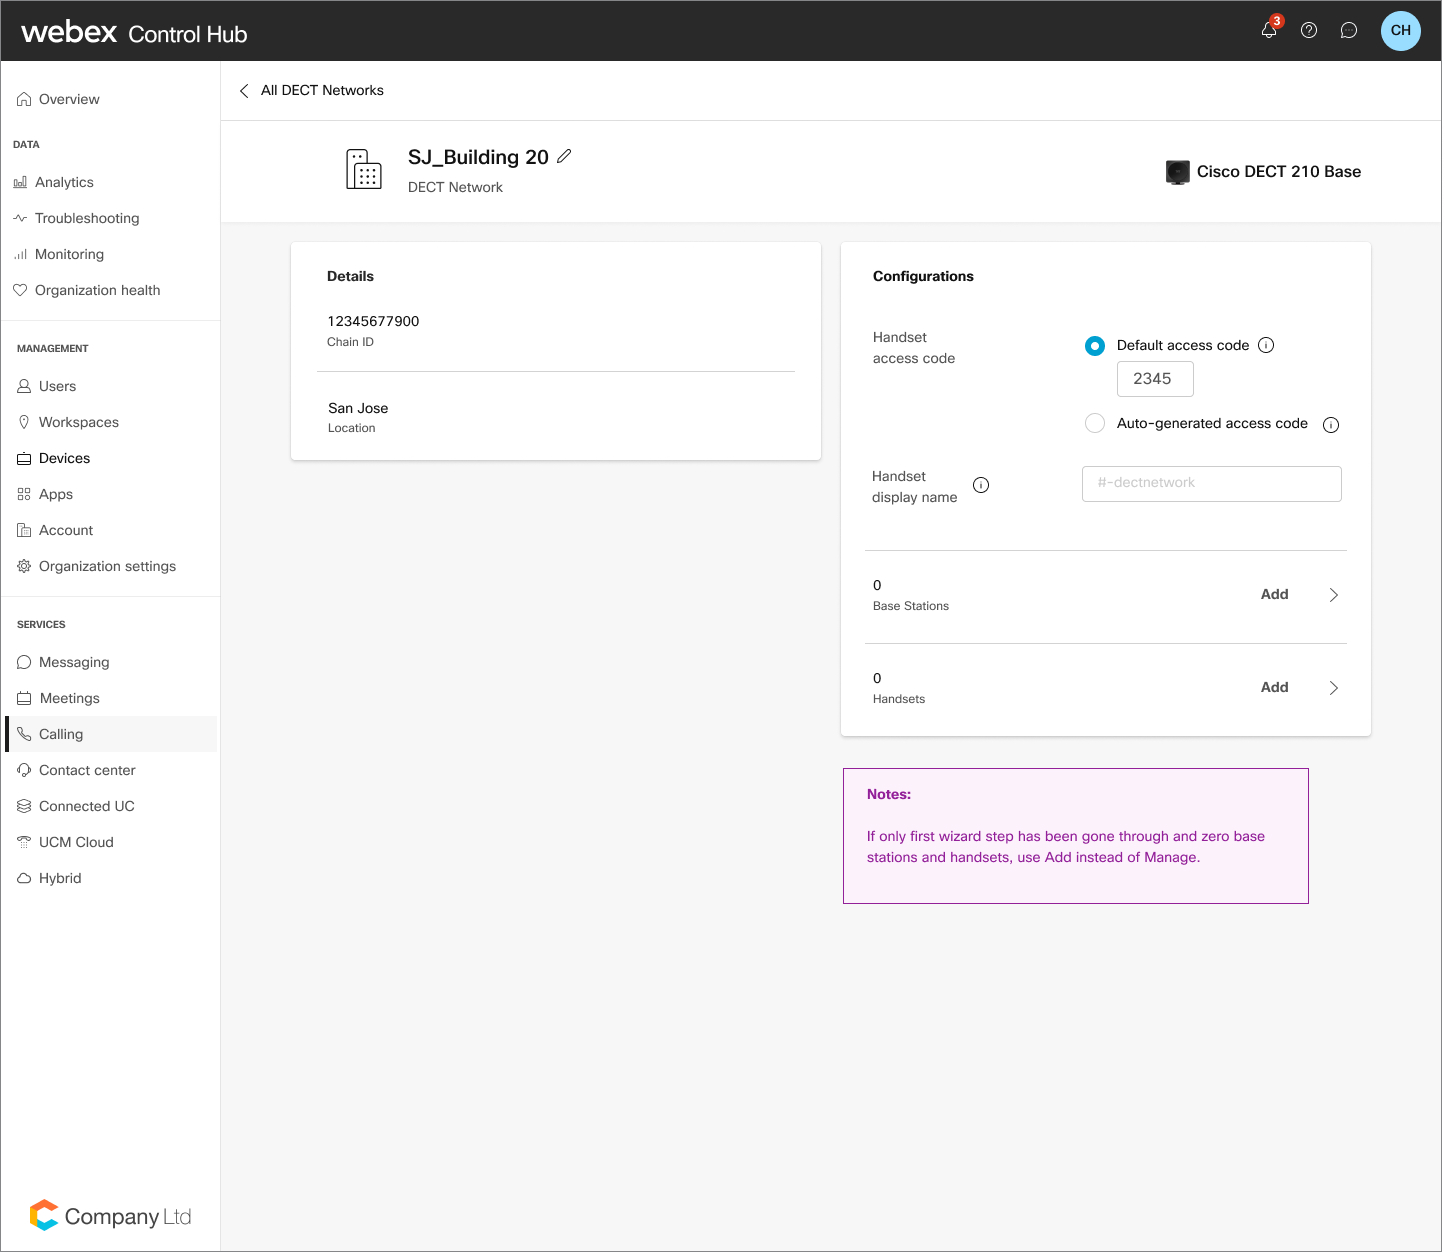
PIN の設定を選択します。
アクセス コードを使用して、ハンドセットを DECT ネットワークに初めて接続するか、切断されたハンドセットに再度接続します。 |
| 9 |
[次へ] をクリックして [ベース ステーション] タブに移動します。 ボックスの上部にある X をクリックして閉じると、DECT ネットワークは作成されず、設定は保持されません。 次へ をクリックして、DECT ネットワークを作成し、設定を保存します。残りの手順はオプションであり、後で DECT ネットワーク管理プロセスを使用して完了できます。 |
| 10 |
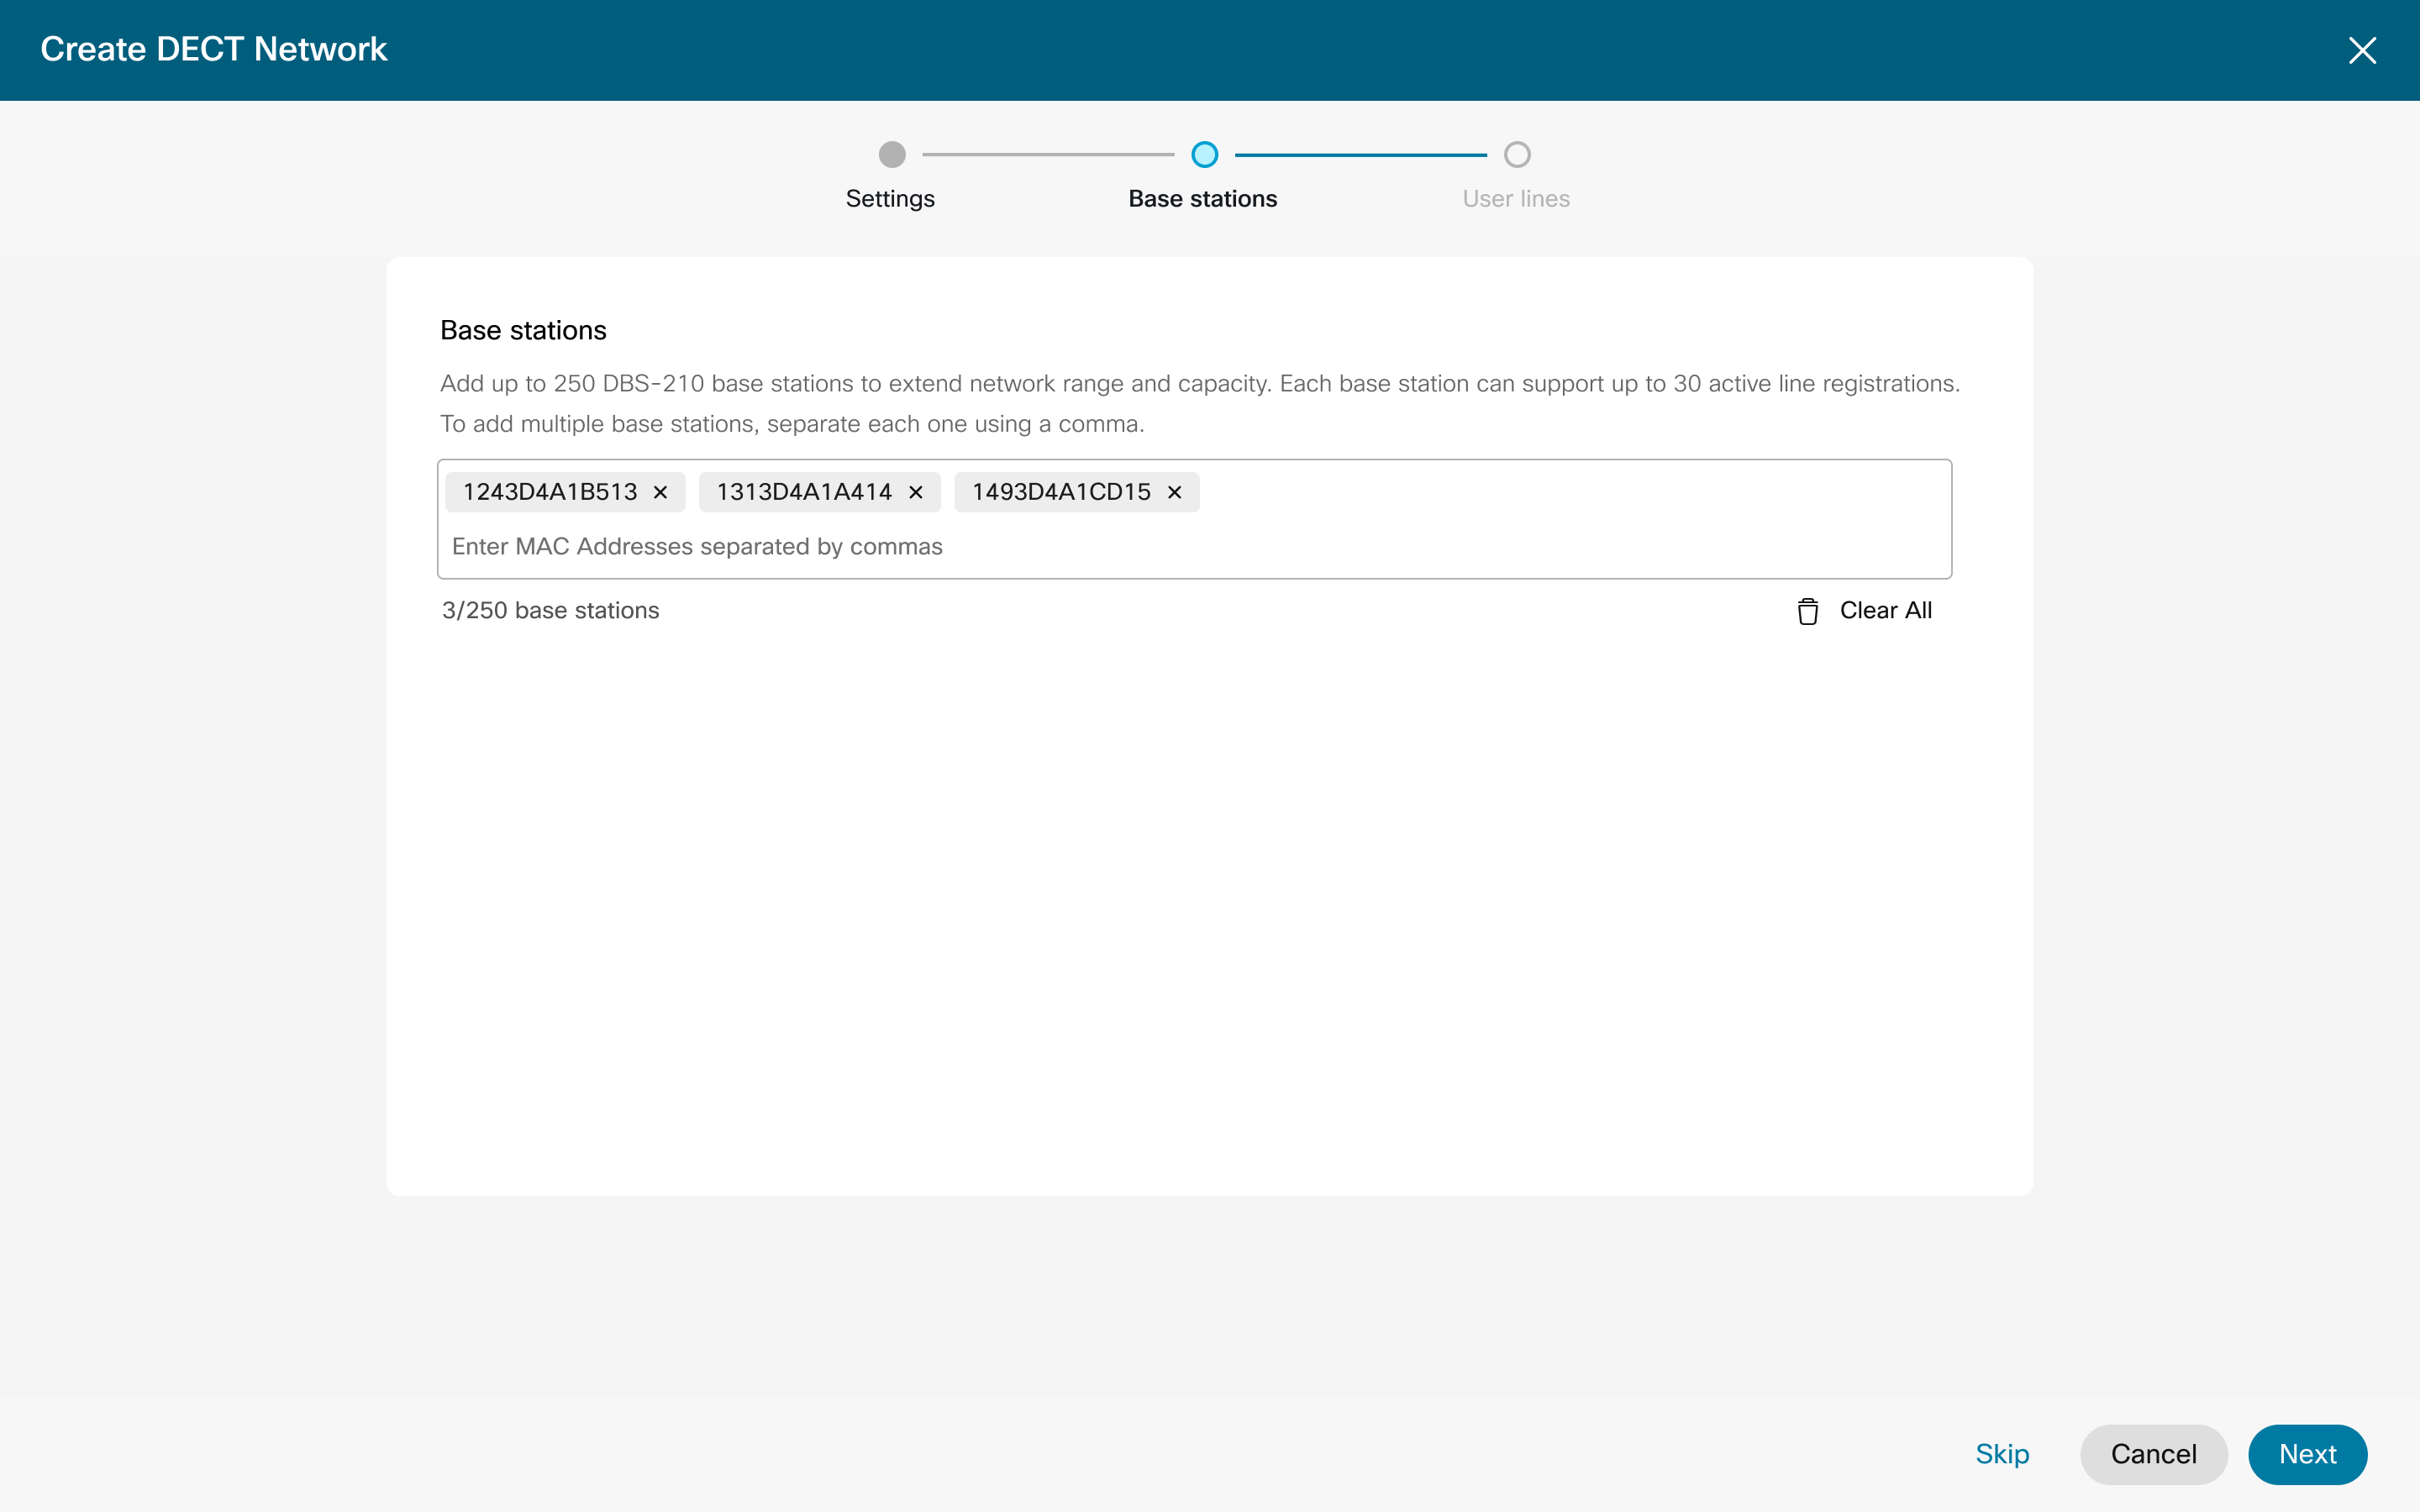
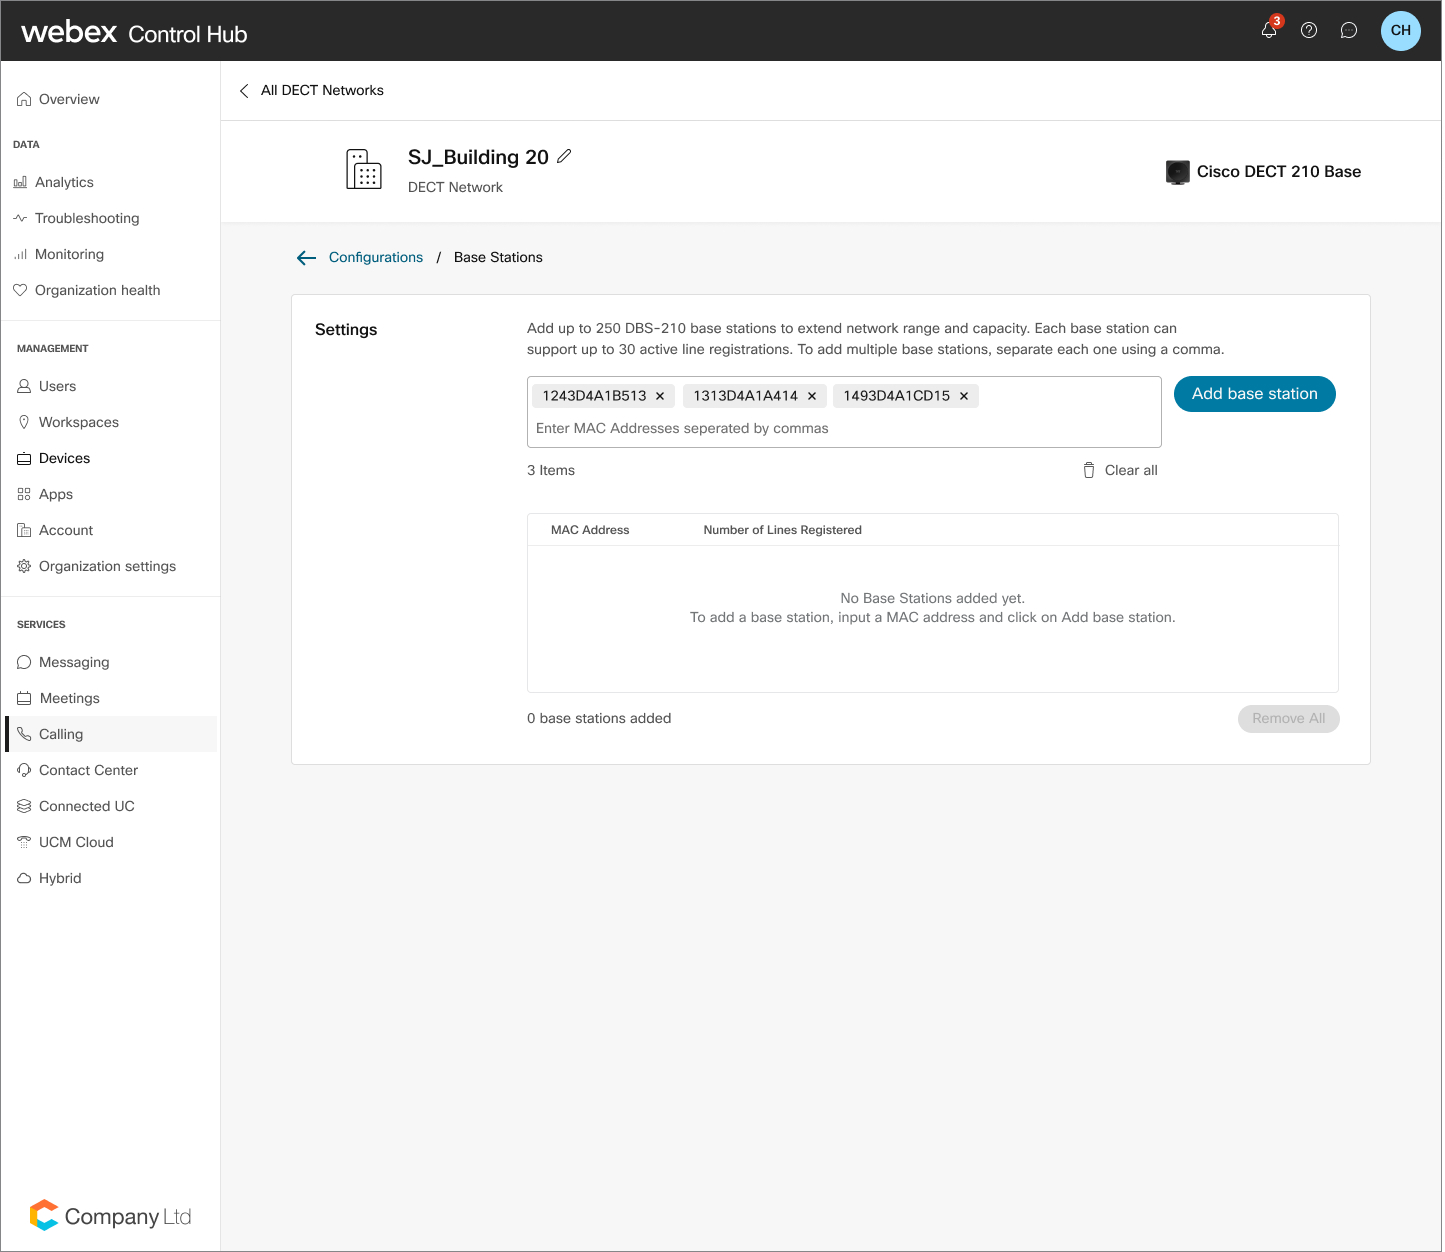
登録したいベースステーションのMACアドレスを一度に最大5つまで入力します。コンマを入力して各 MAC アドレスを区切ります。
設定画面からボックスの上部にある X をクリックすると、DECT ネットワークは作成されず、設定は保持されません。 次へをクリックすると、DECT ネットワークが作成され、設定が保存されます。残りのベース ステーションの追加とユーザーの追加手順はオプションであり、後で DECT ネットワークの管理プロセスを使用して完了できます。 |
| 11 |
[次へ] をクリックして [ユーザー] タブに移動します。ここでは、ハンドセットに割り当てる必要があるユーザーと、その数を定義します。 管理対象ハンドセット プロセスを使用して、これらのハンドセットにさらに回線を割り当てます。残りのユーザー追加手順はこの時点ではオプションであり、後で DECT ネットワーク管理プロセスを使用して手順を完了できます。 |
| 12 |
割り当てを選択 Users/Workspaceをクリックし、対応する検索ボックスでユーザーを検索し、割り当てるユーザーを選択します。 |
| 13 |
[ハンドセット数] ドロップダウン メニューから、このユーザー ID をハンドセットに関連付ける回数を選択します。
|
| 14 |
完了したら、[次へ] をクリックします。 |
| 15 |
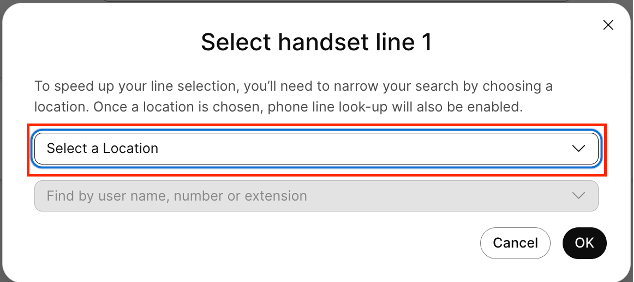
[完了] をクリックします。 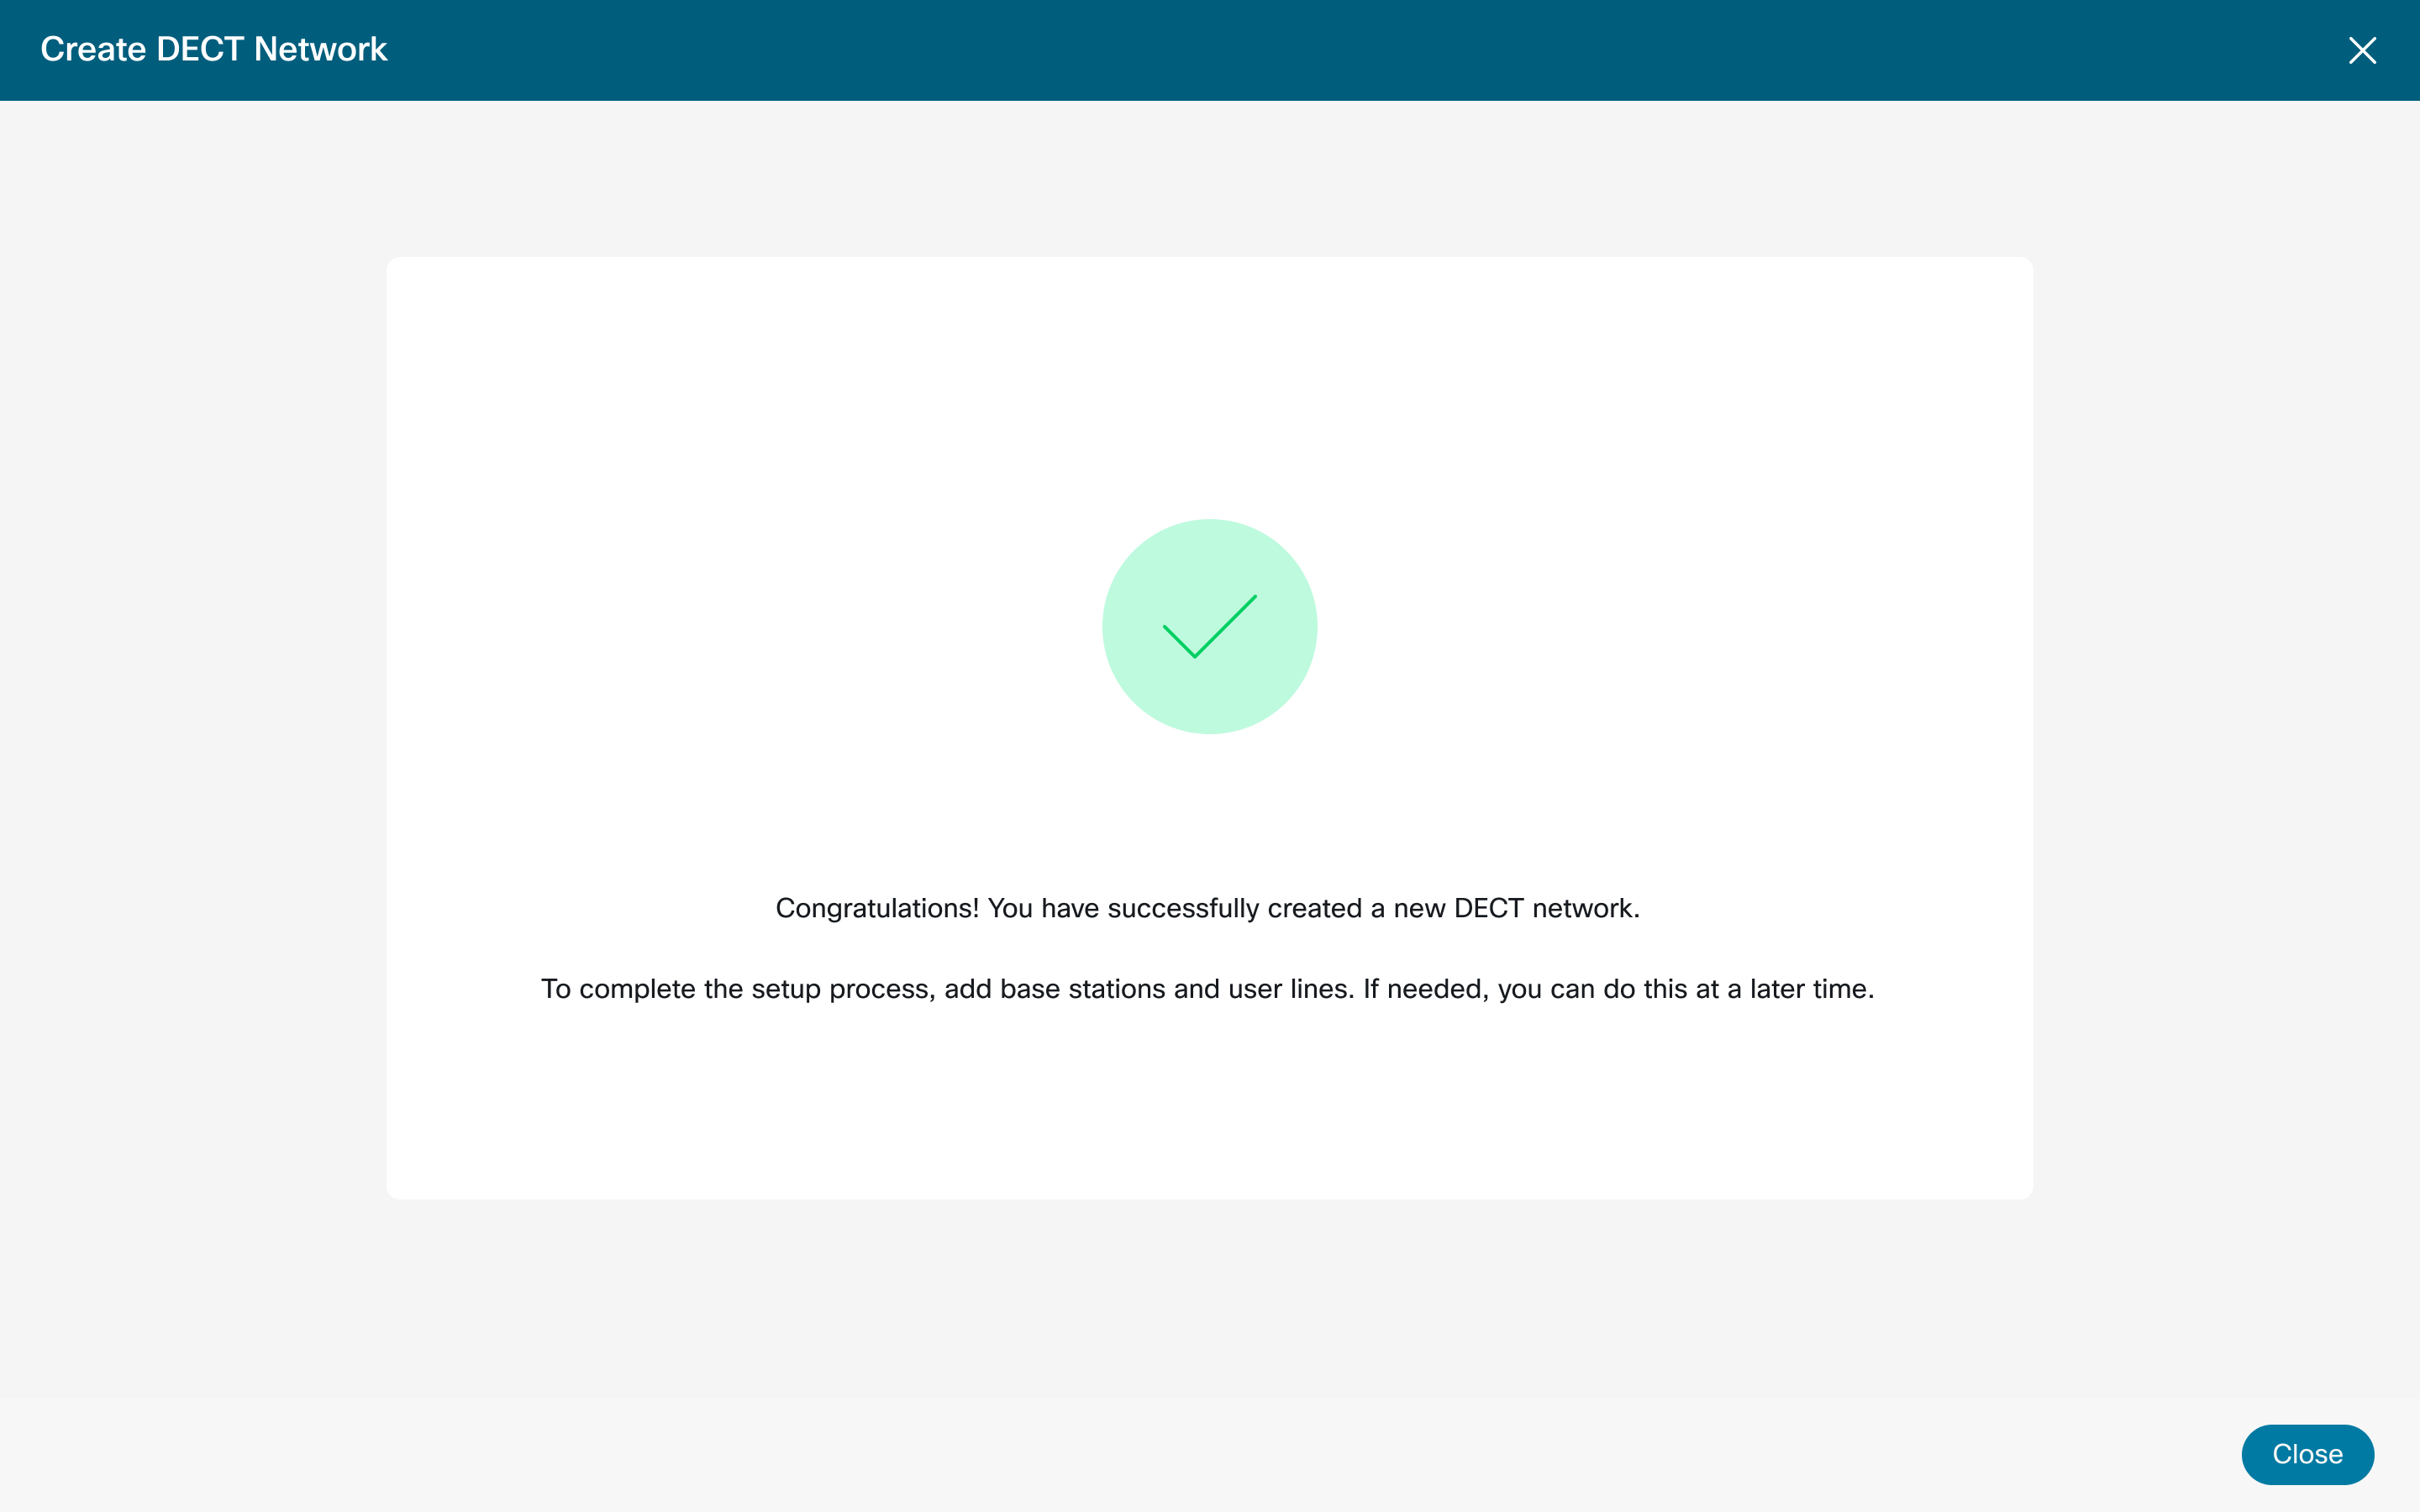 大規模な組織の場合、管理者はユーザーまたはワークスペースを割り当てる前に場所を選択する必要があります。 |
ハンドセット アクセス コードを管理する
アイドル状態のハンドセット名を管理する
ベース ステーションを管理する
ハンドセットを管理する
| 1 | |
| 2 |
。 |
| 3 |
変更する DECT ネットワークを探して選択します。 |
| 4 |
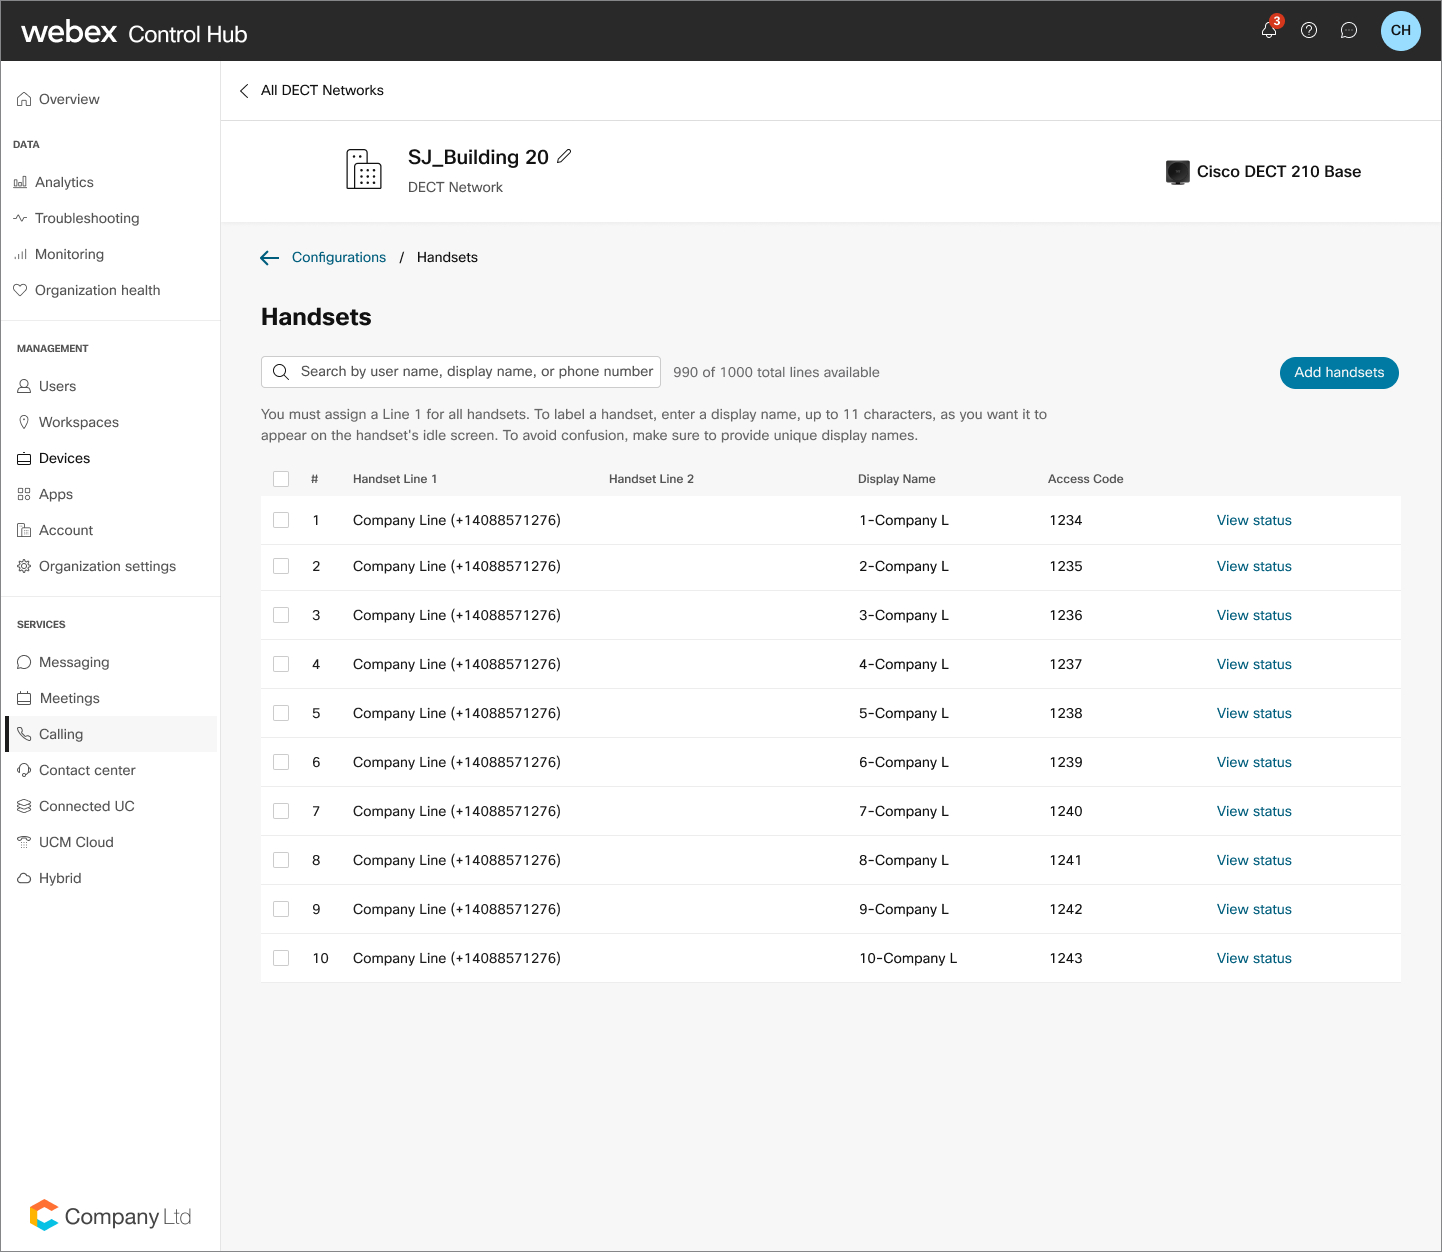
[ハンドセット] から [管理] をクリックします。 |
| 5 |
[ハンドセットを追加] を選択します。 |
| 6 |
テーブルから、プラス アイコンをクリックし、対応する検索ボックスでユーザーを検索し、割り当てるユーザーを選択します。 |
| 7 |
[保存] をクリックします。 ユーザーを削除するには、テーブルでユーザーを探します。ごみ箱アイコンをクリックし、[削除] を選択して削除を確定します。 最初にプロビジョニングされたハンドセットを削除すると、他のすべてのハンドセットが未登録状態に変わります。 2 番目のハンドセットを各回線に追加することもできます。完了後に、2 つのハンドセットを切り替える機能があります。 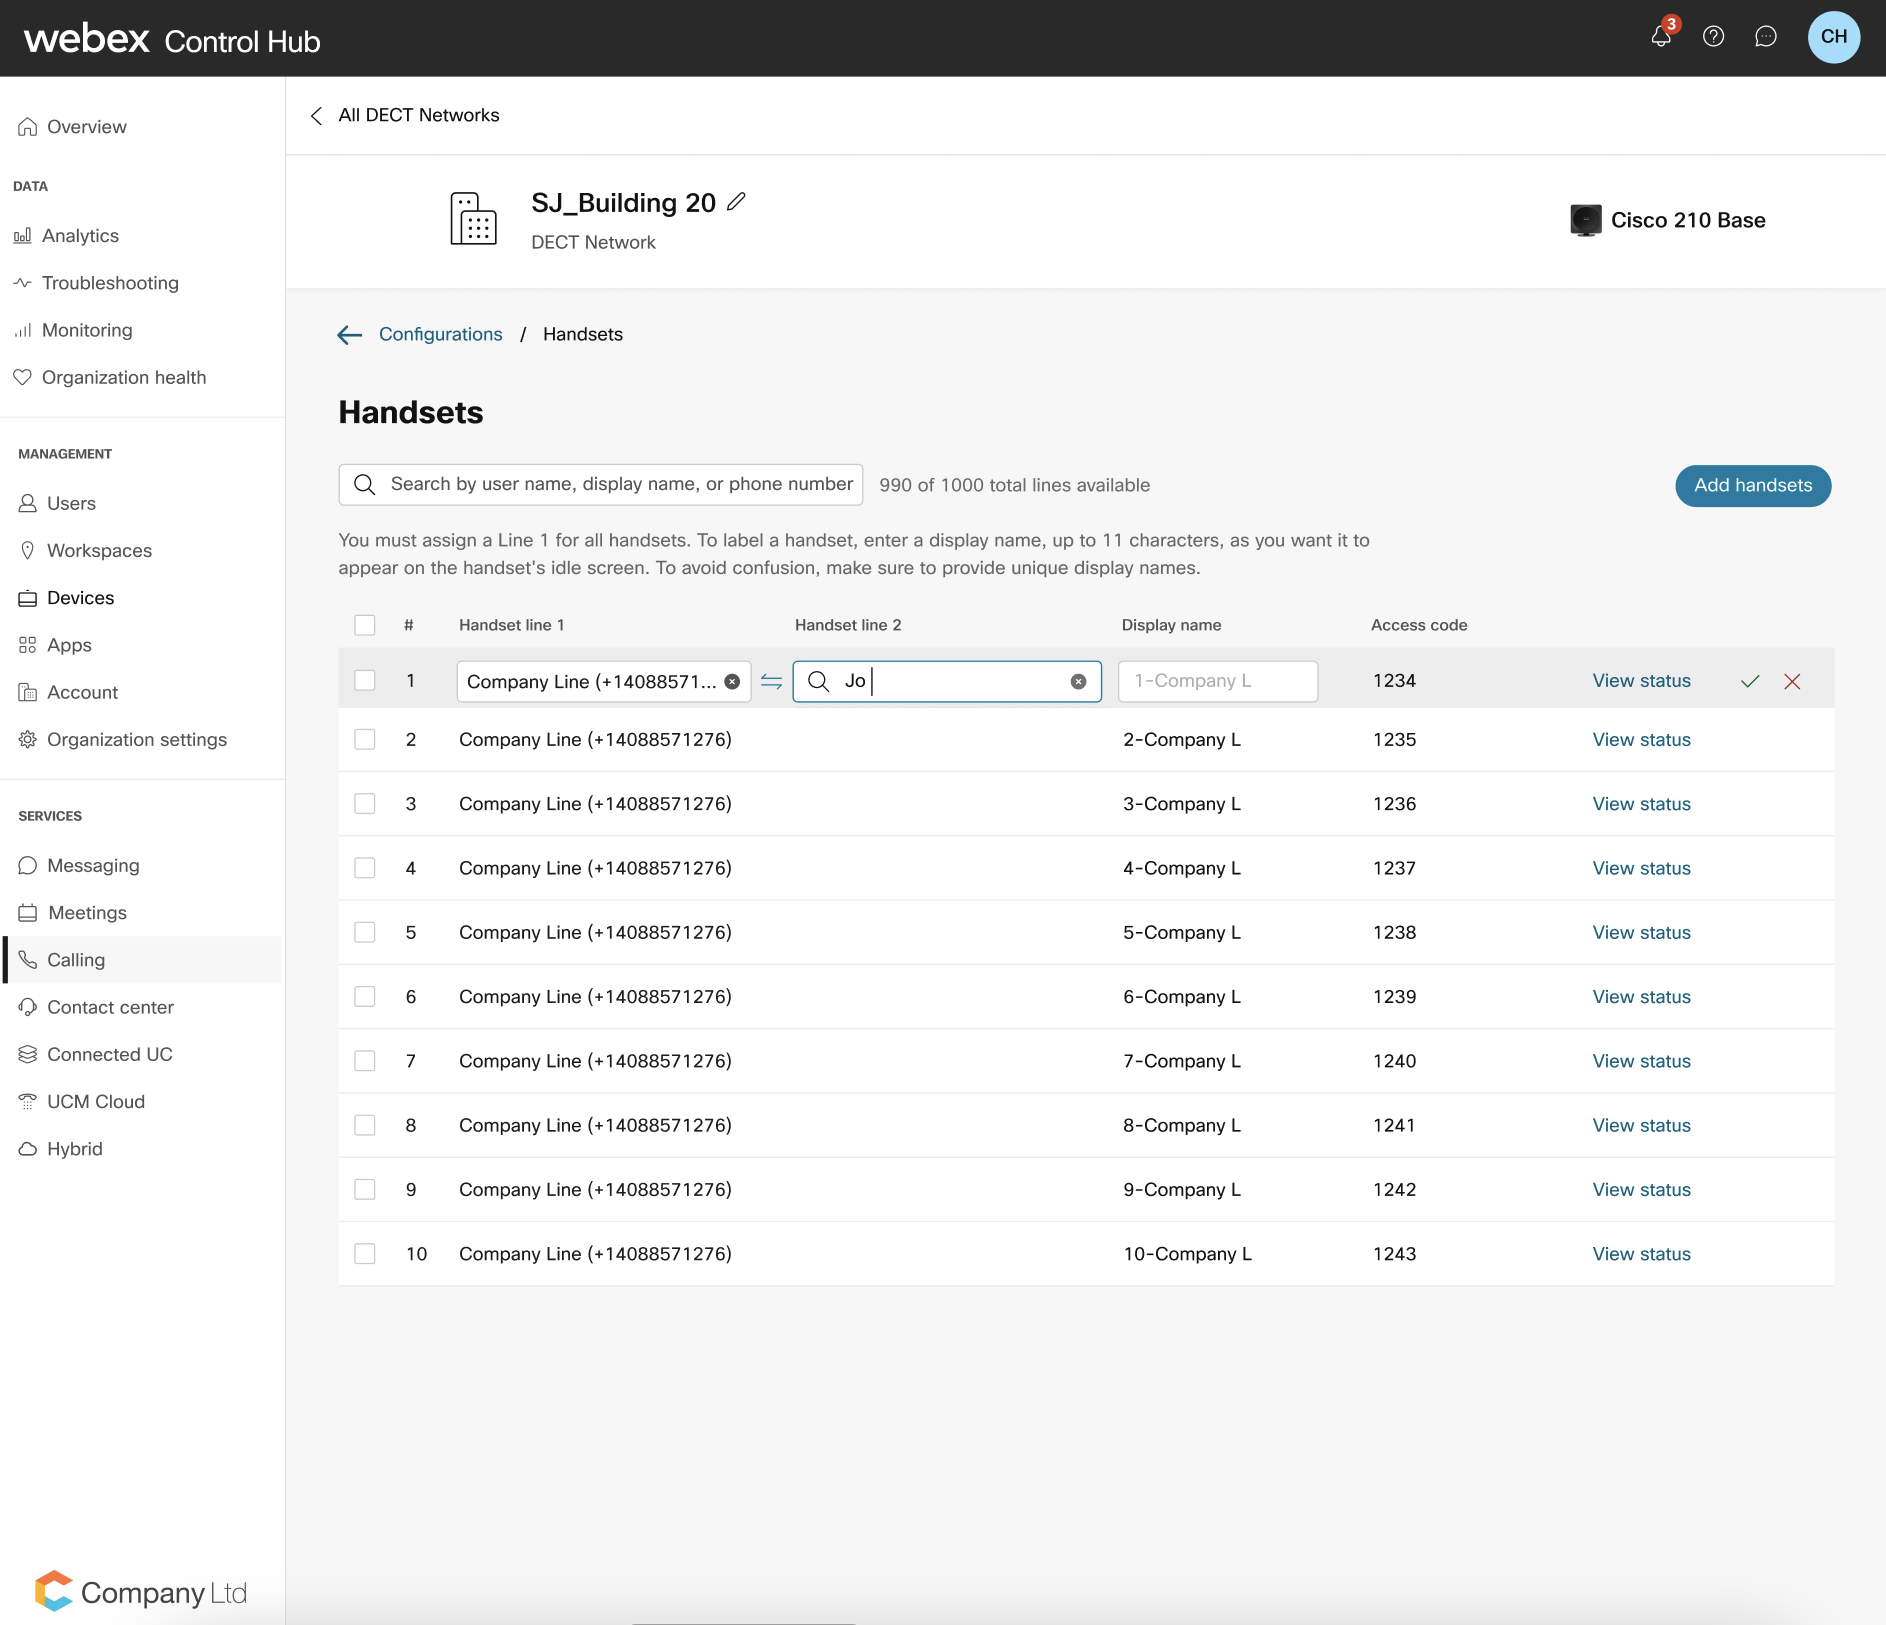 大規模な組織の場合、管理者は電話回線に受話器を追加する前に場所を選択する必要があります。 |
DECT ベースとハンドセットのステータスを確認する
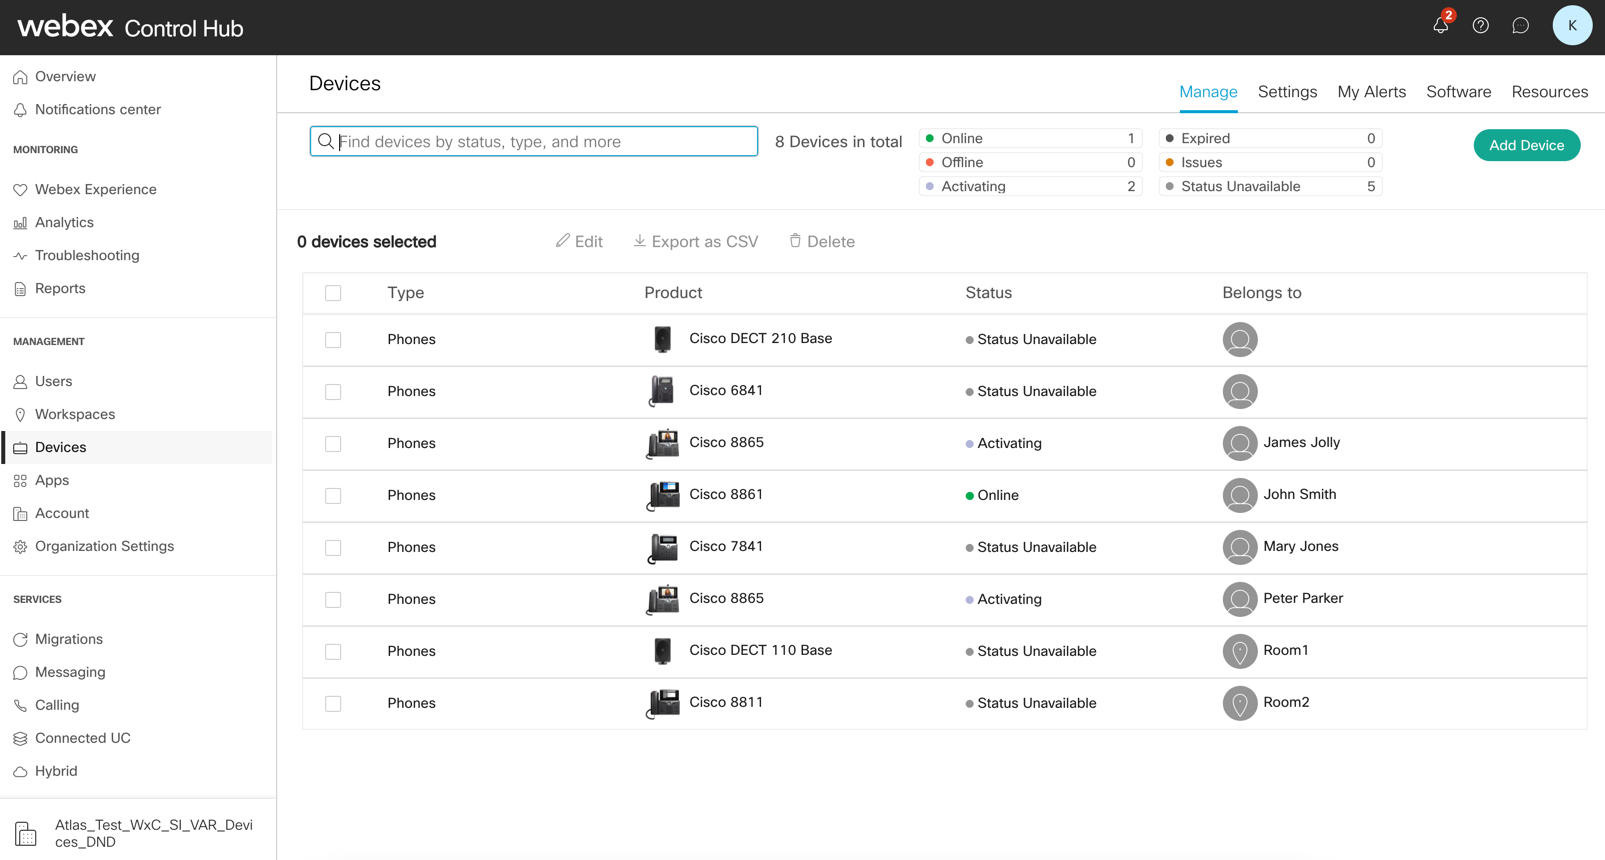
DECT ネットワークが設定されると、ベースごとのアクティブなハンドセット登録のステータス、従来のシングルセル ステーション、ハンドセットごとのアクティブな回線登録を表示できます。これは、Control Hub の [デバイス] ページから行います。
| 1 | |
| 2 |
。 |
| 3 |
[ステータス] 列では、オンライン、オフライン、ステータス利用不可などのデバイスのステータスを表示できます。 |
| 4 |
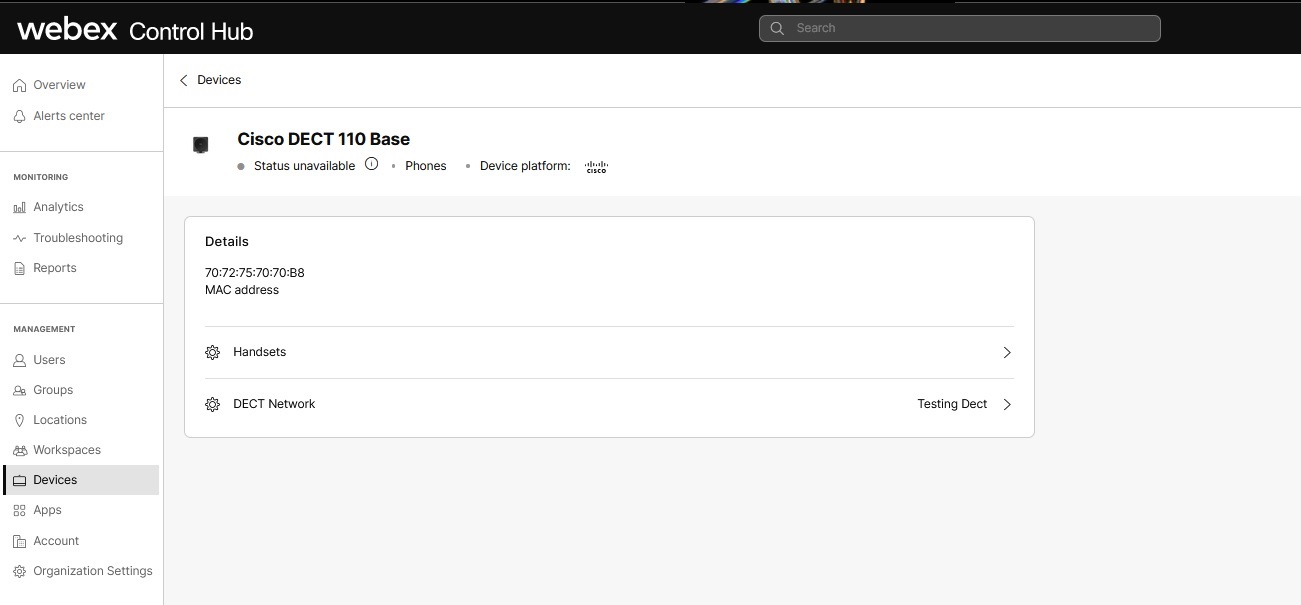
特定のデバイスを選択すると、デバイスの詳細が表示されます。デバイスの詳細ビューを使用して、端末の状態を確認します。ステータスを確認するには、ハンドセットの前方矢印をクリックします。 |
DECT ネットワークを削除する
ベース ステーションを展開する
| 1 |
この ドキュメント は、マルチプラットフォームファームウェアのハンドセットとベースステーションを持つ Cisco IP DECT 6800 シリーズで単一セルシステムおよびマルチセルシステムに展開するためのベストプラクティスを説明しています。 |
| 2 |
ローカルネットワーク機器で Multicast を構成し、DECT ベースを互いに同期します。Multicast を構成していない場合、これにより展開中の DECT ネットワークのパフォーマンス問題が発生します。詳細 については、DECT 管理者ガイド および DECT 展開ガイド を参照してください。 |
次に行うこと
ベース ステーションをインストールした後、サイト調査を再度実施して、サイトの作業領域全体に良好なカバレッジがあることを確認します。ベース ステーションとプラットフォームの接続に問題がある場合は、ベース ステーションを手動で設定して接続しなければならない場合があります。
ハンドセットをベース ステーションにペアリングする
始める前に
-
ハンドセットのバッテリーをインストールして充電する必要があります。
-
ハンドセットはユーザーの作業ロケーションごとにインストールするか、共有されている場合は共通領域にインストールします。
| 1 |
ハンドセットを [オン] にします。 |
| 2 |
。 |
| 3 |
画面の空白行をハイライトし、[選択] を押します。 |
| 4 |
AC フィールドにアクセス コードを入力します。[OK] を押します。 |
次に行うこと
画面がオンになるまで、[電源]/[終了] を長押しします。
シングルセル モードまたはマルチセル モードで従来の DECT ベースを移行する
新しい DECT ネットワーク プロビジョニング ソリューションの前に Control Hub でプロビジョニングされた既存の Cisco DECT ベースは、セットアップに変更を加える前に、新しい DECT ネットワーク ソリューションに移行する必要があります。正常に変換されたことを確認できるように、メンテナンス期間中にベースを移行する必要があります。ベースが移行されると、新しい から完全に管理できるようになります。
| 1 | |
| 2 |
。 |
| 3 |
変換するベースを探し、[DECT ネットワークに変換] をクリックします。 |
| 4 |
DECT ネットワーク名を入力し、[変換] をクリックします。 |
| 5 |
割り当てられたユーザーのリストを確認し、[変換] をクリックします。 |
| 6 |
[閉じる] をクリックして終了します。 |
ユーザーに対して Cisco DECT DBS210/DBS110 を手動で再構成Webex Calling
この手順は、ネットワークに対して Cisco DECT DBS210/DBS110 を手動Webex Callingします。この設定を完了すると、デバイス上のすべての以前の設定が上書きされます。これには管理者パスワードも含めて上書きされます。新しく設定したデバイスは、ネットワークにWebex Callingできます。他のネットワークでデバイスを使用する場合、デバイスを工場出荷時設定にリセットしてください。
以下の手順で Cisco DECT DBS210/110 を構成 Webex Calling
始める前に
ファームウェアの要件は次のとおりです。
-
Webex Calling でデバイスを設定する前に、DBS210 ベースのファームウェア バージョンが 480 であることを確認してください。
-
システムでデバイスを構成する前に、DBS110 ベースにファームウェア バージョン 480Ab (任意の 480 バージョン) がインストールWebex Calling。
| 1 |
DBS210 デバイスがファームウェア要件を満たしていることを確認してください。すべての DBS110 デバイスには、ファームウェア バージョン 480Ab がすでにインストールされている必要があります。この手順は DBS110 デバイスには必要ありません。
|
| 2 |
Control Hub から DBS210/110 デバイスを追加します。Control Hub のハンドセットに設定されているアクセス コードを書き込きます。 |
| 3 |
この手順に従ってデバイスを工場出荷時設定にリセットします。
|
| 4 |
デバイスが起動するまで待ちます。 DECT デバイスのライトは緑に表示される必要があります。これは、デバイスで観察できる一連の変更です。
|
| 5 |
ハンドセットを登録します。端末から メニュー ボタンをクリックし、 接続 に移動します。 > 登録 し、先ほど取得したアクセスコードを入力して端末を登録します。 |
ネットワークでデバイスを検出できない、または問題がある場合、以下の手順を実行します。
-
Control Hub でデバイス MAC アドレスが正しいか確認します。
-
デバイス MAC が DECT ネットワークに追加され、Control Hub でユーザーまたは電話が割り当てられた場所を確認します。
-
ファームウェア バージョンを確認するには、 DECT デバイスのファームウェア バージョンを確認する に従ってください。デバイスのファームウェア バージョンが 480B20 より前の場合は、 DBS210 デバイスのファームウェアを手動でアップグレードする に従って、デバイスを手動でアップグレードします。
デバイスで引き続き問題が発生する場合は、テクニカル サポート チームにお問い合わせください。
DECT デバイスのファームウェア バージョンを確認してください
この手順を使用して、デバイスの Web インターフェイスにログインし、Webex でデバイスを起動する前に、デバイスのファームウェア バージョンを確認します。
| 1 |
ハンドセットを使用して、ベースの IP アドレスを探します。 ハンドセットで、メニュー ボタンを押し、*47* を入力し、ベースの IP アドレスを見つけて下さい。 |
| 2 |
デバイスに関連付けられた IP アドレスを
|
| 3 |
管理者がウェブ インターフェイスにログインすると、ホームページにファームウェア バージョンが表示されます。 |
DBS210 デバイスのファームウェアを手動でアップグレードする
この手順を使用して、Control Hub を使用して DBS210 デバイスを 480B20 に手動でアップグレードします。
| 1 |
管理者として、デバイスのウェブ インターフェイスにログインします。 | ||||||||||
| 2 |
[ファームウェア更新] ページに移動 して、ファームウェア バージョンを設定します。
| ||||||||||
| 3 |
[更新の 保存/開始] をクリックします。 |
DECT ネットワークをトラブルシューティングする
特定の問題のトラブルシューティングに関する情報については、以下のカテゴリー別のリンクを参照してください。

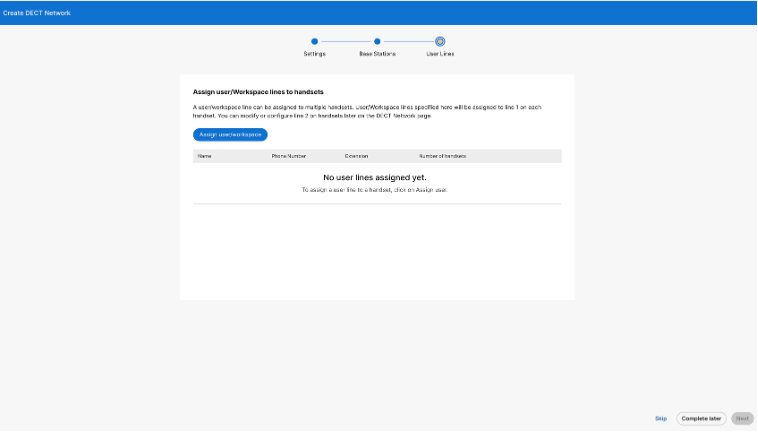
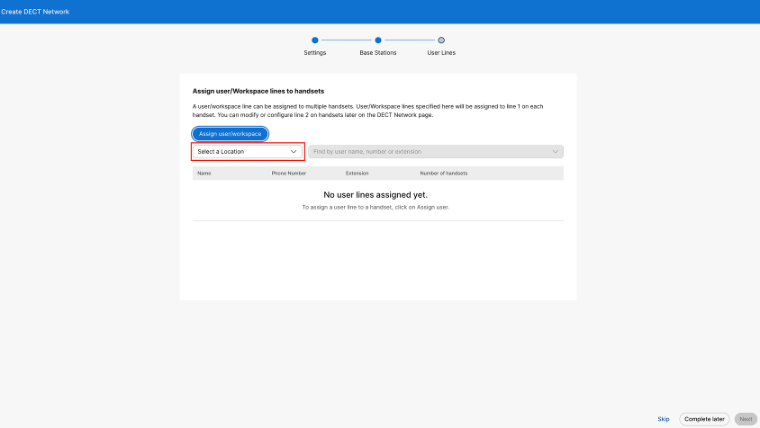
 アイコンをクリックすると、場所フィルターを含むポップアップ ウィンドウが表示されます。管理者は希望の場所を選択し、ユーザーまたはワークスペースを選択できます。