
Thanks for your feedback.
Migrate enterprise phone to Webex Calling phone firmware
 Feedback?
Device Firmware Migration Overview
Perform the new and automated device firmware migration from Control Hub, so that you can migrate your enterprise devices to cloud. You can migrate the required Enterprise Firmware phones to Multiplatform Phone (MPP) Firmware from Control Hub. MPP phones are powered by Webex Calling solutions.
The steps outlined here is applicable to Dedicated Instance also.
MPP firmware can run on certain models of the Cisco IP Phone 6800, 7800, and 8800 series. However, only the Cisco IP Phone 7800 and 8800 series have the capability to run either MPP firmware or Enterprise firmware. If you have the appropriate license, you can migrate between the MPP or Enterprise firmware on the Cisco IP Phone 7800 and 8800 series.
7800 firmware migration requires that the 7800 model is the correct hardware version.
This feature helps to migrate the registration of a phone from one of the following devices to Webex Calling:
-
Unified CM with on-premises calling
-
Unified CM with hosted calling using Hosted Collaboration Solution.
-
Cloud calling via Spark Calling
Use the migration wizard on Control Hub to prepare your devices for migration. The migration wizard automates the device license generation and checks the device eligibility before you start the migration. This tool helps you to migrate your devices and assign it to the existing Webex users or workspaces.
All phones that are migrated to MPP firmware using this tool must use Webex Calling.
Prerequisites
Before you perform the device firmware migration, make sure that you meet the following requirements:
-
Get familiar with Webex Control Hub.
The Webex app is primarily managed from Webex Control Hub, which is the management interface for the Webex platform. For more information, see Get Started with Webex Control Hub.
-
Access Webex Control Hub with full administrator privileges.
With full administrator privileges, you can assign one or more roles to any user in your organization. For more information, see Assign Organizational Account Roles in Webex Control Hub.
-
Create locations and assign PSTN for each location.
For more information, see Create a Location and Set up a PSTN for each Location.
-
Check the supported Cisco IP Phone models.
You can migrate only the supported Cisco IP Phone models. For more information, see Supported Cisco IP Phone Models.
-
Import all Unified CM users into Control Hub.
The tool requires all users to be present in Control Hub. You can synchronize all Unified CM users to Webex Control Hub using one of the following methods:
Add Users Manually in Control Hub
Add Multiple Users in Cisco Webex Control Hub with the CSV Template
-
Install or upgrade Cisco IP Phone firmware.
You can install or upgrade Cisco IP Phone firmware or load version to 14.1 or later. For more information on the upgrade process, see Install or Upgrade Cisco IP Phone Firmware.
- (Optional) You can enable CCUC, to use auto firmware migration.
The user will exist in control hub, webex and workspace is created as a part of migration.
Before you begin: - Identify devices in Unified CM that you wish to migrate and gather information about the devices.
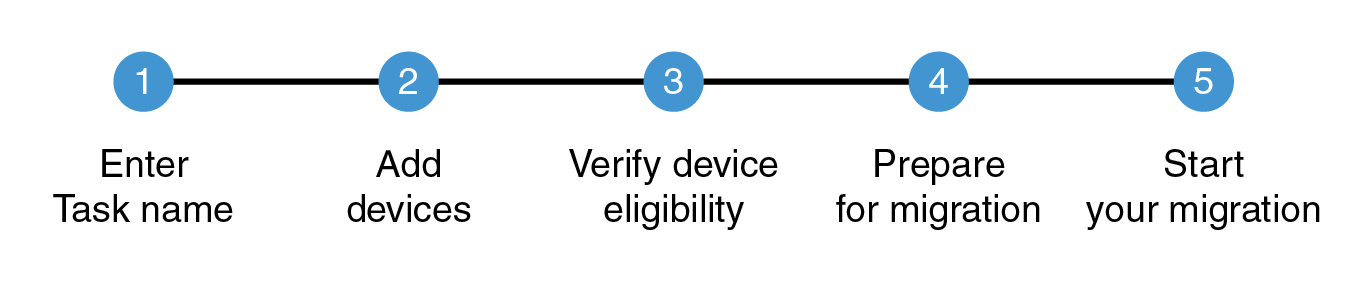
The migration wizard helps you to perform the following tasks and to start the migration.
Before you begin
To add phones to the device default task, from the customer view in https://admin.webex.com, go to Management > Devices, and then click Add Device.
| 1 |
On the Firmware migration from Enterprise to MPP page, Click Add device default task to migrate the pre-populated list of all the Cisco enterprise phones that are added to Webex. The devices with no errors and ready to migrate are populated in the Ready for Migration tab. Any devices with errors are listed under Error tab. |
| 2 |
Click Ready for Migration tab to migrate the devices. |
| 3 |
From the Actions drop-down list, choose Complete Migration. |
| 4 |
Select the devices you choose to migrate from the list of populated devices. |
| 5 |
Click Complete Migration to create the migration task. Create a new migration task window appears. |
| 6 |
Enter a task name. |
| 7 |
Click Continue. |
| 1 |
On the Firmware migration from Enterprise to MPP page, Click Start a new task to start a new migration task. At any given time, only one task is with the In Progress status is allowed. If you start a new task with its status In Progress and Prepare For Migration, a new task can be created but the button is disabled until the In Progress task completes. |
| 2 |
Enter the task name in the Task name field. Enter a unique task name for each migration task. You can use a combination of the device name or creation date for the migration task name. For example, 8800-01-01-21. Having a unique name for a task helps you to quickly identify and track the status and progress of your migration tasks. Do not use a space in the migration task name. Replace the space with an underscore. |
| 3 |
Select a migration option from the drop-down list.
|
| 4 |
Click Next. The Add devices page appears.
|
You can add multiple devices to a location. To add devices, enter the required device details into a comma-separated values (CSV) file and upload it. When you upload the file, the data is provided to Control Hub, and it generates the device information and verifies the device eligibility for migration. If you've entered incorrect device details or want to modify the details, you can download the CSV file, update it, and then reupload the file.
Admin can add only one device to a workspace.
When you add an eligible enterprise device to the Webex Calling, a license is automatically generated to aid in migration and will be applied when the MPP load requests its onboarding configuration.
| 1 |
From the Add devices page, go to the Download template files section to download the following files:
| |||||||||||||||||||||||||
| 2 |
If you already have a CSV file and don't require a template, then enter the details in the CSV file. Here’s an example of the CSV file.
The following table describes the CSV file parameters for Generate device license and add device. For Generate device license only, the CSV file contains only two parameters - Model and MAC address. The following table contains the parameters in the CSV file and the description.
| |||||||||||||||||||||||||
| 3 |
Choose one of the following options to upload the file to the Upload section. Make sure that the devices that are already configured in Webex Calling aren’t added to the CSV file that you plan to upload. This results in the device not being added to the CSV file.
The Upload status section displays the following details:
| |||||||||||||||||||||||||
| 4 |
Click Next. The Check device migration eligibility page appears.
|
All ineligible devices are not migrated.
Use the Search field to search for any attributes, such as name, type, location, directory number, Webex extension, device model, MAC address, eligibility, and so on. The search is case insensitive and supports partial match search. You can also click the All (Eligibility) drop-down list to filter the list of eligible, ineligible, and unknown devices.
The following table lists the total number of devices and their eligibility status:
|
Devices |
Description |
|---|---|
|
Total devices |
The total number of devices added to the migration task. The maximum number of devices supported for a migration task is 1000. |
|
Eligible devices |
The total number of devices that are suitable for migration. The eligibility status of the device appears in green. |
|
Ineligible devices |
The total number of devices that aren't suitable for migration. There is not enough information to decide if these devices can migrate. The eligibility status of the device appears in red. |
|
Devices with Unknown Eligibility |
The total number of devices with inadequate information therefore cannot decide on migrating the devices. For example, the device details are not available. These devices may or may not be successful during migration. For procedure to check the migration eligibility for these devices, see the Overview section in the Convert between Enterprise Firmware and Multiplatform Firmware for Cisco IP Phone 7800 and 8800 Series Guide. The eligibility status of the device appears in yellow. |
|
Eligible* |
It is ready to use with Webex Calling. For more information, See Field Notice FN74296. |
| 1 |
From the Verify device migration eligibility page, click the All (Eligibility) drop-down list, check the eligible and unknown devices check boxes to filter the devices, and then click Prepare for migration. You can also click Download to download and view the list of all device details. | ||||||||||||||||||
| 2 |
Click Prepare for migration to prepare migration of all the verified devices. The Prepare for migration confirmation screen appears. | ||||||||||||||||||
| 3 |
Choose one of the following options:
The Firmware device migration page appears with the following tasks and status:
|
| 1 |
On the Firmware Migration screen, Click the Complete Migration button against the device you wish to migrate. The Complete Migration button is enabled only when the task status is Ready for Migration. Ensure your devices are added to the Webex Calling organization if the task type is migration license only. |
| 2 |
Select the devices you want to complete the migration for. |
| 3 |
Click Complete Migration to start migration of the selected devices. The Create a new migration task window appears.
|
| 4 |
Enter a task name to keep track of the selected device migration. |
| 5 |
Click Continue to complete the migration. The task name appears in the list of firmware migration with a Ready for Migration status and Complete Migration button is enabled.
|
| 6 |
Click Complete Migration against the task name from the firmware migration list for which migration must be completed. |
The task describes how to complete migration of phones.
|
Click Complete Migration against the task name from the firmware migration list for which migration must be completed. |
The task describes how to automatically migrate phones.
Before you begin
-
If you cannot connect your wireless device to a wired device, reconfigure the Wi-Fi information to your device after the phone is migrated to MPP Firmware.
-
Auto migration is disabled if Cloud Connected UC is not onboarded.
| 1 |
Click the Auto Complete Card to migrate phones automatically. |
| 2 |
Select the TFTP Server Type. |
| 3 |
Select a Unified CM TFTP Load Server where a device can be found. |
| 4 |
Click Migrate Phones to start migrating phones automatically. The csv file can contain 1000 devices. But, the firmware migration is trigerred in batches of 200 devices from control hub.
Auto complete migrating devices window apprears.
|
| 5 |
Click Continue to continue migration. The task appears on the Firmware Migrations window with the status changed to Auto-Migration complete. |
The task describes how to manually migrate phones.
| 1 |
Click the Manually Complete Card to migrate phones manually. |
| 2 |
Click Download Export to download the bat files. If you cannot connect your wireless device to a wired device, reconfigure the Wi-Fi information to your device after the phone is migrated to MPP Firmware. |
This section explores the task scenarios while migrating devices to webex calling.
|
On the Firmware migration from Enterprise to MPP page, click on the task name to view the migration task status. The Migration Tasks window appears. The devices are classified under Error, Ready for Migration, In Progress and complete tabs based on the device status. |
A list of devices with an error status is displayed here. You can resolve the errors or contact TAC for assistance.
| 1 |
On the Migration Tasks page, click on the Error tab. |
| 2 |
Click Migrate errors to resolve the erroneous devices. |
| 3 |
Select the devices you wish to resolve the errors for. |
| 4 |
Click Move to move devices to Ready for Migration. The devices are moved to Ready for Migration tab. |
| 5 |
Click Actions to perform any of the following actions:
|
What to do next
If the errors are not resolved, contact TAC for assistance.
A list of devices ready for migration is displayed here.
| 1 |
On the Migration Tasks page, click on the Ready for Migration tab. |
| 2 |
Click Actions to perform any of the following actions:
|
A list of devices whose migration status is in progress is displayed here.
| 1 |
On the Migration Tasks page, click on the In Progress tab. |
| 2 |
Click Actions to perform any of the following actions:
|
A list of devices whose migration activity is completed is displayed here.
| 1 |
On the Migration Tasks page, click on the Complete tab. The list of devices whose migration is complete are displayed under this tab. |
| 2 |
Click Actions to perform any of the following actions:
|
When CCUC is enabled, you can initiate phone migration from the control hub.
This section describes the procedure to:
-
upload files to Cisco Unified CM
-
upload phones using custom files
The downloaded files contain the list of devices that were sucessfully provisioned on Control Hub and are ready to migrate. The admin can use the file to select the devices for migration firmware. Use these steps to select the devices from the download file and perform the migration:
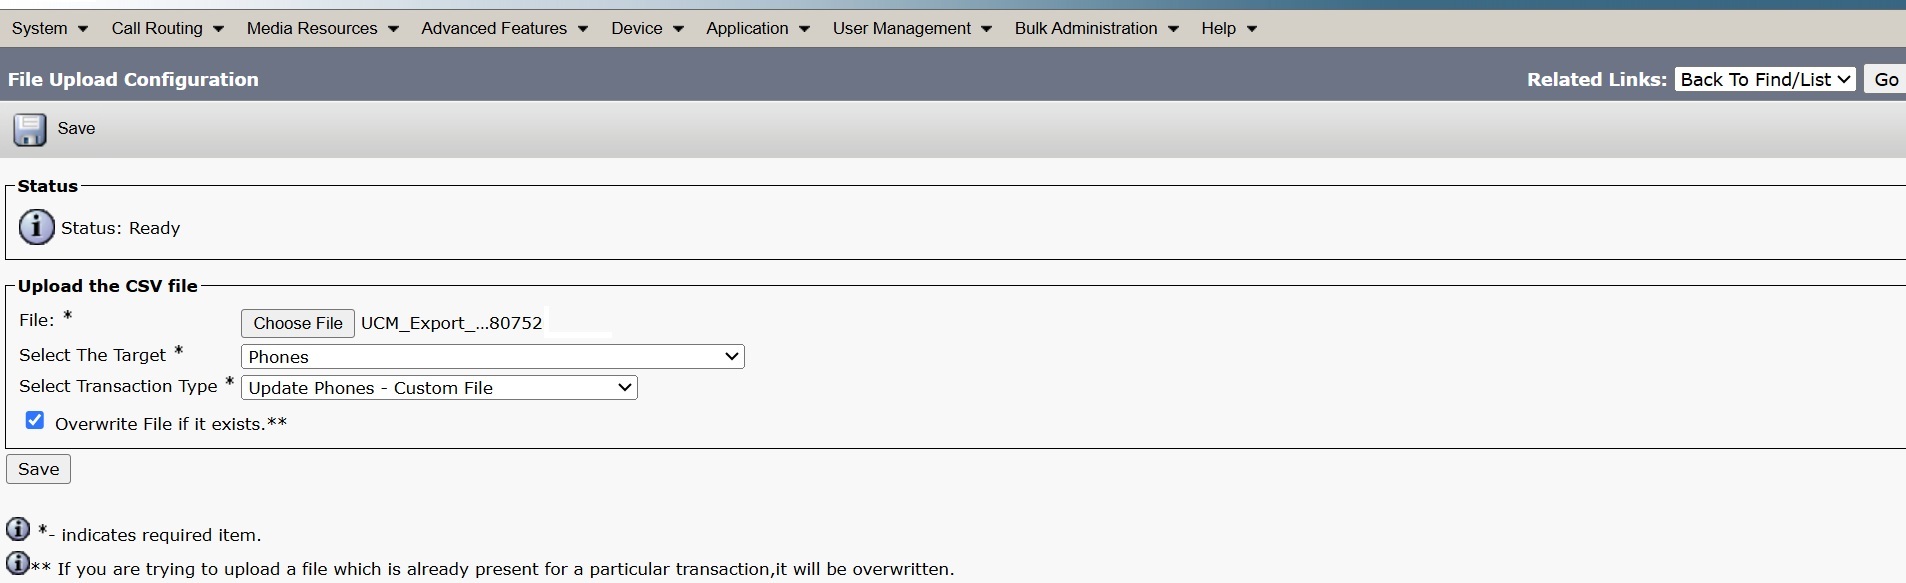
| 1 |
Log in to Cisco Unified Communications Manager. |
| 2 |
From Cisco Unified CM Administration, choose Bulk Administration > Upload/Download Files. |
| 3 |
Click Add New. The File Upload Configuration window appears.
|
| 4 |
In the File text box, enter the full path of the file that you want to upload, or click Browse and locate the file. |
| 5 |
From the Select the Target drop-down list, choose the target as Phone. |
| 6 |
From the Transaction Type drop-down list, choose the transaction type as Update Phone - Custom File. |
| 7 |
Check the Overwrite File if it Exists check box, if you want to overwrite an existing file with the same name. |
| 8 |
Click Save. The upload status appears.
|
| 9 |
Repeat steps 4 to 8 for all the generated files. |
| 1 |
Log in to Cisco Unified CM. |
| 2 |
From Cisco Unified CM Administration, go to Bulk Administration > Upload/Download Files. |
| 3 |
Click Add New. The File Upload Configuration window appears.
|
| 4 |
In the File text box, enter the full path of the file to upload from the downloaded manifest file or click Browse and locate the file. |
| 5 |
From the Select the Target drop-down list, choose the target as Phone. |
| 6 |
From the Transaction Type drop-down list, choose the transaction type as Update Phone - Custom File. |
| 7 |
Check the Overwrite File if it Exists check box, if you want to overwrite an existing file with the same name. |
| 8 |
Click Save. The upload status appears.
|
| 9 |
Repeat steps 4 to 8 for all the generated files. |
Prerequisite
Make sure that you have the list of devices that you plan to update and also a text file with the options such as Device name, Directory name, and Description.
| 1 |
From Cisco Unified CM Administration, choose Bulk Administration > Phones > Update Phones > Custom File. The Update Phones Custom Configuration page appears.
| ||||||||||||
| 2 |
From the Update Bulk Phone Template where drop-down list, choose Device Name. | ||||||||||||
| 3 |
Click Find. The phones that are listed in the files, if available, appear on this page. | ||||||||||||
| 4 |
Click Next. | ||||||||||||
| 5 |
Check the required parameters check boxes and update the details such as description, phone load name, load server, and so on, in the respective fields. There are 2 groups in the text files that you download from Control Hub, which are:
| ||||||||||||
| 6 |
From the Job Information section, choose one of the following options:
| ||||||||||||
| 7 |
Click Submit. | ||||||||||||
| 8 |
Repeat steps 1 to 7 for all the generated files. | ||||||||||||
| 9 |
To view the status of the submitted job, go to Cisco Unified CM Administration, choose Bulk Administration > Job Scheduler. | ||||||||||||
| 10 |
Select your job to view the job status. |
The following table lists the supported phone models that can be converted from Enterprise to Multiplatform firmware.
|
7800 Series (*limitations apply) |
8800 audio series |
8800 video series |
9800 series |
|---|---|---|---|
|
CP-7811-K9= |
CP-8811-K9= |
CP-8845-K9= |
DP-9841-K9= DP-9841NR-K9= |
|
CP-7821-K9=*(V03 or later) |
CP-8841-K9= |
CP-8865-K9= CP-8865NR-K9= |
DP-9851-K9= DP-9851NR-K9= |
|
CP-7841-K9=*(V04 or later) |
CP-8851-K9= CP-8851NR-K9= |
CP-8875-K9= CP-8875NR-K9= |
DP-9861-K9= DP-9861NR-K9= |
|
CP-7861-K9=*(V03 or later) |
CP-8861-K9= |
— |
DP-9871-K9= DP-9871NR-K9= |
|
CP-7832-K9= | CP-8832-K9= CP-8832NR-K9= (*limitations apply) |
— |
— |
All versions of 8800 series audio phones that are listed above can convert to MPP firmware but V15 and later hardware versions require minimum 11.3.3 MPP firmware that is once converted and cannot downgrade to earlier MPP firmware versions. The following 8800 devices are not eligible to migrate to MPP: 8821, and 8831.8832NR can be migrated to MPP but some features may not be supported.


