- Home
- /
- Article

Thanks for your feedback.


 In this article
 Feedback?
Seamlessly place Cisco Call from Microsoft Teams without interrupting your workflow or switching between applications.
Overview
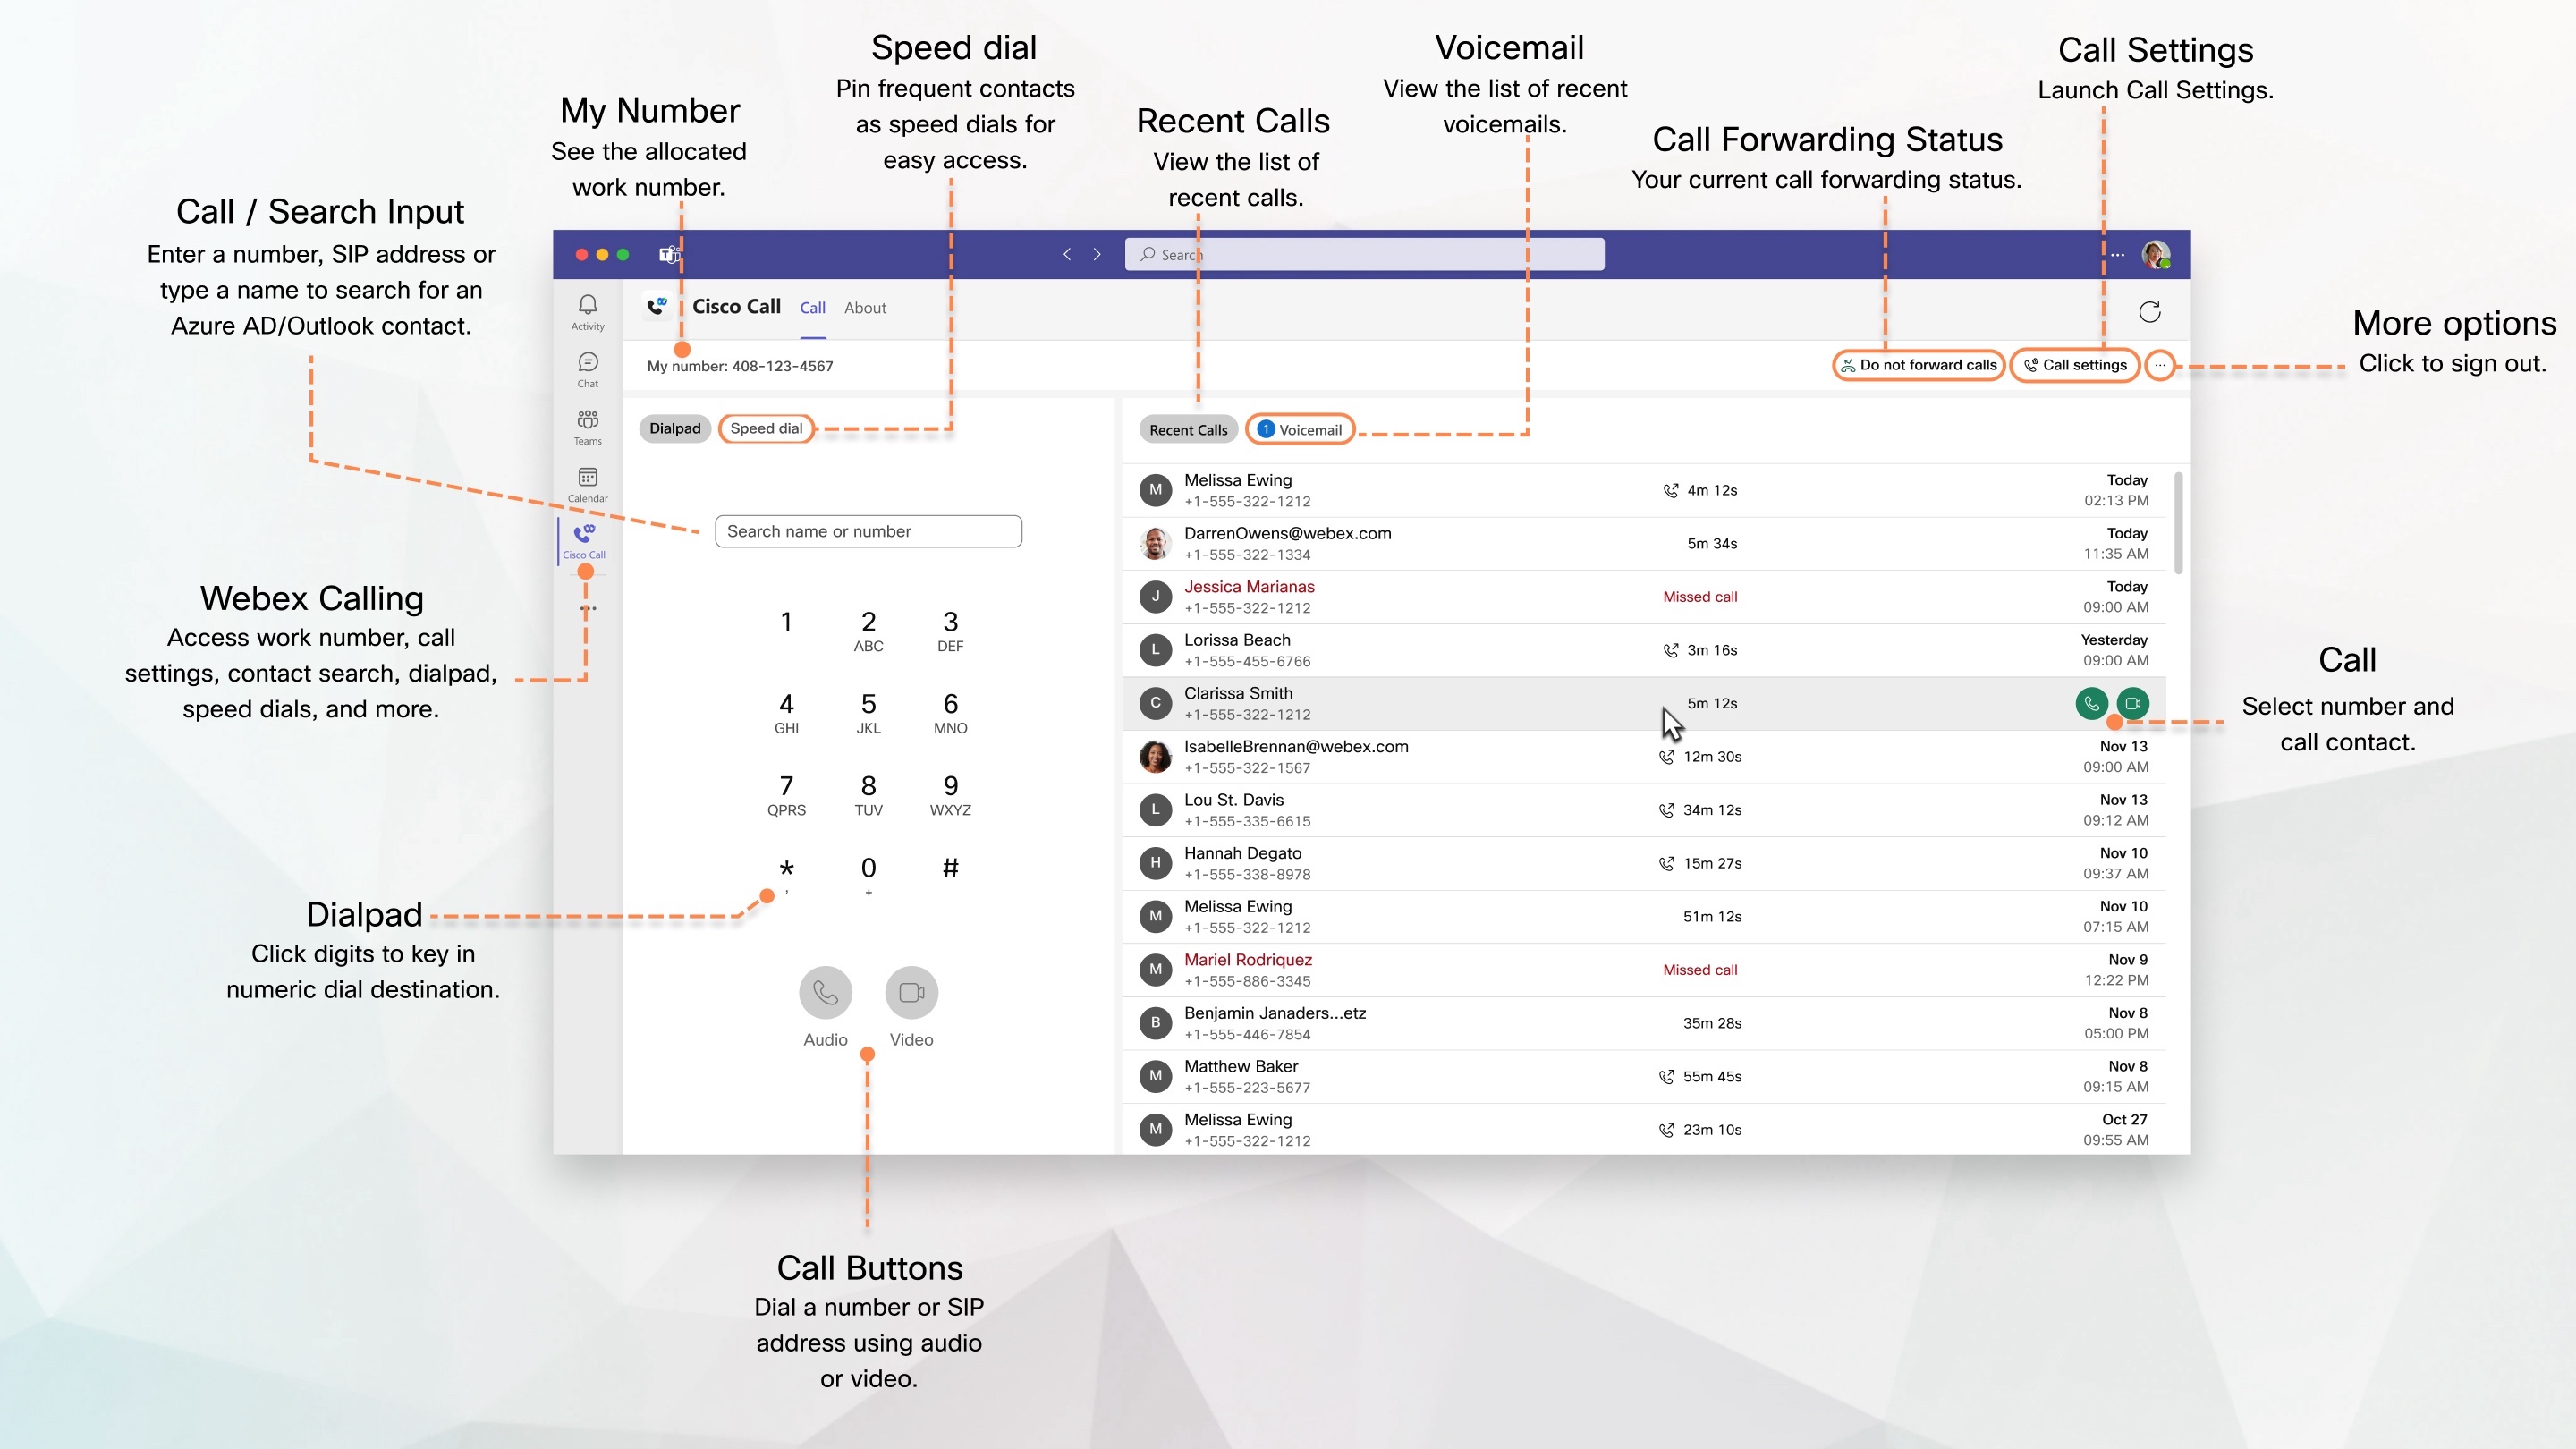
With Cisco Call for Microsoft Teams, the Microsoft Teams users can access the enterprise-grade Cisco Call experience directly in the Microsoft Teams app. With a single click from the Microsoft Teams interface, you can access a complete suite of calling features. The features include directory search, PSTN dialing, speed dial, voicemail, call history, and artificial intelligence-powered background noise removal.
This integrated app works with the Cisco Unified Communications Manager (UCM) call-control solution, Webex Calling for cloud deployment or the Dedicated Instance offering.
Prerequisite
- Ensure that you’ve installed and signed in to the Webex App on Desktop and Mobile.
- Your administrator must have granted access for the organization to access the Cisco Call integration.
Sign in
To start using the Cisco Call, you need to sign in to your Webex account first.
Open the Webex App, sign in to your Webex account, and then close the app. Once signed in, you're ready to start using the Cisco Call integration in the Microsoft Teams.
Opening the Webex App to sign in is a one-time activity. If the Webex App isn’t visible on your desktop, it's likely that your admin has hidden it to enhance the experience. In this case, you need to search for the Webex App initially to open it.
Sign in from Desktop
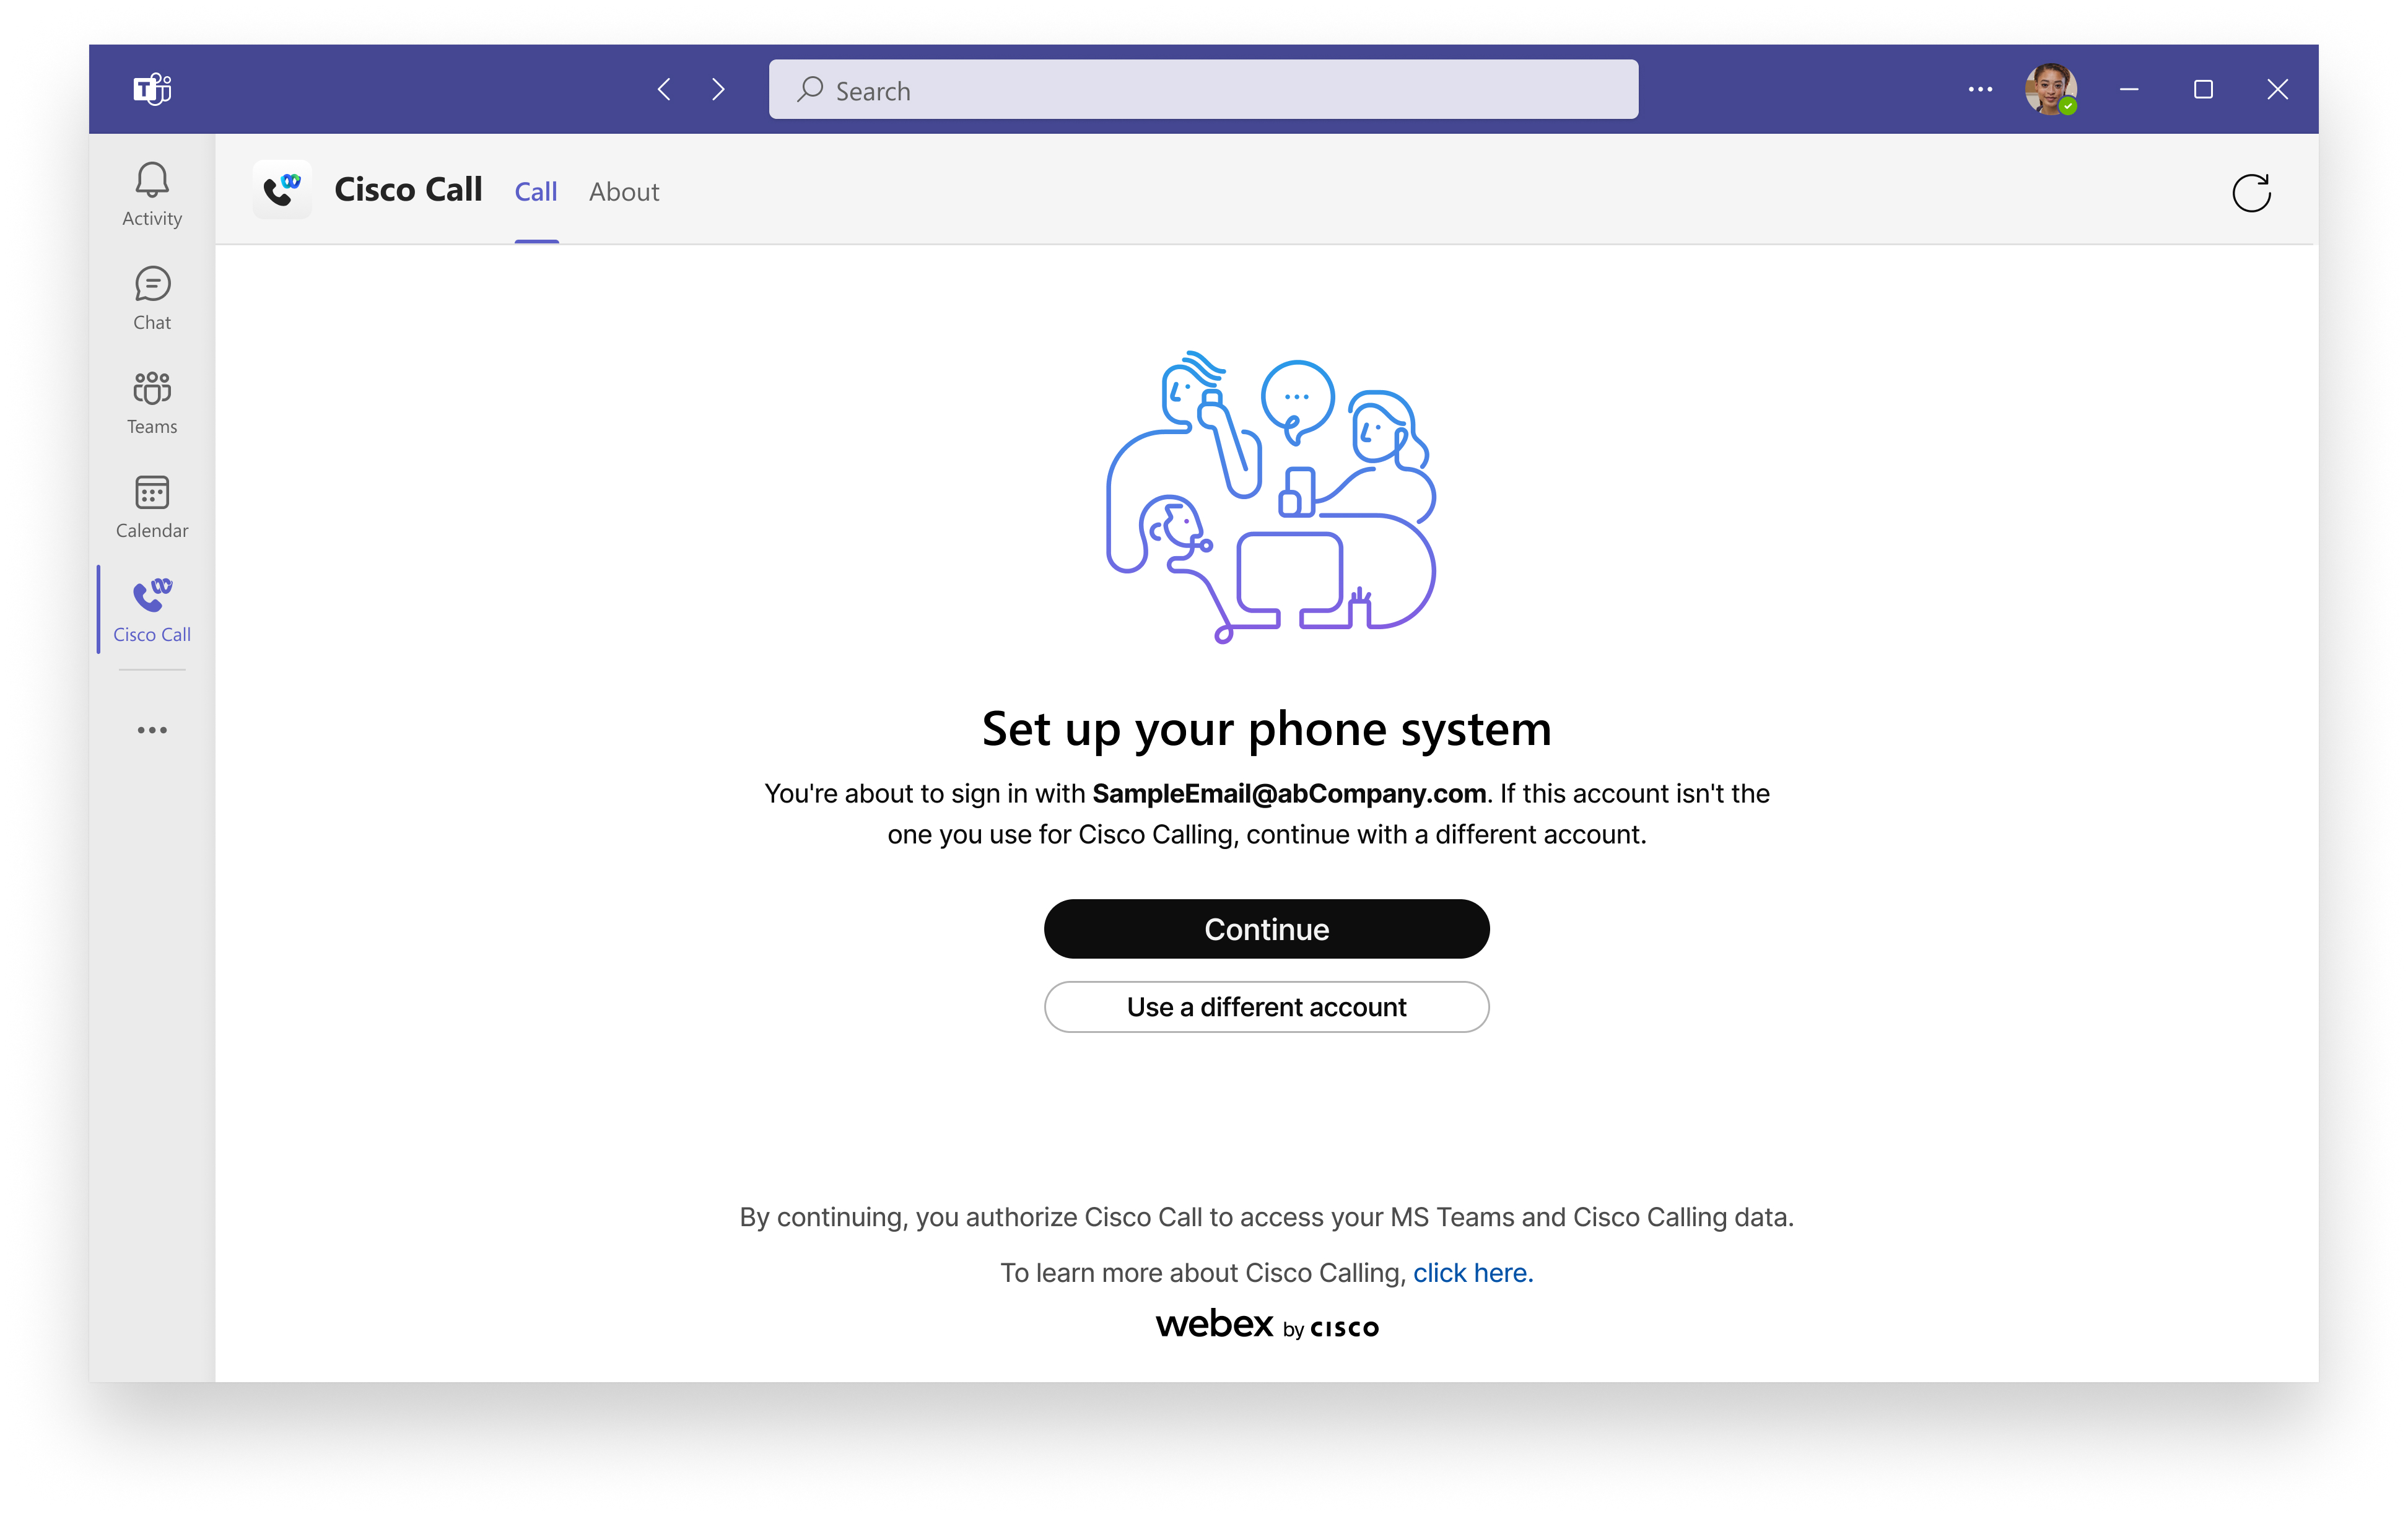
Go to Microsoft Teams, click Cisco Call
 , and then click
Continue if you’re using the same Microsoft Teams account for
Webex.
, and then click
Continue if you’re using the same Microsoft Teams account for
Webex.
If you're using a different account for Webex, then click Use a different account and sign in with your Webex email address and password.
After signing in, you can find all the calling features under Cisco Call
option.
Sign in from Mobile
| 1 |
Go to Microsoft Teams, tap the |
| 2 |
Tap Continue if you’re using the same Microsoft Teams account for Webex. If you're using a different account for Webex, then tap Use a different account and sign in with your Webex email address and password. After signing in, you can find all the calling features under Cisco Call option. |
Make a call
You can make a Webex call directly from the Microsoft Teams using the dialpad of the Cisco Call app or using the Cisco Call app as a messaging extension in one-on-one chat and group chat.
If your administrator has set up your profile with multiple lines with different phone numbers for calling, you see them under the My number dropdown in the Cisco Call integration. You can select the lines if you need to make outgoing calls from different lines with a different caller ID. After you make your selection, every outgoing call you make uses your new active line. You can change the active line again at any time.
Make a call from Desktop
From dialpad
| 1 |
Click Cisco Call
|
| 2 |
Select the contact and click |
 or
or  to connect.
From chat
| 1 |
In direct chat, click Cisco Call
|
| 2 |
From the contact card, select the number from the drop-down list. |
| 3 |
Click The app opens in a new window.
|
From channel
Use Cisco Call to call another member in the channel without creating a direct space.
| 1 |
In a channel, click Cisco Call
|
| 2 |
Start typing the member's name in the Select or search field, then select their name. (Optional) Click the drop-down under their name to change the outbound call options. |
| 3 |
Click |
Make a call from Mobile
From dialpad
To make a call using dialpad of the Cisco Call app:
| 1 |
Go to Microsoft Teams, and tap Cisco Call
|
| 2 |
Tap |
From chat
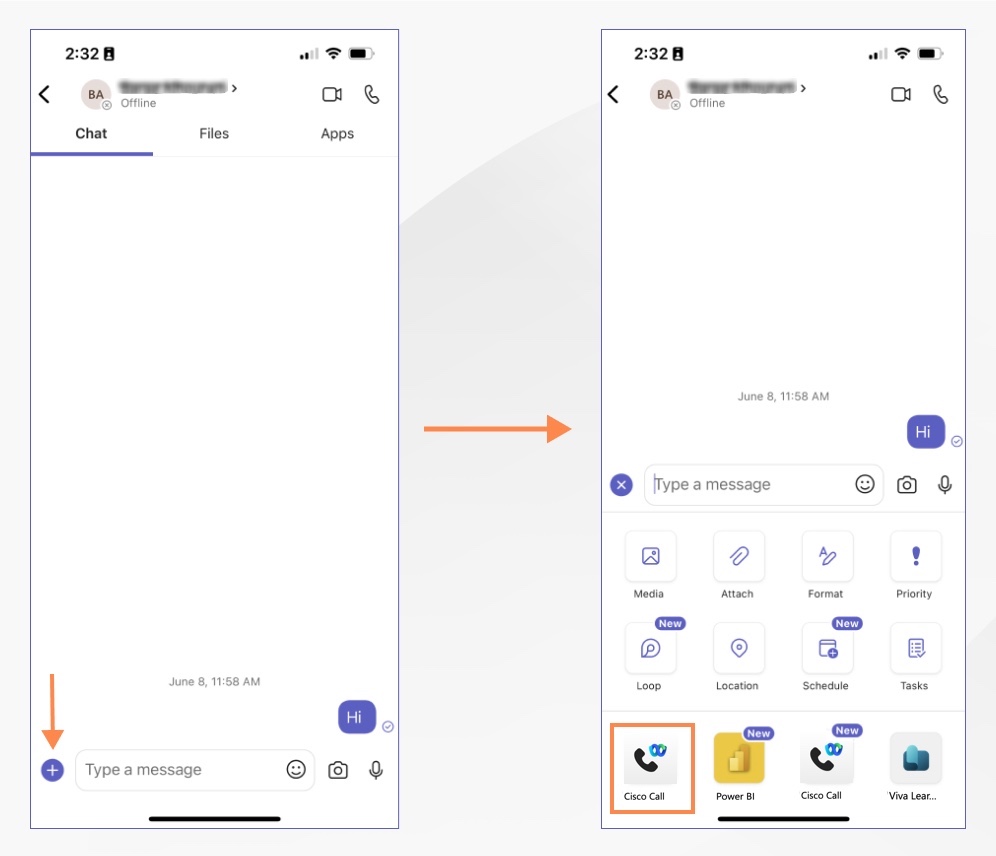
To make a call from chat using the Cisco Call app as a messaging extension:
| 1 |
Go to Microsoft Teams, tap Chat and choose a chat. |
| 2 |
Tap the
|
| 3 |
Perform one of the following actions:
|
 icon at the bottom and tap the Cisco Call app
  .
.
Manage speed dial
Add up to 20 contacts inside or outside of your Outlook or Azure Active Directory as speed dials. The app saves your speed dials to your Microsoft 365 profile so you can call your most frequent contacts quickly and easily.
| 1 |
Click Cisco Call
|
| 2 |
Type the name of a directory contact, or for a custom contact.
The Name field has a maximum character limit of 100, and the Phone field has a maximum character limit of 50. |
| 3 |
Click Add. You can also edit, re-arrange, and delete the speed dial contact. |
View call history
See up to 200 of the calls you've made, received, and missed in the last 30 days in your Recent calls. You can also call them back at the same number they called you from. The contact name, phone number, and call type isn't displayed for unknown numbers.
Call history shows the calls you've made, received, and missed on your primary line and across multiple lines, such as shared or virtual lines.
For shared or virtual lines, you see consistent call history across your client or devices, regardless of which client or device you use. For calls handled by someone other than yourself on a shared or virtual line, your call history record displays Managed by to indicate who handled the call. Reading or deleting a call history record only affects your personal call history and it doesn’t impact the call history records for other users sharing the same line.
BroadWorks administrators must enable unified call history to ensure this feature works correctly. See Webex for Cisco BroadWorks Configuration Guide for more details.
View call history from Desktop
| 1 |
Click Cisco Call
If you've missed any call, they appear in red.
|
| 2 |
To call the person back, hover over a call log and click |
| 3 |
To delete a call log, hover over a call log, click The recent calls list refreshes automatically every minute to display the latest call records. For on-prem Unified CM customers, recent calls are listed only when call history is enabled for the cluster where the device is registered. For more information, see To enable voicemail, call history, and bidirectional presence sync service for on-prem Unified CM customers section of Configure Microsoft Teams for Cisco Call. |
View call history from Mobile
| 1 |
Open Microsoft Teams and tap Cisco Call
Under Recents, view the calls you’ve made or received. If you've missed any, they appear in red. To see missed calls, tap Missed. |
| 2 |
Tap an entry to return a call with audio or video. Tap Delete this call to delete the selected entry. The recent calls list refreshes automatically every minute to display the latest call records. |
Listen to or read your voice messages
You can view and listen to the voice messages right from the integration. A badge counter (Message Waiting Indicator) ) appears next to the Voicemail tab to show how many new voicemail messages you've received.
Before you begin
-
Your administrator must have enabled the voicemail feature for you to access it.
-
Voicemail and transcription are available only for your primary line.
-
You see the voicemail transcription only if you're set up with Webex Calling and your administrator turned on transcriptions for you.
If you don't see a transcription, it could be because of one of the following reasons:
-
The message was left before transcriptions were made available.
-
The transcription is still pending.
-
The message wasn't spoken clearly enough.
-
The message was left in a language other than English.
Listen to or read your voice messages from Desktop
| 1 |
Click Cisco Call
|
| 2 |
Click If you're a Webex Calling user, you can see the transcription. To listen to your voice messages from the voicemail portal, click Call Voicemail
To call the person back, hover over a voice message and click To delete a voice message, hover over it and click delete The voice messages list refreshes automatically every minute to display the latest voice message records. |
 to listen to the voice message.
 at the right corner and follow the prompts.
 .
.Listen to or read your voice messages from Mobile
| 1 |
Open Microsoft Teams and tap Cisco Call at the bottom. |
| 2 |
Tap Voicemail. |
| 3 |
Tap a message, and then in the Voicemail information screen, tap Play If you're a Webex Calling user, you can see the transcription. You've a few other options: call the person back with audio or video, delete the message, or mark the message as read or unread. The voice messages list refreshes automatically every minute to display the latest voice message records. |
Find your work phone number and access call settings
Find your work phone number
To find your work phone number from mobile, open Microsoft Teams, tap Cisco Call
at the bottom, tap  and you can find My number at the bottom of the dialpad which shows your work number.
To find your work phone number from desktop, click Cisco Call
and you can find My number at the top left corner which shows your work number.
Access call setting from Desktop
You can access and update Webex App call settings directly from the Cisco Call integration in the Microsoft Teams, without having to interact directly with the Webex App.
| 1 |
Click Cisco Call
|
| 2 |
Update your settings and click Save. |
Manage all your phone calls in one place
Manage multiple lines or shared line in a single window. With the calling dock window (multi call window), you can make and answer calls, get a quick view of your line status, and easily access some common calling features, such as mute, hold, share, conference, park, barge, transfer, and record.
Before you begin
-
Administrator must have enabled this feature for you to access it.
-
This feature is currently available only on Windows.
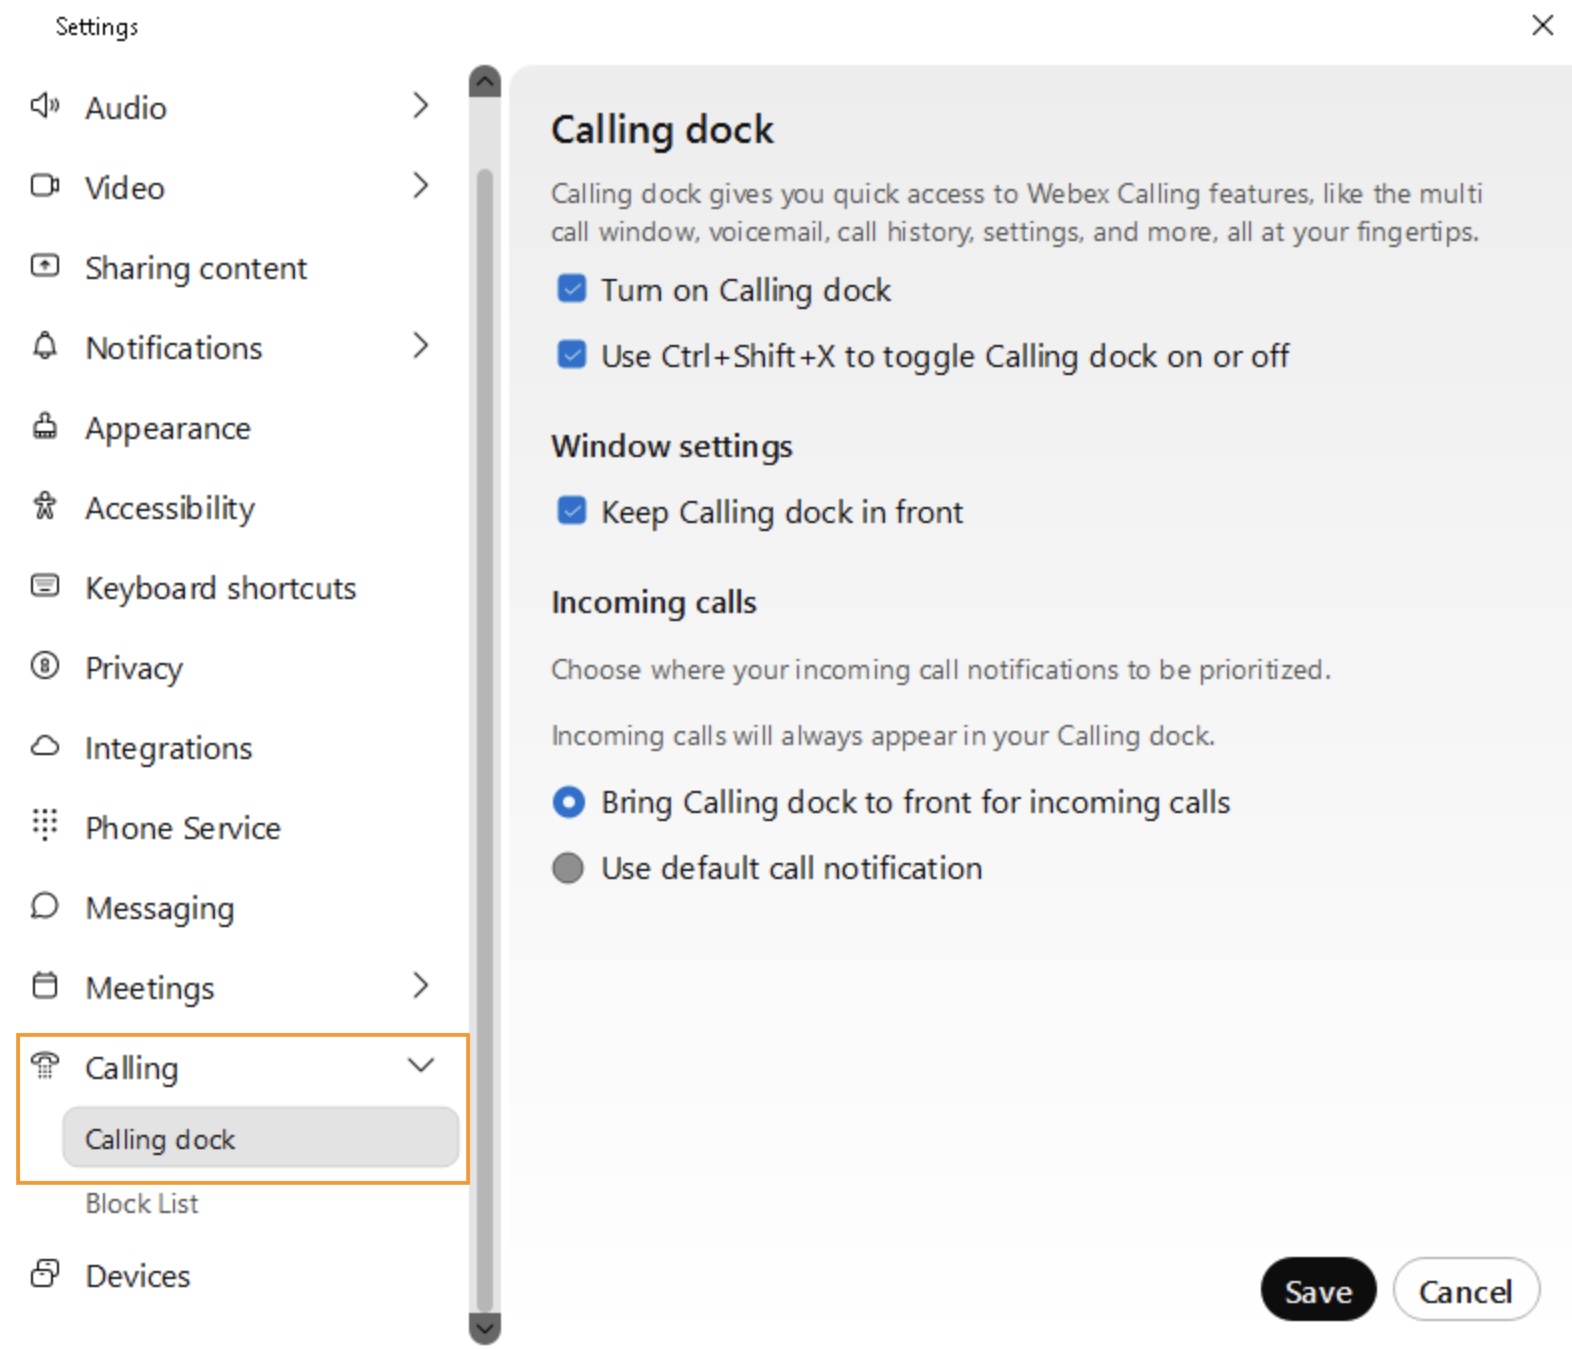
You can enable this feature directly from the integration landing page or from call settings.
To enable it from the integration landing page, click the More option  at the right corner and then enable or disable the
Calling dock toggle.
at the right corner and then enable or disable the
Calling dock toggle.
To enable it from call settings, perform the following steps:
| 1 |
Click Cisco Call
|
| 2 |
Go to . |
| 3 |
Choose one or both of the available options to turn on the calling dock:
|
| 4 |
Click Save.
For more information on accessing some common calling features from the calling dock window, see Manage all your phone calls in one place. |
Forward your phone calls
If you're going to be away but don't want to miss an important call, you can forward your calls to another phone number. Or, if you don't want to be interrupted, you can send all your calls to voicemail instead.
| 1 |
Click Cisco Call
|
| 2 |
Under Call Forward, click After you've enabled the call forwarding, the call forwarding status appears beside the Call settings option on the landing page.
Currently, the call forwarding status is available only for Webex Calling (Cloud/Multi-Tenant), Dedicated Instance, and UCM users. |
 to add a number to forward the calls to or choose
 Bidirectional presence sync
Before you begin, your administrator must have enabled this feature for you.
As a Microsoft Teams user using Cisco Call integration, you now have the ability to see whether your contacts are currently in a Webex call, Meeting, or in Do not disturb mode. This feature enables bidirectional synchronization of presence status between Microsoft Teams and Webex, supporting multiple Microsoft Teams tenants in the same Webex organization.
When you make or receive a Webex call, your Microsoft Teams status gets changed to In a call. When you enable Do not disturb in the Webex App or any Webex device, the status is automatically synchronized to Microsoft Teams. Similarly, the In a meeting and Presenting statuses synchronizes between applications.
When Do not disturb is enabled on Webex App or Webex device, you won’t get any notification of incoming calls and messages in Webex App, Webex device or Microsoft Teams.
The following table shows the bidirectional status sync representation between Webex and Microsoft Teams.
|
Webex status |
Microsoft Teams status |
|---|---|
 On a call On a call |
 In a call In a call |
 In a meeting (This status syncs only from Webex to Teams) In a meeting (This status syncs only from Webex to Teams) |
In a call |
 Presenting Presenting |
 Presenting Presenting |
 Do not disturb Do not disturb |
Do not disturb |
Cross launch Attendant Console and Webex Calling Customer Assist
You can cross launch Attendant Console and Customer Assist directly from the Cisco Call integration in Microsoft Teams.
You see the Attendant Console option only if you’re a Webex Calling user with the Attendant Console license. You see the Customer Assist option only if you’re a user with a Customer Assist license.
To access Attendant Console and Customer Assist, click the More option at the right corner of the Cisco Call integration, and then click Open Attendant Console or
Open Customer Assist.
For Customer Assist, the respective window opens based on your role as an agent or a supervisor.
For more information on the Attendant Console features, such as search for a contact, call management, park a call, access queue panel, compact view, call recording, keyboard shortcuts, and so on, see Get started with the Attendant Console.
For more information on Customer Assist, see Get started with Webex Calling Customer Assist for Agents and Get started with Webex Calling Customer Assist for Supervisors.
Mute Cisco calls when on Teams meeting or call
You can mute notifications for incoming Cisco calls when you are in a Microsoft Teams meeting or call. You can also set up to decline the calls automatically. Any unattended calls are listed as missed calls under Recent Calls.
Before you begin
To mute notifications when you’re in either a Microsoft Teams call or meeting, or a Cisco call or meeting, your administrator must enable the Optimize Webex App for Microsoft Teams experience option in the Control Hub, and you need to enable the following settings.
If your administrator has disabled the feature and you’ve enabled it, then it only mutes notifications when you’re in a Cisco call or meeting.
| 1 |
Click Cisco Call
|
| 2 |
Go to . |
| 3 |
Under Direct calls, choose Only mute notifications when I’m in a meeting or on a call. If you want to decline the call, select Automatically decline incoming calls. |
| 4 |
Click Save. |
Update your location for emergency services
Depending on how your administrator has set up your account and whether the country you're in supports Enhanced 911 (E911) integration, Cisco Call integration may prompt you to update your location.
You're prompted to update your location when you're first set up with E911 service and every time you change locations after that.
An alert appears next to the More option at the right corner when the address needs to be updated.
| 1 |
Click the More option |
| 2 |
Update your address and click Save. |
Phone service disconnection
The Cisco Call integration displays an alert banner if your phone service is disconnected.
This can occur in the following scenarios:
-
You’re signed into the Webex App on one desktop and then sign into the Webex App on another desktop using the same username.
-
The Webex App isn’t running in the background, either because it was accidentally closed, or you were signed out.
To restore the service, you can click the suggestions in the banner.
Bot notifications for missed calls and new voicemails
The Cisco Call bot notifies you if you miss a call or receive a new voicemail.
In the Microsoft Teams chat, the Cisco Call chat gives you a notification card for every missed call and new voicemail, with options such as Go to Recent calls, Go to Voicemails, and Call back. Clicking these options directs you to the integration page for more details.
The Cisco Call integration icon displays a notification badge with the number "1" when there are missed calls or voicemails. This number is a general alert for new activity and it doesn't increase even if you have more than one notification.
Turn on closed captions for calls
Closed captions display spoken words as text during a live call. Call transcription instantly converts spoken words to written text in real time. It displays only for you in a scrollable window, capturing dialogue, not sounds, and updating as participants speak. When you turn on closed captions, the transcription automatically starts for you.
Before you begin
-
Your administrator must have enabled the closed captions and call transcriptions feature for you to access it.
-
This feature is available only if you're set up with Webex Calling.
| 1 |
During a call, click Show closed captions
|
| 2 |
Choose from the available languages: English (default), German, Spanish, French, Italian, and Japanese. Your closed captions setting is saved. If you enabled it in your previous call, it automatically turns on in your next call. If you disabled it, you need to enable it manually. Currently, this feature is supported only for Cisco Call integration on desktop and isn’t available for call received or made on shared lines. |
 in the lower-left corner of the screen.
Get in-call summaries with Cisco AI Assistant
AI Assistant for Webex Calling provides live call summaries, making it easy to quickly catch up on the discussion and ask questions about what’s happened so far. You don’t have to take notes manually anymore—you can stay focused and fully engaged in the conversation.
Before you begin
-
Your administrator must have enabled the Cisco AI Assistant feature for you to access it.
-
This feature is available only if you're set up with Webex Calling.
| 1 |
First, start your call. |
| 2 |
Go to the call controls, and click AI Assistant
During the call, click AI Assistant
|
| 3 |
In the Cisco AI Assistant panel, select from:
After your call, you'll receive a notification when your call summary is available. In
your call history, any calls that have used AI Assistant are clearly marked with an indicator showing if they include a
Summary
Currently, AI Assistant call summaries are supported only in English. |
 .
.  ,
,  , or both.


