- Home
- /
- Article

Thanks for your feedback.

 In this article
 Feedback?
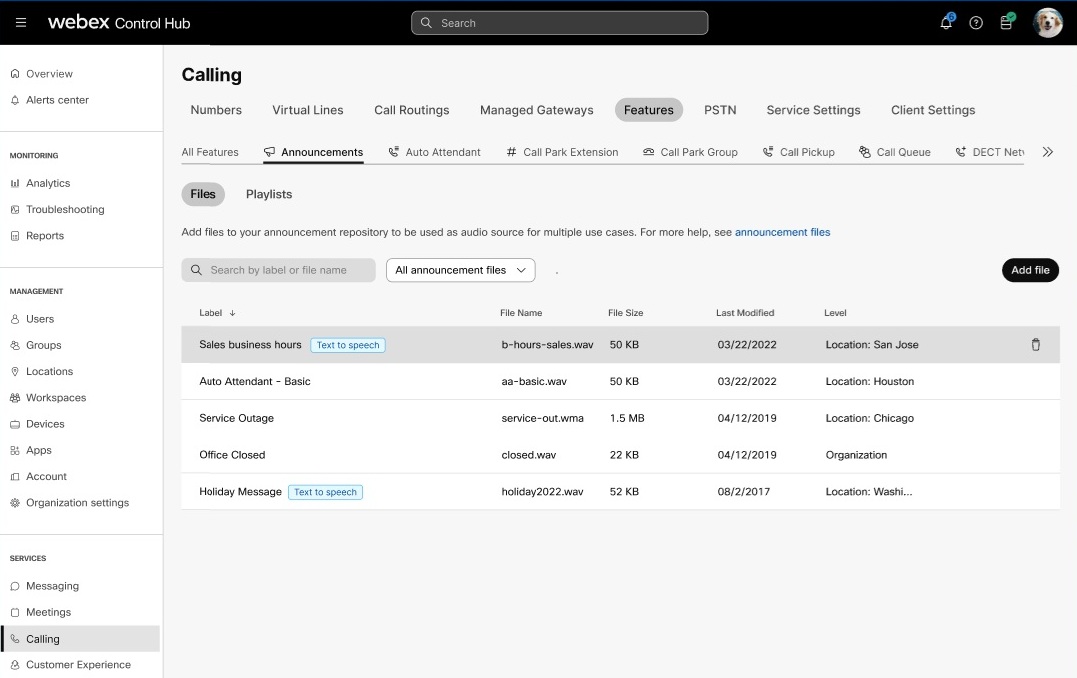
Manage your audio files in the centralized announcement repository, including those generated using Text-to-Speech (TTS), allowing you to use them across services like auto attendant, music on hold, and call queue announcements.
Set up a common repository, which allows different locations to use a shared announcement. Services such as Auto attendants, Call Queues, or Music On Hold can point to a common announcement in the repository.
You can update these announcements once, and apply them against all the respective instances. This feature provides a more efficient way to update auto attendants and allows you to update company-wide announcements. For example: a holiday announcement.
You can set the announcement repository at organization level and location level.
The announcement repository option at the organization and location level provides these capabilities:
-
Add, update, and delete the audio files, including the generation of new audio files using Text-to-Speech.
-
Replace existing announcement files
-
Filter and sort capability to view the files
-
Displays the file information and the feature instance that uses the announcement.
-
Supports localization of the announcements
Set up announcement repository
Before you begin
-
You can’t delete current files that the features use.
-
You can store announcement files with up to 1-GB storage limit across all the levels.
-
Ensure that you don’t upload announcement files with duplicate names.
| 1 |
Sign in to Control Hub. |
| 2 |
Go to . |
| 3 |
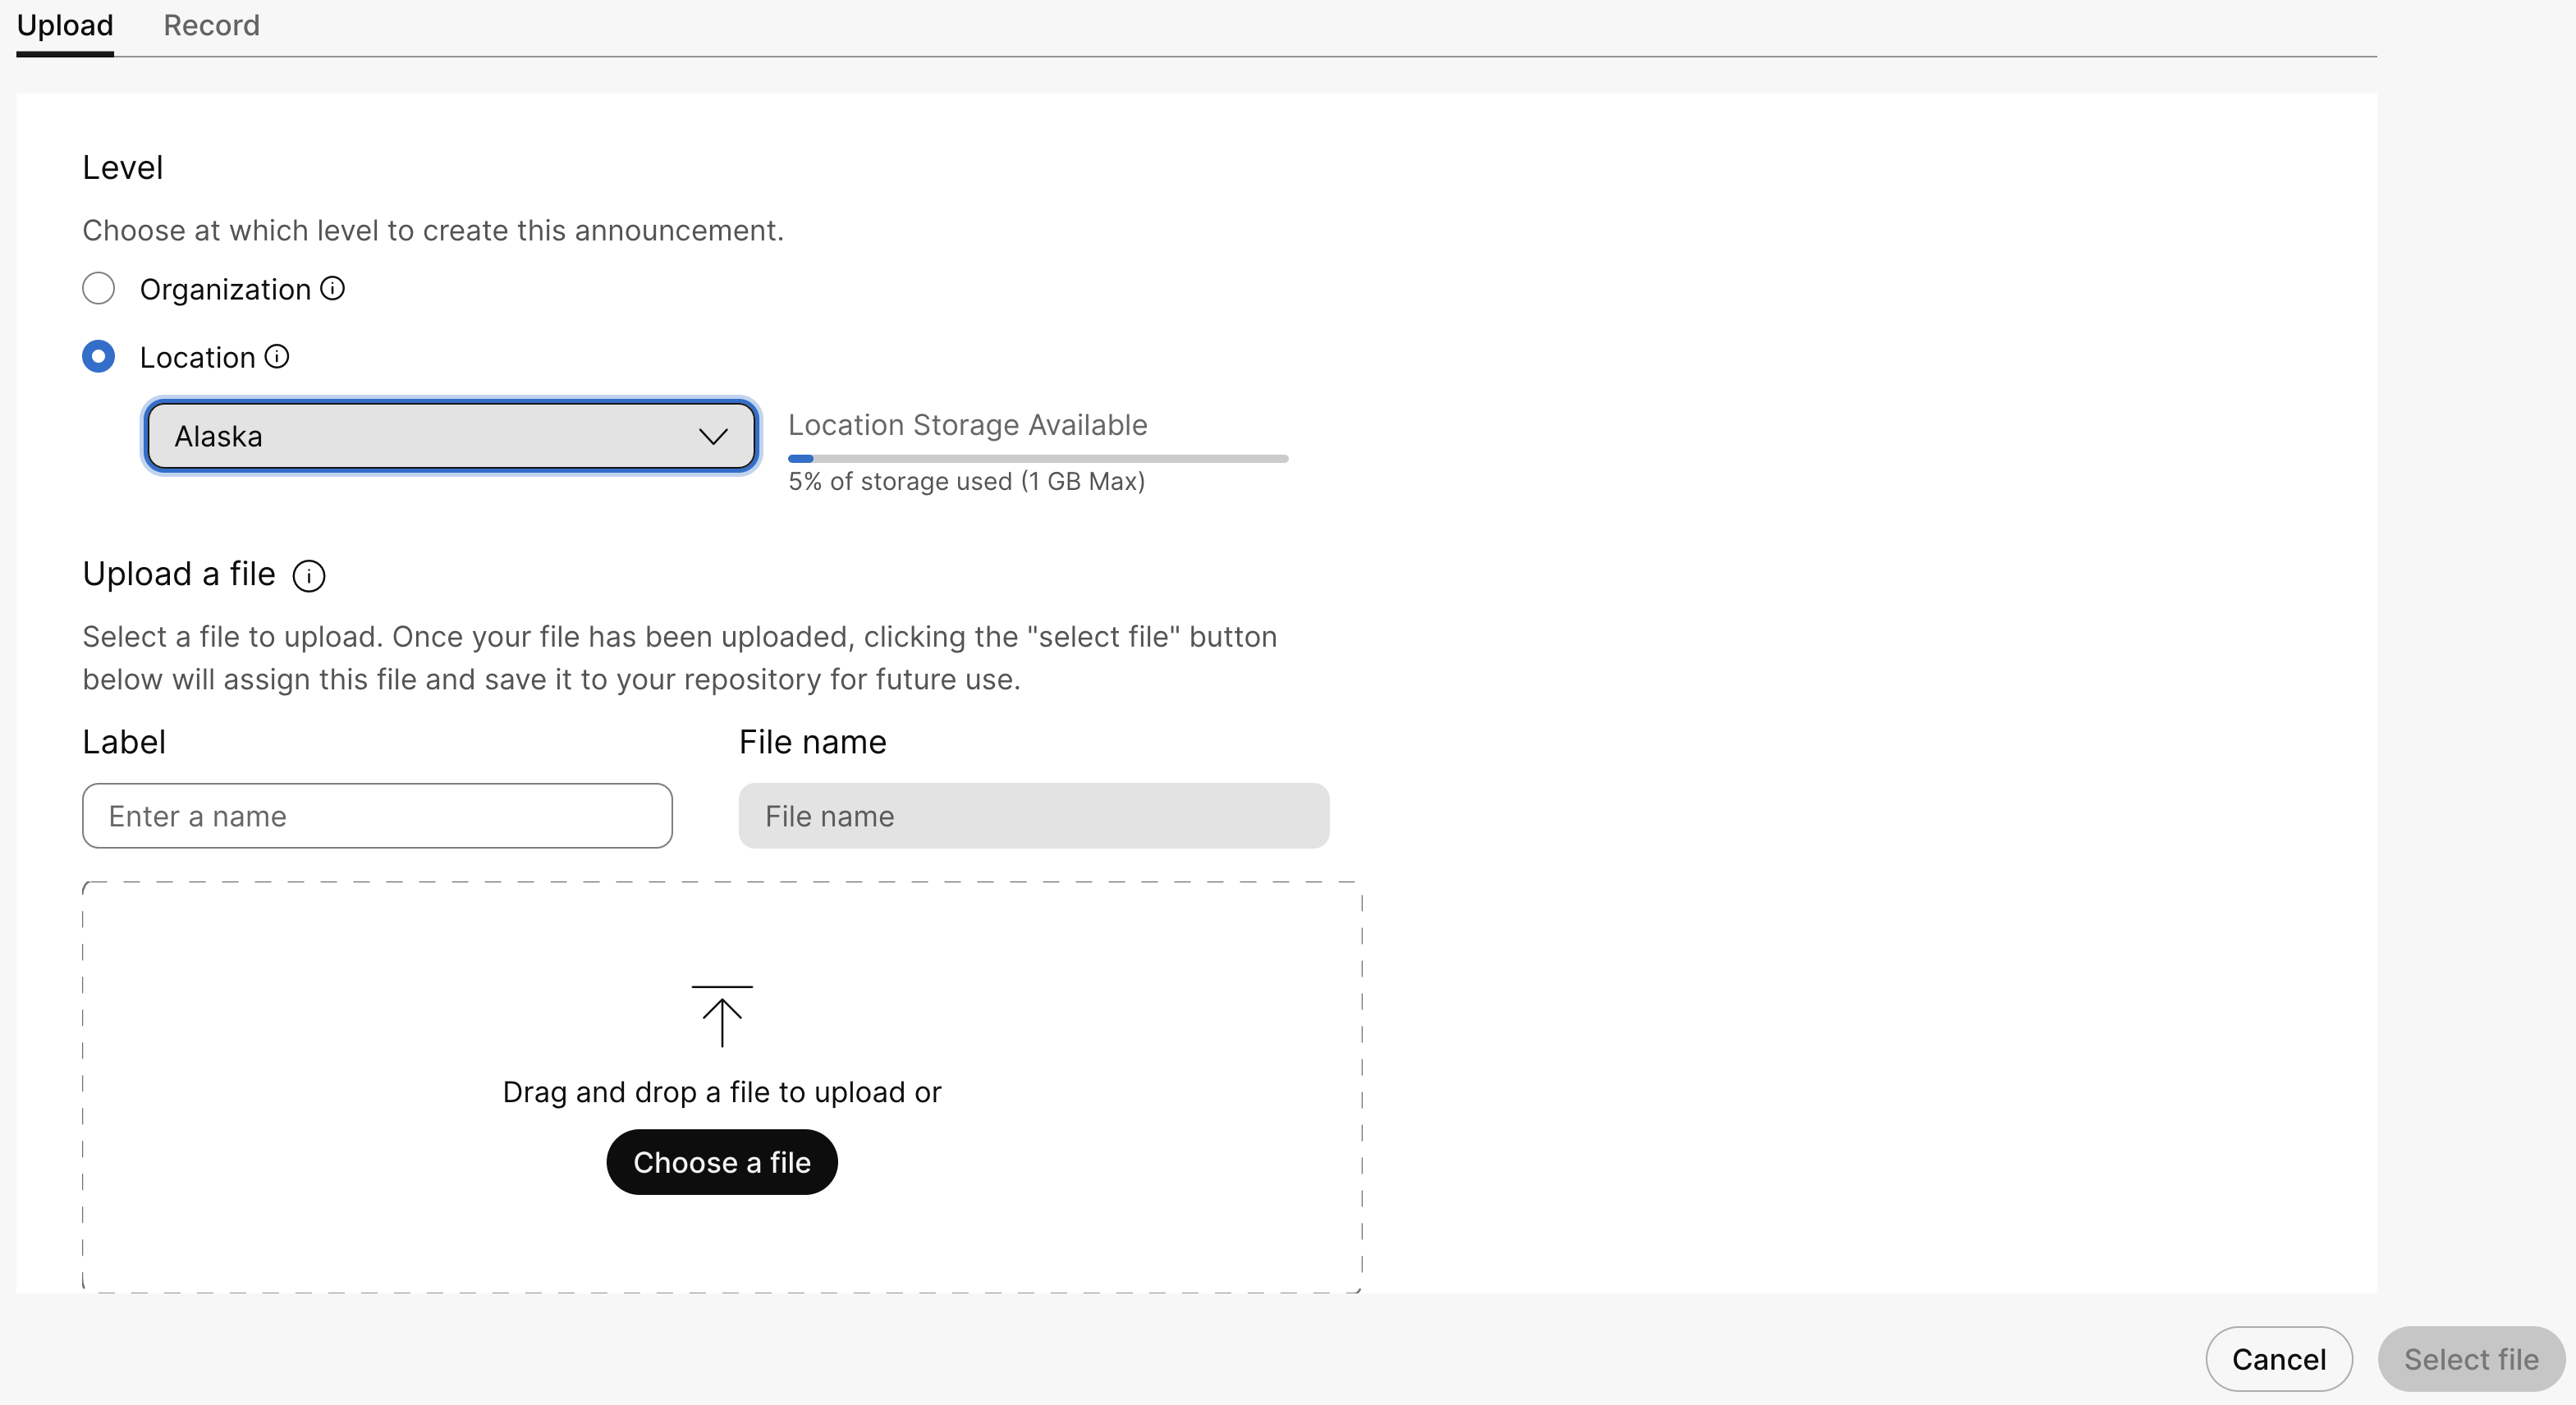
Go to the Announcements card and click Add New to add a new announcement file. You can add the announcement files using one of these methods:
If you change the greeting type from Default to Custom and then switch back to Default, the custom greeting remains associated with the announcement file. As a result, you cannot delete the custom greeting immediately. To remove the greeting, first set the greeting type to Custom and upload a new announcement. Save your changes, then you can delete the old announcement file. |
| 4 |
To Upload a file, perform the following steps:
|
| 5 |
To Record a message, perform the following steps:
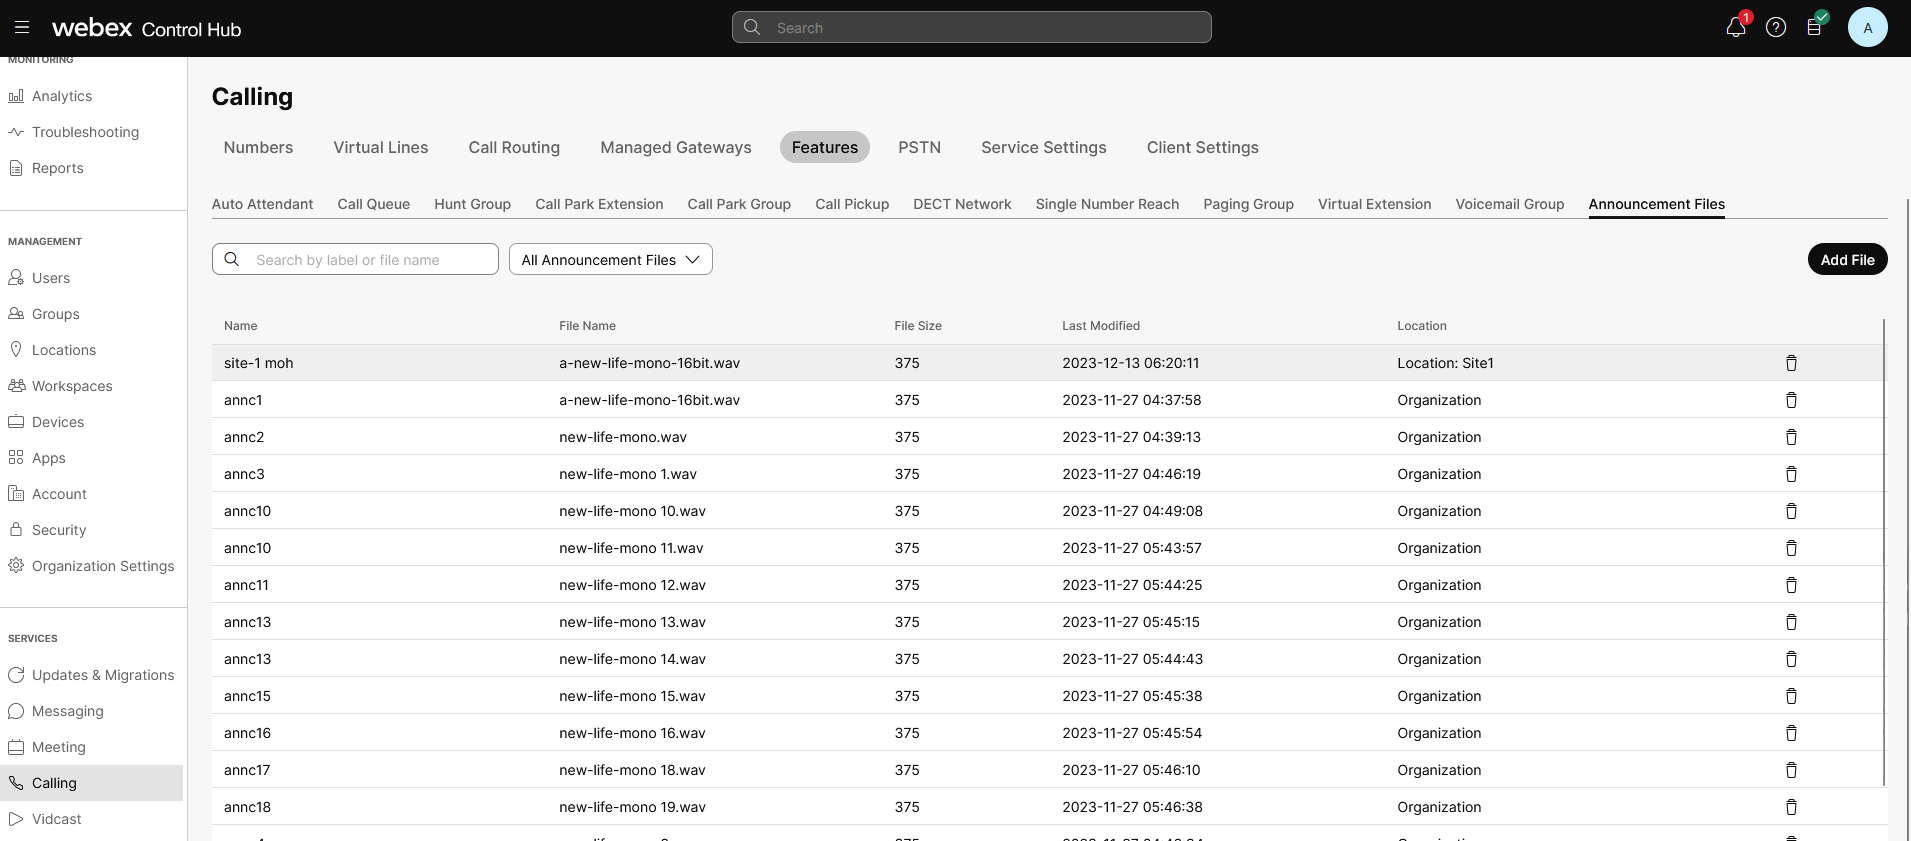
The uploaded or recorded audio files now list in the Announcements page. You can search and filter the files applicable for a location or organization.
|
| 6 |
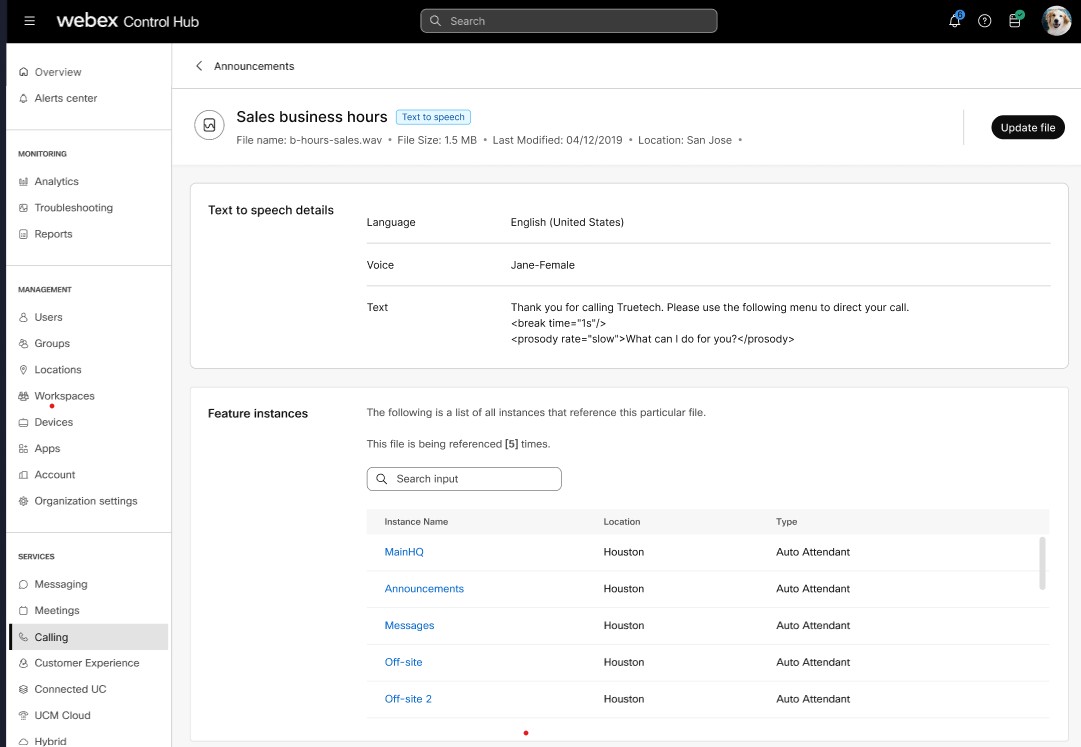
To delete an audio file, click the delete icon . To replace a file, click the audio file and click Replace file. Replacing an announcement file allows you to use a single file and apply it to the relevant services. For example, to change the monthly specials announcement for 25 locations, you can use a single replacement file. The announcement repository supports the following:
|
 to record the message, and then click the
play icon
to record the message, and then click the
play icon  to listen to the recorded message.
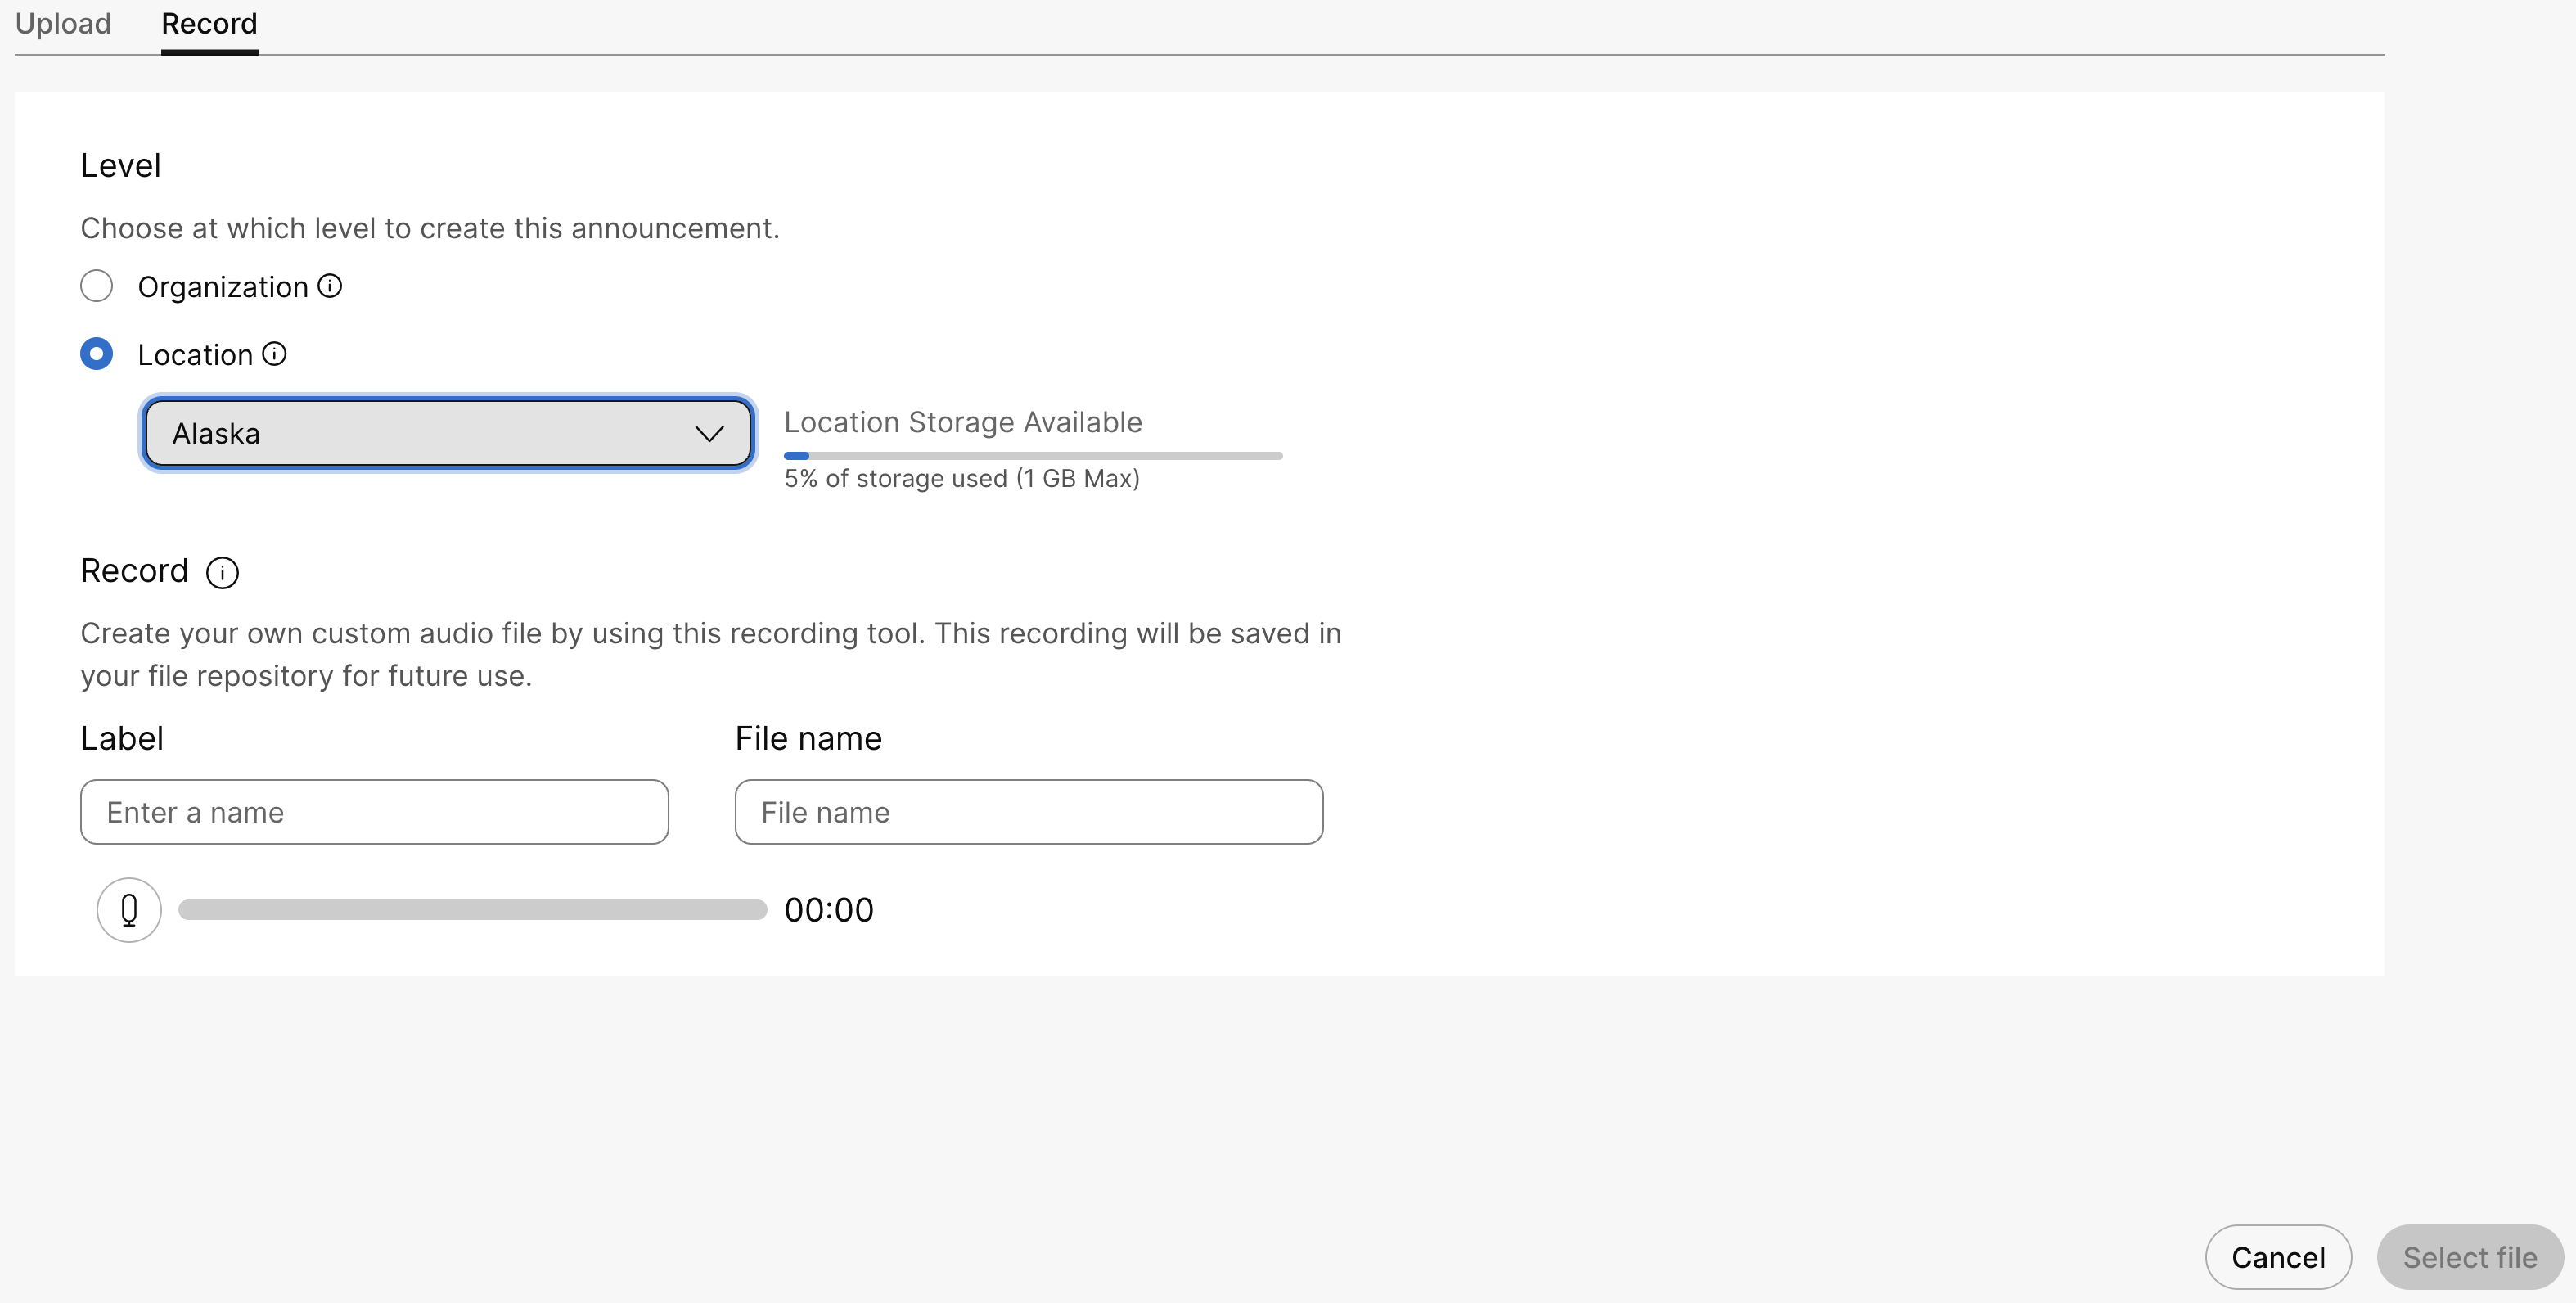
What to do next
You can use the audio files for custom configuration in the following features:
-
Music on Hold—Select the Play custom music option to play custom music when a call is in the queue. For details, see Configure music-on-hold settings from Control Hub.
-
Auto Attendant—Select the Custom Greeting option to set a message that the callers hear when they call during business hours. For details, see Manage auto attendants.
-
Call Queue—Select the Custom announcement option to set messages and music that the callers hear when the agents are busy. For details, see Manage call queue announcements.
Generate a Text-to-speech announcement file
Before you begin
This feature efficiently and quickly generates prompts, greetings, and announcements using Text-to- Speech (TTS). It functions like a recorded WAV file, eliminating the need for manual recording.
Consider these pointers while using the Text-to-Speech feature:
-
Audio file format:
.WAVfiles with 16 kHz, 16-bit depth, PCM -
Language supported: English
-
Maximum text length: Text can have a maximum character length of 3000 characters.
-
Speech Synthesis Markup Language (SSML) tags: You can include Speech Synthesis Markup Language (SSML) tags in your Cloud Text-to-Speech requests to customize your audio output. The supported SSML tags from Voicea are:
SSML tag Accepted Attributes Example for using the SSML tag say-as
digits
<say-as interpret-as="digits">345</say-asfraction <say-as interpret-as="fraction"> 3/5</say-as>ordinal <say-as interpret-as="ordinal">12</say-as>cardinal <say-as interpret-as="cardinal"> 12345</say-as>date <say-as interpret-as="date" format="us">12/03/25</say-as>time <say-as interpret-as="time"> 14:35</say-as>characters <say-as interpret-as="characters" format="strict">test</say-as>address <say-as interpret-as="address">Apt. 17, 28 N. Whitney St., Saint Augustine Beach, FL 32084-6715</say-as>bleep Hello <say-as interpret-as="bleep">world</say-as>!prosody
rate
The acceptable preset values are percentage, x-slow, slow, medium, fast, and x-fast
<prosody rate="+20%">Pronounced faster
</prosody>
volume
The acceptable preset values are: silent, x-soft, soft, medium, loud, and x-loud.
Do not set the volume to more than 5-6dB.
<prosody volume="5dB">Very loud statement
</prosody>
pitch
This attribute increases or decreases the pitch of the voice. The acceptable presets are: percentage, x-low, low, medium, high, x-high. In this example, the pitch is increased by 15%
<prosody pitch="+15%">High-pitched speech.
</prosody>
emphasis
level
The acceptable preset values are: none, strong moderate, and reduced.
<emphasis level="strong">The statement is
pronounced loudly and slowly</emphasis>
break
time
The acceptable preset values are: none (0), x-weak (250ms), weak (500ms), medium (1000ms), strong (2000ms), and x-strong (3000ms).
Hello <break time="1500ms"></break>
 world!
Hello <break strength="weak"></break> world! -
Number of voices: Support for 2 voices to generate the prompts
| 1 |
Sign in to Control Hub. |
| 2 |
Go to . |
| 3 |
Go to the Announcements card and click Add New to add a new announcement file. |
| 4 |
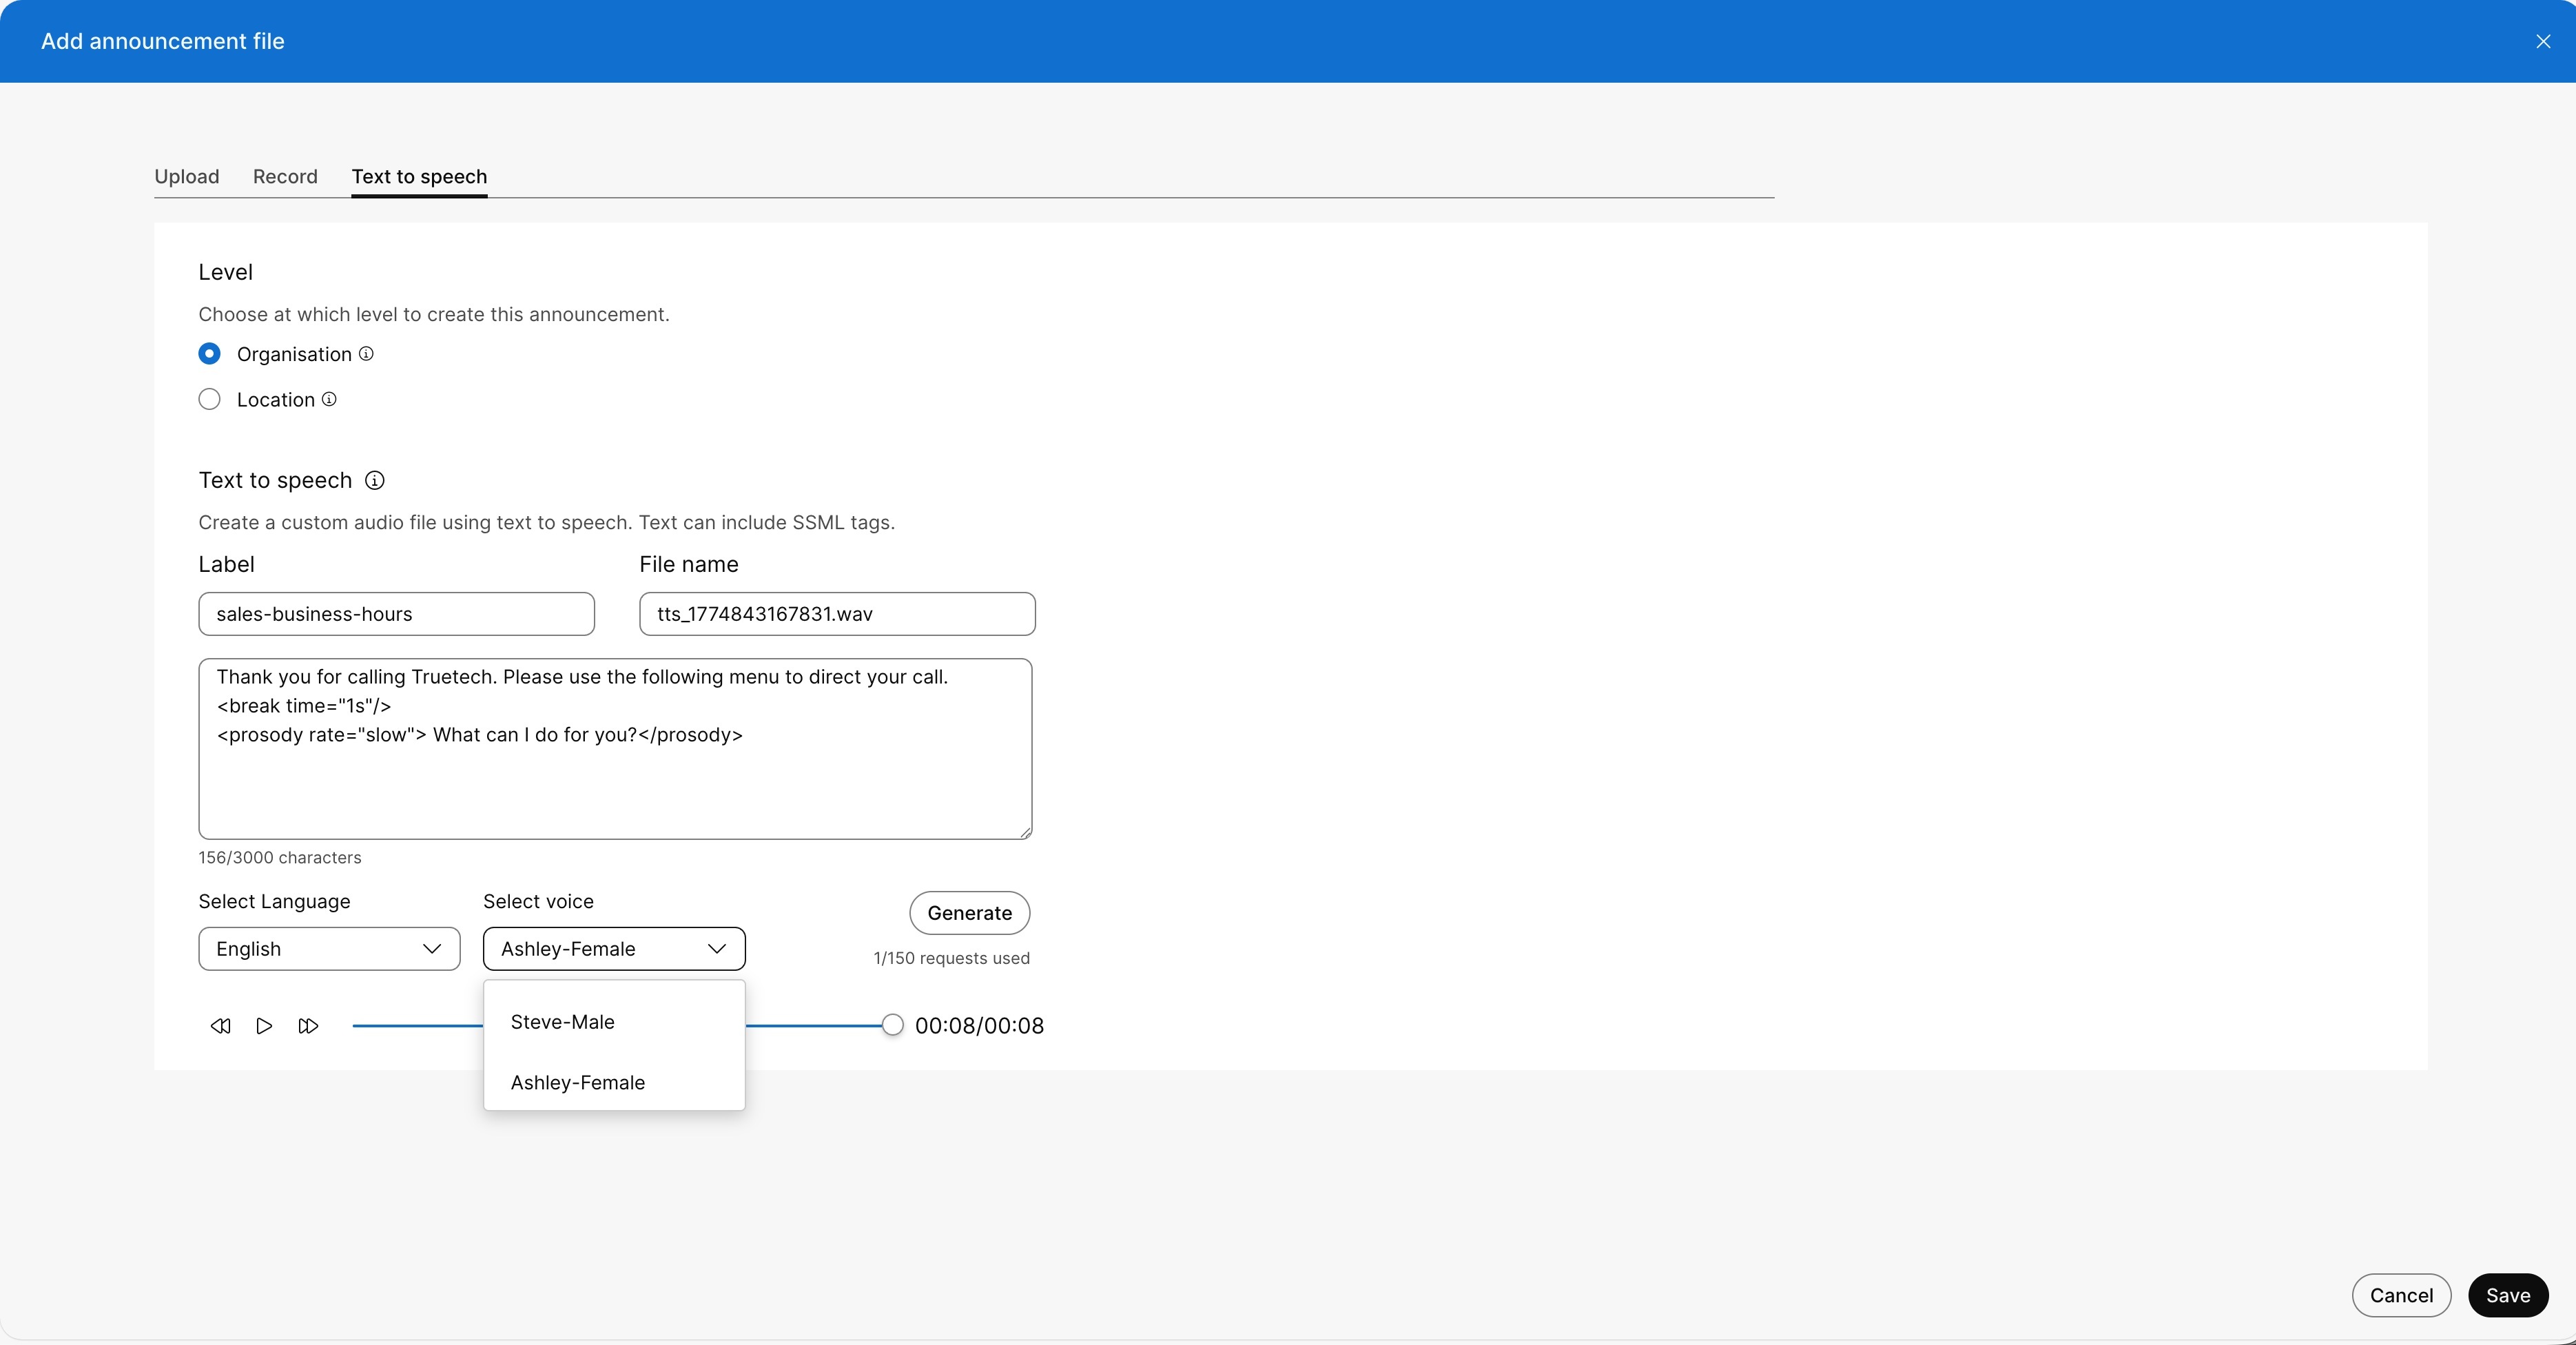
To add the text announcement file, click Text-to-Speech tab You can choose the level that you want to create the announcement file.
|
| 5 |
Specify the Text-to-Speech announcement file, perform the following steps:
|
| 6 |
Click Generate to create the preview of the announcement. An audio player displays. Click play, to hear the newly created announcement.
|
| 7 |
Click Add to save the TTS file. On saving, the generated audio files now list in the Announcements page with the If you do not save the generated announcement, it does not list in the Announcements page. You can search and filter the files applicable for a location or organization.
You cannot generate the announcement, if you have selected the Calling region for your organization as Kingdom of Saudi Arabia (KSA). The data residency server for this region is currently not available, and therefore, Text-to-Speech announcements are not supported. |
Edit a TTS announcement
Complete these steps to update or edit a TTS announcement file:
| 1 |
Sign in to Control Hub. |
| 2 |
Go to . |
| 3 |
Click Announcements , to view the list of generated TTS file. |
| 4 |
Select the audio file from the list that you wish to modify, click Update file. The update an audio file, click the audio file The Feature instance displays the number of instances the announcement file applies. Updating an announcement file allows you to use a single file and apply it to the relevant services. For example: to change the Sales business hours announcement for 15 locations, you can use a single replacement file.
|
| 5 |
For Text-to-Speech announcements, you can update the prompt by modifying the input text, language, or voice, and then regenerate the audio. Thus the prompts can be generated dynamically. An administrator can create or update 150 TTS announcements per day for an organization. |
Preview and download announcement files
Webex Calling allows you to preview and download announcement repository files from the Files tab. Use this work flow to audit individual files and make sure the correct audio file is applied to your business services.
- You can preview uploaded, recorded, and Text-to-Speech (TTS) announcement files. You can download uploaded and recorded audio files, but you can't download TTS files.
-
This feature is currently unavailable in select European regions.
| 1 |
Sign in to Control Hub. |
| 2 |
Go to . |
| 3 |
Go to the Announcements card and click Files. |
| 4 |
Locate the announcement file that you want to preview or download. 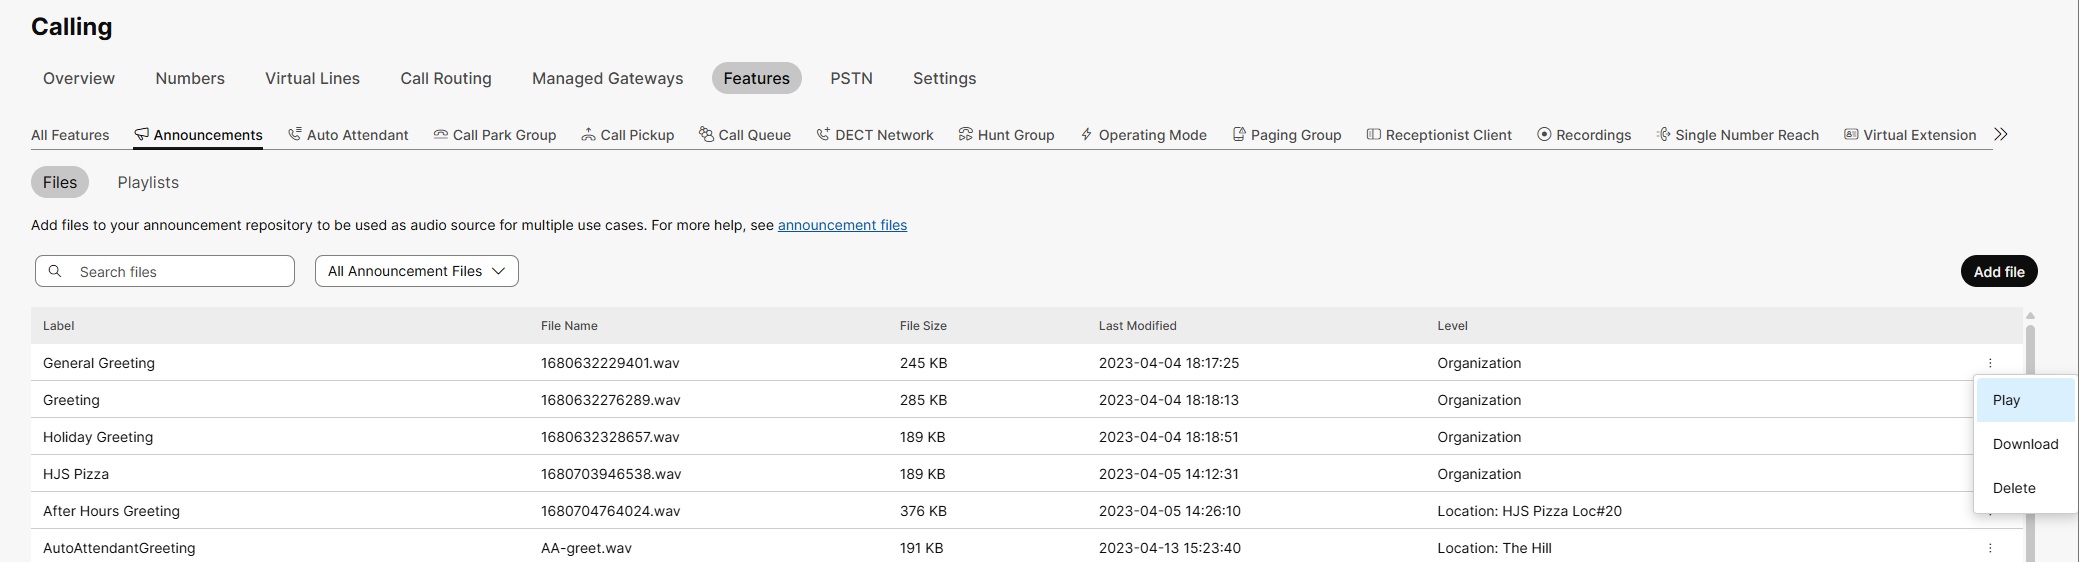
|
| 5 |
To preview the file, click the More icon (three dots) next to the file name and select Play. The audio player opens, allowing you to listen to the file. |
| 6 |
To download the file, click the More icon (three dots) next to the file name and select Download. The file downloads to your browser's default download location. |
What to do next
To improve speed, the system caches recently played or downloaded files in your browser.
Preview and download playlists
Webex Calling allows you to preview and download announcement playlists from the Playlists tab. Use this workflow to audit the files in a playlist before you assign it as a music-on-hold source.
| 1 |
Sign in to Control Hub. |
| 2 |
Go to . |
| 3 |
Go to the Announcements card and click Playlists. |
| 4 |
Locate the playlist that you want to preview or download. |
| 5 |
To preview the playlist, click the More icon (three dots) next to the playlist name and select Play. The audio player opens and displays the playlist files. The files play in a loop. 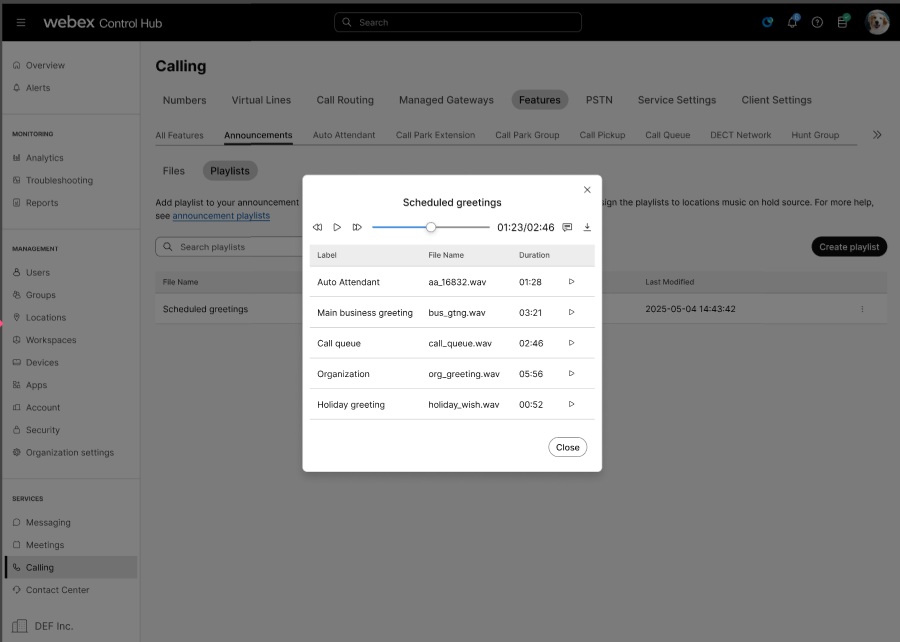
|
| 6 |
To download the playlist, click the More icon (three dots) next to the playlist name and select Download. |
| 7 |
If the playlist includes TTS announcement files, review the confirmation message and click Continue to download the playlist without the TTS files. |
What to do next
To improve speed, the system caches recently played or downloaded files in your browser.


