
Thanks for your feedback.
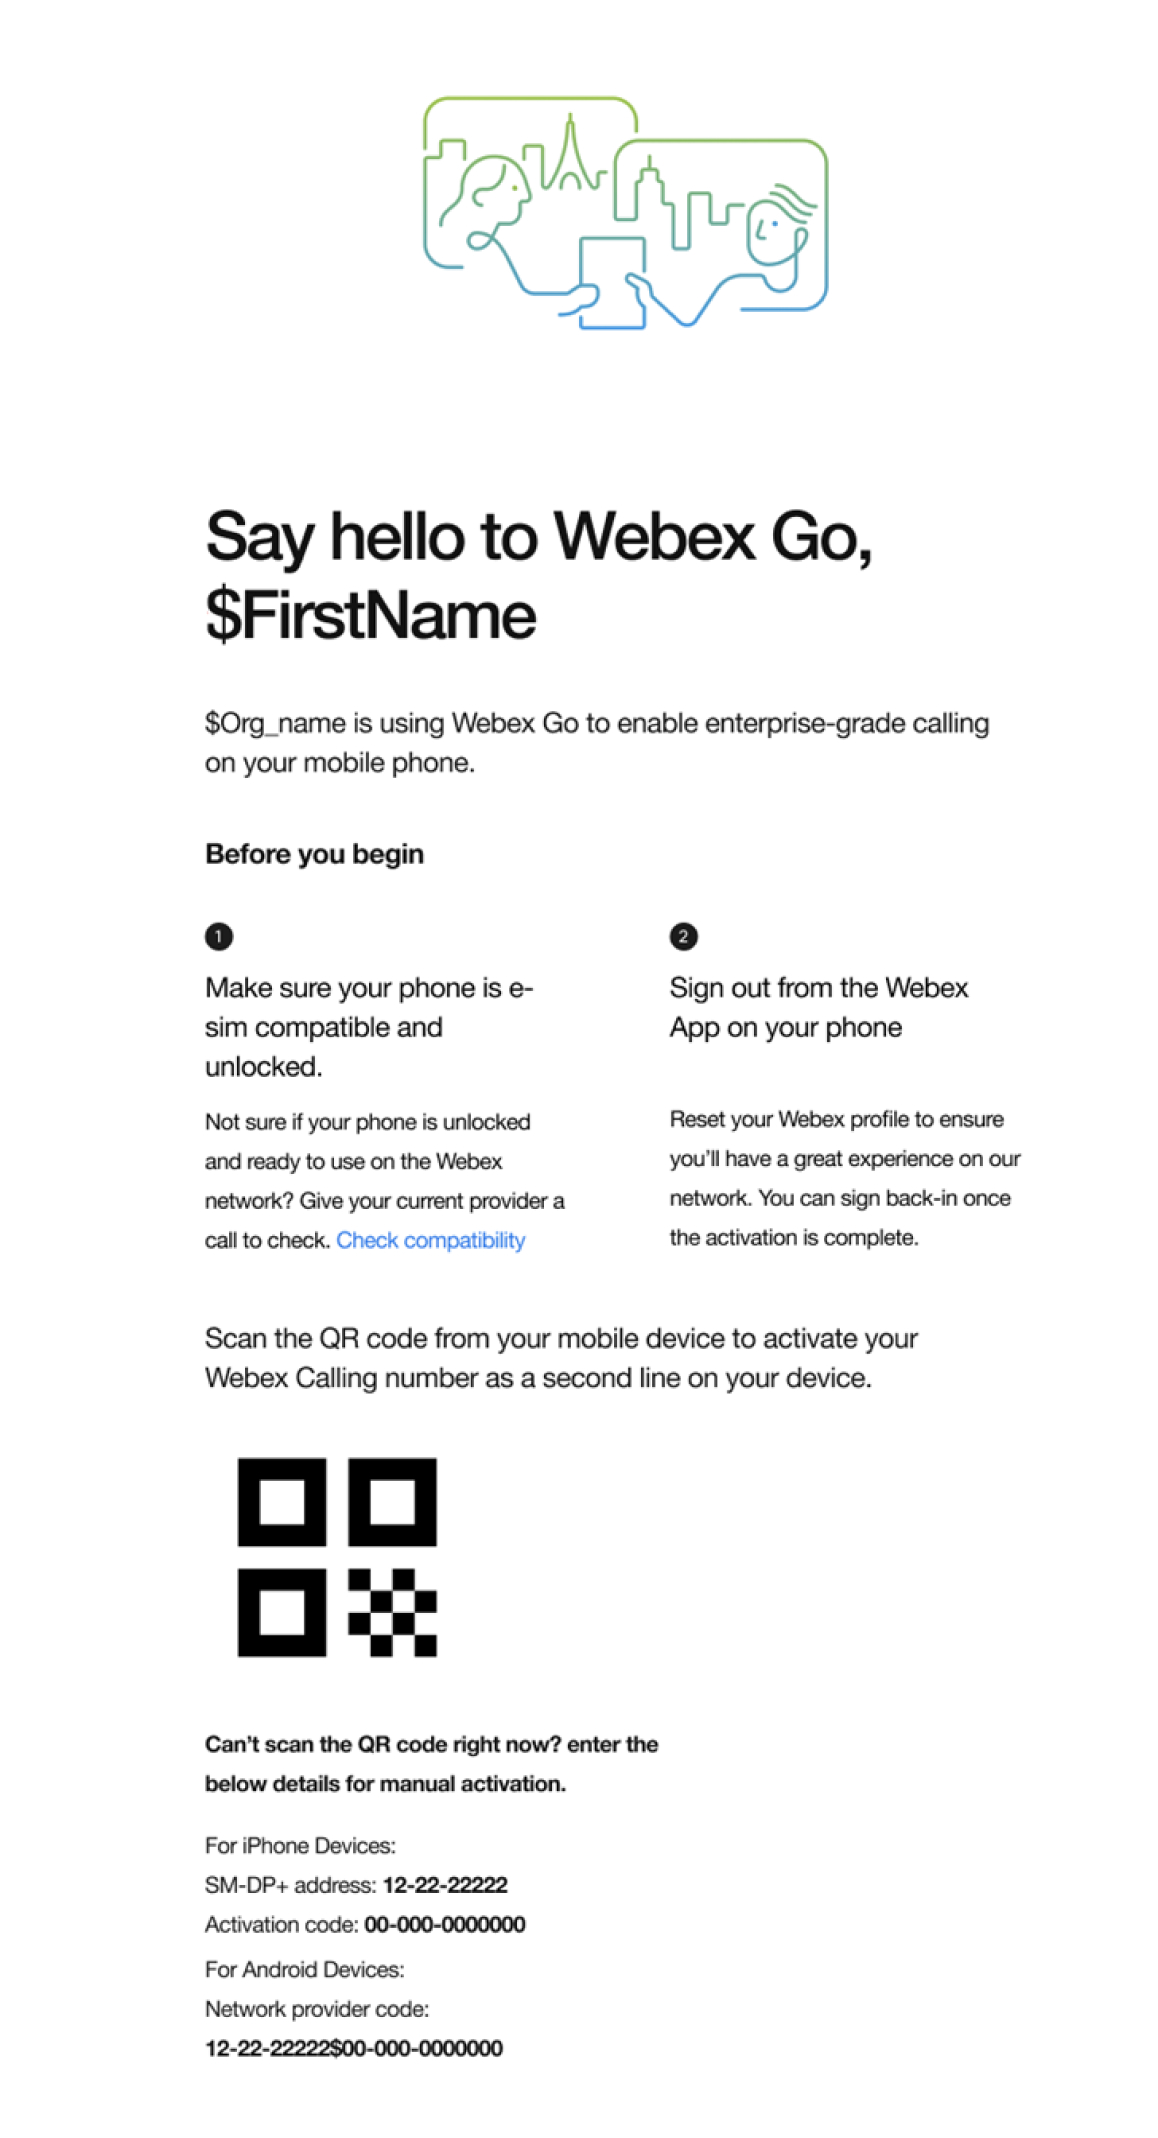
Activate Webex Go on your mobile phone
 Feedback?
Before you begin
-
Confirm your phone is carrier unlocked, dual SIM compatible, and can support an active eSIM profile.
-
Webex Go is enabled through eSIM and requires an active eSIM profile on the device to be available. Refer to the supported device models and number of active eSIMs supported by the device.
Device lock policies apply only in the U.S.
-
-
Sign out of the Webex application on your mobile phone to configure the calling mode settings.
-
Make sure you have an active Wi-Fi network.
Supported iPhone models
-
iPhone Xr
-
iPhone Xs
-
iPhone Xs Max
-
iPhone SE 2020
-
iPhone 11
-
iPhone 11 Pro
-
iPhone 11 Pro Max
-
iPhone 12
-
iPhone 12 Pro Max
-
iPhone SE 2022
-
iPhone 13
-
iPhone 13 Pro
-
iPhone 13 Pro max
-
iPhone 14
-
iPhone 14 Plus
-
iPhone 14 Pro
-
iPhone 14 Pro Max
OS/software version required: iOS 15.4 or later
Device lock status
Only applies to customers in the U.S.
-
Go to Settings → General → About
-
Under Carrier Lock you should see No SIM restrictions. If you don't see the message, contact:
-
Your IT administrator (if you are on corporate plan)
-
Carrier (if you are on a personal plan)
-
Scanning the QR code
Depending on the language set in your mobile device, the terms Mobile Data and Mobile Plan may be used in place of Cellular Data and Cellular Plan.
-
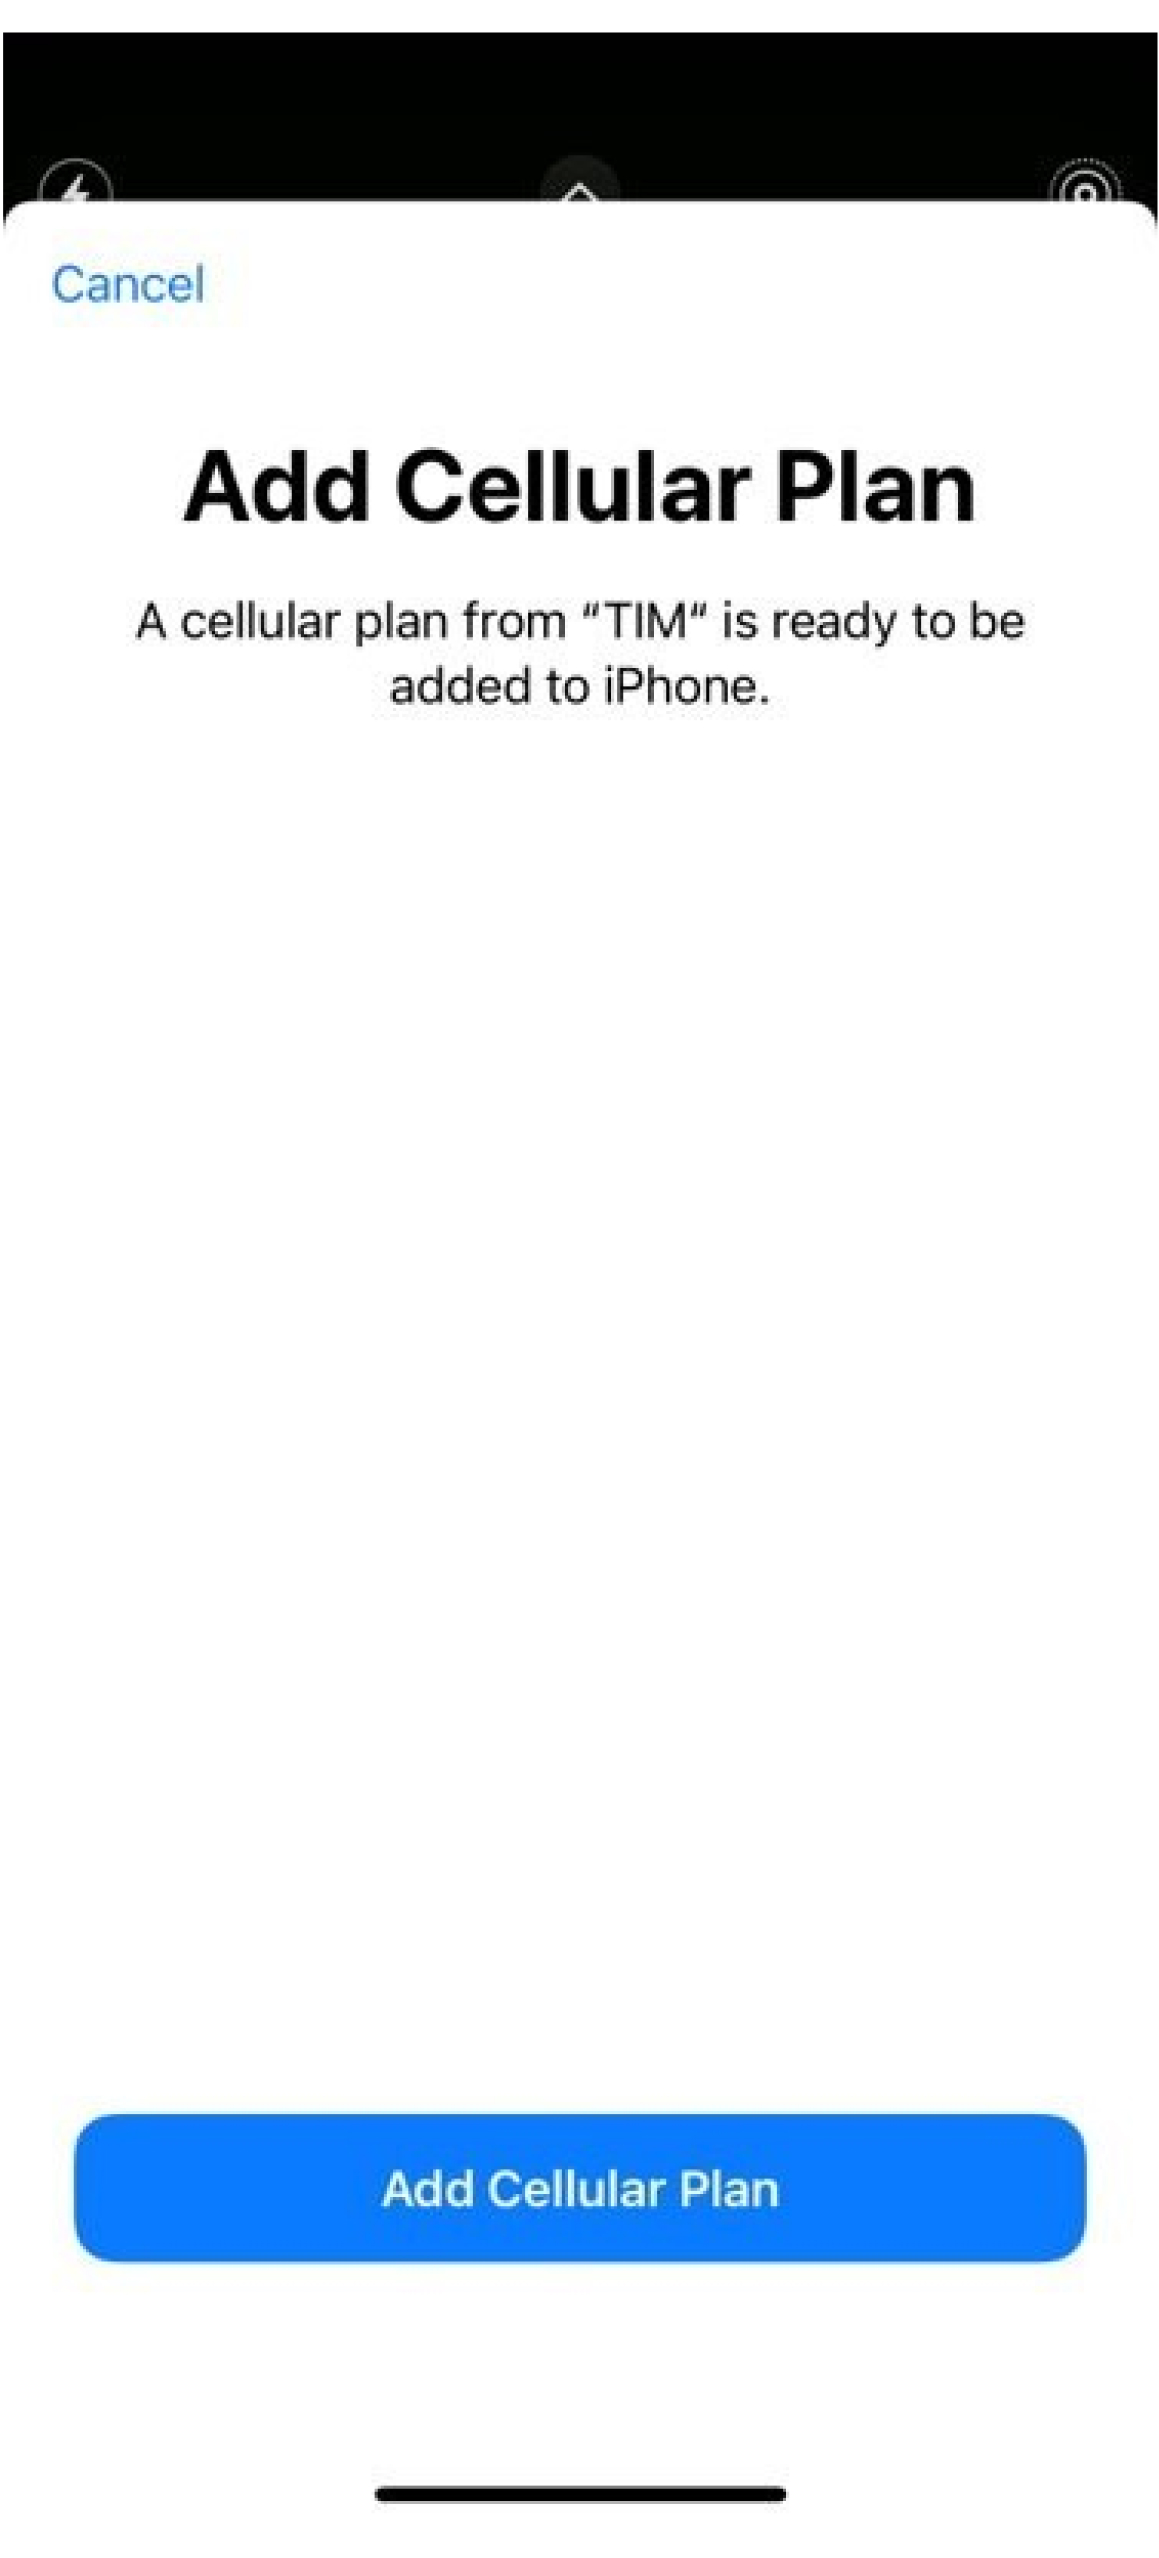
Navigate to Settings → Cellular Data → Add Cellular Plan.
-
Scan the QR code included in the activation email.
-
Tap Add Cellular Plan.
-
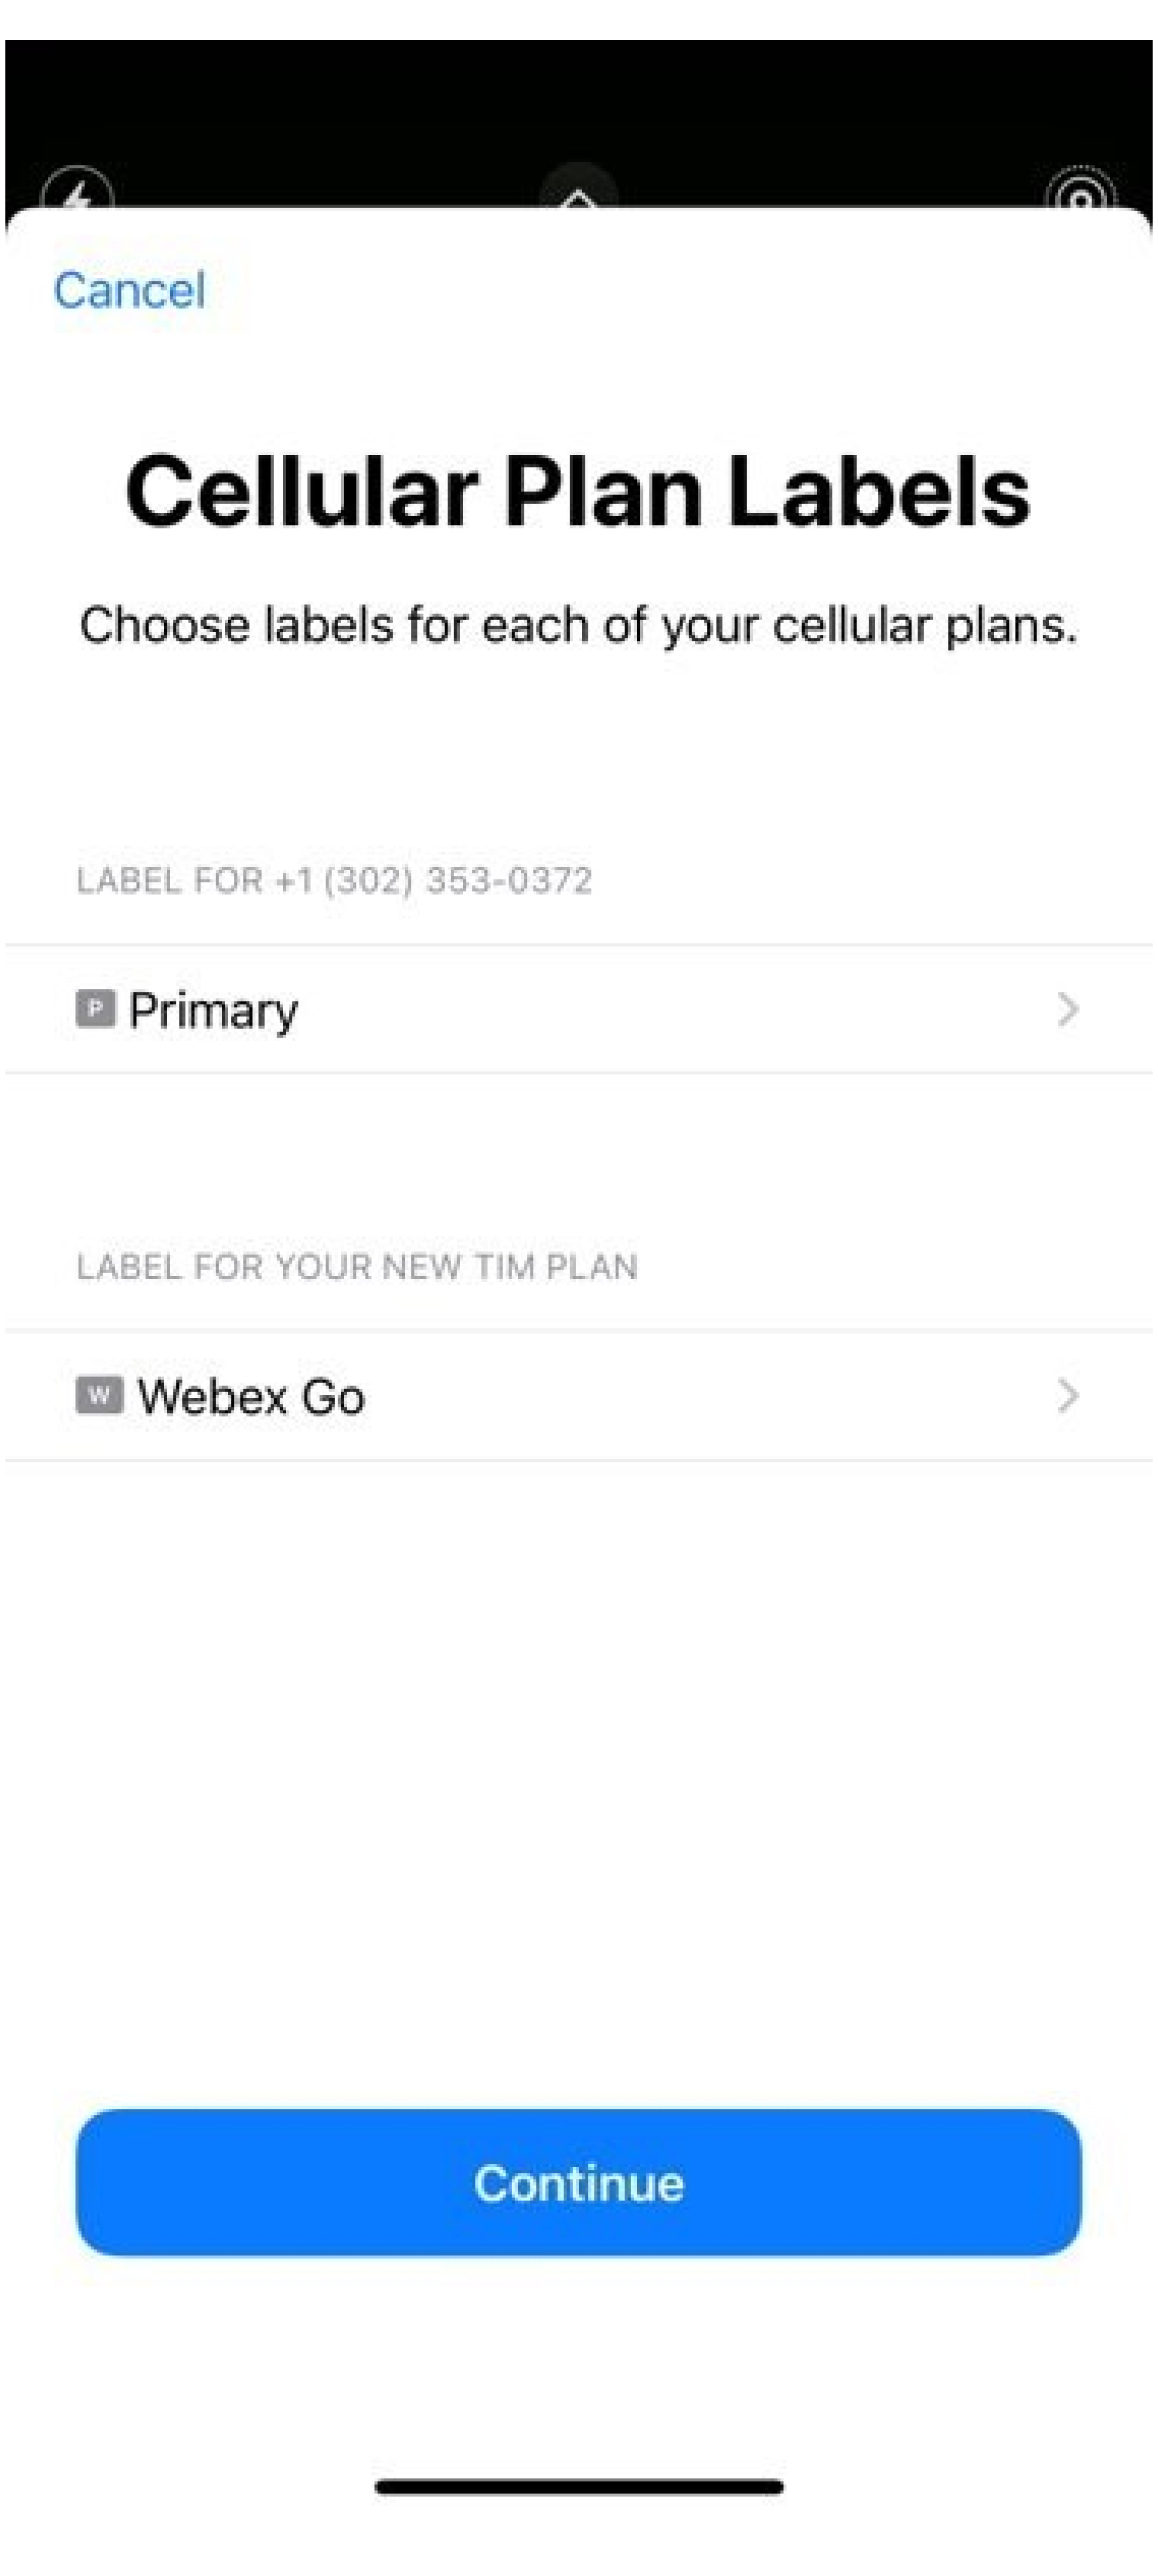
Label your plan: Pick an existing label or create a custom label and click Continue.
-
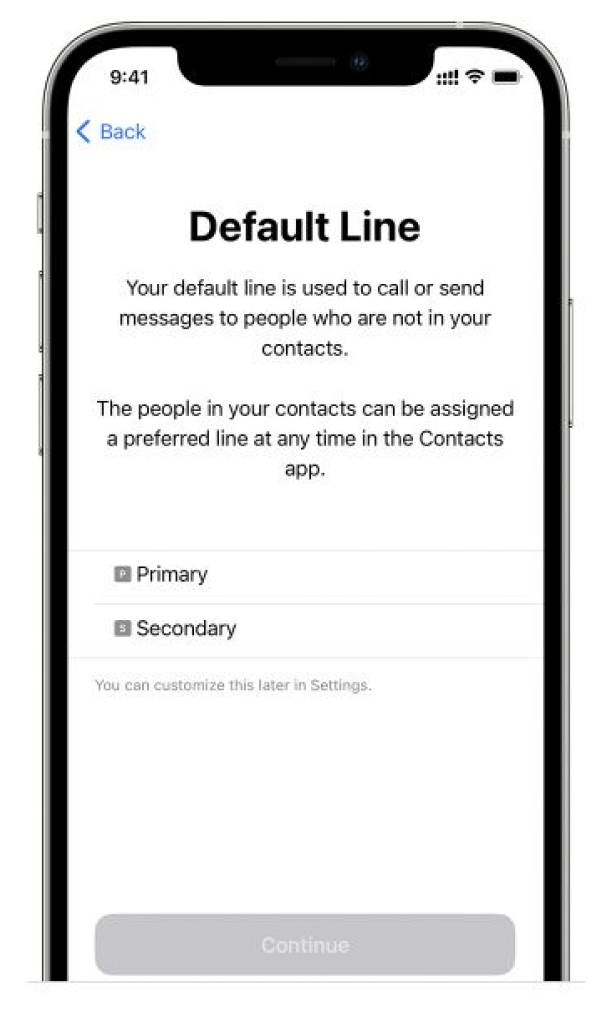
Set your default number: The default line is used when you call or send a message to someone who isn't in your Contacts application.
If selecting Webex as the default line - calls will be captured in the Call Detail Record (CDR) for Webex Calling. Note that your organization security and compliance policies related to Webex Calling will now apply to this number that’s using a mobile plan and eSIM on a personal mobile phone device. Also, Business Texting is currently not available with Webex Go numbers and needs to be enabled separately with Cloud Connect Provider.
-
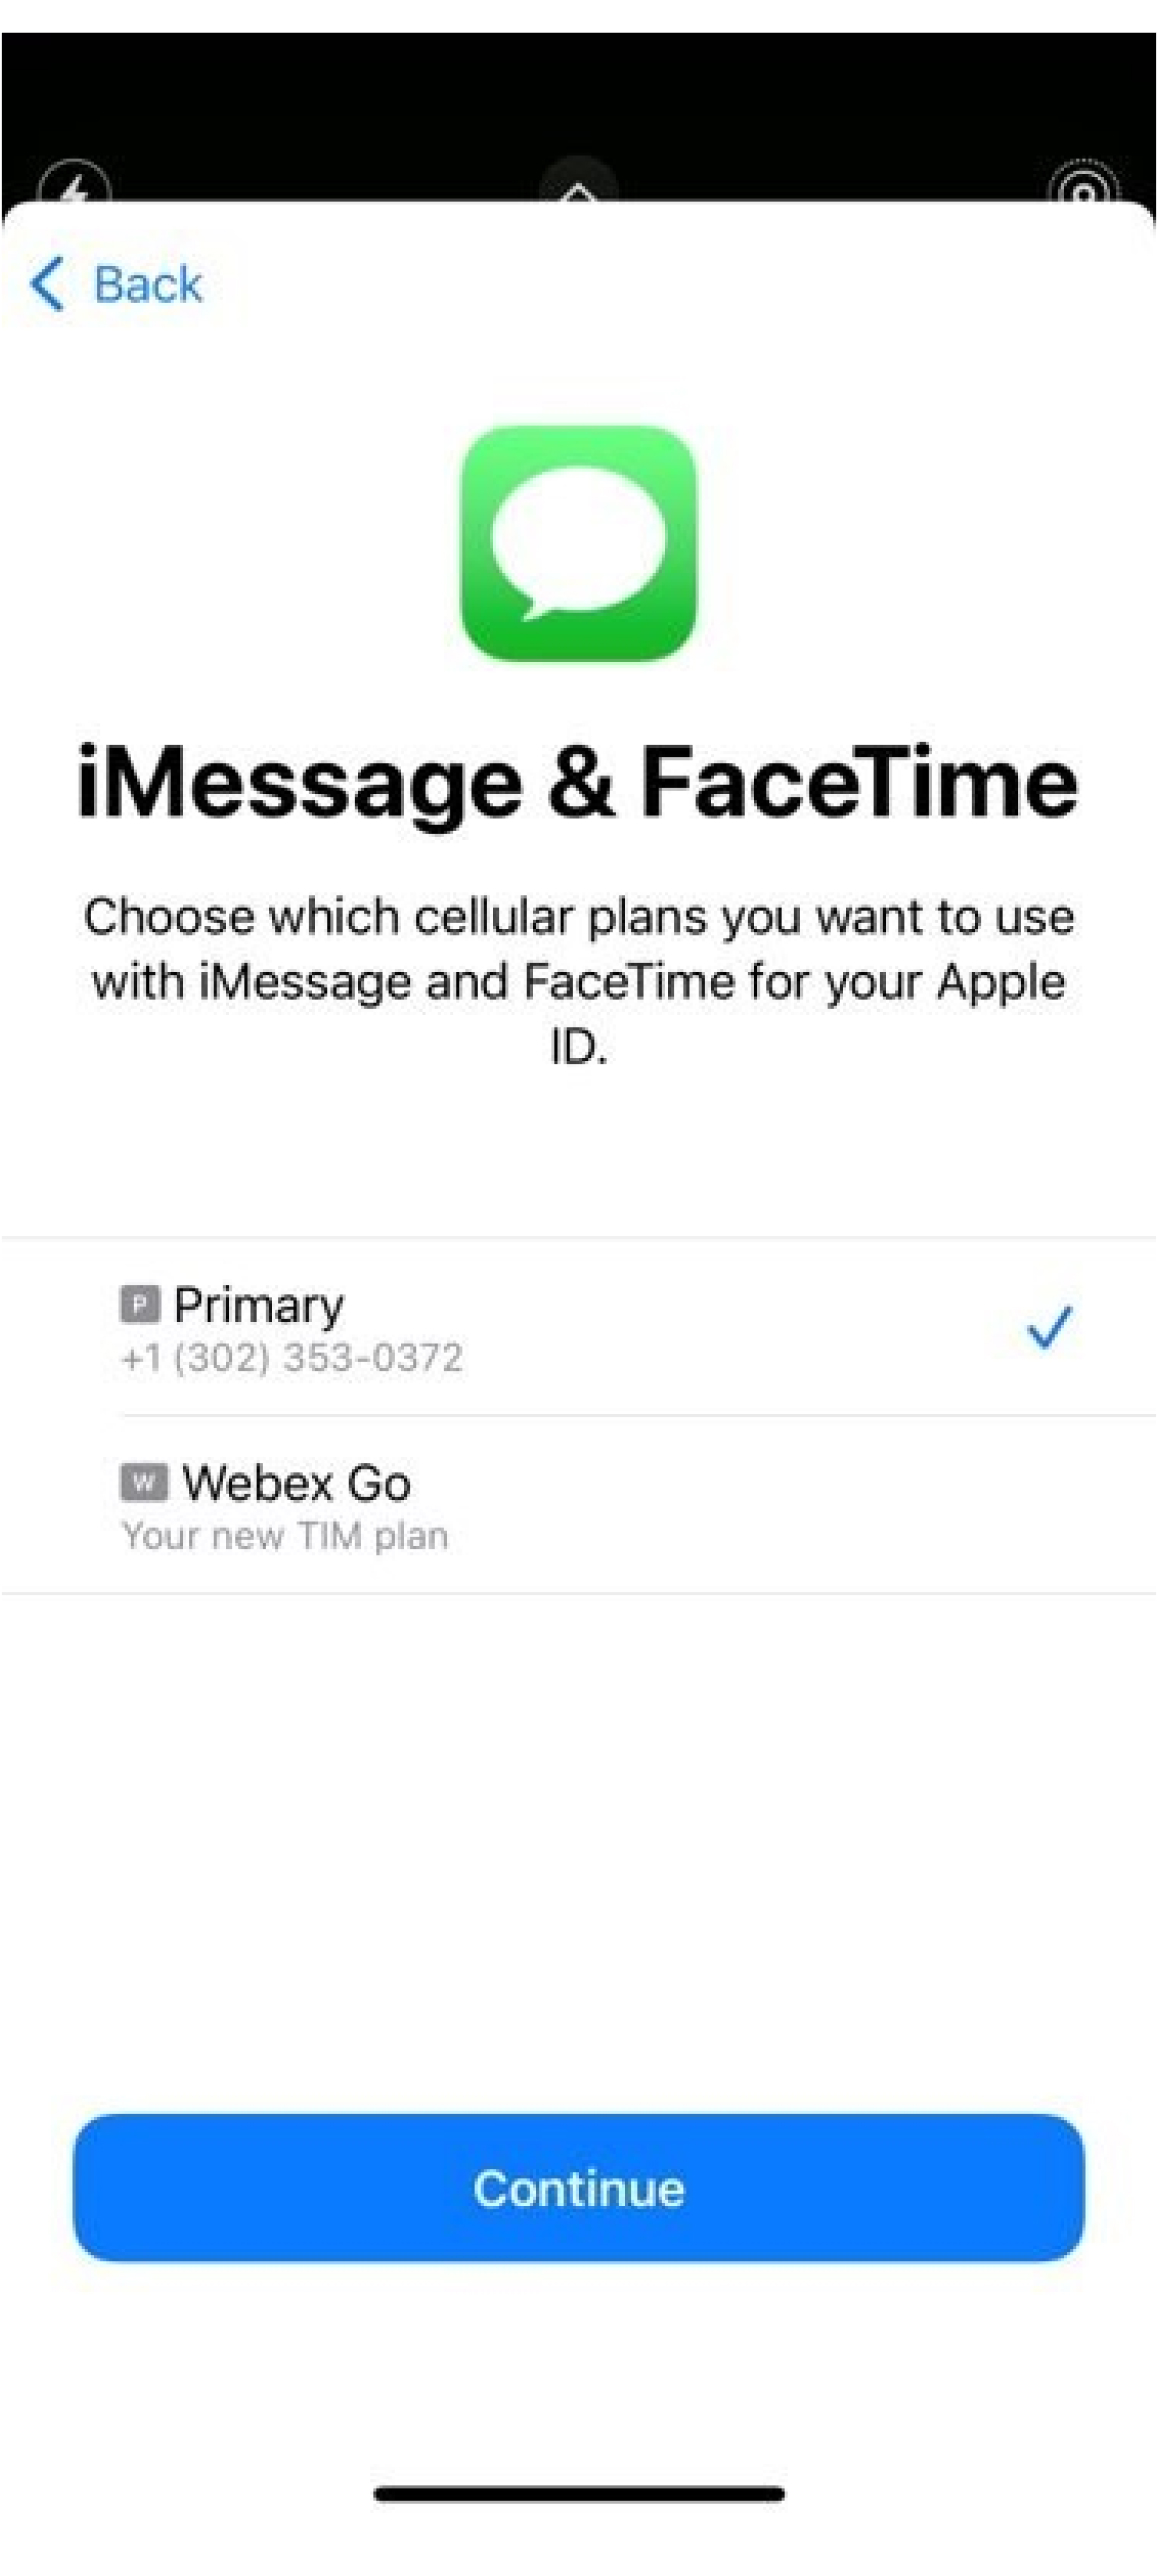
Set cellular plan for iMessage and FaceTime: If you are on iOS 13 and later, you can choose which cellular plan you want to use for iMessage and FaceTime. It’s recommended to set it to the existing plan active on your device.
-
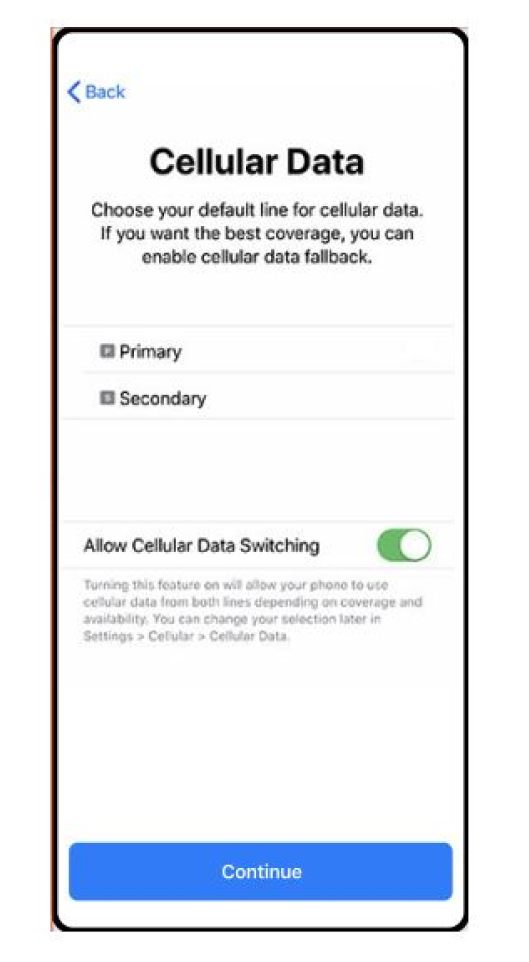
Set default line for cellular data: It’s recommended to set it to the existing plan active on your device. However, turn on Allow Cellular Data Switching to access applications when on a call on your business line.
-
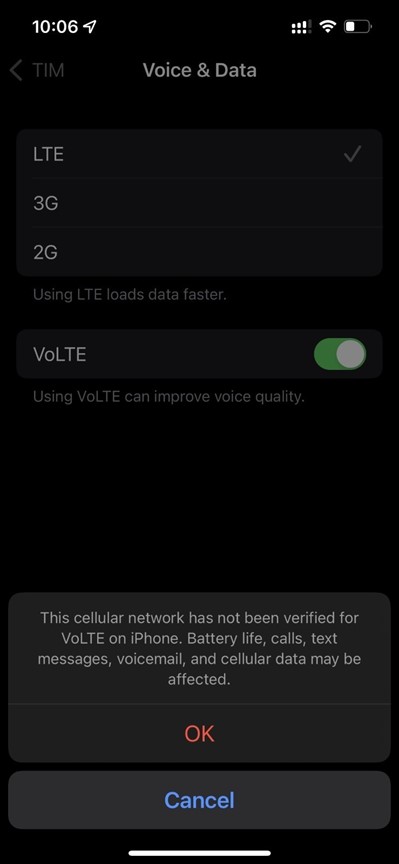
Webex Go leverages VoLTE mobile network for routing calls. Confirm that the following settings are enabled and restart the mobile phone in order to use the service.
Under Voice & Data, ensure 4G or LTE is selected for data and VoLTE is enabled for voice.
Data Roaming slider is enabled.
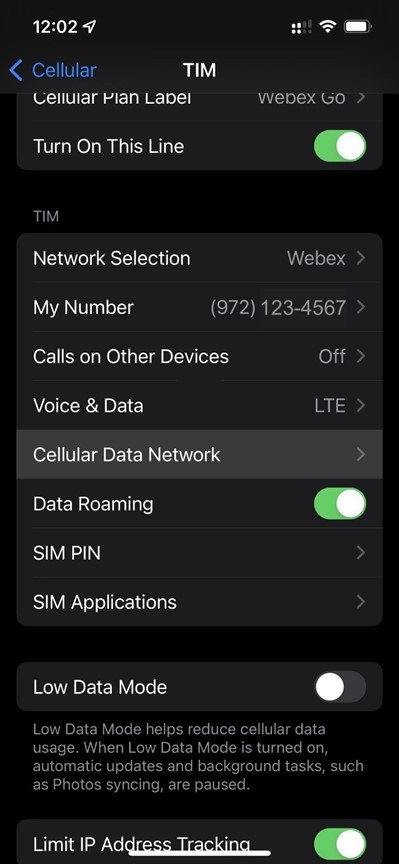
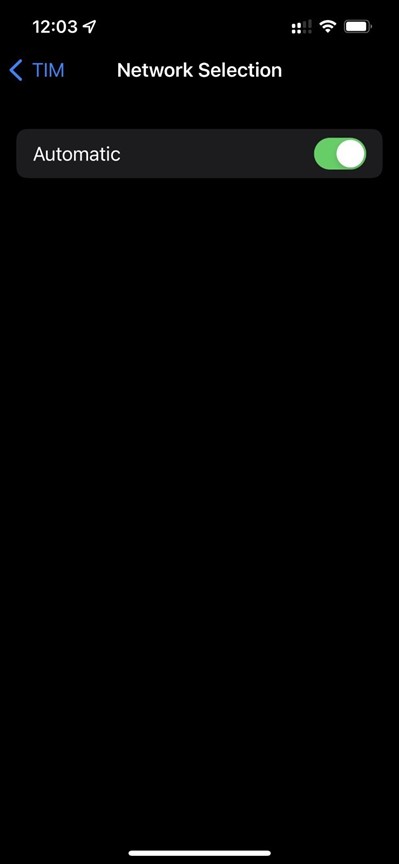
Network Selection slider is set to Automatic.
-
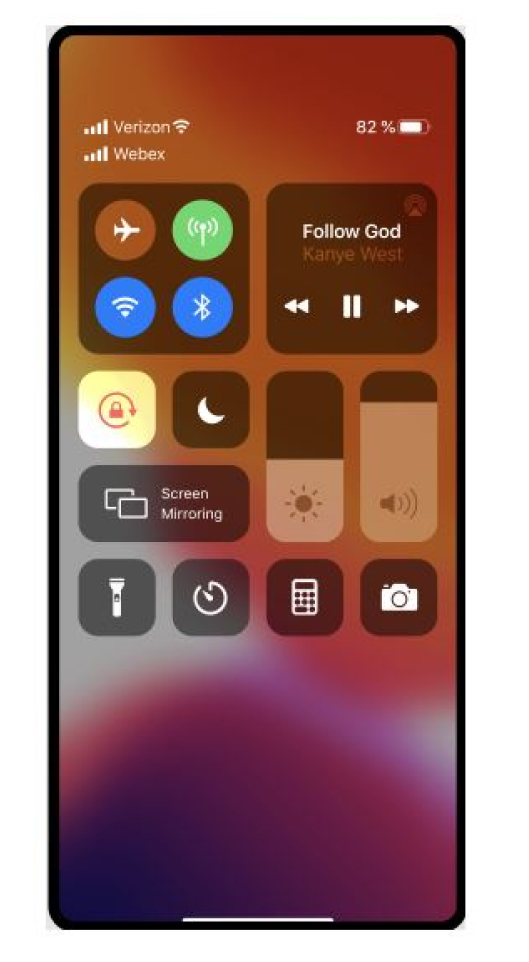
Restart your mobile phone, once the setup is complete. You should see the Webex network in the Control center. To open the control center, swipe down from the top-right corner of your iPhone screen.
Manually enter the plan
-
Navigate to Settings.
-
Tap either Cellular or Mobile Data.
-
Tap Add Cellular Plan.
-
Tap Enter Details Manually, at the bottom of your iPhone screen and enter SM-DP+address and activation code provided in the email. Follow step 5 through step 9 from Scan the QR Code procedure to complete the setup.
For information on Using Dual SIM with an eSIM, refer to https://support.apple.com/en-us/HT209044.
Want to see how it's done? Watch this video demonstration on how to activate Webex Go on your iPhone.Before you begin
-
Confirm your phone is carrier unlocked, dual SIM compatible, and can support an active eSIM profile.
-
Webex Go is enabled through eSIM and requires an active eSIM profile on the device to be available. Refer to the supported device models and number of active eSIMs supported by the device.
Device lock policies apply only in the U.S.
-
-
Sign-out of the Webex application on your mobile phone to configure the calling mode settings.
-
Make sure you have an active Wi-Fi network.
Supported Samsung models
-
Galaxy S20 FE 5G
-
Galaxy S21 5G
-
Galaxy S21 + 5G
-
Galaxy S22
-
Galaxy S22+
-
Galaxy S22 Ultra
-
Galaxy S23
-
Galaxy S23+
-
Galaxy S23 Ultra
-
Galaxy XCover 6 Pro
-
Galaxy Z Flip4
OS/software version required: 13 One Ui 5.1 or later
Device lock status
Only applies to customers in the U.S.
-
If you are on a corporate plan, work with your IT admin to get your device unlocked.
-
If you are on a personal plan, contact your service provider. Links to IMEI tools offered by service providers:
Scanning the QR code
-
Navigate to Settings → Connections → SIM card manager.
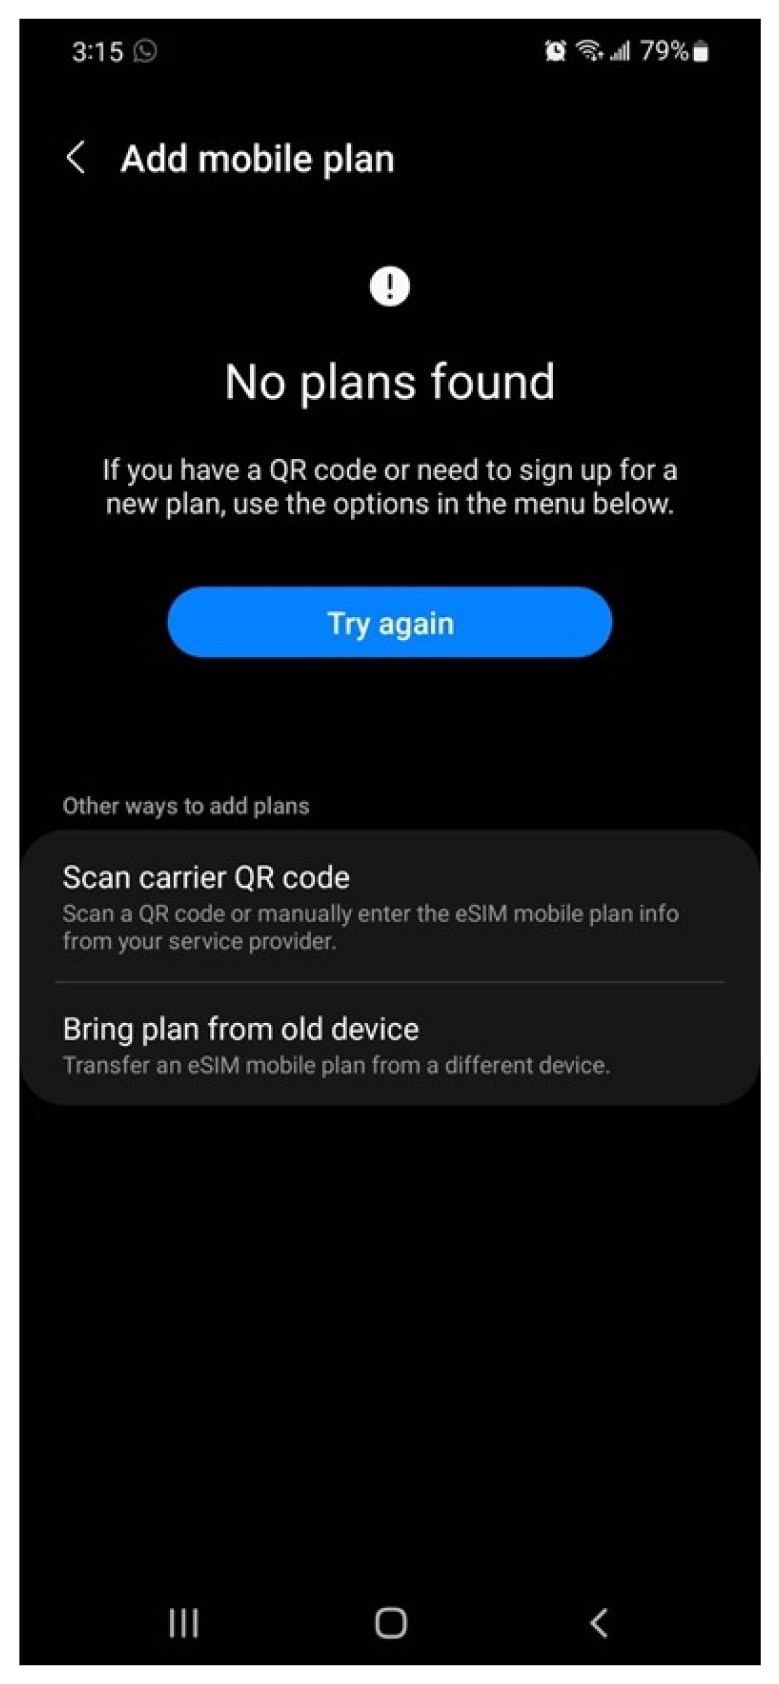
Tap Add mobile plan and select Scan carrier QR code.
-
Scan the QR code sent through email.
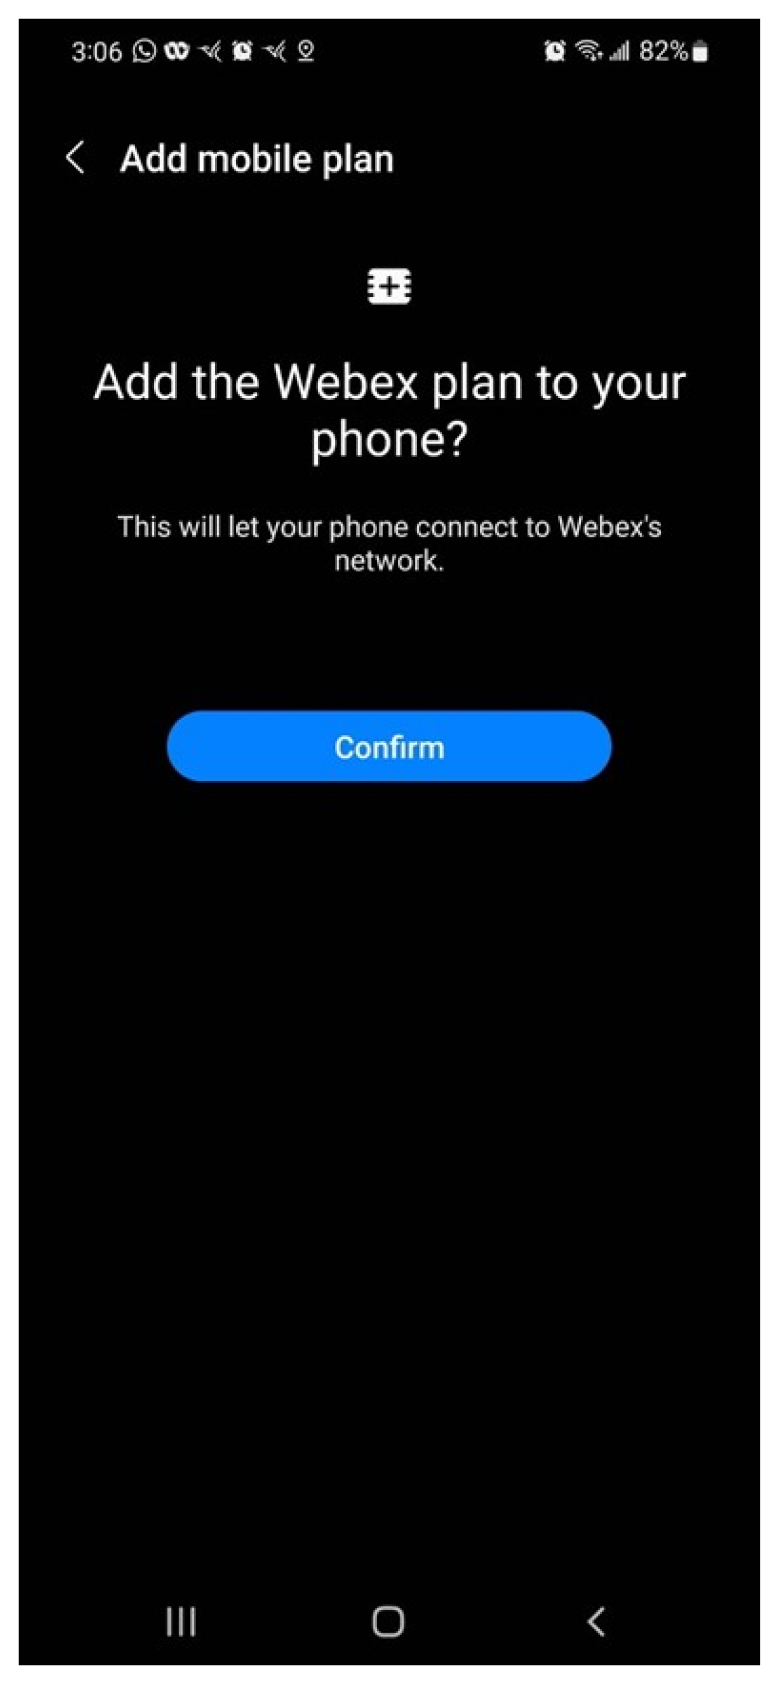
Select Add plan to phone if the message Add this plan to a new mobile network is displayed.
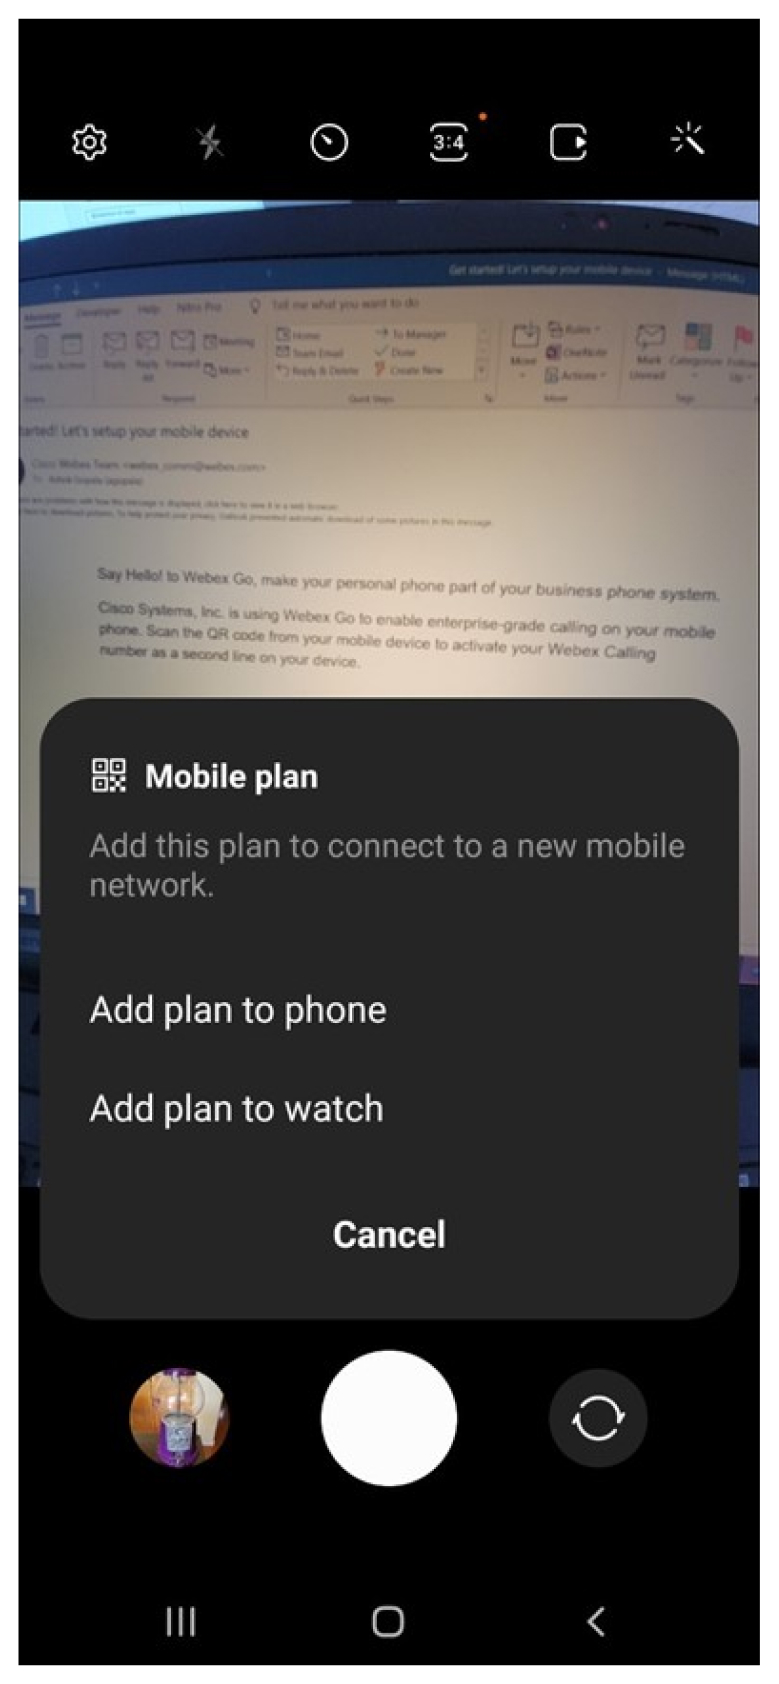
Click Confirm in the next screen and the plan is added to your device
Click Allow when prompted to allow secondary SIM to use data during calls.

-
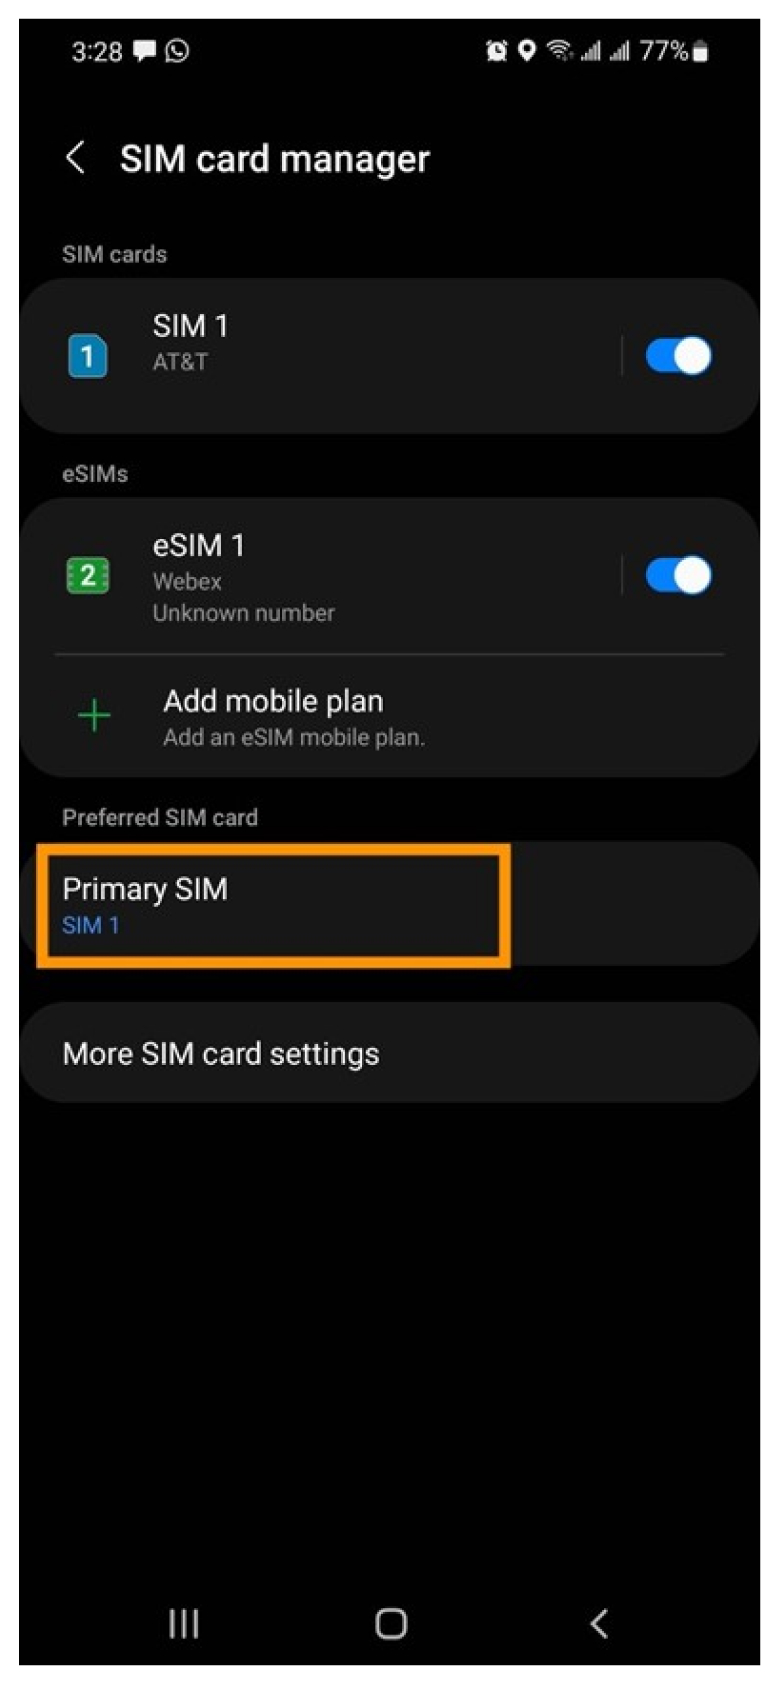
Set the preferred SIM: The preferred SIM is the default cellular plan used for calls, texts, and data.
If selecting Webex as primary SIM – calls are recorded. Note that your organization security and compliance policies apply for calls going over the business cellular plan. Also, texting isn’t currently available with your business plan.
Manually add the plan
If you have problems with the QR code, manually add the plan by entering the network provider code in the email.
Before you begin
-
Confirm your phone is carrier unlocked, dual SIM compatible, and can support an active eSIM profile.
-
Webex Go is enabled through eSIM and requires an active eSIM profile on the device to be available. Refer to the supported device models and number of active eSIMs supported by the device.
Device lock policies apply only in the U.S.
-
-
Sign-out of the Webex application on your mobile phone to configure the calling mode settings.
-
Make sure you have an active Wi-Fi network.
Supported Google Pixel models
-
Pixel 6
-
Pixel 6a
-
Pixel 6 pro
-
Pixel 7
-
Pixel 7 pro
OS/software version required: Android 13 or later
Device lock status:
-
If you are on a corporate plan, please work with your IT admin to get your device unlocked.
-
If you are on a personal plan, please reach out to your service provider. Links to IMEI tools offered by service providers:
Scan the QR code
-
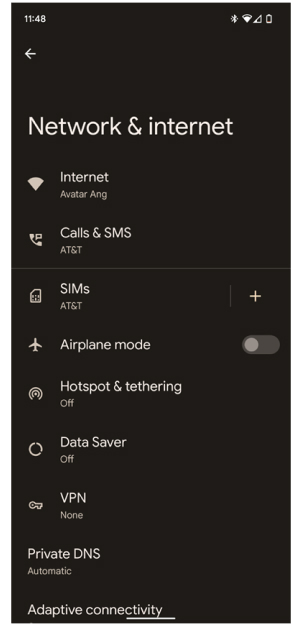
Navigate to Settings -> Network and Internet.
-
Tap the + sign next to SIMs.
-
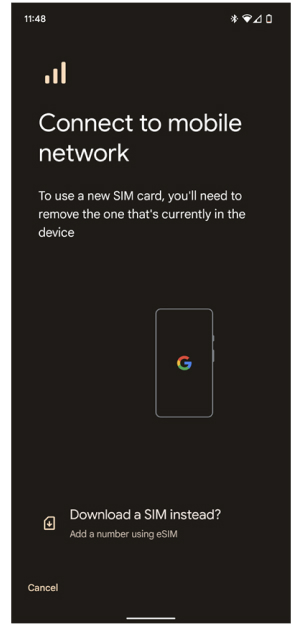
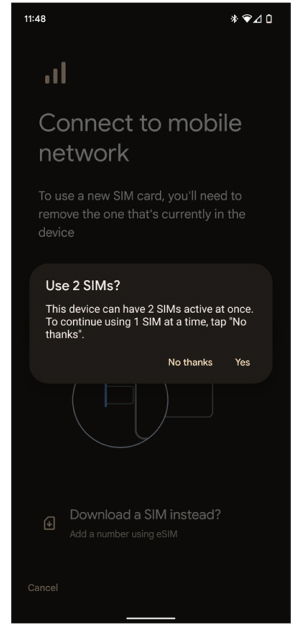
On the Connect to mobile network screen, tap Download a SIM instead?.
-
Tap Yes in Use 2 SIMs? screen to have two SIMs active at the same time.
-
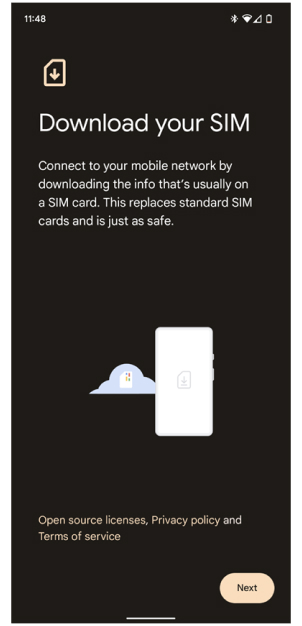
Click Next on Download your SIM screen.
-
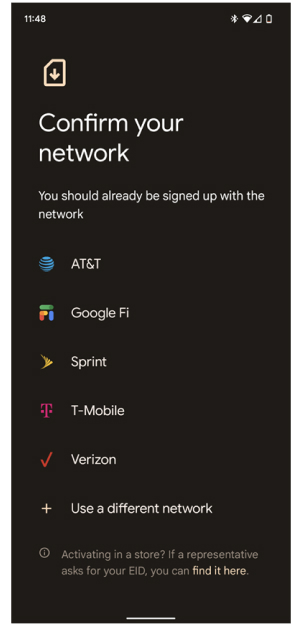
Click + sign next to Use a different network in Confirm your network screen.
-
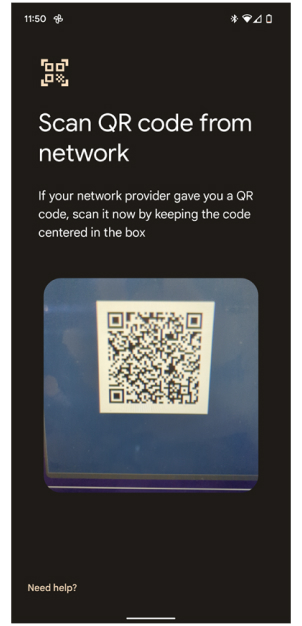
Scan the QR code.
-
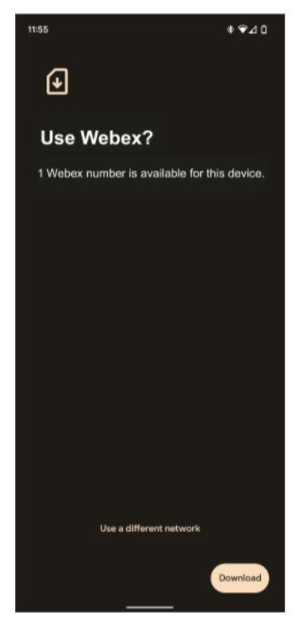
Confirm you want to use Webex number by clicking on Download in the Use Webex? screen.
-
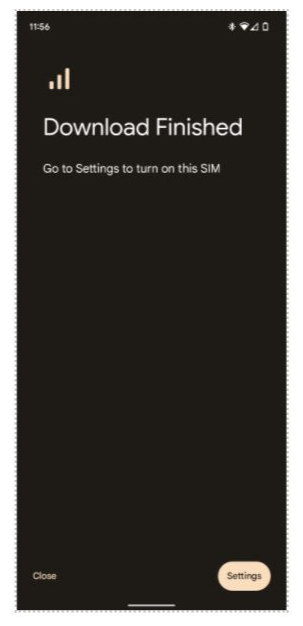
Once the download is complete, click Settings to turn on the SIM.
-
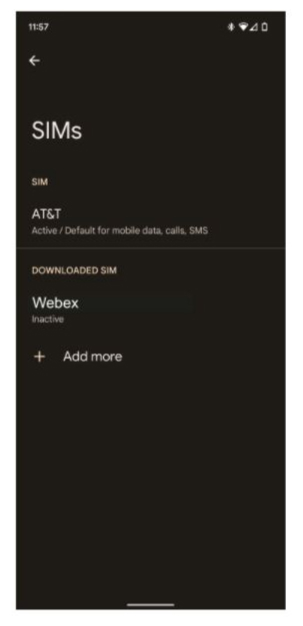
Select Webex under Downloaded SIM.
-
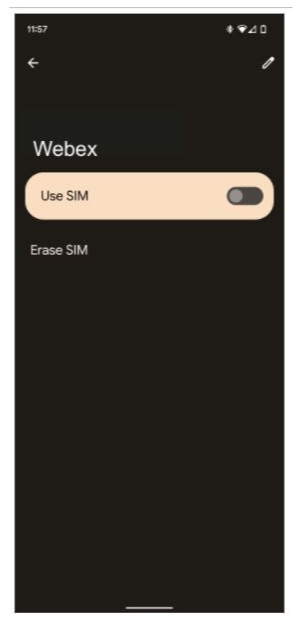
Turn the toggle on and select Yes when asked to confirm.
-
-
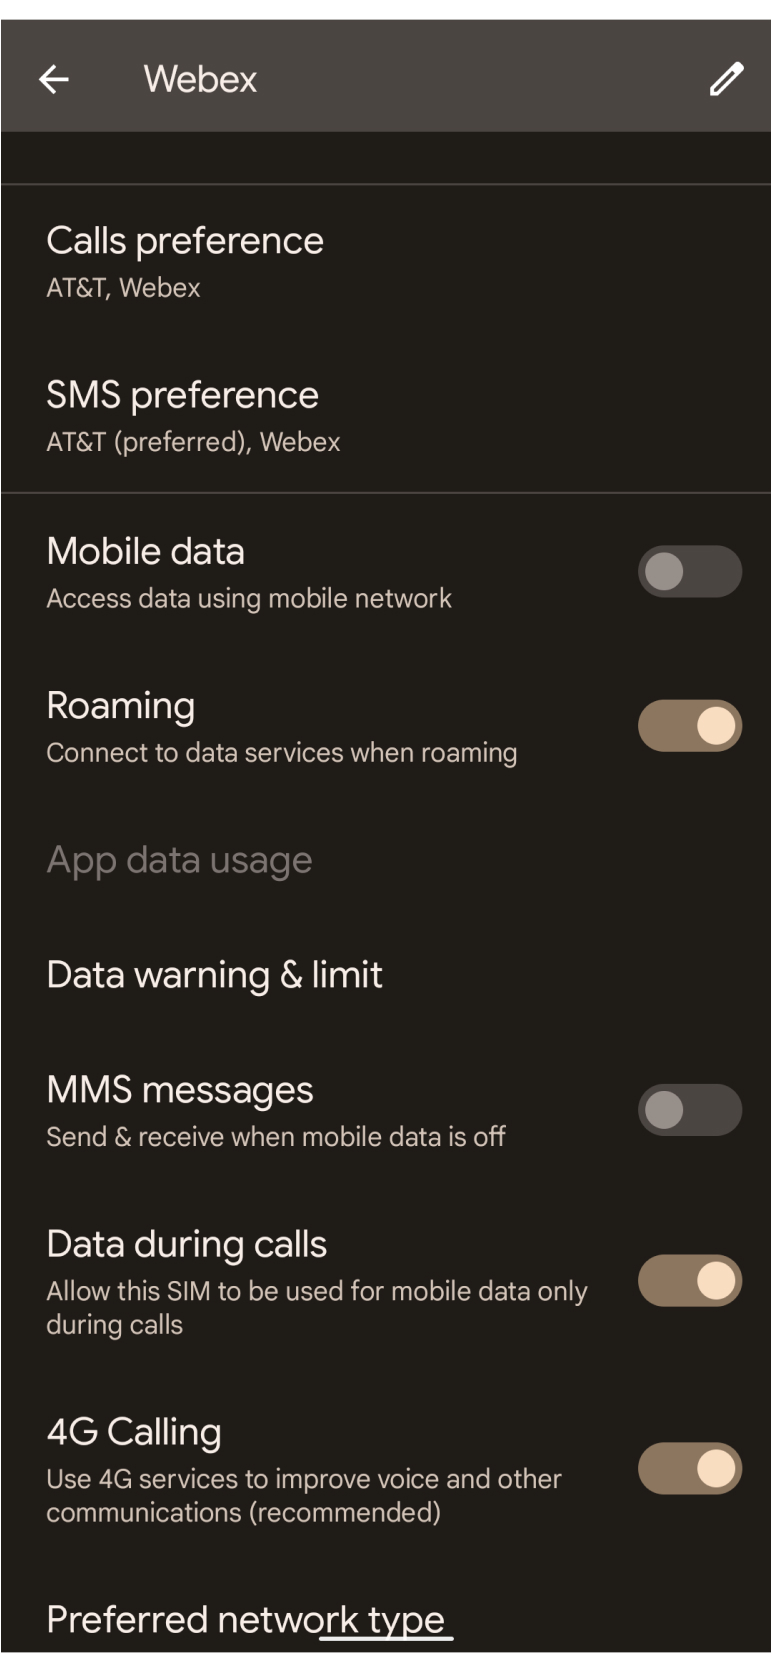
Enable Roaming to use data on the eSIM connection.
-
Setting Dual SIM preferences:
-
Only one SIM can be the default for data. If you already have one set up, you'll get a notification. It is recommended to use the previously installed SIM as default for data. However, please make sure that Data during calls toggle is enabled for Webex SIM.
-
For calls, set preference to Ask every time.
-
For SMS, set preference to previously installed SIM.
-
Manually enter the plan
-
If you are manually activating Webex Go, follow Step 1 thru Step 6 from above. In the Scan the QR code screen, click Need help at the bottom of the screen and manually enter the network provider code included in the activation e-mail.
-
After entering the code, please follow Step 8 thru Step 11 from above.
For additional information Google Pixel article.
Webex Go Mobile Operator doesn’t require a QR code to activate. Activation is handled by your administrator. To learn more about the process of adding mobile numbers and assigning them to users in Control Hub, see Provision Webex Go. Once provisioned by your administrator, AT&T Cloud Voice for Webex Go Bolt-on or Service Operation Code is automatically enabled in the back end and should be instantly enabled when the mobile number is assigned in Control Hub. No action is required by the user.
Once your mobile number is assigned by your administrator, all your Webex devices, including your AT&T mobile phone, Webex desk phone, desk or room system, and laptop with Webex App share the AT&T mobile phone number. You're also upgraded to Webex voicemail and have access to all Webex Calling features.
For administrators:
Webex Go Mobile Operator is activated/provisioned by requesting authentication and activation of the mobile number(s) from the mobile operator and then assigning it to a user as their primary line (replacing their fixed business number). For steps on how to add mobile numbers in Control Hub and then assign to a user, see Provision Webex Go.


